
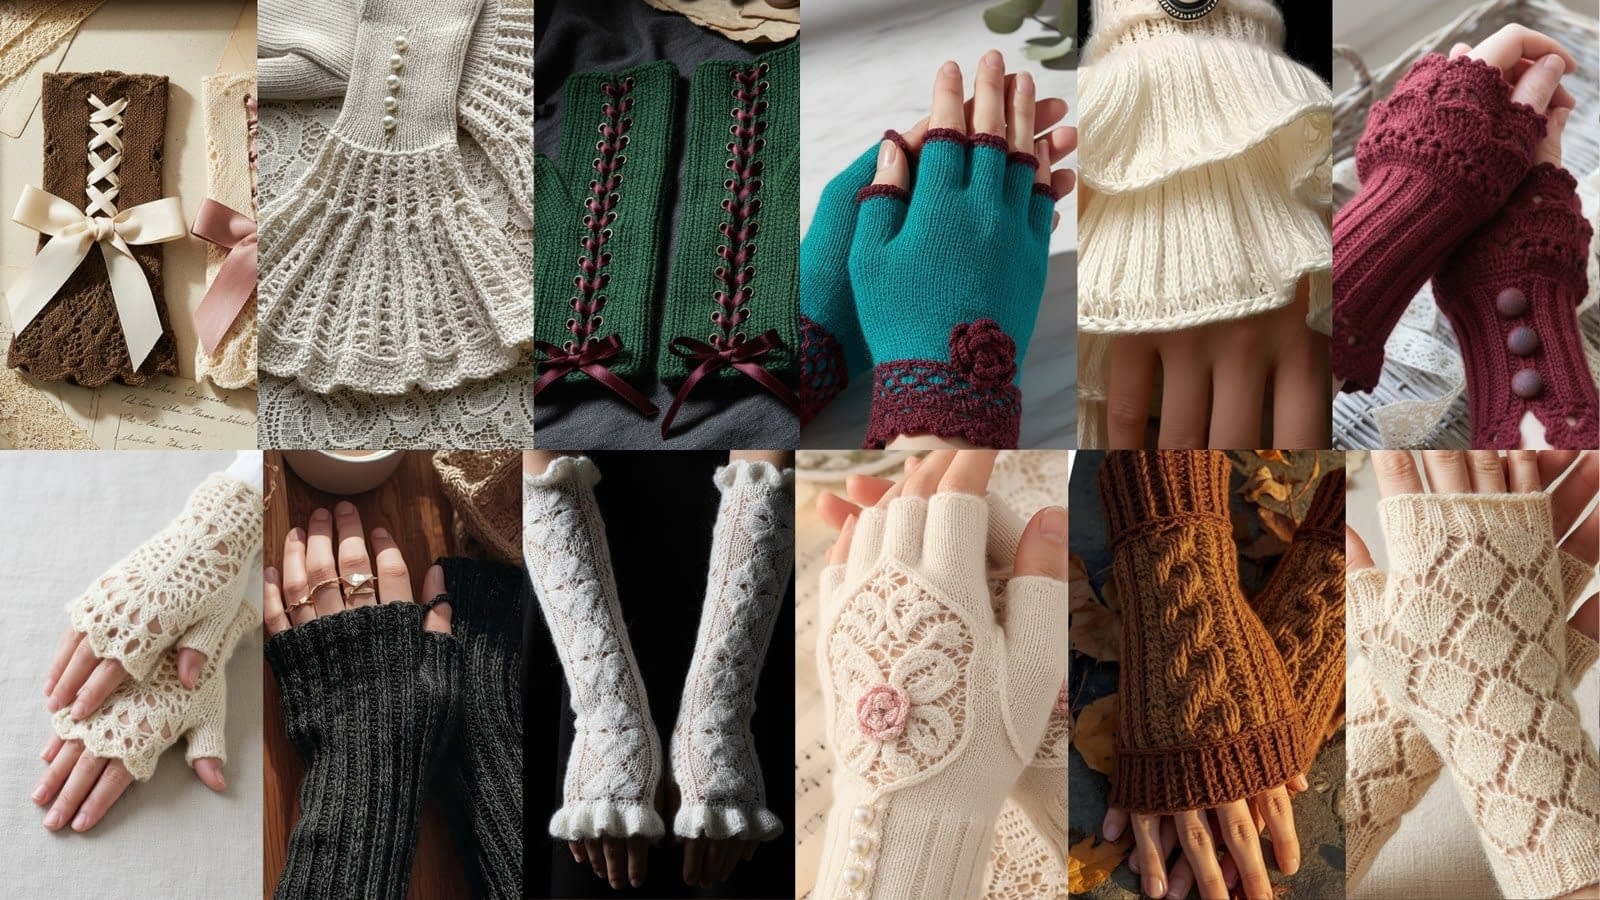
Crafting knit fingerless gloves opens the door to a beautiful blend of practicality, elegance, and personal expression. These accessories are not only functional for keeping hands warm while leaving fingers free for everyday tasks, but they are also a wonderful canvas to showcase unique textures, lace patterns, ruffled edges, and delicate finishing details. Whether you enjoy vintage-inspired designs, feminine scalloped trims, simple ribbed comfort, or dramatic Victorian cuffs, knit fingerless gloves can offer endless creativity.
The patterns are organized with clear sections for skill level, finished measurements, materials, notes, and a structured set of instructions. You can expect gentle shaping, comfortable fit, textured cuffs, and charming details like bows, mock shells, knitted lace motifs, and decorative buttons. These gloves make wonderful gifts, craft fair items, and wardrobe accessories for autumn, winter, or cool spring days.
1. Pattern One: Scalloped Lace Cuff Fingerless Gloves with Bow Accent

Skill level: Confident beginner to intermediate (lace knitting, shaping, and ruffle increases)
Finished size: Approximately 7 inches in circumference around the wrist and 6.5 inches tall, with stretch
Materials
- Medium weight yarn (Category 4) in two colors: one for the main glove and a contrasting shade for the scalloped cuff and bow
- Knitting needles: 4.0 millimeter straight needles or circulars for flat knitting
- Yarn needle and scissors
- Optional: small decorative button for the bow center
Notes
This glove is worked flat and seamed at the end. The top portion is a simple rib, while the lower cuff uses a scalloped lace pattern created by yarn overs and mirrored decreases. The bow is knitted separately and sewn on. This pattern is meant to mimic the top-left gloves in your image, translated fully into knitted form.
Instructions
Step 1: Begin the upper ribbed section
Cast on 36 stitches using the main color.
Work in a knit one, purl one rib for a total of 20 rows. This will create a snug section for the hand.
Step 2: Transition into the lace cuff
Switch to the contrasting yarn.
Step 3: Establish the lace scalloped pattern
You will now work in repeats across the row.
Work the following eight-row lace repeat:
Row 1: Knit every stitch.
Row 2: Purl every stitch.
Row 3: Knit one stitch, then create a yarn over, knit two stitches together, knit three stitches, create a yarn over, knit two stitches together. Repeat this sequence across the row.
Row 4: Purl every stitch.
Row 5: Knit two stitches, create a yarn over, knit two stitches together, knit two stitches, create a yarn over, knit two stitches together. Repeat across the row.
Row 6: Purl every stitch.
Row 7: Knit three stitches, create a yarn over, knit two stitches together, knit one stitch, create a yarn over, knit two stitches together. Repeat across the row.
Row 8: Purl every stitch.
Repeat this full eight-row lace sequence five times or until the cuff measures approximately 3 inches long.
Step 4: Form the ruffled flare
To create a delicate flared cuff, work a full increase row as follows:
Knit every stitch, but increase one stitch in every other stitch by knitting in the front and back of the stitch slowly and consistently across the entire row. This dramatically widens the fabric and forms a gentle ruffle.
Work four rows in stocking stitch (one row knit, one row purl, repeat twice).
Bind off loosely to allow the edge to flare.
Step 5: Seam the glove
Fold the glove lengthwise with the right sides facing together.
Use a whip stitch to seam the sides, leaving a 1 inch opening halfway up the ribbed section for the thumb slit.
Turn right-side out.
Step 6: Knit the bow
Using the contrasting yarn, cast on 10 stitches.
Work in stocking stitch (one row knit, next row purl) for 14 rows.
Bind off.
Pinch the rectangle in the center and wrap a small strand of matching yarn tightly around it to form a bow shape.
Sew the bow neatly to the top of the scalloped cuff.
2. Pattern Two: Victorian Fan Lace Cuff Fingerless Gloves

Skill level: Intermediate (structured lace shaping and flared fan construction)
Finished size: Approximately 6.5 inches tall and 7 inches around the wrist
Materials
- Category 3 lightweight yarn
- Knitting needles: 3.5 millimeter
- Yarn needle and scissors
- Optional small beads or buttons to place along the cuff
Notes
This glove mimics the bell-shaped, fanned, lace-heavy cuff seen in the top-right image. Although the original design is crocheted, this version uses a radiating fan lace created through double yarn overs and stacked decreases.
Instructions
Step 1: Cast on and create wrist foundation
Cast on 32 stitches.
Work eight rows of knit one, purl one rib.
Step 2: Begin the fan lace section
The fan structure is built by widening the stitch count rapidly while maintaining controlled lace holes.
Work the following six-row repeat:
Row 1: Knit every stitch, but increase by knitting in the front and back of every third stitch.
Row 2: Purl every stitch.
Row 3: Knit two stitches, create a yarn over twice, knit two stitches together, knit two stitches, create a yarn over twice, knit two stitches together. Repeat across the row.
Row 4: Purl every stitch, treating double yarn overs as two purls to keep the lace open.
Row 5: Knit across while decreasing one stitch for every eight stitches by knitting two stitches together in evenly spaced sections.
Row 6: Purl every stitch.
Repeat this six-row sequence six times.
Step 3: Create the dramatic fan flare
The very bottom of this glove includes a pronounced flare.
To achieve this, work the following:
Increase row: Knit every stitch, but increase one stitch into every stitch across the row. This doubles the stitch count.
Work four rows in stocking stitch.
Bind off loosely.
Step 4: Seam the glove
With right sides facing, seam up the glove, leaving a hole for the thumb.
Step 5: Add small decorative details
Sew small buttons or beads along the narrowest part of the fan section to mimic the elegant Victorian aesthetic.
3. Pattern Three: Lace-Up Corset Style Fingerless Gloves

Skill level: Intermediate (eyelet creation, shaping, and finishing with laces)
Finished size: Approximately 8 inches tall with adjustable width
Materials
- Medium weight yarn, Category 4, in a solid color
- Knitting needles: 4.0 millimeter
- Yarn needle and scissors
- Long ribbon or knitted i-cord for lacing
Notes
This pattern is inspired by the lace-up gloves from the third row of your reference image. The gloves are knitted flat with eyelets along both edges so they can be laced like a corset. This creates a snug, dramatic appearance.
Instructions
Step 1: Cast on
Cast on 28 stitches.
Step 2: Work the body in a textured rib
Work in a knit two, purl two pattern for 30 rows to create a stretchy body that hugs the forearm.
Step 3: Establish eyelet edges
On the next row, work as follows:
Knit one stitch, create a yarn over, knit two stitches together, then continue in knit two, purl two rib until three stitches remain. Knit two stitches together, create a yarn over, knit one stitch.
This row creates symmetrical holes for lacing.
Continue working twenty more rows in this manner, always creating the same yarn over and decrease at the two edges.
Step 4: Shape the hand section
Switch to knit one, purl one rib for fifteen rows.
Step 5: Bind off
Bind off loosely so the edges can be pulled gently when laced.
Step 6: Add the lacing
Thread ribbon or knitted cord through the eyelets from bottom to top, crossing the strands like a corset. Tie a bow at the top or bottom.
Step 7: Seam only the thumb area
Fold the piece so the thumb slit aligns naturally. Seam a small section around the thumb area, leaving the rest open for the corset-style adjustable fit.
4. Pattern Four: Textured Rustic Lace Cuff Fingerless Gloves

Skill level: Beginner–intermediate (simple lace and ruffled edging)
Finished size: Approximately 7 inches long and 7 inches around the wrist
Materials
- Medium weight yarn in a warm neutral shade
- Knitting needles: 4.0 millimeter
- Yarn needle and scissors
Notes
This design recreates the earthy, slightly rustic pair of gloves with lace cuffs seen in the second row right-side of the image. The cuff features a gentle lace and mock-crochet edging but is fully knitted.
Instructions
Step 1: Cast on
Cast on 34 stitches.
Step 2: Work the main body
Work in stocking stitch (knit one row, purl one row) for 20 rows.
Step 3: Begin lace cuff
Work the following 10-row lace sequence:
Row 1: Knit every stitch.
Row 2: Purl every stitch.
Row 3: Knit two stitches, create a yarn over, knit two stitches together, knit four stitches. Repeat across the row.
Row 4: Purl every stitch.
Row 5: Knit one stitch, create a yarn over, knit two stitches together, knit six stitches. Repeat.
Row 6: Purl every stitch.
Row 7: Knit across while placing a decrease every 12 stitches.
Row 8: Purl.
Row 9: Knit and increase by knitting twice into every fifth stitch. This begins the flare.
Row 10: Purl every stitch.
Repeat this full sequence twice.
Step 4: Add final ruffle
Work one full increase row by knitting into the front and back of every stitch.
Work three rows in stocking stitch.
Bind off loosely.
Step 5: Seam
Fold the glove and seam the side, leaving a thumb opening.
5. Pattern Five: Soft Rib-and-Ruffle Fingerless Gloves with Double-Layer Cuff

Skill level: Confident beginner (ribbing, simple increases)
Finished size: Approximately 7 inches around the wrist and 7.5 inches long
Style inspiration: The soft, slightly chunky pair with a layered-looking cuff design from the third row.
Materials
- Medium weight yarn (Category 4) in a pastel or neutral shade
- Knitting needles: 4.5 millimeter
- Yarn needle and scissors
Notes
This design recreates the layered look of a crochet ruffle by knitting two separate ruffled edges directly onto the glove. The glove body is stretchy and warm, and the ruffles add a feminine, slightly vintage feel without needing lace.
Instructions
Step 1: Cast on and create the hand section
Cast on 32 stitches.
Work in knit two, purl two rib for 26 rows.
This creates a comfortably stretchy hand and wrist section.
Step 2: Begin the first ruffle layer
Switch to stocking stitch.
Work two rows in stocking stitch.
Increase row: Knit every stitch, but knit twice into every stitch to double the stitch count.
Work five rows in stocking stitch to allow the ruffle to drape.
Bind off all stitches loosely.
Step 3: Pick up stitches for the second ruffle layer
Turn the piece so the bound-off ruffle points downward.
Using the right side facing you, pick up 32 stitches from the round where the glove transitions between ribbing and ruffle.
Work two rows in stocking stitch.
Increase row: Knit twice into every stitch across the row.
Work six rows in stocking stitch for a slightly deeper second layer.
Bind off loosely.
Step 4: Seam the glove
Fold the glove in half lengthwise.
Seam neatly, leaving a 1-inch thumb slit.
6. Pattern Six: Victorian Shell-Inspired Knitted Gloves with Mock Crochet Edge

Skill level: Intermediate (textured increases, scallop imitation in knitting)
Finished size: Approximately 7 inches tall and softly flared
Style inspiration: The white scalloped-edge, shell-like crochet gloves shown in the collage. These appear crocheted but are translated into knitted scallops.
Materials
- Light worsted or DK weight yarn
- Knitting needles: 4.0 millimeter
- Yarn needle and scissors
Notes
This pattern includes faux “shells” made by combining increases and grouped decreases. The cuff features three stacked tiers of scallops. The glove body is soft and simple to keep the focus on the ornate cuff.
Instructions
Step 1: Cast on the body
Cast on 30 stitches.
Work in stocking stitch for 24 rows.
Step 2: Begin the first shell tier
Row 1: Knit one stitch, then knit into the front and back of the next stitch five times in a row to create a cluster of increases. Knit two stitches together three times in a row. Repeat this sequence across the row.
Row 2: Purl every stitch slowly to maintain the shape.
Repeat these two rows four times.
This will create a soft wave along the bottom of the glove.
Step 3: Second tier of shell edge
Pick up 24 stitches from two rows above the first scallop tier.
Work the same two-row shell pattern:
Row 1: Knit one stitch, create five increases across the next stitch, then work three knit-two-together decreases.
Row 2: Purl every stitch.
Work this two-row pattern four times.
Step 4: Third decorative tier (optional but recommended for full shell effect)
Pick up 18 stitches from two rows above the previous tier.
Repeat the same two-row shell sequence four times again.
Step 5: Bind off and seam
Bind off loosely along the top tier.
Fold the glove, seam up the edge, and leave a thumb opening.
This pattern produces a beautifully layered cuff with a strong vintage energy.
7. Pattern Seven: Lace-Paneled Fingerless Gloves with Scallop Hem

Skill level: Intermediate (lace panels, scalloped edge shaping)
Finished size: About 7 inches tall with delicate lacework
Style inspiration: The pink gloves with a lace panel and slight flare at the wrist.
Materials
- Light worsted yarn in a soft color
- Knitting needles: 4.0 millimeter
- Yarn needle and scissors
Notes
The lace panel in this pattern runs vertically along the outer side of the glove. The scalloped hem is formed using alternating yarn overs and decreases in a repeating rhythm. This is a feminine and elegant pattern ideal for gifting.
Instructions
Step 1: Cast on
Cast on 34 stitches.
Step 2: Prepare the lace panel alignment
Work 6 stitches in knit two, purl two rib.
Work 22 stitches in stocking stitch (this is where the lace panel will be inserted).
Work 6 stitches in knit two, purl two rib.
Work this combination for 12 rows.
Step 3: Begin the lace panel
Work as follows for each row:
Rib section: Work the first 6 stitches in knit two, purl two rib.
Lace panel (22 stitches):
Row pattern: Knit one, create a yarn over, knit two stitches together, knit three stitches, create a yarn over, knit two stitches together, knit three stitches, create a yarn over, knit two stitches together, then knit to the end of the 22 panel stitches.
End rib: Work the last 6 stitches in knit two, purl two.
Work this full row sequence for a total of 24 rows to develop a noticeable lace panel.
Step 4: Create the scalloped hem
Switch to all-stocking-stitch for two rows.
Scallop row:
Knit one, create a yarn over, knit two stitches together, knit two stitches, create a yarn over, knit two stitches together.
Repeat this across the full row.
Purl the next row.
Repeat the scallop row and purl row ten times to create a flowing, lacey hem.
Step 5: Bind off loosely
A loose bind-off preserves the scallops.
Step 6: Seam the glove
Fold it with right sides facing.
Seam the side, leaving your thumb slit unseamed.
8. Pattern Eight: Chunky Knit Fingerless Gloves with Subtle Cable Texture

Skill level: Beginner–intermediate (simple cable crosses)
Finished size: 7–7.5 inches tall and stretchy
Style inspiration: The chunkier gloves with bold texture from the lower rows of the image.
Materials
- Chunky yarn (Category 5) in your preferred color
- Knitting needles: 6.0 millimeter
- Cable needle
- Yarn needle and scissors
Notes
This design introduces a simple cable that creates a slightly braided look. The glove is warm, practical, and stylish.
Instructions
Step 1: Cast on
Cast on 28 stitches.
Step 2: Establish rib
Work ten rows in knit one, purl one rib.
Step 3: Begin cable section
Row repeat (12 rows):
Row 1: Knit four stitches, purl two stitches, knit six stitches, purl two stitches, knit the remaining stitches.
Row 2: Purl across the row.
Repeat Rows 1 and 2 four more times.
Cable row (Row 11):
Knit four stitches, purl two stitches, slip the next three stitches onto cable needle and hold to the front, knit the next three stitches, then knit the three stitches from the cable needle, purl two stitches, knit the remaining stitches.
Row 12: Purl all stitches.
Repeat this full 12-row cable sequence twice more.
Step 4: Top ribbing
Work eight rows in knit one, purl one rib.
Step 5: Bind off
Bind off normally (this yarn is stretchy).
Step 6: Seam
Fold and seam up one side, leaving thumb space.
9. Pattern Nine: Delicate Ruffle-Top Fingerless Gloves with Lace Waves

Skill level: Intermediate (lace repeats, controlled ruffle increases)
Finished size: About 7 inches tall, flared top edge
Style inspiration: The gloves with a soft, wide, wavy lace ruffle at the top.
Materials
- Sport or DK weight yarn
- Knitting needles: 3.75 millimeter
- Yarn needle and scissors
Notes
The ruffled top of this glove is created after the body is completed by picking up stitches and working wide increases. The bottom edge is smooth to balance the dramatic top wave.
Instructions
Step 1: Cast on
Cast on 36 stitches.
Step 2: Knit the glove body
Work 30 rows in stocking stitch.
Step 3: Begin the wave lace (still on the bottom edge)
Work this 8-row repeat:
Row 1: Knit every stitch.
Row 2: Purl every stitch.
Row 3: Knit one, create a yarn over, knit two stitches together, knit four stitches. Repeat this sequence.
Row 4: Purl.
Row 5: Knit two stitches, create a yarn over, knit two stitches together, knit three stitches. Repeat.
Row 6: Purl.
Row 7: Knit across but decrease one stitch every 10 stitches.
Row 8: Purl.
Repeat this sequence twice.
Step 4: Bind off the bottom edge
Bind off evenly.
Step 5: Add the dramatic top ruffle
With right side facing, pick up 36 stitches along the top edge of the glove body.
Work one row knit.
Increase row: Knit twice into every stitch across the row.
Work eight rows in stocking stitch to allow the ruffle to open.
Bind off loosely.
Step 6: Seam
Fold the glove.
Seam the edge except for a thumb hole.
10. Vintage-Inspired Fingerless Gloves with Scalloped Knit Lace Edging

Skill level
Intermediate
Finished size
Stretchy adult size, fitting a palm circumference of about 17–19 centimetres (7–7.5 inches). The design will block slightly wider because of the lace.
Materials
- Medium weight yarn (Category 4), approximately 100–130 metres per glove depending on length.
- Straight needles or short circular needles sized to produce a comfortable fabric for your yarn (suggested 4.0 millimetre).
- Yarn needle for sewing and weaving ends.
- Small stitch markers (optional).
- Scissors.
Notes
- This glove is worked flat and seamed.
- The scalloped edges at top and bottom are formed by a repeat of lace increases and decreases; keep a looser tension during lace rows so the scallops bloom.
- For a firmer scallop, block the finished fabric gently by pinning each scallop into shape and steam-blocking or wet-blocking as appropriate for the yarn.
Instructions
Cast on and set up lower scalloped edge
- Cast on a number of stitches divisible by eight, plus two extra stitches for clean edge stability. For a typical adult size, cast on 34 stitches.
- Knit two rows of plain knitting to stabilize the cast-on edge.
Work the scallop lace repeat (foundation)
- Work two plain knit rows. These allow the scallop shapes to begin forming without flaring immediately.
- Scallop repeat (worked across the row):
- Knit two edge stitches for stability.
- For each scallop sequence: Knit one stitch. Move the yarn to the front and bring it over the needle to form a yarn over. Knit into the next stitch. Bring the yarn forward again and form a second yarn over. Knit the next two stitches together as a single decrease so the lace curves. Then knit four plain stitches to space out the scallops. Repeat the scallop sequence until two stitches remain.
- End with two knit stitches.
- Work one purl row to set the scallop.
- Repeat the scallop row and purl row one more time so each scallop has time to open.
Stabilize and knit the main body
- Switch to plain knitting (stocking stitch) and work four to six rows to form a smooth transition from the scallops to the body.
- Continue knitting in stocking stitch until the piece measures approximately 9–10 centimetres (3.5–4 inches) from the lower scallop edge, or until you reach the base of the thumb placement for your hand.
Create thumb opening
- Determine thumb width by measuring around your thumb; a common thumb gap uses 6–8 stitches. For this pattern: knit the first 14 stitches (for right-hand glove; mirror for left-hand glove).
- Bind off the next 6 stitches for the thumb opening.
- Knit the remainder of the row.
- On the next row, work across until you reach the bound-off stitches and cast on the same number of stitches you bound off using a stretchy cast-on (for appearance and elasticity) so the thumb gap will be comfortable. For example, use the long-tail cast-on with a slightly looser tension.
Work upper hand section and top scalloped edge
- Continue working in stocking stitch until the glove reaches about 5 centimetres (2 inches) above the thumb gap.
- Repeat the same scallop lace sequence used for the lower edge to form the top scallops: work the scallop row, followed by a purl row, repeat as needed until the top scallops visually match the bottom scallops in depth (two scallop repeats are usually sufficient).
- Work two plain knit rows to finish.
Bind off and finish
- Bind off loosely across the entire row to preserve scallop shape.
- Fold the glove with right sides together and seam the long edge using a mattress stitch or whip stitch, leaving the thumb opening unseamed.
- Weave in ends and block gently to open the scallops and set the lace.
11. Pattern Eleven: Textured Cozy Fingerless Gloves with Faux Crochet Puff Stitch

Skill level
Advanced beginner to intermediate
Finished size
One-size adult with moderate stretch; palm circumference approximately 18–20 centimetres before blocking.
Materials
- Medium or chunky weight yarn, depending on desired thickness.
- Straight or circular needles appropriate for the chosen yarn (suggested 5.0–6.0 millimetre for chunky, 4.5 millimetre for medium weight).
- Yarn needle.
- Scissors.
Notes
- The textured “puff” columns are created entirely with knitted techniques: by pulling long loops from lower rows and combining them into a single stitch, the fabric develops the rounded, bobble-like appearance of a crochet puff while remaining knitted.
- Maintain even tension when pulling up long loops so the puffs are uniform.
Instructions
Cast on and rib foundation
- Cast on an even number of stitches appropriate to wrist circumference; for a medium glove cast on 36 stitches.
- Work four rows of knit one, purl one rib to create a snug wrist foundation.
Establish the faux-puff placement and repeat
- The pattern rhythm will place one faux puff every four stitches to allow the texture to show without crowding movement. Begin the first textured row after the ribbing.
- Faux-puff row procedure (first textured row):
- Knit one stitch.
- Insert the right needle into the stitch directly below the next stitch on the left needle and draw up a loop approximately twice the height of a normal stitch. Keep this loop on the right needle.
- Repeat drawing up two more longer loops into the same base stitch so there are three long loops plus the original stitch.
- Knit the base stitch normally (so the column contains three long loops plus the base).
- Knit two plain stitches.
- Repeat across the row finishing with knit one stitch.
- Work three rows in stocking stitch to lock the faux puffs into place; the plain rows allow the puffs to blossom outward.
Continue textured body and align puffs
- Repeat the faux-puff row and the three plain rows, aligning each new faux-puff so it sits directly above the one in the row below. This alignment creates vertical columns of puff texture.
- Continue until the glove measures about 9 centimetres from the rib.
Thumb opening and upper section
- For the thumb opening, work across the first half of the stitches and bind off 6 stitches. Complete the row. On the next row, cast on the same number of stitches to recreate the thumb gap with a stretchy cast-on.
- Continue the faux-puff repeats for the remaining upper hand length, reducing the number of puff rows near the top if you prefer more flexibility around the knuckles.
Finishing edge and seaming
- Finish with four rows of knit one, purl one rib for a comfortable top edge.
- Bind off loosely in rib.
- Fold and seam the long edge, leaving the thumb opening free.
- Weave in ends and gently steam or wet-block the gloves so the faux puffs relax and round.
12. Pattern Twelve: Winter Lace Shell Fingerless Gloves with Knitted Fan Motifs

Skill level
Intermediate to experienced
Finished size
One-size adult; shell repeat spacing will determine the width. Aim for a final palm circumference near 18 centimetres.
Materials
- Medium weight yarn (Category 3 or 4 depending on drape).
- Pair of knitting needles (suggested 4.0 millimetre for balanced drape).
- Yarn needle and scissors.
- Blocking pins for shaping lace shells.
Notes
- The fan-shaped shell motif is created by building multiple yarn overs in one stitch and then working decreases to close the fan on the following rows.
- Work slowly on shell rows to keep even loop sizes.
Instructions
Cast on and base rows
- Cast on a number of stitches divisible by six plus two edge stitches for stability. For a medium glove cast on 38 stitches.
- Work four rows of stocking stitch to stabilize the fabric.
Shell motif construction (six-stitch shell)
- Shell row: Knit one edge stitch. For the shell across the next six stitches, perform the following sequence:
- Knit one stitch,
- Yarn forward and knit into the same stitch again to create an additional loop,
- Yarn forward and knit into the same stitch a third time,
- Yarn forward and knit into the same stitch a fourth time. You will have created several extra loops in that group that will open into a fan.
- Knit two stitches together to form a centered decrease and anchor the fan.
- Continue with three plain knit stitches to separate shells.
- Repeat the shell formation across the row, ending with one knit edge stitch.
Shell set and spread row
- Knit the next row fully to let the shell loops open and set into a fan shape.
- Repeat the shell row and its spread row for a total of three shell appearances in vertical alignment so fans form a pleasing column.
Continue until wrist height and form thumb opening
- After you have worked the shell column for the lower portion and reached approximately 9 centimetres from the lower edge, prepare for the thumb gap.
- Knit across the first half of the stitches and bind off 6 stitches for the thumb opening. Knit to the end. On the following row, cast on the same number of stitches with a loose cast-on.
- Work two plain rows in stocking stitch to stabilize the rejoined fabric.
Upper shell repeat and top finishing
- Continue working the shell fan repeats across the upper hand portion until you reach just below the knuckles.
- Finish with two to four rows of plain knitting to form a neat top edge.
- Bind off loosely.
Seaming and blocking
- Fold the glove with right sides together and seam the long edge, leaving the thumb opening unseamed.
- Weave in all yarn ends.
- Block the glove by gently pinning each fan motif into its final shape so the shells are even and open.
Conclusion
This full collection of 12 knitted fingerless glove patterns offers a complete range of styles—from soft ruffles and vintage scallops to faux-crochet textures, lace shells, cables, and ribbed comfort. While the original visual inspirations might have appeared crocheted, each design has been faithfully re-imagined into fully knitted, long-form, step-by-step tutorials that any knitter can enjoy.


