Creating your own paper flower crowns is one of those crafts that feels both relaxing and rewarding. Whether you want something delicate and romantic, bold and colorful, or whimsical and playful, paper flower crowns give you full creative control without the cost of fresh flowers.
In this detailed guide on 5 Paper Flower Crowns, you’ll learn exactly how to recreate the designs shown in your reference images. These tutorials are written carefully for beginners, so nothing is skipped. Every fold, cut, and glue step is explained clearly so you can follow along without confusion.
Below are the first three tutorials, each matching a specific crown style from your visuals.
Paper Flower Crown 1: Rose and Butterfly Wire Crown
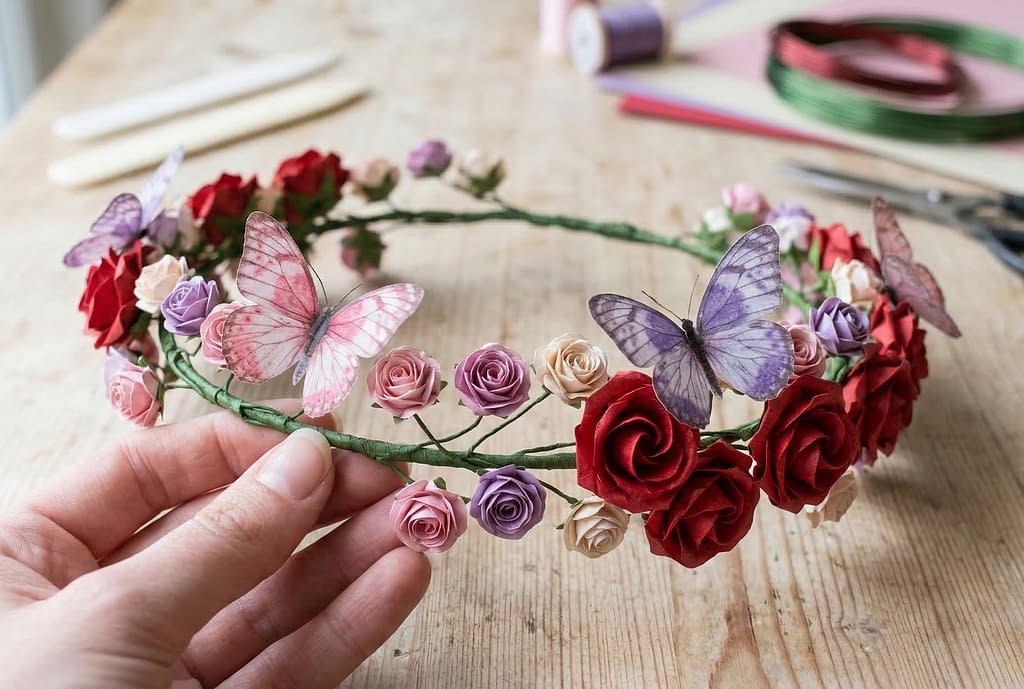
This design is elegant and slightly magical, combining small paper roses with delicate butterfly accents on a thin wire base.
Materials Needed
- Thin floral wire (flexible but sturdy)
- Green floral tape
- Colored craft paper (red, pink, cream, purple)
- Printed or pre-cut paper butterflies (or draw your own)
- Scissors (sharp, for detailed cutting)
- Glue (preferably tacky glue or hot glue)
- Pencil
- Small round object (like a pen or brush handle for shaping petals)
Preparing the Base
Step 1: Measure and Shape the Crown
Wrap the floral wire around your head where you want the crown to sit. Do not make it too tight; leave about 1–2 cm extra space for comfort.
Twist the ends together securely. Then wrap the entire wire ring with floral tape. Stretch the tape slightly as you wrap—this activates its stickiness and ensures it grips tightly.
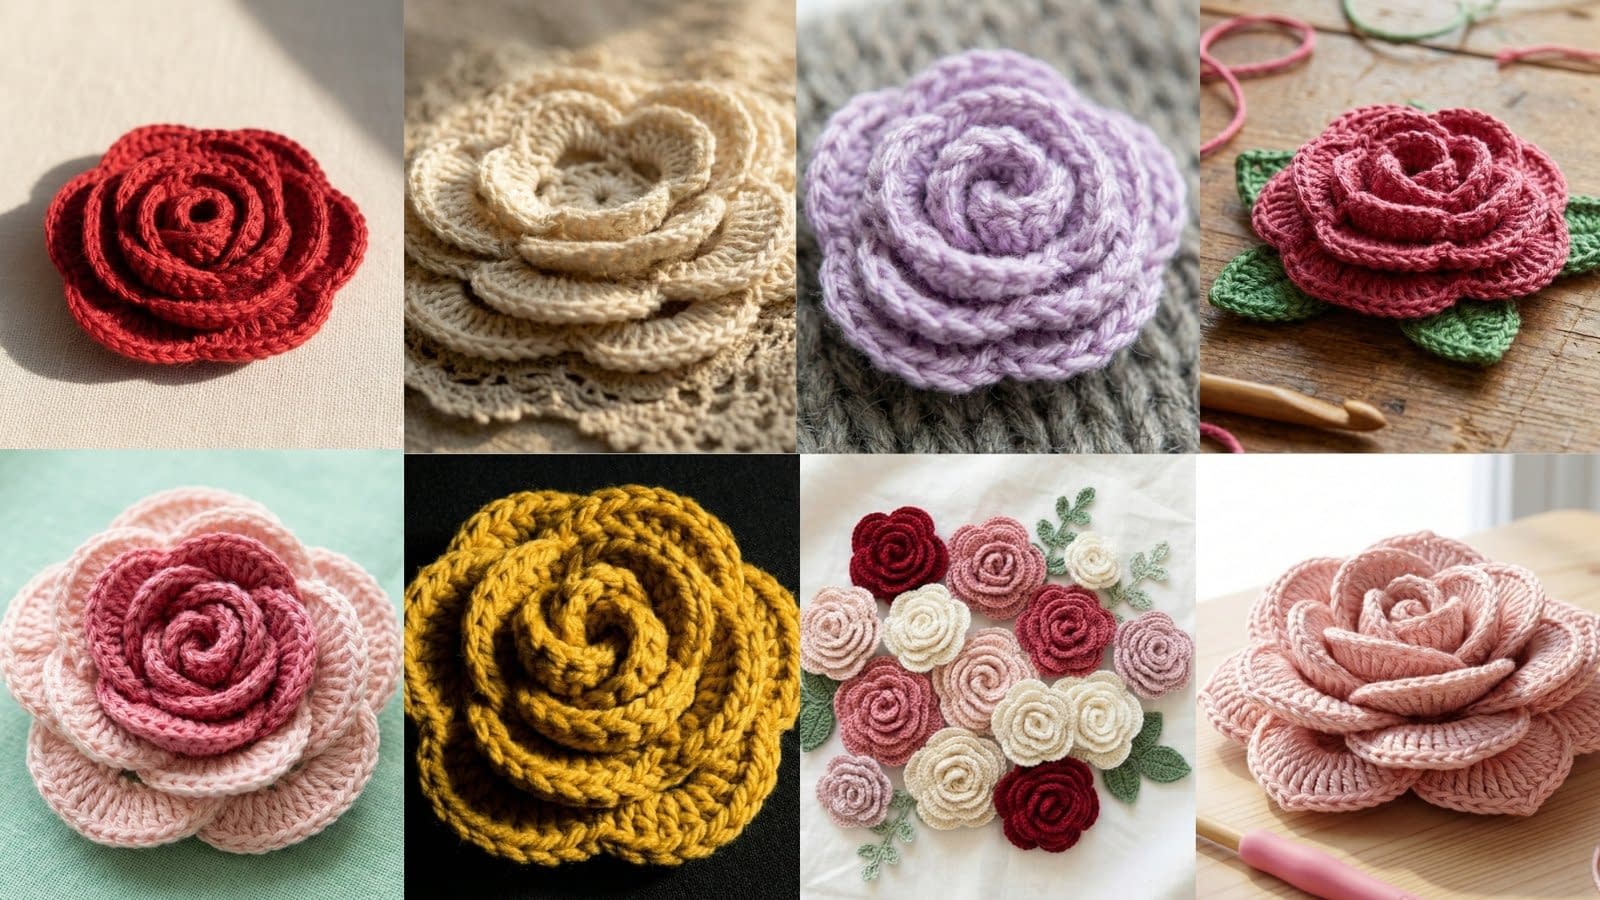
Creating Paper Roses
Step 2: Draw Spiral Circles
On your colored paper, draw a circle about 4–5 cm wide. Inside it, draw a spiral starting from the outer edge going toward the center.
Cut along the spiral line carefully. Keep your hand steady—uneven cuts will make uneven petals.
Step 3: Roll the Rose
Start rolling from the outer edge of the spiral inward. Use your fingers to keep the roll tight at first.
As you reach the center, slightly loosen the roll so it looks more natural. The small circular base at the center will act as the bottom.
Step 4: Secure with Glue
Apply glue to the base and press the rolled flower onto it. Hold for a few seconds until it sticks.
Use a pencil or your fingers to gently curl the outer edges of the petals outward for a more realistic look.
Making Small Accent Flowers
Step 5: Cut Tiny Flower Shapes
Draw small five-petal flower shapes (about 1–2 cm wide). Cut them carefully.
Slightly fold each petal inward along the center line to give dimension.
Glue a tiny rolled paper or bead in the center if desired.
Attaching Butterflies and Flowers
Step 6: Arrange Before Gluing
Place all your flowers and butterflies on the crown without gluing first. This helps you balance the design.
Cluster roses on one side and spread smaller flowers across the rest.
Step 7: Glue in Layers
Start gluing the largest flowers first. Apply glue directly to the base of each flower and press onto the wire.
Add smaller flowers in between gaps.
Finally, attach butterflies. Apply glue only to the body (center) so the wings stay slightly lifted for a realistic effect.
Final Adjustments
Gently bend the wire if needed to adjust shape. Make sure no sharp wire ends are exposed.
This crown works beautifully for photoshoots, festivals, or decorative display pieces.
Paper Flower Crown 2: Soft Pink Hydrangea Headband
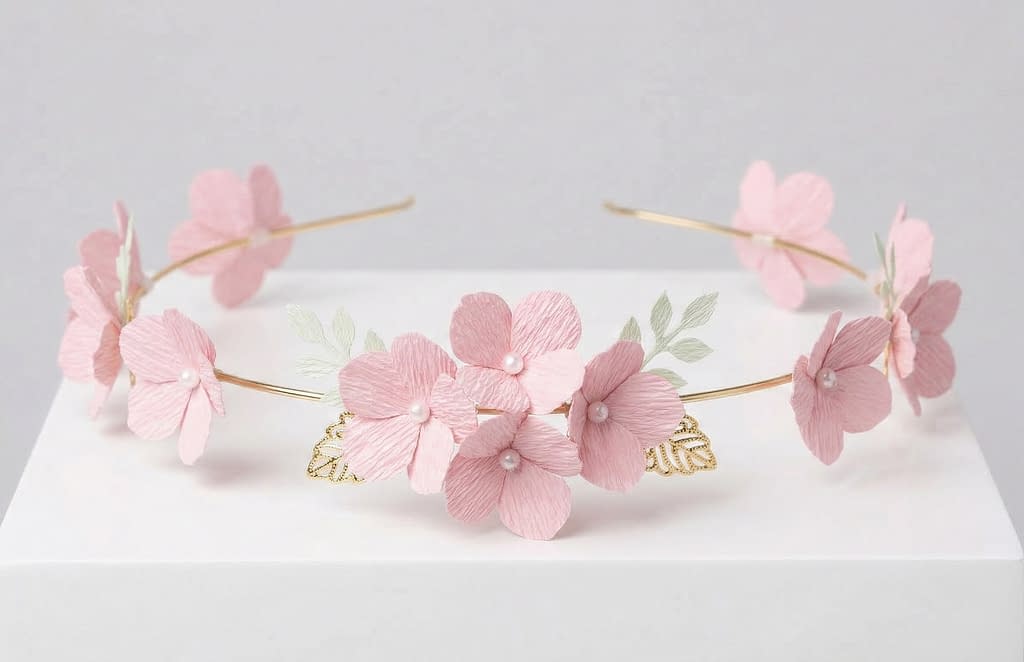
This crown is soft, romantic, and minimal. It features layered hydrangea-style flowers on a smooth band base.
Materials Needed
- Plain headband (plastic or metal)
- Light pink paper (preferably textured or slightly thick)
- Scissors
- Pencil
- Glue (hot glue recommended for strong hold)
- Small pearl beads (optional)
Creating Hydrangea Petals
Step 1: Draw Petal Shapes
Draw small four-petal flower shapes (like a clover) about 3–4 cm wide.
Make sure each petal is rounded and slightly heart-shaped.
Cut out multiple identical pieces. You will need many to create fullness.
Step 2: Add Texture with Folding
Take each flower piece and gently fold each petal slightly inward along the center.
Do not crease too hard—just a soft fold to give a natural look.
Step 3: Shape the Petals
Use your fingers or the edge of scissors to curl the edges slightly outward.
This step makes a big difference in realism.
Layering the Flowers
Step 4: Stack for Depth
Take two or three flower cutouts and stack them slightly offset so petals don’t overlap exactly.
Glue them together at the center.
Add a small pearl bead in the middle if you want a more decorative finish.
Attaching to the Headband
Step 5: Plan Placement
Lay the flowers along one side of the headband. This design typically focuses on one side rather than going all around.
Keep the arrangement slightly asymmetrical for a natural look.
Step 6: Glue Securely
Apply hot glue to the base of each flower and press firmly onto the headband.
Hold for a few seconds until set.
Continue layering flowers slightly on top of each other to create volume.
Finishing Touches
Check for gaps and fill them with smaller flower pieces if needed.
This crown is perfect for weddings, soft aesthetic photos, or minimalist fashion looks.
Paper Flower Crown 3: Blue Hydrangea Circular Crown
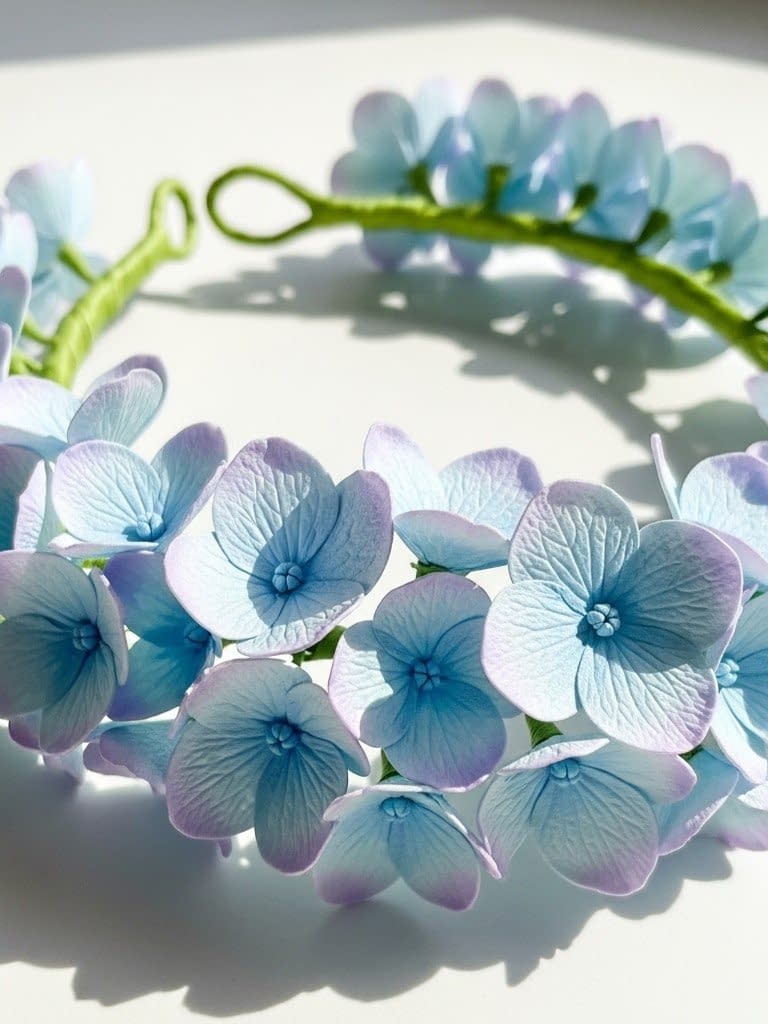
This crown is fuller and wraps completely around the head, using clustered hydrangea-style flowers in cool blue tones.
Materials Needed
- Thick floral wire or a pre-made circular base
- Green floral tape
- Blue and light purple paper
- Scissors
- Pencil
- Glue (hot glue or strong craft glue)
Preparing the Base
Step 1: Form a Circular Frame
Measure your head and form a circular wire frame. Twist ends securely.
Wrap the entire frame with green floral tape to give a clean finish and better grip for glue.
Making Hydrangea Clusters
Step 2: Cut Petal Shapes
Draw small four-petal shapes (similar to the previous tutorial but slightly smaller, around 2–3 cm).
Cut out many pieces in different shades of blue and purple.
Step 3: Create Natural Texture
Fold each petal slightly along the center.
Then gently press the center of the flower inward using your finger to give a cupped shape.
Building Flower Clusters
Step 4: Group Flowers
Instead of attaching single flowers, group 3–5 flowers together first.
Glue them at the base so they form a small cluster.
This creates the dense hydrangea effect seen in the image.
Attaching to the Crown
Step 5: Start from One Point
Begin attaching clusters from one point and move around the circle.
Apply glue to the back of each cluster and press firmly onto the taped wire.
Step 6: Overlap for Fullness
Place each new cluster slightly overlapping the previous one.
Avoid leaving visible gaps—this crown should look full and lush.
Final Detailing
Mix different shades randomly to avoid a flat color look.
Gently adjust petals after everything dries to make them look more natural and less stiff.
This crown is ideal for statement looks, events, or even home decor.
Paper Flower Crown 4: Yellow Origami Lily Crown
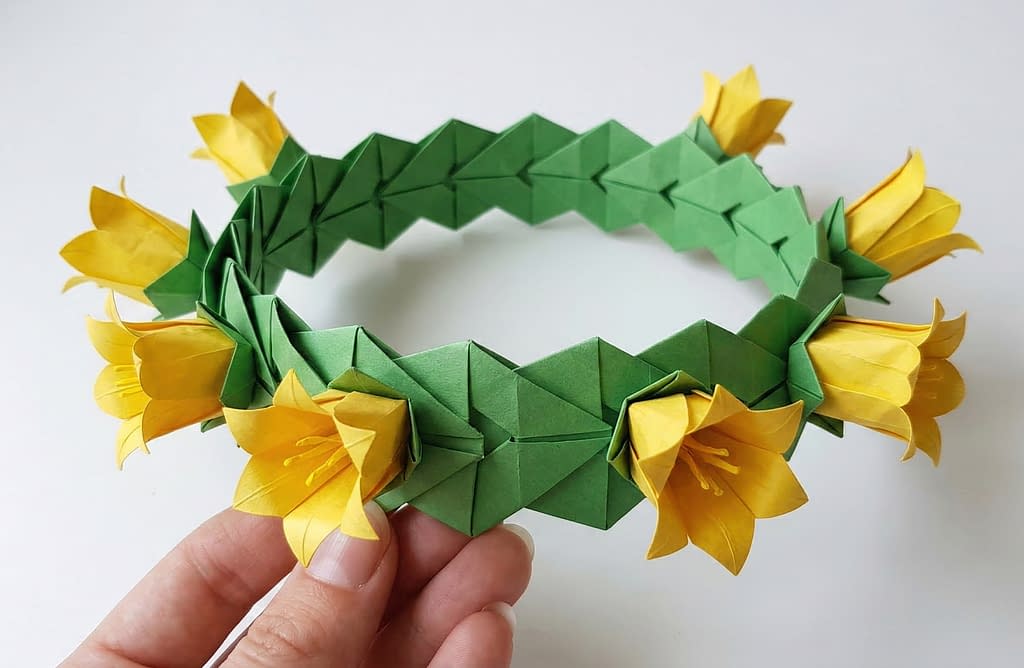
This crown is bold and structured, made with folded origami-style lilies attached to a geometric green base. It stands out because of its clean folds and bright contrast.
Materials Needed
- Green origami paper (for the base)
- Yellow origami paper (for flowers)
- Scissors
- Glue (use a small amount, origami relies mostly on folding)
- Ruler
- Pencil (for light marking only if needed)
Creating the Geometric Base
Step 1: Cut Equal Paper Strips
Take green paper and cut it into equal rectangular strips, approximately 2 cm wide and 10–12 cm long.
Make sure all strips are identical. Uneven strips will cause misalignment later.
Step 2: Fold into Units
Take one strip and fold it in half lengthwise. Open it again so you see a center crease.
Now fold both long edges inward toward the center crease (like making a paper straw shape). Press the folds firmly.
Fold the strip again in half along the original crease. You now have a compact folded unit.
Repeat this for all strips.
Step 3: Interlock the Units
Take two folded units. Slide one into the fold of another at a right angle.
Continue inserting units into each other in a chain-like pattern. This creates a flexible, woven structure.
As you build, gently bend the chain into a circular shape. Continue adding until it fits your head size.
Secure the final ends by tucking them tightly or adding a tiny drop of glue if needed.
Making Origami Lilies
Step 4: Start with a Square Paper
Take a square piece of yellow paper (about 8–10 cm).
Fold diagonally into a triangle. Then fold again into a smaller triangle.
Step 5: Create Petal Base
Take one flap of the triangle and open it, pressing it down into a diamond shape (this is a squash fold).
Repeat for the other side.
You now have a symmetrical base.
Step 6: Shape the Petals
Fold the outer edges slightly inward to narrow the shape.
Then gently pull the top flaps outward to form four petals.
Use your fingers or a pencil to curl the petal tips outward for a lily-like appearance.
Attaching Flowers to the Crown
Step 7: Position the Flowers
Place the lilies evenly around the green base. You can space them equally or cluster them in sections.
Step 8: Glue Carefully
Apply a small amount of glue to the base of each flower.
Press onto the green structure and hold briefly. Avoid excess glue—it can ruin the clean origami look.
Final Adjustments
Check alignment and gently adjust the woven base if needed.
This crown works well for artistic shoots or bold fashion styling.
Paper Flower Crown 5: Purple Origami Flower Crown with Lattice Base
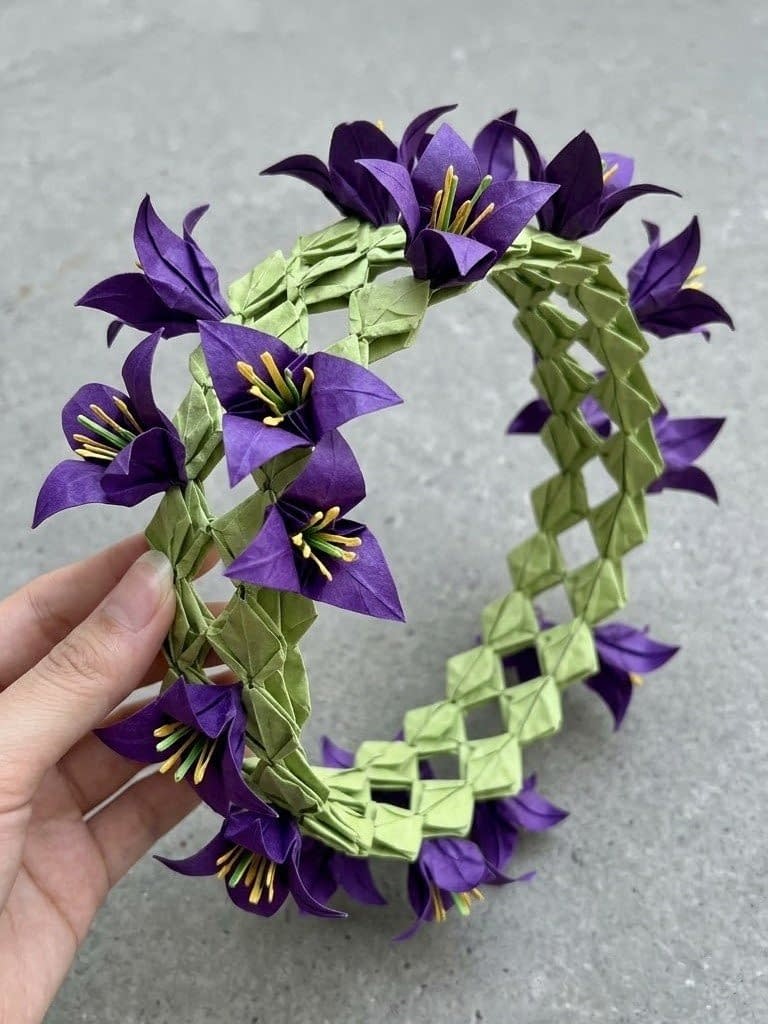
This crown has a more intricate woven structure with purple flowers placed on a lattice-like green base. It looks complex but becomes manageable when done step by step.
Materials Needed
- Green paper (for lattice base)
- Purple paper (for flowers)
- Yellow paper (for flower centers)
- Scissors
- Glue
- Pencil
Creating the Lattice Base
Step 1: Cut and Fold Units
Cut green paper into strips similar to the previous crown, but slightly thinner (about 1.5–2 cm wide).
Fold each strip in half lengthwise, then fold edges toward the center, and fold again to create compact units.
Step 2: Build a Diamond Pattern
Instead of a simple chain, insert strips at alternating angles to create a crisscross pattern.
Slide one strip diagonally through another, forming small diamond-shaped gaps.
Continue this pattern slowly. Keep checking alignment so the diamonds remain even.
Step 3: Shape into a Crown
Once the lattice is long enough, bend it into a circle.
Connect ends carefully, aligning the pattern so it looks continuous.
Use glue sparingly to secure.
Making the Purple Flowers
Step 4: Cut Petal Shapes
Draw six elongated petal shapes connected at the base (like a star). Each flower should be about 4–5 cm wide.
Cut them out cleanly.
Step 5: Fold for Dimension
Fold each petal slightly along the center.
Then gently pinch the base of the petals together to create a slight upward curve.
Step 6: Add Centers
Cut thin strips of yellow paper.
Roll them tightly into small coils and glue the end.
Glue this coil into the center of each purple flower.
Attaching Flowers
Step 7: Arrange First
Place flowers at intersections of the lattice where strips cross. These points are stronger and hold glue better.
Step 8: Glue Securely
Apply glue to the back of each flower and press onto the lattice.
Hold until set.
Final Touches
Adjust spacing so flowers are balanced.
This crown has a handcrafted, slightly geometric aesthetic and looks especially striking in photos.
Paper Flower Crown 6: Mixed Floral Crown with Small Roses
This crown combines small paper roses and tiny filler flowers, creating a soft and natural look similar to fresh floral crowns.
Materials Needed
- Thin wire or flexible band
- Green floral tape
- Colored paper (red, pink, white, lavender)
- Scissors
- Glue
- Pencil
Preparing the Base
Step 1: Create the Wire Frame
Wrap wire around your head and secure ends.
Cover the entire wire with floral tape, stretching it slightly as you wrap.
Making Small Paper Roses
Step 2: Draw Small Spirals
Draw small circles (2–3 cm wide) and sketch spirals inside.
Cut along the spiral lines.
Step 3: Roll the Roses
Start rolling from the outer edge tightly.
As you reach the center, loosen slightly for a natural bloom effect.
Glue the base to secure.
Make multiple roses in different colors.
Creating Tiny Fillers
Step 4: Cut Mini Flowers
Cut very small five-petal shapes.
Fold petals slightly inward.
You can also roll tiny paper buds by rolling small strips tightly.
Assembling the Crown
Step 5: Attach Larger Flowers First
Glue roses onto the base, spacing them evenly.
Step 6: Fill the Gaps
Add small flowers and buds between the roses.
This layering is important—it creates a full and realistic look.
Step 7: Balance Colors
Avoid placing the same color next to each other too often.
Alternate colors to keep the design visually interesting.
Final Adjustments
Gently bend the wire if needed.
Check for empty spaces and fill them.
This crown is versatile and works for casual wear, events, or decorative use.
Conclusion
Now that you’ve explored all 5 Paper Flower Crowns, you can see how different techniques create completely different styles.
Some crowns rely on rolling, like the rose-based designs. Others use folding, like the origami lilies and lattice structures. Each method has its own learning curve, but none are out of reach if you follow the steps patiently.
If you are a beginner, start with the hydrangea or simple rose crowns. These are forgiving and easier to adjust. Once you gain confidence, move to the origami and lattice designs, which require more precision.
The key to success with paper flower crowns is not rushing. Take time to cut clean shapes, fold carefully, and test placement before gluing. Small details—like slightly curling petals or layering flowers—make a huge difference in the final result.
With practice, you can even start combining techniques from different crowns to create your own unique designs.