
There’s something truly heartwarming about giving handmade gifts—especially when they combine both function and personality. A crochet mug cozy is one of those timeless, practical items that instantly adds charm to a morning coffee or evening tea ritual. They’re quick to make, customizable for any season or occasion, and can even be paired with a favorite mug, tea bags, or hot cocoa mix for a complete gift set.
Whether you’re looking for a thoughtful holiday present, a last-minute birthday idea, or just something small to show appreciation, crochet mug cozies are the perfect choice. They don’t take much yarn, can be whipped up in a day, and offer endless ways to personalize with colors, textures, and embellishments.
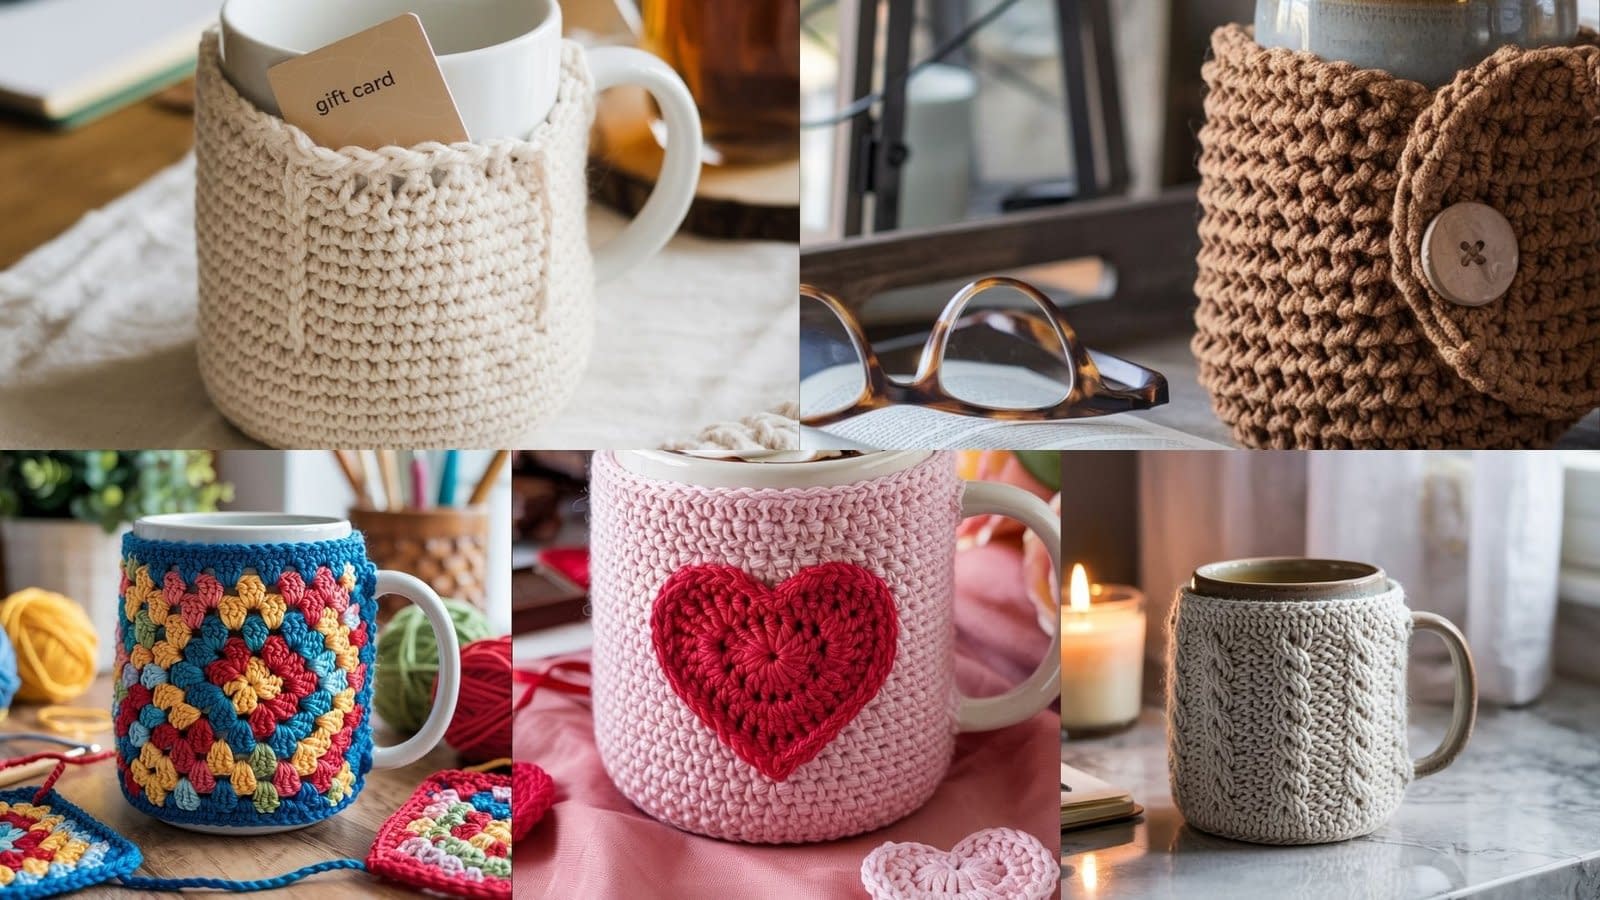
In this guide, we’ll explore 5 crochet mug cozy patterns for gifts—each with detailed instructions, material lists, and helpful tips. To get you started, here’s a complete step-by-step breakdown of a Crochet Christmas Tree Gift Card Holder Pattern, which doubles as a charming mug cozy gift accessory.
1. Pocket Mug Cozy (with Hidden Gift Card Holder)

This pattern creates a beautiful mug cozy with a flat pocket stitched on the front—perfect for slipping in a gift card, tea bag, or little note. Unlike seasonal designs, it’s a neutral, all-occasion cozy that works as a thoughtful handmade gift for birthdays, teacher appreciation, or “just because.”
Skill Level
Beginner to Intermediate (basic stitches, sewing pocket neatly, simple shaping).
Finished Size
- Fits most standard mugs (8–12 oz).
- Cozy height: about 3.5–4″ tall.
- Pocket: approx. 2.5″ wide × 2.5″ tall (adjustable).
You can make it taller or wider by adding rows or stitches.
Materials
- Worsted weight (#4) cotton yarn (cotton holds shape better than acrylic and is heat-safe). Neutral or pastel colors recommended.
- Crochet hook size H/5.0 mm.
- Yarn needle & scissors.
- Optional: 1 button, charm, or small appliqué for decoration.
Stitches & Abbreviations
- Ch = chain
- Sc = single crochet
- Hdc = half double crochet
- Sl st = slip stitch
- RS = right side
Base Cozy (worked flat, then seamed)
- Foundation Chain: Ch 42 (this will wrap around most mugs; adjust by chaining more/less).
- Row 1: Sc in 2nd ch from hook and across (41 sc). Ch 1, turn.
- Rows 2–12: Sc across. Ch 1, turn after each row.
- Work until your panel measures about 3.5″ tall (or enough to cover most of your mug’s height).
- Fasten off, leaving a long tail for sewing later.
Tip: Keep edges straight and stitches even—the panel should be a neat rectangle.
Front Pocket
- Foundation Chain: Ch 18.
- Row 1: Sc in 2nd ch from hook and across (17 sc). Ch 1, turn.
- Rows 2–8: Sc across. Ch 1, turn.
- Work until pocket measures about 2.5″ tall.
- Fasten off, leaving a long tail for sewing.
Tip: You can make the pocket taller (for tea bags) or wider (for larger gift cards).
Assembly
- Attach Pocket:
- Place the pocket on the center front of the base panel.
- Make sure the top of the pocket is open.
- With yarn needle and pocket tail, whip stitch or slip stitch around the sides and bottom only.
- Seam the Cozy:
- Wrap the base panel around your mug.
- Seam the short sides together, leaving an opening for the handle.
- Use whip stitch or mattress stitch for a neat seam.
- Optional Button Closure:
- Attach a button on one side.
- Crochet a small loop on the opposite side (chain 8, sl st back).
- This lets the cozy slip on/off easily.
Finishing Touches
- Weave in all yarn ends securely.
- Block lightly if you want sharper edges.
- Slide a gift card, tea bag, or note into the pocket.
Variations
- Striped Cozy: Alternate colors every 2 rows for a modern striped look.
- Appliqué Add-On: Sew on a small crochet flower, star, or embroidered initials to personalize.
- Different Pockets: Make two smaller pockets side-by-side instead of one.
- Texture Swap: Instead of all sc, alternate rows of sc and hdc for subtle ribbing.
Tips for Success
- Always test the length of your foundation chain around your actual mug before committing.
- Use cotton yarn for durability and washability (wool can shrink).
- Don’t seam too tightly around the handle gap—leave space so it slides easily.
2. Rustic Buttoned Mug Cozy

A buttoned mug cozy is one of the most classic crochet gifts—it’s functional, stylish, and works with almost any mug size. The button closure makes it removable and washable, which is especially practical for everyday use. For this rustic design, we’ll use simple stitches and a neutral yarn, giving it that handmade farmhouse feel.
Skill Level
Beginner — simple rows of stitches with basic shaping.
Finished Size
- Fits most standard 11–15 oz mugs.
- Adjust length by adding or subtracting starting chains.
Materials Needed
- Worsted weight (#4) yarn — neutral/rustic shade (cream, tan, gray, or speckled).
- Crochet hook: 5.0 mm (H).
- 1 large button (1–1.5″ wide, wood recommended for a rustic touch).
- Yarn needle.
- Scissors.
Notes Before Starting
- This cozy is worked as a long rectangle.
- The button loop is worked into the last row, no extra sewing needed.
- Cozy should wrap snugly but not tightly around mug.
Step-by-Step Instructions
Foundation Chain
- Ch 40 (or long enough to wrap around mug, leaving a small gap for the button closure).
- Tip: Lay chain around mug before continuing to check fit.
Row 1
- Hdc in 2nd ch from hook and across. (39 hdc total).
- Ch 1, turn.
Rows 2–8
- Hdc in each st across. (39 hdc).
- Ch 1, turn.
- Continue until rectangle is about 3.5″ tall (or height of your mug).
Button Loop (Final Row)
- On final row, work across until last st.
- Ch 12 (or enough to comfortably loop around your button).
- Sl st into last st of row to secure loop. Fasten off.
Finishing
- Weave in yarn ends neatly with a yarn needle.
- Sew button to opposite short side of rectangle, centered vertically.
- Wrap cozy around mug, button closed.
Variations & Tips
- Textured look: Alternate rows of hdc and dc for subtle texture.
- Two-tone design: Switch colors halfway through for a striped cozy.
- Thicker cozy: Hold two strands of yarn together for extra warmth.
- Gift Idea: Pair this cozy with a rustic stoneware mug and a packet of hot cocoa mix for a farmhouse-inspired gift set.
3. Heart-Inspired Valentine Cozy

A Valentine’s Day crochet mug cozy makes a gift that’s both sweet and practical. This design uses a simple rectangle base with a heart appliqué stitched on. You can make it in traditional red and white or switch colors for birthdays, anniversaries, or even weddings.
Skill Level
Beginner–Intermediate — simple cozy with appliqué attachment.
Finished Size
- Fits a 12 oz mug (adjust length by adding chains).
- Height: approx. 3.5″ tall.
Materials Needed
- Worsted weight yarn (#4): red (main), white or pink (heart appliqué).
- Crochet hook: 4.5 mm (7).
- Yarn needle.
- Scissors.
- Optional: small button and extra yarn for closure.
Notes Before Starting
- Cozy is worked as a flat rectangle.
- Heart is made separately and stitched on.
- Add button closure if you prefer a removable cozy.
Step-by-Step Instructions
Base Cozy (Rectangle)
- Ch 40 (or enough to wrap around mug with slight overlap).
- Row 1: Sc in 2nd ch from hook and across. (39 sc). Ch 1, turn.
- Rows 2–12: Sc in each st across. Ch 1, turn.
- Continue until rectangle measures about 3.5″ tall.
- Fasten off, leaving a long tail for sewing.
Heart Appliqué
- With white or pink yarn, make a magic ring.
- Inside ring:
- Ch 3, 3 tr, 3 dc, ch 1, tr, ch 1, 3 dc, 3 tr, ch 3.
- Sl st into ring, pull tight to close ring, forming a heart shape.
- Fasten off, leaving a tail for sewing.
Assembly
- Place cozy rectangle around mug to check fit.
- Sew short edges together (for a permanent cozy) OR add a button + chain loop closure (for removable cozy).
- Position heart appliqué in center front of cozy.
- Sew heart securely with yarn needle, making sure it lays flat.
Finishing Touches
- Weave in all ends neatly.
- Block gently if needed to keep edges flat.
Variations & Tips
- Custom Colors: Try cream with pastel pink for weddings, or black with a red heart for bold contrast.
- Multiple Hearts: Stitch two or three small hearts instead of one large.
- Personalization: Embroider initials or a short word (“LOVE”, “XOXO”) inside or near the heart.
- Gift Idea: Wrap this cozy around a mug filled with chocolates or heart-shaped candies for the perfect Valentine’s present.
4. Cable Stitch Mug Cozy

If you’re looking for a mug cozy with texture and elegance, the cable stitch design is a wonderful choice. Cables might look intimidating, but once you understand how to work front post double crochet (fpdc) and back post double crochet (bpdc), it becomes straightforward. This cozy has a thick, knitted look that makes it perfect for winter gifts.
Skill Level
Intermediate — requires knowledge of fpdc and bpdc stitches.
Finished Size
- Fits most 12–16 oz mugs.
- Width: approx. 3.5–4″ tall.
- Length: adjustable to mug circumference.
Materials Needed
- Worsted or aran weight yarn (#4 or #5).
- Crochet hook: 5.5 mm (I).
- Yarn needle.
- Scissors.
- Optional: 1–2 buttons for closure.
Notes Before Starting
- Cozy is worked flat as a rectangle, then seamed or buttoned.
- Cables are formed by crossing stitches using fpdc.
- Keep tension even—tight fpdc stitches can shrink fabric.
Step-by-Step Instructions
Foundation Chain
- Ch 42 (or enough to wrap around mug, add multiples of 6 for extra cable repeats).
Row 1
- Dc in 4th ch from hook and across. (39 dc).
- Ch 2, turn.
Row 2 (Setup Row)
- Fpdc around next 2 dc, bpdc around next 2 dc — repeat across.
- End with dc in last st.
- Ch 2, turn.
Row 3 (Cable Row)
- Skip next 2 dc, fpdc around following 2 dc, fpdc around skipped 2 dc (crossed cable), bpdc around next 2 dc.
- Repeat pattern across.
- Dc in last st.
- Ch 2, turn.
Row 4 (Stabilizing Row)
- Repeat Row 2.
Rows 5–12
- Repeat Rows 3–4 alternately until cozy measures approx. 3.5″ tall.
Finishing Options
- Seamed Cozy: Fold around mug and whip stitch edges together.
- Buttoned Cozy: Instead of seaming, leave edges open and sew 1–2 buttons on one side. Use gaps between stitches as buttonholes.
Variations & Tips
- Thicker cables: Use chunky (#5 bulky) yarn.
- Striped effect: Switch yarn colors every 2 rows.
- Gift Idea: Pair with a knitted-look blanket or coffee sampler for a cozy winter gift.
5. Granny Square Mug Cozy

The granny square mug cozy is colorful, fun, and versatile—perfect for using up leftover yarn. You’ll make two small granny squares and join them together around the mug, leaving a space for the handle. This design feels cheerful and makes a great gift for anyone who loves vintage charm.
Skill Level
Beginner — basic granny square knowledge required.
Finished Size
- Fits standard 12 oz mugs.
- Each square approx. 3.5″ across.
Materials Needed
- Worsted weight yarn (#4), 2–3 colors for squares + 1 neutral color for joining.
- Crochet hook: 4.5 mm (7).
- Yarn needle.
- Scissors.
- Optional: button for closure.
Notes Before Starting
- Each granny square is made separately, then joined with rows of sc.
- Leave space for mug handle when joining.
- Customize colors for seasonal themes.
Step-by-Step Instructions
Granny Square (Make 2)
- Round 1: Magic ring, ch 3 (counts as dc), 2 dc, ch 2. (3 dc, ch 2) repeat 3 more times. Join with sl st.
- Round 2: Sl st into next ch-2 sp, ch 3, 2 dc, ch 2, 3 dc (corner made). In next ch-2 sp: 3 dc, ch 2, 3 dc. Repeat in remaining corners. Join with sl st.
- Round 3+: Continue working corners with (3 dc, ch 2, 3 dc), sides with 3 dc clusters.
- Stop when square measures 3.5″. Fasten off.
Joining Squares
- Place squares on opposite sides of mug.
- With joining color yarn, attach to one corner.
- Sc across one side of first square, across mug bottom, then across second square.
- Repeat for opposite side, leaving handle area open.
- Optional: add sc border around entire cozy for neat finish.
Closure Option
- Sew button to one edge.
- Crochet a small ch loop on opposite side for closure.
Variations & Tips
- Seasonal Colors: Red/green for Christmas, orange/black for Halloween, pastels for spring.
- Scrap Project: Use leftover yarns for a patchwork effect.
- Gift Idea: Wrap cozy around a mug filled with homemade cookies or tea bags.
Conclusion
Handmade gifts like crochet mug cozies bring warmth and thoughtfulness to every occasion. Not only are they practical, but they also carry the love and care of the maker—making them far more meaningful than store-bought alternatives.
The Crochet Christmas Tree Gift Card Holder pattern is just the beginning. By exploring different stitches, yarn colors, and embellishments, you can create endless cozy designs to suit anyone’s taste. From festive holiday cozies to minimalist everyday styles, these projects make perfect gifts for friends, family, coworkers, or even teachers.


