
Granny square bucket hats are the perfect blend of cozy nostalgia and street-style flair. They’re modular (work in small pieces), portable, and beginner-friendly—yet they leave tons of room for creativity with color and texture. This guide gives you seven complete patterns, each built from granny squares and finished with a comfortable crown, smooth side walls, and a flattering brim. Every pattern includes:
- Skill level and finished size
- Materials and gauge guidance
- Notes for success (how many squares, how big, and how to adjust)
- Step-by-step, row-by-row instructions for the squares, assembly, and brim
- Variations, sizing tweaks, and finishing tips
Granny square hat blueprint (applies to every pattern):
- For an average adult head (21–23 in / 53–58 cm), aim for twelve squares about 4 in (10 cm) each: 4 squares make the top (2×2), and 8 squares form the side band.
- If your squares are smaller, add a round or a single-crochet border to hit the target size.
- Join squares neatly to avoid bulk at seams.
- Brim style and width are your choice—structured, floppy, wavy, narrow, or wide.
Abbreviations (US terms): ch = chain, sl st = slip stitch, sc = single crochet, hdc = half double crochet, dc = double crochet, tr = treble crochet, sk = skip, sp = space, st(s) = stitch(es), rep = repeat, inc = increase (2 sts in the same st).
Gauge tip: For worsted (#4) cotton with a 4.0 mm (G-6) hook, a classic 4-round granny often measures close to 4″ square. Adjust hook size to meet size.
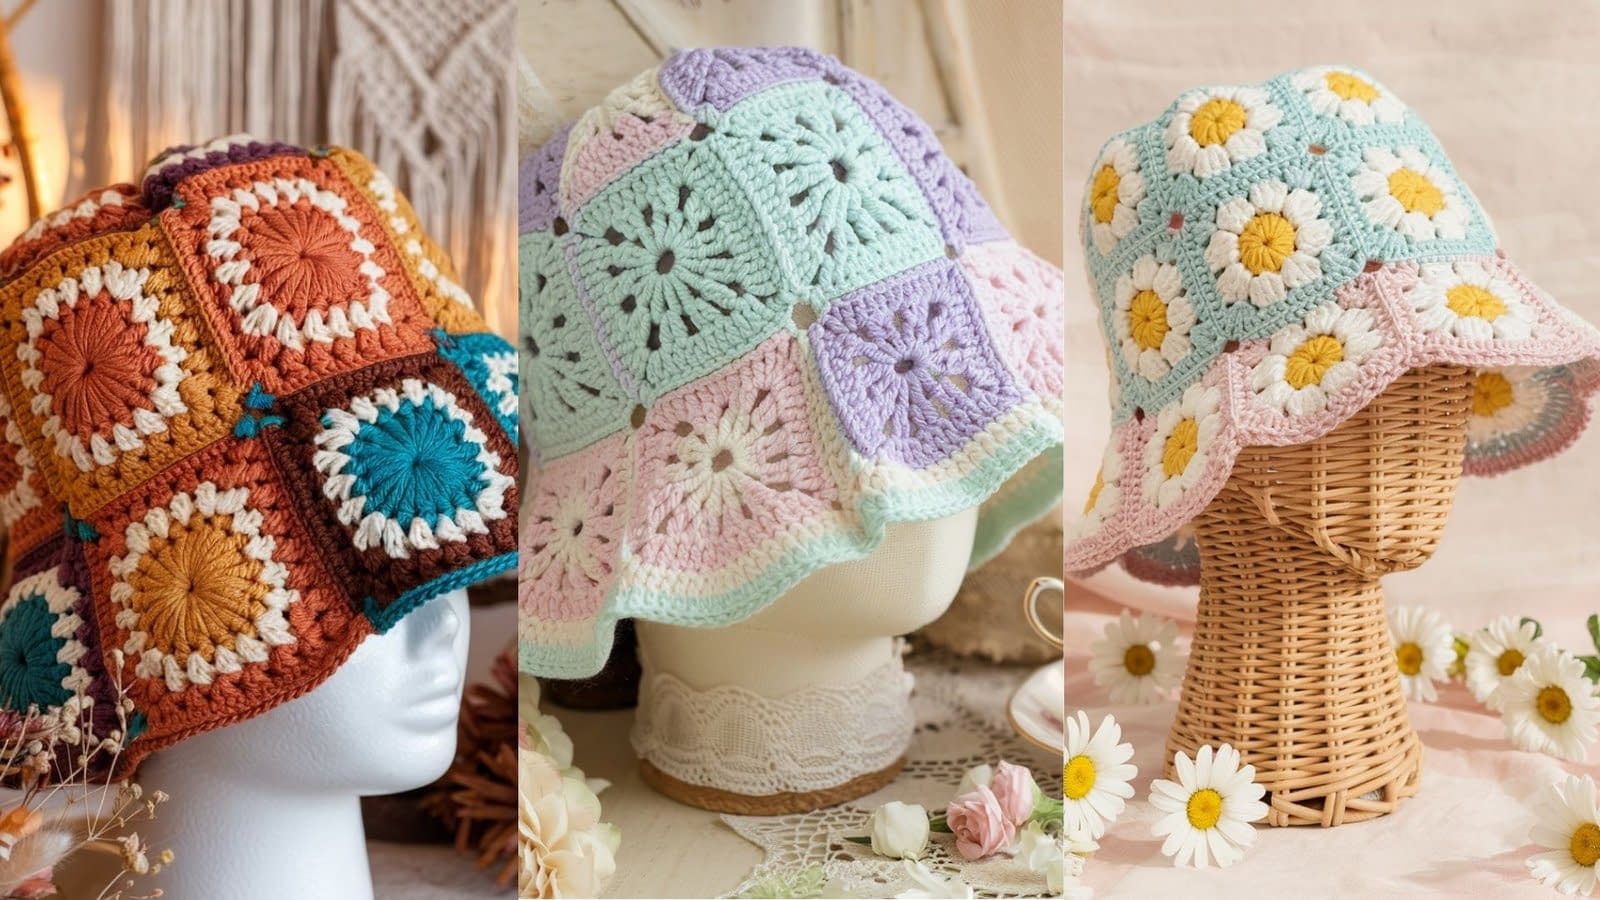
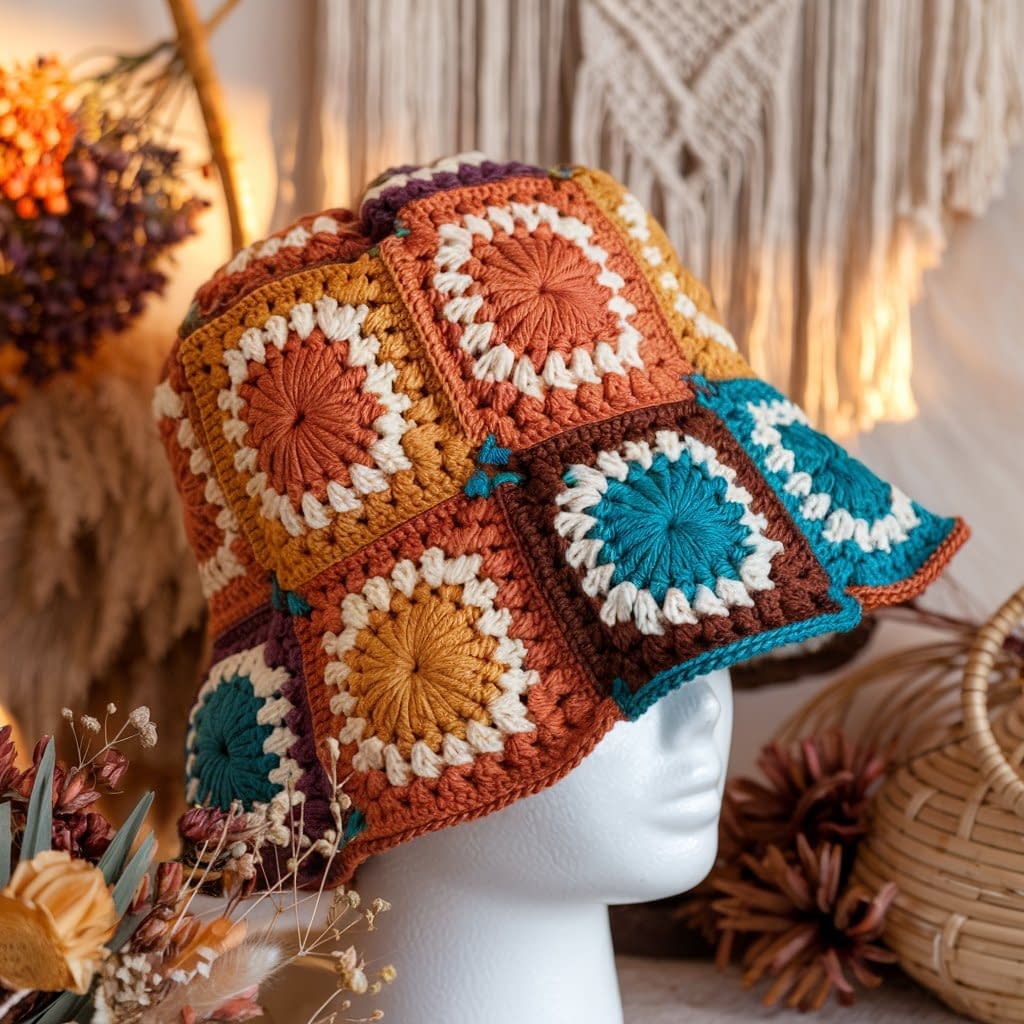
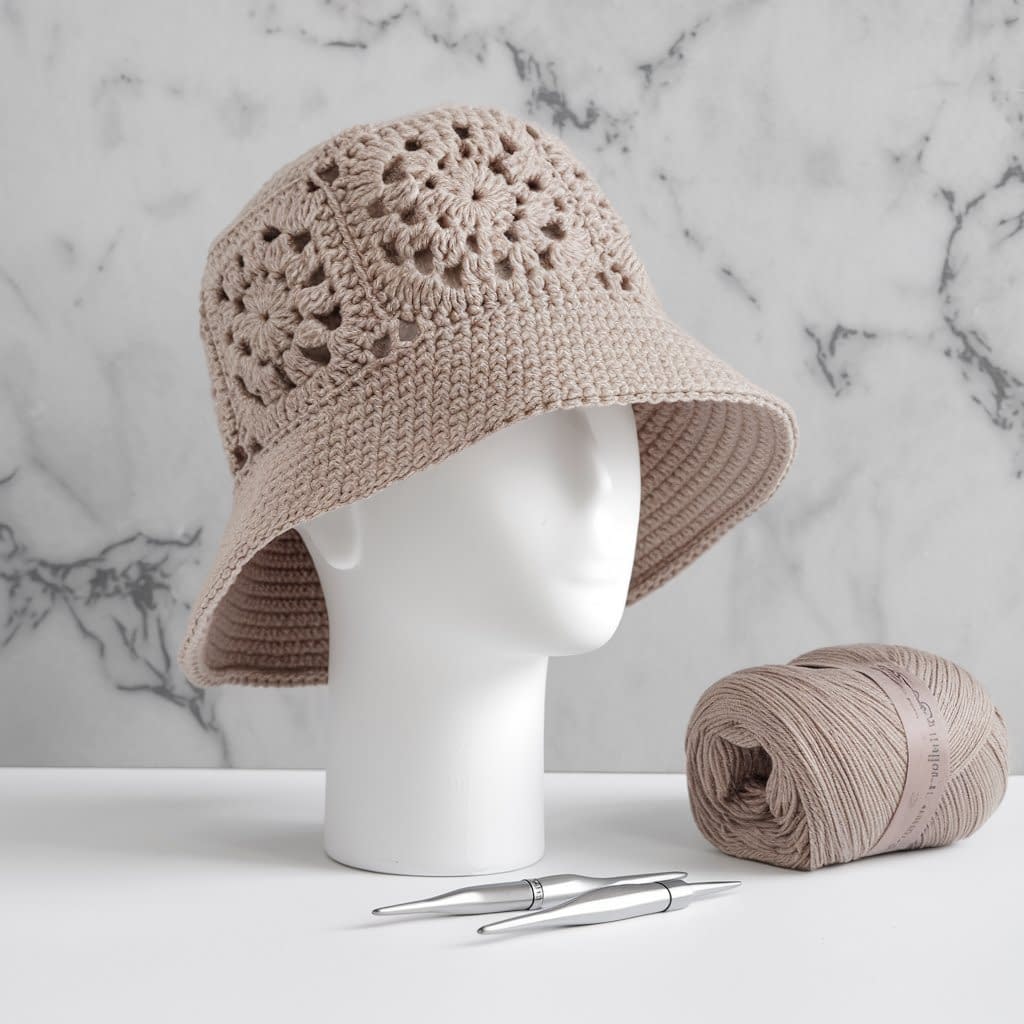
1) Classic Color-Block Granny Square Bucket Hat
Skill level: Beginner
Finished size: Adult medium (21–23 in / 53–58 cm). Adjust by changing square size or count.
Materials
- Worsted weight (#4) cotton yarn in 3 colors (A, B, C)
- Hook 4.0 mm (G-6) (or size to hit ~4″ squares)
- Yarn needle, scissors, stitch markers (optional)
- Measuring tape and blocking pins (optional)
Notes
- Make 12 classic grannies, ~4″ each: 4 for the crown (2×2) + 8 for the side band.
- If your squares measure larger/smaller, adjust with hook size or add/remove a round.
Instructions
A. Square (classic 3-dc cluster granny)
- Foundation: With Color A, ch 4, sl st to form a ring.
- Rnd 1 (Clusters): Ch 3 (counts as dc), 2 dc in ring, ch 2, 3 dc in ring × 3. Ch 2, sl st to top of ch-3 to join. (You have 4 corners formed by ch-2 sps.)
- Rnd 2: Sl st to next ch-2 sp, ch 3, 2 dc, ch 2, 3 dc in same sp (corner made); (3 dc in next sp, ch 1) once between corners; (3 dc, ch 2, 3 dc) in next corner. Work around, ending with ch 1, sl st to join.
- Rnd 3: Work (3 dc, ch 2, 3 dc) in each corner; 3 dc, ch 1 in each side sp between corners. Join.
- Rnd 4 (if needed for size): Repeat Rnd 3. Fasten off.
- Make 4 in A, 4 in B, 4 in C (or any color distribution you like).
B. Block (optional)
- Wet block or steam lightly to reach ~4″ and crisp corners.
C. Join Squares (crown then sides)
- Crown: Arrange 4 squares in a 2×2. With a yarn needle, whip stitch or with a hook sl st through back loops only (BLO) along edges. Keep seam allowances even.
- Side Band: Join 8 squares in a ring (long edges touching), then seam the ring to the crown edges—match joins to joins.
D. Brim (clean, slightly flared)
- Join yarn to any stitch at the lower edge.
- Rnd 1: Ch 1, sc evenly around (place 1 sc in each st and 1–2 sc in each join to avoid holes). Sl st to join.
- Rnd 2: Ch 2 (counts as hdc), hdc around, inc every 8th st. Join.
- Rnd 3: Ch 2, hdc around, inc every 9th st. Join.
- Rnd 4–6: Repeat, spacing increases a little farther each round (every 10th, then 12th), stopping when the brim is 2–3″ wide.
- Edge: Ch 1, sc around; optional crab stitch (reverse sc) for a tidy corded edge. Fasten off.
Variations & Finishing
- Add a contrast single-crochet join for visible seams.
- Weave ends neatly at square corners.
- Lightly steam brim to set shape.
2) Retro Flower Granny Square Bucket Hat (Daisy Look)
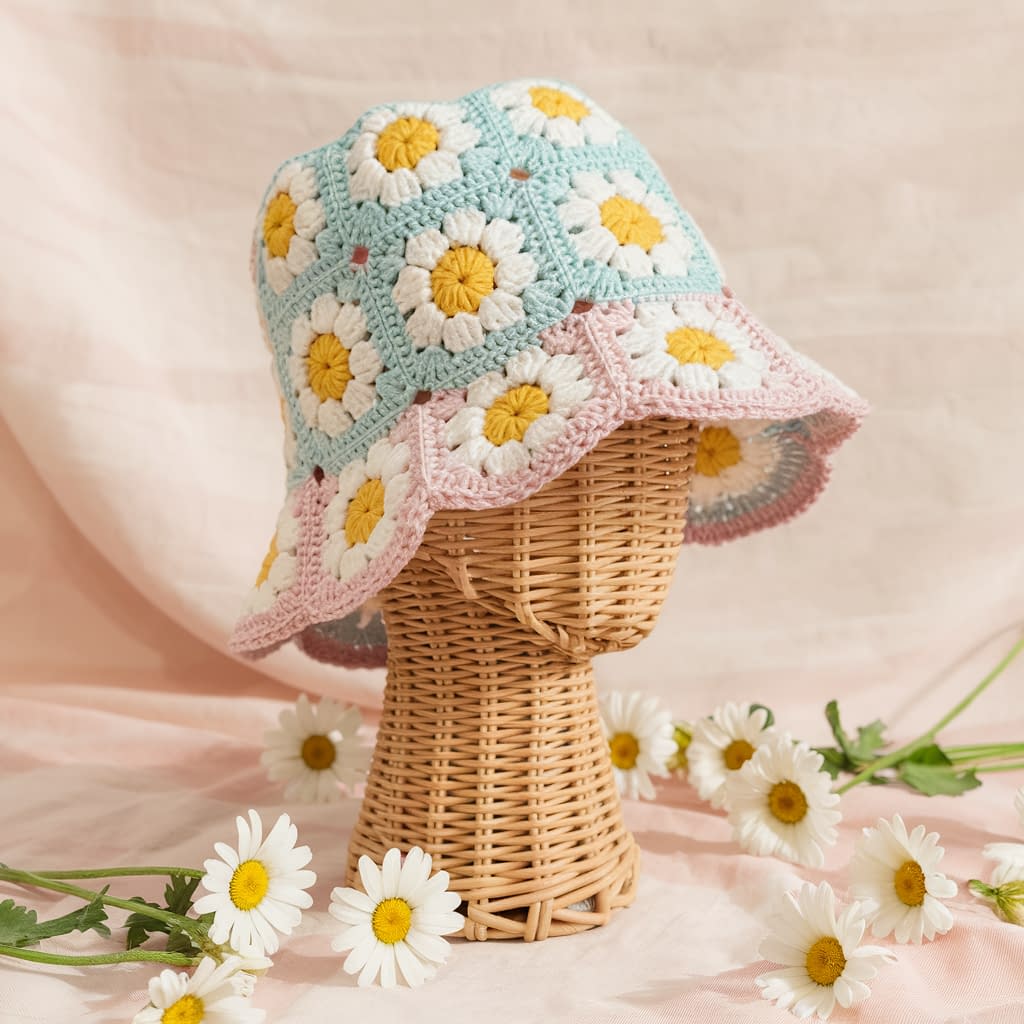
Skill level: Beginner–Intermediate
Finished size: Adult small–medium; adjust square size to fit.
Materials
- Worsted (#4) cotton or acrylic in 4 colors: center (C1), petals (C2), background (C3), brim (C4)
- Hook 4.0 mm (G-6)
- Yarn needle, scissors
Notes
- Work 12 daisy-in-a-square motifs to ~4″.
- Keep your petal tension even so the motif lays flat before squaring.
Instructions
A. Daisy-in-a-Circle
- With C1, ch 4, sl st to form ring.
- Rnd 1: Ch 2 (does not count), 12 hdc in ring, sl st to join. Fasten off C1.
- Rnd 2 (Petals, C2): [Sl st in any st, (ch 2, dc, tr, dc, ch 2) in same st, sl st in next st] × 6 to form 6 petals. Join and fasten off.
B. Square It (Background, C3)
- Rnd 3: Join C3 in a space between petals. (3 dc in next space, ch 1) around, placing (3 dc, ch 2, 3 dc) at four evenly spaced points to form corners (arrange approximately at N/E/S/W around the circle). Join.
- Rnd 4: In each corner: (3 dc, ch 2, 3 dc); along sides work 3 dc, ch 1 in each side sp. Join.
- Add Rnd 5 if needed to reach ~4″. Make 12 squares.
C. Join & Brim
- Join as in Pattern 1 (2×2 crown, 8-square side band).
- Brim (gentle flare with dc):
- Rnd 1: Ch 3, dc around (place 1–2 extra dc over joins). Join.
- Rnd 2: Dc around, inc every 10th st.
- Rnd 3–5: Continue dc, inc every 12th then 14th st for a light flare.
- Edge with sc or picot edging (sc, ch 3, sl st in 1st ch, sk 1, sc) for a dainty finish.
Variations & Finishing
- Alternate petal colors per square for a meadow look.
- Add a single-crochet border to any undersized square to standardize.
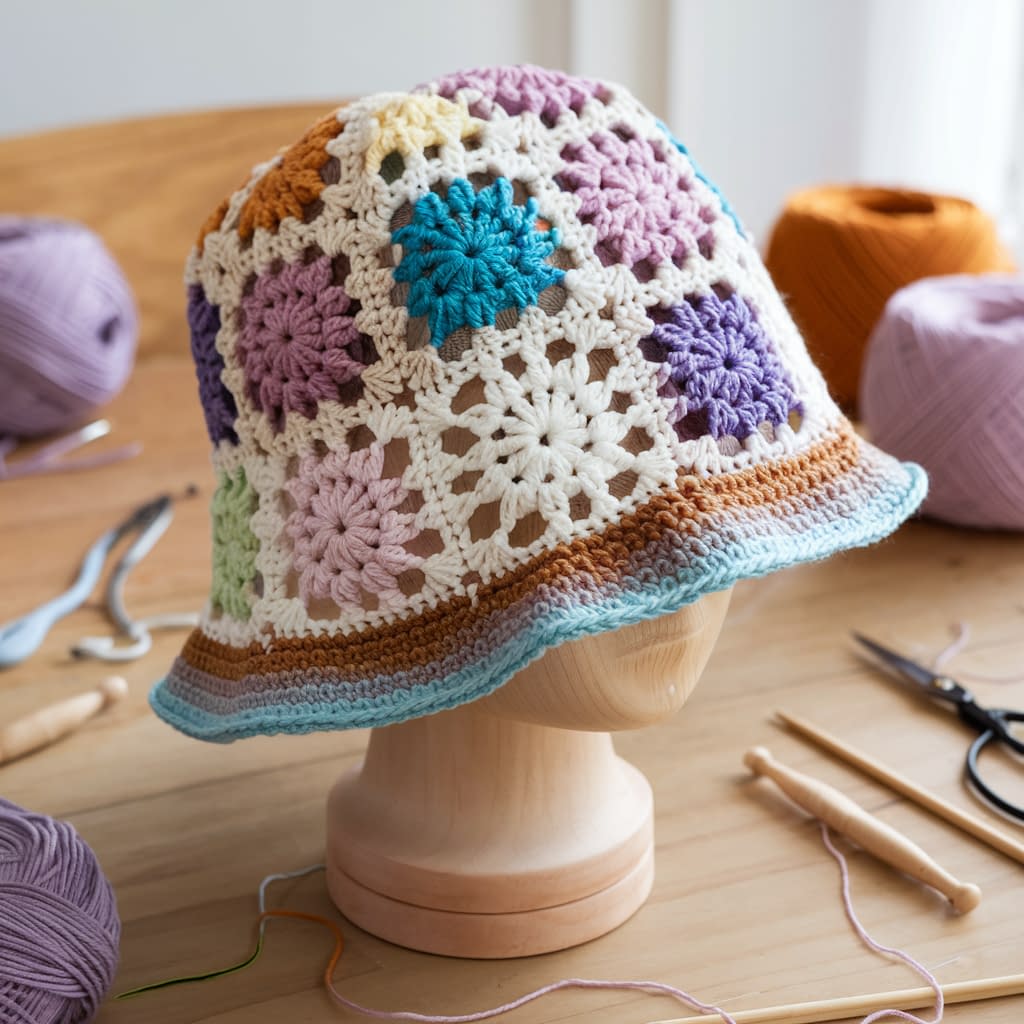
3) Boho Sunburst Granny Square Bucket Hat
Skill level: Intermediate (puffs/clusters + even tension)
Finished size: Adult medium
Materials
- Worsted (#4) cotton/acrylic in sunset palette (4–6 colors)
- Hook 4.0–4.5 mm (choose the one that gives a flat sunburst)
- Yarn needle, scissors, blocking tools
Notes
- Sunburst squares have extra bulk—block lightly to 4″.
- Keep puffs uniform for a polished look.
Instructions
A. Sunburst Center (Puffs)
- With C1, magic ring, (ch 1, puff = yarn over, insert, pull up loop) × 4, yarn over, pull through all loops, ch 1) 8 times into ring. Join. Fasten off C1.
- With C2, join in any ch-1 between puffs. (2 dc in sp, dc in top of puff, 2 dc in next sp) around. Join.
- With C3, (dc, ch 1) in each st around to introduce airy spacing. Join.
B. Square It (C4)
- Corner round: (3 dc, ch 2, 3 dc) in next sp to make a corner; (3 dc, ch 1) across side; repeat for 4 corners. Join.
- Border round: Repeat corners; 3 dc, ch 1 in each side sp.
- Add an extra round if needed to hit ~4″. Make 12.
C. Join & Brim (boho floppy)
- Join as before.
- Brim:
- Rnd 1: Ch 2, hdc around evenly.
- Rnd 2: Hdc around, inc every 7th st for a stronger flare.
- Rnd 3–6: Continue hdc, inc every 9th, 11th, 13th (space increases farther each round).
- Stop at 3–4″ brim width for floppy style.
- Edge with reverse sc (crab stitch) for a rope-like finish.
Variations & Finishing
- Add tassel ties at side seams.
- Work last brim round in back loop only (BLO) to create a subtle ridge.
4) Minimalist Solid-Color Granny Square Hat (Dense, Less “Hole-y”)
Skill level: Advanced Beginner
Finished size: Adult medium
Materials
- Worsted (#4) cotton or soft acrylic in one solid color
- Hook 4.0 mm (G-6)
- Yarn needle, scissors
Notes
- Uses a solid granny square (no chain-1 spaces on sides) for a sleek look.
- Great choice if you want warmer, denser fabric.
Instructions
A. Solid Granny Square
- Start: Ch 4, sl st to ring.
- Rnd 1: Ch 3 (counts as dc), 2 dc, ch 2, (3 dc, ch 2) × 3 in ring. Join.
- Rnd 2: Sl st to corner sp, (ch 3, 2 dc, ch 2, 3 dc) in corner; dc in each dc across to next corner; work corner again. Repeat around. Join.
- Rnd 3–4: Repeat Rnd 2—dc across sides, corners as (3 dc, ch 2, 3 dc).
- Make 12 squares, each ~4″.
B. Join & Brim (sleek, narrow)
- Join as before with invisible whip stitch for minimalist seams.
- Brim:
- Rnd 1: Ch 1, sc around.
- Rnd 2: Sc around, inc every 10th st.
- Rnd 3: Sc around, inc every 12th st.
- Rnd 4: Sc around without increases (keeps brim neat, ~1.5–2″).
- Edge with a tight sl st round for structure.
Variations & Finishing
- Add a contrast edge on the final round only.
- Sew a discreet cotton sweatband inside for comfort.
5) Rainbow Scrap-Yarn Granny Bucket Hat
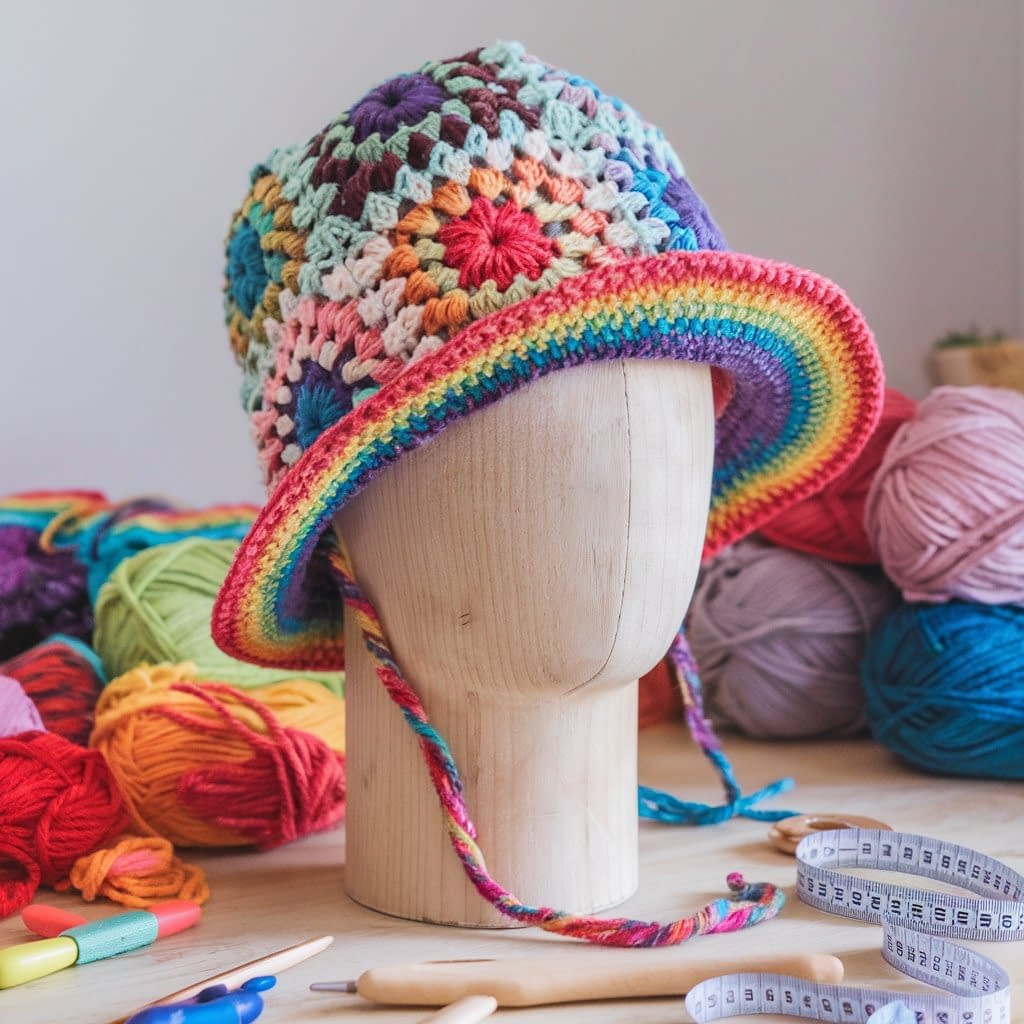
Skill level: Beginner (color changes)
Finished size: Adult medium; perfect stash-buster.
Materials
- Worsted (#4) leftovers in many colors
- Hook 4.0 mm (G-6)
- Yarn needle, scissors
Notes
- Change colors every round (or even within a round).
- To reduce ends, carry yarn along the back and cover it with stitches where possible.
Instructions
A. Scrap Granny Squares (classic)
- Work the classic granny from Pattern 1, but change color each round.
- Keep all squares to the same number of rounds so they match size.
- Make 12.
B. End Management
- Weave as you go: After each color change, weave tails under the next round’s clusters.
- Or add a final sc border around each square with a single neutral color to lock in tails and standardize size.
C. Join & Brim (striped)
- Join: Try join-as-you-go (JAYG) with the same neutral used on borders for a cohesive look.
- Brim (striped hdc):
- Rnd 1: With Color X, hdc around.
- Rnd 2: Switch to Color Y, hdc around, inc every 9th st.
- Rnd 3–6: Change color each round; inc every 11th, 13th as needed for a smooth flare.
- Finish with 1–2 rounds sc in a final pop color.
Variations & Finishing
- Work one square per color family (reds, blues, greens) then arrange in a rainbow.
- Edge the brim with crab stitch for definition.
6) Vintage Pastel Granny Bucket Hat (Light & Soft)
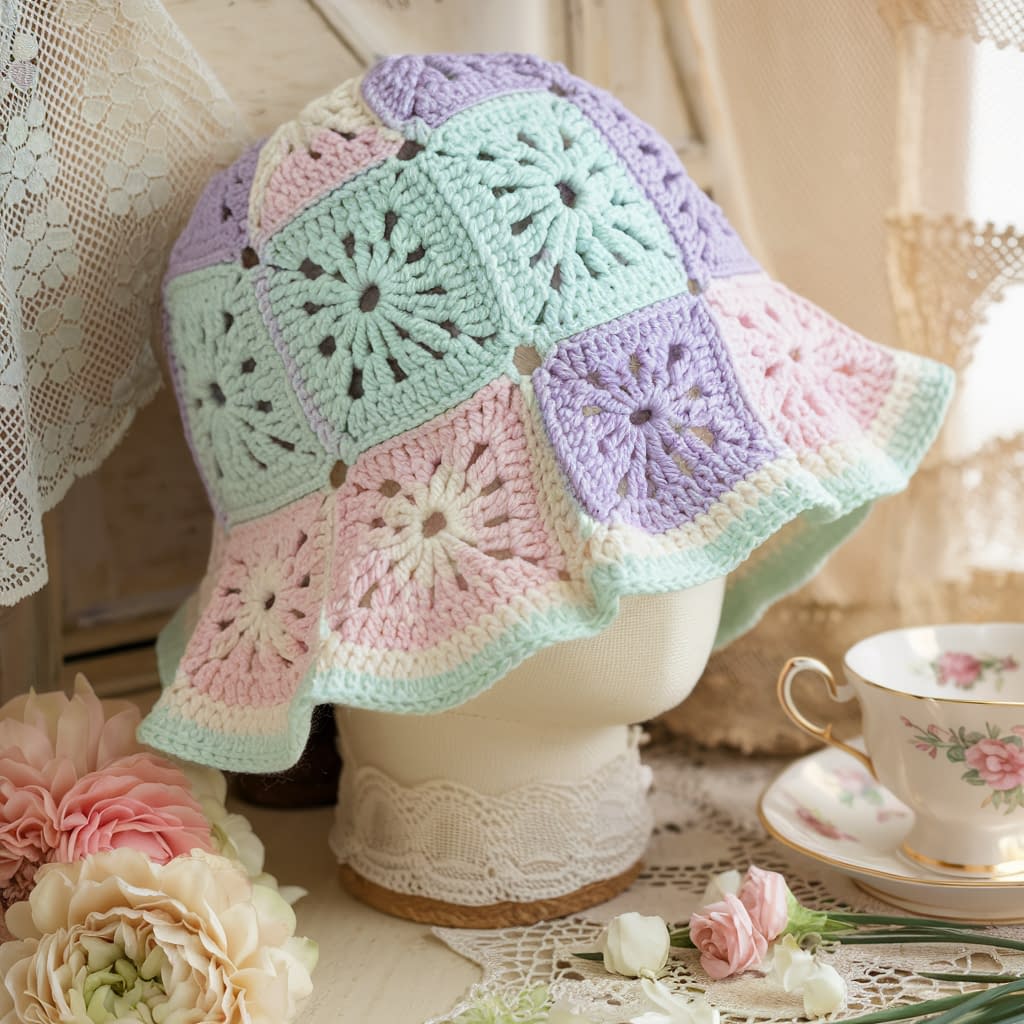
Skill level: Beginner–Intermediate
Finished size: Adult medium
Materials
- DK (#3) cotton/bamboo blend in soft pastels
- Hook 3.75–4.0 mm (adjust to reach ~4″ squares)
- Yarn needle, scissors, blocking tools
Notes
- DK yarn makes a lighter hat. You may need an extra round per square or a single-crochet border to hit size.
Instructions
A. Pastel Granny Squares
- Work the classic granny recipe, using 3–4 gentle colors per square.
- Add one more round than you used in Pattern 1 to compensate for thinner yarn, or edge each finished square with a round of sc (no increases, 3 sc in each corner) to reach 4″.
- Make 12.
B. Join & Brim (soft, wavy)
- Join as before (whip stitch or BLO sl st).
- Brim (gentle wave in dc):
- Rnd 1: Ch 3, dc around.
- Rnd 2 (wave set-up): (2 dc in next st, dc in next 3 sts) rep around.
- Rnd 3: (Dc in next 4 sts, 2 dc in next st) around.
- Rnd 4: Dc around without increases to smooth.
- Rnd 5: Optional subtle flare—inc every 14th st.
- Edge with sc for a tidy finish.
Variations & Finishing
- Add a picot edge for a vintage touch.
- Light steam block; bamboo/cotton relaxes nicely and holds shape after cooling.
7) Bold Checkered Granny Square Bucket Hat
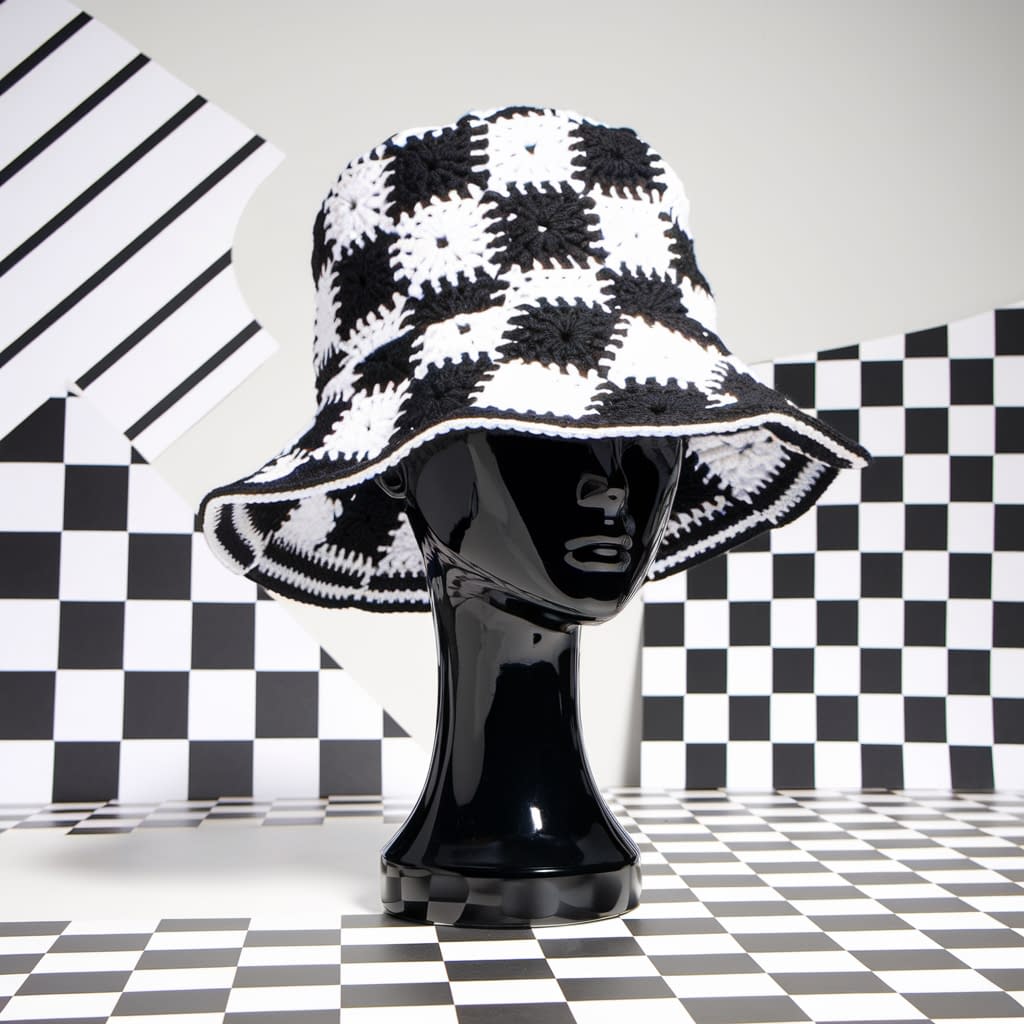
Skill level: Advanced Beginner (color planning)
Finished size: Adult medium
Materials
- Worsted (#4) in two high-contrast colors (C1, C2)
- Hook 4.0 mm (G-6)
- Yarn needle, scissors, markers
Notes
- Alternate square colors for a checkerboard.
- Keep all squares identical in round count for a clean grid.
Instructions
A. Two-Color Granny Squares
- Option A (monochrome squares): Make 6 squares entirely in C1, and 6 entirely in C2 using the classic granny.
- Option B (split-round squares): Work Rnd 1–2 in C1, Rnd 3–4 in C2 (and vice versa on alternate squares) for more interplay.
- Measure; adjust to ~4″. Make 12.
B. Layout & Join
- Crown (2×2): Arrange squares in checker order (C1/C2/C1/C2).
- Side Band (ring of 8): Keep the checker pattern continuous around. Pin first, then whip stitch for accuracy.
C. Brim (structured with crisp edge)
- Rnd 1: With C1, ch 1, sc around.
- Rnd 2: Switch to C2, hdc around, inc every 8th st.
- Rnd 3: C1, hdc around, inc every 10th st.
- Rnd 4: C2, hdc around no increases to stabilize.
- Rnd 5: C1, dc around, inc every 12th st for a modest flare.
- Edge: Work reverse sc in C2 for a sharp outline.
Variations & Finishing
- Add surface slip stitching along seam lines in a third accent color to “frame” each square.
- For extra structure, thread thin nylon craft cord through the final edge round and stitch ends together; cover with one more round of sc.
Universal Sizing & Fit Adjustments (Quick Reference)
- Head circumference: Measure around the widest part of the head.
- Square size target: ~4″ (10 cm) for most adult sizes with 12-square build.
- If hat is tight:
- Add a round to each square, or
- Add a single-crochet border to each square before joining, or
- Work an extra easing round (hdc with a few evenly spaced increases) after joining sides and before starting the brim.
- If hat is loose:
- Use a smaller hook for the brim,
- Work a decrease-free, no-increase round to snug the base before flaring the brim,
- Sew in a soft elastic band inside the side band.
Finishing & Care
- Weave ends as you go—especially at square corners—to reduce bulk.
- Block gently (steam or wet block) to square up motifs and set the brim.
- Care: Hand wash cool, lay flat. Cotton can be reshaped with steam; acrylic responds better to gentle steam without direct ironing.
Conclusion
You now have a complete toolkit to crochet seven distinct granny square bucket hats—from classic color-block to bold checkered, from boho sunburst to minimalist solid. Each pattern follows the same reliable structure (12 squares, clean joins, comfortable side band, and a brim tailored to your style), so you can mix and match techniques and details with confidence. Change colors, swap brim styles, test different joins, and fine-tune sizing with the quick reference. With a few evenings of stitching, you’ll have a handmade hat that’s as unique as your yarn basket—and the skills to make many more.


