
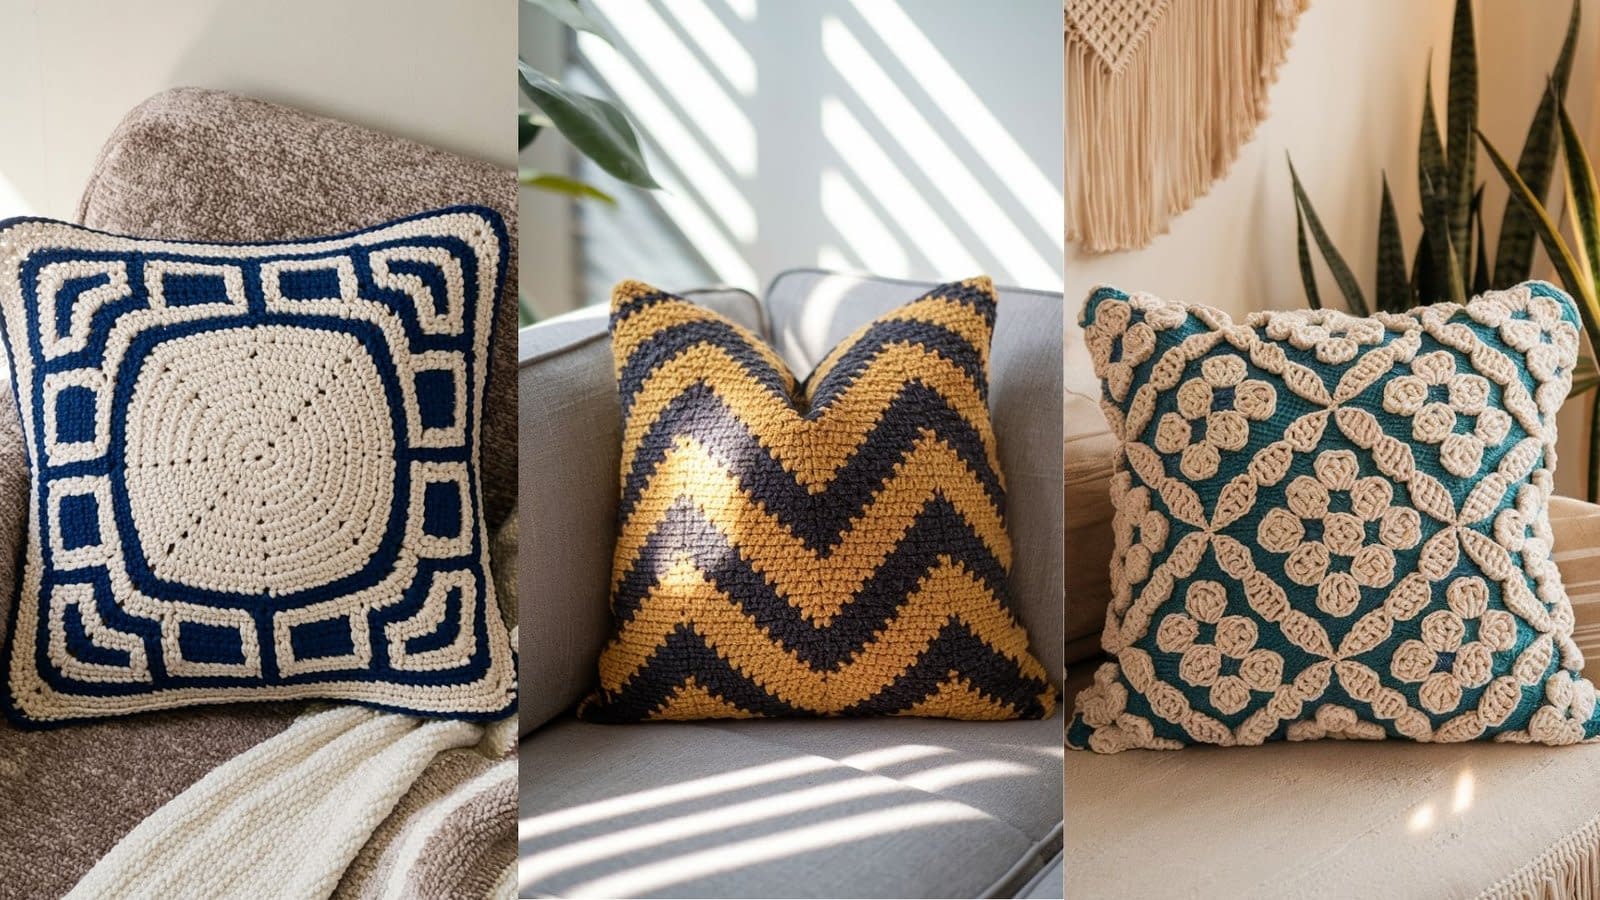
Mosaic crochet has become one of the most popular techniques for adding bold geometric designs and eye-catching textures to home décor projects. If you’ve been wanting to try it, mosaic crochet pillows are a perfect place to start. They’re small enough to complete in a manageable timeframe but still provide endless opportunities to play with patterns, shapes, and colors.
Read This First: Mosaic Crochet Basics (Applies to All 7 Patterns)
Technique: These patterns use overlay mosaic crochet worked flat in rows.
- Work two rows per color (Color A, then A; Color B, then B), turning at the end of each row.
- Unless noted, all stitches are sc in BLO (back loop only).
- An overlay dc (odc) is worked into the front loop of the stitch two rows below (on the right side), skipping the stitch directly behind it.
- Carry the inactive color up the same side (no cutting each row) for a neat edge.
- Gauge (reference only): Worsted (#4) + 5.0 mm (H) hook ≈ 14–16 sc × 16–18 rows = 4″ (10 cm). Adjust hook/yarn to fit your insert.
Abbreviations (US terms): ch = chain, sc = single crochet (BLO unless noted), odc = overlay double crochet (into front loop 2 rows below, skip the hidden st behind), sl st = slip stitch, RS = right side, WS = wrong side, rep = repeat, st(s) = stitch(es).
Sizing Formula (for square pillows):
- Choose a multiple given for the chart + edge stitches (usually +2 for clean edges).
- Foundation chain count = (multiple × repeats) + edge stitches.
- Work to slightly smaller than your insert (about 0.5″ / 1–1.5 cm smaller) for a snug finish.
Finishing Options (used throughout):
- Envelope back: Two simple panels overlapping.
- Zipper: Add a zipper along one side or across the back panels.
- Button tabs: Work buttonholes across the overlap.
1) Classic Greek Key Border Pillow (Square)
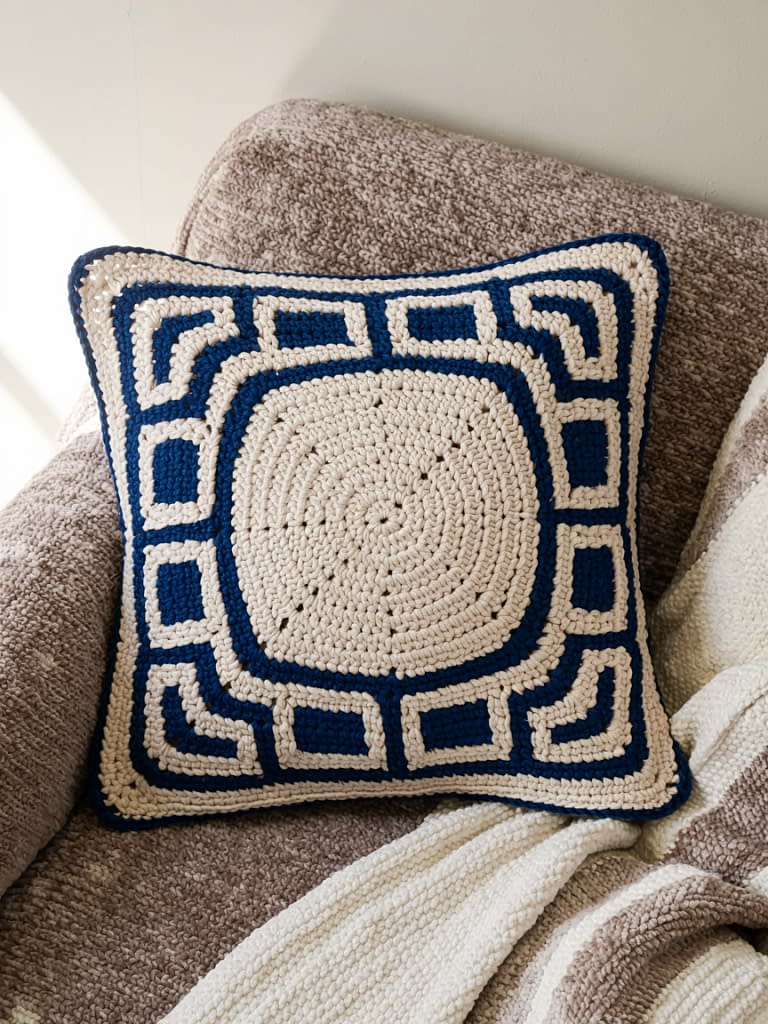
Skill level: Beginner–Intermediate (repetitive motif, great first mosaic)
Finished size: 16″ × 16″ cover (easily adjustable)
Materials
- Worsted weight (#4) yarn: Color A (light) 220–260 yd; Color B (dark) 220–260 yd
- 5.0 mm (H) hook
- 16″ (40 cm) pillow insert
- Yarn needle, scissors, optional zipper (14–16″)
Stitch Multiple & Foundation
- Multiple of 8 + 2 for neat edges.
- For 16″: Ch 66 (8×8 = 64 + 2 = 66).
Notes
- The Greek key repeats in tidy blocks of 8 stitches.
- Keep color contrast high for crisp lines.
Step-by-Step (Front Panel)
Row 1 (A, WS): Ch 1, sc (BLO) across, turn. (65 sc)
Row 2 (A, RS): Ch 1, sc across, turn.
Row 3 (B, WS): Ch 1, sc 6, odc in FL of st 2 rows below (Row 1), sc 1; rep across, end sc in last st, turn.
Row 4 (B, RS): Ch 1, sc across, turn.
Row 5 (A, WS): Ch 1, sc 2, odc, sc 5; rep across, turn.
Row 6 (A, RS): Ch 1, sc across, turn.
Row 7 (B, WS): Ch 1, odc, sc 7; rep across, turn.
Row 8 (B, RS): Ch 1, sc across, turn.
Pattern repeat (Rows 3–8) forms the Greek key.
Work Rows 3–8 until your fabric measures ~15.25″–15.5″. End after an even-numbered row for symmetry.
Back Panel (Envelope or Plain)
- Plain: Work Rows 1–2 in A, then alternate 2 rows A / 2 rows B (all sc BLO, no odc) to the same height.
- Envelope back: Make two rectangles the width of the front and ~11″ and ~8″ tall. Add 1 row of buttonholes (ch-1 spaces) along one short edge if using buttons.
Border & Assembly
- With A, sc evenly around the front panel: 1 sc per st across; 3 sc in each corner; along sides, place ~1 sc per row. Repeat for back pieces.
- Place RS together; sl st seam three sides. Insert pillow/zipper. Seam final edge or attach zipper as preferred.
Customization
- Add a slim 1-row crab stitch (reverse sc) border for structure.
- Use three colors: alternate B with a third accent every other repeat.
2) Bold Chevron Lumbar Pillow (Rectangle)
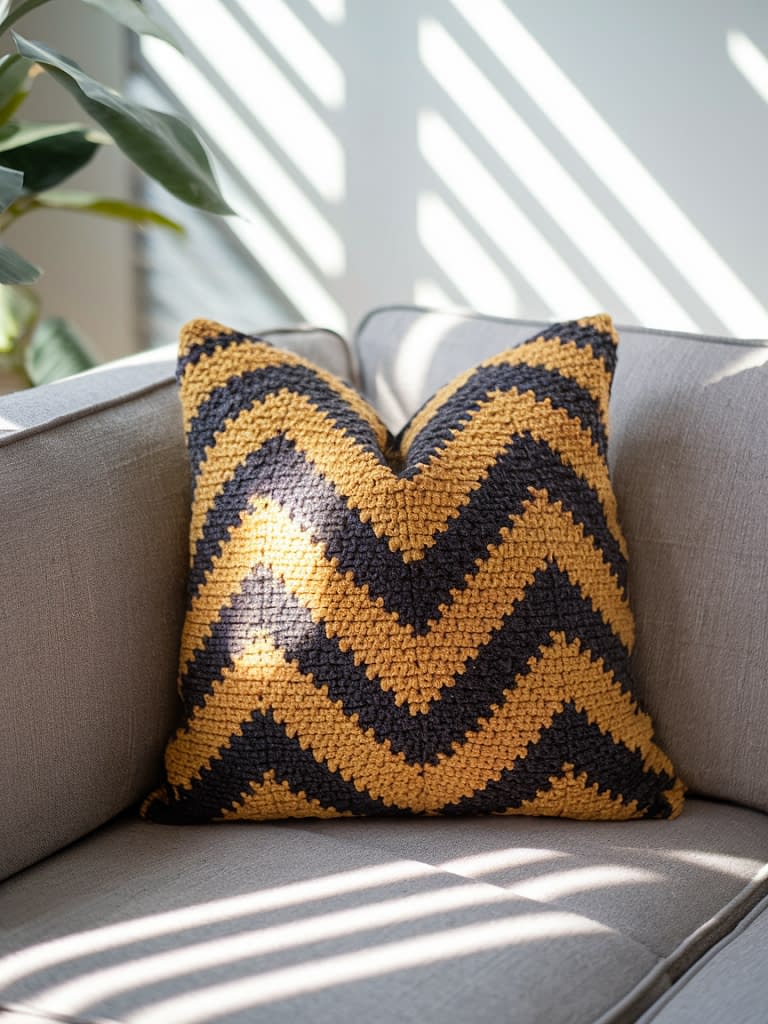
Skill level: Beginner–Intermediate
Finished size: 14″ × 20″ (lumbar)
Materials
- Worsted (#4): A (neutral) ~220 yd, B (bold) ~240 yd
- 5.0 mm (H) hook, 14″×20″ insert
Stitch Multiple & Foundation
- Multiple of 10 + 2.
- For 20″ width: Ch 82 (10×8 = 80 + 2 = 82).
Step-by-Step (Front Panel)
Rows 1–2 (A): As above (sc BLO across).
Row 3 (B): Ch 1, sc 4, odc, sc 4, odc; rep across, turn.
Row 4 (B): Sc across.
Row 5 (A): Ch 1, sc 3, odc, sc 2, odc, sc 3; rep, turn.
Row 6 (A): Sc across.
Row 7 (B): Ch 1, sc 2, odc, sc 4, odc, sc 2; rep, turn.
Row 8 (B): Sc across.
Continue shifting the odc positions inward then outward every 2 rows to build pronounced zigzags.
Work until height is ~13.5″–13.75″.
Back Panel
- Plain sc BLO stripes (2 rows per color) to match height and width.
Edge Treatment & Assembly
- Block lightly.
- Add I-cord or cording inside a final sc round for a tailored piping look.
- Seam as in Pattern 1 (or install zipper along a long side).
Tips
- Chevron looks best with high contrast or ombre (B in gradient skein).
3) Nordic Snowflake Pillow (Holiday Classic)
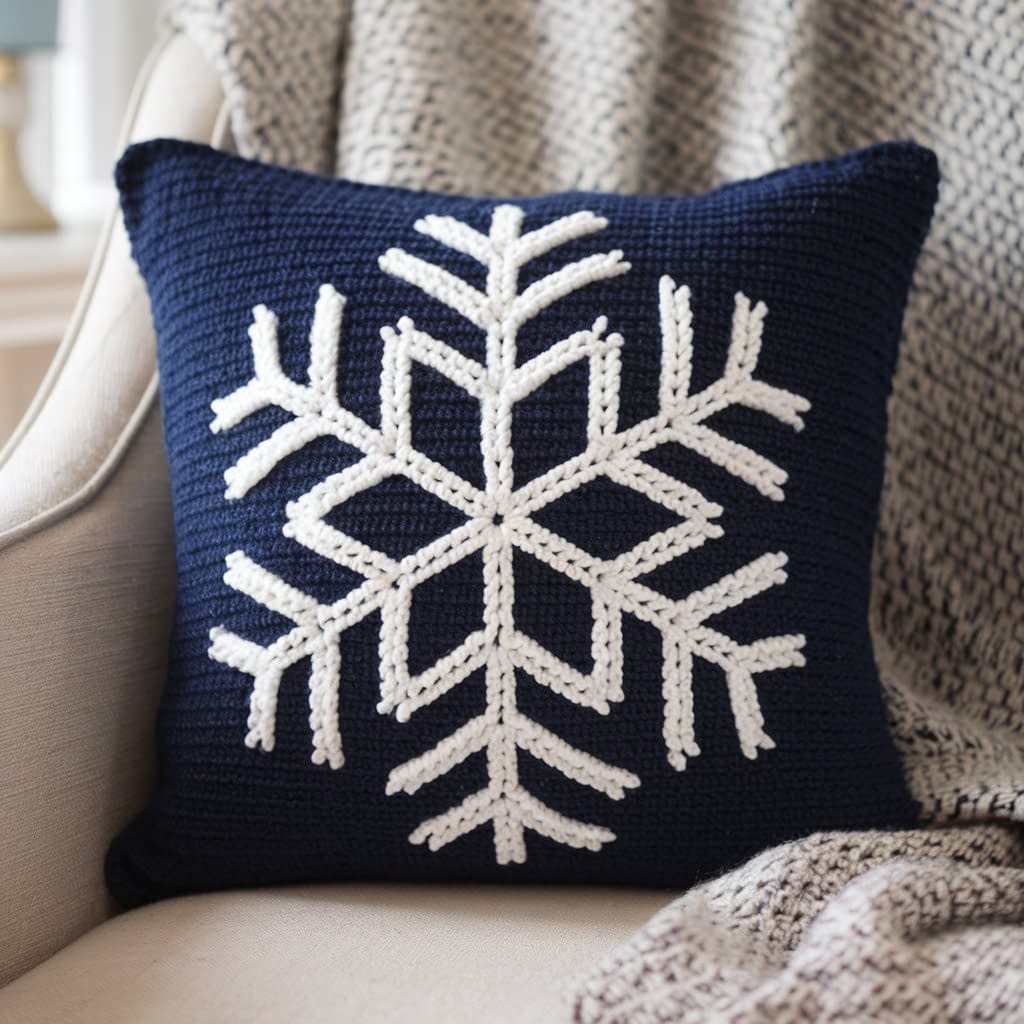
Skill level: Intermediate–Advanced (centered motif)
Finished size: 16″ × 16″
Materials
- Worsted (#4): A (navy) ~250 yd, B (white) ~250 yd
- 5.0 mm (H) hook, 16″ insert
Stitch Multiple & Foundation
- Multiple of 6 + 2.
- For 16″ wide: Ch 68 (6×11 = 66 + 2 = 68).
Notes
- Keep edges tidy—carry colors up the same side.
- Centering trick: Work total repeats so the snowflake is centered horizontally; your stitch multiple already does this.
Step-by-Step (Front Panel)
Rows 1–4 (A then A, B then B): Establish base (all sc BLO).
Row 5 (A): Ch 1, sc 2, odc, sc 3; rep.
Row 6 (A): Sc across.
Row 7 (B): Ch 1, sc 1, odc, sc 2, odc, sc 1; rep.
Row 8 (B): Sc across.
Row 9 (A): Ch 1, odc, sc 4, odc; rep.
Row 10 (A): Sc across.
Continue in this expanding/contracting odc layout to form the arms of a large snowflake.
Work until motif completes (about 24–28 rows after setup) and total height ≈ 15.25″–15.5″.
Back Panel & Closure
- Consider a zipper for seasonal swapping.
- Alternatively, envelope back from Pattern 1.
Finishing
- Steam-block (hover only; don’t mash the texture).
- Optional: add tiny duplicate-stitch dots in B between arms for “snow.”
4) Diamond Lattice Pillow (All-Season Modern)
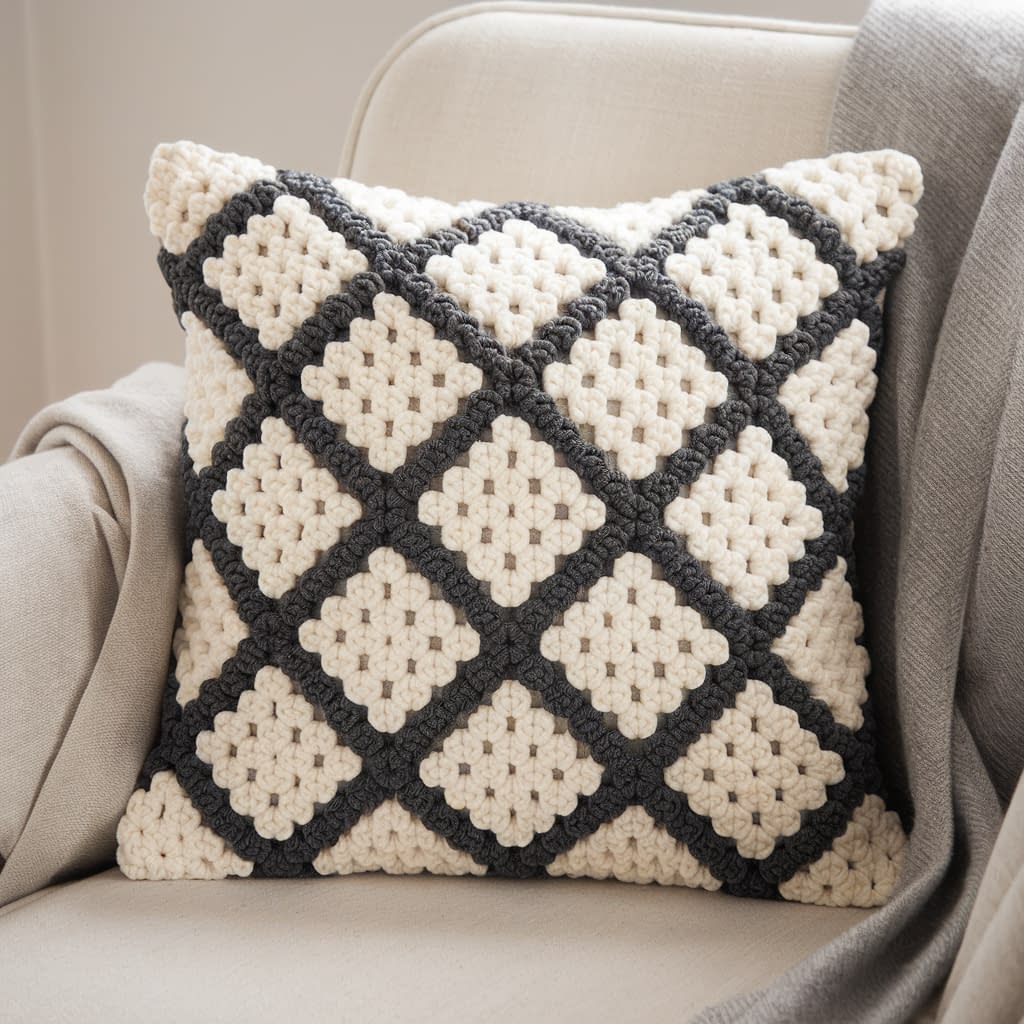
Skill level: Beginner–Intermediate
Finished size: 18″ × 18″
Materials
- Worsted (#4): A (cream) ~300 yd, B (charcoal) ~300 yd
- 5.0 mm (H) hook, 18″ insert
Stitch Multiple & Foundation
- Multiple of 4 + 2.
- For 18″: Ch 74 (4×18 = 72 + 2 = 74).
Step-by-Step (Front Panel)
Rows 1–2 (A): Base sc BLO.
Row 3 (B): Ch 1, sc 3, odc; rep; turn.
Row 4 (B): Sc across.
Row 5 (A): Ch 1, sc 1, odc, sc 2; rep.
Row 6 (A): Sc across.
Row 7 (B): Ch 1, odc, sc 3; rep.
Row 8 (B): Sc across.
Rows 3–8 create offset diamonds.
Repeat Rows 3–8 until ~17.25″ tall. End after Row 8 for complete diamonds.
Back Panel
- Plain sc BLO stripes or simple hdc rows (non-mosaic) in A for quicker work. Match size.
Border & Assembly
- Work 1 round sc around each panel with 3 sc corners.
- Join with mattress stitch for a near-invisible seam, or sl st through back loops only for a corded edge.
Variations
- Two-tone gradient: Hold two strands of lace mohair with A for soft halo.
5) Moroccan Tile (Trellis) Pillow
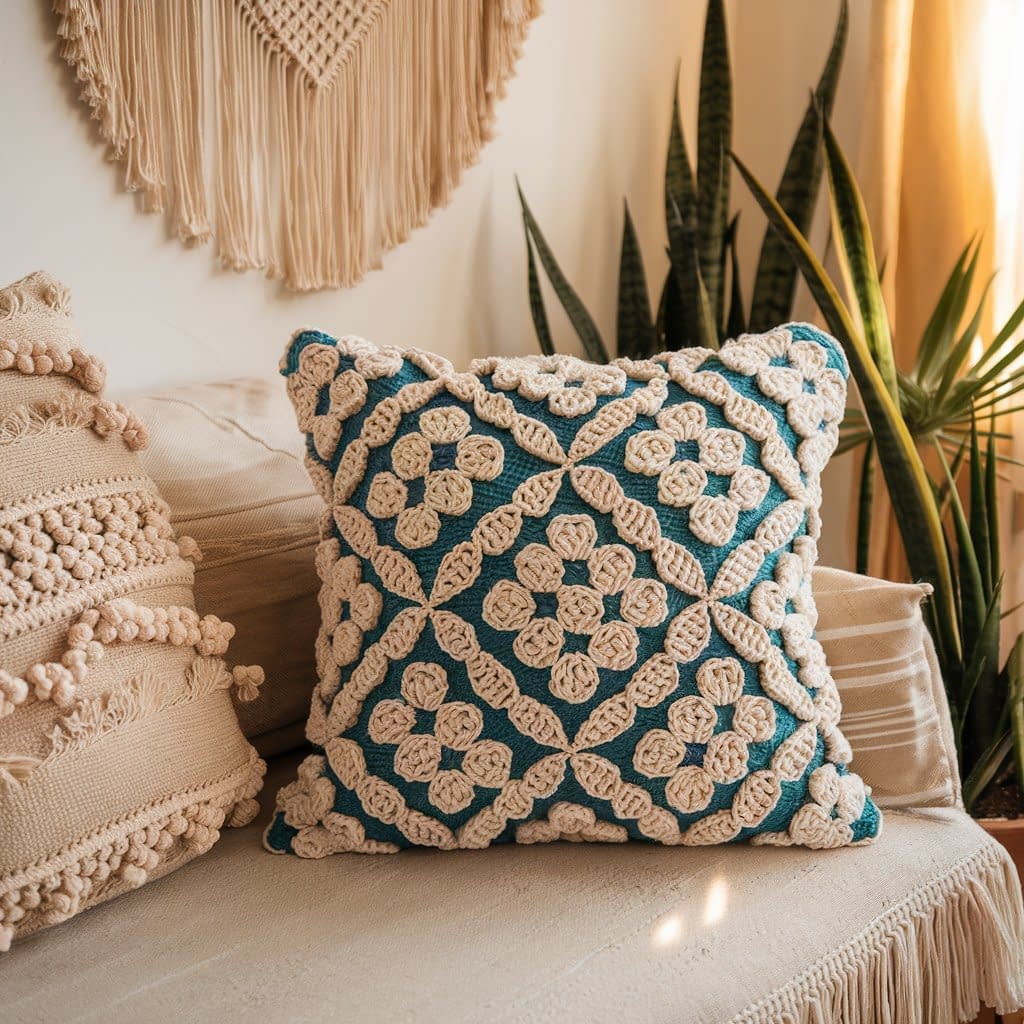
Skill level: Intermediate (denser odc usage)
Finished size: 16″ × 16″
Materials
- Worsted (#4): A (sand) ~230 yd, B (teal) ~260 yd
- 5.0 mm (H) hook, 16″ insert
Stitch Multiple & Foundation
- Multiple of 8 + 2.
- For 16″: Ch 66.
Step-by-Step (Front Panel)
Rows 1–2 (A): Base sc BLO.
Row 3 (B): Ch 1, sc 2, odc, sc 2, odc, sc 2; rep; turn.
Row 4 (B): Sc across.
Row 5 (A): Ch 1, odc, sc 6, odc; rep; turn.
Row 6 (A): Sc across.
Row 7 (B): Ch 1, sc 1, odc, sc 4, odc, sc 1; rep; turn.
Row 8 (B): Sc across.
Repeat Rows 3–8 to build interlocking trellis shapes.
Work to ~15.25″–15.5″ tall.
Back Panel & Closure
- Make two overlap panels in A only for an elegant back; add buttonholes (ch-1 spaces) every 1.5″ along one overlap edge.
Finishing Touch
- Add a final reverse sc edging around the finished cover after assembly for a boutique look.
Troubleshooting
- Diagonal lean? Count odc placements at ends—missing the skip behind an odc causes drift.
- Wavy edges? Tighten tension on odc; block lightly.
6) Checkerboard Pop Pillow (Beginner-Friendly)
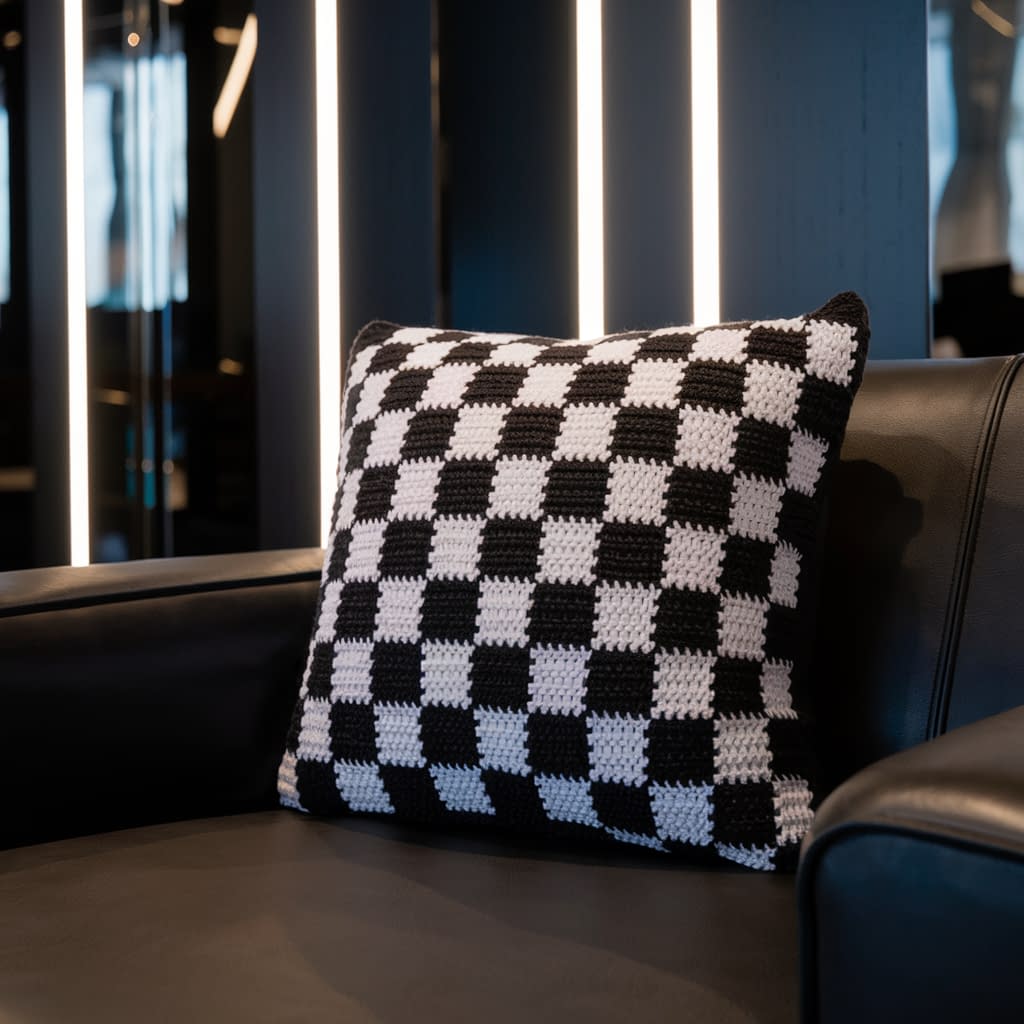
Skill level: Beginner
Finished size: 16″ × 16″
Materials
- Worsted (#4): A (white) ~220 yd, B (black) ~220 yd
- 5.0 mm (H) hook, 16″ insert
Stitch Multiple & Foundation
- Multiple of 4 + 2.
- Ch 66 for 16″.
Step-by-Step (Front Panel)
Rows 1–2 (A): Base sc BLO.
Row 3 (B): Ch 1, (sc 3, odc); rep; turn.
Row 4 (B): Sc across.
Row 5 (A): Ch 1, (odc, sc 3); rep; turn.
Row 6 (A): Sc across.
Rows 3–6 = 1 full checker repeat (4 rows).
Repeat until square (~15.5″ tall). End after Row 6.
Back Panel
- Entirely A or B for a reversible contrast.
- Work plain sc BLO to match size.
Border & Assembly
- Work 1 round sc; seam as preferred.
- Great candidate for a zipper along one side (hidden in black).
Color Ideas
- Pastel A with charcoal B for softer contrast.
- Use variegated B to create a “pixel pop” effect without extra work.
7) Sunrise Arches (Wave) Pillow
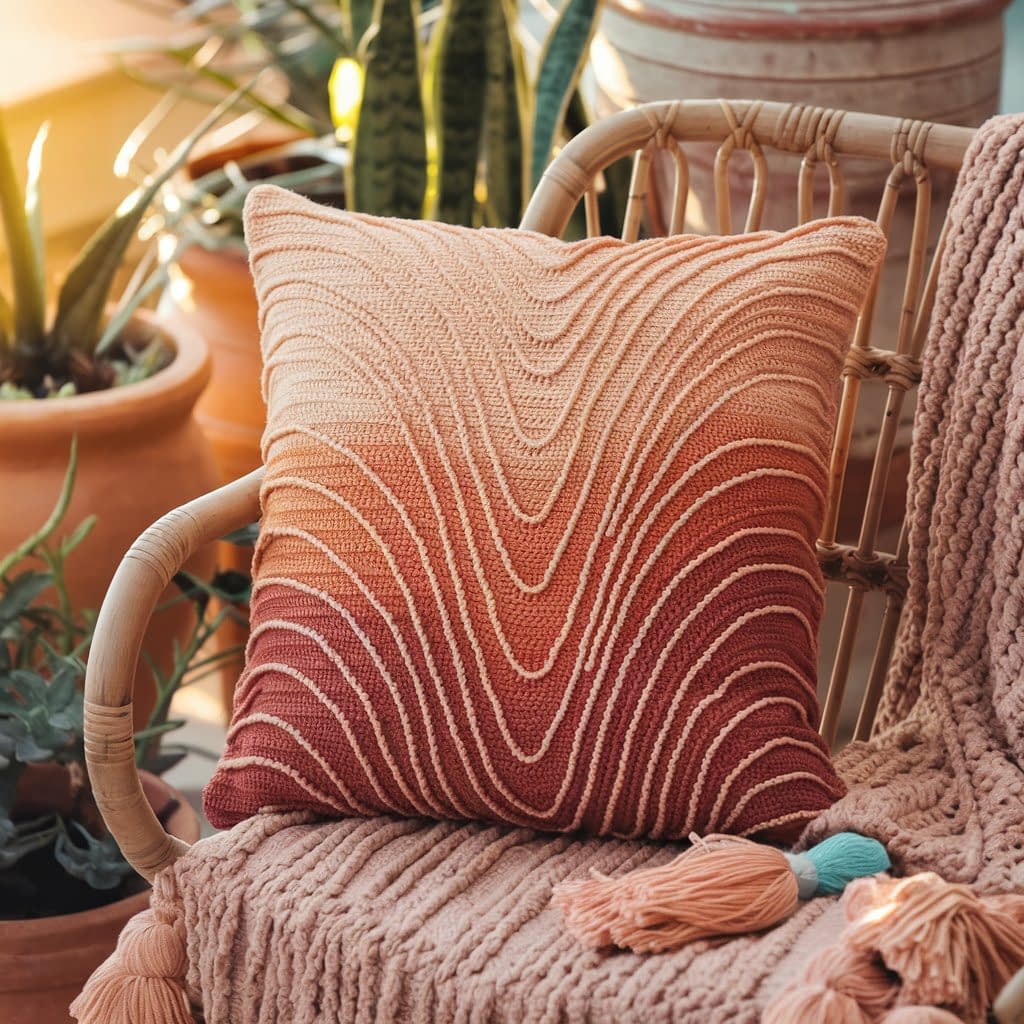
Skill level: Intermediate (curves formed by odc staggering)
Finished size: 12″ × 18″ (rectangular)
Materials
- Worsted (#4): A (dawn peach) ~180 yd, B (rust/copper) ~200 yd
- 5.0 mm (H) hook, 12″ × 18″ insert
Stitch Multiple & Foundation
- Multiple of 6 + 2.
- For 18″ width: Ch 74 (6×12 = 72 + 2 = 74).
Step-by-Step (Front Panel)
Rows 1–2 (A): Base sc BLO.
Row 3 (B): Ch 1, sc 4, odc, sc 1; rep, turn.
Row 4 (B): Sc across.
Row 5 (A): Ch 1, sc 3, odc, sc 2; rep, turn.
Row 6 (A): Sc across.
Row 7 (B): Ch 1, sc 2, odc, sc 3; rep, turn.
Row 8 (B): Sc across.
Row 9 (A): Ch 1, sc 1, odc, sc 4; rep, turn.
Row 10 (A): Sc across.
Rows 3–10 create smooth arches that “travel” across the fabric.
Repeat until height is ~11.5″–11.75″ (snug for a 12″ height).
Back Panel
- Plain sc BLO stripes (2 rows per color) or entirely A. Match dimensions.
Finishing
- Block to rectangle.
- Consider tassels on the short sides for a modern boho accent.
Professional Finishing Guide (For All Patterns)
Blocking
- Pin to 0.5″ smaller than the insert in both directions for a fitted look.
- Steam-hover or wet-block (check fiber content). Don’t crush the mosaic texture.
Clean Edges
- Always work a setup round of sc around each panel with 3 sc in corners.
- If edges ripple, redo the round with fewer side stitches (e.g., 3 sc for every 4 rows).
Closures
Envelope Back (no hardware):
- Back Piece A: same width as front, ~60–70% of height.
- Back Piece B: same width, ~45–55% of height.
- Overlap pieces by 2–3″; seam all four edges with front facing inward; turn RS out.
Zipper:
- Pin zipper face down to RS of front edge; stitch with a zipper foot; attach back panel to opposite zipper tape; then seam remaining sides.
Buttons:
- On one overlap, work a row: (sc 3, ch 1, skip 1) repeat—fits ~1.25–1.5″ buttons.
Borders & Extras
- Crab stitch (reverse sc) round adds structure.
- Rope piping: hold cotton cord along edges and sc over it for a tailored finish.
- Tags: sew a small leather/faux-leather tag for a professional touch.
Troubleshooting (Quick Fixes)
- Holes behind odc: Remember to skip the stitch behind every odc.
- Leaning motif: Count end repeats; place odc exactly in the FL of the st two rows below.
- Wavy sides: Slightly smaller hook for the setup/border rounds or reduce side-edge stitch frequency.
- Too big/small: Mosaic fabric can grow. Block first; if still off, remove/ add one repeat of the multiple.
How to Resize Any Pattern Here
- Measure your insert: Width × height.
- Swatch 16–20 rows in mosaic (2 colors, 2 rows/color). Measure stitches per 4″.
- Choose a multiple from the pattern; calculate repeats:
- Repeats = floor((desired width × sts per inch) / multiple).
- Foundation chain = repeats × multiple + edge stitches (usually +2).
- Work pattern to desired height; block to a snug fit.
Conclusion
Mosaic crochet looks intricate, but with the overlay method (sc BLO + odc two rows below) and two rows per color, it’s predictable, rhythmic, and incredibly versatile. With these 7 complete pillow patterns, you have exact stitch multiples, repeat logic, row setups, finishing options, and pro tips to get shop-quality results—whether you prefer graphic checkerboards, elegant Greek keys, modern diamonds, or flowing arches. Pick your color story, swatch once for sizing, and you’ll have custom pillows that elevate any room.


