
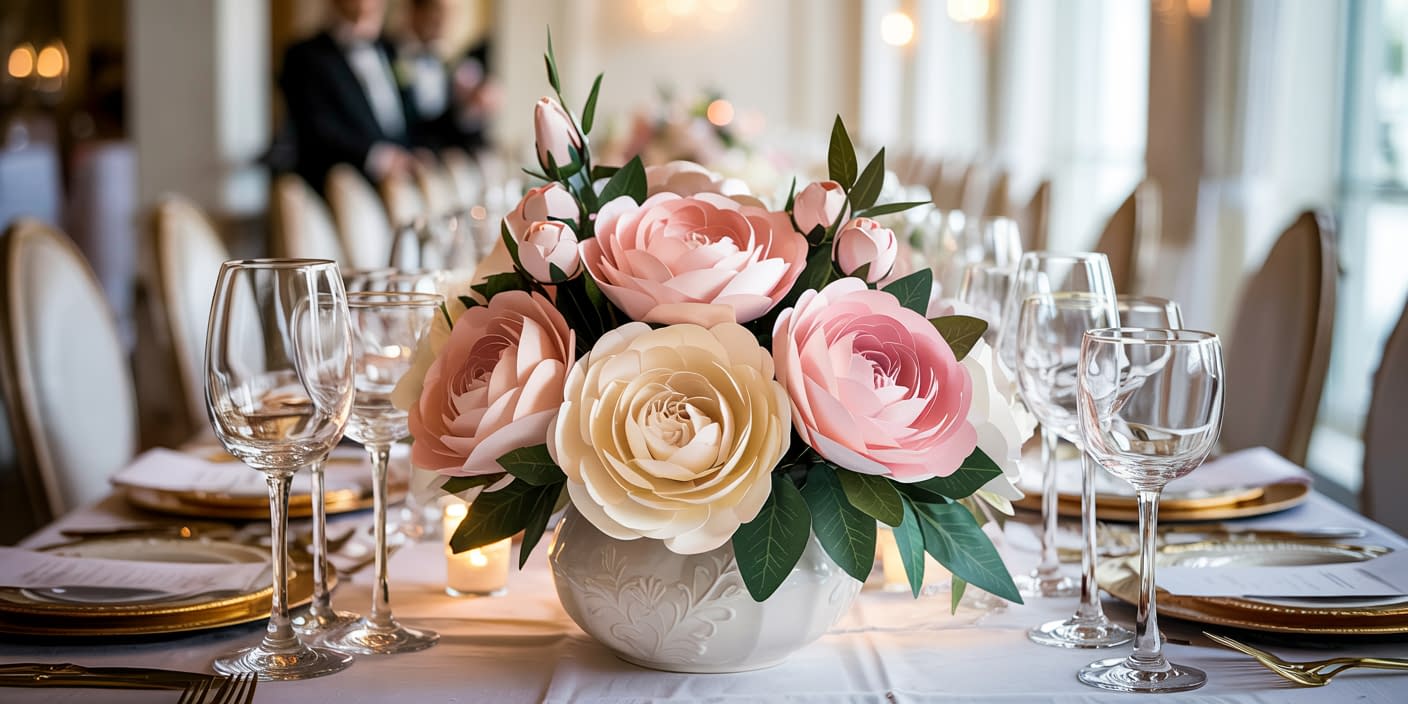
A Cricut Paper Flower Centerpiece is more than just a craft project—it’s a statement piece that can transform any gathering into something truly special. Whether you’re planning a wedding, a birthday celebration, a bridal shower, or simply want to add a touch of handmade beauty to your home, paper flowers created with a Cricut machine can bring your vision to life.
Unlike real flowers that wilt after a few days, paper flowers are timeless. With the help of Cricut’s precise cutting technology, you can design intricate petals, experiment with endless colors, and craft arrangements that suit any style—whether modern, rustic, or whimsical. This guide will walk you through everything you need to know, from choosing your materials to arranging your final centerpiece, while also offering tips, variations, and creative ideas to inspire your own unique project.
Why Choose a Cricut Paper Flower Centerpiece?
Before diving into the crafting process, let’s explore why this project stands out as both a practical and creative choice.
1. Long-Lasting Beauty
Fresh flowers are gorgeous but short-lived. A Cricut Paper Flower Centerpiece provides the same visual impact but will last for months or even years with proper care.
2. Endless Customization
From pastel roses to bold peonies, your flowers can be customized to match the exact color scheme of your event. Cricut’s design flexibility means you can resize petals, layer different textures, or even mix paper flowers with greenery and other elements.
3. Cost-Effective Alternative
A large floral arrangement can be costly, especially for weddings or large events. By making your own centerpiece with cardstock, crepe paper, or specialty papers, you save money without sacrificing beauty.
4. Handmade Sentiment
There’s something incredibly meaningful about décor you’ve made yourself. Guests will admire the artistry, and you’ll feel proud knowing you created something special with your own hands.
Materials You’ll Need
To create a Cricut Paper Flower Centerpiece, gather the following supplies. The exact materials can vary depending on your preferred flower style, but here are the essentials:
- Cricut Machine (Cricut Maker, Cricut Explore, or Cricut Joy)
- Cricut Design Space Software (to choose or upload flower templates)
- Cardstock or Crepe Paper (65–80 lb. cardstock works best for sturdy flowers)
- Green Cardstock (for leaves and stems)
- Hot Glue Gun & Glue Sticks
- Floral Wire & Floral Tape (for stems)
- Foam Block or Floral Foam (to hold the arrangement)
- Decorative Container or Vase (to display your centerpiece)
- Optional: Paint, glitter, or ink pads for shading petals
Step-by-Step Guide to Making Cricut Paper Flowers
Step 1: Choose Your Flower Template
Cricut Design Space offers a wide selection of ready-to-use flower templates, from roses and peonies to sunflowers and daisies. You can also find downloadable SVG files from craft designers online.
- Tip: Start with a simple rose or daisy template if you’re new to paper flower crafting. As you gain confidence, experiment with more complex designs like ranunculus or dahlias.
Step 2: Cut the Petals and Leaves
Load your chosen paper into the Cricut machine and let it cut the flower pieces with precision. Depending on the size of your centerpiece, you’ll likely need multiple flowers, so plan accordingly.
- Pro Tip: Use a scoring tool or Cricut’s scoring stylus for realistic petal folds.
Step 3: Shape the Petals
Once cut, gently curl the edges of each petal using a bone folder, pencil, or even the edge of scissors. This step adds dimension and realism to your paper flowers.
- For roses, curl the petals inward for a tight bloom.
- For daisies or peonies, curl outward for a fuller look.
Step 4: Assemble the Flowers
Using a hot glue gun, begin layering petals around a rolled paper or floral wire center. Work in small sections, gluing petals one by one until the flower takes shape.
- Layering Tip: Alternate petal sizes, starting with smaller petals in the center and gradually moving to larger petals on the outside.
Step 5: Add Stems and Leaves
Wrap floral wire with green floral tape to form stems. Attach your completed flowers and glue on leaves cut from green cardstock.
Step 6: Arrange the Centerpiece
Insert your finished flowers into a foam block or floral foam placed inside a decorative vase, basket, or wooden box. Arrange them in varying heights and angles for a natural look.
Creative Ideas for Cricut Paper Flower Centerpieces
1. Wedding Reception Tables

Craft white and blush roses for elegant wedding centerpieces. Mix in gold-dipped leaves or pearl accents for a romantic touch.
2. Seasonal Décor
- Spring: Bright tulips, daffodils, and pastel peonies.
- Summer: Bold sunflowers, zinnias, and hibiscus.
- Fall: Warm-toned dahlias, orange roses, and maple leaves.
- Winter: White poinsettias, evergreen sprigs, and icy blue paper roses.
3. Holiday Celebrations
- Thanksgiving: Combine paper flowers with faux pumpkins or acorns.
- Christmas: Create red poinsettias with glitter-tipped petals for festive flair.
- Valentine’s Day: Design heart-shaped petals and display them in a glass vase.
4. Everyday Home Décor

Add a pop of color to your dining table or coffee table with a vase of paper flowers that never fade. Match the palette to your room’s interior for year-round charm.
5. Party & Event Styling
For birthdays, baby showers, or bridal showers, tailor your flowers to the event theme. For example, pastel flowers with gold accents are perfect for a chic baby shower centerpiece.
Tips for Making Your Cricut Paper Flower Centerpiece Stand Out

- Mix Paper Types: Combine cardstock with crepe paper for texture. Crepe paper adds a soft, realistic petal effect.
- Add Dimension with Ink: Use ink pads or soft pastels to shade petal edges for a lifelike appearance.
- Experiment with Sizes: Make oversized flowers for a dramatic centerpiece or smaller blooms for a delicate arrangement.
- Layer with Greenery: Include ferns, vines, or eucalyptus cutouts to balance your arrangement.
- Play with Containers: A rustic wooden box gives a farmhouse vibe, while a glass vase feels modern and chic.
Common Mistakes to Avoid
- Using the Wrong Paper Weight: Too thin, and your flowers won’t hold shape. Too thick, and they’ll be hard to curl. Stick to medium-weight cardstock or crepe paper.
- Overusing Glue: Too much hot glue can make petals clump or leave visible marks. Apply sparingly.
- Skipping Petal Shaping: Flat petals look unrealistic. Always take time to curl and shape them.
- Forgetting Balance in Arrangement: Don’t overcrowd one side of the centerpiece. Spread flowers evenly for a natural look.
Variations of Cricut Paper Flower Centerpieces

1. Minimalist Style
Use a few large blooms with greenery in a sleek vase for a clean, modern aesthetic.
2. Rustic Farmhouse Look
Combine kraft paper flowers with burlap ribbon and display them in a wooden crate.
3. Glamorous Touch
Add metallic cardstock flowers (gold, silver, or rose gold) for an eye-catching luxury centerpiece.
4. Bohemian Arrangement
Mix different flower types in earthy tones, paired with feathers or macramé accents.
How to Care for Your Cricut Paper Flower Centerpiece
Though paper flowers last much longer than real ones, a little care helps preserve their beauty:
- Keep Away from Direct Sunlight: Prolonged exposure can cause fading.
- Avoid Humidity: Paper can warp in damp environments. Display them indoors in a dry area.
- Dust Regularly: Use a soft brush or compressed air to gently remove dust.
- Store Carefully: If not in use, place flowers in a box lined with tissue paper to prevent crushing.
Final Thoughts
A Cricut Paper Flower Centerpiece is the perfect blend of creativity, practicality, and beauty. Not only does it save money compared to fresh flowers, but it also allows you to create something completely unique for your home or event. From weddings and parties to seasonal décor and everyday displays, these handmade arrangements elevate any space with charm and elegance.


