
If you love crafting, chances are you’ve got a stash of leftover fabric scraps waiting to be used. While they may be too small for larger sewing projects, these bits of fabric are perfect for creating something practical, beautiful, and personal. One such project is making bookmarks. In this blog post, we’ll walk through 3 Fabric Scrap Bookmark DIY tutorials, each with its own unique style and technique.
These bookmarks are not only functional but also an excellent way to upcycle and reduce waste. They make charming gifts for friends, thoughtful additions to handmade journals, or even personalized keepsakes for your own reading collection. Whether you’re a beginner or an experienced crafter, these step-by-step tutorials will guide you through the process in detail.
By the end of this post, you’ll have three different bookmark designs to try, along with ideas for customization, styling tips, and inspiration for making them your own.
Why Make Fabric Scrap Bookmarks?
Before diving into the tutorials, let’s look at why fabric scrap bookmarks are such a rewarding DIY project:
- Eco-friendly crafting: Instead of discarding fabric scraps, you give them a second life.
- Budget-friendly: No need for expensive materials—everything can come from what you already have.
- Customizable: You can choose fabrics, trims, and embellishments that reflect your personality.
- Gift-worthy: Handmade bookmarks are thoughtful presents, especially when paired with a good book.
- Beginner-friendly: These projects require only basic sewing or crafting skills.
Materials You’ll Need
Here’s a general list of supplies for all three tutorials. Each tutorial will also include its specific materials:
- Fabric scraps (cotton, linen, denim, or any non-stretch fabric works best)
- Fusible interfacing or felt (for stability)
- Sewing machine or needle and thread (hand sewing works too)
- Fabric scissors or rotary cutter
- Ruler or measuring tape
- Iron and ironing board
- Pins or fabric clips
- Optional embellishments: lace, ribbon, beads, embroidery thread, buttons, or tassels
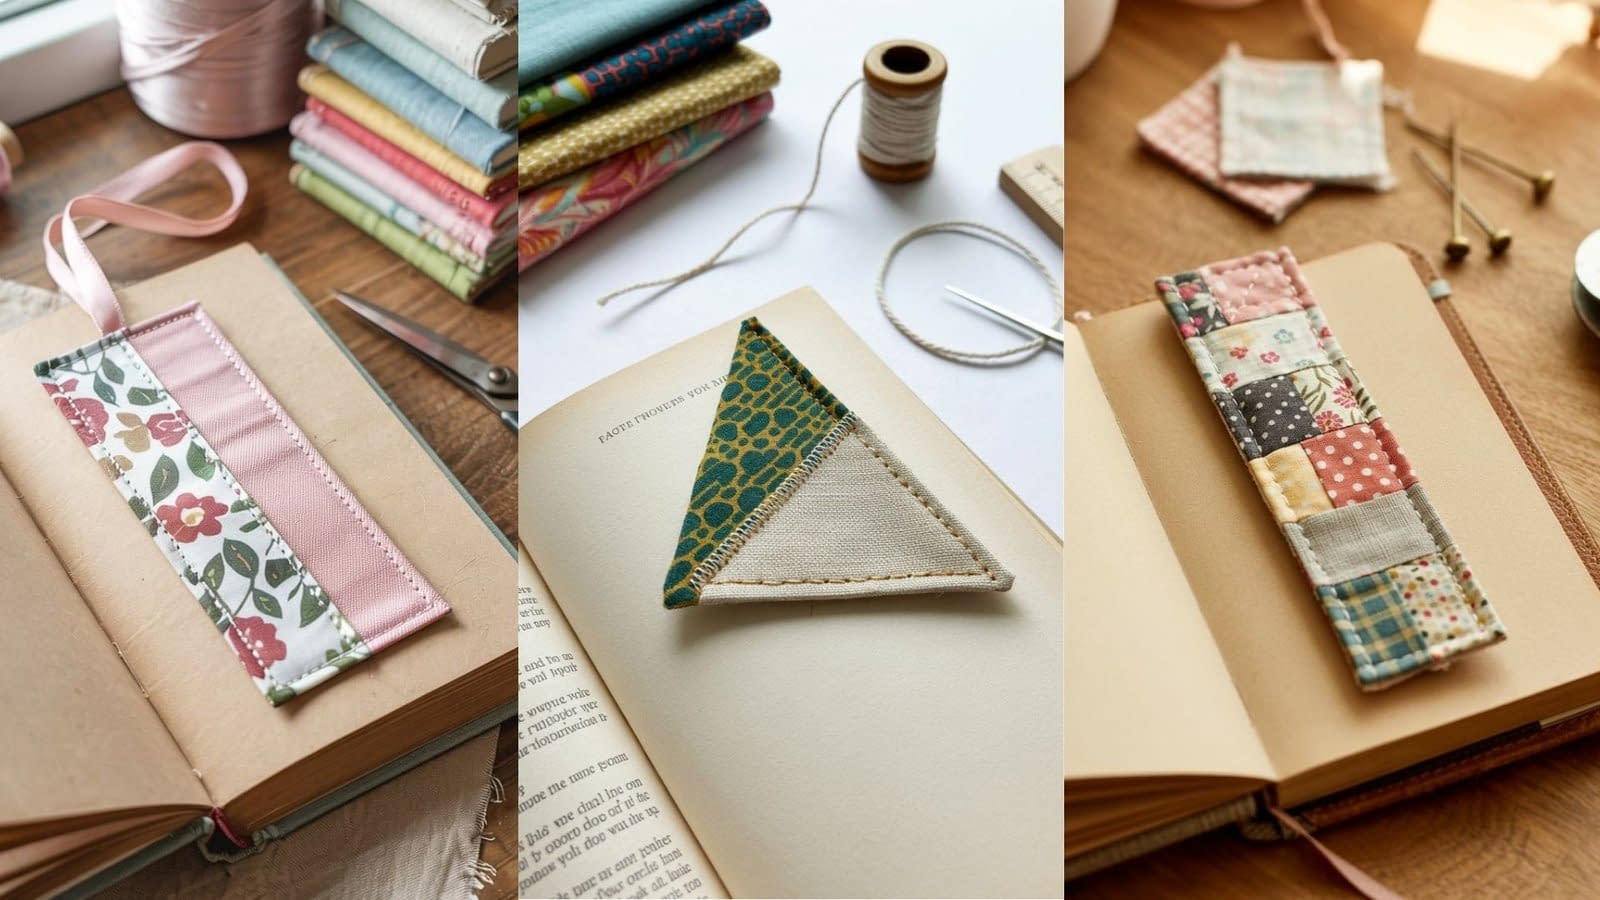
Tutorial 1: Classic Rectangular Fabric Scrap Bookmark
This design is clean, simple, and timeless—perfect for everyday use.
Materials Needed
- 2 fabric scraps (each 2.5 x 7 inches)
- Fusible interfacing (same size as fabric)
- Sewing machine or needle and thread
- Iron
- Scissors
Step-by-Step Instructions
- Cut the Fabric
Cut two rectangles of equal size (2.5 x 7 inches is a good standard size). Cut one piece of interfacing the same size. - Fuse the Interfacing
Place the interfacing on the wrong side of one fabric piece and fuse it with an iron. This will make the bookmark sturdy. - Assemble the Layers
Place the two fabric pieces right sides together. Pin around the edges. - Sew Around the Bookmark
Sew with a ¼-inch seam allowance, leaving a small gap (about 1 inch) for turning. - Turn and Press
Trim the corners, turn the bookmark right side out, and press with an iron. - Topstitch for a Clean Finish
Topstitch around the entire bookmark. This not only closes the gap but also gives a polished look.
Optional Variations
- Add a small fabric tab at the top with a tassel or ribbon.
- Use contrasting fabrics on each side for a reversible look.
- Add embroidery details or decorative stitching along the edges.
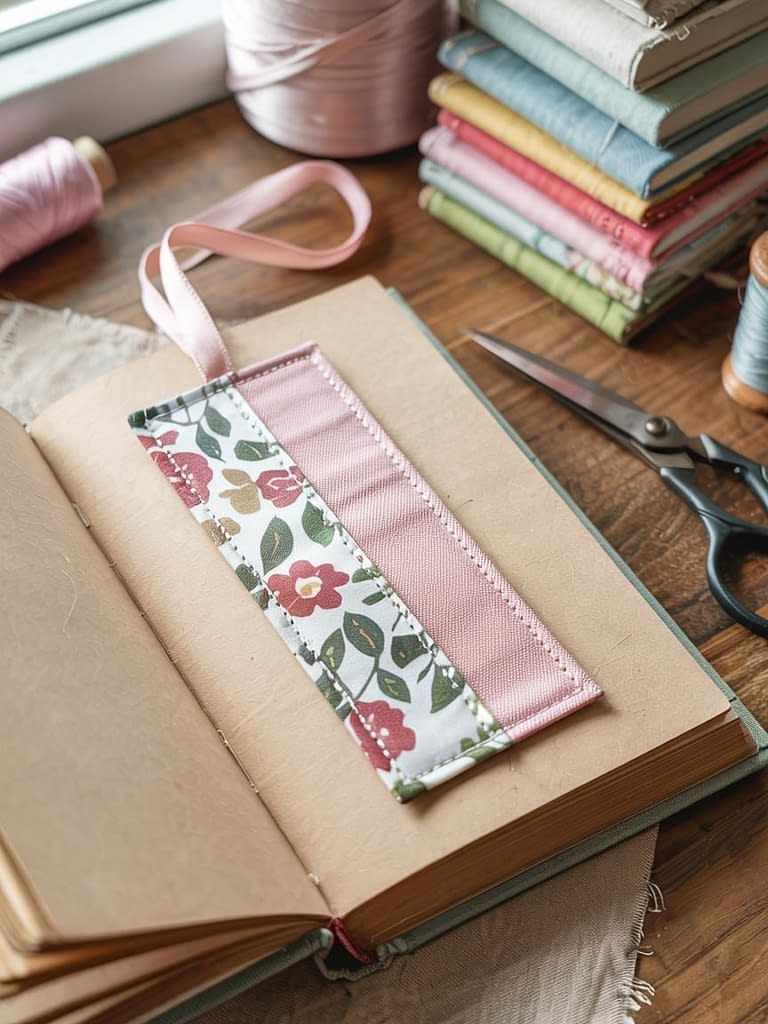
Tutorial 2: Corner Fabric Scrap Bookmark
This triangular design slips onto the corner of a book page, keeping your place securely.
Materials Needed
- 2 fabric scraps (4 x 4 inches each)
- 1 fabric scrap (4 x 4 inches) of felt or interfacing
- Scissors
- Sewing machine or needle and thread
Step-by-Step Instructions
- Cut the Fabric into Triangles
Cut all three fabric squares into right-angled triangles by cutting diagonally across. - Layer the Pieces
Place one fabric triangle right side up. Lay the felt/interfacing triangle on top. Place the second fabric triangle right side down on top of that, aligning all edges. - Pin and Sew
Pin around the two shorter sides of the triangle. Sew along these edges with a ¼-inch seam allowance, leaving the longest side open. - Turn and Press
Turn the bookmark right side out, push out the corners, and press flat with an iron. - Finish the Edges
Topstitch along the sewn edges for durability and neatness.
Optional Variations
- Use two contrasting fabrics so both sides are interesting.
- Add decorative stitching across the diagonal edge.
- Attach a button or small charm for an extra touch.
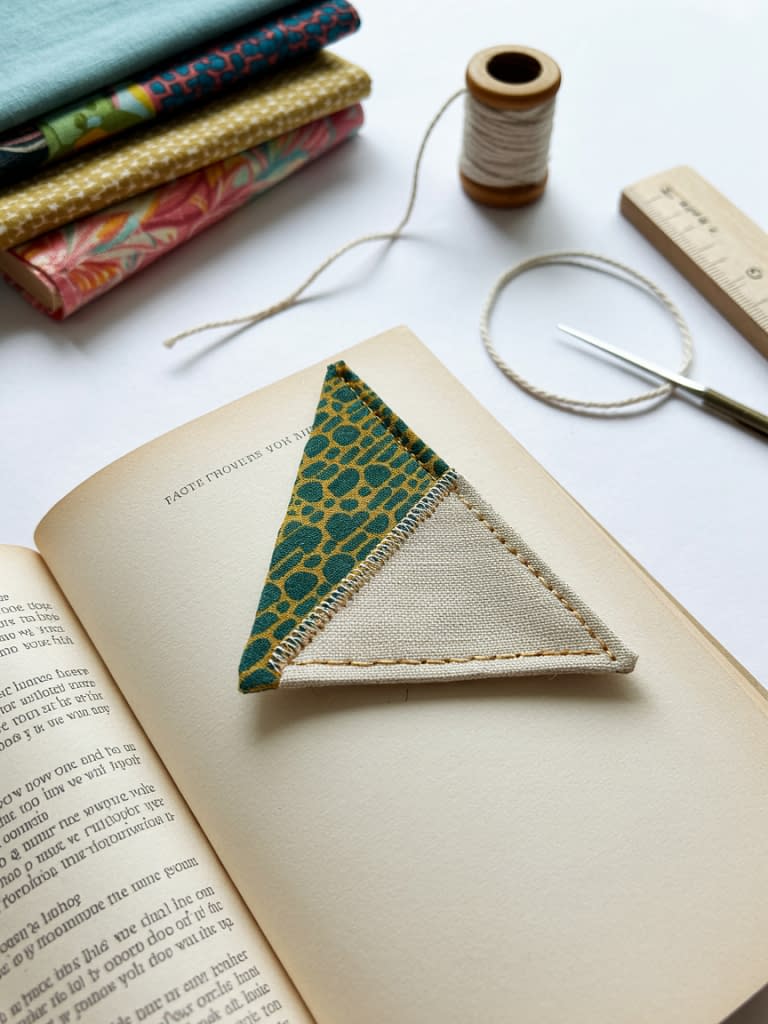
Tutorial 3: Quilted Patchwork Fabric Scrap Bookmark
Perfect for using up even the smallest pieces of fabric, this design gives your bookmark a unique, quilt-like look.
Materials Needed
- Multiple small fabric scraps (various shapes and sizes)
- Backing fabric (about 2.5 x 7 inches)
- Fusible interfacing or thin batting
- Sewing machine and thread
Step-by-Step Instructions
- Prepare the Scraps
Gather small fabric scraps and cut them into squares or rectangles. Aim for uniform shapes for easier assembly. - Arrange the Pieces
Lay the pieces out in a patchwork style until you’re happy with the design. - Sew the Patchwork
Sew the pieces together using a ¼-inch seam allowance. Press the seams flat as you go. Continue until you have a piece slightly larger than 2.5 x 7 inches. - Trim to Size
Once the patchwork is complete, trim it down to 2.5 x 7 inches. - Add Interfacing and Backing
Fuse interfacing to the back of the patchwork. Place the patchwork piece and backing fabric right sides together. - Sew and Finish
Sew around the edges, leaving a gap for turning. Turn right side out, press, and topstitch all around.
Optional Variations
- Use decorative quilting stitches to add texture.
- Add a ribbon loop at the top.
- Use denim scraps for a sturdier, rustic bookmark.
Extra Tips for Success
- Fabric Choice: Stick to non-stretch fabrics (like cotton or linen) for neat results. Stretch fabrics can warp the bookmark shape.
- Finishing Touches: Pressing is essential—always press seams and final bookmarks for a crisp look.
- Personalization: Embroidery, fabric paint, appliqué, or even stamping can make your bookmarks one of a kind.
- Durability: If the bookmark will be heavily used, consider adding interfacing or double stitching for reinforcement.
Creative Variations Beyond the Tutorials
If you’re inspired to go beyond the three main designs, here are a few more ideas:
- Fabric + Felt Combo: Use felt as the backing for a soft yet sturdy bookmark.
- Appliqué Shapes: Cut small shapes (like hearts, stars, or initials) and stitch them onto your bookmark.
- Beaded Edges: Sew beads or sequins along one edge for a glamorous look.
- Theme-Based Designs: Use fabric that matches book genres (e.g., floral fabric for romance, darker tones for mystery).
How to Gift Fabric Scrap Bookmarks
Fabric bookmarks make wonderful handmade gifts. Here are a few creative presentation ideas:
- Pair with a book or journal for a thoughtful reading gift.
- Wrap a set of bookmarks in brown kraft paper with twine.
- Slip one inside a greeting card for a personalized surprise.
- Create themed sets (e.g., floral prints, geometric designs, or holiday fabrics).
Conclusion
With these 3 Fabric Scrap Bookmark DIY tutorials, you now have three unique ways to transform leftover fabric into something practical and beautiful. From the simple rectangular bookmark to the playful corner design and the intricate quilted version, each project allows for endless customization.
Not only do these bookmarks help reduce waste, but they also showcase your creativity and attention to detail. Whether you’re keeping them for yourself or gifting them to loved ones, these handmade treasures will make every reading experience a little more special.


