
Welcome to this comprehensive and highly detailed guide on creating stunning botanical bookmarks. Whether you are an avid reader looking to add a touch of handmade charm to your favorite novels, or a passionate crafter searching for the perfect quick project, these floral bookmark patterns are exactly what you need. Combining the love for literature with the art of crochet results in delicate, practical, and incredibly beautiful creations that will ensure you never lose your page again.
In this extensive tutorial, we will explore a variety of floral designs inspired by the beauty of nature. From delicate spring blossoms to vibrant tropical blooms, each pattern has been carefully designed to lie flat between the pages of your books without causing damage to the spine or the paper. Handcrafted bookmarks also make exceptional, thoughtful gifts for teachers, librarians, friends, and family members. A handmade gift carries a special warmth, and a beautifully crocheted flower is a lasting token of affection that will not wilt or fade.
To ensure these tutorials are accessible to everyone, including complete beginners, we have removed all confusing crochet shorthand. You will not find any confusing abbreviations here. Every single stitch, technique, and step is spelled out entirely using full descriptive words. We will guide you through the process of creating the first three exquisite designs right now. Grab your favorite fine cotton yarn, a comfortable crochet hook, a pair of scissors, and a yarn needle, and let us begin this creative journey together.
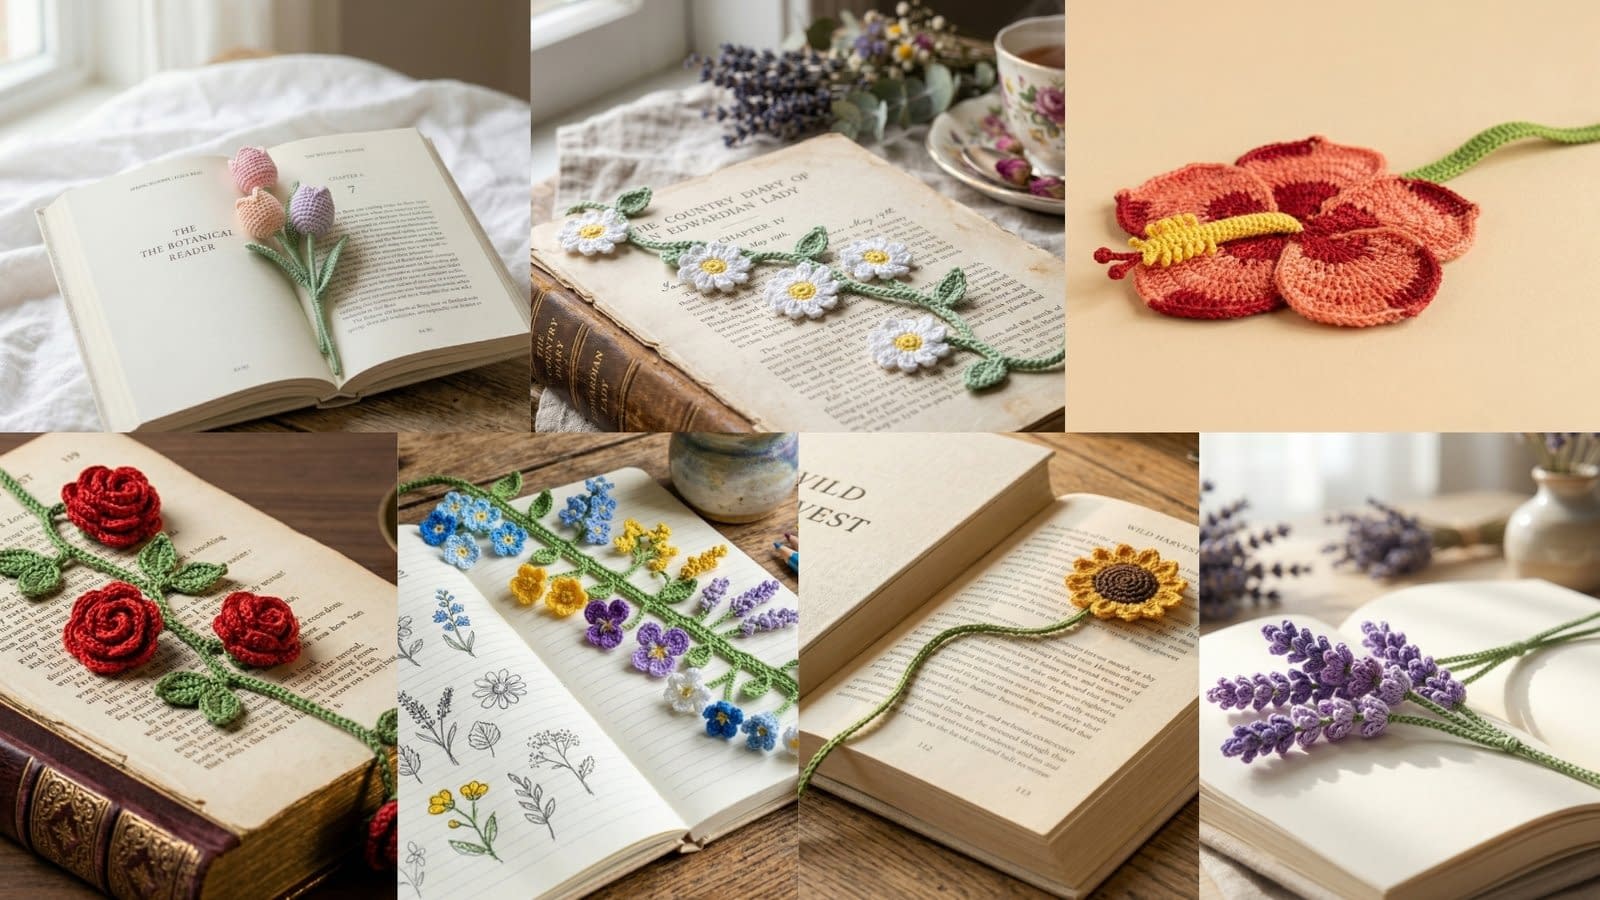
1. Three Layered Tulips Bookmark Pattern
Skill level
Advanced beginner to intermediate. This project requires basic knowledge of working in continuous rounds, increasing stitch counts evenly, and simple sewing techniques to attach the components securely.
Finished size
Depending on your yarn and hook size, the finished bookmark will measure approximately ten to twelve inches from the bottom of the main green stem to the top of the highest central tulip.
Materials
Fingering weight or sport weight cotton yarn. You will need a vibrant leaf green for the stems and leaves, alongside small amounts of light pink, cream, and light purple for the tulip heads. Cotton is highly recommended because it holds its shape wonderfully and does not create fuzzy pills. Crochet hook size 2.5 millimeters or 3.0 millimeters. Tapestry needle for weaving in ends and assembling the pieces. Sharp scissors.
Notes
The tulip heads are worked in continuous rounds. This means you will not join the end of the round with a slip stitch or chain to step up to the next round. Instead, you will simply continue working the first stitch of the next round directly into the first stitch of the previous round. It is highly recommended to use a stitch marker or a small piece of contrasting yarn to mark the first stitch of every round so you do not lose your place.
Instructions — Tulip Heads
You will need to make three tulip heads in total: one in light pink, one in cream, and one in light purple.
Start: With your light pink yarn, create a magic ring. To do this, loop the yarn around your fingers, insert your hook through the loop, grab the working yarn, and pull up a loop. Chain one stitch to secure the ring.
Round 1: Work six single crochet stitches directly into the center of the magic ring. Once you have six stitches, pull the short tail of the yarn tightly to close the hole in the center. Place your stitch marker in the first single crochet you made.
Round 2: You will now increase the number of stitches. Work two single crochet stitches into the very first stitch of the previous round. Continue to work two single crochet stitches into each of the remaining five stitches around. You should now have a total of twelve single crochet stitches. Move your stitch marker to the first stitch of this new round.
Round 3: This round involves a pattern of alternating regular stitches and increases. Work one single crochet stitch into the first stitch. Then, work two single crochet stitches into the next stitch. Repeat this pattern of one single crochet, then an increase, all the way around. You will end the round with eighteen single crochet stitches.
Rounds 4 through 10: For these rounds, you will simply build the height of the tulip cup. Work one single crochet stitch into every stitch around. Do not increase or decrease. Just place one single crochet in each of the eighteen stitches for seven continuous rounds. The piece will naturally start to curve upward, forming a small cup shape.
Closing the Tulip: Flatten the top opening of the cup so the edges align perfectly. Insert your hook through both the front edge and the back edge of the next set of stitches. Work one single crochet stitch through both layers to join them. Continue working single crochet stitches across the flattened top to seal it completely shut.
Creating the fold: To get the cross shaped top shown in the images, fold the two outer corners of the seam you just created inwards toward the center. Thread your tapestry needle with the yarn tail and carefully sew those corners down into the center point, creating a folded bud appearance. Fasten off the yarn and weave the loose end deeply into the inside of the tulip.
Repeat this entire process to make the cream tulip and the light purple tulip.
Instructions — Main Stem and Branches
Start: With your green yarn, leave a somewhat long starting tail to weave in later. Begin by making a slip knot and placing it on your hook. Create a very long foundation chain. Chain approximately sixty to seventy stitches, depending on how long you want the main part of the bookmark to be.
Thickening the stem: Skip the very first chain stitch closest to your hook. Insert your hook into the second chain stitch, yarn over, pull up a loop, and pull that loop directly through the loop already on your hook to create a slip stitch. Work one slip stitch into every single chain stitch all the way back down to the very first slip knot you made. Fasten off and weave in the ends.
First branch: Attach your green yarn to the main stem about two thirds of the way up from the bottom. Chain fifteen stitches branching outward. Skip the first chain from the hook, and work one slip stitch into each of the remaining fourteen chains back toward the main stem. Slip stitch into the main stem to secure the branch, and fasten off.
Second branch: Repeat this process a little higher up on the opposite side of the main stem to create the second branch.
Instructions — Leaves
Start: With your green yarn, chain twelve stitches. We will make two leaves in total.
Working down the chain: Skip the first chain from your hook. In the second chain, work one single crochet stitch. In the next chain, work one half double crochet stitch. In the next six chains, work one double crochet stitch into each chain. In the next chain, work one half double crochet stitch. In the last chain, work three single crochet stitches.
Working up the other side: Rotate the piece to work into the bottom loops of the foundation chain. In the next chain space, work one half double crochet stitch. In the next six chain spaces, work one double crochet stitch into each space. In the next chain space, work one half double crochet stitch. In the last chain space, work one single crochet stitch.
Creating the tip: Chain two stitches, and then work a slip stitch into the second chain from the hook. Finally, work a slip stitch into the very first single crochet you made at the beginning of the leaf. Leave a long tail of yarn for sewing, and fasten off. Make a second leaf exactly the same way.
Assembly
Lay your finished pieces out on a flat surface. Thread your tapestry needle with the long tail left on one of the leaves. Sew the base of the leaf securely to the lower portion of the main green stem. Attach the second leaf slightly higher up on the opposite side of the stem.
Use small pieces of green yarn to attach the tulip heads to the tops of the stems. Sew the light purple tulip to the top of the main, tallest stem. Sew the cream tulip to one of the side branches, and sew the light pink tulip to the remaining side branch. Ensure your stitches are tight and secure, passing through the base of the tulip head and the top loop of the stem several times. Snip away any remaining yarn tails, making sure they are woven in thoroughly.
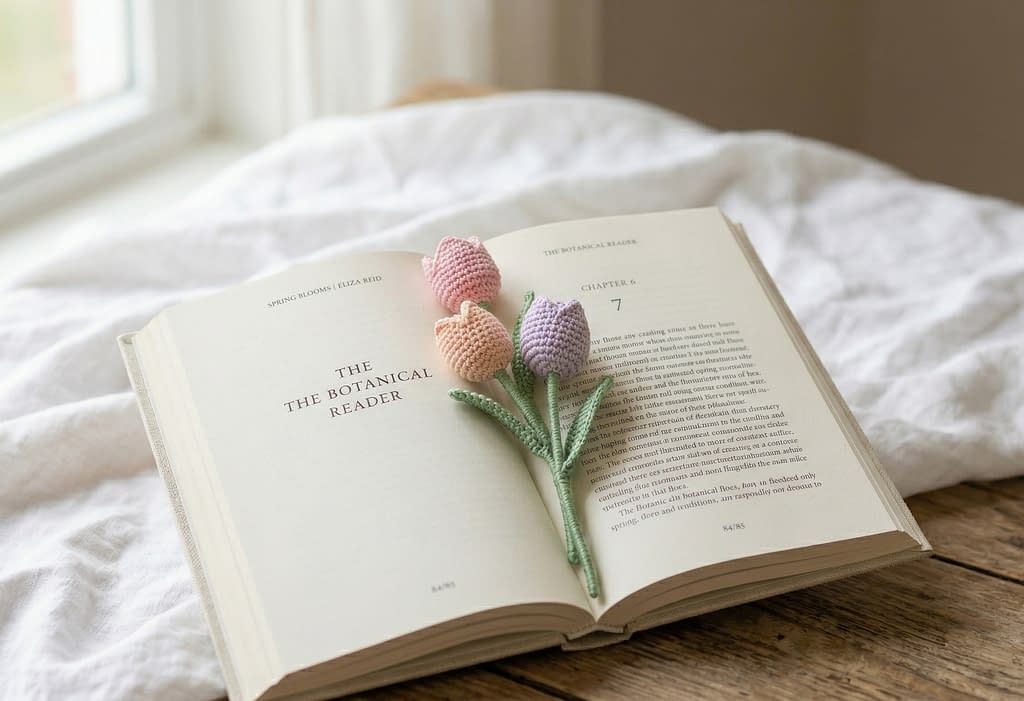
2. Delicate Daisy Chain Bookmark Pattern
Skill level
Beginner friendly. This pattern involves basic shaping, color changes, and creating simple petal structures along a continuous chain. It is a fantastic project for practicing tension.
Finished size
The finished length of the daisy chain will be approximately twelve to fourteen inches, though this is easily customizable by simply adding more length to the green vine foundation chain.
Materials
Fine cotton yarn in three colors. You will need a sunny yellow for the flower centers, a pure white for the petals, and a soft, earthy green for the vine and leaves. Crochet hook size 2.5 millimeters to keep the stitches tight and the flowers looking neat. Tapestry needle. Scissors.
Notes
The daisies are created in two separate steps. First, you will crochet the yellow center, and then the white petals are joined directly to that center. We will make the flowers completely separate from the vine first, and then sew them onto the finished vine at the end. This allows for better placement and a much neater finish on the back of the bookmark.
Instructions — Daisy Flowers
You will need to make four identical daisies.
Yellow Center: Begin with your yellow yarn. Create a magic ring. Chain one stitch to secure the ring. Work six single crochet stitches directly into the center of the ring. Pull the tail of the yarn to close the ring tightly. To finish the center, work one slip stitch into the very first single crochet stitch you made. Fasten off the yellow yarn, leaving a small tail, and weave it in securely at the back of the circle.
White Petals: Take your white yarn and join it to any of the six single crochet stitches of the yellow center with a slip stitch.
First petal: Chain five stitches. Skip the very first chain closest to your hook. In the second chain from the hook, work one slip stitch. In the next three chain stitches, work one single crochet stitch into each. You have now reached the yellow center again. Work one slip stitch into the exact same yellow stitch where you joined the white yarn initially. This completes one petal.
Next petals: To start the next petal, work one slip stitch into the next single crochet stitch of the yellow center. Chain five stitches, skip the first chain, work a slip stitch into the second chain, and work one single crochet stitch into the remaining three chains. Slip stitch back into the same yellow stitch.
Repeat process: Repeat this entire process for every stitch around the yellow center. Since there are six yellow stitches, squeeze two petals into a few of the stitches to make the daisy look fuller, aiming for about eight to ten petals in total. Once you have made enough petals to surround the center nicely, work a final slip stitch into the base of the very first petal. Fasten off the white yarn, leaving a tail for sewing the flower to the vine later. Repeat these steps to create three more complete daisies.
Instructions — Vine Stem and Leaves
Start: Take your green yarn and create a slip knot. Begin chaining your foundation chain. Chain fifteen stitches.
First leaf: Pause chaining to create the first small leaf. Chain five extra stitches. Skip the first chain from the hook. In the second chain, work a slip stitch. In the next chain, work a single crochet stitch. In the next chain, work a half double crochet stitch. In the final chain of this extra group of five, work a single crochet stitch. Finally, to anchor the leaf, work a slip stitch into the original chain stitch where the leaf began.
Continuing the vine: Chain twenty more stitches along the main stem.
Second leaf: Make another leaf on the opposite side of the chain to create a natural look. Twist your chain slightly so you are working into the back bumps. Chain five extra stitches. Skip the first chain, work a slip stitch in the second, a single crochet in the third, a half double crochet in the fourth, and a single crochet in the fifth. Slip stitch back into the main chain to anchor it.
Repeating the pattern: Continue this pattern of chaining a length of the main vine and adding a small leaf every fifteen to twenty stitches until the vine is as long as you desire. A foundation chain of about eighty to one hundred stitches total works perfectly.
Thickening the vine: Once you have reached your desired length, skip the first chain from your hook, and carefully work one slip stitch into every single chain stitch all the way back up the vine. When you encounter a leaf, simply push the leaf forward and continue working your slip stitches into the main chain stitches behind the base of the leaf. When you reach the very first slip knot, fasten off your yarn and weave in the end.
Assembly
Lay your finished green vine flat on a table. Arrange your four daisies along the vine. Place one at the very top, one at the very bottom, and the other two spaced evenly between the small green leaves.
Thread your tapestry needle with the white yarn tail left on the back of one of the daisies. Carefully sew the center back of the daisy directly to the green vine. Make sure to only catch the back loops of the flower stitches so your sewing thread does not show through to the front of the white petals. Secure it tightly with a knot at the back and weave the remaining tail invisibly into the white petals. Repeat this for all four daisies.
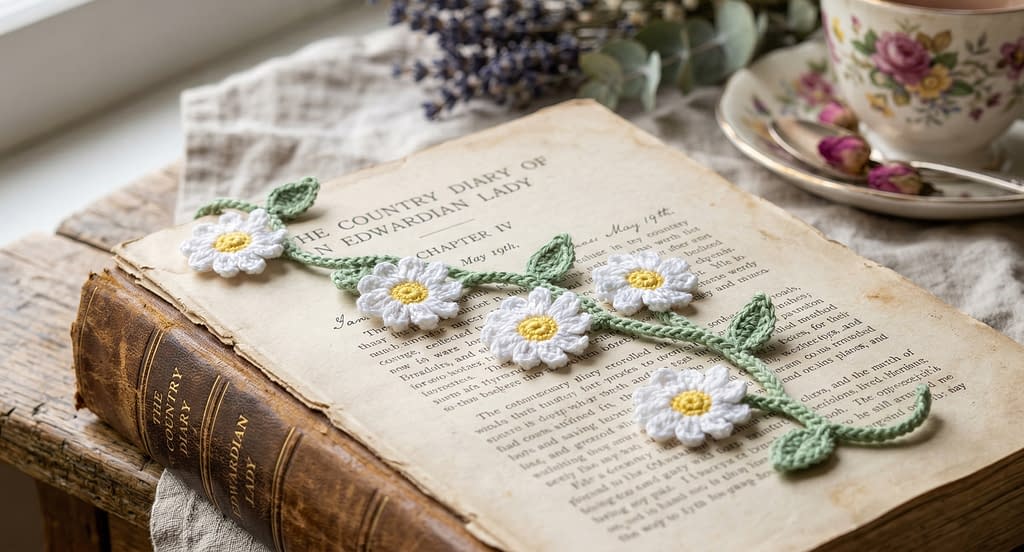
3. Large Tropical Hibiscus Bookmark Pattern
Skill level
Intermediate. This pattern requires careful stitch placement to create the wide, overlapping shapes of the petals. It also involves managing multiple color changes to achieve a beautiful gradient effect.
Finished size
The hibiscus flower itself will measure about three to four inches across, making it a substantial and beautiful decorative piece. The stem will measure approximately twelve inches long.
Materials
Fine cotton yarn in a beautiful palette of warm colors. You will need dark burgundy red, bright cherry red, vibrant orange, sunny yellow, and a bright, grassy green for the stem. Crochet hook size 2.5 millimeters or 3.0 millimeters to ensure the large petals maintain enough stiffness to hold their shape without drooping. Tapestry needle. Scissors.
Notes
The petals of this hibiscus are worked in a specific way to create an overlapping, slightly ruffled effect. We will work them in rows back and forth, radiating outward from a central ring, rather than in continuous rounds. Pay close attention to the stitch heights, as you will be using single crochets, half double crochets, double crochets, and treble crochets to create the sweeping curves.
Instructions — Hibiscus Petals
The flower consists of five large petals. We will build them one by one around a central hub.
Central Hub: Start with your darkest burgundy red yarn. Create a magic ring. Chain three stitches. This chain three counts as your first double crochet stitch. Work fourteen more double crochet stitches into the center of the magic ring. Pull the ring tightly closed. You should have a total of fifteen double crochet stitches in the circle. Join with a slip stitch to the top of the initial chain three to close the round. Fasten off the dark red yarn.
First Petal Row 1: Take your bright cherry red yarn and join it with a slip stitch to any of the double crochet stitches in the central hub. Chain one. Work two single crochet stitches into the same stitch where you joined. Work two single crochet stitches into the next stitch. Work two single crochet stitches into the third stitch. You have used three stitches from the central hub and now have six single crochet stitches for the base of the petal.
First Petal Row 2: Chain two and turn your work. The chain two counts as a half double crochet. In the same first stitch, work one double crochet. In the next stitch, work two treble crochet stitches. In the next two stitches, work two treble crochet stitches into each. In the next stitch, work two treble crochet stitches. In the last stitch, work one double crochet and one half double crochet. Fasten off the bright red yarn.
First Petal Row 3: Join your vibrant orange yarn to the top of the chain two you made at the beginning of Row 2. Chain one. Work one single crochet into the same space. Work one half double crochet in the next stitch. Work one double crochet in the next stitch. Work two double crochets in each of the next six stitches across the top curve. Work one double crochet in the next stitch, one half double crochet in the next, and one single crochet in the final stitch. Fasten off the orange yarn and weave in the ends.
Remaining Petals: Join your bright cherry red yarn to the very next available stitch on the dark red central hub. Repeat the exact same instructions from Row 1 to Row 3 to create the second petal. The edges of the petals will naturally overlap each other slightly. Continue this process three more times until you have created five full petals surrounding the central hub. Weave in all the loose yarn tails at the back of the flower.
Instructions — Yellow Stamen
Start: Take your bright yellow yarn and leave a long starting tail. Chain twenty stitches.
Creating the texture: Skip the first chain from the hook. In the second chain, work a slip stitch. Chain three stitches. Slip stitch back into the very first of those three chains to create a tiny bump known as a picot. Work one slip stitch into the next chain on the main foundation chain.
Repeating the texture: Repeat this process of chaining three, slip stitching into the first of those three chains, then slip stitching into the next foundation chain. Do this a total of five times to create a cluster of texture at the very top of the stamen.
Finishing the stamen: For the remaining length of the foundation chain, simply work one slip stitch into each chain stitch until you reach the end. Fasten off, leaving another long tail for sewing.
Instructions — Green Stem
Start: With your green yarn, create a slip knot and chain sixty to eighty stitches, depending on the height of your favorite books.
Thickening the stem: Skip the first chain from the hook and work one slip stitch into every single chain all the way back to the beginning. Fasten off, leaving a generous tail of yarn for attaching the stem to the back of the heavy flower.
Assembly
Attaching the stamen: Thread the two long yellow yarn tails from the base of the stamen onto your tapestry needle. Push the needle straight through the exact center of the dark red magic ring of the flower from the front to the back. Pull the tails tightly so the stamen sits flush against the center of the petals. Tie the two tails together securely in a double knot at the back of the flower to lock it in place, and trim the excess yarn.
Attaching the stem: Thread the green yarn tail onto your tapestry needle. Place the top of the green stem flat against the back of the dark red central hub, making sure it covers the yellow knots you just tied. Sew the top half inch of the green stem firmly to the back of the flower. Make sure you only sew through the back loops of the red stitches so the green yarn remains completely invisible from the front of the hibiscus. Secure the yarn with a knot and weave the tail deep into the back of the stem to finish the piece beautifully.
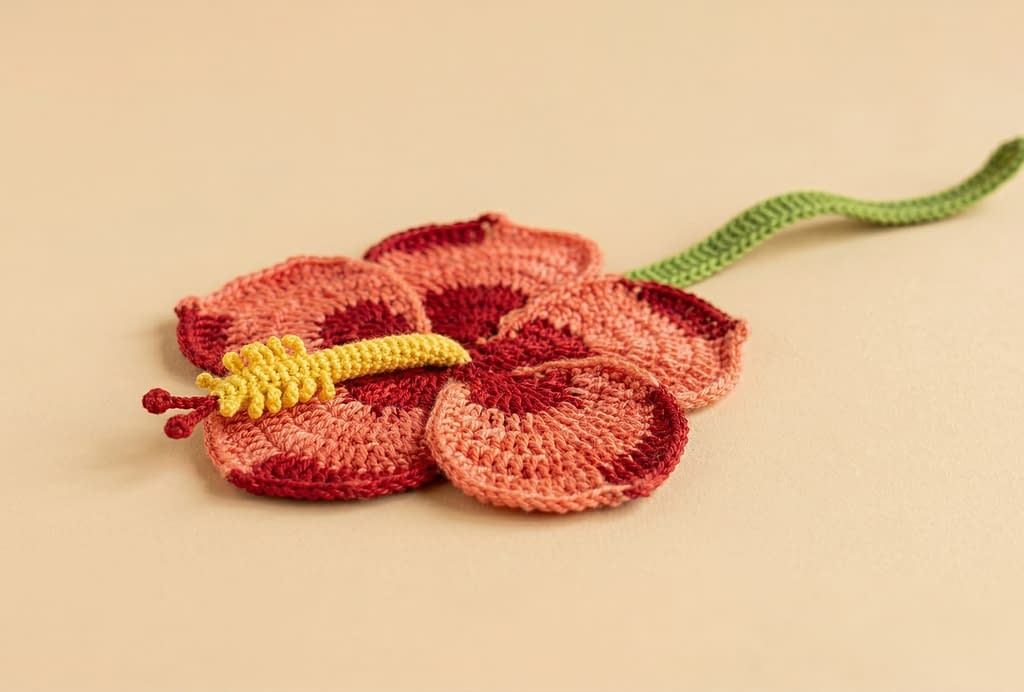
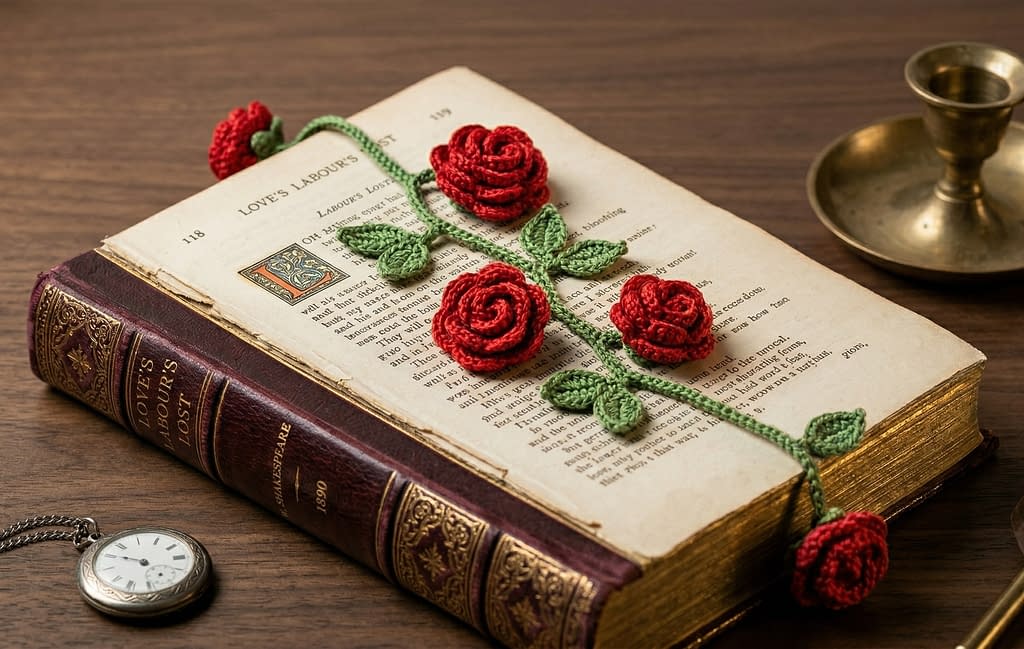
4. Romantic Red Rose Vine Bookmark Pattern
Skill level
Intermediate. This pattern involves creating a coiled, three dimensional flower and working intricate leaf shapes along a continuous chain.
Finished size
Approximately twelve to fourteen inches long from the tip of the bottom leaf to the top rose. The size can be easily adjusted by altering the length of the foundation chain for the vine.
Materials
Fingering weight or sport weight cotton yarn in deep crimson red for the roses and an earthy forest green for the vine and leaves. Crochet hook size 2.5 millimeters. Yarn needle for sewing the roses together and attaching them to the vine. Scissors.
Notes
The roses are created by crocheting a long, scalloped strip that is then rolled tightly upon itself and sewn together at the base. This gives the signature spiraled look of a classic rose. The vine is crocheted as a single continuous piece, with the leaves formed by branching off the main chain and working back down.
Instructions — Rose Flowers
Make three identical rose pieces using the deep crimson red yarn.
Start: Leave a long tail for sewing later. Create a slip knot and chain thirty two stitches.
Row 1: Skip the first three chain stitches from your hook. These skipped chains will count as your first double crochet stitch. Work one double crochet stitch into the fourth chain from the hook. Chain two stitches. Work one double crochet stitch into the exact same chain space. Skip the next two chain stitches on your foundation chain. In the next chain stitch, work one double crochet stitch, chain two stitches, and work another double crochet stitch into the same space. Repeat this pattern of skipping two chains, then working a double crochet, chain two, and double crochet into the next chain. Continue this across the entire foundation chain. You are creating a row of small V shaped spaces. Turn your work.
Row 2: Chain one stitch. Work one slip stitch into the very first chain two space from the previous row. Chain two stitches. Work six double crochet stitches into that same chain two space. Work one slip stitch into the gap between the V shapes from the previous row. Move to the next chain two space. Work seven double crochet stitches directly into that space. Work one slip stitch into the gap between the V shapes. Repeat this process, placing seven double crochet stitches into every single chain two space across the entire row, anchoring each scallop with a slip stitch between the V shapes. Fasten off, leaving another long tail for sewing.
Instructions — Rolling the Roses
Thread one of your long yarn tails onto your yarn needle. Start at one end of the scalloped strip you just made. Carefully roll the strip inward, keeping the straight foundation edge perfectly aligned at the bottom while the scalloped petals flare out at the top. Once rolled completely into a rose shape, use your needle to sew back and forth straight through all the layers of the flat bottom edge. Pass the needle through several times from different angles to ensure the center does not pop out. Secure the yarn with a tight knot but do not trim the tails yet, as you will use them to attach the rose to the vine. Repeat this rolling and sewing process for all three roses.
Instructions — Vine and Leaves
Start: Using the forest green yarn, create a slip knot. Chain fifteen stitches.
Forming the first leaf: Chain an additional eight stitches. Skip the first chain from your hook. Work one slip stitch into the second chain. Work one single crochet stitch into the third chain. Work one half double crochet stitch into the fourth chain. Work one double crochet stitch into the fifth and sixth chains. Work one half double crochet stitch into the seventh chain. Work one single crochet stitch into the eighth chain. Work a slip stitch into the original chain on the main stem to anchor the leaf.
Continuing the vine: Chain fifteen more stitches along the main stem.
Forming the second leaf: Twist the chain slightly to work on the opposite side. Chain eight stitches. Repeat the exact same sequence of stitches used for the first leaf to create an identical leaf pointing in the opposite direction. Anchor it with a slip stitch to the main stem.
Continuing the vine: Chain fifteen more stitches. Create a third leaf exactly like the first one. Chain fifteen more stitches. You can continue this pattern to make the vine as long as you desire.
Thickening the vine: Once you reach the desired length, skip the very first chain from your hook. Work one slip stitch into every single chain stitch along the main stem, working carefully behind the base of each leaf you encounter. Continue all the way back to your starting slip knot. Fasten off and weave in the green yarn ends.
Assembly
Lay the green vine flat. Position your three coiled red roses along the vine, placing them near the bases of the green leaves. Thread the red yarn tails from the bottom of a rose onto your yarn needle. Sew the flat base of the rose securely to the green vine, passing the needle through the vine and the base of the rose multiple times. Tie a secure knot at the back of the vine and weave the red tails carefully into the base of the rose so they are hidden. Repeat this process for the remaining two roses.
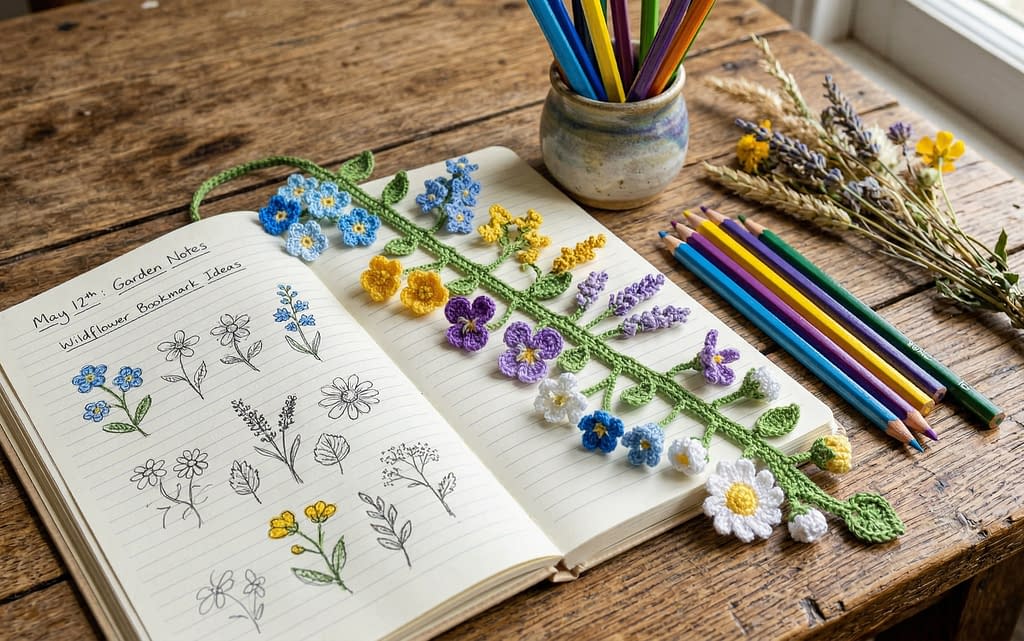
5. Meadow Wildflower Branch Bookmark Pattern
Skill level
Beginner to Intermediate. Requires making many tiny, separate components and sewing them precisely onto a branching stem structure.
Finished size
Approximately eleven to thirteen inches long. The width will vary based on how you arrange the small branches.
Materials
Fingering weight or sport weight cotton yarn in a variety of meadow colors. You will need a bright spring green for the stems, a sunny yellow, a sky blue, a soft lavender purple, and a crisp white for the tiny blossoms. Crochet hook size 2.5 millimeters. Yarn needle for detailed assembly. Scissors.
Notes
This design mimics a wild botanical specimen. You will create a central stalk that has multiple smaller side branches. The tiny blossoms are made individually in various colors and then sewn onto the tips of the branches to create a beautiful, scattered wildflower effect.
Instructions — Small Wildflowers
You will need to make approximately ten to twelve small flowers in a mixture of blue, yellow, purple, and white.
Start: Choose your first flower color. Create a magic ring. Chain one stitch to secure it.
Round 1: Work five single crochet stitches into the center of the magic ring. Pull the starting tail tightly to close the hole completely. Join with a slip stitch to the very first single crochet stitch.
Round 2: Chain two stitches. Work two double crochet stitches into the exact same stitch where you joined. Chain two stitches, and work a slip stitch into the same stitch. This completes your first petal. Move to the next single crochet stitch. Work one slip stitch into it. Chain two stitches, work two double crochet stitches into the same space, chain two stitches, and work a slip stitch into the same space. This is your second petal. Repeat this entire sequence for the remaining three single crochet stitches around the center. You will have five distinct petals. Fasten off, leaving a long tail for sewing the flower to the branches.
Repeat this entire process to make multiple flowers in your chosen meadow colors.
Instructions — Central Branch Stem
Start: Using your spring green yarn, create a slip knot. Chain twenty stitches.
Creating a side branch: Chain an additional eight stitches. Skip the first chain from the hook, and work one slip stitch into each of the remaining seven chains back toward the main stem. This creates a thin offshoot.
Continuing the main stem: Work one slip stitch into the next chain on the main foundation chain. Chain fifteen more stitches.
Creating another side branch: Chain ten stitches. Skip the first chain from the hook, and work one slip stitch into each of the remaining nine chains back toward the main stem.
Repeating the structure: Continue this pattern. Chain a section of the main stem, then chain a side branch, slip stitch back down the side branch, and continue chaining the main stem. Vary the lengths of the side branches by chaining anywhere from six to twelve stitches. Make sure to alternate sides so the branches look natural and organic. Stop when your main stem reaches ten to twelve inches in length.
Thickening the main stem: To finish, skip the first chain from your hook at the very top of the main stem. Work one slip stitch into every chain stitch down the central trunk, skipping over the side branches. Fasten off at the bottom and weave in the green ends.
Assembly
Lay the branched green stem flat. Take one of your tiny colorful wildflowers and thread its long yarn tail onto your needle. Position the flower at the very tip of one of the side branches. Sew the back of the flower securely to the green tip. Tie a knot at the back and carefully weave the colored yarn end into the petals of the flower so it is invisible. Repeat this process, attaching a different colored wildflower to the tip of every single side branch, and perhaps attaching one or two directly to the main central stem for fullness.
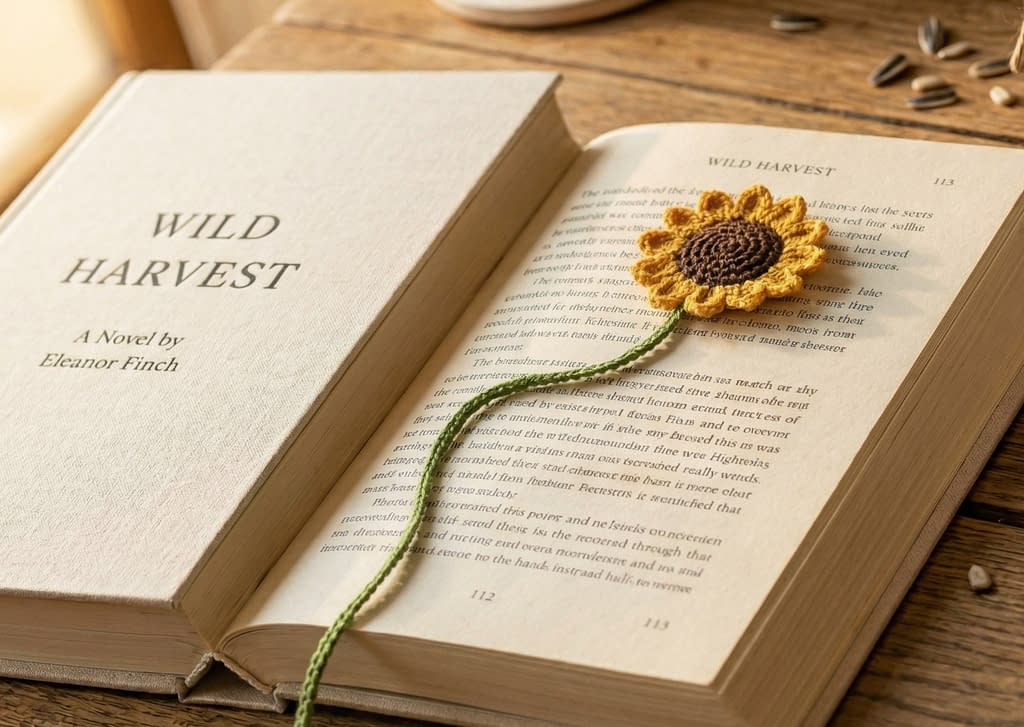
6. Classic Sunflower Bookmark Pattern
Skill level
Intermediate. Requires working in tight, continuous rounds for the center and creating pointed, structured petals.
Finished size
The flower head will measure approximately two and a half inches across, with a stem length of about ten inches.
Materials
Fingering weight or sport weight cotton yarn in dark chocolate brown for the center, bright golden yellow for the petals, and a rich, deep green for the stem and leaf. Crochet hook size 2.5 millimeters. Yarn needle. Scissors.
Notes
The sunflower is iconic for its large, textured dark center and bright, pointed petals. We will create a flat, circular center first, and then work the yellow petals directly into the outer edge of the brown circle.
Instructions — Sunflower Center
Start: Using the dark chocolate brown yarn, create a magic ring. Chain one stitch to secure.
Round 1: Work six single crochet stitches into the center of the magic ring. Pull tightly to close. Do not join with a slip stitch. Place a stitch marker in the first stitch.
Round 2: Work two single crochet stitches into every single stitch around. You will now have twelve stitches. Move the stitch marker.
Round 3: Work one single crochet stitch into the first stitch. Work two single crochet stitches into the next stitch. Repeat this pattern of one single crochet, then an increase, all the way around. You will now have eighteen stitches.
Round 4: Work one single crochet stitch into each of the first two stitches. Work two single crochet stitches into the next stitch. Repeat this pattern around. You will have twenty four stitches.
Round 5: Work one single crochet stitch into every stitch around to create a neat, flat border. At the end of the round, work a slip stitch into the next stitch to level off the circle. Fasten off the brown yarn and weave in the end seamlessly.
Instructions — Sunflower Petals
Start: Join the golden yellow yarn with a slip stitch to any of the stitches on the outer edge of the brown center.
Round 1: Chain six stitches. Skip the first chain from your hook. Work one slip stitch into the second chain. Work one single crochet stitch into the third chain. Work one half double crochet stitch into the fourth chain. Work one double crochet stitch into the fifth chain. Work one treble crochet stitch into the sixth and final chain. You have created one pointed petal. Skip the next stitch on the brown center border. Work one slip stitch into the following stitch on the brown center to anchor the petal. Repeat this process. Chain six, work back down the chain with a slip stitch, single crochet, half double crochet, double crochet, and treble crochet. Skip one stitch on the brown border, and slip stitch into the next. Continue this all the way around the brown center. You should end up with twelve bright yellow petals surrounding the dark core. Fasten off the yellow yarn and weave in the ends at the back of the flower.
Instructions — Stem and Leaf
Start: Using the deep green yarn, leave a long tail and create a slip knot. Chain fifty to sixty stitches for the stem.
Forming the leaf: Chain an additional ten stitches. Skip the first chain from the hook. Work one single crochet stitch into the second chain. Work one half double crochet stitch into the third chain. Work one double crochet stitch into the fourth, fifth, and sixth chains. Work one half double crochet stitch into the seventh chain. Work one single crochet stitch into the eighth chain. Work a slip stitch into the ninth chain.
Continuing the stem: Slip stitch into the main chain where the leaf branched off. Continue to work one slip stitch into every single chain stitch all the way back down the main stem to the beginning slip knot. Fasten off, leaving a long tail for sewing.
Assembly
Thread the top green tail of the stem onto your yarn needle. Place the top of the green stem against the back of the dark brown sunflower center. Sew it securely to the back loops of the brown stitches, ensuring your needle does not pass through to the front of the flower. Tie a knot to secure it, and weave the remaining green tail deep into the back of the stem.
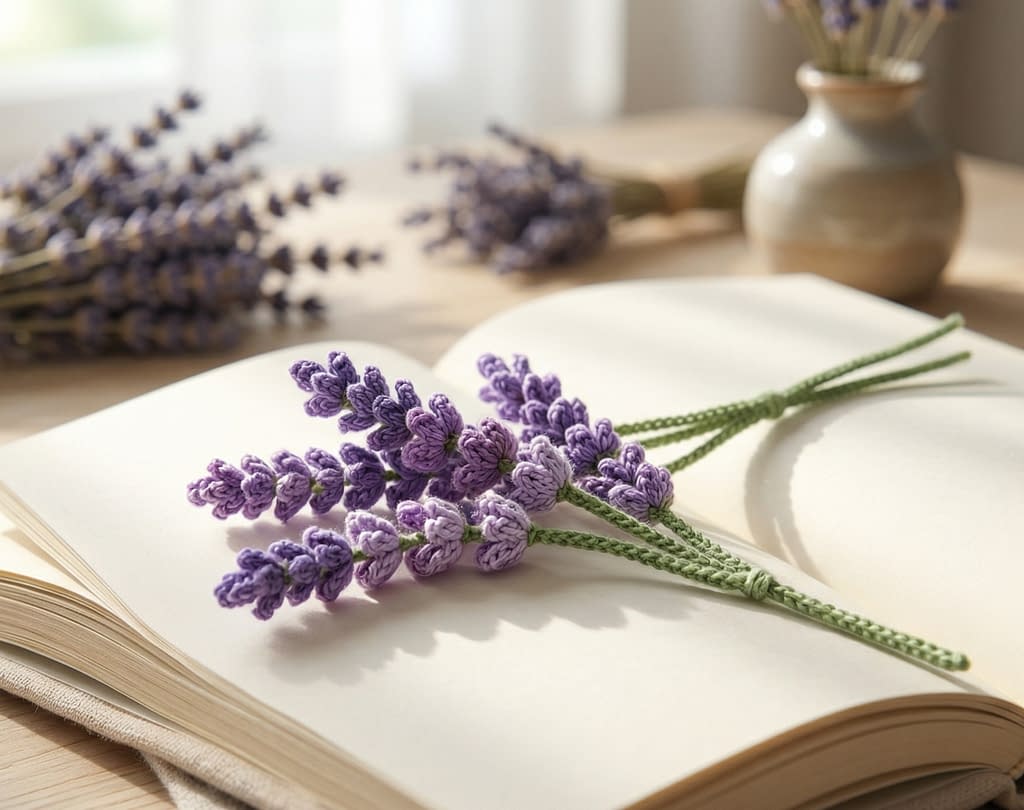
7. Soothing Lavender Sprig Bookmark Pattern
Skill level
Advanced Beginner. This pattern utilizes a repetitive looping technique to create the textured appearance of tiny lavender buds.
Finished size
Approximately ten to twelve inches long. The design features three stems clustered together.
Materials
Fingering weight or sport weight cotton yarn in a soft, dusty purple for the lavender buds and a muted sage green for the stems. Crochet hook size 2.5 millimeters. Yarn needle. Scissors.
Notes
Lavender is recognizable by its clusters of tiny, fragrant buds resting atop long, straight stalks. We will mimic this by crocheting a straight green stem and then attaching the purple yarn directly to the stem, chaining small loops, and slip stitching them tightly together to build the textured flower head.
Instructions — Main Stems
You will need to make three identical straight stems.
Start: Using the sage green yarn, create a slip knot. Chain forty five stitches.
Row 1: Skip the very first chain from your hook. Work one slip stitch into every single chain stitch across the entire foundation chain. This creates a very thin, straight, and slightly stiff stalk perfectly suited for lavender. Fasten off, weave in the bottom end, but leave a tiny tail at the top for guidance. Repeat this twice more so you have three green stalks.
Instructions — Lavender Flowers
Take one of your finished green stalks. You will be working over the top three inches of this stalk.
Start: Join the dusty purple yarn with a slip stitch to a stitch approximately three inches down from the top of the green stalk.
Row 1: Chain four stitches. Work a slip stitch into the exact same spot on the green stalk where you joined the yarn. This creates your first tiny petal loop. Chain four stitches again. Work a slip stitch into the exact same spot. You now have a tiny cluster. Work one slip stitch into the next stitch moving upward along the green stalk. Chain four stitches, and slip stitch into that same spot. Chain four stitches, and slip stitch into that same spot again. Continue this pattern, moving slowly up the green stalk stitch by stitch. In each stitch along the stem, create two loops consisting of four chains and a slip stitch. As you work your way up to the very top tip of the green stem, the purple loops will crowd together, creating a beautiful, textured, three dimensional lavender head. When you reach the very top tip, create three loops in the final stitch to cap it off neatly. Fasten off the purple yarn and use your yarn needle to weave the end straight down through the center of the purple loops to hide it completely.
Repeat this entire process on the other two green stalks.
Assembly
Lay your three finished lavender sprigs flat on a table. Arrange them so the purple flower heads are slightly staggered at different heights, mimicking how they grow in nature. Take a long piece of your sage green yarn and thread it onto your needle. About halfway down the stems, wrap the green yarn tightly around all three stalks multiple times to bundle them together securely. Tie a tight double knot at the back of the bundle. You can either leave the ends of the knot hanging slightly to look like a tied ribbon, or weave them invisibly into the stems for a cleaner look.
Conclusion
Creating your own floral bookmarks is a wonderfully rewarding project that perfectly marries the joy of reading with the satisfaction of crafting. These seven unique botanical patterns offer a beautiful variety of textures, shapes, and colors, ensuring there is a perfect design for every book lover and every season. Because we have provided every instruction in complete, descriptive language without relying on abbreviations, crafters of all skill levels can confidently tackle these projects.
If you choose to make a single elegant sunflower or an entire vibrant meadow branch, your finished creations will serve as a constant reminder of your creative abilities every time you open a book. Take your time, enjoy the process of watching the yarn transform into delicate petals and sweeping vines, and do not be afraid to experiment with your own color palettes to make each piece entirely your own.


