
Floral crochet head coverings bring together softness, texture, and intricate beauty in a way that feels both timeless and modern. Whether you are drawn to delicate pastel flowers or bold layered blooms, these designs allow you to create something that feels handmade, thoughtful, and truly unique.
In this guide on 6 Floral Crochet Head Coverings Patterns, each design is carefully matched to the visuals you provided, ensuring that the final result looks exactly like what you expect. The focus is not just on the finished piece, but on helping you understand every step along the way. From forming individual flowers to joining motifs and shaping the final head covering, everything is explained in a slow, clear, and beginner-friendly way.
The first three patterns below include:
- A delicate floral bandana with joined motifs
- A minimalist floral headband with evenly spaced flowers
- A bold floral crown-style headpiece with layered blooms
Each pattern builds different skills, so by the time you complete these, you will feel much more confident working with floral crochet designs.
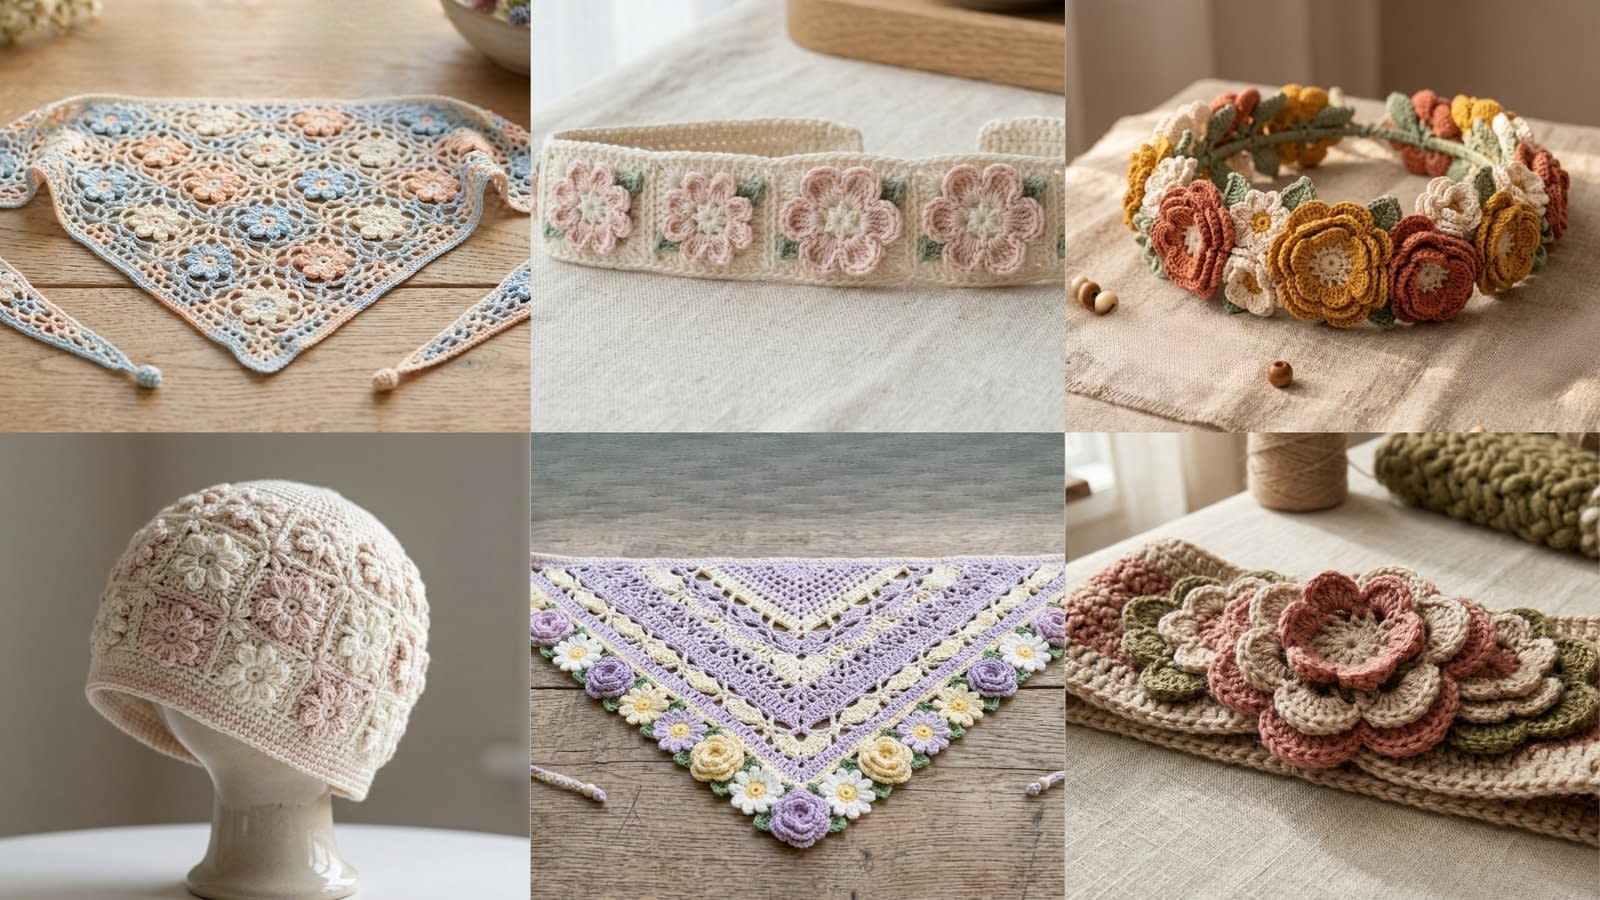
1. Floral Crochet Bandana with Motif Flowers
This design matches the soft pastel triangular bandana shown in the image. It features multiple small floral motifs joined together to form a structured yet delicate head covering.
Skill Level
Beginner to intermediate
Finished Size
Approximately 18 to 22 inches wide across the top edge and 8 to 10 inches deep, depending on yarn and tension
Materials
Cotton yarn in soft pastel shades (cream, baby blue, blush pink)
Crochet hook suitable for your yarn (usually 3.5 millimeters to 4.0 millimeters)
Yarn needle
Scissors
Stitch markers (optional)
Notes
This bandana is created by making individual floral granny motifs and joining them as you go. The triangular shape is formed naturally by reducing the number of motifs in each row. The edges are finished with a clean border and ties.
Step 1: Creating the Floral Motif
Start by making the small flower centers.
Make a magic ring. If you are not comfortable with a magic ring, you can chain four and join to form a loop.
Round 1: Chain two to begin. Work twelve half double crochet stitches into the ring. Pull the ring tight and join with a slip stitch.
Round 2: Change to your petal color. Chain two, then work two double crochet stitches, one chain, and one slip stitch into the same stitch. This forms one petal. Repeat this sequence in every stitch around to create a full round of petals. You should have twelve small petals.
Fasten off and weave in the ends neatly.
Step 2: Squaring the Motif
To transform the flower into a square motif:
Join yarn in any space between petals.
Chain three, then work two double crochet stitches in the same space. Chain two, then work three double crochet stitches again. This forms your first corner.
In the next space, work three double crochet stitches. Continue this pattern around, creating four corners and four sides.
Finish the square with a slip stitch and fasten off.
Make enough motifs to form a triangle layout. Typically:
- Bottom row: 6 motifs
- Next row: 5 motifs
- Continue until you reach 1 motif at the top
Step 3: Joining the Motifs
Lay out your motifs in a triangle shape before joining.
Join motifs using slip stitch or whip stitch. Align edges carefully and join through the outer loops only to keep the seam neat and flat.
Work row by row, ensuring that the triangle remains symmetrical.
Step 4: Creating the Edging
Once all motifs are joined:
Attach yarn to one corner.
Work one single crochet stitch into each stitch along the edges. At each corner, work three single crochet stitches to maintain shape.
For a softer look, you can add a picot edge:
Chain three, slip stitch into the same stitch, skip one stitch, and repeat.
Step 5: Adding Ties
Attach yarn to each top corner.
Chain a long chain (about 40 to 50 chains). Turn and work one single crochet stitch into each chain.
Fasten off and weave in all ends.
Finishing Tips
Block the bandana gently by dampening it and laying it flat. Shape the triangle evenly and allow it to dry completely. This step helps the motifs open up and gives a polished finish.
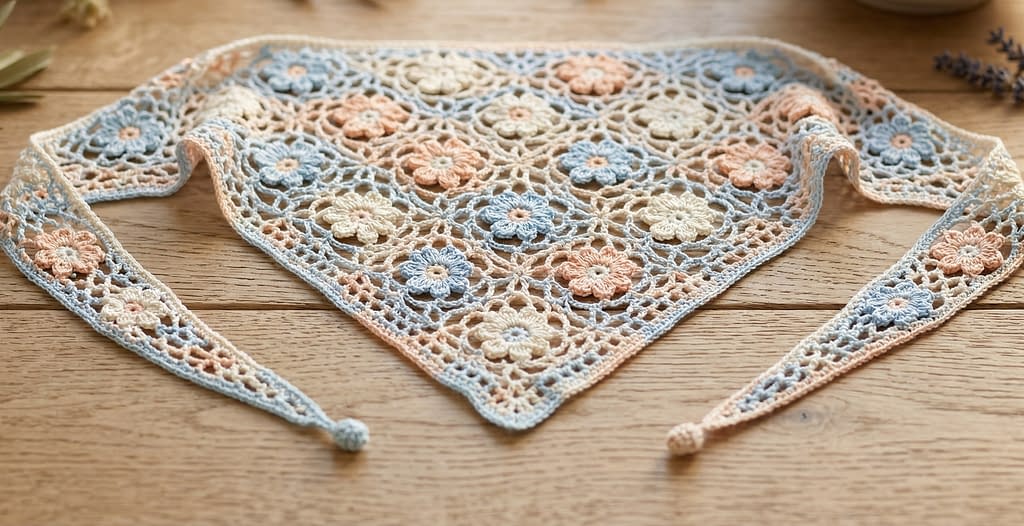
2. Minimal Floral Crochet Headband
This pattern matches the clean, structured headband with evenly spaced soft pink flowers.
Skill Level
Beginner
Finished Size
Adjustable length, typically 18 to 22 inches
Materials
Cotton yarn in cream, soft pink, and green
Crochet hook (around 4.0 millimeters)
Yarn needle
Scissors
Optional button or snap closure
Notes
This headband is worked as a long strip, and small flowers are crocheted separately and attached evenly across the band.
Step 1: Creating the Base Band
Chain a length that fits comfortably around your head. Usually between 70 to 90 chains depending on yarn thickness.
Row 1: Starting from the second chain, work one single crochet stitch into each chain across.
Row 2: Chain one and turn. Work one half double crochet stitch into each stitch across.
Repeat Row 2 until the band reaches about 1.5 inches in width.
Fasten off and weave in ends.
Step 2: Making the Small Flowers
Make a magic ring.
Round 1: Chain one, then work ten single crochet stitches into the ring. Join.
Round 2: For each stitch, work one slip stitch, chain two, and three double crochet stitches, then slip stitch again into the same stitch. This creates one rounded petal.
Repeat around to create full flowers.
Make enough flowers to evenly space along the headband (usually 5 to 7).
Step 3: Adding Leaves
With green yarn:
Chain five, then work one single crochet, one half double crochet, one double crochet, one half double crochet, and one single crochet back along the chain.
Attach two leaves under each flower.
Step 4: Attaching Flowers to the Band
Lay the band flat and mark equal spacing points.
Using a yarn needle, sew each flower onto the band. Attach leaves first, then sew the flower on top so it sits slightly raised.
Make sure all stitches are secure but not too tight, so the band remains flexible.
Step 5: Closure Options
You can:
- Sew the ends together for a seamless loop
- Add a button and loop
- Attach a snap closure
Finishing Tips
Lightly steam or block the headband to help the flowers settle into place and enhance stitch definition.
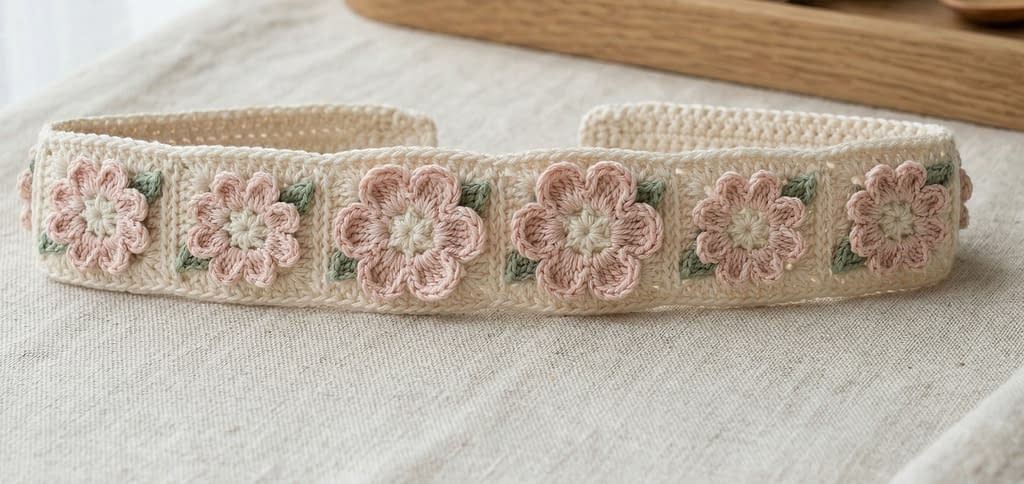
3. Boho Floral Crochet Crown Headpiece
This pattern reflects the circular floral crown with bold, layered flowers in earthy tones.
Skill Level
Intermediate
Finished Size
Adjustable, typically fits adult head circumference
Materials
Cotton yarn in earthy shades (mustard, rust, cream, green)
Crochet hook (4.0 to 4.5 millimeters)
Yarn needle
Scissors
Flexible cord or crochet chain base
Notes
This piece is built by creating multiple layered flowers and attaching them onto a circular base.
Step 1: Creating the Base Circle
Chain enough stitches to fit around your head comfortably.
Join with a slip stitch to form a circle.
Work one round of single crochet stitches evenly around.
This forms a sturdy base.
Step 2: Making Layered Flowers
Make a magic ring.
Round 1: Work twelve double crochet stitches into the ring. Join.
Round 2: Chain two, then work two double crochet stitches in each stitch around.
Round 3: Create petals by working one single crochet, one half double crochet, three double crochet stitches, one half double crochet, and one single crochet into each stitch.
Fasten off.
Repeat with slightly different yarn colors for variety.
Step 3: Creating Smaller Accent Flowers
Make smaller flowers using fewer stitches and shorter petals to create contrast.
Step 4: Adding Leaves
Using green yarn, crochet small leaf shapes similar to the previous pattern.
Make multiple leaves to fill gaps between flowers.
Step 5: Assembling the Crown
Lay the base circle flat.
Arrange the flowers before attaching. Place larger flowers first, then fill gaps with smaller ones and leaves.
Using a yarn needle, sew each piece securely onto the base.
Make sure to stitch through multiple layers so the flowers do not shift.
Step 6: Adjusting Fit
If needed, attach a short chain extension with a button or tie to make the crown adjustable.
Finishing Tips
Gently shape each flower with your fingers. Light steaming can help define the layers and give a soft, natural curve to the petals.
4. Floral Crochet Cap with Raised Flower Motifs
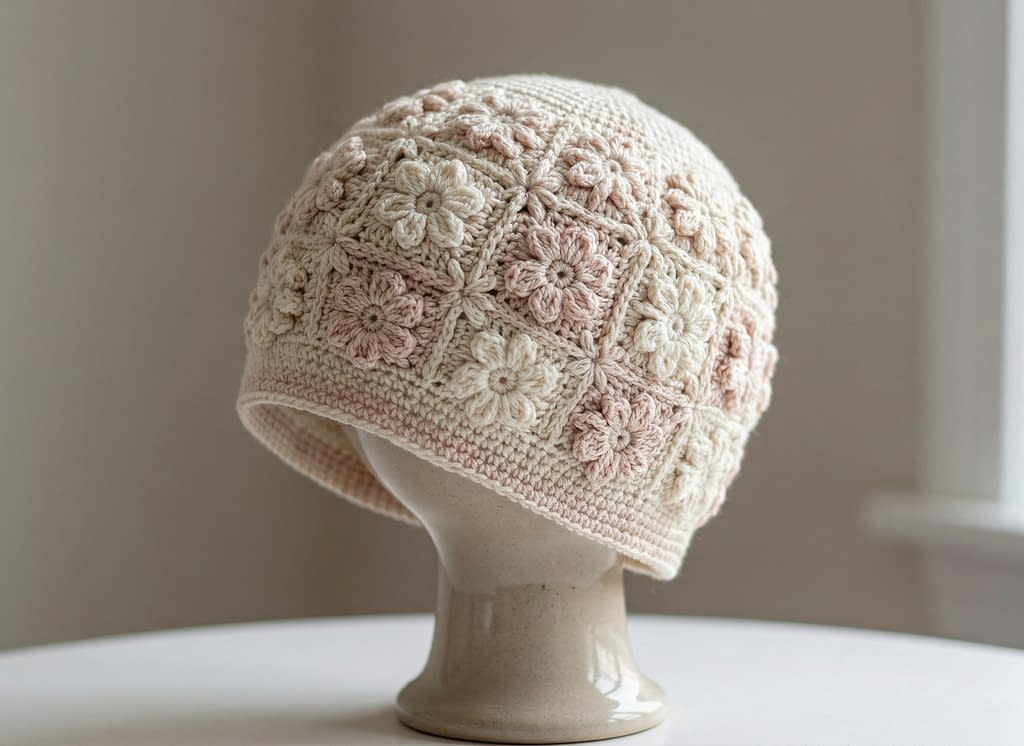
This pattern matches the soft, rounded cap shown in the image, featuring neatly arranged raised floral motifs across the surface. The design looks structured yet delicate, with a smooth base and slightly lifted flowers that add texture.
Skill Level
Intermediate
Finished Size
Adult size cap, approximately 21 to 23 inches in circumference
Materials
Soft cotton or cotton blend yarn in cream, blush pink, and light beige
Crochet hook around 3.5 to 4.0 millimeters
Yarn needle
Scissors
Stitch markers
Notes
This cap is constructed by creating small floral motifs first and then joining them together to form a dome shape. A ribbed or simple band is added at the bottom for a snug and comfortable fit.
Step 1: Creating the Flower Motifs
Make a magic ring.
Round 1: Chain two and work ten half double crochet stitches into the ring. Pull tight and join.
Round 2: Switch to a petal color. For each stitch, work one slip stitch, chain two, two double crochet stitches, chain two, and one slip stitch into the same stitch. This creates a slightly raised petal.
Repeat around to form a full flower.
Make multiple flowers, usually between 12 and 18 depending on size.
Step 2: Creating the Motif Base
To give each flower structure:
Join yarn between two petals.
Chain three, then work two double crochet stitches. Chain two and work three double crochet stitches again to form a corner.
Continue building a square or hexagon around each flower, depending on how you want them to fit together.
Keep all motifs consistent in size.
Step 3: Arranging and Joining Motifs
Lay the motifs flat and arrange them in a dome shape pattern.
Start by joining a small circle of motifs at the top. Then gradually add more motifs around, slightly increasing the number per round to shape the cap.
Use slip stitch or whip stitch to join edges carefully.
Make sure the joins are smooth so the cap curves naturally without gaps.
Step 4: Filling Small Gaps
If there are small gaps between motifs:
Attach yarn and work a few single crochet stitches or small clusters to fill the space neatly.
This helps stabilize the structure and improves the overall appearance.
Step 5: Creating the Bottom Band
Attach yarn to the bottom edge.
Round 1: Work one single crochet stitch evenly around the entire edge.
Round 2 and onward: Work one half double crochet stitch in each stitch for several rounds until you reach your desired band height.
For a tighter fit, you can switch to back loop only stitches to create a ribbed effect.
Step 6: Shaping and Finishing
Check the fit and adjust if needed by adding or removing rounds at the band.
Weave in all loose ends carefully.
Lightly block the cap to smooth out the motifs and enhance the flower texture.
5. Layered Floral Crochet Bandana with Edged Flowers
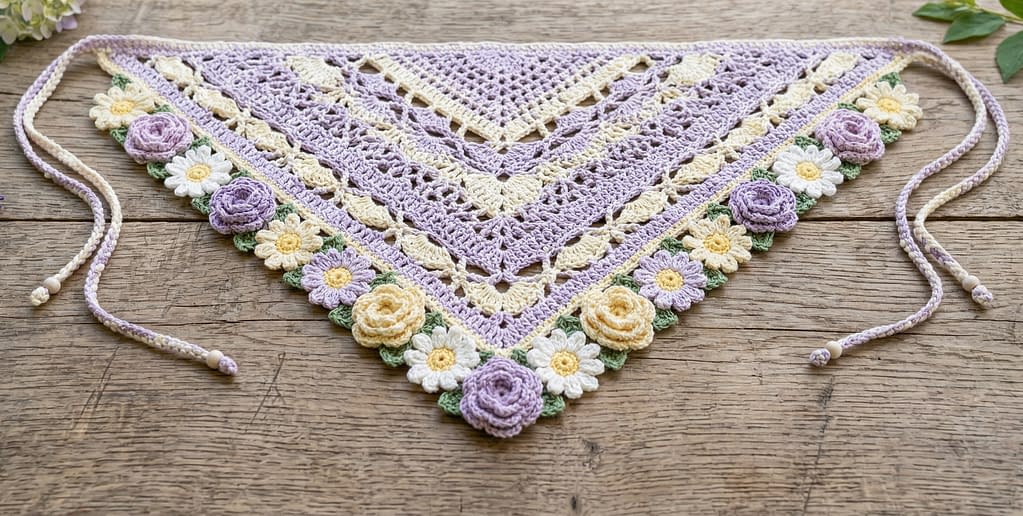
This pattern reflects the second triangular bandana in the image, featuring layered rows and decorative floral edging along the bottom.
Skill Level
Beginner to intermediate
Finished Size
Approximately 20 to 24 inches wide
Materials
Lightweight yarn in lavender, cream, yellow, and soft green
Crochet hook around 3.5 to 4.0 millimeters
Yarn needle
Scissors
Notes
This bandana is worked from the top down in rows, forming a triangle. The floral edging is added after the base is complete.
Step 1: Starting the Triangle
Chain four and join to form a ring.
Row 1: Chain three, work two double crochet stitches, chain two, and three double crochet stitches into the ring.
Row 2: Turn your work. Chain three, work two double crochet stitches in the same space, then work three double crochet stitches in the next space, and in the center chain space work three double crochet stitches, chain two, and three double crochet stitches. Continue across.
Step 2: Building the Triangle
Repeat the previous row pattern.
Each row increases at the center, forming a triangle.
Continue until the bandana reaches your desired depth.
You can alternate rows using half double crochet stitches and double crochet stitches to create subtle texture, matching the layered look in the image.
Step 3: Adding Decorative Rows
To create the striped and layered appearance:
Switch colors every two or three rows.
Maintain consistent stitch height to keep the triangle balanced.
Step 4: Creating the Floral Edging
Attach yarn at one corner of the bottom edge.
Work a base row of single crochet stitches evenly across.
Next row: For each section, work a small flower:
Chain one, work five half double crochet stitches in the same stitch, slip stitch into the next stitch.
Repeat this pattern to form rounded petals along the edge.
Step 5: Adding Mini Flowers
Create tiny flowers separately:
Make a magic ring, work six single crochet stitches, then create small petals using chain stitches and slip stitches.
Sew these small flowers along the edge between the larger petal shapes.
Step 6: Adding Ties
Attach yarn to both top corners.
Chain a long strand and reinforce by working single crochet stitches back along the chain.
Finishing Tips
Gently block the bandana so the triangle lays flat and the edging opens up nicely. Shape the flowers carefully while damp.
6. Wide Floral Crochet Head Wrap with Large Layered Flower
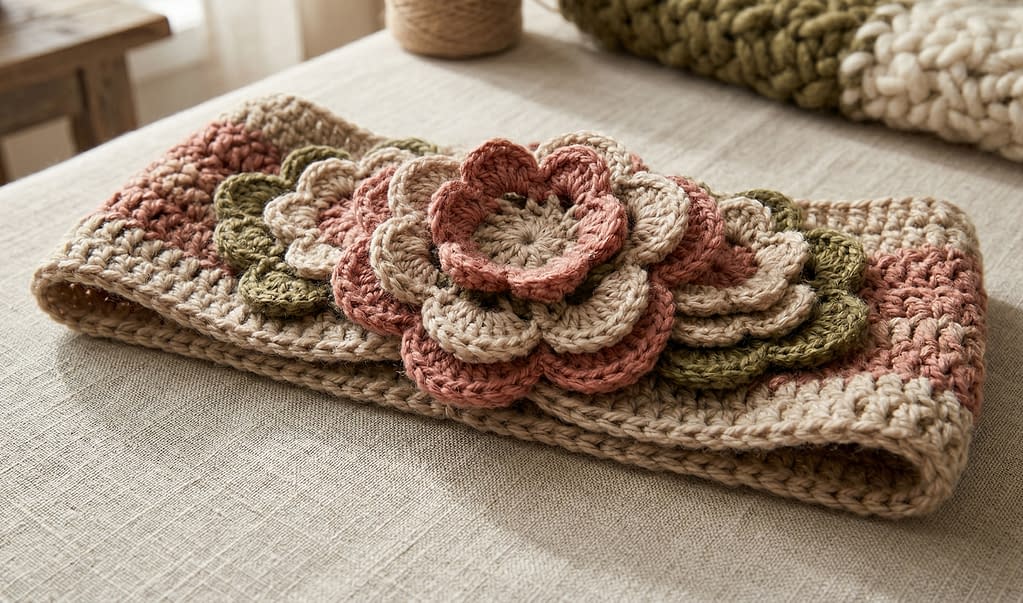
This pattern matches the wide head wrap with a bold central layered flower, offering a cozy and stylish look.
Skill Level
Beginner to intermediate
Finished Size
Approximately 18 to 22 inches in length and 3 to 4 inches wide
Materials
Soft yarn in neutral and earthy tones (beige, rose, olive)
Crochet hook around 4.0 to 5.0 millimeters
Yarn needle
Scissors
Notes
The wrap is worked as a long rectangle, and the large flower is created separately and attached at the center.
Step 1: Creating the Base Wrap
Chain enough stitches to match your desired length.
Row 1: Work one half double crochet stitch in each chain across.
Row 2: Chain one and turn. Work one half double crochet stitch in each stitch.
Repeat until the wrap reaches your desired width.
For a textured look, alternate rows using front loop only or back loop only stitches.
Step 2: Shaping the Edges
To give a clean edge:
Work one round of single crochet stitches around the entire wrap.
At corners, place two stitches to prevent curling.
Step 3: Creating the Large Layered Flower
Make a magic ring.
Round 1: Work twelve double crochet stitches into the ring.
Round 2: Work two double crochet stitches in each stitch.
Round 3: Create petals by working one single crochet stitch, one half double crochet stitch, three double crochet stitches, one half double crochet stitch, and one single crochet stitch into each stitch.
Fasten off.
Repeat a second smaller layer using fewer stitches.
Step 4: Adding Leaf Layers
Using green yarn:
Chain six.
Work along the chain using single crochet, half double crochet, double crochet, half double crochet, and single crochet stitches.
Make multiple leaves.
Step 5: Assembling the Flower
Layer the smaller flower on top of the larger one.
Position leaves underneath.
Use a yarn needle to stitch all layers together securely.
Step 6: Attaching to the Wrap
Place the flower at the center of the head wrap.
Sew it firmly in place, making sure to stitch through the base wrap multiple times so it stays stable.
Finishing Tips
Shape the petals gently with your fingers. Light steaming helps define the flower layers and gives a soft, finished look.
Conclusion
This complete collection of 6 Floral Crochet Head Coverings Patterns offers a well-rounded exploration of floral crochet design. Each pattern reflects a unique style, from soft and delicate to bold and textured, while staying practical and wearable.
The first patterns introduced you to motif joining and structured layouts, helping you understand how individual elements come together to form a cohesive piece. As you progressed, you explored shaping techniques, decorative edging, and layering methods that added depth and personality to each design.
The final three patterns focused more on construction and assembly, guiding you through building wearable forms such as caps and wraps while maintaining the beauty of floral detailing. These projects also emphasized finishing techniques, which are essential for achieving a polished and professional look.
By working through all six patterns, you not only create beautiful head coverings but also develop a strong foundation in crochet techniques such as shaping, joining, layering, and decorative detailing. These skills can be applied to many other crochet projects, allowing you to expand your creativity even further.
Floral crochet designs remain timeless because they balance softness with structure, simplicity with detail. With patience and attention to each step, you can recreate these pieces exactly as shown and even begin to experiment with your own variations in color, size, and style.


