
Daffodils symbolize new beginnings, happiness, and hope. They are one of the first flowers to bloom in spring, bringing brightness after a long winter. But what if you could enjoy daffodils all year long without worrying about wilting petals? That’s where paper daffodil bouquets come in.
Crafting paper daffodils is not only fun but also practical. These handmade blooms are versatile for decorating homes, gifting on special occasions, or even creating affordable wedding bouquets. The best part is that making them doesn’t require advanced crafting skills—just patience, creativity, and some simple materials.
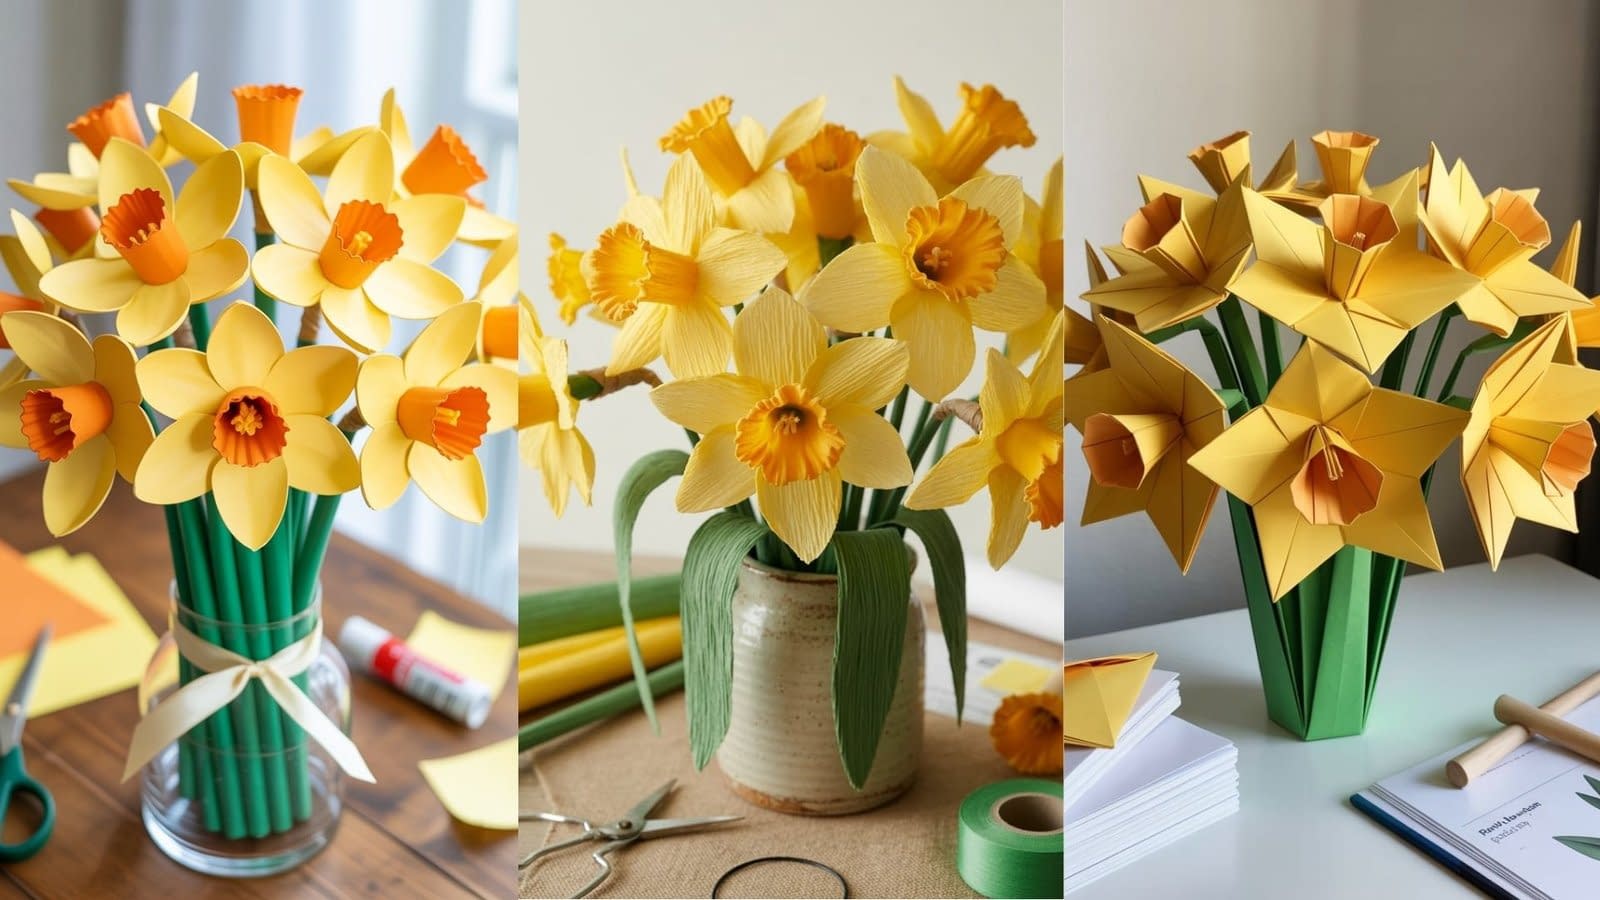
In this post, we’ll dive into 3 easy paper daffodil bouquet tutorials, each with its own unique method and style. Whether you’re a beginner looking for a simple design or someone who wants to try more detailed paper crafting, these tutorials will guide you step by step.
Materials You’ll Need for All Three Tutorials
Before starting, let’s gather the basic supplies. Most of these can be found at home, in stationery stores, or online:
- Colored craft paper (yellow, orange, green, and white)
- Scissors
- Pencil
- Craft glue or hot glue gun
- Floral wire or green pipe cleaners (for stems)
- Green floral tape (optional for a professional finish)
- Ruler
- Small round object or template (like a coin or bottle cap) for tracing circles
Optional extras: crepe paper for texture, glitter for accents, or printed scrapbook paper for patterned petals.
Tutorial 1: Classic Paper Daffodils Bouquet

This is the most traditional design and closely resembles real daffodils. Perfect for beginners, it balances simplicity and beauty.
Step 1: Cut the Petals
- Take yellow craft paper and cut out six petal shapes (each about 2–3 inches long).
- To keep them uniform, fold the paper and cut multiple petals at once.
Step 2: Create the Trumpet Center
- Cut a strip of orange paper (about 2 inches wide and 5 inches long).
- Fold the strip in half lengthwise, then curl it into a cone.
- Secure with glue and trim the base flat.
- Gently snip the top edge with small cuts and fan them outward to mimic the trumpet’s ruffled edge.
Step 3: Assemble the Flower
- Arrange the six petals around the trumpet and glue them in place.
- Ensure the petals are evenly spaced for a natural look.
Step 4: Add the Stem
- Attach the flower head to floral wire or a green pipe cleaner.
- Wrap the base with green floral tape for stability.
Step 5: Build the Bouquet
- Make at least 6–8 flowers and arrange them together.
- Tie them with a ribbon or wrap in decorative paper for a finished bouquet look.
Why This Tutorial Works: The classic design is easy enough for beginners but elegant enough to be displayed in a vase or gifted.
Tutorial 2: Crepe Paper Daffodil Bouquet for a Realistic Touch

If you want more lifelike flowers with texture, crepe paper is your best option. This tutorial adds depth and detail to the petals and trumpet.
Step 1: Prepare the Petals
- Use yellow crepe paper with vertical grain.
- Cut six oval petals (about 3 inches long).
- Stretch the paper slightly in the middle to create a curved, natural petal shape.
Step 2: Make the Trumpet
- Cut a strip of orange crepe paper, 2 inches wide and 4 inches long.
- Fringe one side with small cuts to create ruffles.
- Roll the strip into a cone and glue it shut.
Step 3: Attach the Center
- Wrap the trumpet around the top of a floral wire.
- Add a small crumpled piece of yellow paper inside for depth.
Step 4: Layer the Petals
- Glue the six petals around the trumpet, overlapping slightly.
- Bend and curl the petal edges outward with your fingers for realism.
Step 5: Wrap the Stem
- Cover the wire with green crepe paper or floral tape.
- Add green crepe leaves along the stem for a natural look.
Step 6: Arrange the Bouquet
- Make 8–10 flowers for fullness.
- Place them in a mason jar or tie them together for a spring-inspired bouquet.
Why This Tutorial Works: The crepe paper adds texture that makes the daffodils look almost real. It’s a step up from the classic design but still approachable.
Tutorial 3: Origami Paper Daffodil Bouquet

For those who love the precision of folding, this origami daffodil bouquet is perfect. It requires no glue for petals and results in a crisp, geometric look.
Step 1: Create the Petals
- Start with a square piece of yellow paper.
- Fold diagonally to form a triangle, then fold again into a smaller triangle.
- Make precise creases and fold the paper into a diamond shape.
- Shape the corners into petal-like points.
Step 2: Fold the Trumpet
- Use a smaller square of orange paper.
- Fold into a cone shape, securing with a dab of glue at the seam.
- Gently flare the edges outward.
Step 3: Assemble the Flower
- Insert the trumpet into the center of the folded petals.
- Secure with glue or tape if necessary.
Step 4: Add the Stem
- Attach the flower to a green paper-wrapped straw, chopstick, or floral wire.
- Fold a small green origami leaf and glue it onto the stem.
Step 5: Create the Bouquet
- Make multiple origami daffodils in different sizes for variety.
- Bundle them into a bouquet with ribbon or display in a paper-wrapped vase.
Why This Tutorial Works: Origami daffodils are unique and modern. They’re ideal for minimalistic décor, handmade cards, or gifts that stand out.
Tips for Making the Perfect Paper Daffodil Bouquet
- Mix Styles: Combine classic, crepe, and origami daffodils in one bouquet for texture and variety.
- Experiment with Colors: While yellow and orange are traditional, try white petals with peach centers or pastel tones for weddings.
- Add Greenery: Incorporate paper leaves, ferns, or even paper baby’s breath to fill out the bouquet.
- Use Quality Paper: Thicker paper holds shape better, while crepe adds realism.
- Gift Ideas: Paper daffodil bouquets make meaningful gifts for birthdays, anniversaries, Mother’s Day, or as get-well-soon flowers.
Creative Uses for Your Paper Daffodil Bouquet
- Home Décor: Brighten your living room, desk, or entryway.
- Event Decoration: Use as centerpieces for spring parties, baby showers, or Easter gatherings.
- Wedding Arrangements: Affordable and lasting alternatives to fresh flowers.
- Gifting: Pair with a handmade card or basket of goodies.
- Educational Crafts: Great for teaching children about flowers, colors, and creativity.
Conclusion: Bring Spring into Your Home with Paper Daffodils
With these 3 easy paper daffodil bouquet tutorials, you can create stunning, handmade flowers that bring joy and color into your life year-round. Whether you prefer the classic version, the textured crepe style, or the precise origami design, each tutorial offers something unique.
Paper daffodils are not just crafts—they’re symbols of creativity, thoughtfulness, and celebration. So, gather your supplies, set aside some time, and start folding, cutting, and gluing your way into a bouquet of everlasting daffodils.


