Handmade mug sleeves are one of the most satisfying small crochet projects you can create. They require very little yarn, they work up quickly, and they provide an excellent opportunity to practice texture stitches, decorative techniques, and creative embellishments. More importantly, they transform an ordinary mug into something personal, warm, and visually charming.
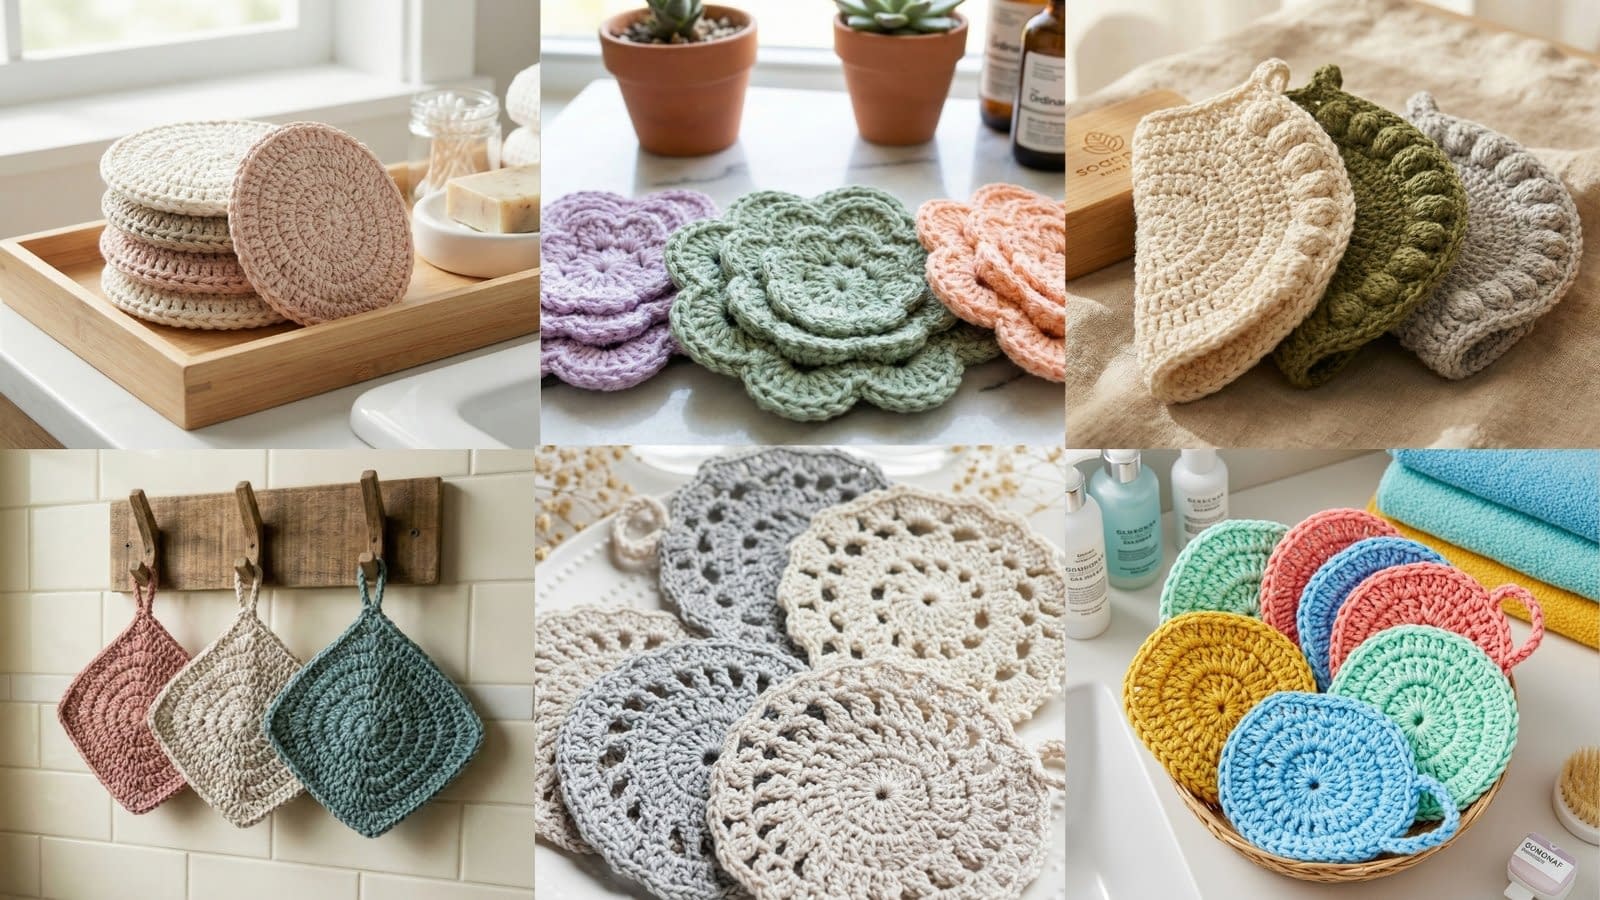
In this guide to 6 Crochet Coffee Cup Sleeve Patterns, you will learn how to recreate the beautiful sleeve styles shown in the image. Each pattern focuses on a different decorative theme, from embroidered floral designs to textured crochet stitches and delicate flower motifs. These patterns are intentionally written in a very detailed way so beginners can follow every step without confusion.
This first part covers three designs that match the visual references: the embroidered wildflower sleeve, the daisy appliqué sleeve with coaster, and the pink textured sleeve with pearl accents. The remaining three patterns will continue in the next section when you request it.
Materials and Tools Needed for Crochet Coffee Cup Sleeves
Before starting the tutorials, gather the basic materials used across most crochet mug sleeve patterns.
Yarn
Cotton yarn or cotton-blend yarn works best for mug sleeves because it holds shape well and tolerates heat better than acrylic. A medium weight yarn (worsted weight) is ideal.
You will also need small accent colors for decorative flowers, embroidery, or embellishments.
Crochet Hook
A 4 mm to 5 mm crochet hook works well with worsted yarn. Beginners may prefer a 4.5 mm hook for tighter stitches.
Yarn Needle
Used for weaving in ends, sewing appliqués, and adding embroidery details.
Scissors
Sharp craft scissors are important for trimming yarn ends and cutting decorative shapes.
Measuring Tape
Helpful for ensuring the sleeve fits around the mug properly.
Optional Decorative Supplies
Small pearls or beads
Craft felt sheets
Fabric glue or craft glue
Small buttons
Embroidery yarn
A standard mug circumference is usually around 9 to 10 inches, with a height of about 3 to 3.5 inches. The sleeve patterns below are designed around that general size but can easily be adjusted by adding or removing stitches.
Tutorial 1: Embroidered Wildflower Crochet Coffee Cup Sleeve
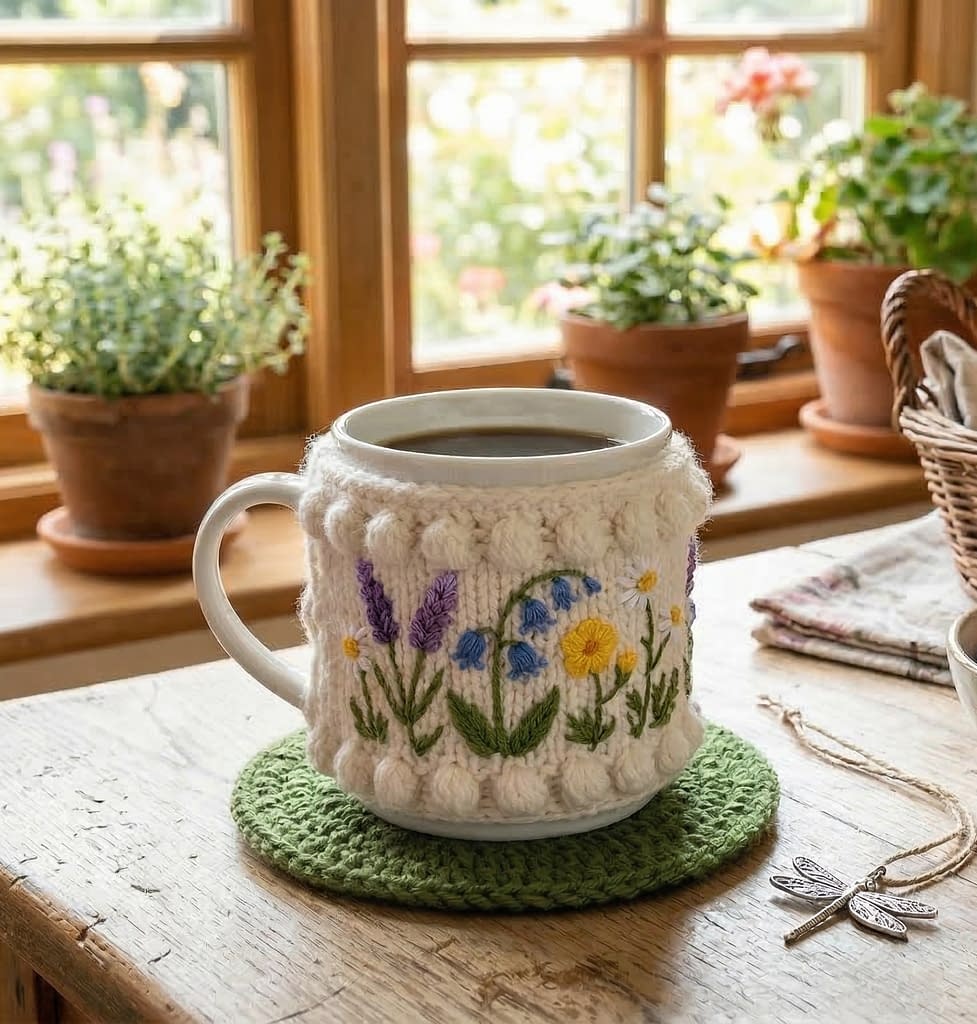
This sleeve corresponds to the cozy with colorful embroidered meadow flowers on a cream crochet base. The design looks like a soft sweater decorated with small wildflowers.
Design Overview
The base of the sleeve is crocheted using simple stitches, and the flowers are added afterward with embroidery. This method allows beginners to create beautiful details without complicated crochet shaping.
Materials for This Pattern
Cream or off-white worsted weight yarn
Small pieces of green, yellow, purple, and blue yarn for embroidery
4.5 mm crochet hook
Yarn needle
Scissors
Thin craft felt (optional)
Fabric glue
Creating the Base Sleeve
Step 1: Measure and Make the Foundation Chain
Wrap the measuring tape around the mug where the sleeve will sit.
Most mugs measure around 9 inches in circumference.
Create a foundation chain that measures about 8.5 inches so the sleeve fits snugly. For worsted yarn with a 4.5 mm hook, this will usually be about 36 chains.
Lay the chain flat and make sure it is not twisted.
Step 2: Join the Chain
Insert the hook into the first chain and make a slip stitch to form a ring.
Be careful that the chain remains straight and does not twist before joining.
Step 3: Crochet the First Row
Chain 1.
Work one single crochet into each chain around the ring.
When you reach the beginning, join with a slip stitch.
This row creates the base foundation of the sleeve.
Step 4: Build the Sleeve Texture
For the next rows, work half double crochet stitches.
Chain 2.
Yarn over, insert the hook into the next stitch, yarn over again, pull through the stitch, then yarn over and pull through all three loops.
Continue this around the sleeve.
Repeat this row for about 8 rounds or until the sleeve measures about 3 inches tall.
Step 5: Add a Decorative Edge
To create the textured trim seen in the image, work a simple bobble edge.
Chain 1.
In the next stitch, yarn over, insert hook, pull up a loop, yarn over, pull through two loops. Repeat this four times in the same stitch.
Yarn over and pull through all loops.
Skip the next stitch and repeat around the sleeve.
Join with a slip stitch and fasten off.
Embroidering the Wildflowers
This step creates the meadow-style flower design.
Step 6: Stitch the Stems
Thread green yarn onto a yarn needle.
Insert the needle from inside the sleeve so the knot stays hidden.
Use a backstitch technique to create thin stems. Push the needle forward about half an inch, then stitch back to the previous point.
Continue until each stem reaches the height you want.
Step 7: Add Leaves
Leaves are created with small angled stitches.
Insert the needle at the base of the leaf and bring it out at the tip, then repeat beside it to fill the shape.
Two or three stitches form a neat leaf.
Step 8: Create the Flower Centers
Use yellow yarn to create small French knots.
Wrap the yarn around the needle twice, insert it back near the original entry point, and pull the yarn gently to form a small knot.
Step 9: Stitch Flower Petals
Use purple or blue yarn.
Insert the needle at the base of the petal and bring it out slightly above the center knot.
Repeat around the knot to form a small flower.
Scatter flowers across the sleeve to mimic a meadow look.
Adding Optional Lining
Cut a rectangle of felt slightly smaller than the sleeve.
Wrap the felt around the mug to check the size, then trim if necessary.
Apply a thin line of fabric glue along the felt seam and press it inside the crochet sleeve.
Allow the glue to dry for at least 15 minutes before using.
Tutorial 2: Daisy Appliqué Crochet Coffee Cup Sleeve with Matching Coaster
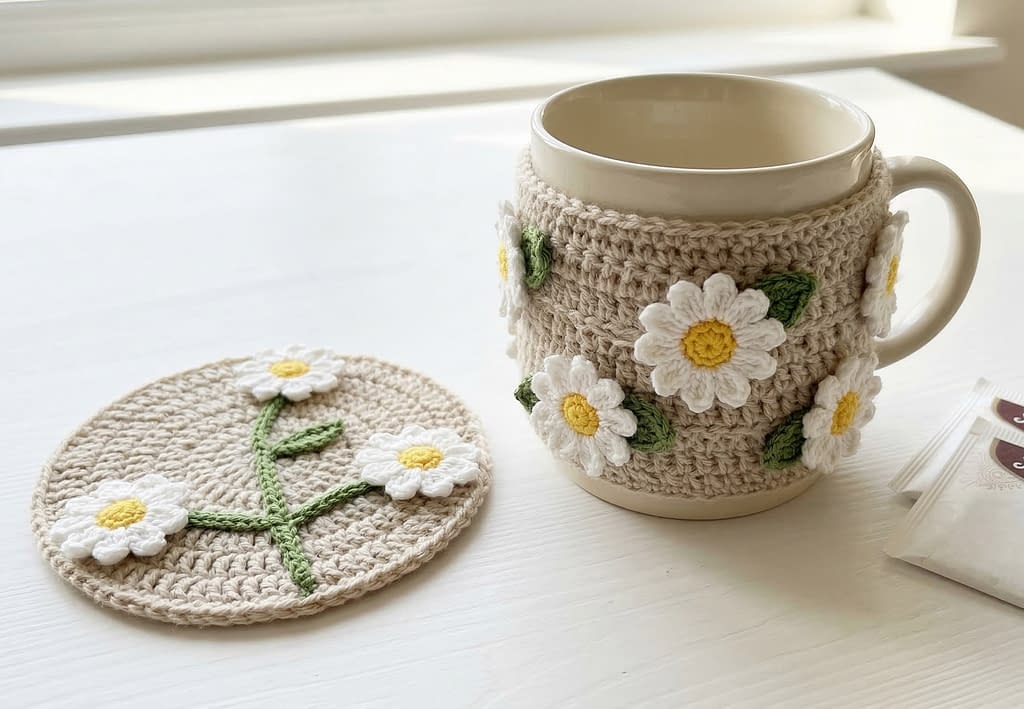
This sleeve corresponds to the design with raised white daisies and a matching crochet coaster.
Design Overview
The sleeve itself is simple and textured, while the daisies are crocheted separately and stitched onto the surface.
Materials for This Pattern
Beige or light tan yarn
White yarn for petals
Yellow yarn for centers
Green yarn for stems
4.5 mm crochet hook
Yarn needle
Scissors
Fabric glue (optional)
Crocheting the Sleeve Base
Step 1: Create the Foundation Chain
Chain 36 stitches.
Check the chain around the mug to ensure it fits comfortably.
Join with a slip stitch.
Step 2: Work the Base Rows
Chain 2.
Work one half double crochet in each stitch around.
Join with a slip stitch.
Repeat this row until the sleeve measures about 3 inches tall.
Step 3: Add the Top Edge
Chain 1.
Work one single crochet in each stitch.
Join with a slip stitch and fasten off.
This gives the sleeve a neat top edge.
Making the Crochet Daisies
Each sleeve uses about three daisies.
Step 4: Crochet the Flower Center
Using yellow yarn, make a magic ring.
Work six single crochet stitches into the ring.
Pull the ring closed and join with a slip stitch.
Step 5: Crochet the Petals
Switch to white yarn.
Chain 3.
Slip stitch into the same stitch.
Chain 3 again and slip stitch into the next stitch.
Repeat this process around the flower to create six petals.
Fasten off and leave a long yarn tail for sewing.
Attaching the Flowers
Step 6: Position the Flowers
Lay the sleeve flat.
Arrange the daisies evenly across the front surface.
Make sure the spacing matches the visual look of the design.
Step 7: Sew the Flowers
Thread the yarn tail through a yarn needle.
Insert the needle through the center of the flower and into the sleeve.
Stitch through several points around the flower to secure it.
Tie the yarn on the inside of the sleeve.
If desired, place a very small drop of fabric glue beneath the flower center before tightening the stitches.
Adding Stems and Leaves
Using green yarn, stitch short lines beneath each flower to represent stems.
Add small leaf shapes using two angled stitches.
Creating the Matching Coaster
The coaster complements the sleeve.
Chain 4 and join to form a ring.
Round 1
Work 12 double crochet stitches into the ring.
Round 2
Work two double crochet in each stitch.
Round 3
Create small chain spaces by chaining 2 and skipping a stitch between clusters.
Finish with a scalloped edge by working five double crochet stitches into every second chain space.
Fasten off and weave in the ends.
Tutorial 3: Pink Textured Crochet Coffee Cup Sleeve with Pearl Accents
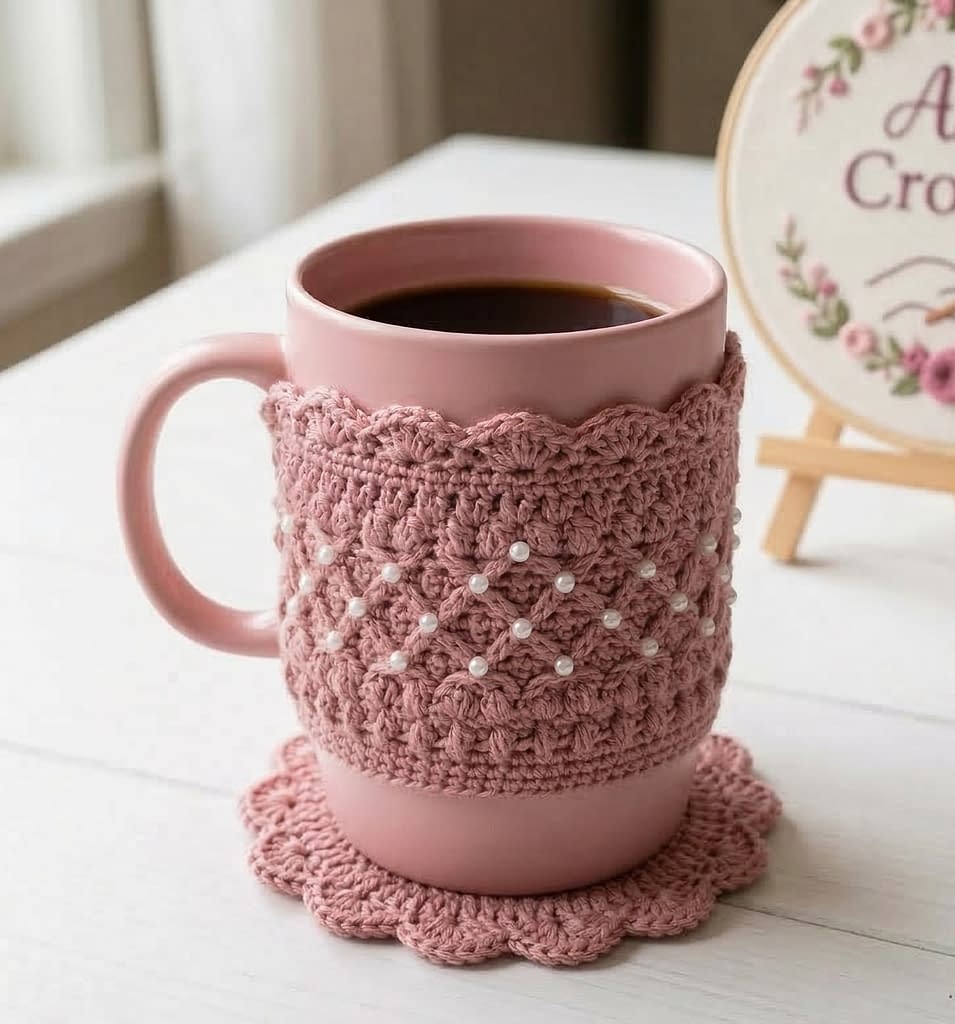
This sleeve matches the pink textured design with a lattice-like pattern and pearl embellishments.
Design Overview
The pattern uses a diamond-style texture created with front post stitches, and pearls are added afterward for decorative elegance.
Materials
Dusty pink yarn
4.5 mm crochet hook
Small craft pearls or beads
Sewing needle and thread
Fabric glue
Scissors
Crocheting the Sleeve Base
Step 1: Foundation Chain
Chain 38 stitches.
Join with a slip stitch to form a ring.
Step 2: First Round
Chain 2.
Work one half double crochet in each stitch around.
Join with a slip stitch.
Step 3: Begin the Diamond Texture
Chain 2.
Work two front post double crochet stitches around the previous row stitches.
Then work two regular double crochet stitches.
Repeat this pattern around the sleeve.
This creates raised ridges.
Step 4: Alternate the Pattern
On the next row, shift the front post stitches slightly to the side so the ridges form a diamond shape.
Continue alternating the placement for several rows.
Work until the sleeve measures about 3 inches tall.
Step 5: Top Edge
Chain 1.
Work one single crochet in each stitch around.
Fasten off and weave in the ends.
Adding the Pearl Decorations
Step 6: Mark the Pearl Positions
Lay the sleeve flat.
Identify the center of each diamond shape formed by the textured stitches.
Use a pin or stitch marker to mark these positions.
Step 7: Sew the Pearls
Thread a sewing needle with matching thread.
Insert the needle from the inside of the sleeve so the knot stays hidden.
Pass the needle through the pearl bead and back through the fabric.
Repeat the stitch twice to secure the bead.
Tie the thread inside the sleeve.
For extra hold, apply a tiny dot of fabric glue over the knot inside the sleeve.
Allow the glue to dry completely.
Optional Decorative Coaster
You may pair the sleeve with a lace crochet coaster.
Chain 6 and join to form a ring.
Work 16 double crochet stitches into the ring.
On the next round, work clusters separated by chain spaces to create a lace pattern.
Finish with scalloped edges.
Preparing for the Remaining Tutorials
The remaining three crochet sleeve designs in the image include:
The cable-style crochet sleeve with small flowers
The personalized alphabet crochet sleeves
The granny-square floral crochet sleeve
Tutorial 4: The Cable-Knit Inspired Tulip Border Sleeve
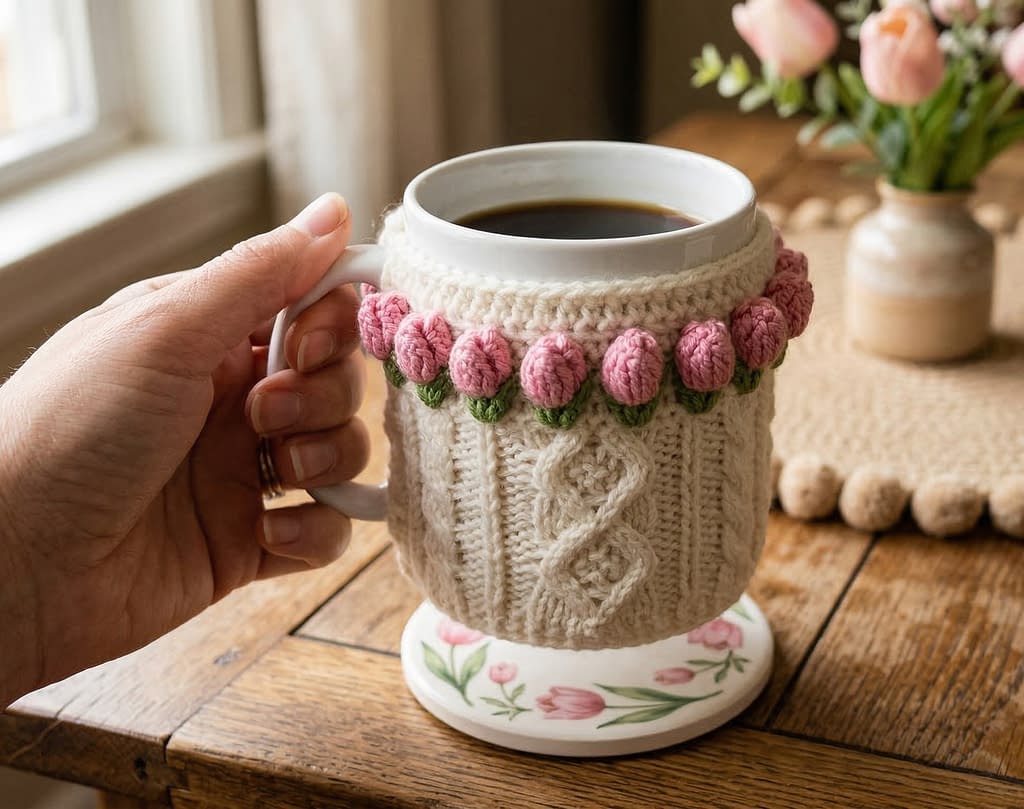
This pattern corresponds to the sleeve with a soft cream color, a vertical braided texture, and a row of small pink tulip flowers around the upper edge. The design resembles a miniature crocheted sweater with decorative trim, which makes it look warm and handcrafted.
Design Overview
The base sleeve is crocheted using a textured cable-style stitch created with front post crochet techniques. These stitches create raised vertical lines that resemble knitted cables. Once the sleeve is finished, small crocheted or yarn tulip flowers are attached along the top edge.
Materials for This Pattern
Cream or light beige worsted weight cotton yarn
Small amount of soft pink yarn for the flowers
4.5 mm crochet hook
Yarn needle
Scissors
Fabric glue
Optional thin felt sheet for lining
Creating the Foundation Chain
Step 1: Measure the Mug
Wrap a measuring tape around the center of the mug where the sleeve will sit. A typical mug circumference is around 9 inches.
Create a foundation chain measuring about 8.5 inches so the sleeve will stretch slightly and fit snugly.
With worsted weight yarn and a 4.5 mm hook, this will usually require about 36 chain stitches.
Lay the chain flat on the table and ensure it is not twisted.
Step 2: Join the Chain
Insert the hook into the first chain and make a slip stitch to join the chain into a ring.
This ring forms the base of the sleeve.
Building the Sleeve Base
Step 3: First Round
Chain 2.
Work one half double crochet into each stitch around the ring.
Join the round with a slip stitch into the first stitch.
This round creates the basic structure of the sleeve.
Step 4: Begin the Cable Texture
Chain 2.
Work two regular double crochet stitches.
Then work two front post double crochet stitches around the posts of the stitches from the previous row.
To make a front post double crochet, yarn over, insert the hook from front to back around the stitch post, pull up a loop, and complete the double crochet normally.
Repeat this pattern of two double crochet followed by two front post double crochet all the way around.
Join with a slip stitch.
Step 5: Shift the Texture
On the next round, shift the front post stitches slightly.
Work one double crochet, then two front post double crochet, then two regular double crochet.
This shifting creates a braided effect that visually resembles a cable pattern.
Repeat this round pattern until the sleeve measures about 3 inches tall.
Finishing the Sleeve Edge
Step 6: Top Border
Chain 1.
Work one single crochet in each stitch around.
Join with a slip stitch and fasten off.
This creates a neat border for attaching the decorative trim.
Making the Flowers
Step 7: Create the Flowers
Wrap pink yarn around two fingers approximately 12 to 15 times.
Carefully slide the yarn off your fingers without letting it unravel.
Cut a small strand of yarn about 4 inches long and tie it tightly around the center of the yarn loop.
Pull the knot firmly to secure the center.
Use scissors to cut through the loops on both sides.
Trim the yarn evenly until a small round tulip shape forms.
Repeat this process to make six to eight small tulip flowers.
Attaching the Flowers
Step 8: Position the Flowers
Lay the sleeve flat on the table.
Place the tulip flowers evenly along the top edge.
Make sure they are spaced equally for a balanced appearance.
Step 9: Secure the tulips
Thread the yarn tails from each tulip through a yarn needle.
Insert the needle through the crochet stitches along the top border.
Pull the yarn through and tie a secure knot inside the sleeve.
For additional security, apply a very small drop of fabric glue beneath the base of each tulip before tightening the yarn.
Allow the glue to dry for about 10 to 15 minutes.
Optional Felt Lining
If you want the sleeve to feel thicker and provide better insulation, add a lining.
Lay the sleeve flat on a piece of thin felt.
Trace the shape and cut the felt slightly smaller than the sleeve.
Wrap the felt into a cylinder shape and place it inside the sleeve.
Apply a thin line of fabric glue along the felt seam and press it into place.
Allow the glue to dry before placing the sleeve on a mug.
The finished result is a soft cable-style crochet sleeve with a row of charming pink flowers around the top.
Tutorial 5: Personalized Alphabet Crochet Coffee Cup Sleeves
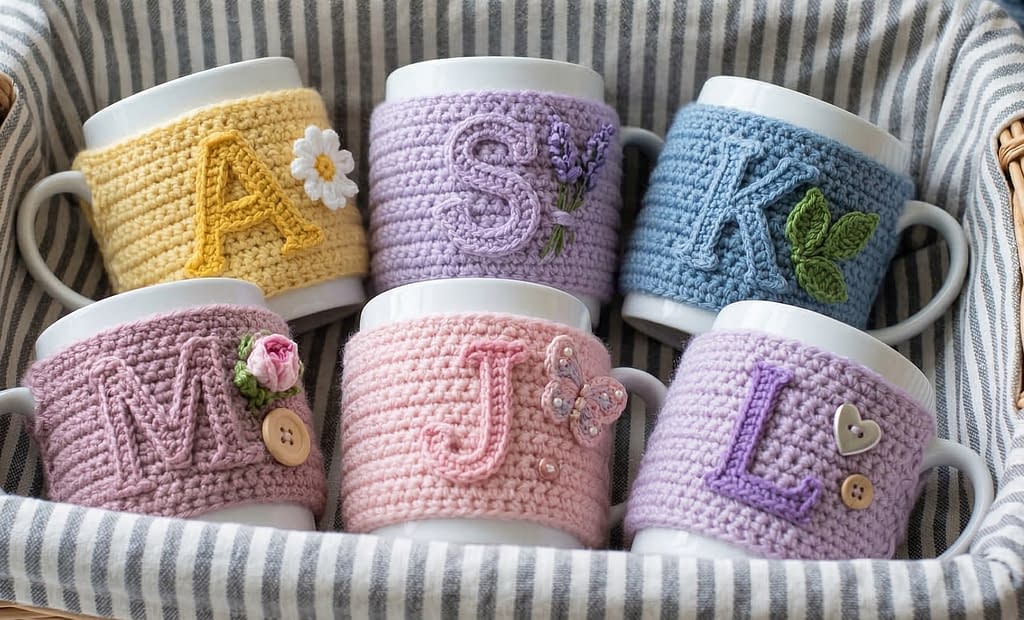
This pattern corresponds to the set of pastel-colored sleeves featuring large letters such as A, S, K, M, and J. These sleeves are ideal for personalized gifts or for identifying different mugs.
Design Overview
Each sleeve is crocheted using a simple textured stitch, and a large crocheted or felt-backed letter is attached to the front as an appliqué.
Materials for This Pattern
Pastel yarn in different colors
Contrasting yarn for the letter appliqué
4.5 mm crochet hook
Yarn needle
Scissors
Craft felt sheets
Fabric glue
Optional small decorative elements such as buttons or crochet flowers
Crocheting the Sleeve Base
Step 1: Foundation Chain
Chain 36 stitches.
Check the chain around the mug to ensure it fits comfortably.
Join the chain with a slip stitch to form a ring.
Step 2: First Round
Chain 2.
Work one half double crochet in each stitch around.
Join with a slip stitch.
Step 3: Textured Rows
Chain 2.
Work one front loop half double crochet in each stitch.
To do this, insert the hook only into the front loop of each stitch instead of both loops.
This technique creates horizontal ridges across the sleeve.
Repeat this row for about 8 rounds until the sleeve measures about 3 inches tall.
Step 4: Finish the Top Edge
Chain 1.
Work one single crochet stitch in each stitch around.
Join with a slip stitch and fasten off.
Creating the Letter Appliqué
Step 5: Crochet a Small Rectangle
Using the contrasting yarn, chain 14 stitches.
Row 1
Work one single crochet in each stitch.
Turn the work.
Row 2 through Row 6
Continue working single crochet across each row.
Fasten off.
This creates a small crocheted fabric piece that will be cut into the letter shape.
Cutting the Letter Shape
Lay the crocheted rectangle flat on a cutting surface.
Use scissors to carefully trim the rectangle into the shape of a letter such as A, S, K, M, or J.
Cut slowly in small sections to maintain smooth edges.
Reinforcing the Letter
Because crochet fabric can stretch, reinforce the letter shape.
Place the cut letter on a sheet of craft felt.
Trace the outline with a pencil.
Cut the felt shape slightly smaller than the crocheted letter.
Apply a thin layer of fabric glue to the felt piece and press it onto the back of the crocheted letter.
Allow the glue to dry completely.
This reinforcement helps the letter maintain its shape.
Attaching the Letter
Place the letter in the center of the sleeve.
Thread a yarn needle with matching yarn.
Sew along the edges of the letter using small whip stitches.
Make sure each corner of the letter is firmly secured.
Tie the yarn securely on the inside of the sleeve.
Optional Decorations
You may add small crochet flowers, buttons, or butterfly embellishments near the letter.
Attach these using a sewing needle and thread.
For heavier decorations, apply a tiny drop of fabric glue beneath them before sewing.
These personalized sleeves make excellent handmade gifts for friends or family members.
Tutorial 6: Granny Square Flower Crochet Coffee Cup Sleeve
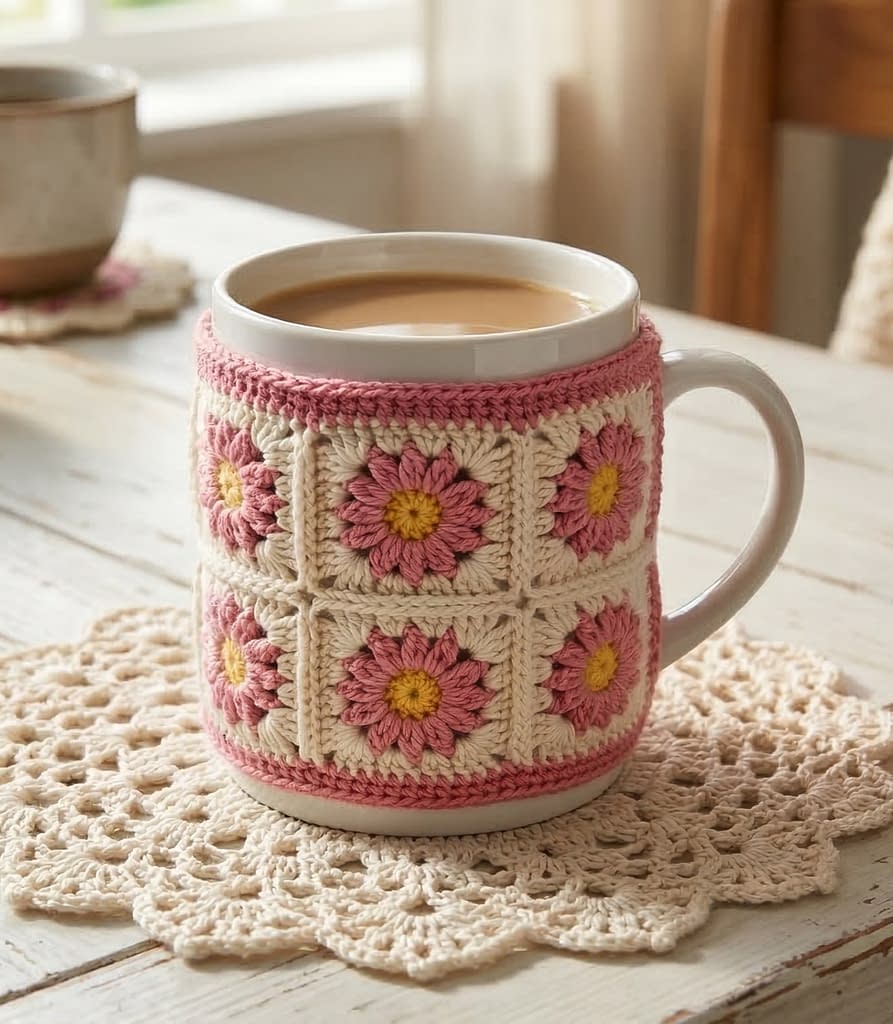
This pattern corresponds to the sleeve featuring square floral motifs arranged in a grid pattern. The design resembles a classic crochet granny square blanket wrapped around a mug.
Design Overview
Small crochet flower squares are created separately and then stitched together to form the sleeve.
Materials for This Pattern
Cream or beige yarn
Pink yarn for petals
Yellow yarn for flower centers
Green yarn for leaf details
4.5 mm crochet hook
Yarn needle
Scissors
Fabric glue
Optional felt lining
Crocheting the Flower Squares
Each sleeve uses six small squares arranged in two rows of three squares.
Step 1: Make the Flower Center
Using yellow yarn, create a magic ring.
Work 8 single crochet stitches into the ring.
Pull the ring closed and join with a slip stitch.
Fasten off the yellow yarn.
Step 2: Crochet the Petals
Attach pink yarn to any stitch.
Chain 2.
Work three double crochet stitches into the same stitch.
Chain 2 and slip stitch into the next stitch.
Repeat this pattern around the circle to form five or six petals.
Fasten off and weave in the ends.
Step 3: Form the Square Shape
Attach beige yarn between two petals.
Chain 3 to form the first corner.
Work two double crochet stitches, chain 2, and three double crochet stitches into the same space.
This forms one corner of the square.
Continue working clusters of three double crochet stitches along the sides, and use chain 2 spaces to create the corners.
By the end of the round, the flower will be framed inside a small granny square.
Fasten off and weave in the ends.
Repeat this process until you have six squares.
Arranging the Squares
Lay the six squares on the table in two rows of three squares.
Adjust their orientation so the flowers face the same direction.
Joining the Squares
Thread a yarn needle with beige yarn.
Place two squares side by side with the right sides facing upward.
Insert the needle through the outer loops of both squares and sew them together using whip stitches.
Join the squares row by row until all six squares form a rectangular panel.
Forming the Sleeve
Wrap the panel around the mug to check the fit.
Bring the two short edges together.
Use the same whip stitch method to join the final seam.
Tie off the yarn and weave in the ends.
Optional Felt Lining
Cut a felt rectangle slightly smaller than the crocheted panel.
Wrap the felt inside the sleeve.
Apply a thin line of fabric glue along the felt seam and press it in place.
Allow the glue to dry fully before using the sleeve.
The finished result is a charming crochet sleeve that looks like a miniature granny square blanket wrapped around a mug.
Conclusion
Creating crochet mug sleeves is one of the most enjoyable ways to practice crochet techniques while making something practical. These 6 Crochet Coffee Cup Sleeve Patterns demonstrate how simple stitches can be transformed into beautiful handmade accessories with a little creativity.
The embroidered wildflower sleeve offers a delicate handmade look inspired by nature. The daisy appliqué design adds dimension and charm with raised flowers and a matching coaster. The pink textured sleeve introduces elegant stitch patterns enhanced with pearl accents.
The cable-style crochet sleeve brings warmth and depth through raised stitches and decorative flowers. The personalized alphabet sleeve allows you to create meaningful gifts by adding initials or names. Finally, the granny square flower sleeve celebrates the timeless beauty of traditional crochet motifs.
Each pattern uses simple materials and approachable techniques, making them accessible even for beginners. At the same time, they offer enough variety to keep experienced crocheters inspired. By experimenting with yarn colors, textures, and embellishments, you can easily adapt these designs to suit different seasons, home décor styles, or personal preferences.