
There is something undeniably satisfying about the hexagon shape. It is nature’s perfect polygon, found in honeycombs and snowflakes, and it tessellates beautifully to create surface areas that are both geometrically pleasing and functionally sound. When it comes to home decor, specifically dining table arrangements, the hexagon offers a modern twist on the traditional circular doily or rectangular placemat.
In this comprehensive guide, we are going to explore six distinct crochet hexagon table mat patterns. These designs have been curated to cover a wide range of aesthetic preferences, from heavy texture and boho-chic vibes to delicate lace and colorful patchwork. Whether you are looking to protect your wooden table from hot mugs or simply want to add a centerpiece that sparks conversation during dinner parties, these mats are the perfect project.
We have structured this guide to be incredibly beginner-friendly. You will not find any confusing abbreviations or shorthand here. Every stitch is written out in full, plain English, and the instructions are broken down into granular steps. We believe that a pattern should be a relaxing journey, not a puzzle to solve. Grab your favorite hook and some cotton yarn, and let us begin with the first three stunning designs.
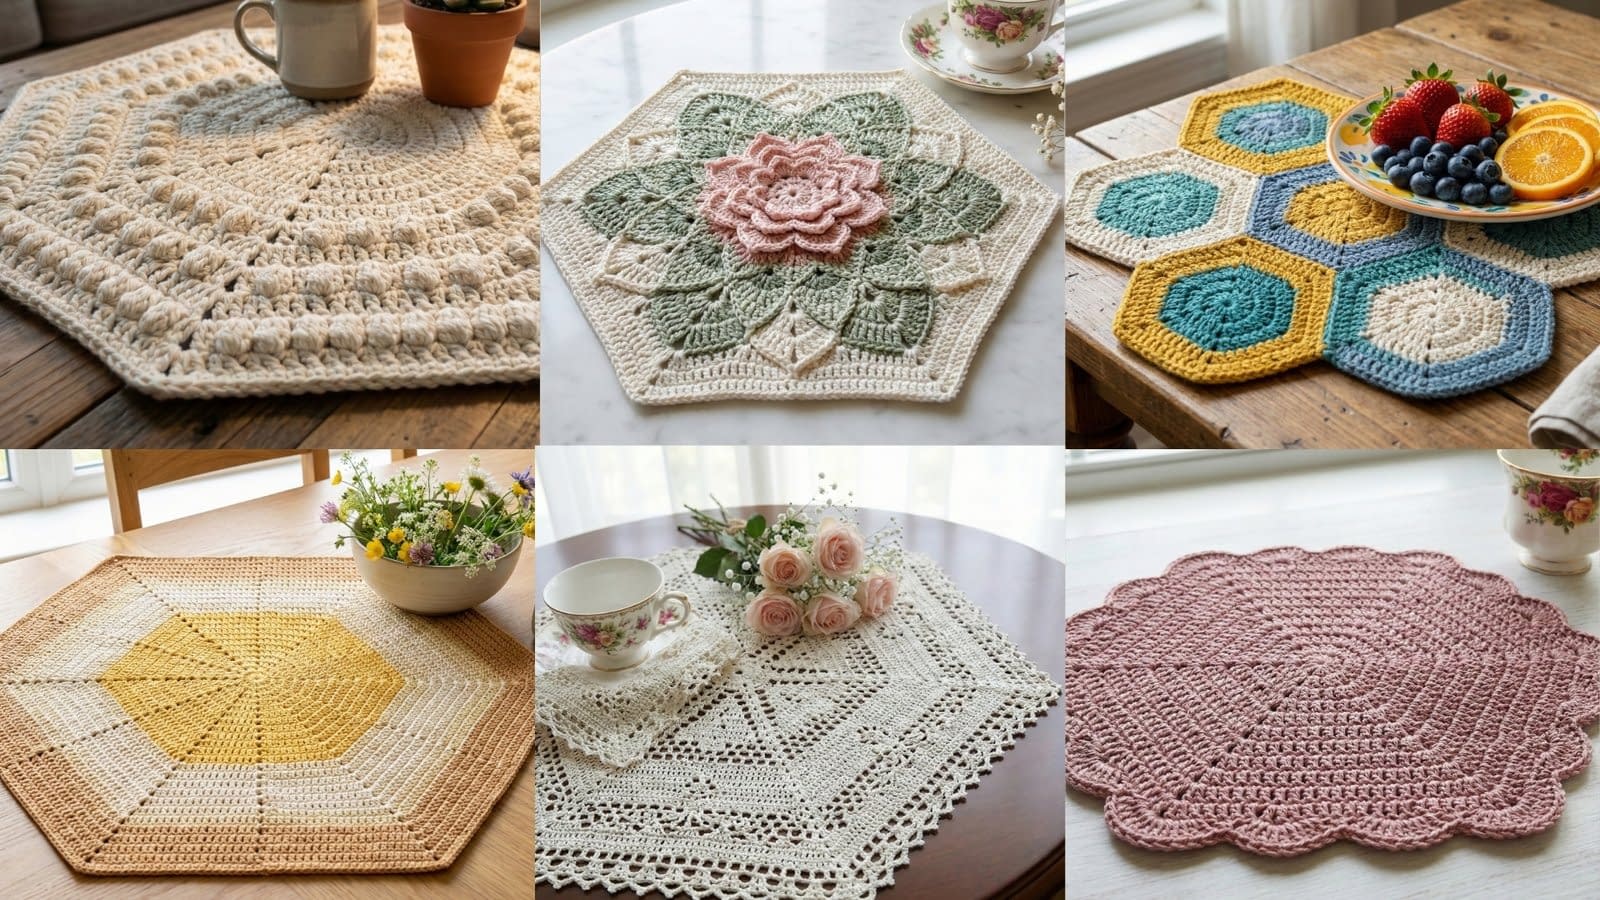
1. The Cream Puff Textured Hexagon Mat

This pattern corresponds to the beautiful, monochromatic cream mat shown in the top-left of the reference imagery. It features a dense, cozy fabric highlighted by rounds of raised texture, often referred to as bobbles or popcorns. This mat is excellent for heat protection due to its thickness, making it ideal for placing under a heavy teapot or a hot serving dish. The single color allows the texture to take center stage.
Skill Level
Intermediate (requires comfort with special textured stitches)
Finished Size
Approximately 12 inches to 14 inches in diameter (adjustable based on yarn weight)
Materials
Worsted weight cotton yarn in a cream or oatmeal shade
Crochet hook size 4.5 mm or 5.0 mm
Yarn needle for weaving in ends
Scissors
Notes
This pattern is worked in joined rounds. You will not turn your work at the end of the round unless specified. The texture is created by working a special stitch known as the Bobble Stitch. To make a Bobble Stitch for this pattern: Yarn over, insert hook into the stitch, yarn over and pull up a loop, yarn over and pull through two loops. Repeat this four more times in the same stitch. You should have six loops on your hook. Yarn over and pull through all six loops. Chain one to lock the stitch.
Instructions
Foundation
Start by making a magic circle. If you find the magic circle difficult, you may chain four and join with a slip stitch to the first chain to form a ring.
Round 1
Chain three. This counts as your first double crochet stitch. Work eleven more double crochet stitches into the center of the ring. You should have a total of twelve double crochet stitches. Join the round by performing a slip stitch into the top of the beginning chain three.
Round 2
Chain three (counts as first double crochet). Work one double crochet in the same stitch as the joining. In the next stitch, work two double crochet stitches. Continue to work two double crochet stitches in every stitch around the circle. You will end up with twenty-four double crochet stitches. Join with a slip stitch to the top of the beginning chain three.
Round 3
Now we will begin to form the hexagon shape. Chain three (counts as double crochet). In the next stitch, work a corner cluster consisting of: one double crochet, chain two, and one double crochet—all in the same stitch. Work one double crochet in the next three stitches. In the following stitch, work another corner cluster (one double crochet, chain two, one double crochet). Repeat the pattern of working one double crochet in the next three stitches followed by a corner cluster around the circle. Join with a slip stitch to the top of the starting chain three.
Round 4 (Texture Round)
Chain one. Work one single crochet in the same stitch. Work one single crochet in the next stitch. In the corner chain-two space, work one single crochet, chain two, and one single crochet. Now, work one single crochet in the next stitch. Work a Bobble Stitch (as explained in the notes) in the next stitch. Work one single crochet in the next stitch. Work one Bobble Stitch in the next stitch. Work one single crochet in the last stitch before the corner. In the corner space, work one single crochet, chain two, and one single crochet. Repeat the sequence between the asterisks along each straight edge of the hexagon. Join with a slip stitch to the first single crochet.
Round 5
Chain three (counts as double crochet). Work one double crochet in each stitch leading up to the corner space. In the corner chain-two space, work one double crochet, chain two, and one double crochet. Continue working one double crochet in every stitch along the sides, and work the (one double crochet, chain two, one double crochet) increase in every corner space. Join with a slip stitch to the top of the starting chain three.
Round 6 (Texture Round)
Chain one. Work single crochet stitches in each stitch leading to the corner. In the corner space, work one single crochet, chain two, and one single crochet. Along the side, work a pattern of: one single crochet, one Bobble Stitch, one single crochet. Ensure you space the bobbles so they sit nicely between the bobbles from the previous textured round (offsetting them looks best). Repeat the corner increases and the side texture pattern around the entire mat. Join with a slip stitch.
Round 7 through 10
Continue alternating between a solid double crochet round (like Round 5) and a textured single crochet and Bobble round (like Round 6). In each round, your sides will have more stitches, so you will need to add more Bobble stitches to fill the space. Always ensure your corners consist of increases to keep the mat flat.
Finishing
Once the mat reaches your desired size, finish with a round of simple single crochet stitches in every stitch and two single crochets in each corner space to give it a clean, finished edge. Cut the yarn, fasten off, and weave in all ends securely using your yarn needle.
2. The Blooming Rose Garden Hexagon

This pattern matches the romantic, vintage-inspired mat in the top-center of the reference image. It features a three-dimensional pink flower in the center, surrounded by sage green “leaves,” and framed by a cream border. This is a motif-style hexagon, meaning the design radiates outward from the central floral feature. It looks stunning as a centerpiece or under a vintage tea set.
Skill Level
Intermediate (requires working in rounds and changing colors)
Finished Size
Approximately 10 inches to 12 inches across
Materials
DK or Worsted weight cotton yarn in three colors: Dusty Pink (Color A), Sage Green (Color B), and Cream (Color C)
Crochet hook size 4.0 mm
Yarn needle
Scissors
Instructions
Center Flower – Round 1
With Pink yarn (Color A), start with a magic circle. Chain one. Work twelve single crochet stitches into the ring. Tighten the ring to close. Join with a slip stitch to the first single crochet.
Round 2 (Petal Foundation)
Chain one. Single crochet in the first stitch. Chain three. Skip one stitch. Single crochet in the next stitch. Chain three. Skip one stitch. Repeat this around until you have six chain-three loops. Join with a slip stitch to the first single crochet.
Round 3 (First Layer of Petals)
Work into the first chain-three loop: one single crochet, one half double crochet, three double crochet stitches, one half double crochet, one single crochet. This forms one petal. Move to the next chain-three loop and repeat the sequence. Do this for all six loops. You now have six small petals. Do not cut the yarn.
Round 4 (Second Layer Foundation)
We will now work behind the petals you just made. Chain four. Insert your hook from the back around the post of the single crochet from Round 2 (between the petals) and make a slip stitch. Chain four. Slip stitch around the next post. Repeat around so you have six new chain-four loops behind the first set of petals.
Round 5 (Second Layer of Petals)
Work into the first chain-four loop: one single crochet, one half double crochet, five double crochet stitches, one half double crochet, one single crochet. Repeat this in all six loops to create larger petals behind the first ones. Fasten off the Pink yarn.
Leaf Round – Round 6
Join the Green yarn (Color B) in any space between the large petals (working behind them slightly). Chain three (counts as a double crochet). Work two double crochet stitches in the same space. Chain two. Work three more double crochet stitches in the same space. This creates your first corner. Chain one. Skip over the petal. In the next space between petals, work a corner again (three double crochet, chain two, three double crochet). Repeat around. You should have six green corners separated by chain-one spaces. Join with a slip stitch to the top of the beginning chain three. Fasten off Green yarn.
Border Round – Round 7
Join the Cream yarn (Color C) in any chain-two corner space. Chain three (counts as double crochet). Work one double crochet, chain two, two double crochet in the same corner space. Work one double crochet in each of the next three green stitches. Work one double crochet in the chain-one space. Work one double crochet in each of the next three green stitches. In the corner space, work two double crochet, chain two, two double crochet. Repeat the sequence between the asterisks around the hexagon. Join with a slip stitch.
Round 8
Chain three (counts as double crochet). Work one double crochet in the next stitch. In the corner space, work (one double crochet, chain two, one double crochet). Work one double crochet in every stitch along the side until you reach the next corner. Repeat the corner increase. Continue this pattern around.
Round 9 (Decorative Edge)
To create the slight texture seen in the image, chain one. Work a reverse single crochet (also known as the crab stitch) in each stitch around the entire perimeter. If you find the reverse single crochet too difficult, you can simply work a standard single crochet round. Fasten off and weave in ends.
3. The Honeycomb Patchwork Table Mat

This pattern corresponds to the colorful mat shown in the top-right of the reference image. Unlike the previous patterns which are single large hexagons, this mat is constructed by making several smaller, solid hexagons (motifs) and joining them together. This creates a “honeycomb” effect. It is a fantastic stash-buster project, allowing you to use leftover yarns in mustard, teal, blue, and cream.
Skill Level
Beginner (simple motifs joined together)
Finished Size
Variable. Each individual small hexagon is about 4 inches wide. The final size depends on how many you join. The image shows a cluster of seven to ten hexagons.
Materials
Worsted weight yarn in Mustard Yellow, Teal, Light Blue, and Cream
Crochet hook size 4.0 mm or 4.5 mm
Yarn needle for sewing
Scissors
Instructions for One Small Hexagon
Make as many of these as you need for your desired size. Mix and match the colors for each hexagon.
Foundation
Begin with a magic circle.
Round 1
Chain three (counts as first double crochet). Work eleven double crochet stitches into the ring. Join with a slip stitch to the top of the chain three. You have twelve stitches.
Round 2
Chain three (counts as double crochet). Work one double crochet in the same stitch. In the next stitch, work two double crochet stitches. Repeat from * to * around. You should have twenty-four double crochet stitches. Join with a slip stitch.
Round 3
Chain three (counts as double crochet). In the next stitch, work the corner: (one double crochet, chain one, one double crochet) in the same stitch. Work one double crochet in each of the next three stitches. Work a corner in the next stitch (one double crochet, chain one, one double crochet). Repeat from * to * around. Note: You may need to adjust the stitch count slightly to ensure you end up with six corners evenly spaced. A common variation is to have the side count be three stitches. Join with a slip stitch.
Round 4
Chain three (counts as double crochet). Work one double crochet in each stitch to the corner space. In the chain-one corner space, work (one double crochet, chain one, one double crochet). Work one double crochet in each stitch along the next side. Repeat around. Join with a slip stitch. Fasten off leaving a tail for weaving in.
Assembly Instructions
Layout
Lay your completed small hexagons out on a flat surface. Arrange them in a honeycomb pattern that pleases you. A classic arrangement is one hexagon in the center surrounded by six hexagons.
Joining
Thread your yarn needle with a matching or contrasting yarn color (Cream usually works best to unite the colors). Hold two hexagons with their right sides facing each other. Sew them together along one side using a whip stitch. A whip stitch involves inserting the needle through the outer loops of both pieces from front to back, looping over the top.
Connection Order
Sew the center hexagon to the surrounding hexagons first. Then, sew the side seams of the surrounding hexagons where they touch each other.
Border (Optional)
Once all hexagons are joined into a single piece, join Cream yarn to any outer corner. Work a round of single crochet evenly around the entire perimeter of the new shape. Place three single crochet stitches in outer points (corners) to keep them sharp, and skip one stitch in the inner “valleys” where two hexagons meet to prevent bunching. Fasten off and weave in all ends.
4. The Golden Hour Two-Tone Hexagon

This pattern corresponds to the modern, geometric mat shown in the bottom-left of the reference imagery. It features a striking two-tone design with a bright mustard yellow center that transitions into a warm oatmeal or tan border. The beauty of this mat lies in its simplicity and the clean, defined lines of the hexagon “spokes” created by the corner increases. It is perfect for a modern farmhouse or Scandinavian-style dining room.
Skill Level
Beginner (focuses on basic stitches and one color change)
Finished Size
Approximately 14 inches to 16 inches across (designed to be a larger placemat)
Materials
Worsted weight yarn in two colors: Mustard Yellow (Color A) and Tan/Beige (Color B)
Crochet hook size 5.0 mm
Yarn needle
Scissors
Notes
This pattern is a classic “Solid Hexagon.” The increases are made in the corners to keep the fabric flat. We will be using the Double Crochet stitch throughout. To change colors seamlessly, finish the last stitch of the yellow section until there are two loops left on the hook, then pull the new tan color through to complete the stitch.
Instructions
Center Section (Color A)
Start with your Mustard Yellow yarn. Create a magic circle.
Round 1
Chain three. This counts as your first double crochet stitch. Work one double crochet into the ring. Chain two. Work two double crochet stitches into the ring. Chain two. Repeat the sequence between the asterisks four more times. You should have six groups of two double crochets separated by chain-two spaces. Join with a slip stitch to the top of the beginning chain three.
Round 2
Slip stitch into the next stitch and then slip stitch into the chain-two space (this moves your starting position to the corner). Chain three (counts as double crochet). Work one double crochet, chain two, and two double crochet stitches all in that same space. This is your first corner. Work one double crochet in each stitch across the side until you reach the next chain-two space. In the chain-two space, work a corner: two double crochet, chain two, two double crochet. Repeat from * around the entire hexagon. Join with a slip stitch to the top of the beginning chain three.
Round 3 through Round 6
Continue expanding the hexagon using the established pattern.
1. Slip stitch your way to the nearest corner space at the start of every round.
2. Always start the round with a corner sequence (Chain three, one double crochet, chain two, two double crochet).
3. Work one double crochet in every double crochet stitch along the straight sides.
4. Work the corner sequence (two double crochet, chain two, two double crochet) in every corner chain-two space.
At the end of Round 6 (or when the yellow section is about 7 inches wide), fasten off the Mustard Yellow yarn.
Outer Border (Color B)
Join the Tan/Beige yarn in any corner chain-two space.
Round 7
Chain three (counts as double crochet). Work one double crochet, chain two, two double crochet in the same space. Proceed to work one double crochet in every stitch along the sides, and work the standard corner sequence (two double crochet, chain two, two double crochet) in the corners. The only difference here is that you are working with a new color.
Round 8 through Round 12
Continue working rounds in the Tan color exactly as you did before. As the hexagon grows larger, the number of stitches on each side will increase, but the corner method remains exactly the same. Keep going until the mat reaches your desired placemat size.
Finishing
To create a smooth edge, work one final round of Single Crochet stitches. Work one single crochet in every stitch and three single crochet stitches in each corner space. Fasten off and weave in all ends neatly on the back side.
5. The Victorian Lace Tea Mat

This pattern corresponds to the exquisite white lace mat shown in the bottom-center of the reference imagery. It is delicate, airy, and features intricate openwork that mimics traditional tatting or doilies. This mat is intended more for decoration—perfect for placing under a vase of flowers or a vintage tea cup—rather than for heavy-duty heat protection.
Skill Level
Intermediate to Advanced (requires attention to counting and tension)
Finished Size
Approximately 10 inches to 12 inches across
Materials
Mercerized Cotton Yarn (lighter weight, such as DK or Sport weight) in White or Cream
Crochet hook size 3.5 mm or 3.75 mm (smaller hooks create crisper lace)
Yarn needle
Scissors
Instructions
Center Motif
Begin with a magic circle.
Round 1
Chain four (counts as one double crochet and one chain space). Work one double crochet into the ring, followed by chain one. Repeat from * ten more times. Join with a slip stitch to the third chain of the beginning chain four. You should have twelve double crochet posts separated by chain spaces.
Round 2
Slip stitch into the first chain space. Chain three (counts as double crochet). Work one double crochet in the same space. Chain one. In the next chain space, work two double crochet stitches, chain one. Repeat around. Join with a slip stitch.
Round 3 (Creating the Hexagon Shape)
Slip stitch to the next chain space. Chain three. Work two double crochet, chain two, three double crochet in the same space (Corner made). Skip the next group of stitches. In the next chain space, work three double crochet stitches. Skip the next group. In the following chain space, work a corner: three double crochet, chain two, three double crochet. Repeat this pattern around. You will form six corners. Join with a slip stitch.
Round 4 (The Open Mesh)
Slip stitch to the corner space. Chain four (counts as double crochet plus chain one). Work one double crochet in the same corner space. Chain one. Skip one stitch. Work one double crochet in the next stitch. Chain one. Skip one stitch. Work one double crochet in the next stitch… Continue this mesh pattern along the side. When you reach the corner chain-two space, work: one double crochet, chain three, one double crochet. Continue the mesh pattern (double crochet, chain one, skip one) along all sides. Join with a slip stitch.
Round 5 (Lace Arches)
Slip stitch into the first space. Chain five. Skip two spaces. Single crochet into the next space. Repeat this arch pattern along the side. When you reach a corner, work a single crochet, chain five, and single crochet back into the same corner loop to create a corner point. Continue working chain-five arches around the mat.
Round 6 (The Picot Edge)
This is the final decorative rim. Work into the first chain-five loop: Work three single crochet stitches. Chain three, then slip stitch back into the first chain you just made (this creates a “picot” or little nub). Work three more single crochet stitches into the same loop. Move to the next loop and repeat: three single crochets, picot, three single crochets. Repeat this in every loop around the entire mat.
Finishing
Fasten off. For lace items, blocking is essential. Wet the finished mat with water, stretch it out on a blocking board or towel, pin it into a perfect hexagon shape (paying attention to the picot points), and let it dry completely. This will “open up” the lace and make the pattern crisp.
6. The Scalloped Rose Hexagon

This pattern matches the dusty pink mat shown in the bottom-right of the reference imagery. It combines a solid, sturdy center with a playful, feminine border made of large shell stitches. This design is charming and works wonderfully in nurseries, bedrooms, or for a spring-themed brunch table.
Skill Level
Easy to Intermediate
Finished Size
Approximately 11 inches across
Materials
Worsted weight cotton yarn in Dusty Pink or Mauve
Crochet hook size 4.5 mm
Yarn needle
Scissors
Instructions
The Solid Base
We will start by making a standard solid hexagon base, similar to the “Golden Hour” mat but in a single color.
Round 1 through Round 8
Follow the instructions for the “Golden Hour Two-Tone Hexagon” (Pattern 4), but do not change colors. Use the Dusty Pink yarn continuously.
• Start with a magic ring.
• Round 1: 12 DC total (grouped as 2 DC, ch 2).
• Round 2 onwards: Increase at the corners with (2 DC, ch 2, 2 DC) and work 1 DC in side stitches.
Continue until you have completed Round 8. The mat should be a solid, flat hexagon. Do not fasten off.
The Scalloped Border
We will now add the decorative shell edge that makes this pattern unique.
Round 9 (Setup Round)
Chain one. Single crochet in the same stitch. Work one single crochet in every stitch around the mat. When you reach a corner chain-two space, work three single crochet stitches into the space. Join with a slip stitch to the first single crochet.
Round 10 (Shell Stitch Edge)
Skip two stitches. In the next stitch, work seven double crochet stitches all into the same stitch. (This creates a fan or “shell”). Skip two stitches. Slip stitch into the next stitch.
Repeat the sequence between the asterisks along the side of the hexagon.
Note on spacing: You want to ensure a shell lands nicely near the corners. If you approach a corner and your stitch count is off by one, simply skip one stitch instead of two to make it fit. The goal is to have the shells flow continuously around the edge.
When you reach a corner point (the center of the three single crochets you made in the previous round), try to place a Shell Stitch exactly in that center stitch to accentuate the point of the hexagon.
Finishing
Once you have worked shells all the way around and reached the start, join with a slip stitch. Fasten off. Weave in the ends. You may need to gently tug on the shells with your fingers to make them lay flat and rounded.
Conclusion
Crocheting hexagon table mats is a delightful way to explore geometry through yarn. Unlike large blankets that take months to complete, these mats are quick, satisfying projects that offer instant gratification. They allow you to practice new techniques—from textured bobbles and color changes to delicate lace work—on a manageable scale.
Whether you choose the sturdy, heat-resistant Cream Puff design for your daily dining or the intricate Victorian Lace for special occasions, these handmade touches bring warmth and personality to your home. Remember, the beauty of crochet lies in the imperfections and the unique hand of the maker. Do not be afraid to experiment with different yarn colors to match your seasonal decor or to mix and match these patterns for an eclectic, bohemian table setting.


