Discover how to transform simple cardstock and paper into enchanting celestial decor with these five detailed paper moon craft tutorials. From elegant origami swans to whimsical nursery mobiles and 3D geometric sculptures, this comprehensive guide provides step-by-step instructions to help you master the art of paper crafting. Whether you are looking for a calming weekend project or a unique handmade gift, these moon-inspired designs offer a perfect blend of creativity and sophistication.
The Magic of Paper Moon Crafts
There is something inherently soothing about the crescent moon. It represents transition, peace, and the quiet beauty of the night sky. In the world of paper crafting, the moon provides a versatile silhouette that can be adapted into countless styles. By using different weights of paper, textures, and folding techniques, you can create pieces that range from minimalist and modern to ornate and romantic.
This guide is designed to take you through the process of creating several distinct styles of moon crafts. We will look at how to build structural stability into paper, how to create delicate folds that mimic professional origami, and how to incorporate secondary elements like flowers, birds, and even lighting to bring your creations to life.
Paper crafting is an accessible hobby, but achieving a professional finish requires patience and attention to detail. In the following sections, we will break down each project into granular steps. We will avoid shorthand and abbreviations to ensure that even if this is your very first time working with paper as a medium, you will feel confident in your ability to produce a beautiful result.
1. The Golden Origami Swan and Crescent Moon Display
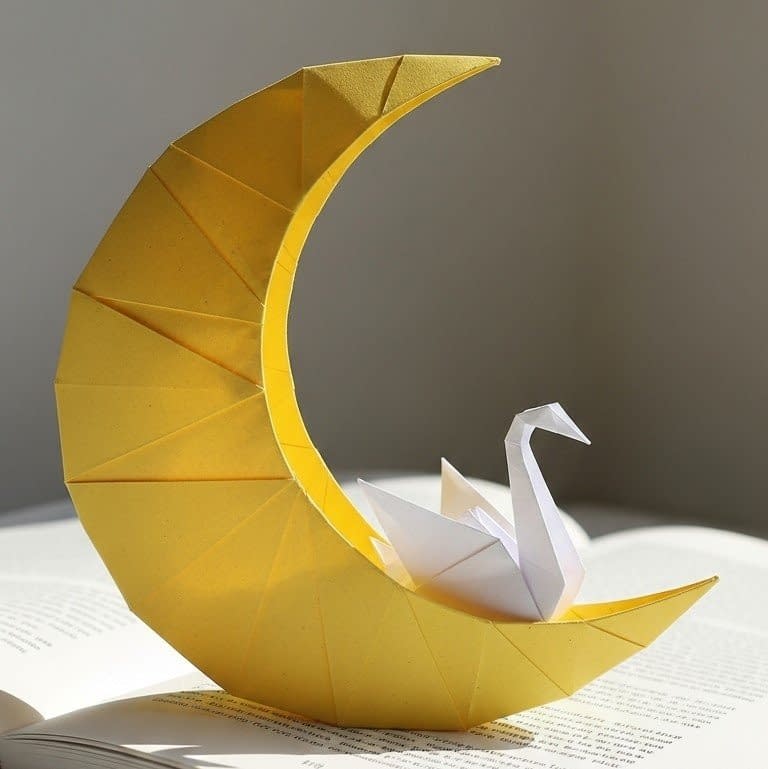
This project combines a structural, faceted crescent moon base with a delicate, traditional origami swan. It is a beautiful study in contrast—the sharp, geometric lines of the yellow moon against the soft, fluid curves of the white swan. This piece works exceptionally well as a desk accessory or a centerpiece for a bookshelf.
Materials Required for the Swan and Moon
To begin this project, you will need several sheets of high-quality cardstock. For the moon, a vibrant golden-yellow cardstock with a weight of at least 200 grams per square meter is recommended to ensure the structure can stand on its own. For the swan, a lighter weight white bond paper or specific origami paper is best, as it allows for the precise, multiple folds required for the bird’s neck and wings. You will also need a bone folder for crisp creases, a ruler, a pencil, and a clear-drying craft glue.
Constructing the Faceted Moon Base
The moon in this tutorial is not a flat cutout but a three-dimensional, faceted object. To start, you will need to cut several long, tapered strips of your yellow cardstock. Instead of a smooth curve, we are aiming for a “pleated” look.
Lay your first strip of paper horizontally on your work surface. Using your ruler and pencil, mark vertical lines every half-inch. Use your bone folder to score along these lines. Scoring is the process of creating a light indent in the paper without cutting through it, which allows for a much cleaner fold.
Once scored, fold the paper in an accordion style—folding one way, then the other. To achieve the crescent shape, you will need to taper the top and bottom of these strips so they meet at a point. You will create two identical side panels and a central “spine” or gusset. Apply a thin, even layer of glue along the edges of the side panels and press them firmly against the central spine. Hold them in place for thirty seconds to ensure a strong bond. The result should be a sturdy, upright crescent moon with visible vertical facets.
Folding the Elegant Origami Swan
Now we will create the swan that rests inside the curve of the moon. Take a square piece of white paper, approximately six inches by six inches. Place the paper so it looks like a diamond. Fold the paper in half diagonally to create a crease and then unfold it.
Fold the left and right outer corners inward so they meet at the center crease. This is often called a “kite fold.” Flip the paper over and repeat this process, folding the new outer edges toward the center. This makes the shape even thinner and more pointed.
Next, fold the entire long, thin shape in half by bringing the bottom point up to the top point. You now have a thick triangle. Fold about one-third of the thin top point back down to create the head of the swan. Now, fold the entire structure in half lengthwise.
To reveal the swan, gently pull the long neck piece away from the body and pinch the base to set the angle. Do the same with the head. Finally, fold the wings slightly outward to give the bird volume. Place a small dot of glue on the bottom of the swan and nestle it into the curve of your yellow moon.
2. The Celestial Cloud and Star Hanging Mobile
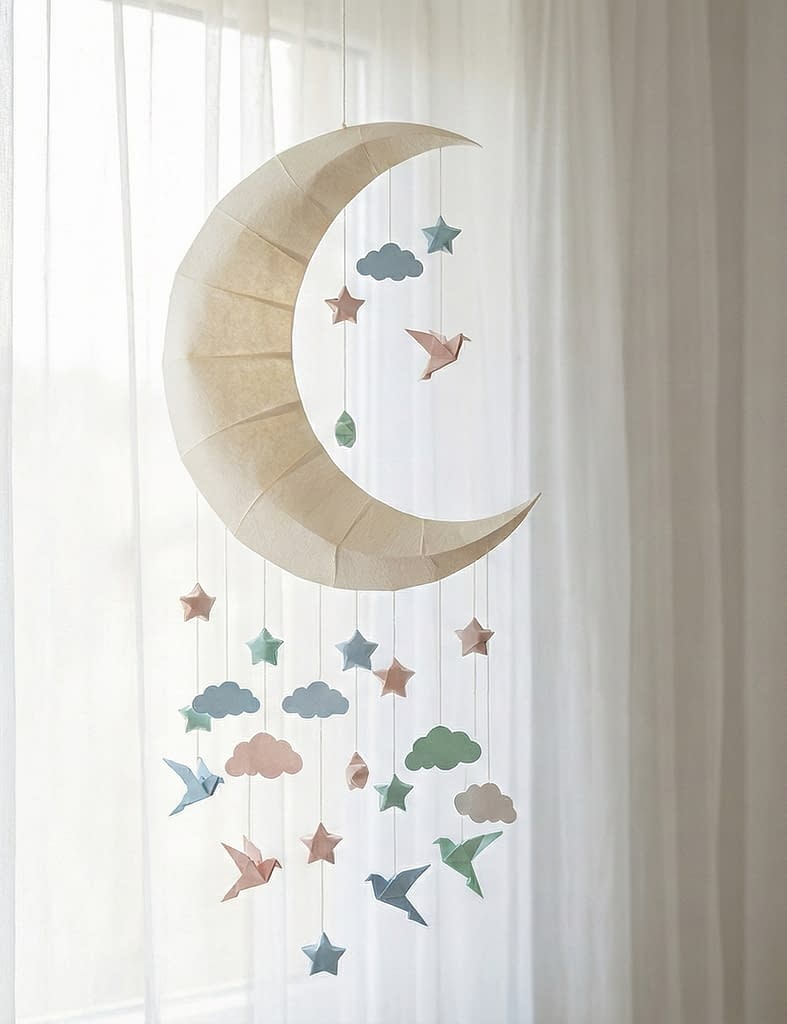
This tutorial focuses on a light, airy aesthetic. It features a large, off-white crescent moon that serves as the anchor for a variety of hanging elements, including stars, clouds, and small birds. This is an ideal project for a nursery or a window display where the natural light can catch the different layers of paper.
Gathering Your Mobile Supplies
For this project, you will want a variety of soft, pastel-colored papers. A cream or off-white textured paper works beautifully for the main moon. You will also need scraps of light blue, mint green, and dusty pink paper for the clouds and stars. In addition to paper, you will need a spool of white thread or thin fishing line, a small needle, a pair of precision scissors, and a lightweight wooden dowel or a circular wire hoop if you wish to hang the entire assembly.
Creating the Puffy Paper Moon
The central moon in this design is made of two identical crescent shapes cut from your cream paper. To give it a sense of depth, we will use a “scored and puffed” technique.
Cut your two moon shapes. On each shape, use your bone folder to score light lines radiating from the inner curve toward the outer curve. Gently bend the paper along these lines to give it a slight three-dimensional convex shape.
Place the two moons back-to-back. Use a small amount of glue only along the outer edges, leaving the middle section slightly hollow. This creates a “puffy” effect. Before sealing the top completely, insert a long piece of thread that will be used to hang the mobile.
Crafting the Hanging Elements
The charm of this mobile lies in the variety of the hanging pieces. For the clouds, cut out several organic, rounded shapes from the blue and pink paper. For a 3D effect, cut two of each cloud shape, slot them together in the middle, or glue them with a small piece of foam tape between them.
For the stars, use a star-shaped punch or a template to cut out twenty to thirty small stars in various colors. Using your needle, thread the stars onto different lengths of string. Tie a small knot under each star to keep it from sliding down the thread.
For the tiny birds, use a simple origami crane fold or a basic bird silhouette. To assemble the mobile, pierce the bottom edge of the large moon with your needle and pull the threads through. Vary the lengths of the threads so the stars and clouds hang at different levels, creating a sense of depth and movement. Balance is key here, so hold the mobile up frequently as you work to ensure it hangs straight.
3. The Sleeping Bunny Peach Moon Sculpture
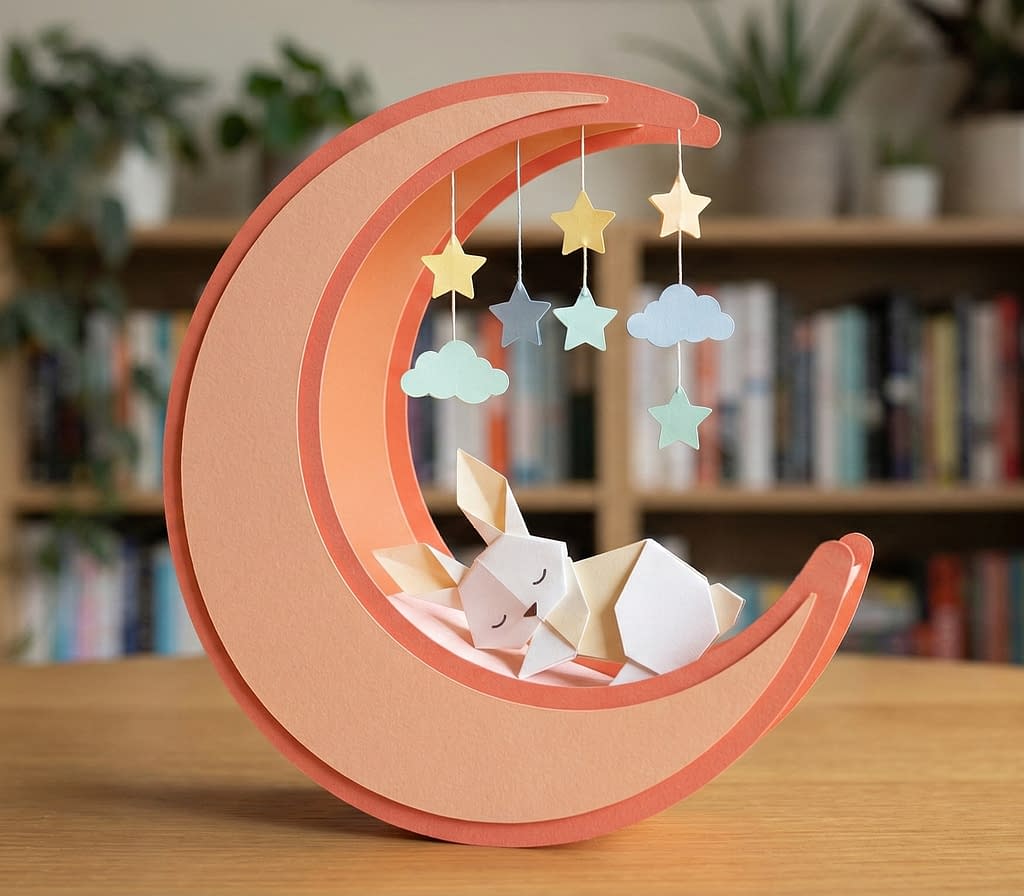
This design is incredibly sweet and focuses on a layered, “shadow box” style construction. The moon is a vibrant peach color with a hollow center, providing a perfect little nook for a sleeping origami bunny. It is a wonderful example of how to use paper to create a narrative scene.
Materials for the Bunny Scene
You will need heavy cardstock in two shades of peach—one slightly darker than the other—to create a sense of shadow and depth. For the bunny, a soft white or very light grey paper is best. You will also need some thin white string to hang small stars from the top tip of the moon. A set of precision hobby knives will be very helpful for the curved cuts required for the moon’s frame.
Building the Layered Moon Frame
The moon in this tutorial consists of a front frame, a back frame, and a wide strip of paper that connects them. Start by cutting two large crescent shapes from your darker peach cardstock. Then, cut a slightly smaller crescent from the lighter peach cardstock and glue it onto the front of one of the darker shapes. This creates a beautiful bordered effect.
Next, cut a strip of peach paper that is about two inches wide and long enough to wrap around the entire inner and outer circumference of the moon. Use your bone folder to score “tabs” along both long edges of this strip. These tabs will be folded inward and glued to the back of your front and back moon panels.
Start by gluing the strip to the front panel, following the curve carefully. Once the glue has set, repeat the process with the back panel. This creates a hollow, 3D moon that can stand on its own. The wide base provides a “floor” for the bunny to rest on.
Folding the Sleeping Bunny
The bunny is created using a modified origami technique that focuses on a resting pose. Start with a square of white paper. Fold it in half diagonally to form a triangle. Fold the bottom edge up about half an inch to create what looks like a paper boat.
Flip the paper over. Fold the left and right sides up toward the center to create the ears. Now, fold the entire bottom point upward to create the bunny’s face. To make the bunny look like it is sleeping, fold the tips of the ears slightly forward and tuck the back of the body under itself to create a rounded, huddled shape.
Use a fine-tipped black pen to draw two small, closed arcs for eyes. Place the bunny inside the bottom curve of the peach moon. To finish the piece, hang three or four tiny paper stars from the top point of the moon using your white string. This adds a vertical element that balances the composition.
4. The Floral Garden Crescent Lamp

This is perhaps the most decorative and complex project in the series. It features a mint-green moon adorned with handmade paper roses and tropical leaves, with a space in the center for a battery-operated tea light. It serves as both a piece of art and a functional ambient light source.
Supplies for the Floral Moon
You will need mint green, dusty rose, and sage green cardstock. For the flowers, a lighter-weight paper is easier to roll and shape. You will also need a battery-operated LED tea light (never use a real candle with paper crafts), a hot glue gun for attaching the heavy floral elements, and a pair of decorative edge scissors if you want to add texture to the leaves.
Constructing the Mint Moon Housing
The base of this craft is similar to the 3D peach moon, but with an added feature. The mint green moon should be built with a wider “shelf” at the bottom of the curve. Construct the front and back panels with a layered border to match the aesthetic of the previous projects.
When you are attaching the central strip (the gusset), ensure the bottom section is wide enough to securely hold your LED tea light. You may want to reinforce this bottom section with an extra layer of heavy cardboard hidden inside the paper to ensure it doesn’t sag under the weight of the light and the decorations.
Creating the Paper Roses and Foliage
The roses are made by cutting a circle out of the dusty rose paper. Starting from the outside edge, cut a spiral inward toward the center of the circle. Take the outer end of the spiral and begin rolling it tightly around a toothpick or a quilling tool.
As you reach the center of the circle, let the paper relax slightly so the “petals” expand. Glue the bottom of the roll to the small circular center of the spiral to hold it in place. Repeat this process to create five to seven roses of varying sizes.
For the leaves, cut leaf shapes from the sage green paper. To make them look like tropical Monstera leaves, cut small notches or “fenestrations” into the sides. Use your bone folder to draw a line down the center of each leaf and fold it slightly to give it a realistic, veined appearance.
Final Assembly and Lighting
Arrange the leaves and roses along the bottom and side of the mint moon. Use your hot glue gun to secure them, starting with the largest leaves as a base and layering the roses on top. Be careful to leave the central shelf clear for the tea light. Once the glue is dry, place your LED tea light into the curve. The light will cast beautiful shadows through the petals and leaves, creating a warm, magical glow.
5. The Geometric Lotus and Butterfly Moon Sculpture
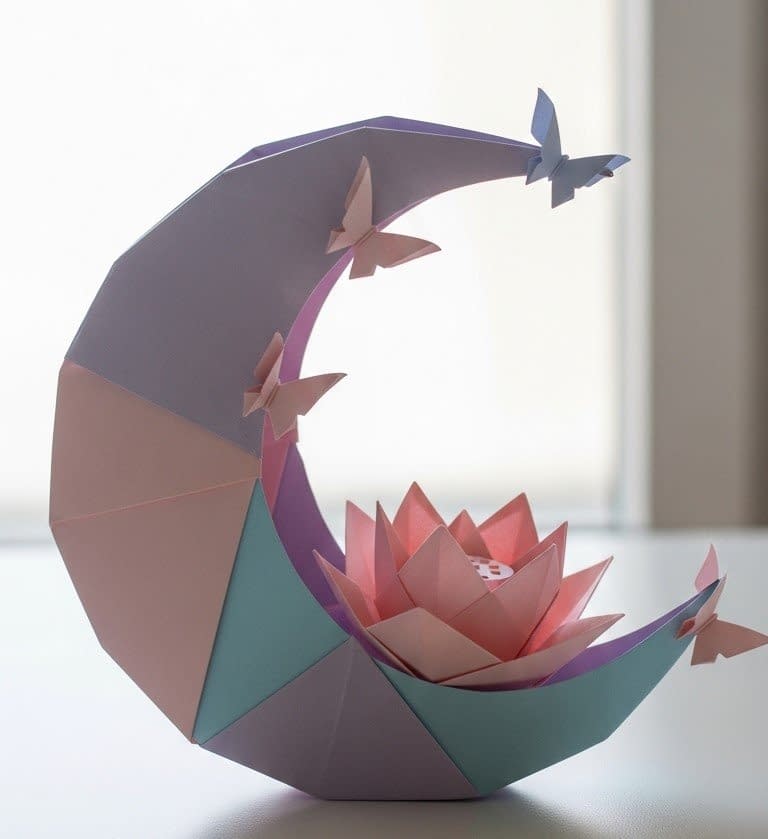
The final project in our collection is a stunning example of low-poly paper art. This design features a modern, faceted moon constructed from varying shades of pastel purple, blue, and pink cardstock. Nestled securely in the curve of the moon is a complex, multi-layered lotus flower, and the sculpture is finished with delicate butterflies perched on the upper rim. This piece mimics the look of a three-dimensional computer model brought to life and makes for a striking centerpiece on a coffee table or a meditation altar.
Materials for the Geometric Design
To achieve the color-blocking effect seen in the reference, you will need cardstock in three complementary colors: lavender, powder blue, and soft pink. You will also need a darker shade of pink or magenta for the lotus flower to ensure it stands out against the moon. Because this project relies on precise geometric geometry, a metal ruler, a self-healing cutting mat, and a craft knife are essential tools. You will also need a quick-setting tacky glue or double-sided craft tape to assemble the facets without making the paper soggy.
Constructing the Faceted Multi-Colored Moon
Unlike the smooth curves of the previous moons, this structure is built from flat geometric shapes—mostly triangles and trapezoids—that are taped or glued together to form a curve. This technique is often called “low-poly” crafting.
Begin by drawing your crescent moon shape on a plain piece of scratch paper to serve as your template. Divide this moon shape into three distinct sections: the top tip, the middle curve, and the bottom tip. You will use the lavender cardstock for the top section, the blue for the bottom, and the pink for the middle (or whichever color arrangement you prefer).
For each section, you need to create a front face, a back face, and a side strip that connects them. However, to get the “faceted” look, you should not cut these as smooth curves. Instead, draw the edges using straight lines. For example, the outer curve of the moon should look like a series of short straight lines connecting rather than one long arc.
Cut two identical geometric panels for the front and back of each color section. Next, cut a long strip of cardstock for the side walls. Score this strip vertically every inch or so. These score lines allow the strip to bend around the angular edges of your front and back panels.
Apply glue to the edges of your front lavender panel. Attach the scored side strip, bending it at each score line to match the straight edges of the panel. Once the side wall is attached to the front, glue the back lavender panel on top, closing the shape. Repeat this process for the middle and bottom sections with their respective colors. Finally, glue the three colored sections together to form the complete crescent shape. The result will be a sturdy, angular moon that changes color as your eye moves down the arc.
Assembling the Paper Lotus Flower
The lotus flower is the crown jewel of this piece. It requires creating volume through layering. Start by cutting out three sizes of teardrop-shaped petals from your dark pink cardstock: small, medium, and large. You will need about eight to ten petals of each size.
Take the small petals first. Curl the edges of each petal inward using a pencil or the edge of your scissors. Glue the bottoms of these petals together in a tight circle to form the central bud. The petals should overlap significantly, almost closing up at the top.
Next, take the medium petals. Curl the tips of these petals outward slightly to simulate a blooming flower. Glue these around the base of your central bud. Position them so that the center of each new petal aligns with the gap between the two petals in the previous row.
Finally, attach the large petals. These should be curled outward more dramatically to create the wide, open base of the lotus. Cut a small circle of yellow paper for the very center of the flower (the stamen) and fringe the edges with your scissors before gluing it deep inside the bud. Apply a generous amount of glue to the bottom of the finished flower and press it firmly into the inner curve of your geometric moon.
Adding the Fluttering Butterflies
The final touch brings a sense of movement to the sculpture. Draw simple butterfly silhouettes on leftover scraps of your blue or purple cardstock. A silhouette implies distinct upper and lower wings connected by a thin body.
Cut out three or four butterflies. To give them life, fold the wings upward along the body line so they sit at a forty-five-degree angle. This creates shadows and makes them look like they have just landed. Apply a tiny dot of glue to the underside of the butterfly body and attach them to the highest points of the moon—one near the top tip and perhaps one resting on the edge of a facet. These small details draw the eye upward and balance the visual weight of the large lotus flower at the bottom.
Conclusion
Paper is often underestimated as a simple stationary material, yet as these five tutorials have demonstrated, it possesses an incredible capacity for transformation. By simply cutting, folding, and gluing, you can manipulate a flat sheet into a faceted geometric structure, a soft organic flower, or a storytelling scene.
Whether you chose to make the serene origami swan or the vibrant floral lamp, you have engaged in a creative process that requires mindfulness and patience. These paper moon crafts are not just decorative objects; they are expressions of artistry that you can proudly display in your home or gift to a loved one.
We hope this guide has inspired you to pick up your scissors and explore the celestial possibilities of paper crafting. Remember, the beauty of these projects lies in the details—the crispness of a fold, the choice of color, and the personal touches you add along the way.