
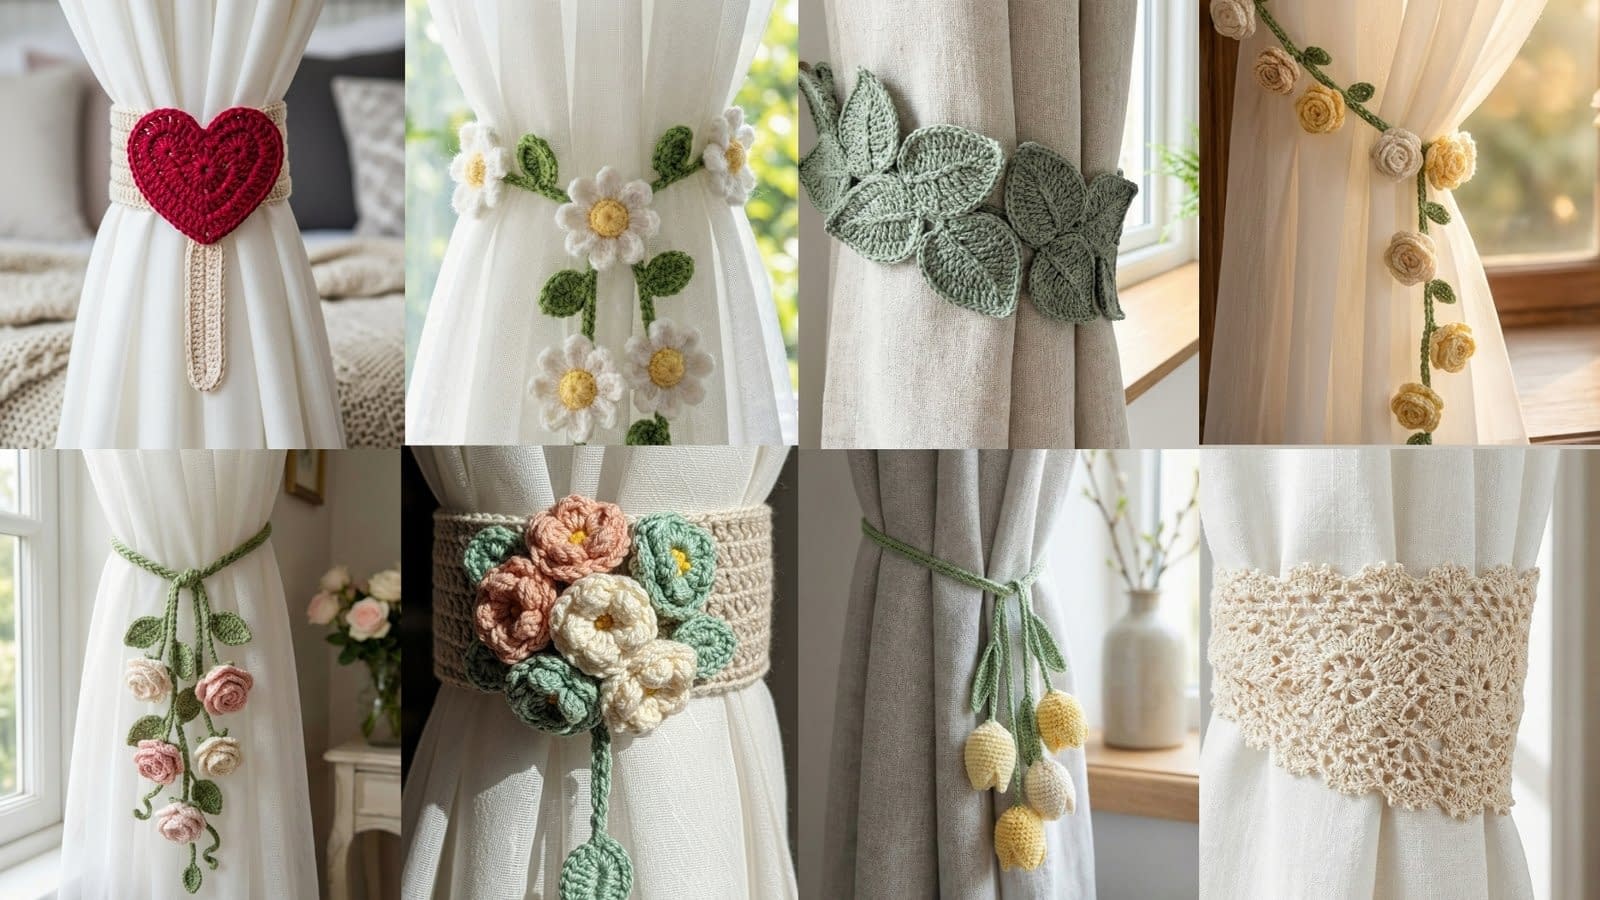
Crochet is often associated with cozy blankets and warm scarves, but its versatility extends beautifully into home decor. One of the most charming and functional ways to introduce handmade elegance into your living space is through crochet curtain tie backs. These small yet impactful accessories serve a practical purpose by holding your drapes open to let natural light flood in, but they also act as artistic accents that define the mood of a room. Whether you are aiming for a romantic cottage atmosphere, a fresh spring vibe, or a sophisticated vintage look, the right yarn and stitch pattern can completely transform your window treatments.
In this comprehensive guide, we will explore eight distinct crochet curtain tie back patterns. These designs have been curated to offer a variety of textures and styles, ranging from cascading floral vines to structured lace bands. We have designed these tutorials to be accessible for beginners while still offering enough detail to engage experienced crafters. We will be using full stitch names and detailed, step-by-step descriptions to ensure you can follow along without needing to decipher complex charts or abbreviations. By the end of this post, you will have the inspiration and the know-how to create stunning custom decor for every room in your house.
1. Hanging Rose Vine Crochet Curtain Tie Back
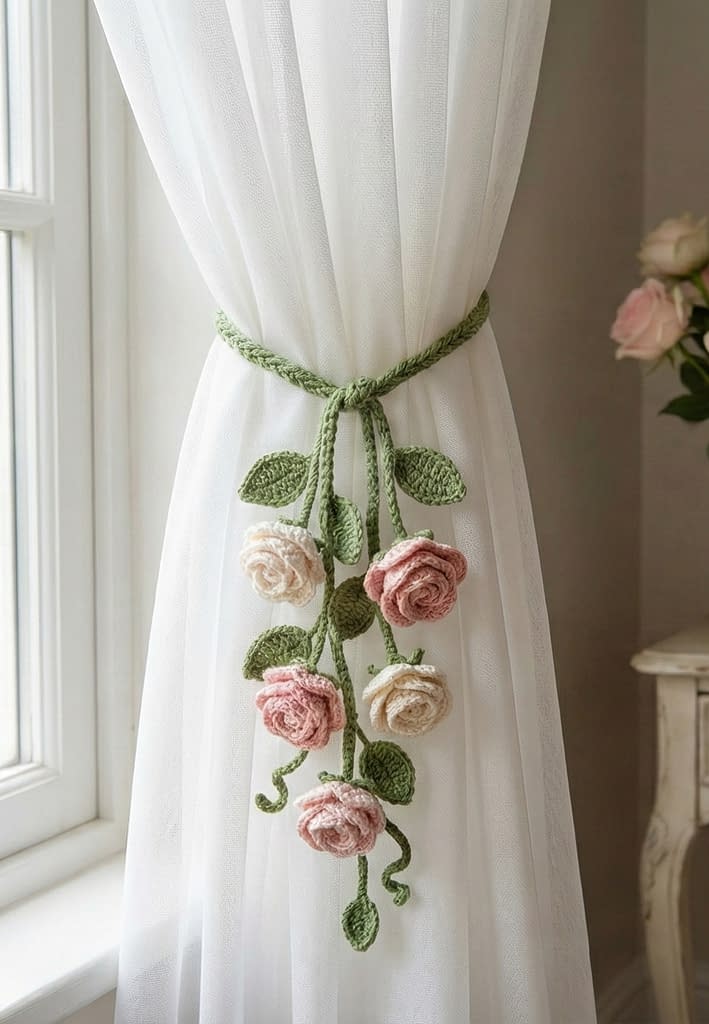
This pattern captures the essence of a romantic cottage garden. As visualized in our design concept, this tie back features a main vine that wraps around the curtain, adorned with multiple small hand-crocheted roses in soft blush pink and ivory. The roses hang vertically and organically from the green vine, accompanied by textured leaves. This design is perfect for adding a touch of softness to sheer white curtains or creating a whimsical focal point in a sunlit bedroom.
Skill Level
Beginner to Intermediate. The shaping is simple, but assembly requires patience to arrange the flowers naturally.
Finished Size
Approximately 20 inches in length for the main vine, with hanging tendrils varying from 3 to 6 inches. You can easily adjust the length by adding more foundation chains.
Materials
- Worsted weight yarn in Sage Green (for the vine and leaves), Blush Pink (for roses), and Ivory (for roses).
- Crochet hook size 4.0 mm.
- Yarn needle for weaving in ends and assembly.
- Scissors.
- A small wooden button (optional for closure).
Instructions
Step 1: Creating the Main Vine Structure
We will begin by creating the main cord that wraps around the curtain. This needs to be sturdy but flexible.
- Start with your Sage Green yarn. Make a slip knot and place it on your hook.
- Create a foundation chain of 70 chains. This length should be enough to wrap around a standard curtain panel. If your curtains are thick, add 10 to 20 more chains.
- Turn your work. Skip the first chain from the hook and work one single crochet into the second chain.
- Continue to place one single crochet into every chain stitch all the way across the row.
- When you reach the end, chain one and turn your work.
- Work one slip stitch into each single crochet across the entire row. This adds a cord-like texture and prevents the vine from stretching out too much over time.
- Do not cut the yarn yet. At the end of the row, chain 10. This small loop will serve as your buttonhole if you are using a button. Join this chain back to the base with a slip stitch.
- Fasten off the yarn by cutting it and pulling the tail through the loop. Weave in the ends.
Step 2: Making the Hanging Tendrils
To achieve the cascading look, we need smaller vines that will hang down from the main cord.
- Join the Sage Green yarn to the main vine at approximately the 5th stitch from one end.
- Chain 25. This will be a long tendril.
- Turn and work a slip stitch into each chain back up toward the main vine.
- Slip stitch into the next stitch on the main vine to anchor the tendril.
- Fasten off.
- Repeat this process at random intervals along the main vine (every 3 or 4 inches), varying the chain lengths between 15 chains and 30 chains to create a natural, uneven look.
Step 3: Crocheting the Roses
Make 3 roses in Blush Pink and 3 roses in Ivory.
- Start with a slip knot and chain 15.
- Row 1: Single crochet in the second chain from the hook and in each chain across. You will have 14 stitches. Chain 2 and turn.
- Row 2: Work 2 double crochet stitches into the first stitch. Work 2 double crochet stitches into the next stitch. Continue placing 2 double crochet stitches into every single stitch across the row. This increase will cause the strip to curl naturally.
- Fasten off, leaving a long tail of about 10 inches.
- Coil the curled strip into a spiral shape to form a rosebud. Use the yarn needle and the long tail to stitch through the base layers of the flower, securing the spiral in place so it does not unravel.
Step 4: Crocheting the Leaves
Make 8 to 10 leaves using Sage Green yarn.
- Chain 8.
- Single crochet in the second chain from the hook.
- Half double crochet in the next chain.
- Double crochet in the next 2 chains.
- Half double crochet in the next chain.
- Single crochet in the next chain.
- In the last chain, work 3 single crochet stitches. This turns the work so you can crochet down the other side of the chain.
- Working up the opposite side of the foundation chain: Single crochet in the first space, half double crochet in the next, double crochet in the next 2 spaces, half double crochet in the next, and single crochet in the last.
- Join with a slip stitch to the very first single crochet. Fasten off, leaving a tail for sewing.
Step 5: Assembly
Lay your main vine flat. Sew the leaves onto the main vine and the hanging tendrils using a yarn needle. Position the roses on top of the leaves or at the ends of the hanging tendrils to mimic the weight of real flowers. Ensure everything is stitched securely. Attach a button to the end opposite the buttonhole loop.
2. Tulip Drop Crochet Curtain Tie Back
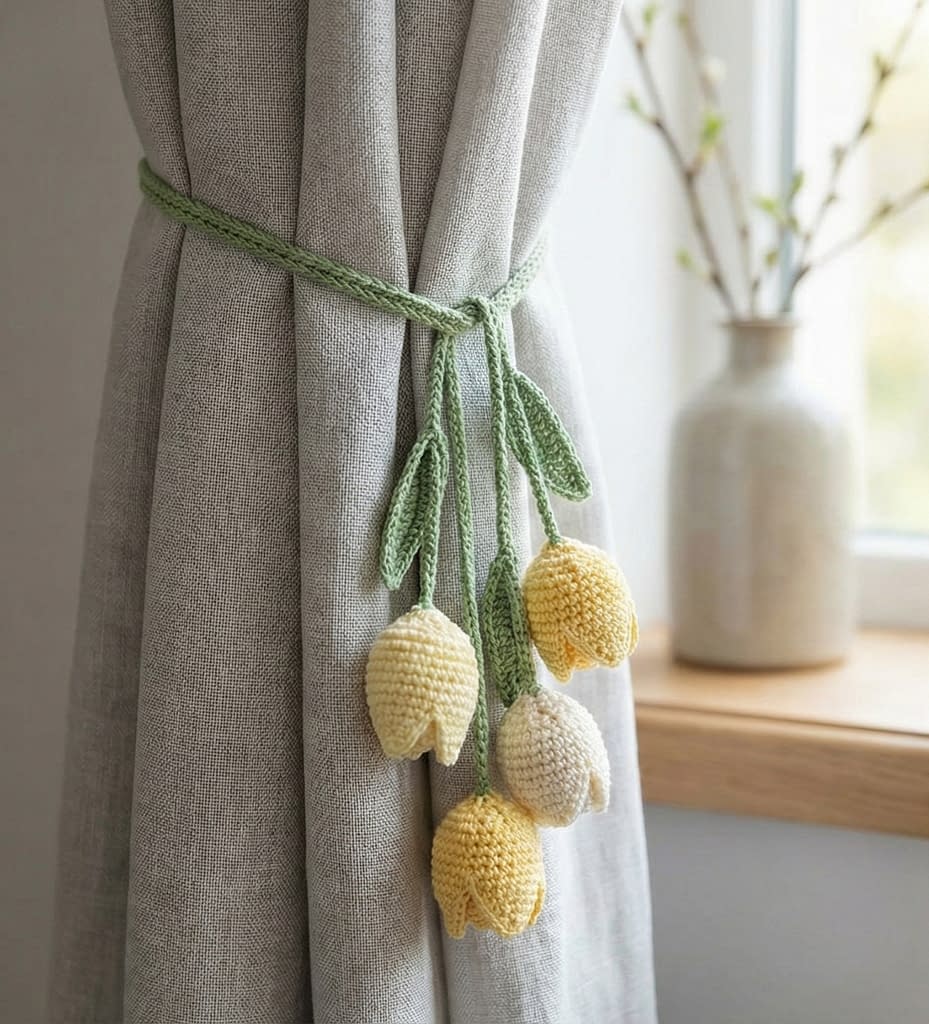
This design brings a fresh, spring-like atmosphere to your home. Inspired by the clean lines of tulips, this tie back features a slim green stem cord with graceful tulip-shaped flowers in pastel yellow and white hanging down. The flowers are designed to fall naturally against the fabric, making this ideal for gray or neutral-toned curtains.
Skill Level
Beginner. Requires working in the round for the flower heads.
Finished Size
Main cord approximately 18 inches. Tulips hang down about 4 to 5 inches.
Materials
- Cotton yarn in Pastel Yellow, White, and Leaf Green.
- Crochet hook size 3.5 mm.
- Polyester fiberfill (stuffing) – a very small amount.
- Yarn needle.
Instructions
Step 1: The Main Cord
- Using Leaf Green yarn, make a slip knot.
- Chain 65.
- Slip stitch in the second chain from the hook and in each chain across.
- For a thicker cord, do not cut the yarn. Chain 1, turn, and slip stitch back down the entire row again.
- Fasten off and weave in ends. Sew a small button to one end and create a chain loop on the other end for closure.
Step 2: The Tulip Stems
We need stems that will hold the flower heads.
- Join Leaf Green yarn to the center area of your main cord.
- Chain 20.
- Fasten off, leaving a tail to sew into the flower later.
- Repeat this 3 or 4 times, grouping the stems close together in the middle of the tie back so they hang in a cluster. Vary the chain lengths slightly (e.g., 18 chains, 20 chains, 22 chains) for a bouquet effect.
Step 3: The Tulip Flowers
Make 2 Yellow and 2 White tulips.
- Create a magic ring (adjustable loop).
- Round 1: Chain 1. Work 6 single crochet stitches into the ring. Pull the tail tight to close the hole. Join with a slip stitch to the first single crochet.
- Round 2: Chain 1. Work 2 single crochet stitches into each stitch around. You should have 12 stitches. Join.
- Round 3: Chain 1. Work 1 single crochet in the first stitch, then 2 single crochet in the next stitch. Repeat from * to * around. You should have 18 stitches. Join.
- Rounds 4 through 8: Chain 1. Single crochet in every stitch around (18 stitches). Join at the end of each round. This builds the height of the cup.
- Round 9: Chain 1. Single crochet in the first stitch, then single crochet the next two stitches together (decrease). Repeat from * to * around. You will have 12 stitches.
- Fasten off, leaving a long tail.
Step 4: Finishing the Tulips
- Take the end of one green stem chain you created in Step 2. Thread it through the bottom center of the tulip cup (from the outside in) and knot it securely on the inside so it cannot pull back out.
- Lightly stuff the tulip cup with a pinch of fiberfill to help it hold its shape.
- To create the tulip shape: Pinch the top opening of the cup flat. Sew a stitch through the center to hold the front and back together. Then pinch the sides together and stitch through the center again, creating a cross shape or an “x” at the top of the flower. This pulls the opening closed and creates the distinct petals of a tulip.
- Repeat for all flowers.
3. Daisy Chain Crochet Curtain Tie Back
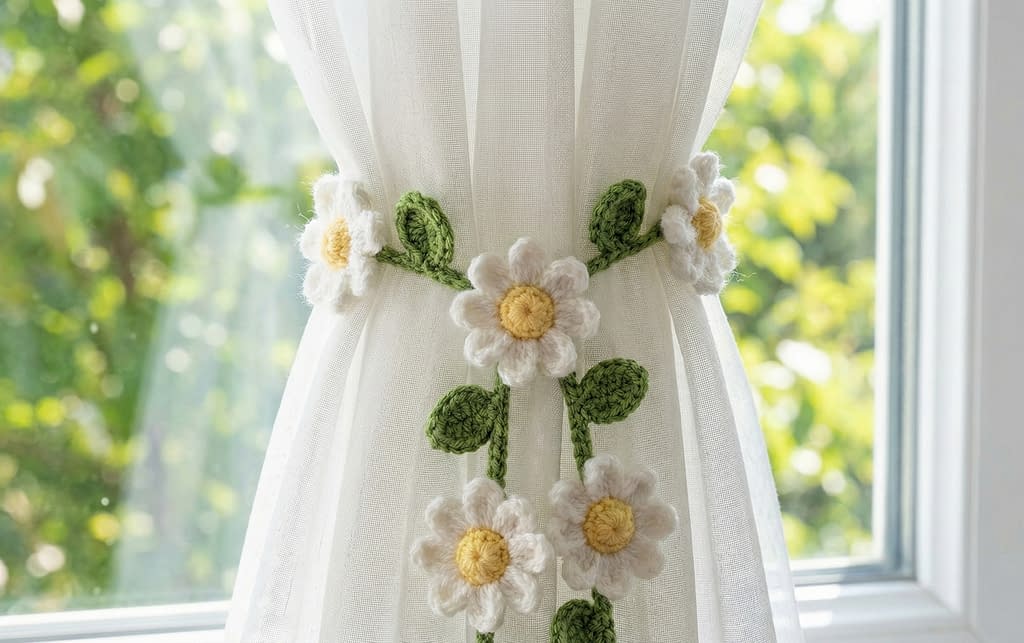
Cheerful and classic, this tie back is constructed as a vertical chain of daisies. The design consists of white petals with soft yellow centers, connected by a green cord that weaves them together. This style is particularly effective in kitchens or nurseries where you want a bright, airy mood.
Skill Level
Beginner. Involves making motifs and joining them.
Finished Size
Length varies based on how many daisies you connect. Typically 18-20 inches.
Materials
- Yarn in Bright White, Sunshine Yellow, and Grass Green.
- Crochet hook size 4.0 mm.
- Yarn needle.
Instructions
Step 1: Making the Daisy Centers
Make 6 to 8 centers depending on required length.
- With Yellow yarn, make a magic ring.
- Round 1: Chain 1. Work 10 single crochet stitches into the ring. Pull tight to close. Join with a slip stitch to the first single crochet.
- Fasten off yellow yarn.
Step 2: Adding the Petals
- Join White yarn to any stitch on the yellow center.
- Round 1: Chain 3. Work 2 double crochet stitches into the same stitch where you joined. Chain 3, and slip stitch back into the same stitch. This completes one petal.
- Slip stitch into the next yellow stitch.
- Repeat the petal sequence: Chain 3, 2 double crochet in the same stitch, chain 3, slip stitch in the same stitch.
- Continue around until you have 10 petals.
- Fasten off and weave in ends. Repeat for all daisies.
Step 3: Connecting the Daisies
There are two ways to do this. You can sew them edge-to-edge for a solid band, or use a green chain to link them for a “vine” look. We will use the green chain method as per the visual description.
- With Green yarn, chain 15 (this is the tie end).
- Slip stitch into the back of a petal on your first daisy.
- Chain 5.
- Slip stitch into the back of a petal on the opposite side of the same daisy.
- Chain 5 (this is the space between flowers).
- Slip stitch into the back of a petal on the second daisy.
- Continue this process until all daisies are attached in a row.
- Finish with a chain of 15 for the other tie end.
Step 4: Leaves (Optional)
To add more greenery, you can crochet simple leaves directly off the connecting chains.
- Join Green yarn to a connecting chain space.
- Chain 6. Slip stitch in the 2nd chain from hook, single crochet in next, half double crochet in next 2, single crochet in last.
- Slip stitch back into the main chain to anchor.
4. Vintage Lace Band Crochet Curtain Tie Back
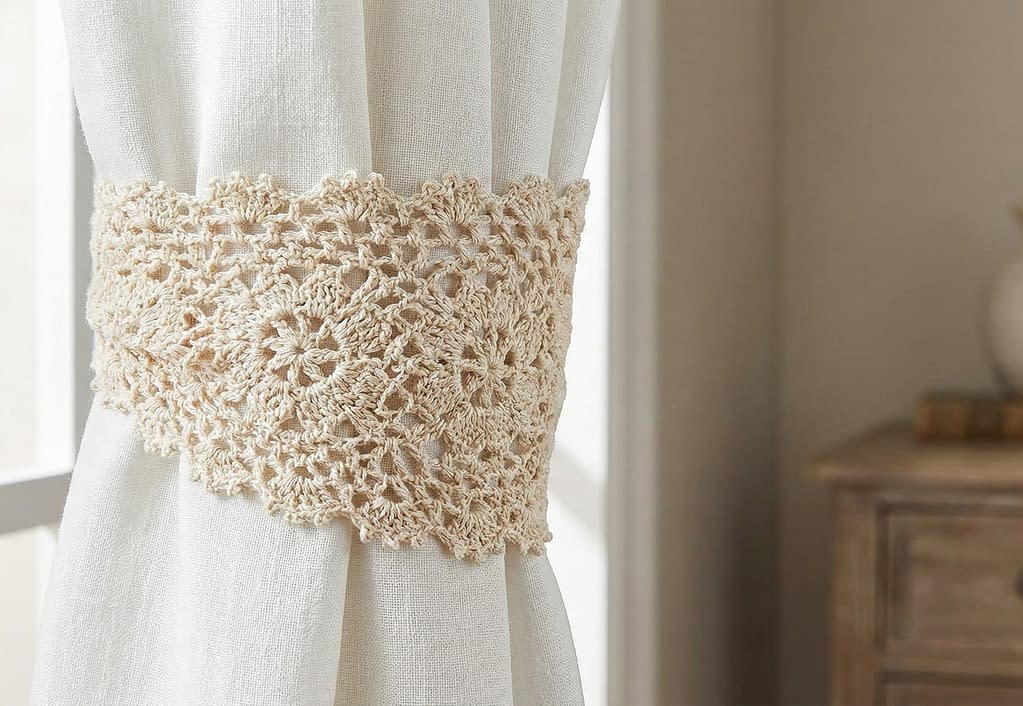
For a more sophisticated and timeless aesthetic, the Vintage Lace Band is the perfect choice. Unlike the floral vines, this is a wide, structural band that wraps snugly around the curtain. It features intricate openwork stitches in warm cream yarn, creating beautiful shadows and texture.
Skill Level
Intermediate. Requires knowledge of shell stitches and consistent tension.
Finished Size
Approximately 4 inches wide and 18 inches long.
Materials
- Mercerized cotton yarn in Cream or Beige (Sport or DK weight gives good stitch definition).
- Crochet hook size 3.0 mm or 3.5 mm.
- Two buttons for closure.
Instructions
Step 1: The Foundation
We will work this pattern in rows across the width.
- Chain 16.
- Row 1: Single crochet in the second chain from the hook and in each chain across. You should have 15 stitches. Chain 3 and turn.
Step 2: The Lace Pattern
- Row 2: The chain 3 counts as your first double crochet. Skip the next 2 stitches. In the next stitch, work a Shell (2 double crochet, chain 1, 2 double crochet). Skip the next 2 stitches. Double crochet in the next stitch. Skip the next 2 stitches. Work a Shell in the next stitch. Skip the next 2 stitches. Double crochet in the last stitch. Chain 3 and turn.
- Row 3: Work a Shell into the chain-1 space of the previous row’s Shell. (To do this, place 2 double crochet, chain 1, 2 double crochet all into that hole). Work a double crochet into the single double crochet from the previous row. Work a Shell into the next chain-1 space. Double crochet in the top of the turning chain. Chain 3 and turn.
- Rows 4 through 50: Repeat Row 3 until the band is long enough to wrap around your curtain (approx 18 inches).
Step 3: The Border
To give it a finished, vintage look, we will add a picot border.
- Do not fasten off. Chain 1 and turn to work down the long side of the band.
- Work 3 single crochet stitches evenly into the side of each row.
- When you reach a corner, work 3 single crochet stitches into the corner stitch to turn nicely.
- Picot Detail: Along the top and bottom long edges, work 3 single crochet, chain 3, slip stitch into the first chain (this makes a picot bump), 3 single crochet. Repeat this pattern across the length.
- Continue single crocheting around the entire rectangle.
- Join with a slip stitch to the start.
Step 4: Finishing
- Sew two buttons onto one end of the band, aligning them with the center of the lace shells.
- The openwork spaces of the lace pattern on the opposite end will naturally serve as buttonholes, allowing you to adjust the tightness as needed. Block the piece (wet it and pin it flat to dry) to open up the lace stitches and ensure the edges are straight.
5. Blossom Cluster Crochet Curtain Tie Back
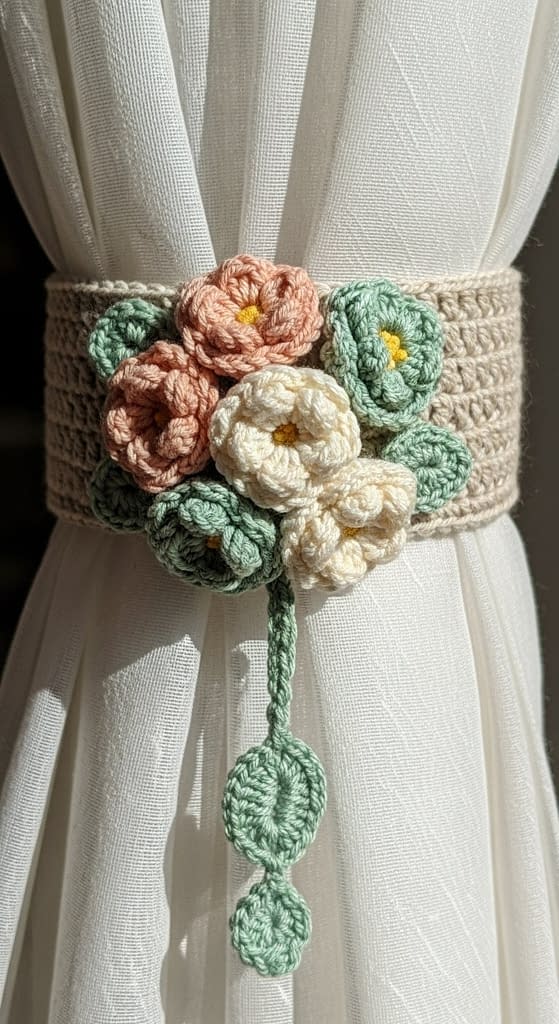
This pattern is designed to look like a hand-picked bouquet resting gently on your curtains. As depicted in the fifth visual concept, this tie back features a cluster of small, puffy blossoms in peach, ivory, and soft mint green. The key to this look is the “puff stitch,” which gives the flowers a three-dimensional, pillowy texture that stands out against the fabric. It is a cozy, feminine choice perfect for nurseries or shabby-chic interiors.
Skill Level
Intermediate. You will need to be comfortable with puff stitches and working in tight clusters.
Finished Size
The floral cluster measures about four inches across. The tie back strap is adjustable, approximately 18 inches long.
Materials
- Sport weight or DK weight yarn in Peach, Ivory, Soft Mint, and Leaf Green.
- Crochet hook size 3.5 mm.
- Yarn needle.
- Two small wooden beads for the tie ends.
Instructions
Step 1: The Foundation Strap
We need a simple, thin strap that will disappear behind the curtain, allowing the flower cluster to be the star.
- Using the Leaf Green yarn, create a slip knot and place it on your hook.
- Create a foundation chain of 60 chains.
- Turn your work. Skip the first chain from your hook.
- Work one single crochet into the second chain.
- Continue to work one single crochet into every chain stitch across the entire row.
- When you reach the end, chain one and turn your work.
- Work one slip stitch into each single crochet across the row to reinforce the strap.
- Fasten off the yarn and weave in the loose ends using your yarn needle.
Step 2: Puff Stitch Blossoms
You will make five small blossoms: two in Peach, two in Ivory, and one in Soft Mint.
- Start with a magic ring (adjustable loop).
- Round 1: Chain one. Work six single crochet stitches into the ring. Pull the tail tight to close the center hole. Join the round with a slip stitch to the first single crochet.
- Round 2 (Petals): Chain two. Into the same stitch where you joined, work a Puff Stitch.
- How to work a Puff Stitch: Yarn over your hook, insert the hook into the stitch, yarn over and pull up a loop to the height of your starting chain. Repeat this three more times in the same stitch (yarn over, insert, pull up loop). You should have nine loops on your hook. Yarn over one last time and pull through all nine loops. Chain one to lock the puff.
- Slip stitch into the next stitch.
- Chain two, work a Puff Stitch into that same stitch, chain one to lock, and slip stitch into the next stitch.
- Repeat this process until you have six puffy petals around the center.
- Join with a slip stitch to the base of the first petal. Fasten off leaving a tail for sewing.
Step 3: Small Filler Leaves
Make three or four small leaves to tuck behind the flowers.
- Using Leaf Green yarn, chain six.
- Single crochet in the second chain from the hook.
- Half double crochet in the next chain.
- Double crochet in the next chain.
- Half double crochet in the next chain.
- Work three single crochet stitches into the last chain to turn the corner.
- Work down the other side of the chain: Half double crochet, Double crochet, Half double crochet, Single crochet.
- Join with a slip stitch and fasten off.
Step 4: Assembly
- Lay your green strap flat. Find the exact center.
- Arrange your five puff blossoms in a tight circular cluster at the center of the strap. The colors should be mixed randomly for a natural look.
- Tuck the green leaves underneath the outer edges of the flower cluster so they peek out.
- Using the yarn tails and a needle, sew the flowers and leaves securely onto the strap. Ensure the stitches do not show on the front.
- Thread a wooden bead onto the yarn tails at both ends of the main strap and tie a knot to secure them. This adds a nice finished detail to the ties.
6. Leaf Loop Crochet Curtain Tie Back
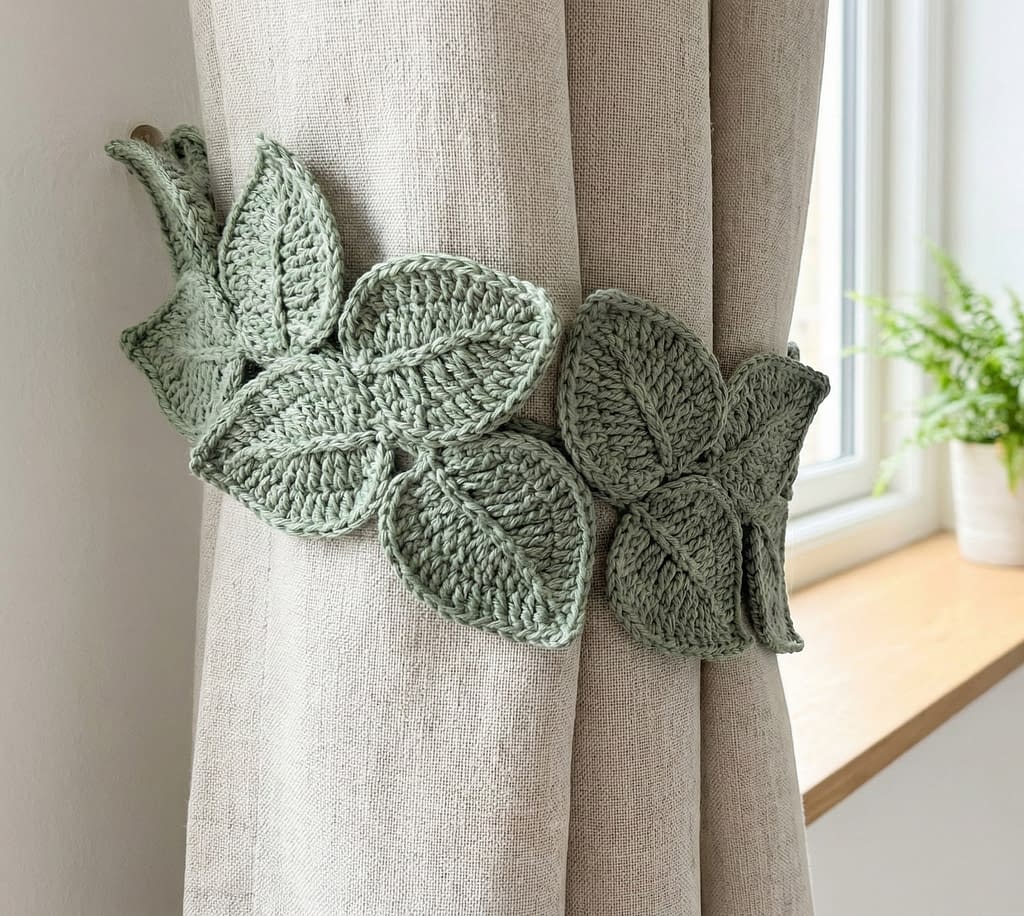
This design is unique because it does not rely on a separate strap; the leaves themselves form the tie back. As shown in the sixth visual, large, textured leaf motifs overlap slightly to create a continuous band of botanical greenery. The “muted sage green” color palette makes this an excellent choice for modern, minimalist, or botanical-themed rooms.
Skill Level
Intermediate. The construction is unique as you join motifs as you go, or sew them together later.
Finished Size
Approximately 4 inches wide and 20 inches long.
Materials
- Worsted weight cotton yarn in Sage Green.
- Crochet hook size 4.0 mm or 4.5 mm.
- Yarn needle.
- A button for closure.
Instructions
Step 1: Crocheting the Large Leaves
You will need to make approximately 8 to 10 large leaves, depending on the thickness of your curtains.
- Start with a slip knot and chain twelve.
- Round 1: Single crochet in the second chain from the hook.
- Half double crochet in the next chain.
- Double crochet in the next six chains.
- Half double crochet in the next chain.
- Single crochet in the next chain.
- In the last chain, work three single crochet stitches. This allows you to turn the corner smoothly.
- Do not turn the work over; instead, rotate it to work along the bottom of the foundation chain.
- Single crochet in the first space on the return side.
- Half double crochet in the next space.
- Double crochet in the next six spaces.
- Half double crochet in the next space.
- Single crochet in the last space. Join with a slip stitch to the first single crochet.
Step 2: Adding Texture (Surface Slip Stitch)
To give the leaf realistic veins and stability, we will add a center vein.
- Do not fasten off yet. Insert your hook into the center of the leaf, at the base tip.
- Pull up a loop from the working yarn underneath the leaf.
- Work surface slip stitches in a straight line down the center spine of the leaf until you reach the other tip.
- Fasten off and weave in the ends.
Step 3: Assembly
There are two ways to assemble this. For the most secure finish, we will sew them.
- Lay your leaves out on a flat surface. Arrange them in a line so that the tip of one leaf overlaps the base of the next leaf by about one inch. They should slightly angle to the left and right alternately to look like a natural vine.
- Pin them in place.
- Using the Sage Green yarn and a tapestry needle, stitch the overlapping sections together securely.
- Continue until you have a chain of leaves that measures approximately 18 to 20 inches.
Step 4: Closures
- On the very first leaf at one end, sew a button securely to the base.
- On the very last leaf at the other end, create a chain loop. Attach your yarn to the tip of the leaf, chain twelve, and slip stitch back into the same spot to form a loop. Secure it well.
- Wrap the band around your curtain and button it closed. The overlapping leaves create a seamless, organic look.
7. Mini Rose Garland Crochet Curtain Tie Back
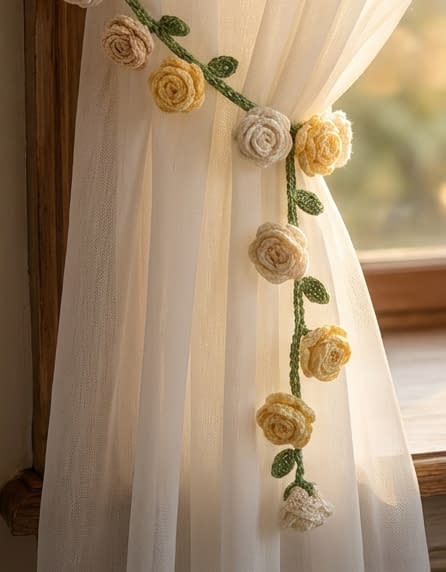
While the first pattern featured large, prominent roses, this “Mini Rose Garland” is delicate, airy, and dainty. It features a thin vine with miniature roses in cream and pale yellow scattered along the length. This style is perfect for lightweight curtains or sheer voiles where a heavy tie back might slide down.
Skill Level
Beginner. The motifs are very small and quick to make.
Finished Size
Approximately 22 inches long.
Materials
- Fingering weight or fine cotton yarn in Cream, Pale Yellow, and Forest Green.
- Crochet hook size 2.5 mm or 3.0 mm.
- Yarn needle.
Instructions
Step 1: The Vine
- Using Forest Green yarn, chain 80. This forms the core of the vine.
- Turn and work a slip stitch into each chain across. This makes a very thin, flexible cord.
- Fasten off.
- To create the branching look, reattach the green yarn at random points along the cord (e.g., at stitch 10, stitch 25, stitch 40). At each point, chain 10 and then fasten off. These little offshoots will hold the mini roses.
Step 2: Miniature Roses
Make 6 Cream roses and 6 Pale Yellow roses. These are made differently than the large roses to keep them tiny.
- Leave a long starting tail (about 6 inches). Chain ten.
- Row 1: Work three double crochet stitches into the fourth chain from the hook.
- Slip stitch into the next chain.
- In the next chain, work three double crochet stitches, then slip stitch into the following chain.
- Repeat this pattern until you reach the end of the chain. You will have a small, ruffled strip.
- Fasten off, leaving a long ending tail.
- Roll the strip up tightly. The chain edge becomes the base, and the ruffled edge becomes the petals.
- Use the yarn tails to stitch through the base and hold the rolled shape together.
Step 3: Mini Calyx (Green Base)
To make the roses look realistic, we add a tiny green base.
- With Forest Green yarn, make a magic ring.
- Chain one, work five single crochet stitches into the ring.
- Join with a slip stitch. Fasten off.
- Sew the bottom of a rolled rose onto this green circle.
Step 4: Assembly
- Using the green yarn tails from the vine offshoots, sew a rose onto the end of each short chain.
- Sew a few roses directly onto the main cord as well.
- The result should look like a wild, scattering vine. Because the tie back is light, you can simply tie the two ends of the vine together in a bow around the curtain, or add small jewelry clasps for a more polished finish.
8. Heart Motif Crochet Curtain Tie Back
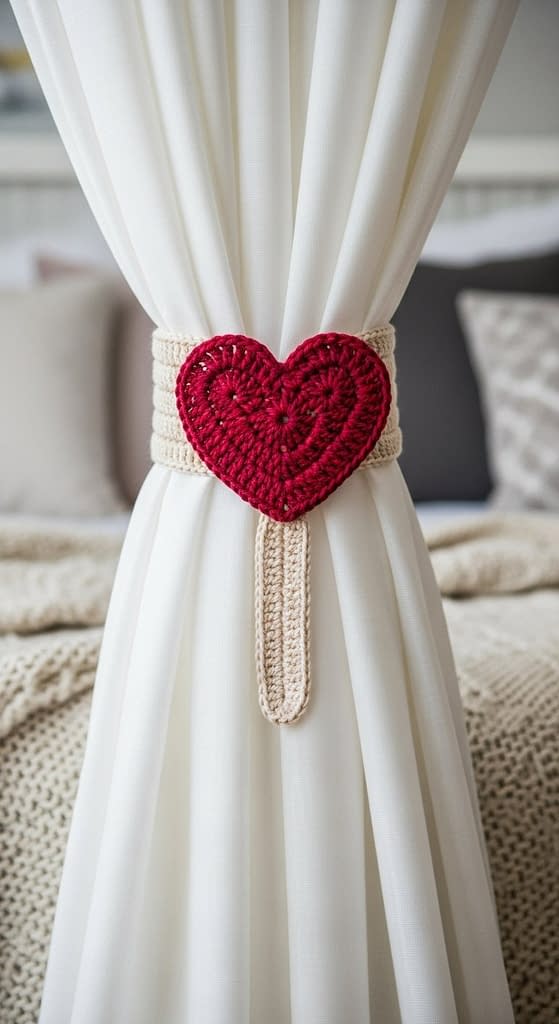
This pattern moves away from the floral theme to offer a warm, symbolic design. As seen in the final visual, it features a bold, deep red heart at the center of a contrasting cream strap. It evokes a “cozy bedroom” feeling, perfect for Valentine’s Day decor or simply adding a touch of love to a room.
Skill Level
Beginner to Intermediate. The heart requires working stitches of varying heights to create the shape.
Finished Size
Strap is 18 inches long, 1.5 inches wide. Heart is approximately 3 inches wide.
Materials
- Worsted weight yarn in Deep Red and Cream (or Oatmeal).
- Crochet hook size 4.0 mm.
- Yarn needle.
- Two buttons.
Instructions
Step 1: The Textured Strap
We want a strap that looks like a cozy sweater. We will use the “ribbing” technique.
- Using Cream yarn, chain 8.
- Row 1: Single crochet in the second chain from the hook and in each chain across (7 stitches). Chain one and turn.
- Row 2: Single crochet in the Back Loop Only of each stitch across.
- Note: The “Back Loop” is the part of the V-shape on top of the stitch that is furthest away from you. Working only in this loop creates a ridged, ribbed texture.
- Repeat Row 2 until the strap measures approximately 18 inches long.
- Fasten off and weave in ends.
Step 2: The Heart Motif
- Using Deep Red yarn, start with a magic ring.
- Round 1: Chain three. Work roughly into the ring in this order:
- Three Treble Crochet stitches.
- Three Double Crochet stitches.
- Chain one.
- One Treble Crochet (this forms the bottom point).
- Chain one.
- Three Double Crochet stitches.
- Three Treble Crochet stitches.
- Chain three.
- Slip stitch into the center of the ring.
- Pull the magic ring tight to close the center.
- Round 2: Chain three.
- Single crochet and Half Double crochet in the first stitch (the top of the first treble).
- Three Half Double crochet in the next stitch.
- Two Half Double crochet in the next stitch.
- Single crochet in the next four stitches.
- Chain one, Single crochet in the bottom point stitch, Chain one.
- Single crochet in the next four stitches.
- Two Half Double crochet in the next stitch.
- Three Half Double crochet in the next stitch.
- Half Double crochet and Single crochet in the last stitch.
- Chain three and slip stitch into the center base.
- Fasten off, leaving a long tail for sewing.
Step 3: Assembly
- Lay the Cream strap flat. Fold it in half to find the exact center.
- Position the Red Heart in the center. The ridges of the strap should run horizontally behind the heart.
- Using the red yarn tail, whip stitch around the edge of the heart to secure it to the strap.
- Sew buttons to one end of the strap. The ribbed texture of the crochet fabric allows you to push the buttons through any gap between stitches on the other end, so you do not need specific buttonholes.
Conclusion
Crocheting your own curtain tie backs is a rewarding project that combines functionality with artistic flair. Whether you chose the intricate Vintage Lace band for your living room, the playful Daisy Chain for a kitchen, or the romantic Hanging Rose Vine for a bedroom, you have created a piece of decor that is completely unique to your home.
These eight patterns demonstrate that with just a hook and some leftover yarn, you can change the entire character of a window. We hope these detailed, step-by-step instructions have given you the confidence to pick up your hook and start stitching. Remember, the beauty of handmade items lies in the imperfections and the personal touches you add, so do not be afraid to experiment with colors or yarns to match your style perfectly.


