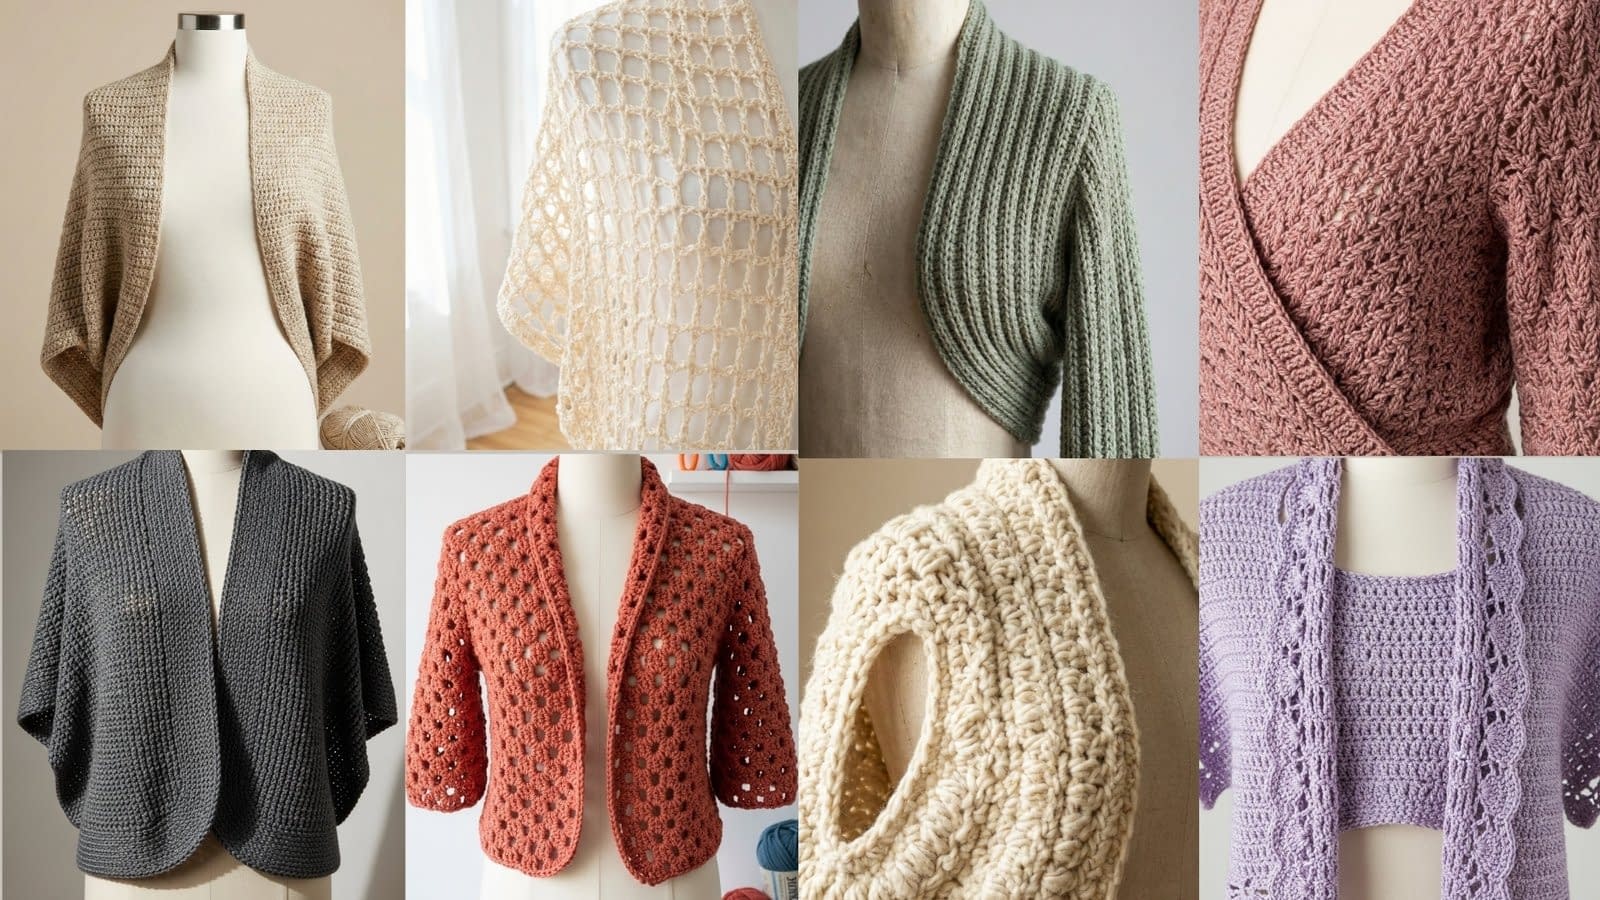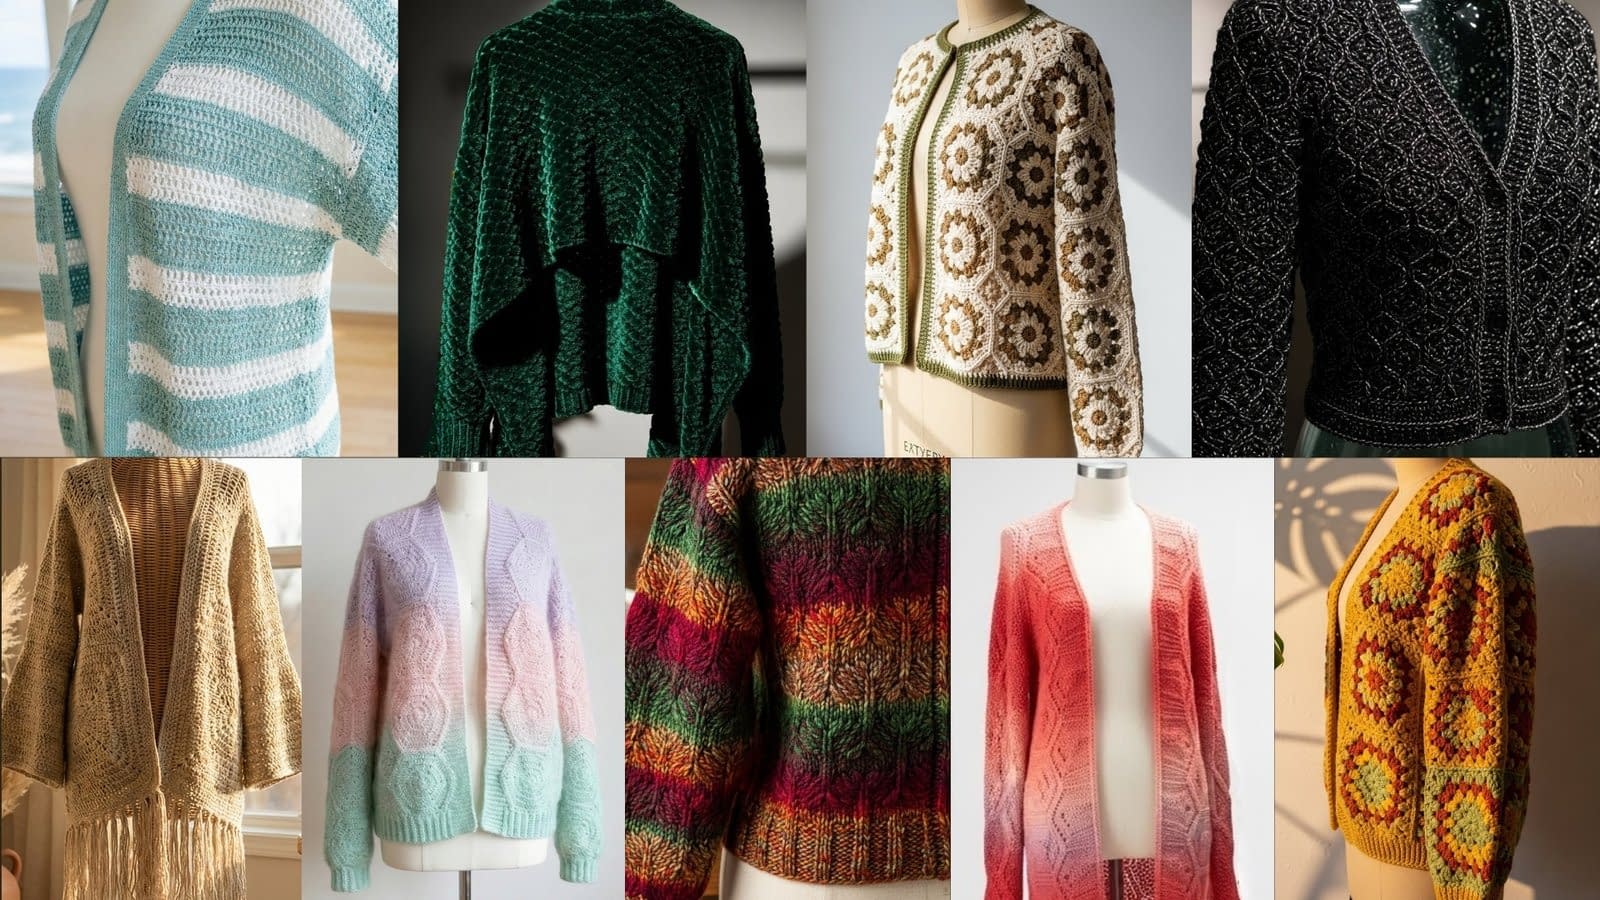
Summer calls for light layers, and nothing complements a breezy dress or a simple tank top quite like a delicate, lacy crochet shrug. These versatile garments add a touch of elegance, provide a hint of warmth on cooler evenings, and can elevate any casual outfit into something special. Whether you are a seasoned crocheter looking for a new challenge or an enthusiastic beginner eager to expand your skills, these patterns offer a beautiful way to create unique, handmade fashion pieces. In this comprehensive guide, we will explore seven stunning crochet lacy summer shrug patterns, diving deep into their construction, stitch patterns, and the delightful details that make each one a wardrobe essential. Get ready to select your favorite yarn, grab your hook, and embark on a rewarding creative journey.
Understanding Crochet Lacy Shrugs
Before we delve into the individual patterns, let’s establish a foundational understanding of what makes a crochet lacy summer shrug so appealing. The “lacy” aspect refers to open, airy stitch patterns that create a breathable fabric, ideal for warmer temperatures. Shrugs are typically small, bolero-style garments that cover the shoulders and arms, often without a full front closure, designed to be worn over other clothing. Their charm lies in their ability to provide coverage without being bulky, adding texture and visual interest to an ensemble. The patterns we will explore vary in complexity, from simpler repeats perfect for those new to garment making, to more intricate designs involving motifs and detailed shaping.
Choosing the Right Yarn for Your Summer Shrug
The success of a lacy summer shrug largely depends on the yarn you select. For summer garments, natural fibers are often preferred for their breathability and drape.
Fiber Content
- Cotton: A classic choice for summer crochet. Cotton is breathable, absorbs moisture, and creates crisp stitch definition, making it excellent for showcasing intricate lace patterns. It can be a little heavy, so consider mercerized cotton for a lighter feel and a slight sheen.
- Linen: Known for its beautiful drape and cooling properties. Linen yarn can be a bit stiffer to work with initially but softens wonderfully with wear and washing. It creates garments with a sophisticated, rustic elegance.
- Bamboo: Exceptionally soft, silky, and drapes beautifully. Bamboo yarn has a lovely sheen and is incredibly comfortable against the skin, making it perfect for luxurious summer layers.
- Blends: Many yarns are available as blends (e.g., cotton-linen, cotton-bamboo, cotton-acrylic). These blends often combine the best qualities of different fibers, offering a balance of softness, drape, durability, and ease of care.
Yarn Weight
For lacy summer shrugs, lighter weight yarns are generally recommended.
- Fingering (1) or Sport (2): These weights create delicate, airy fabrics that are perfect for intricate lace and provide minimal warmth, ideal for summer.
- DK (3) or Light Worsted (3): While slightly heavier, these can still work well, especially if paired with a larger hook size to maintain an open, lacy texture. They will produce a garment with a bit more structure.
Always check your pattern for the recommended yarn weight and fiber content, but feel free to experiment with similar substitutions that match the desired drape and feel.
Essential Crochet Tools and Techniques
Beyond your yarn, having the right tools and mastering a few fundamental techniques will ensure a smooth crocheting experience.
Hooks
- The pattern will specify a recommended hook size. It is crucial to make a gauge swatch to ensure your tension matches the pattern’s, adjusting your hook size as needed (going up for looser fabric, down for tighter).
- Ergonomic hooks can be very helpful for longer crocheting sessions, reducing hand fatigue.
Notions
- Stitch markers: Essential for marking the beginning of rounds, specific stitches, or pattern repeats, especially in more complex designs.
- Tapestry needle: For weaving in yarn ends neatly and invisibly.
- Scissors: Sharp scissors for cutting yarn.
- Measuring tape: For checking your gauge and the dimensions of your growing shrug.
- Blocking supplies: A blocking mat, rust-proof pins, and a spray bottle (or a steamer) are crucial for finishing lacy crochet garments. Blocking opens up the lace patterns, evens out stitches, and helps the garment achieve its intended shape and drape.
Key Crochet Techniques
- Slip knot and chain stitch (ch): The absolute basics.
- Single crochet (sc), half double crochet (hdc), double crochet (dc), treble crochet (tr): These are the foundational stitches that form the building blocks of most patterns.
- Slip stitch (sl st): Used for joining, moving across stitches without adding height, and finishing edges.
- Working in rows and rounds: Understanding how to turn your work for rows or join at the end of rounds.
- Increasing and decreasing: Essential for shaping your garment to fit properly.
- Reading crochet charts and written patterns: Most patterns will provide one or both. Familiarize yourself with common abbreviations.
Now, let’s dive into the first three stunning crochet lacy summer shrug patterns!
Pattern 1: The Floral Medallion Bolero
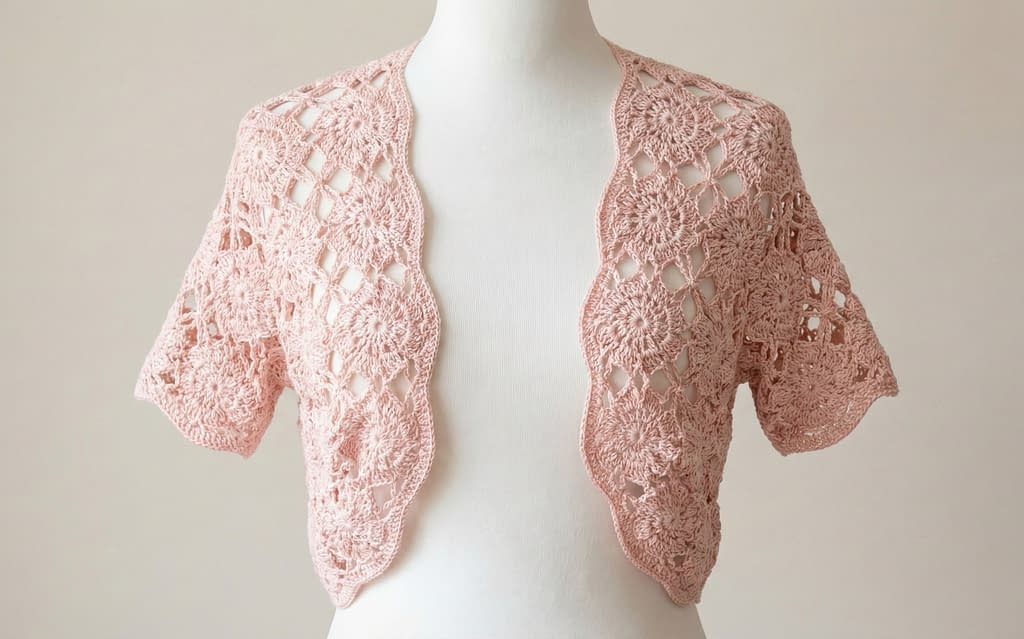
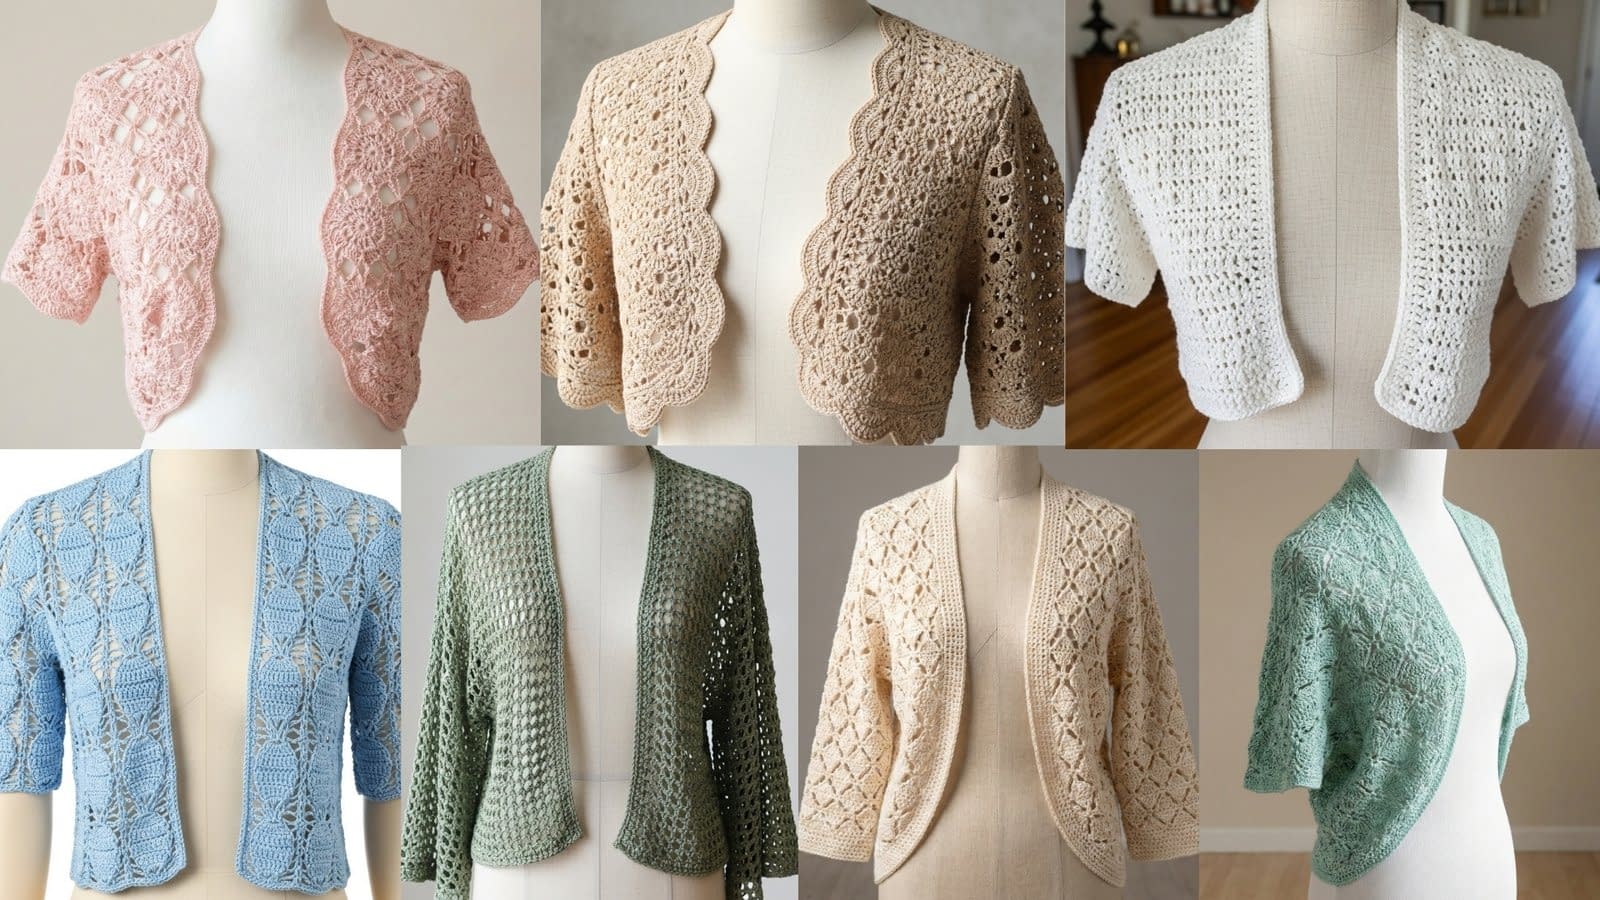
This pattern creates a truly exquisite bolero with a captivating design reminiscent of antique lace. It features interconnected floral motifs that form a delicate, open fabric with a distinct scalloped edge, providing a romantic and feminine touch. This is the dusty pink bolero from your image set.
Skill Level
Intermediate to Advanced. The construction involves creating and joining individual motifs, which requires precision and attention to detail.
Materials Needed
- Yarn: Approximately 600-800 yards of Fingering (1) or Sport (2) weight mercerized cotton or cotton-bamboo blend in a dusty pink or similar soft, summery shade. The exact yardage will depend on the size you are making and your personal tension.
- Crochet Hook: A hook size appropriate for your chosen yarn to achieve the recommended gauge (e.g., 3.0mm-3.5mm).
- Stitch Markers
- Tapestry Needle
- Scissors
- Measuring Tape
- Blocking Supplies
Gauge
Achieving the correct gauge is paramount for this pattern, especially since it relies on motif construction. The gauge will typically be given as the diameter of one finished floral motif. For example, one motif might measure 4 inches (10 cm) across after blocking. Make sure to crochet at least one motif and block it to check your size. Adjust your hook accordingly.
Construction Overview
This bolero is constructed from several individual floral medallions that are crocheted and then joined together as you go, or sewn together at the end. The main body of the bolero is formed by a panel of these motifs, and then sleeves are either created by extending motifs or adding a border pattern. The scalloped edge is an inherent part of the motif’s design.
Stitch Abbreviations Used
- ch: chain
- sl st: slip stitch
- sc: single crochet
- dc: double crochet
- tr: treble crochet
- ch-sp: chain space
- picot: ch3, sl st into the first ch
- yo: yarn over
- sk: skip
- st(s): stitch(es)
Pattern Instructions: Creating the Floral Medallion
Each floral medallion starts from the center and works outwards in rounds. You will need to make approximately 20-30 motifs, depending on the size of your bolero and the size of your motifs.
Round 1: Foundation Ring
- Make a magic ring (or ch4, sl st to first ch to form a ring).
- Ch3 (counts as first dc), work 11 dc into the ring.
- Sl st to the top of the initial ch3 to join. (12 dc total)
Round 2: Petal Foundations
- Ch1, sc in the same stitch.
- Ch5, sk1 st, sc in the next st.
- Repeat from * around, ending with ch5, sk1 st, sl st to the initial sc. (6 ch5-spaces)
Round 3: Building the Petals
- Sl st into the first ch5-space.
- Ch3 (counts as first dc), work (2dc, ch2, 3dc) into the same ch5-space. This forms your first petal cluster.
- *Ch1, work (3dc, ch2, 3dc) into the next ch5-space.
- Repeat from * around, ending with ch1, sl st to the top of the initial ch3 to join. (6 petal clusters)
Round 4: Expanding the Motif (Corners and Sides)
- Ch1, sc in the same st.
- Sc in the next 2 dc.
- *(Sc, picot, sc) in the ch2-space of the petal cluster (this forms the point of the petal).
- Sc in the next 3 dc.
- Sc in the ch1-space between petal clusters.
- Repeat from * around, omitting the final sc in the ch1-space on the last repeat, sl st to the initial sc to join.
- Fasten off and weave in ends for individual motifs, unless joining as you go.
Joining the Motifs
There are two primary methods for joining:
Method A: Sew-As-You-Go
After blocking all your individual motifs to ensure they are the correct size and shape, you can hand-sew them together using a tapestry needle and a length of matching yarn. Lay out your motifs according to a schematic (which would typically be provided with a pattern, illustrating the arrangement of motifs for the front, back, and sleeves). Use a whip stitch or mattress stitch along the edges where motifs touch, catching only the back loops of the stitches for an invisible seam.
Method B: Join-As-You-Go (JAYG)
This method is often preferred as it eliminates the need for extensive seaming at the end. When you are crocheting the final round of a motif that will be connected to an already completed motif, you replace certain chain stitches with slip stitches into the corresponding stitches of the adjacent motif.
For example, when working the picot in Round 4 where two motifs will join:
Instead of (Sc, picot, sc) in the ch2-space, you would do:
- Sc in the ch2-space.
- Ch1.
- Remove hook from loop, insert hook into the picot of the adjacent motif from front to back, pick up the dropped loop and pull it through (this creates a sl st into the adjacent picot).
- Ch1.
- Sc in the same ch2-space of the current motif.
This creates a seamless join. Continue joining at all designated points as you work the final round of each new motif.
Assembling the Bolero
Once all motifs are joined according to your schematic (typically a rectangle or modified shape for the back, two smaller panels for the front, and then panels for the sleeves), you will have the basic structure.
Shaping and Edging
- Armholes: The armholes are naturally formed by the gaps between the joined motifs. Ensure they are comfortably sized.
- Neckline and Front Opening: The neckline and front opening will also be shaped by the arrangement of the motifs. You may choose to add a simple sc or sl st border around the entire opening for a clean finish, or leave the natural scalloped edge as is.
- Sleeves: Depending on the pattern, sleeves might be formed by joining additional motifs for a wider sleeve, or by working additional rounds of an edging pattern directly into the armhole opening to create a short, lacy sleeve. If adding rounds, you might work a repetition of (ch3, dc) or (ch5, sc) around the armhole, then fill in with a lacy pattern for a few rounds.
Finishing and Blocking
This is a critical step for lacy crochet garments.
- Weave in all ends: Use your tapestry needle to neatly weave in any remaining yarn tails. Be careful not to pull too tightly, which could distort the fabric.
- Wet Blocking: Gently wash your bolero or thoroughly wet it by submerging it in cool water with a little wool wash (if using a natural fiber). Squeeze out excess water by rolling it in a towel – do not wring.
- Pinning: Lay the damp bolero flat on a blocking mat. Carefully shape it to the desired dimensions, gently stretching the lace open to showcase the intricate patterns. Use rust-proof pins to secure the edges and shape, ensuring the scalloped borders are even and pronounced.
- Drying: Allow the bolero to air dry completely, which may take 24-48 hours. Do not move it until it is bone dry.
Once blocked, your Floral Medallion Bolero will have beautiful drape, perfectly defined motifs, and be ready to wear!
Pattern 2: The Scalloped Fan Shrug
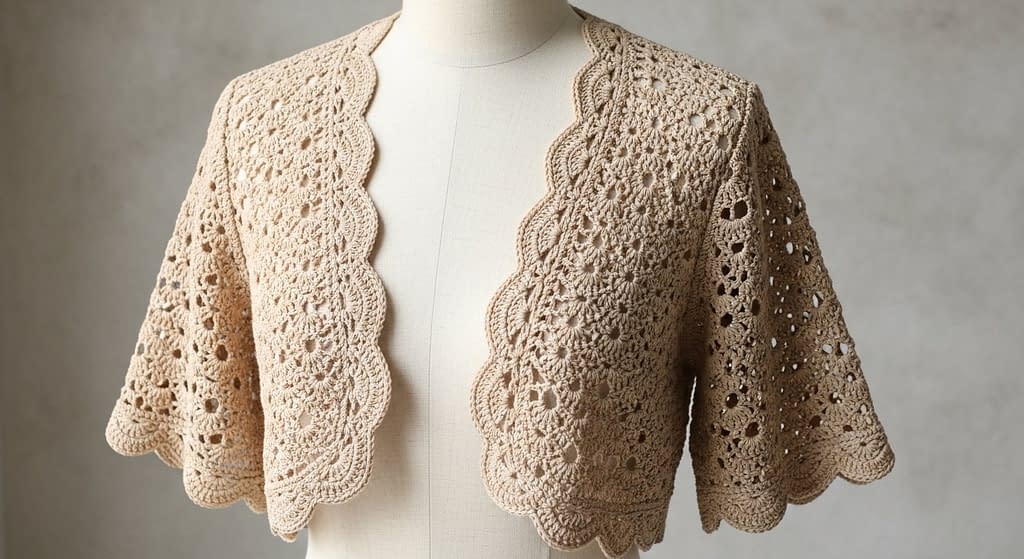
This shrug offers a delightful combination of dense, intricate fan lace work and a tight, elegant scalloped border. The overall effect is structured yet airy, making it a sophisticated addition to any summer outfit. This corresponds to the beige/tan shrug in your image.
Skill Level
Intermediate. While the fan stitch repeat is manageable, the shaping for the sleeves and the continuous scalloped border require attention to stitch placement and increases/decreases.
Materials Needed
- Yarn: Approximately 700-900 yards of DK (3) weight cotton, bamboo, or a blend. The slightly heavier weight provides good stitch definition for the fan pattern. Choose a neutral beige or tan for classic elegance.
- Crochet Hook: Size appropriate for your yarn to achieve gauge (e.g., 4.0mm-4.5mm).
- Stitch Markers
- Tapestry Needle
- Scissors
- Measuring Tape
- Blocking Supplies
Gauge
A 4×4 inch (10×10 cm) swatch of the main fan stitch pattern should typically yield a certain number of fan repeats and rows. For example, 3 fan repeats and 6 rows might equal 4 inches. Pay close attention to this, as it affects the overall size and drape of your shrug.
Construction Overview
This shrug is often constructed in one piece, starting from the back and working outwards towards the sleeves, or as a large rectangle that is then folded and seamed to create armholes. The scalloped border is typically worked last around all edges.
Stitch Abbreviations Used
- ch: chain
- sl st: slip stitch
- sc: single crochet
- dc: double crochet
- tr: treble crochet
- ch-sp: chain space
- dc cluster: a group of dc stitches worked into the same stitch or space
- sk: skip
- st(s): stitch(es)
Pattern Instructions: Main Body (Worked Flat)
Let’s assume a rectangular construction for simplicity, which is then folded. This creates the main back and front panels.
Foundation Chain
- Ch a multiple of 12 + 2, to the desired width of your shrug (e.g., if you want a 36-inch width, chain approximately 120-130 stitches, checking against your gauge swatch).
- Ensure this chain is long enough to span across your back from mid-arm to mid-arm, plus a little extra for the front panels.
Row 1: Establishing the Pattern
- Sc in the 2nd ch from hook.
- *Sk 2 ch, (dc, ch1, dc, ch1, dc, ch1, dc) into the next ch (this is your fan cluster).
- Sk 2 ch, sc in the next ch.
- Repeat from * across the row, ending with an sc in the last ch.
- Ch3 (counts as first dc), turn.
Row 2: Building the Fans
- (Dc, ch1, dc, ch1, dc) in the first sc (this is half a fan at the edge).
- Sk the next (dc, ch1, dc, ch1, dc) cluster of the previous row.
- Sc in the sc that separated the fan clusters in the previous row.
- *Sk the next (dc, ch1, dc, ch1, dc) cluster.
- (Dc, ch1, dc, ch1, dc, ch1, dc) into the next sc.
- Sk the next (dc, ch1, dc, ch1, dc) cluster.
- Sc in the sc that separated the fan clusters.
- Repeat from * across, ending with (dc, ch1, dc, ch1, dc, ch1, dc) in the last sc.
- Ch1, turn.
Row 3: Continuing the Pattern
- Sc in the first dc of the fan.
- *Sk the next (ch1, dc, ch1, dc, ch1).
- (Dc, ch1, dc, ch1, dc, ch1, dc) into the next sc.
- Sk the next (ch1, dc, ch1, dc, ch1).
- Sc in the last dc of the next fan.
- Repeat from * across, ending with an sc in the top of the turning ch3 from the previous row.
- Ch3, turn.
Continue repeating Row 2 and Row 3 until the piece reaches the desired length for the body of the shrug (e.g., from the back of your neck down to your lower back, plus enough for the front panels). This might be approximately 20-30 inches (50-75 cm).
Shaping the Sleeves (if not part of the main rectangle)
If your main rectangle does not account for sleeves, you can add them by working directly into the side edges.
- Fold your completed rectangle in half lengthwise. Mark where your armholes should be (e.g., 8-10 inches down from the top edge on each side).
- Join yarn with a sl st to the edge of the rectangle at your armhole marker.
- Work rows of the fan pattern, or a simpler dc/ch pattern, around the armhole opening. This will extend outwards to create short sleeves.
- Increase stitches evenly in the first few rounds to give the sleeve a gentle flare if desired. For example, add an extra dc to a fan cluster every few stitches, or add an extra fan cluster over a few rounds.
- Work for 4-6 inches (10-15 cm) for a short sleeve.
Adding the Scalloped Border
This border is worked all the way around the entire edge of the shrug (including the front opening, bottom, and sleeve edges).
Border Round 1 (Foundation for Scallops)
- Join yarn with a sl st to any corner or inconspicuous spot.
- Work 2-3 sc stitches evenly into the side of each fan row (when working along the sides of the rectangle).
- Work 1 sc into each sc and 1 sc into each dc (when working along the top/bottom of the rectangle).
- Ensure your stitch count around the entire edge is a multiple of the scallop repeat (e.g., a multiple of 6 or 8 for each scallop). Adjust by adding or skipping a few stitches evenly if necessary.
- Sl st to the first sc to join.
Border Round 2 (The Scallops)
- Ch1, sc in the same st.
- *Sk 2 stitches, work (5 dc) into the next stitch.
- Sk 2 stitches, sc in the next stitch.
- Repeat from * all the way around the entire edge of the shrug.
- Sl st to the initial sc to join.
- Fasten off.
Finishing and Blocking
- Weave in all ends: Use your tapestry needle to neatly hide all yarn tails.
- Seaming (if applicable): If you constructed a simple rectangle, you will now fold it in half and seam up the sides from the bottom edge towards the top, leaving armhole openings of 8-10 inches on each side. Use a mattress stitch for an invisible seam.
- Wet Blocking: Submerge the shrug in cool water with a gentle wool wash. Gently squeeze out excess water.
- Pinning: Lay the damp shrug flat on a blocking mat. Carefully pin the entire piece to its intended measurements, paying special attention to stretching open the fan lace patterns and ensuring the scalloped edges are even and defined. Pin the sleeve edges and the main body to create a pleasing shape.
- Drying: Allow to air dry completely.
Once properly blocked, your Scalloped Fan Shrug will have exquisite drape and perfectly defined lace, ready to be a statement piece in your summer wardrobe.
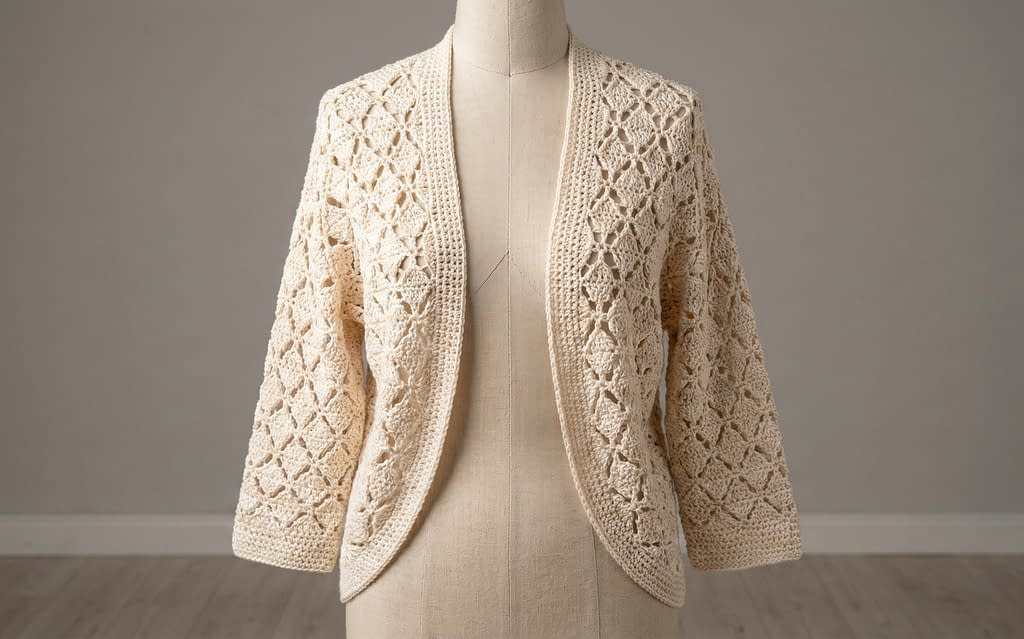
Pattern 3: The Geometric Mesh Shrug

This shrug features a clean, crisp geometric mesh pattern, sometimes referred to as filet crochet, which creates an elegant and understated texture. Its simplicity makes it incredibly versatile, easy to pair with various outfits, and ideal for showcasing beautiful yarn. This is the white shrug from your image.
Skill Level
Easy to Intermediate. While the stitch pattern itself is straightforward (primarily double crochet and chains), maintaining an even tension and understanding basic shaping for a garment elevates it beyond a pure beginner project.
Materials Needed
- Yarn: Approximately 500-700 yards of DK (3) or Light Worsted (3) weight cotton or a cotton blend. The slight weight provides nice structure to the mesh. White is classic, but any solid color will highlight the geometric pattern beautifully.
- Crochet Hook: Size appropriate for your yarn to achieve gauge (e.g., 4.5mm-5.0mm).
- Stitch Markers
- Tapestry Needle
- Scissors
- Measuring Tape
- Blocking Supplies
Gauge
A 4×4 inch (10×10 cm) swatch of the mesh pattern should typically yield a certain number of ‘squares’ (dc, ch1) and rows. For example, 5 dc and 5 ch-spaces and 8 rows might equal 4 inches. Your gauge will directly impact the size of the ‘holes’ in your mesh and the overall dimensions of the shrug.
Construction Overview
This shrug is most often worked as a large rectangle or a slightly shaped rectangle from side-to-side or top-to-bottom. The sleeves are either formed by folding and seaming the rectangle, or by adding rounds of mesh pattern directly into the armhole openings. A simple border is then applied.
Stitch Abbreviations Used
- ch: chain
- sl st: slip stitch
- sc: single crochet
- dc: double crochet
- ch-sp: chain space
- sk: skip
- st(s): stitch(es)
Pattern Instructions: Main Body (Worked Flat, Top-Down or Bottom-Up)
Let’s assume we are working the main body of the shrug as a rectangle, from the bottom hem up to the shoulders.
Foundation Chain
- Ch a multiple of 2 + 1 to the desired width of the shrug (e.g., 40-50 inches for the entire span from sleeve cuff to sleeve cuff, including the body in between). This initial chain will be the long edge that runs along the bottom of the shrug, up over the shoulders, and down to the bottom of the other sleeve. The exact length will depend on your desired sleeve length and body width. A general rule is to measure from wrist to wrist over your shoulders and add a few inches for drape.
Row 1: Setting up the Mesh
- Dc in the 4th ch from hook (the skipped 3 ch count as the first dc).
- *Ch1, sk next ch, dc in next ch.
- Repeat from * across the entire foundation chain.
- Ch4 (counts as first dc + ch1), turn. (This ensures your first mesh ‘square’ is formed correctly).
Row 2: Continuing the Mesh Pattern
- Sk the first dc (since the ch4 already counts for it).
- Dc into the next dc.
- *Ch1, sk the ch1-space, dc into the next dc.
- Repeat from * across the row, ending with ch1, dc into the top of the turning ch3 from the previous row.
- Ch4 (counts as first dc + ch1), turn.
Continue repeating Row 2 until the rectangle reaches the desired height (e.g., about 15-20 inches, or half your full length from wrist over shoulder to wrist). This piece will form one entire side of the shrug (e.g., the back panel plus half of each sleeve). You will then create a duplicate piece, or work a seam. For a single piece construction, you will continue this pattern until the full length (wrist to wrist) is reached.
Assembling the Shrug (Single Piece Construction)
If you have crocheted one large rectangle that measures from one sleeve cuff, across the back/front, to the other sleeve cuff:
- Lay your finished rectangle flat.
- Fold the outer edges inward towards the center. The amount you fold in will determine the length of your sleeves.
- Seam along the sides to create the armholes. You will be seaming the bottom edge of the sleeve to the side edge of the body. Typically, you’ll seam about 8-10 inches from the edge of the folded rectangle, leaving the remainder open for the body and armhole. Use a slip stitch or single crochet seam for a clean, sturdy join. You want to create two tubes for the arms.
Adding the Border
The white shrug in the image has a simple, clean border, likely made of single crochet or a few rows of double crochet.
Border Round 1 (Around Entire Edge)
- Join yarn with a sl st to an inconspicuous spot (e.g., under an armhole or along the bottom edge).
- Work sc stitches evenly around the entire perimeter of the shrug (front opening, bottom edge, and sleeve cuffs).
- For the mesh pattern: Work 2 sc into the side of each dc post when working along raw edges (like the side of the mesh rows).
- Work 1 sc into each dc and 1 sc into each ch-sp when working along the top and bottom of the mesh.
- For the sleeve cuffs, work 1 sc into each stitch around the opening.
- Ensure your stitch count is even and consistent.
- Sl st to the first sc to join.
Border Round 2 (Optional Ribbing/More Structure)
- Ch2 (does not count as a stitch).
- Hdc in each sc around.
- Sl st to the first hdc to join.
- Repeat for 1-2 more rounds if you desire a thicker, more defined border.
- Fasten off.
Finishing and Blocking
- Weave in all ends: Use your tapestry needle to neatly secure all yarn tails, making sure they are invisible through the open mesh pattern.
- Wet Blocking: Submerge the shrug in cool water with a gentle wool wash. Gently squeeze out excess water by pressing it between towels.
- Pinning: Lay the damp shrug flat on a blocking mat. Carefully shape it to the desired dimensions, gently opening up the mesh pattern and ensuring all edges are straight. Pin the front opening, bottom edge, and sleeve cuffs evenly.
- Drying: Allow to air dry completely.
Your Geometric Mesh Shrug will now have a beautiful, crisp drape and a perfectly defined pattern, making it a timeless and versatile addition to your summer wardrobe.
Pattern 4: The Pineapple Lace Column Cardigan
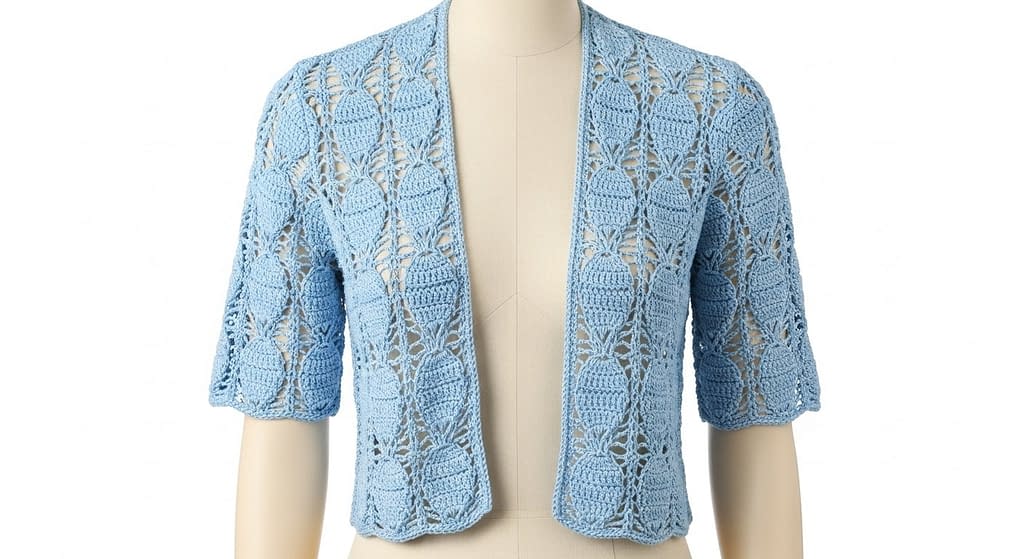
This striking sky blue design showcases the timeless beauty of the pineapple motif, arranged in vertical columns that create an elongating and elegant effect. Unlike the random placement of motifs in other designs, this pattern relies on structured vertical repeats, offering a blend of classic crochet tradition and modern wearable art. This corresponds to the sky blue shrug in your image set.
Skill Level
Intermediate to Advanced. The pineapple stitch requires careful attention to counting stitches and chains to ensure the teardrop shapes form correctly.
Materials Needed
- Yarn: Approximately 800-1000 yards of Sport (2) or DK (3) weight mercerized cotton or a silk-cotton blend. The slight sheen of mercerized cotton highlights the pineapple texture beautifully. Sky blue is fresh, but this looks equally stunning in lilac or mint.
- Crochet Hook: Size 3.5mm to 4.0mm, or size needed to obtain gauge.
- Stitch Markers
- Tapestry Needle
- Scissors
- Measuring Tape
- Blocking Pins and Mats
Gauge
For this pattern, gauge is measured by the width of one “Pineapple Column.” Work one repeat of the pattern (one vertical column of pineapples) for 4 inches in height. Measuring this width is crucial because it determines how many columns you will need for the back and front panels.
Construction Overview
This cardigan is typically constructed in three main panels: one back panel and two front panels, which are seamed at the shoulders and sides. The sleeves are often worked directly from the armhole openings or made as separate rectangles and set in. The vertical nature of the pattern means you will likely be working from the bottom hem up to the shoulders.
Stitch Abbreviations Used
- ch: chain
- sc: single crochet
- dc: double crochet
- tr: treble crochet
- ch-sp: chain space
- shell: (2dc, ch2, 2dc) in same space
- cluster: A group of stitches worked together to form the base or top of the pineapple
- sk: skip
Pattern Instructions: Back Panel
Foundation Row
- Chain a multiple required for the pineapple repeat plus edge stitches. For a standard back width of 18-20 inches, you might need 4 or 5 columns of pineapples.
- Row 1: Work a row of foundation double crochet or ch and dc across to establish a solid base.
- Row 2: Begin the pattern setup. Typically, this involves placing “shells” (2dc, ch2, 2dc) that will frame the pineapples, and chain loops where the pineapple base will grow.
The Pineapple Repeat (Body)
- The pineapple motif grows by working a series of treble crochets or double crochets into a central chain space (the base).
- In subsequent rows, you work chain loops (usually ch3 or ch4) anchored by single crochets into the tops of these base stitches.
- As you work up, the number of chain loops decreases by one in each row (e.g., 5 loops, then 4, then 3…), creating the tapered top of the pineapple.
- Between the pineapples, you will maintain vertical columns of “shells” or V-stitches. These separate the motifs and add structure.
- Continue working these vertical repeats until the back panel measures the desired length from hem to shoulder (approx. 20-22 inches).
- Fasten off and cut the yarn.
Pattern Instructions: Front Panels (Make 2)
- The front panels are worked identically to the back but are narrower. If the back had 5 columns, each front panel might have 2 columns.
- Work the same number of vertical repeats as the back panel so the shoulder seams align perfectly.
- Neck Shaping: On the last vertical repeat (the one nearest the neck), you may need to stop the inner pineapple column halfway through to create a gentle neckline slope. This involves working partial rows and turning before the neck edge.
Assembly and Seaming
- Shoulder Seams: Lay the back panel flat, right side up. Place the two front panels on top, right sides facing down (so right sides are touching). Align the shoulder edges.
- Use a whip stitch or slip stitch seam to join the shoulders. Ensure you match the columns exactly—shell to shell, pineapple tip to pineapple tip.
- Side Seams: Measure approximately 7-8 inches down from the shoulder seam for the armhole. Mark this spot. Seam from the bottom hem up to this marker.
- Sleeves: Join yarn at the bottom of the armhole. Work in rounds, continuing the shell pattern (or a simplified mesh pattern) for 4-6 inches.
Finishing
- Edging: Work a simple border of single crochet around the front opening and neck. To keep the focus on the pineapples, do not add a complex lace border here; a clean edge is best.
- Blocking: This is non-negotiable for pineapples. Wet the garment thoroughly. Pin it out on your mats. You must place a pin in the center of every single chain loop of every pineapple to open them up fully. This takes time but ensures the “7 crochet lacy summer shrug patterns” look professional.
Pattern 5: The Sage Honeycomb Cocoon Shrug
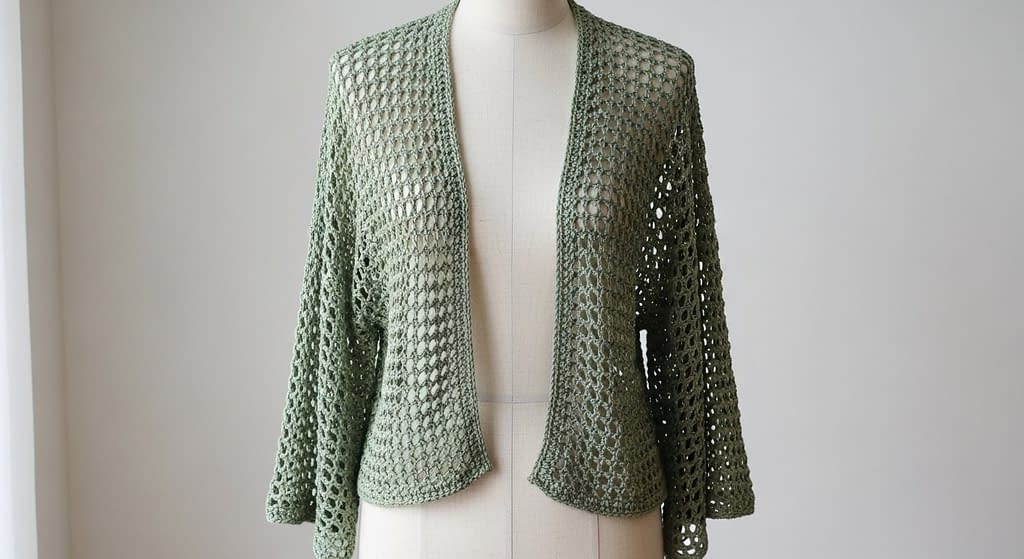
This piece is the epitome of relaxed summer comfort. The sage green color complements the organic, cellular structure of the honeycomb mesh. Unlike tailored jackets, this is a “cocoon” style shrug, which is essentially a square or rectangle folded and seamed to create a loose, draped fit with wide sleeves. This corresponds to the sage green shrug in your image set.
Skill Level
Beginner to Intermediate. The stitch pattern is repetitive and easy to memorize, and the construction is the simplest of all garment shapes.
Materials Needed
- Yarn: Approximately 900-1100 yards of Fingering (1) or Sport (2) weight yarn. A linen or bamboo blend is ideal here to ensure the “cocoon” drapes heavily and doesn’t stick out stiffly.
- Crochet Hook: A larger hook than usual for the yarn weight (e.g., use a 5.0mm hook with sport weight yarn) to exaggerate the open mesh.
- Stitch Markers
- Tapestry Needle
- Scissors
Gauge
Gauge is less critical for fit here due to the oversized nature, but important for yarn usage. A 4×4 inch square in the honeycomb pattern should be checked to ensure you like the openness of the fabric.
Construction Overview
You will crochet one large rectangle. The size of this rectangle determines the fit. A good standard size is approximately 40 inches wide by 36 inches tall. The “shrug” shape is created entirely by the folding and seaming process after the rectangle is complete.
Stitch Abbreviations Used
- ch: chain
- sc: single crochet
- sl st: slip stitch
- sk: skip
Pattern Instructions: The Rectangle
Foundation Chain
- Chain a multiple of 5 + 1 until your chain measures approximately 40 inches (or your desired width from elbow to elbow across the back).
Row 1 (Right Side)
- Sc in 2nd ch from hook.
- *Ch5, sk 4 ch, sc in next ch.
- Repeat from * across.
- Turn.
Row 2
- *Ch5, sc in the ch5-loop of the previous row.
- Repeat from * across.
- End with a sc in the last loop.
- Turn.
Continuing the Fabric
- Repeat Row 2 indefinitely. This creates a fabric made entirely of chain loops offset from one another, resembling a honeycomb.
- Continue until the rectangle measures approximately 34-36 inches in height.
- Fasten off, leaving a very long tail (about 2 yards) for seaming one side, or cut and use fresh yarn for seaming.
Folding and Seaming (The Cocoon Shape)
This is the most crucial step for this specific style.
- Lay your finished rectangle flat on the floor or a large table.
- Fold the rectangle in half width-wise (bring the top edge down to meet the bottom edge). You now have a folded rectangle that is 40 inches wide and 18 inches tall.
- Identify the two short sides (the 18-inch sides). These will become your armhole seams.
- Seaming: Starting from the open corner (the bottom of the fold) on the right side, sew up the edge towards the fold. Do not sew all the way. Stop approximately 6-7 inches before the fold.
- Repeat on the left side. Sew from the bottom corner up, stopping 6-7 inches before the fold.
- The unsewn sections near the fold are your armholes. The seamed sections form the back/bottom of the cocoon.
The Collar and Cuffs
- Collar: You now have a large opening in the center (between the two seams). Join your yarn at one of the seams. Work rounds of single crochet or half double crochet around this entire continuous opening. This creates the collar that runs around your neck and down your back. Work 5-10 rounds for a thick, cozy band.
- Cuffs: Go to the armhole openings. Work rounds of sc or hdc to tighten the cuff slightly. If the sleeves feel too wide, decrease evenly in the first round (e.g., sc2tog every 4th stitch).
Finishing
- Weave in ends securely. Because the mesh is open, run the needle through the solid parts of the single crochet knots or the collar ribbing to hide the tails effectively.
- Block lightly to even out the honeycomb shape.
Pattern 6: The Cream Diamond Lattice Jacket
This elegant cream jacket features a structured diamond lattice pattern. Unlike the shrugs, this piece has the silhouette of a cropped cardigan or jacket with 3/4 length sleeves. The lattice design creates a sophisticated geometric texture that looks expensive and tailored. This corresponds to the cream jacket in your image.
Skill Level
Intermediate. The diamond stitch pattern often uses post stitches or crossing stitches, which requires practice.
Materials Needed
- Yarn: 1000-1200 yards of DK (3) weight wool-blend or acrylic-blend. This garment relies on structure, so a yarn with a bit of “bounce” or memory is better than slippery cotton.
- Crochet Hook: 4.0mm or 4.5mm.
- Stitch Markers
- Tapestry Needle
Construction Overview
This garment is best constructed in five pieces: Back, Left Front, Right Front, and two Sleeves. These pieces are blocked individually and then sewn together. This “pieced” construction allows for the tailored fit seen in the image.
Stitch Pattern: The Open Diamond
This stitch usually works over a multiple of 4 or 6 stitches.
- Foundation: Rows of dc or sc.
- Pattern Row: You will create the “diamond” lines by using Front Post Treble Crochets (FPtr) worked into stitches two rows below.
- For example, work 3 dc, then FPtr around the post of the stitch 2 rows below and 2 stitches to the right. Work next stitches, then FPtr around the post of the stitch 2 rows below and 2 stitches to the left.
- On the next right-side row, you shift the placement of these post stitches so they meet in the middle (closing the diamond) or move apart (opening the diamond).
Shaping the Front Opening
- Work the Back panel as a simple rectangle (approx 18 inches wide x 20 inches tall).
- Work the Front panels starting with half the width of the back.
- Curve Shaping: As you approach the neck height on the Front panels, you must decrease at the inner edge to create the rounded curve seen in the photo.
- How to Decrease: Instead of finishing a row, stop 2 or 3 stitches from the end. Turn, slip stitch over the first stitch, and continue the pattern. This creates a “stair-step” reduction which smooths out into a curve when you add the border later.
Assembly
- Cut the Yarn: Leave long tails for sewing.
- Seaming: Pin the Fronts to the Back at the shoulders. Sew using a mattress stitch for a firm seam. Sew the side seams from the hem up to the armhole (leaving approx 7.5 inches open).
- Setting in Sleeves: Sew the sleeve seams (making tubes). Pin the sleeve cap into the armhole opening. This can be tricky; ease the fabric in evenly before sewing.
The Ribbed Border
The photo shows a distinct border.
- Join yarn at the bottom hem corner.
- Work a row of sc around the entire opening (up the front, around the neck, down the other front).
- Ribbing: You can create a vertical ribbing border. Ch 6 (extending off the main fabric). Sc in 2nd ch from hook and next 4 ch. Sl st into the next 2 stitches of the main jacket body. Turn. Skip the 2 sl sts, working into the back loops only of the 5 sc you just made.
- Repeat this “join-as-you-go” ribbing all the way around the curve. This creates the professional band that hugs the body.
Pattern 7: The Seafoam Starburst Bolero

This lovely seafoam piece features a distinct “star” or “petal” cluster stitch. It has a shorter back and a draped front, typical of a circular-based shrug or a generous rectangle. The texture is high-relief, making it very tactile. This corresponds to the seafoam green shrug in your image.
Skill Level
Intermediate. Working clusters and maintaining stitch counts can be tricky.
Materials Needed
- Yarn: Sport or DK weight yarn in a soft seafoam green. A slightly fuzzy yarn like a mohair blend or a soft acrylic can add to the “cozy” look of the stars.
- Crochet Hook: 4.0mm to 5.0mm.
Stitch Pattern: The Star Stitch
The unique feature here is the Star Stitch (also known as the Marguerite stitch).
- To make a Star: Insert hook in the eye of the last star made, yo and pull up a loop. Insert hook in the back of the last loop of the star, yo and pull up a loop. Insert hook in the same stitch as the last loop of the star, yo and pull up a loop. Insert hook in the next 2 chains/stitches, pulling up a loop in each. (You should have 6 loops on hook). Yo and draw through all 6 loops. Ch 1 to close the eye.
- This creates a dense, flower-like texture.
Construction Method
This shrug looks like a “modified rectangle” or “T-shape” construction.
- Main Body: Work a rectangle of Star Stitch rows that is wide enough to cover the back (shoulder to shoulder) and long enough to drape down the back.
- Sleeves: Unlike the other patterns, the sleeves here appear to be extensions of the main body rather than separate pieces. You can achieve this by chaining extra stitches at the beginning and end of a row once the back section is done, creating a “T” shape.
- Work the “T” shape until the sleeves are wide enough to wrap around the arm.
Finishing
- Folding: Fold the “T” in half horizontally.
- Seaming: Sew along the bottom of the sleeve and down the side of the body.
- Edging: The seafoam shrug has a clean edge. Work 2 rows of Half Double Crochet (hdc) evenly around the cuffs and the main body opening to stabilize the star stitches.
Glue and Cutting Details (for all patterns)
While traditional crochet does not use glue, there are specific instances for these summer garments where “fabric glue” or “fray check” is useful:
- When to use glue: If you are using a slippery yarn like silk or bamboo (common for Pattern 4 or 5), knots can sometimes undo themselves. After weaving in your end with a needle, apply a tiny, microscopic dot of washable fabric glue to the very tip of the yarn tail before tucking it inside a stitch. Press it for 10 seconds.
- How to Cut: Always leave a tail of at least 6 inches (15 cm) before cutting the yarn. Never cut close to the knot immediately. Weave the yarn back and forth in three different directions through the solid parts of the stitches (not the lace holes) before trimming the excess.
Conclusion
Crocheting your own summer wardrobe is a deeply satisfying endeavor. The “7 crochet lacy summer shrug patterns” we have explored in this guide range from the romantic Floral Medallion Bolero to the relaxed Sage Honeycomb Cocoon. Each pattern offers a unique opportunity to explore different construction methods—from motifs and mesh to structured tailoring—and to work with beautiful summer fibers like cotton, linen, and bamboo.
Remember that the key to a professional finish lies not just in the stitching, but in the details: the correct gauge, the careful weaving of ends, and most importantly, the blocking process which transforms crumpled yarn into flowing lace. Whether you are dressing up for a summer wedding or looking for a light cover-up for a beach evening, one of these shrugs is sure to become a cherished piece in your closet.