
There is something undeniably charming about the classic granny stitch. It evokes a sense of nostalgia, comfort, and handmade warmth that few other techniques can replicate. When you combine that timeless texture with the universal symbol of love, you get crochet granny hearts. These versatile motifs are perfect for using up scrap yarn, adding a personal touch to larger projects, or simply creating sweet little gifts for Valentine’s Day, Mother’s Day, or just because.
In this collection of 8 Crochet Granny Heart Patterns, we explore a variety of designs that cater to different skill levels and aesthetic preferences. Whether you are looking for a solid heart to use as a coaster, a delicate lacy motif for embellishing a garment, or a structured square to incorporate into a blanket, this guide has something for you. We will walk through every step with precision, ensuring that even beginners can achieve professional-looking results.
Classic Solid Granny Heart
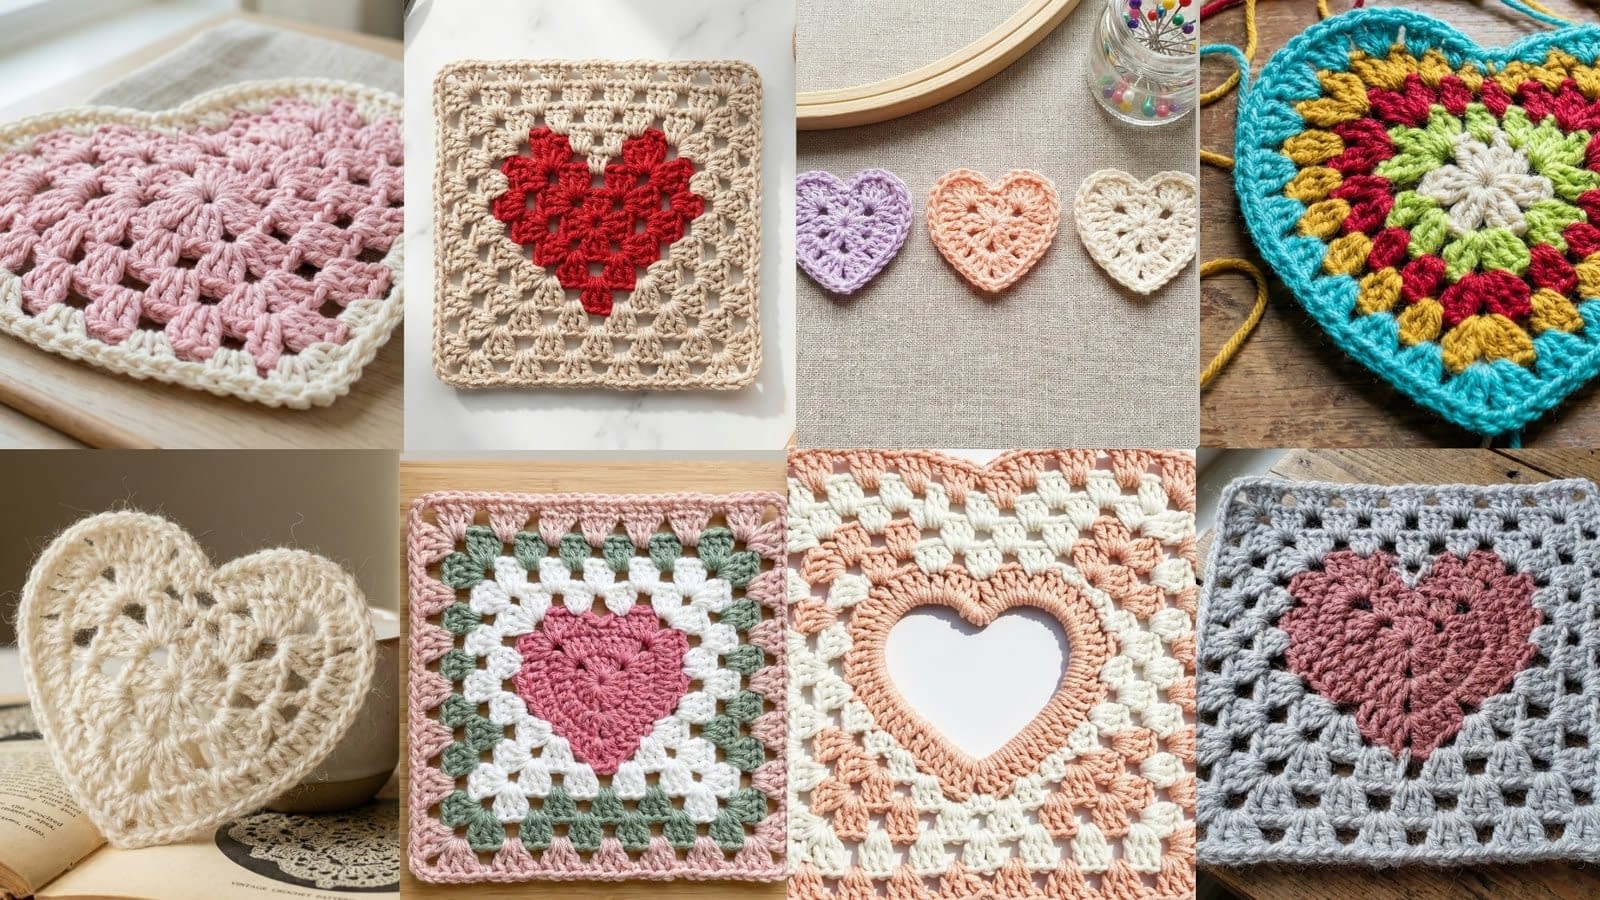
The first pattern in our collection is the quintessential granny heart. This design features the beloved double crochet clusters that define the granny style, worked in a way that shapes a perfectly plump heart. As seen in the reference, this specific variation uses a soft pastel pink for the main body and is finished with a creamy white border. This border not only defines the shape but also adds a polished, finished look that makes the heart stand out. It lies flat, making it an excellent choice for appliqués, coasters, or bunting.
Materials Needed
To recreate the look of the classic heart, opt for a medium-weight cotton yarn. Cotton provides excellent stitch definition, allowing the granny clusters to pop without looking fuzzy. You will need a pastel pink shade for the center and a natural cream or white for the border. A 4.0 mm or 4.5 mm crochet hook is usually ideal for this weight, but check your yarn label. You will also need a tapestry needle for weaving in ends and sharp scissors.
Step-by-Step Instructions
Starting the Center
Begin by creating a magic ring. This technique allows you to pull the center tight, eliminating any unwanted hole in the middle of your heart. If you struggle with the magic ring, you can chain 4 and slip stitch into the first chain to form a ring.
Chain 3, which counts as your first double crochet. Work 2 more double crochets into the ring. This forms your first granny cluster. Chain 2 to create a corner space, then work 3 double crochets into the ring. Repeat this two more times until you have four clusters separated by chain-2 spaces. Pull the magic ring tight and slip stitch into the top of the starting chain-3. You now have a small granny square, which forms the base of the heart.
Forming the Lobes
To transform this square into a heart, we need to build the rounded lobes on two adjacent sides of the square. Identify the next corner space to your left. We will be working all our stitches for the first lobe into this single corner space.
Chain 1 to secure your yarn. In the first corner space, work roughly 12 double crochets (or treble crochets if you want a taller heart). The key here is to pack enough stitches into that space so that they fan out into a semi-circle. If the stitches feel too tight, you can add a chain 1 between the 6th and 7th stitch to give it room to breathe, but a solid fan looks neatest.
Once the first lobe is complete, slip stitch into the center stitch of the next side of the square (the cluster between the corners) to anchor the lobe down. Then, move to the next corner space and repeat the process: work the same number of double or treble crochets into that corner to form the second lobe.
After finishing the second lobe, slip stitch into the side of the square to secure it. You should now see a distinct heart shape formed by the two rounded corners and the pointed bottom corner of the original square.
Adding the Cream Border
Fasten off your pink yarn and weave in the end. Join your creamy white yarn at the bottom point of the heart (the corner of the original square that did not get a lobe).
Chain 1, then single crochet in the same space. Work single crochets evenly up the side of the square until you reach the start of the first lobe. When working over the rounded lobes, place 2 single crochets in every third stitch to ensure the border lays flat and does not cup. The goal is to maintain a smooth curve.
When you reach the deep V at the top center of the heart (between the two lobes), work a slip stitch deeply into the center of the square below. This pulls the yarn down and emphasizes the heart’s indentation. Continue single crocheting around the second lobe, increasing slightly as needed to keep it flat.
At the bottom point, work a single crochet, chain 1, and another single crochet all in the tip to keep the point sharp. Slip stitch to the first white single crochet to join.
Finishing Touches
Cut the yarn and pull the tail through. Thread your tapestry needle and weave the ends back and forth through the solid parts of the clusters on the wrong side. Do not just cut the yarn close to the knot; weaving it in ensures your work will not unravel during use or washing. Finally, block the heart by pinning it to a foam board and spraying it with water. This will square up the stitches and make the border perfectly crisp.
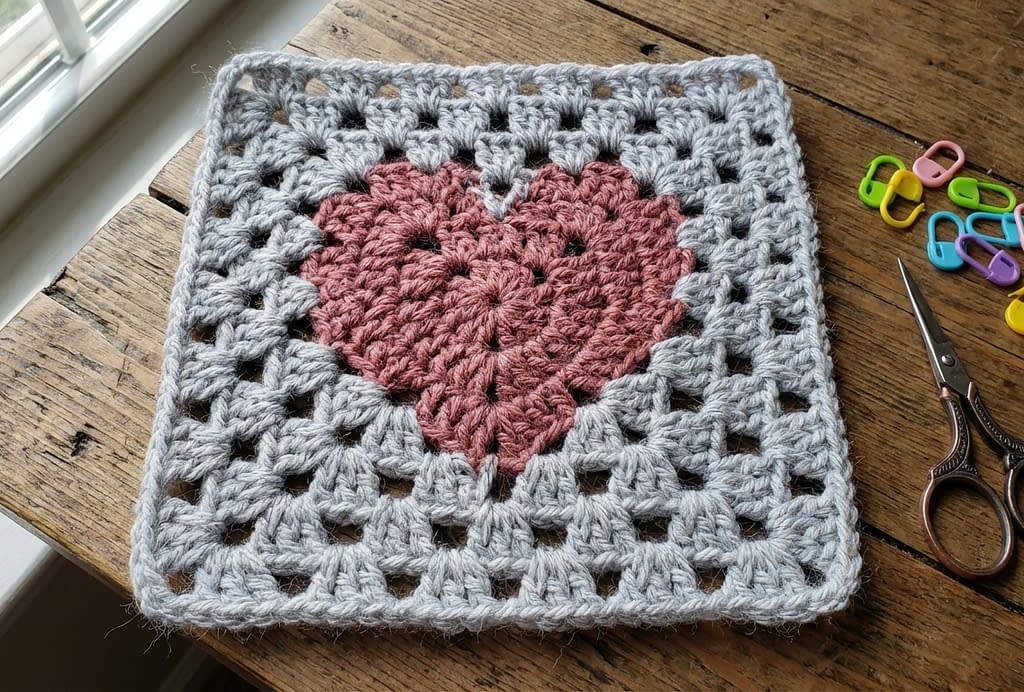
Two-Color Granny Heart Square
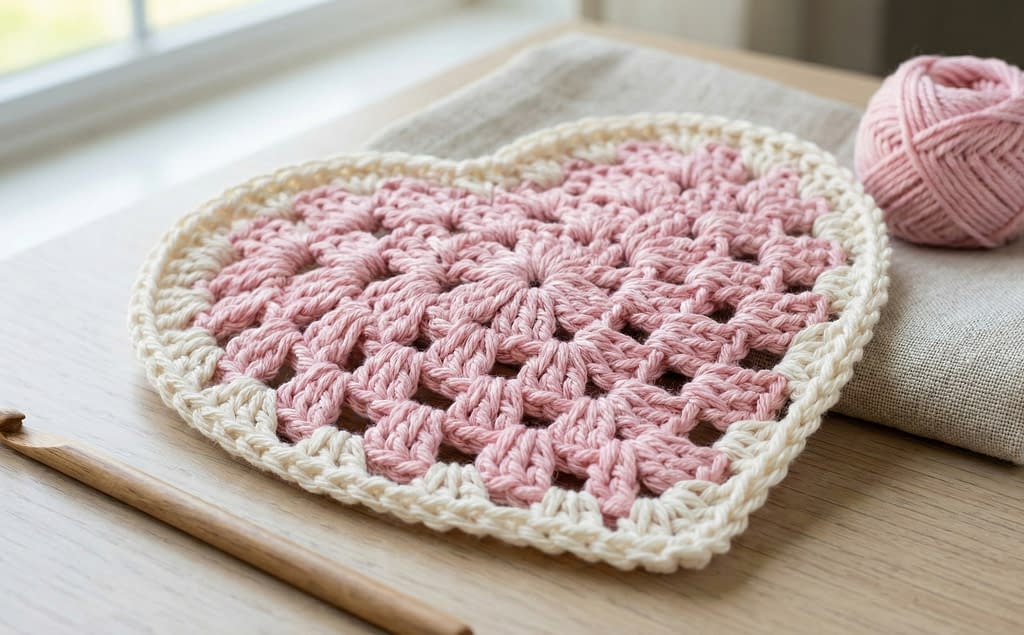
This pattern takes the heart motif and frames it within a classic granny square structure. As shown in the visual guide, this design features a bold red heart centered on a soft beige background. The contrast between the red and beige creates a striking graphic look, while the granny clusters ensure the project retains a traditional, cozy feel. This square is perfect for assembling into blankets, pillow covers, or tote bags.
Materials Needed
For this square, a slightly matte yarn with a visible twist works best to showcase the texture. Worsted weight acrylic or a wool blend is a great choice. You will need a bright, true red for the heart and a neutral beige or oatmeal color for the background. Use a 5.0 mm hook to keep the drape soft, or a smaller hook if you want a stiffer square for a bag.
Step-by-Step Instructions
Creating the Heart Center
The center of this square starts exactly like a standard granny heart. Using your red yarn, form a magic ring. Chain 3 (counts as a double crochet), then work 2 double crochets into the ring. Chain 1, work 3 double crochets, chain 1, work 3 double crochets, chain 1, work 3 double crochets. Chain 1 and join to the top of the starting chain. You have a small square with four clusters.
To make the heart shape, slip stitch over to the next chain-1 space. In this space, work a group of treble crochets (usually 6 to 8 depending on tension) to form the first rounded top. Slip stitch into the next cluster space to anchor. In the following corner space, work another group of treble crochets for the second rounded top. Slip stitch to finish the round. Fasten off the red yarn, leaving a tail for weaving.
Squaring the Heart
Now comes the technique of turning this irregular heart shape back into a square using the beige yarn. Join the beige yarn at the bottom point of the heart (the sharp point, not the rounded tops).
Chain 3 (counts as a double crochet), and work 2 double crochets, chain 2, and 3 double crochets all in that bottom point. This creates your first proper square corner.
Move up the side of the heart. You will need to create side clusters and corners that compensate for the height of the heart’s curves. Typically, you will skip a small section of the red curve and work 3 double crochets into the space between the red treble clusters and the side of the original square.
When you reach the area aligned with the top of the heart lobes, you need to create the top corners. In the space near the top curve, work a corner set (3 treble crochets, chain 2, 3 treble crochets). Using treble crochets here helps reach the height of the heart lobes so the square edge is straight.
Between the two heart lobes (the dip), you need to span the gap. Work a group of regular double crochets or half-double crochets into the slip stitch that separates the lobes. This fills the valley.
Proceed to the next top corner and work another set of trebles to square it off. Continue down the other side with double crochet clusters until you reach the start. Join with a slip stitch.
Refining the Shape
You may find the first round of beige looks a bit uneven because the heart shape is organic. The second round of the border will fix this. Continue with the beige yarn. Chain 3, and work a standard granny square round: 3 double crochets in each side space and (3 double crochet, chain 2, 3 double crochet) in each corner.
As you work this round, pay attention to your tension. If the square is pulling in, your chains between clusters might be too tight; loosen them slightly. If it is ruffling, they are too loose.
Final Details
Fasten off the beige yarn. When weaving in the red ends, be careful to keep them within the red stitches so the dark color does not show through the light beige background. Similarly, weave the beige ends only into the beige section. Wet block this square aggressively. Pin the four corners to exact right angles and let it dry completely. This is crucial for ensuring the “square” shape is truly square, as the heart center can sometimes distort the fabric.
Lacy Granny Heart Pattern
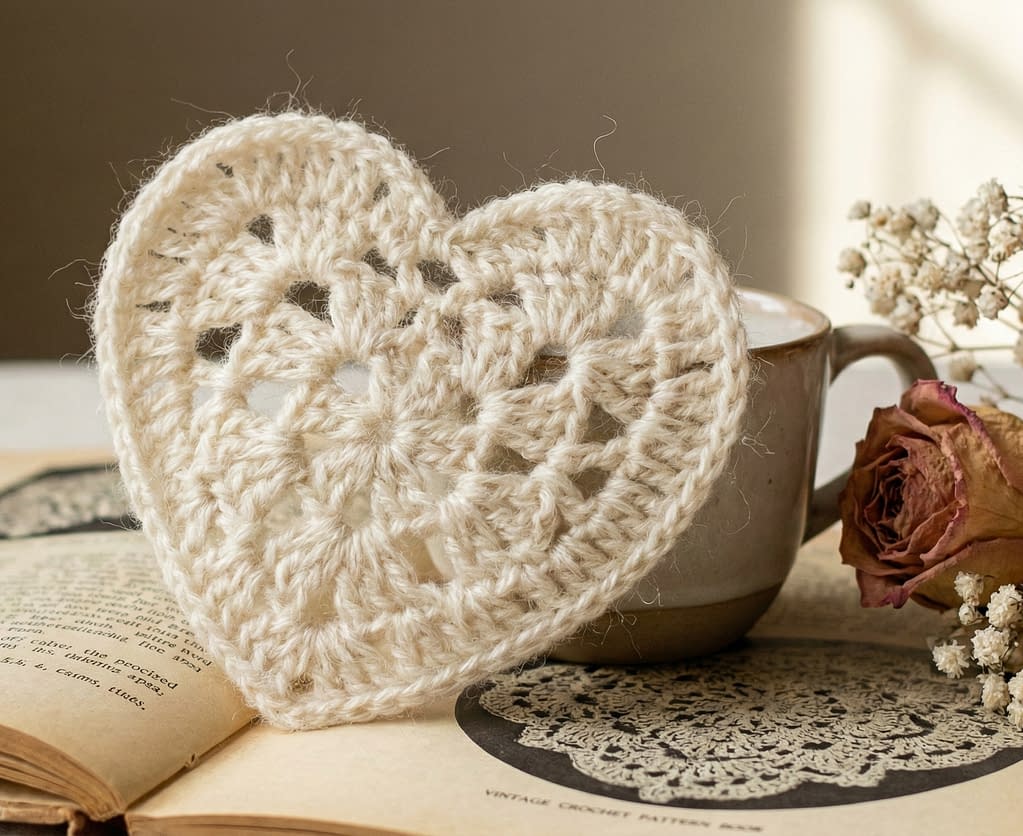
The Lacy Granny Heart is an elegant, romantic variation that focuses on openwork and negative space rather than dense clusters. As depicted in the image, this heart is made with a creamy ivory yarn and features airy chain spaces and delicate arches, giving it a vintage doily aesthetic. It is lighter and more flexible than the solid version, making it ideal for delicate decorations, wedding favors, or sewing onto fabric.
Materials Needed
To achieve the delicate, airy look, use a lightweight yarn. A DK weight or even a fingering weight cotton or bamboo blend is excellent here. The slight sheen of bamboo adds to the elegance. Use a hook slightly larger than recommended for the yarn (e.g., a 3.5 mm hook with fingering weight) to encourage the lacy, open tension. You will also need a smaller needle for weaving in thinner yarn tails.
Step-by-Step Instructions
The Open Center
Start with a magic ring, but make it slightly looser than usual. Chain 4 (counts as 1 double crochet and a chain 1). Work 1 double crochet, chain 1 into the ring 11 times. Join to the 3rd chain of the starting chain-4. You should have a circle with 12 posts and 12 spaces. This radial spoke design creates the airy center.
Creating the Arches
Round 2 is where the lacy texture begins. Slip stitch into the first chain-1 space. Chain 3, and work 2 double crochets closed together (a cluster stitch) in that same space. Chain 3. Work a 3-double-crochet cluster in the next space. Repeat this around. The chain-3 spaces between the clusters create the “netting” look. Join to the top of the first cluster.
Shaping the Heart with Picots
To turn this lacy circle into a heart, we use stitches of varying heights. Identify where your bottom point will be. In one chain space, work a collection of tall stitches: Double Treble, Chain 1, Triple Treble, Chain 1, Double Treble. This creates a sharp, elongated point.
Move up the sides. In the next chain spaces, work treble crochet shells (5 trebles in one space), followed by double crochet shells in the next. This graduation in height creates the curve.
At the top of the heart, we want to create the two distinct lobes. Work a large shell of 8 to 10 treble crochets into the spaces at the “10 o’clock” and “2 o’clock” positions of the circle. Between these two large shells (at “12 o’clock”), work a slip stitch directly into the previous round to pull the center down, creating the heart’s cleavage.
To add the final vintage touch mentioned in the visual, add a picot edging. Single crochet in each stitch around the entire perimeter. At the center of each shell (the top of the curve), chain 3 and slip stitch back into the first chain to make a tiny bump or “picot.” Do this also at the very bottom point of the heart. This adds a decorative, lace-like frill to the edge.
Stabilizing the Lace
Because this pattern relies on chains and open spaces, it can look shapeless right off the hook. Blocking is not optional for this pattern; it is mandatory. Soak the finished heart in a mixture of water and a little starch (or sugar water if you want it very stiff). Pin it out on a board, stretching the chain spaces open and pinning each picot point sharply. Allow it to dry completely before unpinning. This will lock the lacy structure in place and ensure the delicate pattern is visible.
Open-Center Granny Heart Square
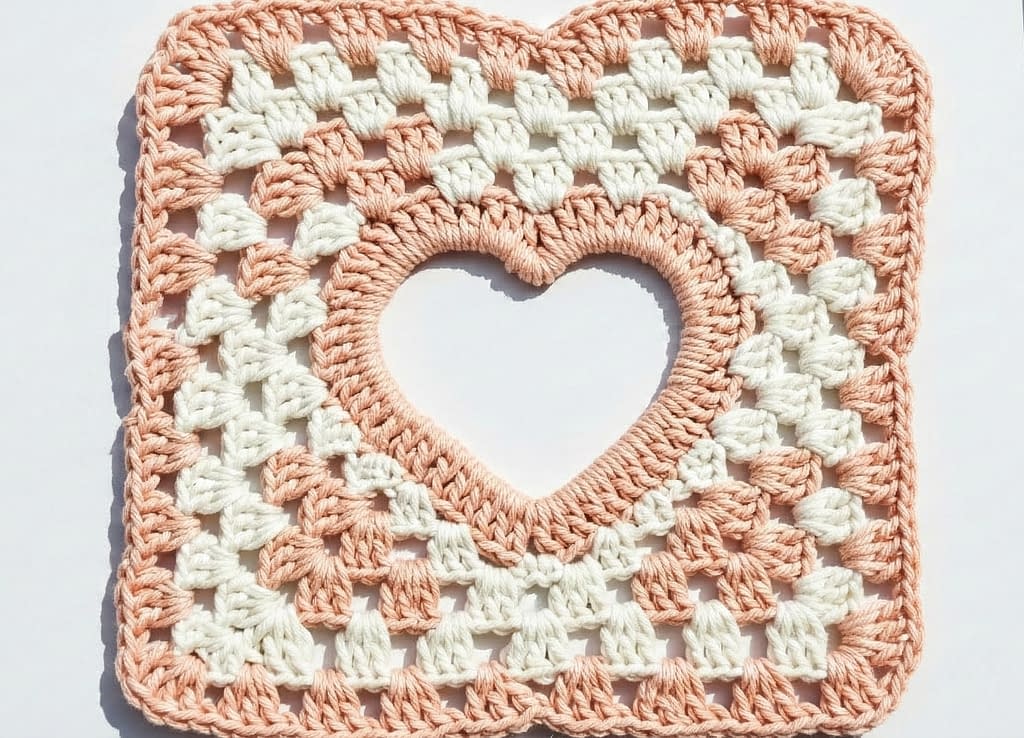
This unique variation flips the script on the traditional granny square. Instead of a solid center, this design features a distinct open heart created by negative space, surrounded by structured granny clusters. As described in the visual guide, the center remains airy and open, framed by soft peach and ivory yarn. This pattern relies on chain loops to define the heart shape before the solid work begins, making it a sophisticated choice for modern blankets or summery tops where you want a bit of breathability.
Materials Needed
To maintain the structural integrity of the open center, a mercerized cotton yarn is the best choice. It has low stretch, meaning the open heart shape will not sag or distort over time. Choose a light worsted or DK weight yarn in ivory and a soft contrasting color like peach. A 4.0 mm hook will help keep the stitches tight enough to hold the shape. You will also need a measuring tape to check that your square dimensions match if you are making multiple blocks.
Step-by-Step Instructions
Creating the Skeleton
Unlike previous patterns that start with a ring, this pattern starts with the heart outline. Chain 24. Join with a slip stitch to the first chain to form a large loop. This loop will become the perimeter of your open heart.
Working into this large loop can be tricky, so take your time. You need to cover the chain with single crochet stitches to give it a solid foundation. Work approximately 30 to 35 single crochets over the chain loop. The exact number matters less than the coverage; ensure no chain is showing. Join with a slip stitch.
Forming the Heart Shape
To force this circle into a heart shape, we use stitch heights in the second round. Chain 1. Single crochet in the first few stitches. Then, to form the bottom point, work half double crochet, double crochet, chain 2, double crochet, half double crochet all into one stitch at the bottom of the loop.
Continue up the side with single crochets. When you reach the top “lobes,” you need to skip stitches to pinch the center. Work single crochets up to the top left, then skip 3 or 4 stitches at the very top center of the loop, and continue single crocheting down the other side. This skipping action pulls the top of the circle inward, creating the dip of the heart. Fasten off this round. You now have a yarn ring shaped like a heart.
Building the Square Frame
Join your ivory yarn at the bottom point (the chain-2 space). Chain 3, and work a standard granny corner (2 double crochet, chain 2, 3 double crochet).
Now you must work around the irregular heart shape to create a square. Along the sides of the heart ring, you will work groups of 3 double crochets. However, because the heart is curved, you cannot simply place them evenly. You may need to skip 2 stitches between some groups and 3 stitches between others to keep the work flat.
When you reach the top lobes of the heart, you need to create the top two corners of your square. Visualizing where a square corner would fall relative to a heart lobe is key. You will likely place a corner group (3 double crochet, chain 2, 3 double crochet) near the peak of each lobe.
Bridging the gap between the two lobes is the final challenge. After the first top corner, chain 3 or 4 to span across the dip in the heart, and then work the second top corner on the next lobe. In the next round, you will work into this chain bridge to solidify the top edge of the square. Continue around until you reach the start.
Stabilizing the Center
The open center might look a bit rounded initially. To fix this, when you weave in your ends, use the yarn tail to reinforce the “V” at the top of the heart. Stitch tightly at the dip to sharpen the cleavage of the heart. Wet block the square, pinning the inner heart outline specifically to ensure it dries in a crisp heart shape.
Mini Granny Heart Appliqués
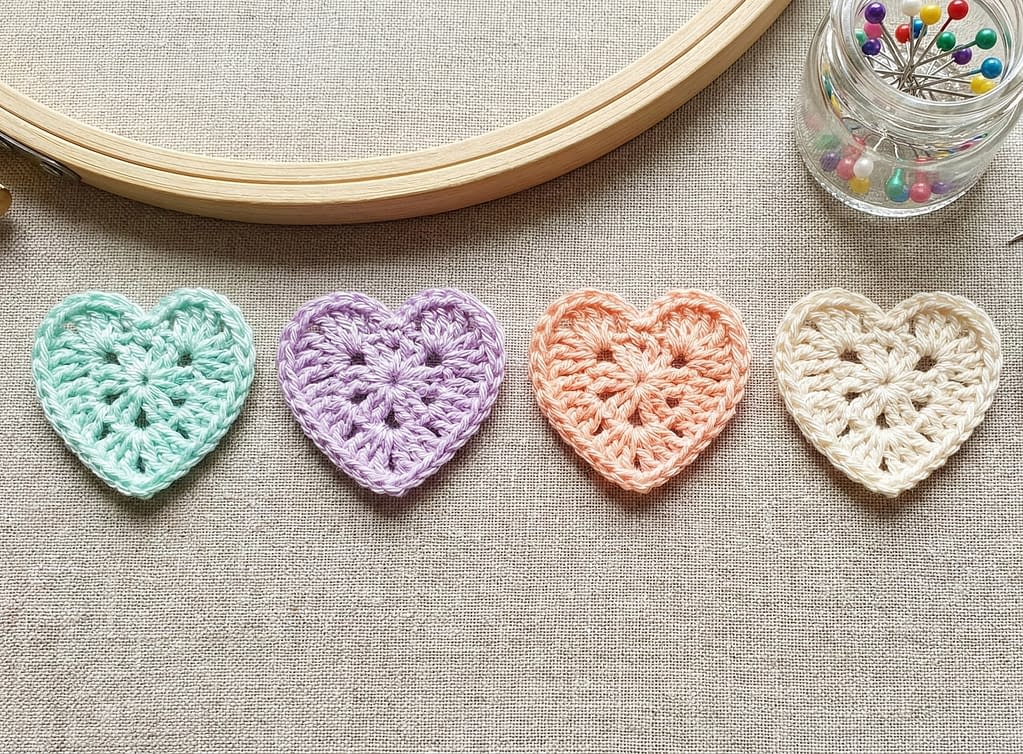
Sometimes you do not need a full square; you just need a tiny, perfect accent. These mini granny hearts are designed to be used as appliqués for greeting cards, scrapbooking, or sewing onto collars and cuffs. As shown in the reference, they look beautiful in a palette of soft pastels like mint, lavender, peach, and cream. Because they are so small, stitch definition is everything.
Materials Needed
This is the perfect project for fingering weight yarn or even high-quality embroidery floss. Using a thick yarn here will result in a bulky, shapeless blob. Use a small hook, such as a 2.0 mm or 2.5 mm. You will also need sharp embroidery scissors and potentially some fabric glue if you plan to attach these to paper projects.
Step-by-Step Instructions
The One-Round Wonder
These hearts are typically made in a single round. Start with a magic ring. This is crucial here because a chain ring would leave a hole too large for such a tiny motif.
Chain 2 (this counts as your first stitch height, but not a full double crochet). Into the ring, work 3 treble crochets. These tall stitches form the first lobe.
Follow this with 3 double crochets. These slightly shorter stitches begin the taper down the side of the heart.
Chain 1 to define the tip. Work 1 treble crochet into the ring. This is the very bottom point of the heart.
Now, work the mirror image to go back up the other side: Chain 1, 3 double crochets, 3 treble crochets.
Closing the Shape
To finish the heart, chain 2 and slip stitch firmly into the center of the magic ring. Cut the yarn, leaving a tail of about 4 inches.
Pull the magic ring tail. Pull it as tight as physically possible. You want the center hole to disappear completely so the stitches fan out from a single invisible point.
Finishing and Mounting
Thread the ending tail onto a needle and bring it to the back of the work. Tie a secure knot with the starting tail. If you are sewing this onto fabric, do not cut the tails; use them to stitch the heart down.
If you are using these for paper crafts (like the card or scrapbook shown in the visual), apply a tiny dot of clear-drying fabric glue to the knot on the back to secure it. Once dry, trim the ends flush. To flatten them perfectly without water, you can use a hair straightener on a low setting (with a protective cloth) to press them instantly flat.
Multicolor Scrap Yarn Granny Heart
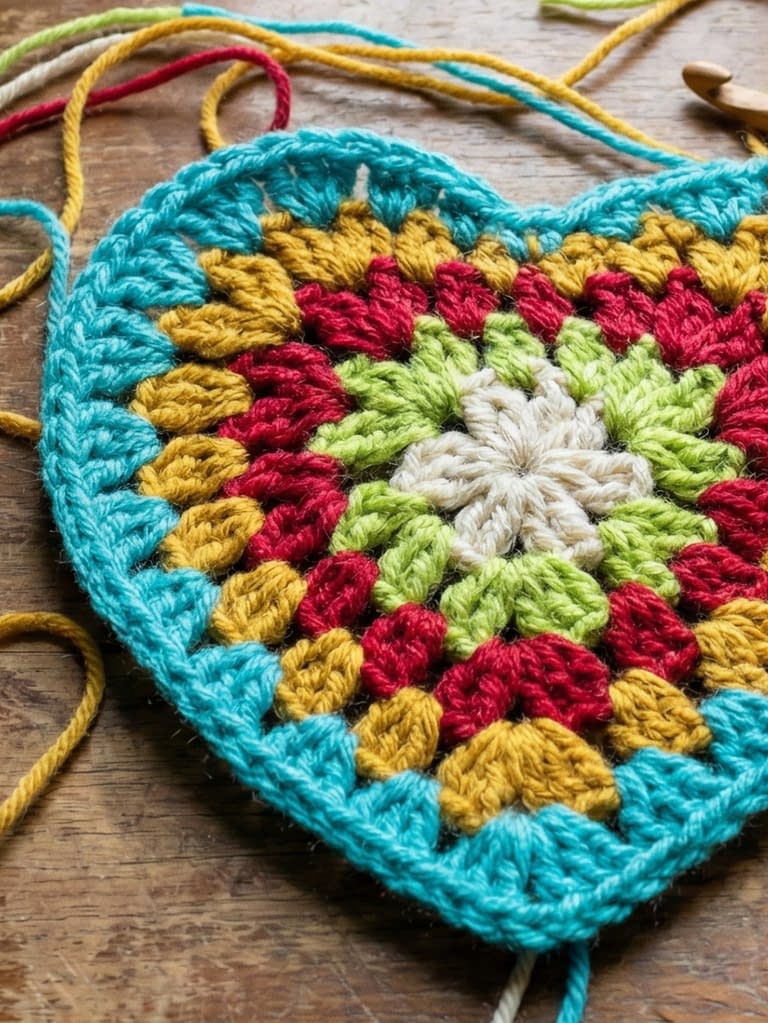
This pattern embraces the “granny” aesthetic in its truest form: using up leftovers. The visual shows a vibrant heart where every round creates a concentric ring of color, resulting in a playful, scrappy look. This is a fantastic pattern for learning how to manage multiple color changes without creating a mess of knots.
Materials Needed
Gather all your scrap yarn balls. The key to a cohesive look is ensuring all scraps are roughly the same weight (e.g., all worsted weight). Mixing very thin and very thick yarns can cause the heart to warp. You will need a hook appropriate for your yarn weight (usually 5.0 mm).
Step-by-Step Instructions
Round 1: The Core
Start with your first color (e.g., yellow) and make a magic ring. Work a simple small circle: Chain 3, 11 double crochets into the ring. Join and fasten off.
Round 2: The Expansion
Join a new color (e.g., pink) in any stitch. Chain 3. Work 1 double crochet in the same stitch. Work 2 double crochets in each stitch around. You are doubling the stitch count to keep the circle flat. Fasten off.
Round 3: Defining the Heart
Join the third color (e.g., blue). This is where the shape changes from a circle to a heart. Join in any stitch.
- Chain 2, half double crochet in the next stitch.
- Work 3 double crochets in the next stitch (start of lobe).
- Work 3 treble crochets in the next stitch (peak of lobe).
- Double crochet in the next 3 stitches.
- (Double crochet, Treble crochet, Double crochet) in the next stitch (bottom point).
- Double crochet in the next 3 stitches.
- Work 3 treble crochets in the next stitch.
- Work 3 double crochets in the next stitch.
- Half double crochet, chain 2, slip stitch in the last space.
Managing Ends
Because you are changing color every round, you will have many tails. Do not wait until the end to weave them in. Use the “crochet over” method. When you join a new color, hold the tail of the old color and the tail of the new color along the top of the previous row. As you crochet the new stitches, work over these tails. After 5 or 6 stitches, you can drop them and trim them later. This saves hours of finishing time.
Two-Tone Granny Heart Square (High Contrast)
This design is about precision and bold geometry. As depicted, a dusty rose heart sits sharply inside a light gray square. Unlike the appliqué style, the heart here is built directly into the rounds of the square, but with a focus on seamless color transitions to avoid the “jagged” look that can happen when switching colors mid-row.
Materials Needed
Use a smooth acrylic or wool blend. Fuzzy yarn will obscure the crisp lines we are aiming for. You need two highly contrasting colors. A 4.5 mm or 5.0 mm hook is standard.
Step-by-Step Instructions
The Center Heart
Work the first three rounds exactly like the Classic Solid Granny Heart (Pattern 1), using your dusty rose yarn. Complete the magic ring square, then the two lobes. Fasten off effectively using an invisible join (needle join) rather than a slip stitch. This eliminates the knot bump that can distort the border.
The Squaring Round (The Critical Step)
Join your gray yarn. The challenge here is filling the negative space around the heart to make a perfect square.
Start at the bottom tip of the heart. Join gray yarn, chain 3, work (2 double crochet, chain 2, 3 double crochet) to form the bottom corner.
Working up the side towards the rounded lobe: You need to graduate your stitch height. Work double crochets in the lower section, then half double crochets as you approach the widest part of the heart lobe. This prevents the square from bulging.
At the top corner (positioned diagonally from the heart center), you will likely be working into the side of the lobe stitches. Create a corner of (3 double crochet, chain 2, 3 double crochet).
Now, the top edge between the lobes. Work half double crochets down the slope of the first lobe. In the center dip, work a slip stitch or a single crochet deeply to anchor the yarn, then half double crochets up the next slope.
Work the second top corner and proceed down the final side, mirroring the first side.
The Smoothing Round
The first gray round might look a bit wonky. The second gray round fixes everything. Work a standard granny square round (double crochets in straight sections, corners in corners) all the way around. Ensure you have the same stitch count on all four sides. If one side has more stitches, decrease invisibly to match the others. This ensures your final piece is a perfect square, not a rhombus.
Multicolor Round-Built Granny Heart Square
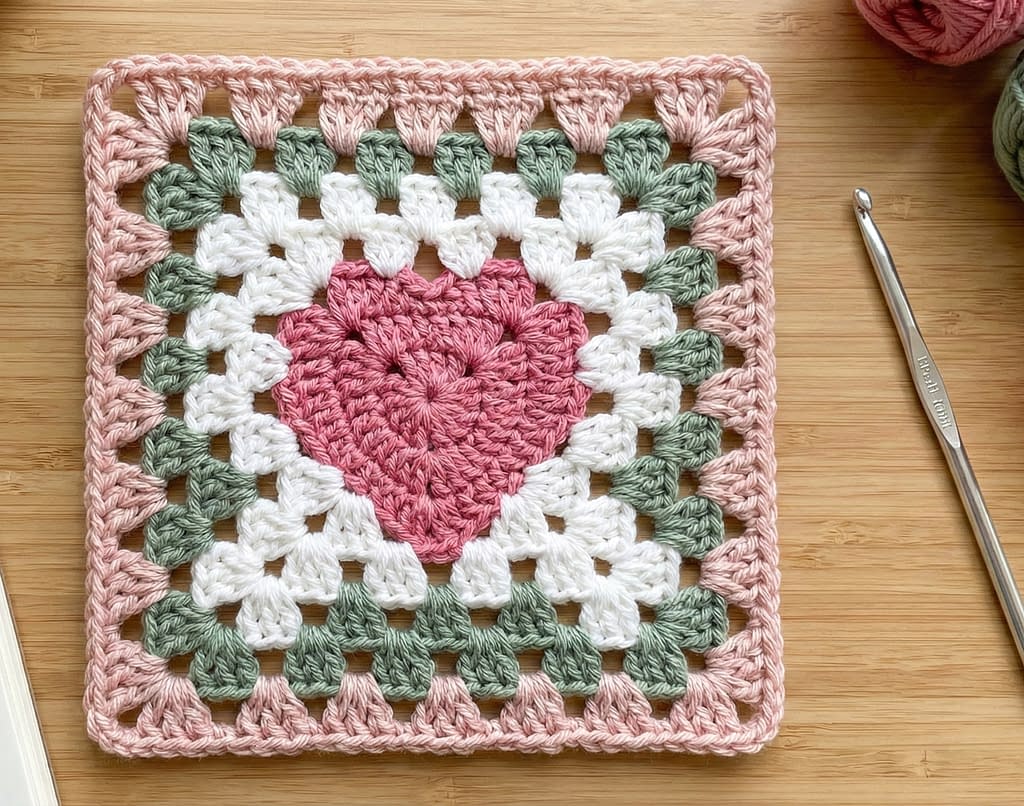
This advanced pattern builds the heart and the square simultaneously in concentric rounds, using color changes to highlight the geometry. As seen in the visual guide, the center is pink, followed by rounds of white, sage, and blush. It demonstrates how a heart shape can “ripple” out into a square.
Materials Needed
This pattern looks best with 3 or 4 coordinating colors. Worsted weight yarn is ideal. You will need a tapestry needle and plenty of patience for color changes.
Step-by-Step Instructions
Round 1: The Pink Center
Start with pink. Create a magic ring. Work (3 double crochet, chain 2) four times. Join to create a tiny square.
Round 2: The White Expansion
Join white in any corner. Work a standard granny round: (3 double crochet, chain 2, 3 double crochet) in each corner.
Round 3: The Sage Heart Shape
Here is the twist. You will turn this square into a heart illusion using the sage color. Join sage in a corner.
- Side 1 & 2 (The bottom V): Work standard granny stitches.
- Side 3 & 4 (The top lobes): In the chain spaces along these top sides, you will increase the stitch height. Instead of 3 double crochets, work 3 treble crochets or even 4 treble crochets in the clusters that form the top of the heart. In the corner between these two sides, work a smaller stitch (like 3 single crochets) to suck the corner in, creating the heart’s dip.
Round 4: The Blush Box
Join the blush yarn. Now you must square off the irregular sage round.
- Over the “V” bottom (normal sides): Work normal granny stitches.
- Over the “dip” (top center): You need to build height to fill the dip. Work tall stitches (trebles or double trebles) into the low single crochets of the previous round.
- Over the “lobes” (top bulges): Work shorter stitches (half double crochets or single crochets) over the tall trebles of the previous round.
By constantly adjusting stitch height—tall stitches in low spots, short stitches in high spots—you create a flat, square perimeter while retaining the visual ghost of the heart shape in the center.
Conclusion
Crochet granny hearts are more than just cute motifs; they are a study in shaping, tension, and structure. From the simplicity of the Classic Solid Heart to the architectural challenge of the Round-Built Square, each of these 8 patterns offers a different lesson in crochet geometry.
As you work through these tutorials, remember that yarn choice and blocking are just as important as the stitches themselves. A lacy heart needs blocking to shine, while a solid square relies on consistent tension to lay flat. Do not be afraid to experiment with your own color palettes or join these squares together to create afghans, table runners, or garments.
We hope this guide has inspired you to pick up your hook and add a little love to your next project. Whether you are a beginner making your first appliqué or an expert assembling a complex blanket, there is a granny heart pattern here for everyone.


