
Rolled paper flower shadow boxes have become one of the most loved paper craft trends for home décor, gifting, and personalized art. These framed artworks combine the delicate beauty of paper flowers with the depth and structure of a shadow box, creating a dimensional piece that feels both modern and timeless.
What makes rolled paper flower shadow boxes especially appealing is their versatility. You can adapt them to different color palettes, themes, seasons, and personal milestones such as weddings, anniversaries, nursery décor, or housewarming gifts. Even beginners can achieve professional-looking results with the right guidance, patience, and attention to detail.
In this guide to 7 Rolled Paper Flower Shadow Box ideas, each tutorial is carefully matched to the visuals provided so readers can easily follow along without confusion. The instructions are written with beginners in mind, explaining not only what to do, but why each step matters. From cutting and folding to rolling, shaping, and gluing, everything is broken down clearly.
In this first part, you will learn how to create the first three designs:
- Luxury Black & Gold Floral Shadow Box
- Romantic Red Rose Heart Shadow Box
- Botanical Greenery & Neutral Bloom Shadow Box
Each tutorial includes detailed preparation steps, flower-making techniques, layout planning, and final assembly tips.
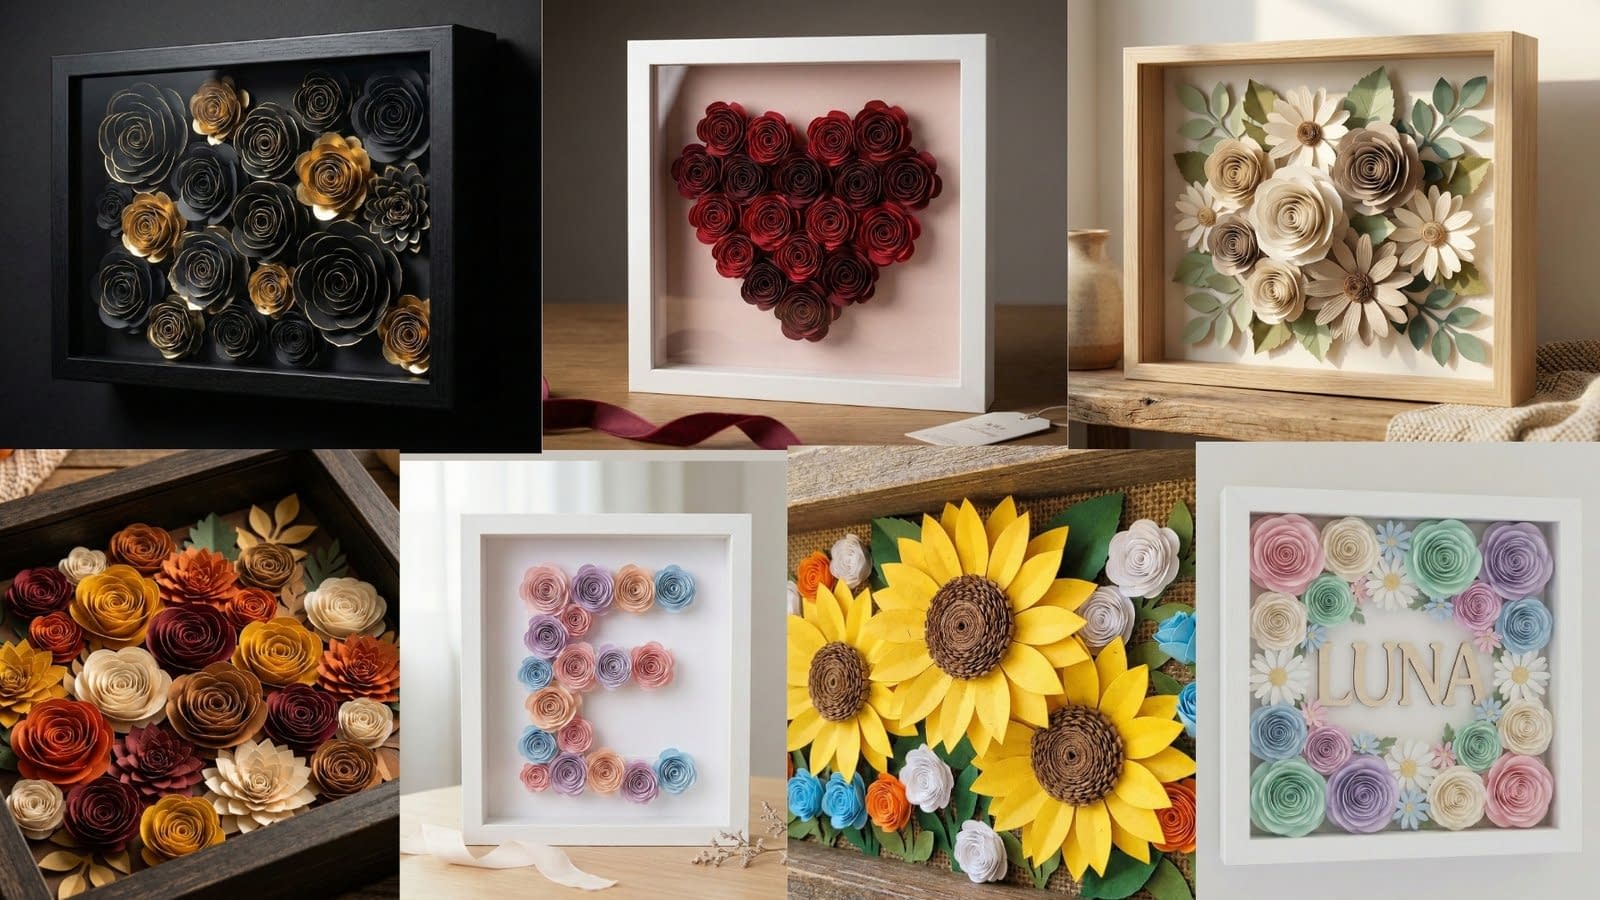
Tutorial 1: Luxury Black and Gold Floral Shadow Box
This design matches the visual with a deep black frame, dramatic lighting, and rolled flowers made from black, charcoal, and metallic gold cardstock. The overall look is bold, elegant, and perfect for luxury home décor or statement wall art.
Materials Needed
- Black shadow box frame with depth (at least 1.5–2 inches deep)
- Black, charcoal gray, and metallic gold cardstock (medium to heavy weight)
- Craft scissors and a precision craft knife
- Self-healing cutting mat
- Pencil and ruler
- Paper flower spiral templates or hand-drawn spirals
- White craft glue or tacky glue
- Hot glue gun (low temperature recommended)
- Tweezers for placement
- Soft cloth to clean the frame glass
Preparing the Flower Spirals
Start by deciding the size variation of your flowers. For a luxury look, use a mix of large, medium, and small blooms.
On the back of the cardstock, lightly draw spiral shapes. The spiral should start wide on the outside and gradually narrow toward the center. Keep the edges slightly uneven rather than perfectly smooth, as this creates more natural-looking petals when rolled.
Cut the spirals carefully using scissors for curves and a craft knife for tight areas. Take your time here. Clean cuts result in smoother rolled edges, especially noticeable on metallic gold paper.
Rolling the Paper Flowers
Begin rolling each spiral from the outer edge inward. Hold the outer end between your fingers and roll tightly at first. As you move toward the center, slightly loosen the tension so the petals naturally flare outward.
When you reach the center tab of the spiral, apply a small dot of glue and press the rolled flower down onto it. Hold for a few seconds until secure. Allow the flower to relax slightly after releasing; this creates depth and dimension.
Repeat this process for all flowers, keeping gold flowers slightly tighter so they catch the light more sharply.
Shaping and Depth Control
Once the glue has dried, gently pinch or curl the outer petals outward using your fingers. Avoid bending too much at once. Small adjustments create a refined, high-end finish.
If you want extra depth, you can glue small cardstock circles to the back of some flowers to raise them slightly when mounted.
Arranging the Shadow Box
Remove the backing from the shadow box and clean the glass. Lay the frame face-down.
Start arranging the flowers without glue. Place darker flowers toward the edges and gold flowers where light naturally hits. This creates contrast and visual flow.
Once satisfied, glue each flower in place using hot glue for strength. Press gently and hold until set. Work from the center outward to avoid crowding.
Final Assembly
After all flowers are secured, allow the glue to cool completely. Reassemble the shadow box and check for loose petals or gaps.
This luxury black and gold rolled paper flower shadow box works beautifully as modern wall art or a high-end handmade gift.
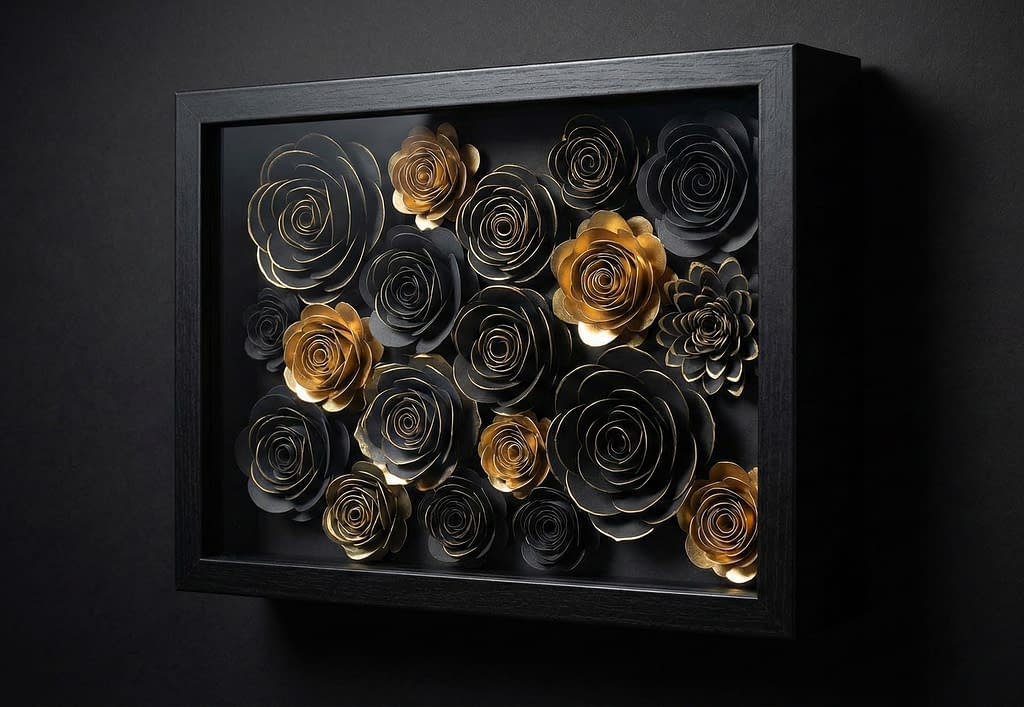
Tutorial 2: Romantic Red Rose Heart Shadow Box
This tutorial matches the visual featuring a heart shape formed entirely from deep red and burgundy rolled roses, set against a soft white or blush background. It is ideal for anniversaries, weddings, or Valentine’s décor.
Materials Needed
- White or blush shadow box frame
- Red and burgundy cardstock
- Pencil and heart template
- Craft scissors
- Tacky glue and hot glue gun
- Cardstock backing in white or light pink
- Tweezers
Creating the Heart Layout
Begin by tracing a heart shape onto the backing cardstock. Keep the heart centered and slightly smaller than the frame opening so it has breathing space around the edges.
This drawn heart will act as your placement guide and will be hidden once the flowers are glued.
Cutting and Rolling Rose Spirals
Draw spiral shapes similar to the first tutorial, but keep them slightly tighter to resemble rose buds.
Cut carefully and roll from the outer edge inward. For roses, maintain consistent tension so the petals appear smooth and layered.
Glue the center tab securely and allow the roses to relax slightly before shaping.
Shaping Realistic Rose Petals
Use your fingertips to gently open the outer petals. Do not flatten them. The goal is a natural rose shape with visible layers and depth.
Mix deep red and burgundy roses to avoid a flat, single-tone look.
Gluing the Heart Shape
Start gluing roses along the outline of the heart first. This defines the shape clearly.
Apply glue to the base of each rose, not the petals. Press firmly and hold. Once the outline is complete, fill in the center area.
Work slowly to maintain symmetry. Adjust spacing as needed so there are no visible gaps.
Final Touches
Check that the heart shape looks balanced from all angles. Remove pencil marks if visible.
Once dry, reassemble the frame. The result should feel romantic, emotional, and handcrafted with care.
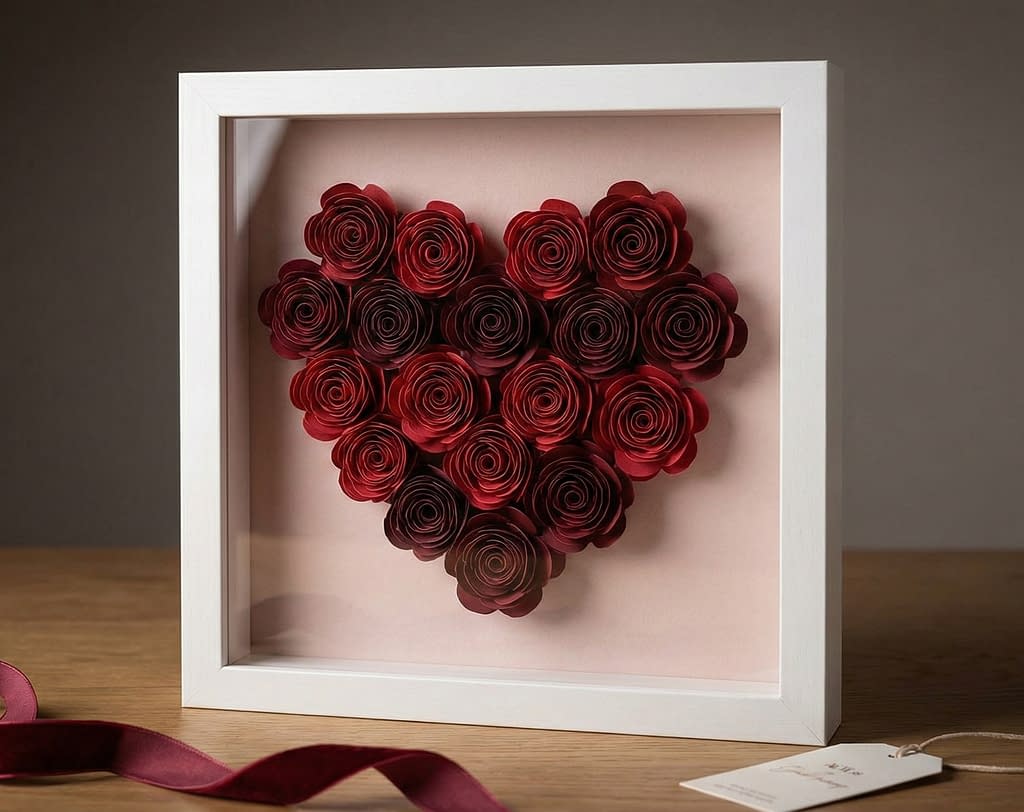
Tutorial 3: Botanical Greenery & Neutral Bloom Shadow Box
This design matches the visual with neutral-toned flowers and layered green paper leaves in sage, olive, and eucalyptus shades. It has a calm, organic, botanical feel.
Materials Needed
- Natural wood shadow box frame
- Neutral cardstock (cream, beige, soft taupe)
- Green cardstock in multiple tones
- Leaf templates or hand-drawn leaves
- Craft scissors
- Glue
- Cardstock backing in warm white
Making Neutral Rolled Flowers
Cut spiral shapes from neutral cardstock. Roll gently, allowing petals to flare more than in previous tutorials. This creates a soft, open bloom style.
Glue the base and let them rest naturally.
Cutting and Shaping Paper Leaves
Draw leaf shapes in different sizes. Cut them cleanly.
To add realism, gently fold each leaf lengthwise down the center, then unfold. This creates a subtle vein.
Curl the tips slightly using your fingers or the edge of a pencil.
Layering the Composition
Arrange flowers first, placing larger blooms in the center and smaller ones around.
Slide leaves underneath flowers before gluing to create a layered look. This step is crucial for botanical realism.
Glue flowers first, then tuck and glue leaves underneath where needed.
Final Assembly
Ensure no glue is visible and petals are not crushed.
Reassemble the frame and inspect under soft lighting. The finished piece should feel airy, organic, and inspired by nature.
Tutorial 4: Sunflower & Wildflower Garden Shadow Box
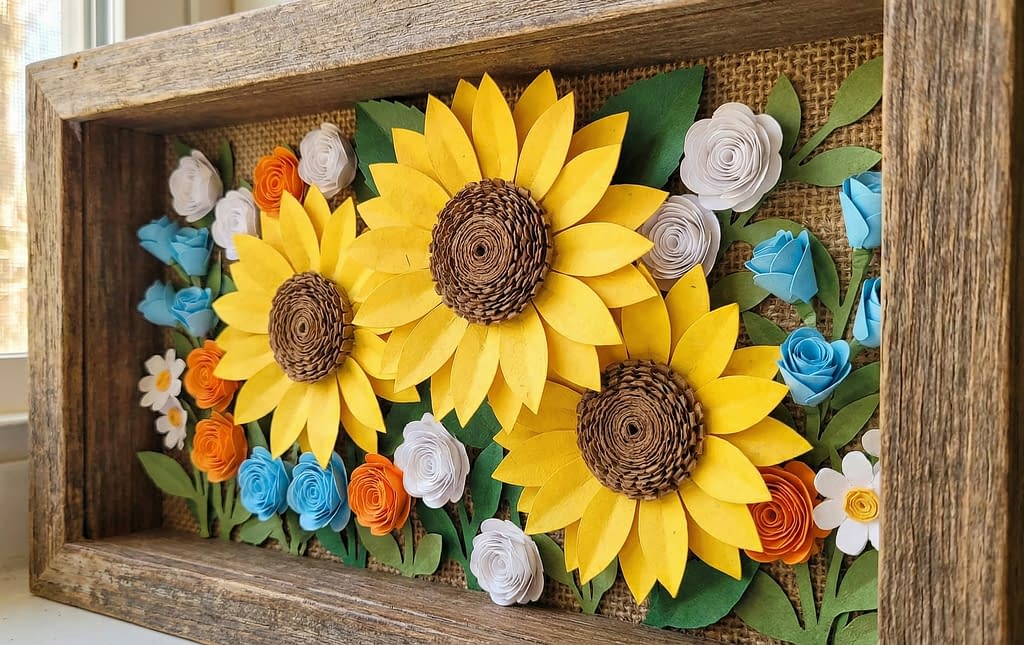
This design matches the visual with bright yellow sunflower spirals, textured brown centers, and smaller rolled wildflowers in white, orange, and sky blue. The overall look resembles a cheerful miniature paper garden.
Materials Needed
- Rustic wooden shadow box frame
- Yellow, brown, white, orange, and sky-blue cardstock
- Green cardstock for leaves and stems
- Pencil and ruler
- Scissors and craft knife
- Tacky glue and hot glue gun
- Cardstock backing (warm white or light kraft)
Creating the Sunflower Centers
Cut long spiral strips from brown cardstock. Keep the spiral narrow to create tight rolls.
Roll tightly from the outer edge inward. Do not loosen these rolls much, as sunflower centers are dense. Glue the center tab firmly and hold until secure.
For extra realism, lightly roughen the outer edges with your fingernail.
Making Sunflower Petals
Cut elongated oval or teardrop shapes from yellow cardstock. Each sunflower will need many petals.
Fold each petal slightly lengthwise, then gently curve it outward using your fingers. This gives the petals a natural lift.
Glue petals around the brown center in layers, overlapping slightly. Start with one full circle, then add a second layer between gaps for fullness.
Rolling the Wildflowers
For the smaller flowers, cut spiral shapes from white, orange, and sky-blue cardstock.
Roll loosely so the petals flare outward. Glue the base and allow them to open naturally.
Keep these flowers smaller so they do not overpower the sunflowers.
Assembling the Garden Scene
Arrange sunflowers first, placing them slightly off-center for a natural layout.
Fill surrounding areas with wildflowers. Add green leaves underneath flowers before gluing to create depth.
Glue larger flowers first, then layer smaller ones last. Check spacing so the design feels lively but not crowded.
Final Assembly
Once all glue is dry, reassemble the shadow box. The finished piece should feel bright, cheerful, and full of handmade charm.
Tutorial 5: Romantic Pastel Floral Letter Shadow Box
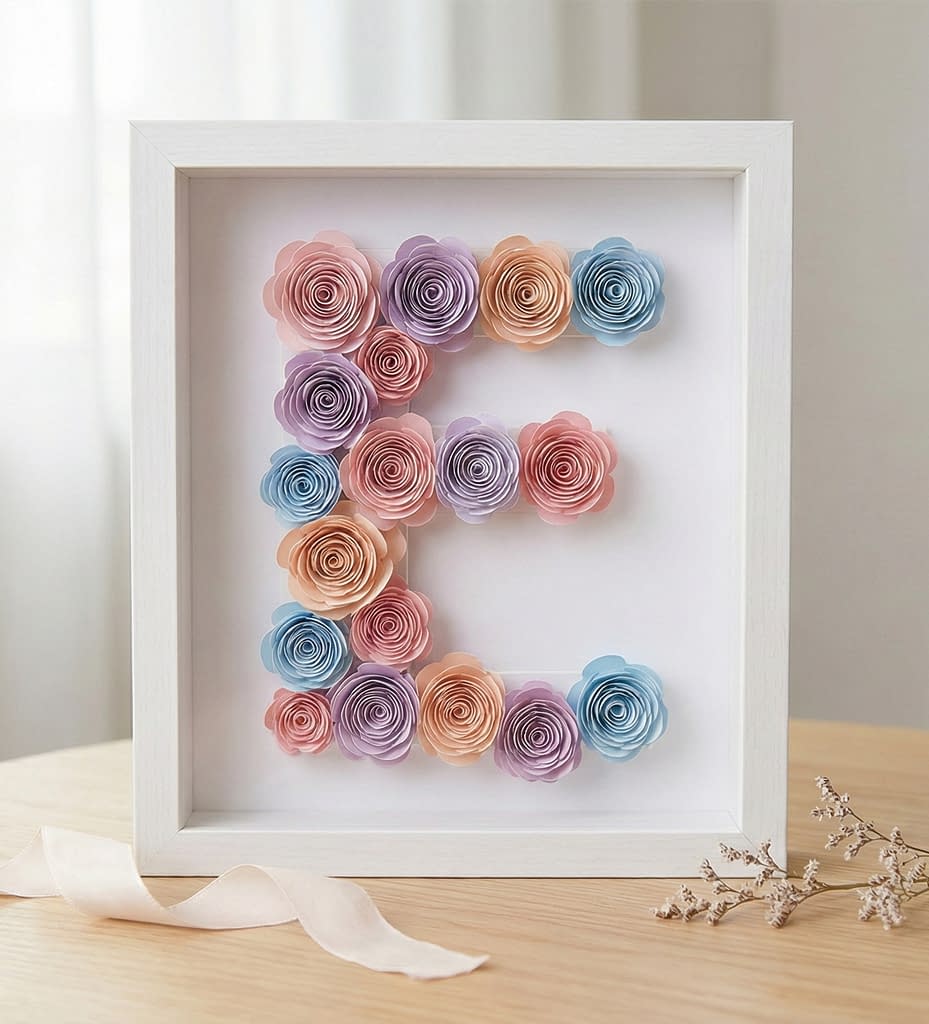
This tutorial matches the visual featuring a large letter filled entirely with pastel rolled flowers. It is soft, feminine, and ideal for personalized gifts.
Materials Needed
- White shadow box frame
- Cardstock letter cutout or wooden letter
- Pastel cardstock (blush, lavender, peach, baby blue)
- Scissors
- Pencil
- Glue
- Cardstock backing in white
Preparing the Letter Base
Place the letter cutout on the backing and lightly trace around it. This helps guide flower placement.
Remove the letter and keep it nearby.
Rolling Pastel Flowers
Cut spiral shapes from pastel cardstock. Keep spiral sizes small and consistent.
Roll gently, allowing petals to open softly. Glue the center tab and let the flower relax.
Make enough flowers to fully fill the letter shape.
Filling the Letter Shape
Place the letter back onto the backing.
Start gluing flowers along the edges of the letter first. This defines the shape clearly.
Work inward, alternating colors to avoid color clustering. Press each flower gently and hold until secure.
Final Touches
Once all flowers are glued, remove any visible pencil lines.
Reassemble the shadow box. The finished letter should feel balanced, soft, and visually soothing.
Tutorial 6: Seasonal Autumn Floral Shadow Box
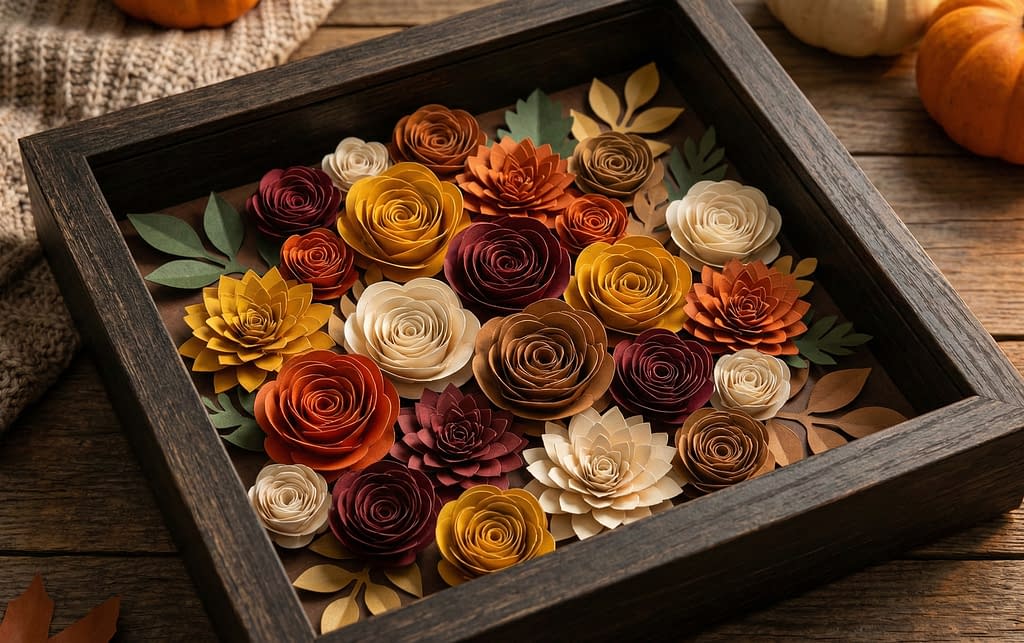
This seasonal autumn floral shadow box is inspired by fall foliage and harvest tones. The visual clearly shows a rich, cozy palette made up of burnt orange, mustard yellow, deep maroon, warm brown, and muted cream, layered with paper leaves for a natural, slightly rustic appearance. This design works beautifully as fall home décor and is ideal for beginners because the organic style allows for natural variation without needing perfect symmetry.
Materials Needed
- Dark wooden shadow box frame with good depth
- Cardstock in autumn tones such as burnt orange, mustard yellow, deep maroon, warm brown, and cream
- Green, olive, and brown cardstock for leaves
- Pencil for tracing and marking
- Craft scissors for curved cuts
- Craft knife for detailed shapes
- Tacky glue for paper flowers
- Hot glue gun for securing larger elements
- Cardstock backing in a warm neutral shade
Planning the Color Balance
Before cutting anything, lay your cardstock colors out together and decide how you want the balance to look. Darker shades like maroon and brown work best as grounding colors, while mustard and burnt orange should be used to brighten the center areas. Cream or soft beige flowers help break up heavy tones and prevent the design from feeling too dark.
This planning step is important for autumn designs so the final result feels warm rather than dull.
Creating Autumn Rolled Flowers
Start by drawing spiral shapes on the back of your cardstock. Use a mix of large, medium, and small spirals to add variety. Autumn flowers look more natural when they are not perfectly uniform.
Cut the spirals carefully, keeping the outer edges slightly uneven. These irregular edges help mimic dried petals and seasonal flowers.
Roll each spiral from the outer edge inward. Unlike romantic or luxury designs, these flowers should not be rolled tightly. Allow the roll to loosen slightly as you reach the center so the petals open up.
Apply glue to the center tab and press the rolled flower down firmly. Hold for a few seconds, then release. Let the flower relax naturally.
Once dry, gently bend or curl the outer petals outward using your fingers. This step gives the flowers a soft, dried-flower appearance that suits autumn décor.
Making and Shaping Paper Leaves
Draw leaf shapes in different sizes. Maple-style leaves work well, but oval or slightly pointed leaves are also effective.
Cut the leaves cleanly. Fold each leaf lengthwise down the center, then unfold. This creates a subtle central vein.
To add realism, gently curl the edges inward or outward using your fingers or the rounded edge of a pencil. Do not over-curl; the goal is natural movement, not stiffness.
Layering and Arranging the Design
Remove the backing from the shadow box and place it flat on your workspace.
Begin by arranging the flowers without glue. Place darker flowers around the outer areas and corners of the design. Use brighter shades like mustard and orange closer to the center to draw the eye inward.
Once the flower placement feels balanced, begin gluing the flowers in place. Glue the larger flowers first, working from the center outward.
After the flowers are secured, slide the leaves underneath flower edges and glue them where they naturally peek through. This layering technique is essential for creating depth and preventing the design from looking flat.
Step back occasionally and view the arrangement from a distance to ensure even spacing.
Final Assembly
Allow all glue to dry completely before touching the surface.
Clean the inside of the glass if needed, then reassemble the shadow box. The finished autumn floral shadow box should feel warm, textured, and inviting, with a handcrafted look inspired by fall nature.
Tutorial 7: Baby Name Nursery Floral Shadow Box

This baby name nursery floral shadow box is designed to be soft, calming, and gentle, matching the visual with pastel rolled flowers surrounding a name cutout. The overall look should feel light, airy, and soothing, making it perfect for nursery décor or a personalized baby gift.
Materials Needed
- White or very light-colored shadow box frame
- Baby name cutout made from wood or thick cardstock
- Pastel cardstock in soft pink, lavender, mint, baby blue, cream, and pale yellow
- Pencil
- Craft scissors
- Tacky glue
- Cardstock backing in white or very pale neutral
Preparing the Name Layout
Place the backing cardstock flat on your work surface.
Position the baby name cutout in the center and lightly trace around it with a pencil. This outline helps guide flower placement and ensures the name stays centered and readable.
Remove the name cutout and set it aside.
Cutting and Rolling Nursery Flowers
Draw small spiral shapes on the back of your pastel cardstock. Keep these spirals smaller than those used in other tutorials, as nursery designs look best with delicate, compact flowers.
Cut the spirals carefully. Avoid jagged edges, as smooth curves create softer-looking petals.
Roll each spiral gently from the outer edge inward. Do not roll tightly. The flowers should look relaxed and rounded.
Apply a small amount of glue to the center tab and press the flower down. Hold briefly, then allow it to open naturally.
After the glue dries, gently fluff the petals with your fingers to create a soft, cloud-like appearance.
Reattaching the Name Cutout
Once you have rolled enough flowers, place the baby name cutout back onto the backing cardstock, aligning it with the traced outline.
If the name is lightweight cardstock, glue it down first and allow it to dry fully before adding flowers. If it is wooden, secure it firmly using a stronger glue and give it extra drying time.
Arranging Flowers Around the Name
Begin placing flowers around the name without glue. Keep spacing even and avoid overcrowding any single area.
Alternate pastel colors to maintain balance and avoid large patches of the same shade.
Once satisfied, glue each flower around the name, not on top of it. Apply glue only to the base of each flower to keep petals clean and soft.
Work slowly, pressing each flower gently into place.
Final Assembly
After all flowers are secured, check for visible pencil lines and erase them carefully.
Allow the piece to dry completely, then reassemble the shadow box.
The finished nursery floral shadow box should feel calm, clean, and lovingly handcrafted, making it a beautiful keepsake for a baby’s room.
Conclusion
These seven rolled paper flower shadow box tutorials show how simple paper, when carefully cut, rolled, shaped, and layered, can be transformed into beautiful dimensional décor. Each design highlights a different mood—from elegant and romantic to cozy, cheerful, and calming—while using the same core techniques that beginners can easily learn and repeat.
By following the step-by-step instructions, taking time with rolling and gluing, and planning layouts before final assembly, anyone can create polished, handmade shadow box art. Whether for home décor, seasonal styling, or personalized gifts, these rolled paper flower shadow box ideas offer a versatile and creative foundation to build on with confidence.


