
Paper crafting is a timeless hobby that combines creativity, patience, and the simple joy of transforming a flat sheet of material into a three-dimensional work of art. Among the myriad of subjects you can choose to create, few are as universally loved as the penguin. These flightless birds, with their waddling gait and tuxedo-like markings, evoke a sense of winter whimsy that is perfect for seasonal decorations, handmade gifts, or simply a relaxing afternoon activity.
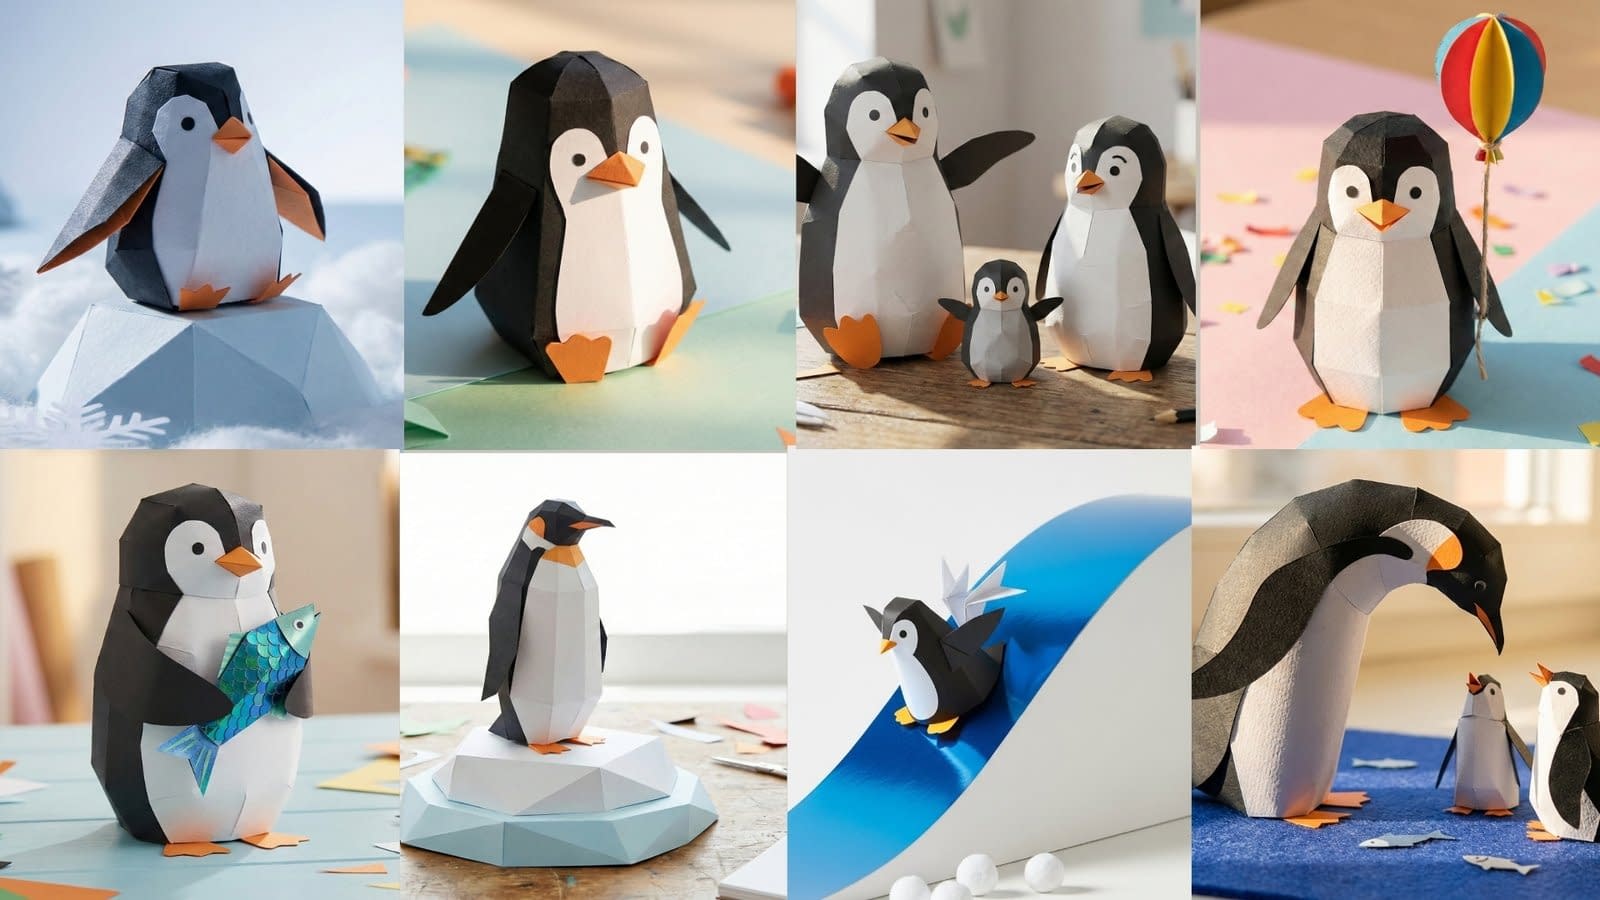
In this comprehensive guide, we will explore 8 paper penguin tutorials that range from simple, solitary figures to complex, interactive scenes. Whether you are a seasoned papercraft enthusiast or a complete beginner looking to pick up your first pair of scissors, these projects are designed to build your skills. We will focus on the low-poly style of paper crafting, which uses geometric shapes and precise folds to create structure and depth. This style, visible in the reference images, gives the penguins a modern, artistic look that is both cute and sophisticated.
We will cover everything you need to know, from selecting the right weight of paper—matte cardstock is often best for holding shape—to the specific techniques of scoring, cutting, and gluing tabs. Preparation is key. Before diving into the individual tutorials, ensure you have a self-healing cutting mat, a craft knife for precision, sharp scissors for general cutting, a ruler for scoring straight lines, and a high-quality craft glue or double-sided tape.
Let us begin with the first four tutorials, focusing on the basics of body structure, family dynamics, and simple accessories.
Tutorial 1: Cute Sitting Paper Penguin
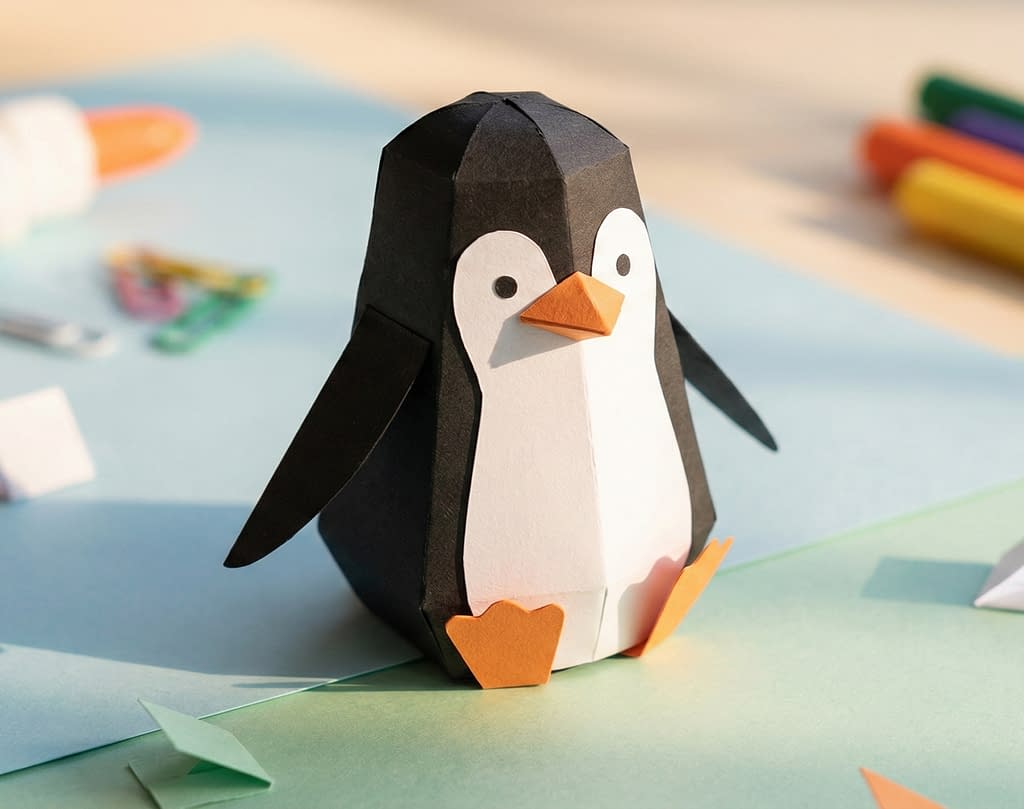
The first project in our collection of 8 paper penguin tutorials is the Cute Sitting Paper Penguin. This design serves as the perfect introduction to 3D paper crafting because it focuses on the fundamental shape of the bird without complex accessories. As seen in the visuals, this penguin has a charming, rounded low-poly geometry, with tiny feet tucked beneath it and wings angled slightly outward to suggest a relaxed posture. The matte finish of the black, white, and orange paper absorbs light beautifully, creating soft shadows that define the geometric facets.
Materials Needed
For this specific project, you will need black cardstock (approximately 160-200 gsm) for the body, white cardstock for the belly and face, and a vibrant orange for the beak and feet. You will also need a scoring tool or a dried-out ballpoint pen to create crisp fold lines.
Step-by-Step Instructions
Preparation and Cutting
Begin by printing out the template for the sitting penguin. If you are printing directly onto the colored cardstock, ensure your printer settings are adjusted for thick paper. If you cannot print on black paper, print on standard white paper and use it as a stencil. Carefully cut along the solid outer lines of the pattern using scissors. For the tighter corners around the wing tips and the small feet, switch to a craft knife to ensure the edges remain sharp and clean. Do not cut the dashed lines inside the shape; these are your fold lines.
Scoring the Folds
The secret to the low-poly look is precise scoring. Place your ruler along the internal dashed lines. Run your scoring tool firmly along these lines. This compresses the paper fibers, allowing you to make clean, straight folds without the paper cracking. In 3D paper crafting, there are usually two types of folds: valley folds (where the fold goes inward) and mountain folds (where the fold ridges outward). For this sitting penguin, the spine and the center of the belly will mostly be mountain folds to create the volume of the body.
Assembling the Head and Body
Start assembly at the top of the head. Apply a thin layer of glue to the tabs designated for the beak and face. It is best to use a toothpick to apply glue to avoid excess mess. Press the matching edges together and hold for ten to fifteen seconds until the bond is secure. Work your way down the back of the penguin, connecting the black panels. As you glue the tabs, you will see the flat paper start to curve and take on a three-dimensional form.
Attaching the Details
Once the main black body shell is formed, construct the white belly section separately. This piece usually slides into the opening at the front of the black shell. Apply glue to the tabs of the white piece and carefully insert it, pressing from the inside if possible to ensure a flush seam. Finally, fold the orange feet. Since this penguin is in a sitting position, the feet are simple triangular structures that attach to the bottom front of the white belly. Glue them in place so they peek out from underneath. The wings should be folded at the shoulder joint and glued only at the top, allowing the tips to flare out slightly for that realistic, resting look. Place your finished penguin on a pastel surface to admire the contrast.
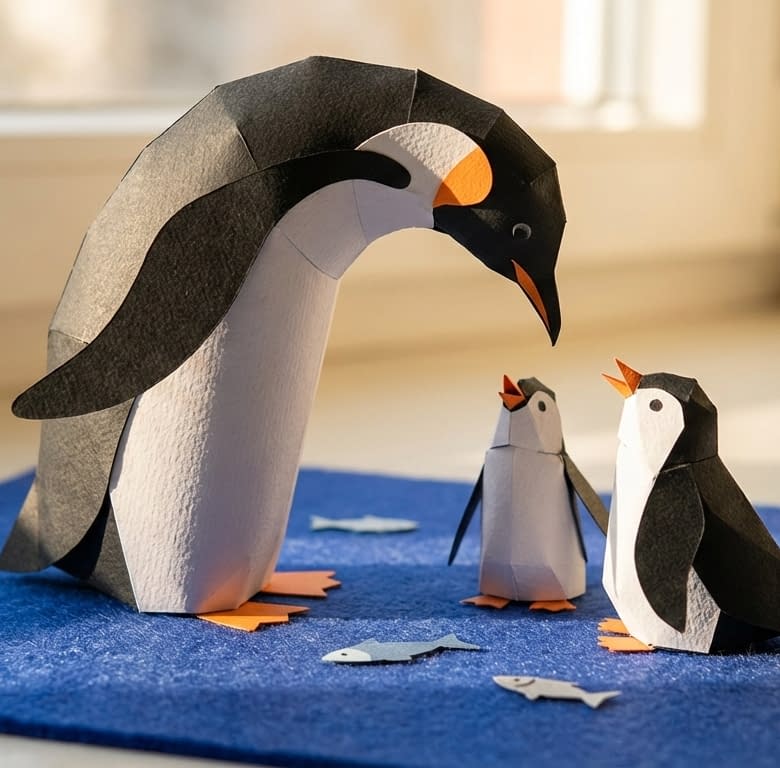
Tutorial 2: Penguin Family Paper Craft
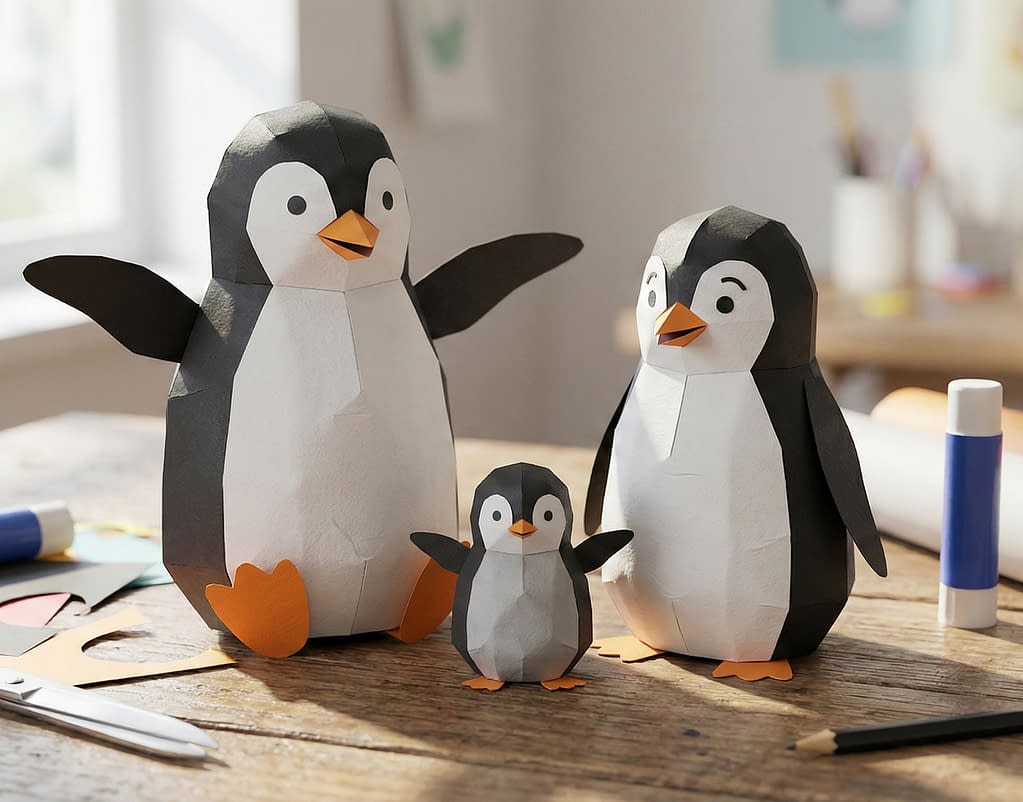
Moving on to the next entry in our 8 paper penguin tutorials, we will expand our scope to create a Penguin Family Paper Craft. This project involves creating three distinct penguins of varying sizes—a large adult, a medium juvenile, and a small chick. This trio allows you to practice scaling your work and adding subtle variations to pose and expression. The visual reference shows them standing on a rustic wooden tabletop, highlighting the warm, homemade vibe of this family unit.
Materials Needed
You will need the same black, white, and orange cardstock as before. However, for the smallest penguin, you might want to use slightly lighter weight paper (around 120-140 gsm) as folding tiny tabs on thick cardstock can be difficult.
Step-by-Step Instructions
Scaling the Templates
If you are working from a single digital file, you may need to print the template at 100 percent for the adult, 75 percent for the juvenile, and 50 percent for the chick. Ensure that the tabs on the smallest penguin do not become too small to handle; if they do, you might need to manually extend them slightly with a pencil before cutting.
Constructing the Adult Penguin
Follow the standard assembly process: cut, score, and fold. For the standing adult, the structure is more vertical than the sitting penguin. Pay close attention to the base. The bottom of the penguin needs to be perfectly flat so it stands upright without wobbling. When gluing the bottom tabs, place the penguin on a flat surface and press down gently from the inside with a pencil or long tool to ensure the base levels out before the glue dries.
Assembling the Juvenile and Chick
The smaller penguins require more dexterity. When cutting the eyes for the chick, they may be extremely small. It is often easier to use a hole punch for the black pupils or draw them on with a marker later if the paper cutting is too intricate. Assemble the bodies carefully. For the smallest chick, tweezers are an indispensable tool. Use the tweezers to hold the glued tabs together in tight spaces where your fingers cannot fit.
Creating Interaction
To make them look like a family, you need to adjust their poses slightly. You can achieve this by changing the angle of the head before the glue sets. For the adult, tilt the head slightly down as if looking at the chick. For the chick, tilt the head up. glue the wings of the medium penguin in a way that looks like it is waving or balancing. Arrange them on your wooden surface in a cluster, perhaps with the little one nestled between the larger two, to emphasize their bond.
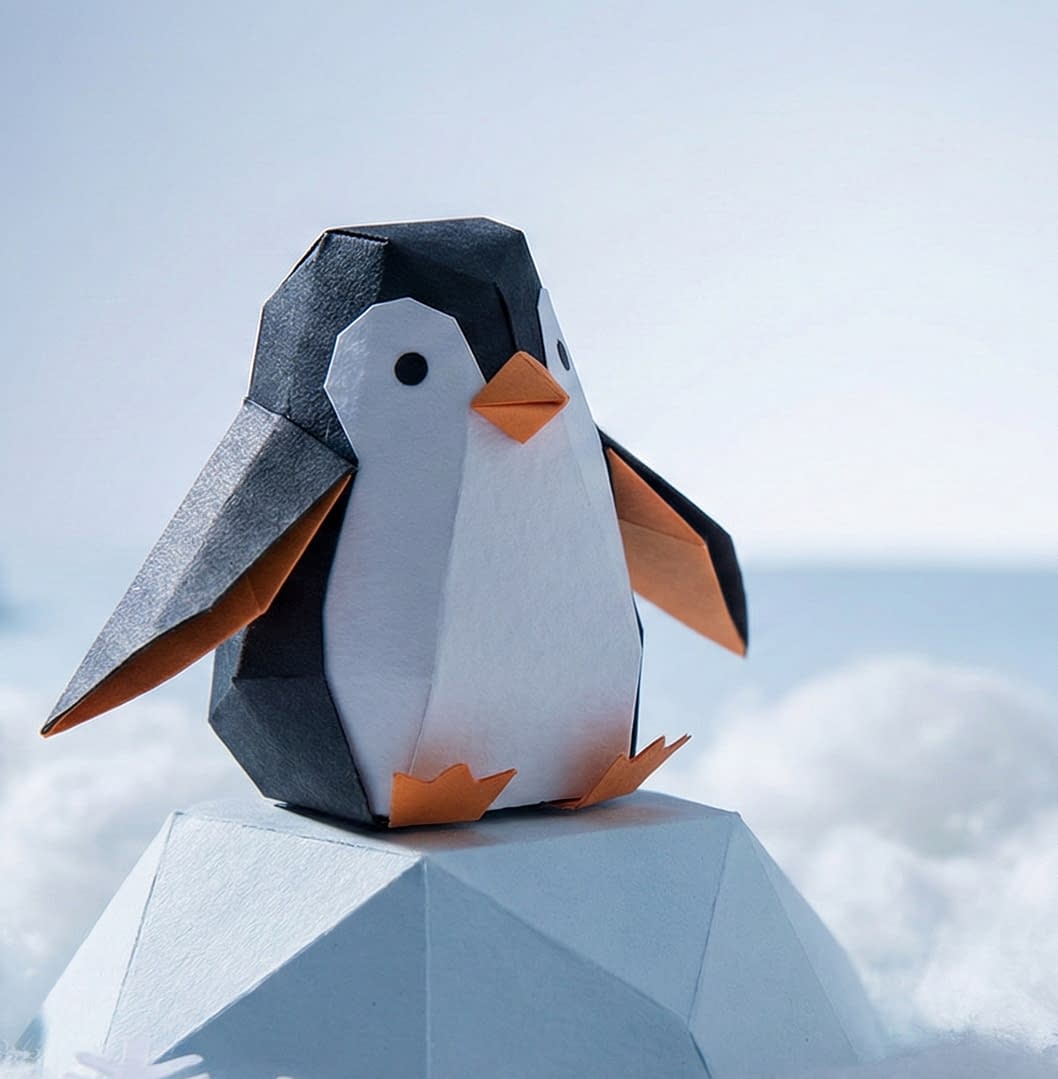
Tutorial 3: Penguin with Paper Iceberg
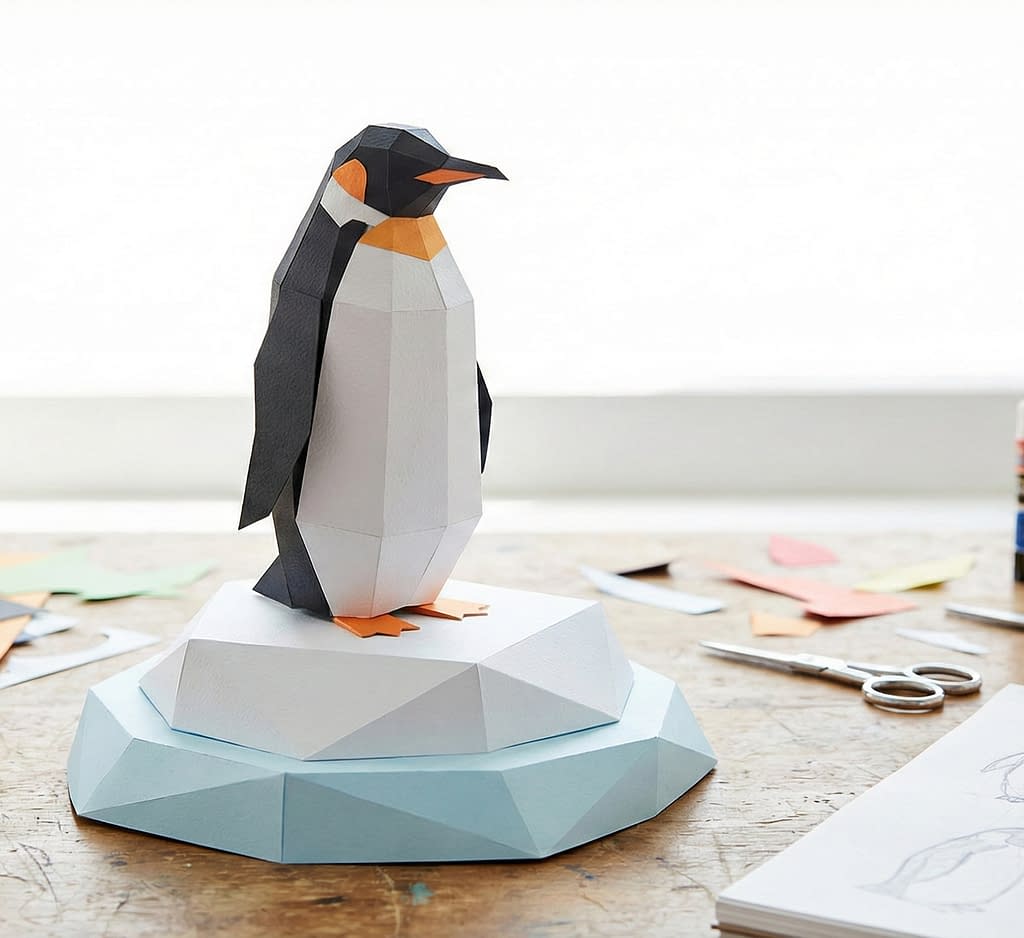
Our third project brings an environmental element into the mix. The Penguin with Paper Iceberg tutorial teaches you how to construct a geometric base that complements the low-poly style of the bird. In the reference image, we see a stately penguin standing on a multi-faceted iceberg platform. This tutorial focuses on the stability of the structure and the contrast between the organic shape of the bird and the sharp, crystalline angles of the ice.
Materials Needed
In addition to your penguin colors, you will need shades of blue and white cardstock for the iceberg. A pearlescent or slightly shimmery white paper can add a nice “icy” texture to the base.
Step-by-Step Instructions
Building the Penguin
Construct the standing penguin as described in the previous tutorials. For this specific pose, ensure the posture is upright and proud. The head should be facing forward, and the wings should be tucked close to the body or slightly extended for balance.
Designing the Iceberg Base
The iceberg is essentially a low-poly mound. The template for this will look like a net of triangles and irregular polygons. Cut out the iceberg shape from your light blue or white cardstock. Score every internal line vigorously; the edges of the ice need to look sharp and hard, unlike the slightly softer curves of the penguin’s belly.
Assembling the Iceberg
Start gluing the iceberg from the perimeter and work your way inward or upward. The base of the iceberg (the part that touches the table) must be left open until the very end or be a flat separate piece. As you fold the facets, you will create a sturdy, uneven platform. Before sealing the final tab, you might want to place a small weight (like a coin or a washer) inside the iceberg structure. This adds heft and prevents the finished piece from tipping over easily.
Mounting the Penguin
Once both the penguin and the iceberg are fully assembled and the glue is dry, identify the flattest surface on the top of your iceberg. This will be the standing point. Apply a strong adhesive, such as a tacky craft glue, to the soles of the penguin’s feet. Press the penguin firmly onto the chosen spot on the iceberg. Hold it in place for a full minute to ensure a strong bond. The result is a dramatic scene where the penguin looks like an explorer in a frozen landscape.
Tutorial 4: Penguin Holding a Mini Paper Fish
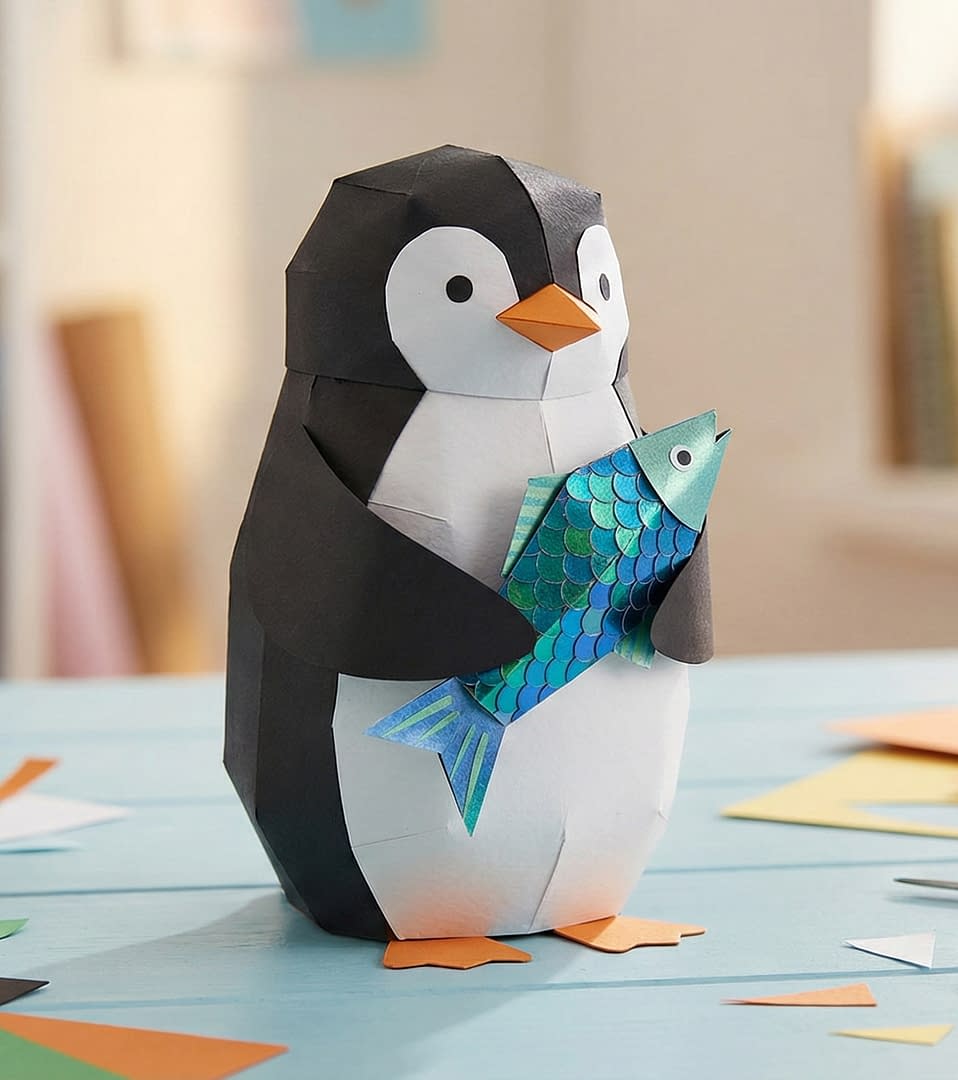
The fourth entry in our 8 paper penguin tutorials introduces props. The Penguin Holding a Mini Paper Fish adds a layer of narrative and complexity. This tutorial is perfect for those who want to practice intricate detail work, as the fish is a small, multi-textured component that contrasts with the smooth body of the penguin. The visual shows the penguin clutching a vibrant, scaly fish, perhaps a fresh catch, adding a humorous and realistic touch.
Materials Needed
You will need the standard penguin materials plus metallic or shiny paper for the fish. Blue, green, or silver paper works best to mimic fish scales. If you do not have metallic paper, you can use markers to draw scales on standard colored paper.
Step-by-Step Instructions
Constructing the Penguin with Arms
The body construction is similar to the standing penguin, but the wings (or flippers) require special attention. Instead of gluing the wings flat against the body, you must fold them forward at the shoulder. Depending on the template, the wings might be separate pieces or integrated into the body. If they are separate, glue them at an angle that brings the tips together in front of the penguin’s belly, leaving enough of a gap to insert the fish later.
Creating the Mini Paper Fish
The fish is a miniature project in itself. Cut out the fish shape, which generally consists of a head, a body with tabs for volume, and a tail. If your paper is plain, now is the time to add texture. Use a silver gel pen or a fine-tip marker to draw tiny “U” shapes across the body to represent scales. Alternatively, if you are up for a challenge, you can cut tiny semicircles of foil paper and glue them in overlapping rows on the fish body for a true 3D textured effect.
Assembling the Fish
Fold the fish along the scored lines to give it some thickness; it should not be flat like a bookmark but have a slight bulge. Glue the head and tail sections. The tail can be curled slightly using the edge of your scissors (like curling ribbon) to give it a flopping motion.
Final Assembly
Place a dab of glue on the inner tips of the penguin’s wings and a dab on the side of the fish’s body. Carefully slide the fish between the wings. You may need to use a small strip of masking tape to hold the fish in position while the glue dries, as gravity will try to pull it down. Once dry, remove the tape. The penguin should now look like it is proudly displaying its catch.
Tutorial 5: Penguin Sitting Cozy on Ice
We continue our journey through these 8 paper penguin tutorials with a project that epitomizes winter comfort: the Penguin Sitting Cozy on Ice. As depicted in the top-left visual, this design features a penguin in a relaxed, seated position resting on a faceted geometric iceberg. Unlike the standing penguin on the iceberg we built earlier, this model is designed to look grounded and settled, perhaps sheltering from a winter wind. The addition of snowflake cutouts and soft cotton elements creates a complete atmospheric scene.
Materials Needed
For this scene, you will need your standard black, white, and orange cardstock. For the iceberg, choose a cool ice-blue or a pale grey cardstock. To create the snowy effects mentioned in the prompt, you will also need a small amount of cotton wool or white felt, and a hole punch that creates snowflake shapes (or patience to cut them by hand).
Step-by-Step Instructions
Creating the Seated Body
The body for this penguin is distinct because the center of gravity is lower. When cutting the black cardstock for the body pattern, you will notice the side tabs are wider near the base. This is to create the “squat” look. Score the fold lines firmly. For the back curve, use a series of gentle mountain folds to round out the spine so the penguin does not look like a rigid box but rather a huddled bird. Assemble the head first and work downwards. When you reach the bottom, do not seal it completely flat yet; you need to ensure it contours to the iceberg.
Constructing the Faceted Iceberg Seat
The iceberg in this tutorial functions as a chair. Cut out the iceberg template, which should have a flat top section specifically sized for the penguin’s bottom. Score all lines on the blue cardstock. As you glue the facets of the iceberg, focus on keeping the edges sharp to contrast with the penguin’s roundness. Before closing the final tab of the iceberg, you might want to glue a small weight inside, like a coin, to keep the entire structure stable.
Merging the Penguin and Ice
Apply a generous amount of tacky glue to the flat top surface of your iceberg. Place the assembled penguin body onto this spot. Press down firmly for at least sixty seconds. The feet should be glued so they dangle slightly over the edge of the flat section or rest on a lower facet, giving the impression that the penguin is perched comfortably.
Adding Atmospheric Details
To achieve the “cozy” aesthetic, take small wisps of cotton wool and gently stretch them. Apply tiny dots of clear glue around the base of the iceberg and tuck the cotton in to simulate soft, drifted snow. If you have a snowflake punch, cut out several flakes from white paper and glue them sporadically on the black body of the penguin or the blue ice, as if snow is freshly falling. These small textures elevate the paper craft from a simple model to a story-telling piece.
Tutorial 6: Penguin Family with Interaction
The sixth entry in our 8 paper penguin tutorials focuses on emotion and narrative: the Penguin Family with Interaction. Illustrated in the bottom-right image, this scene features a large adult penguin bending its neck affectionately toward two smaller chicks. This project challenges you to move beyond static, upright poses and explore dynamic folding to express care and relationship.
Materials Needed
You will need ample black and white cardstock for three figures. For the base, a sheet of blue or grey felt works beautifully to simulate water or soft ground, preventing the figures from sliding.
Step-by-Step Instructions
Modifying the Adult Spine
The key to this tutorial is the adult penguin’s posture. Standard templates usually have a straight spine. To create the bending look, you may need to modify the neck area. If you are designing your own pattern, add an extra triangular segment at the back of the neck and remove a corresponding segment at the throat. When folded, this forces the head to angle downward. If working from a pre-made template, you can achieve a similar effect by scoring the neck tabs deeply and holding the head at a downward angle while the glue sets, essentially “freezing” the paper in a bent position.
Assembling the Chicks
The two chicks are simple, small geometric shapes. Because they are looking up, their heads should be glued at an upward angle. Assemble their bodies from the bottom up. When attaching their heads, apply the glue to the neck tabs but position the face pointing skyward before pressing the pieces together. The beak should point almost vertically.
Creating the Scene on Felt
Cut a piece of felt into an organic, frozen-puddle shape. Arrange the penguins before gluing to check the sightlines. The adult’s beak should point toward the chicks, and the chicks’ beaks should point toward the adult. This triangulation creates the “interaction.” Once satisfied, apply fabric glue or hot glue to the bottom of the paper penguins and adhere them to the felt mat.
Adding Tiny Fish
To enhance the narrative that the parent is feeding the chicks, cut tiny fish shapes from silver paper scraps—no larger than a fingernail. Glue one fish near the chicks or even in the adult’s beak. This small detail completes the story of a family mealtime in the Antarctic.
Tutorial 7: Penguin Sliding on Paper Slope
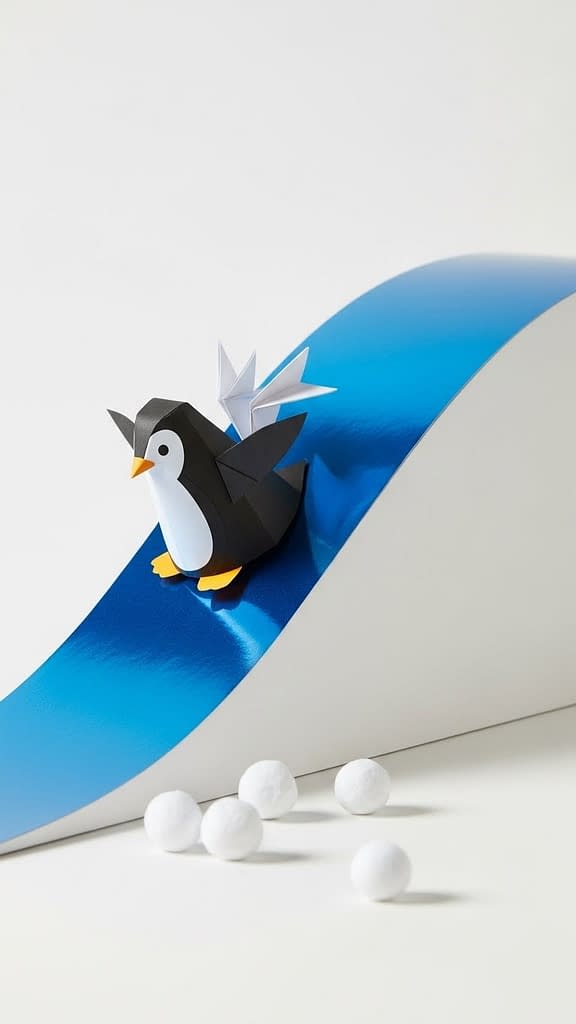
Injecting action into our collection, the seventh project is the Penguin Sliding on Paper Slope. As seen in the bottom-middle visual, this penguin is captured mid-slide on a curve of blue ice. This tutorial teaches you how to convey motion in a static medium and how to construct curved structural bases.
Materials Needed
For the slide, you need a sturdy, flexible cardstock, preferably with a glossy or metallic finish to resemble slick ice. A heavy-weight poster board works well for the structural supports under the slide.
Step-by-Step Instructions
Building the Sliding Penguin
This penguin requires a unique pose: belly down, head up, wings back. Assemble the body on its front rather than its feet. The “belly” piece will be the main contact point. When attaching the wings, fold them backwards toward the tail to simulate wind resistance. The feet should be glued pointing backwards as well, not downwards. This streamline shape is essential for the illusion of speed.
Constructing the Curved Slope
Cut a long strip of your glossy blue cardstock. To create the curve, you will need to build a support structure underneath. Cut two triangular wedges from thick cardboard or foam board. Glue these wedges to the sides of the blue strip to force it into a “J” curve or a gentle slope. Ensure the bottom of the slide transitions smoothly to the table surface.
Mounting for Motion
This is the most critical step. You want the penguin to look like it is in the middle of the action, not just stuck. Apply strong glue to the center of the penguin’s white belly. Press it onto the steepest part of the curve. To enhance the effect of motion, you can cut small white circles or “splashes” and glue them at the base of the slide where the penguin would eventually land, suggesting kicked-up snow.
Checking Angles
View the piece from the side. The curve of the slide and the arch of the penguin’s back should complement each other. The wings should be free of the slide, hovering in the air to emphasize that the penguin is zooming down. This dynamic pose makes it a standout piece among the 8 paper penguin tutorials.
Tutorial 8: Penguin Holding Mini Paper Balloon
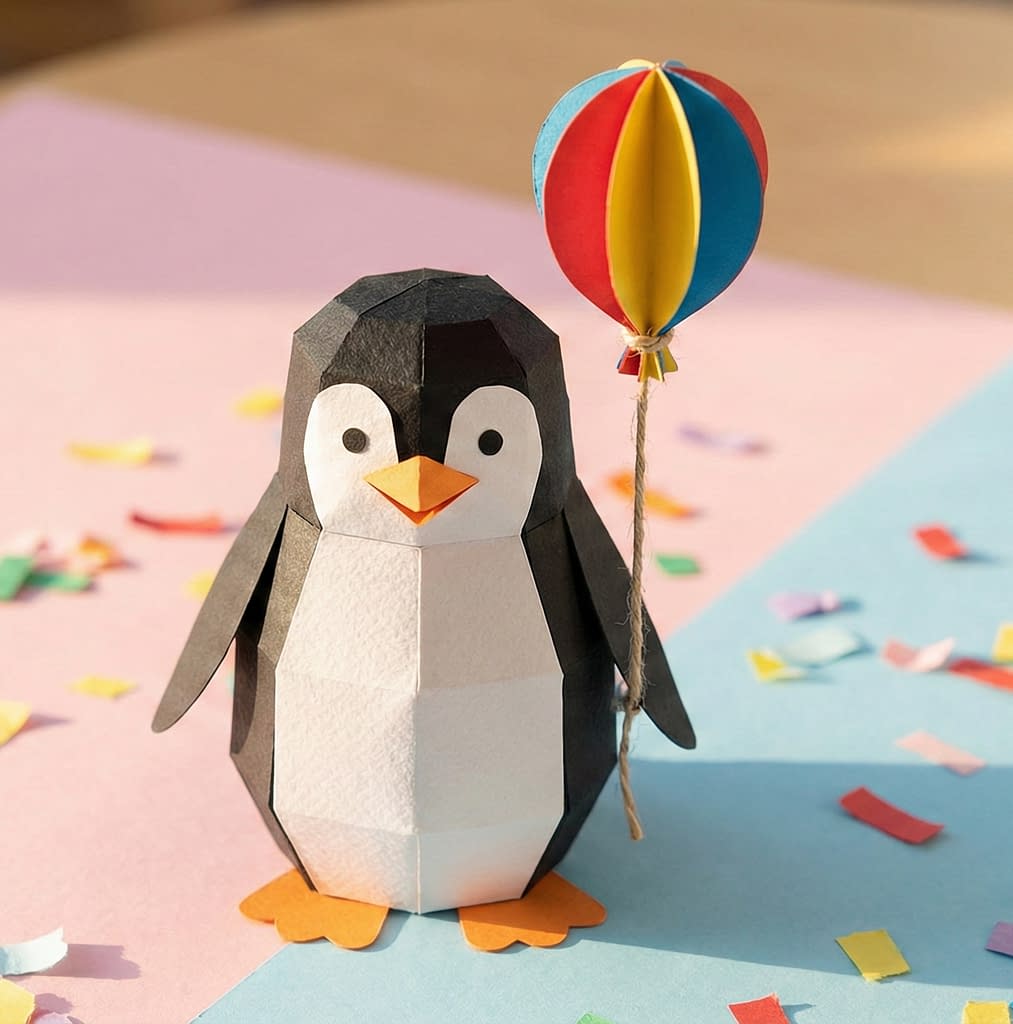
Our final project adds a pop of color and celebration: the Penguin Holding Mini Paper Balloon. Shown in the top-right image, this penguin holds a 3D balloon on a string, making it perfect for birthday cards or festive decorations. This tutorial focuses on creating delicate accessories and balancing a top-heavy figure.
Materials Needed
You will need multiple colors of paper (red, yellow, blue) for the balloon segments, a piece of thin twine or thick thread, and the standard penguin materials.
Step-by-Step Instructions
Creating the Segmented Balloon
The balloon is not a flat cutout; it is a 3D sphere. To make this, cut out six to eight identical circles from your colored papers. Fold each circle in half vertically. Glue the right half of the first circle to the left half of the second circle. Continue this pattern, alternating colors, until you have a stack. Before gluing the first and last circles together to close the sphere, place the tip of your twine into the center spine of the folds. Glue it securely in place, then close the sphere. You now have a multi-colored, 3D paper balloon on a string.
Assembling the Penguin
Construct a standard standing penguin. However, you must ensure the base is weighted. Because the balloon adds height and leverage, the penguin can easily tip over. Before sealing the bottom of the penguin, glue a heavy coin or washer to the inside of the base panel.
Attaching the String
Tie the loose end of the twine to one of the penguin’s wings. To make it look realistic, fold the wing tip over the string and glue it down, as if the penguin is gripping it. Alternatively, you can use a tiny drop of superglue to attach the string to the wing without folding.
Final Positioning
Pull the string taut so the balloon stands upright or at a slight angle as if blowing in the wind. If the string is too floppy, you can coat it in a thin layer of white glue and let it dry straight; this will stiffen the string and hold the balloon in the air without needing helium. Adjust the penguin’s head to look slightly upward at its colorful prize.
Conclusion
Congratulations on completing this comprehensive guide to crafting with paper. You have now explored 8 paper penguin tutorials, ranging from the simple elegance of a sitting bird to the complex engineering of a sliding action scene. By mastering these techniques—low-poly folding, structural bases, narrative posing, and delicate accessory work—you have gained a skillset that extends far beyond penguins.
Paper crafting is a journey of precision and imagination. We hope these tutorials inspire you to create your own frozen worlds, mix and match the accessories, or perhaps design a whole new family of paper creatures. Whether you line them up on a shelf or gift them to friends, these paper penguins are sure to bring a smile to anyone’s face. Gather your scraps, sharpen your scissors, and keep creating.


