
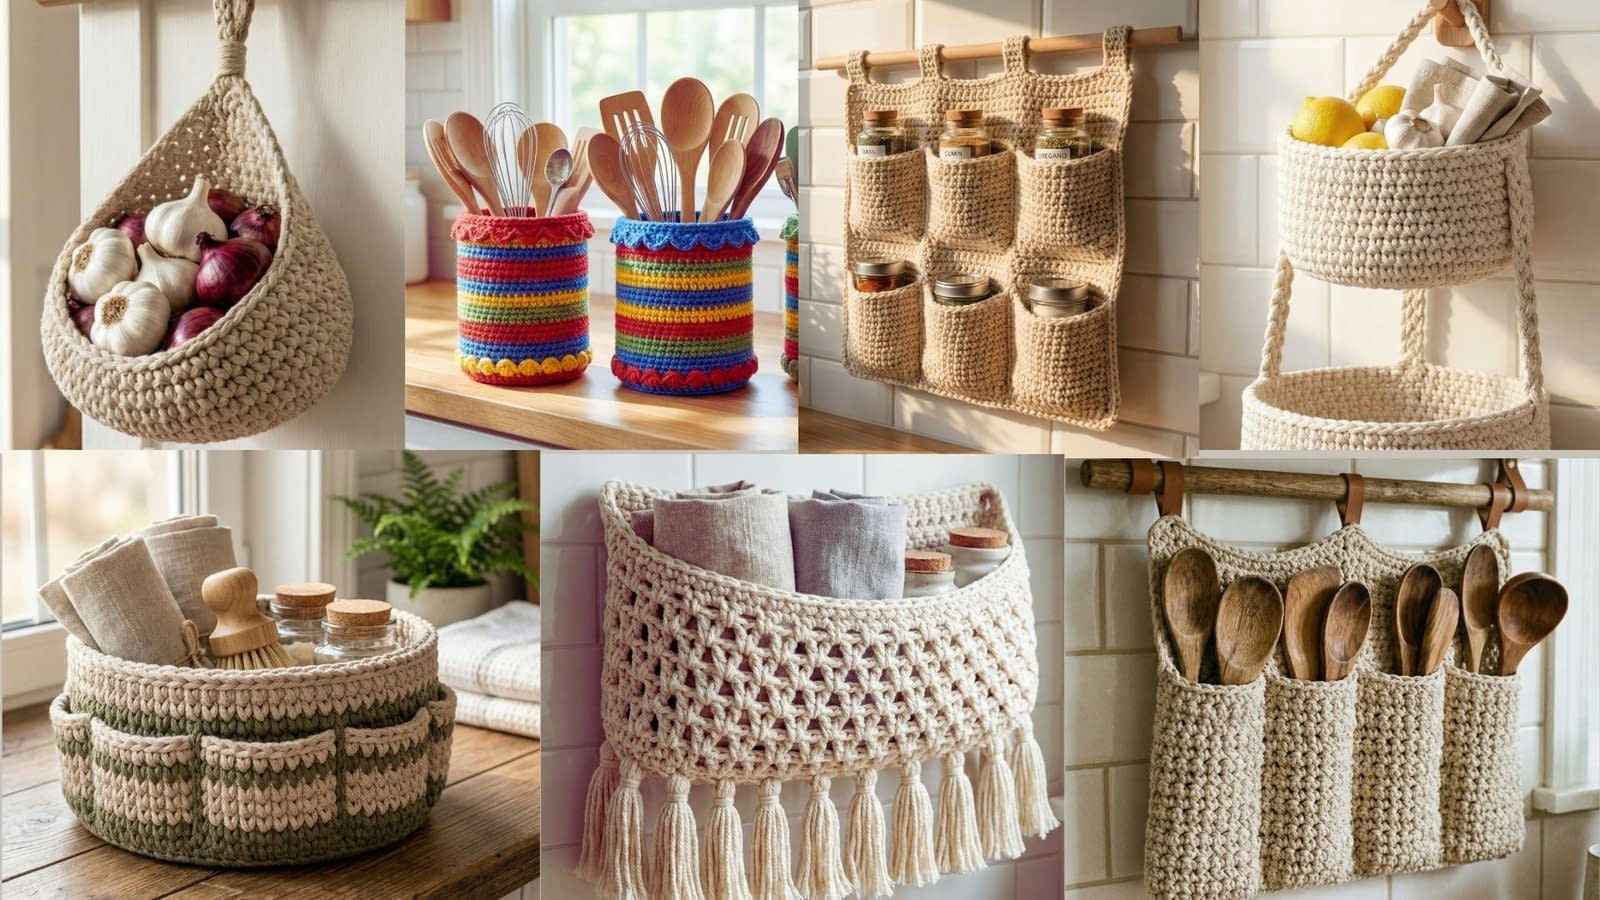
If you love handmade home solutions that combine usefulness with beauty, these 7 crochet kitchen organizer patterns are designed for you. In this post you will find detailed, step-by-step instructions for creating durable, attractive organizers that solve real kitchen storage problems while adding a handcrafted touch to your space. Whether you are making a hanging produce pocket to keep garlic and onions within reach, a wall-mounted basket for towels and spice jars, a two-tier hanging basket for extra countertop clearance, or a utensil organizer to showcase wooden spoons, every pattern in this collection has been written to be clear and approachable.
This post focuses on the first four patterns in the series. Each pattern includes skill level guidance, finished size suggestions, an explicit materials and tools list, construction notes that explain how the item holds its shape, long-form stitch-by-stitch instructions written without shorthand, and finishing and styling suggestions. These tutorials are written for crocheters who prefer full stitch names and explicit sequences. If you plan to create more than one organizer, many of the same yarns and techniques will transfer easily between projects, which makes these patterns efficient to follow.
The phrase 7 crochet kitchen organizer patterns appears throughout this article to help you find these ideas when searching for kitchen storage solutions. The aim is to give you both inspiration and exactly what you need to make professional-looking pieces that last.
General materials, tools, and professional tips
Before you begin any of the patterns below, review this general materials and tools section. Many of the suggestions apply to multiple patterns in this series of 7 crochet kitchen organizer patterns.
Materials and yarn selection
Choose cotton or cotton-blend yarn for kitchen organizers because cotton provides structure, is absorbent, and cleans well. For wall-hung organizers and pieces that must hold shape, select worsted weight cotton yarn or a bulky cotton cord. For countertop baskets where structure is important, consider using macramé cord, braided cotton cord, or multiple strands held together to create a thicker fabric. Neutral colors such as beige, cream, and off-white create a Scandinavian or farmhouse look. Bright striped yarn or multiple color changes produce playful utensil holders that stand out.
Tools
- Crochet hook sizes depend on yarn: for worsted weight cotton, a 4.0 millimeter to 6.0 millimeter hook is common; for bulky cotton cord, use a 6.5 millimeter to 10.0 millimeter hook. Select the hook that produces a firm fabric for structure.
- Yarn needle for sewing seams and weaving ends.
- Scissors.
- A wooden dowel, wooden rod, or sturdy branch for wall-hung pieces.
- Optional small planks or rings for mounting, and small wooden beads or toggles for decorative closures.
- Stitch markers are helpful when shaping pockets or working rounds.
Gauge and fabric density
For organizers that will hold weight, work at a tighter tension than you might for garments. If the fabric is too loose the pockets will stretch and gape. Test your gauge by making a small sample swatch and pressing it flat; if the fabric looks open, go down one hook size. There is no single mandatory gauge for these patterns because you will often adapt the finished size to fit your kitchen and materials.
Basic stitch definitions used in these tutorials
These patterns use basic crochet stitches written in full. If any term is unfamiliar, refer to a beginner stitch book or video for the following operations: chain stitch; single crochet; half double crochet; double crochet; slip stitch; increase and decrease techniques within each stitch family.
Finishing, blocking, and care
Block finished pieces only if the yarn will allow it; many cotton yarns respond well to steam blocking or a light soaking and shaping while damp. For countertop pieces, avoid heavy soaking because some vegetable oils and food residue will alter color over time. For wall-hung items that collect produce, refresh the organizer by airing it out and spot-cleaning with mild soap. For long-term durability, avoid prolonged direct sunlight, which will fade colors.
Now we will move into the first four patterns of the 7 crochet kitchen organizer patterns collection. Each pattern section is long-form and includes step-by-step instructions to ensure clarity.
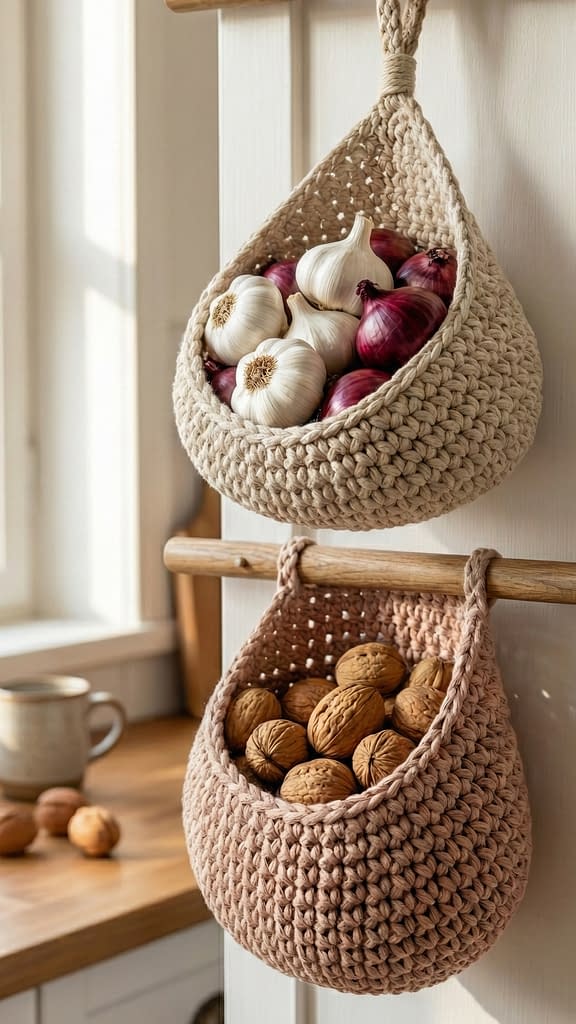
Hanging Crochet Garlic and Produce Organizer
Skill level
Beginner to intermediate. This pattern uses simple shaping and finishing. The construction relies on working flat panels and seaming. Beginners comfortable with single crochet and increases can complete this piece.
Finished size
Approximately 14 inches wide by 20 inches long from top of hanging loop to bottom of pocket, with two teardrop pockets each about 6 to 7 inches wide and 8 to 10 inches deep. Adjust finished size by changing yarn thickness and hook size.
Materials
- Worsted weight cotton yarn, approximately 300 to 400 grams total in neutral tones; the sample uses soft beige for the body and muted blush for decorative edging.
- Crochet hook that matches yarn and desired fabric density; for worsted weight cotton use a 5.0 millimeter hook for a firm fabric.
- Wooden dowel 12 to 16 inches long for hanging.
- Yarn needle and scissors.
- Optional small wooden ring or metal ring for a hanging loop.
- Optional thin cord or small split rings for additional reinforcement.
Notes and construction overview
This hanging organizer is built as two large teardrop-shaped pocket panels connected at their outer edges and mounted on a wooden dowel. Working the teardrop shape can be done by forming a wide base and gradually decreasing to a rounded bottom tip, or by working semi-circular motifs joined together. The pattern below uses a simple flat shaping method that creates two teardrop pockets with a supportive knitted-like texture achieved through alternating rows of single crochet and half double crochet. The teardrop pockets are padded by adding an inner lining or stiffening later, if desired.
Stitch pattern and shaping strategy
To keep the fabric dense and stable, alternate rows of single crochet and half double crochet. For the teardrop curve, work increases toward the base and decreases toward the tip. Corner and curvature shaping is accomplished by adding chains and placing increases and decreases at the edge stitches.
Step-by-step instructions
Prepare: Choose a flat work surface and align reference measurements. Make a small gauge swatch using twelve rows of alternating single crochet and half double crochet, wide enough to measure the stitch density and adjust hook size if necessary.
Panel foundation and base shaping
- With the soft beige yarn and the chosen hook, chain thirty-five stitches. This chain will form the base width of the first teardrop panel. If you desire a wider or narrower teardrop pocket, increase or decrease the starting chain in groups of two stitches to preserve symmetry.
- Row one: Chain one, turn. Work one single crochet into the second chain from the hook and into each chain across until the end of the foundation chain. You will have thirty-four single crochet stitches across. Keep stitch counts consistent in subsequent rows.
- Row two: Chain two, turn. Work one half double crochet into the first stitch and one half double crochet into each stitch across. This row alternates stitch height to create a sturdy fabric. Do not fasten off.
- Row three: Chain one, turn. Work one single crochet into each stitch across. Continue alternating rows of half double crochet and single crochet. Repeat this two-row sequence for a total of twenty to twenty-four rows to create the wide base of the teardrop. The number of rows at the base determines the depth of the pocket.
Shaping toward the tip
- To begin shaping the teardrop toward the tip, you will taper the number of stitches at each end of the rows. On the next single crochet row, work one single crochet into the first two stitches, then single crochet decrease over the next two stitches by inserting the hook into each of the two stitches and completing a single crochet two together. Continue working single crochet across, performing a decrease two times evenly spaced across the row. The goal is to reduce the stitch count in the center third of the row so the fabric begins to round.
- On the following half double crochet row, perform decreases in the same positions by working a half double crochet decrease over two stitches. Continue this sequence of one single crochet row with decreases followed by one half double crochet row with decreases for four to six pairs of rows, depending on how pronounced you want the teardrop taper to be. Decrease two stitches per two-row repeat until the fabric forms a gentle, narrowing curve.
- When the row length reaches approximately ten to twelve stitches across, begin more aggressive shaping to form the rounded tip. On the next single crochet row, work single crochet decrease across the row until only four to six stitches remain.
- Finish the tip by decreasing further on subsequent rows until you have two stitches. Fasten off leaving a long tail of about eighteen inches for sewing and joining.
Make the second teardrop panel
- Repeat steps one through eight to create a second identical teardrop panel. Ensure both panels are the same number of rows and that shaping matches closely. Use stitch markers if necessary to match shaping points.
Creating the central seam and divider
- Place the two teardrop panels with right sides facing each other. Align edges carefully. Using the long tails and a yarn needle, whip stitch or mattress stitch the outer curved edges of the two panels together, leaving the top straight edge open. Sew from one side of the top opening down around the curved bottom tip and back up the other side, leaving the top base open to form the two pockets. Use small, even stitches and do not pull tightly; allow structure but avoid puckering.
- If you prefer two separate pockets rather than one large joined pocket, sew a dividing seam from the top opening down the center to the tip, using a short length of yarn and simple running stitches. This will separate the two teardrop pockets so one holds garlic and the other holds onions or smaller produce.
Adding trim, reinforcement, and lining
- To reinforce the top edge that will slide onto the wooden dowel, fold the top raw edge down approximately three quarters of an inch toward the inside and sew a neat line of stitching to create a casing for the dowel. If you prefer to use a hanging loop instead of a dowel, create a reinforced loop by sewing a strip of fabric or a seam of tightly worked single crochet over the top edge and attach a wooden ring.
- For added strength, you may crochet a simple reinforcement band separately: chain the length to match the dowel plus one extra chain for join, join into a ring with a slip stitch, and work one round of single crochet across the band. Slip the band over the top opening and stitch in place.
Finishing touches
- With the muted blush yarn, work a decorative edging around the top opening and the outer curved edges by using one round of single crochet followed by one round of picot or looped edging. The edging improves visual interest and helps keep the edges tidy.
- Weave in all ends and trim excess yarn. Insert the wooden dowel into the casing and hang the organizer on wall hooks or screw-in brackets. Adjust the hanging position to keep the pockets balanced.
Styling and practical notes
- Use separate pockets for garlic, onions, small root vegetables, and shelled nuts such as walnuts. Rotate contents regularly to prevent moisture buildup. For long-term use with fresh produce, consider lining the bottom interior of the pocket with a thin washable fabric to protect the yarn and allow easy removal for cleaning.
Troubleshooting
- If the pockets stretch under weight, make a darning-stitch band of single crochet inside the top third of the pocket to distribute weight more evenly. Alternatively, use a thicker yarn or smaller hook to tighten the fabric.
This hanging crochet garlic and produce organizer is part of the broader collection of 7 crochet kitchen organizer patterns and demonstrates how thoughtful shaping and simple reinforcement produce a useful hanging solution that complements both rustic and modern kitchens.
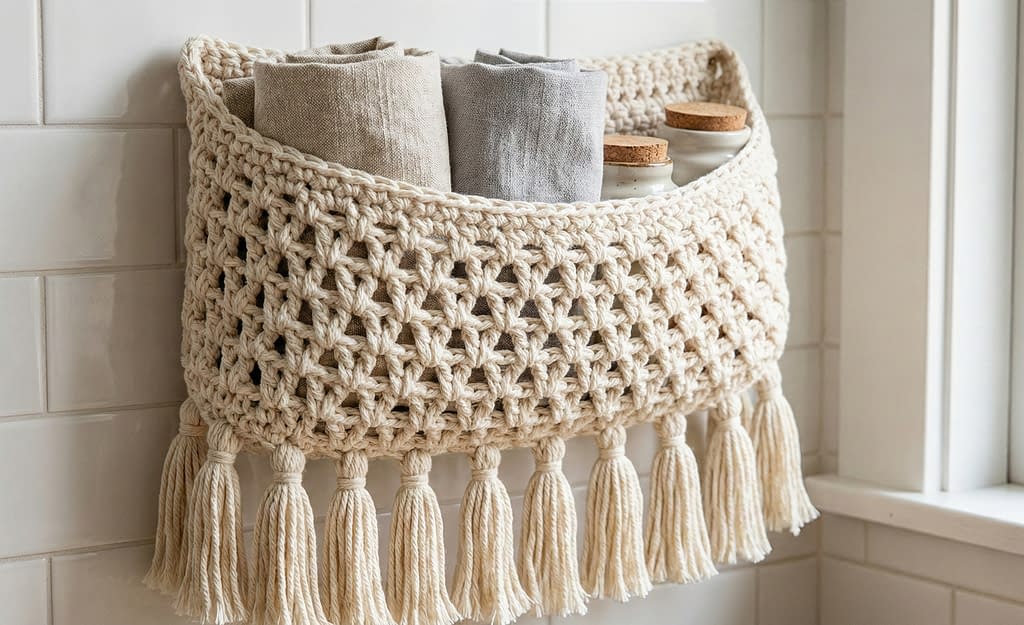
Crochet Wall Basket for Kitchen Towels and Jars
Skill level
Beginner to intermediate. This pattern centers around an open lattice stitch technique and requires working in the round and finishing with long decorative tassels.
Finished size
Approximately 12 inches wide by 10 inches tall with a depth of 5 inches. Adjust dimensions by working more or fewer rounds.
Materials
- Chunky cream-colored yarn or bulky cotton, approximately 400 to 500 grams.
- Crochet hook suitable for bulky yarn: a 8.0 millimeter hook is a typical starting point.
- Yarn needle and scissors.
- Wall-mounting hardware: two strong screws and wall anchors or a wooden mounting plaque.
- Optional: small ceramic spice jars and folded linen kitchen towels for staging.
Notes and construction overview
This wall basket is worked primarily in the round. It features an open lattice stitch that permits airflow and displays contents. Though the lattice appears airy, the use of chunky yarn produces a sturdy fabric. The base is worked in the round as a solid disk to support weight. Sides are constructed in an open stitch and then finished with a dense round at the top for reinforcement. Decorative tassels hang from the lower edge.
Step-by-step instructions
Make the base disk
- With the chunky cream-colored yarn and the chosen bulky hook, form a slip knot and chain two. Join the chain into a ring with a slip stitch to create a closed center.
- Round one: Chain two to count as the first half double crochet, then work eleven half double crochet into the ring. Join with a slip stitch to the top of the initial chain two. You will have twelve half double crochet stitches in the round.
- Round two: Chain two, work one half double crochet into the same stitch, then work two half double crochet into each stitch around. Join with a slip stitch to the top of the chain two. You will have twenty-four half double crochet stitches.
- Round three: Chain two, work half double crochet into the first stitch, then work one increase (two half double crochet into the next stitch). Continue the pattern of one half double crochet followed by one increase around to enlarge the disk. Join with a slip stitch. Work additional increase rounds in the proportion of one half double crochet between increases until the disk measures approximately five inches across or the desired base diameter.
- After reaching the base diameter, work two to three rounds of half double crochet without increases to create a slightly raised edge that helps the base support the sides.
Work the lattice sides
- Round one of sides: Chain three to count as the first double crochet, then double crochet into the next stitch. Chain three, skip two stitches, double crochet into the next stitch. Repeat the chain three, skip two stitches, double crochet pattern around to create an open lattice. Join with a slip stitch to the top of the starting chain three.
- Round two: Slip stitch into the next chain three space. In each chain three space work one single crochet, chain three, and one single crochet. This will form vertical bars connected by chain arches. Continue around and join with a slip stitch.
- Round three: Work as round one across the single crochet posts so the lattice builds evenly. Continue alternating the double crochet row and the single crochet into chain arch row as desired until the sides reach a height of approximately eight to ten rounds, which should yield a side height of about five to six inches.
Reinforce the top edge
- When the sides reach the desired height, work two rounds of half double crochet into each stitch across to create a dense top band. This top band prevents sagging and provides a secure mounting edge.
Create the mounting system
- To mount the basket on the wall you can install a wooden mounting plaque behind the top band or use two small wooden dowels inserted through the top band to secure the basket on screws. To create a clean look, attach a row of single crochet loops across the top band at two evenly spaced points. Use a yarn needle and strong cord or leather straps threaded through the loops to form a hanging loop.
Add decorative tassels
- Cut multiple strands of yarn, each approximately eight to ten inches long. Fold them in half and use a crochet hook to pull the folded loop through the lower edge stitches of the basket. Pull the ends through the folded loop and tighten to form a tassel. Make tassels evenly spaced across the lower edge for decorative effect.
Finishing and styling
- Weave in ends on the inside of the basket. Mount the basket near a window so sunlight highlights the fiber texture. Arrange linen kitchen towels neatly in the basket so they are visible through the lattice, and place small ceramic spice jars in the bottom to add interest.
Troubleshooting and variations
- If the basket seems too flexible, add a round of slip stitches over the outside or insert a cardboard or thin wooden disk in the base for additional support. For a denser basket, substitute single crochet stitches for the open lattice rows or work the lattice with a smaller hook.
This crochet wall basket for kitchen towels and jars is one of the practical entries in the 7 crochet kitchen organizer patterns collection that mixes open decorative stitches with a strong base and top band for reliable storage.
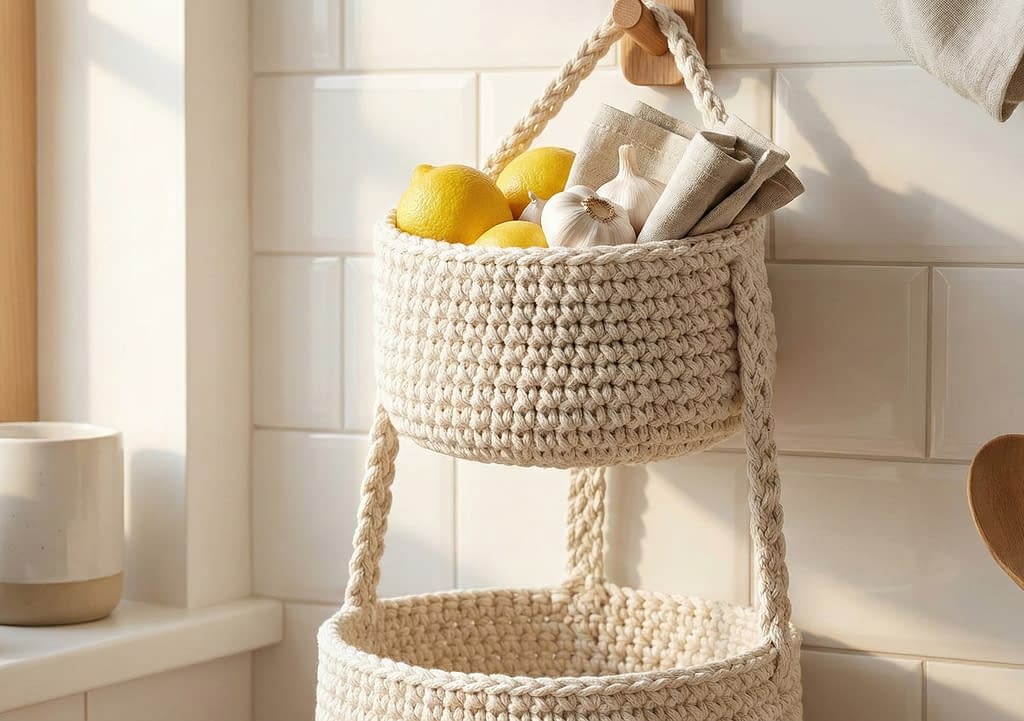
Two-Tier Crochet Hanging Kitchen Basket
Skill level
Intermediate. This project involves working multiple baskets, joining them with braided straps, and balancing weight distribution across the tiers.
Finished size
Top basket approximately 10 inches diameter and 4 inches deep; lower basket approximately 9 inches diameter and 5 inches deep. Total hanging length about 24 to 30 inches including strap.
Materials
- Thick cotton cord or multiple strands of worsted weight cotton held together to create a bulky cord, requiring approximately 500 grams total.
- Crochet hook suitable for cord, commonly a 9.0 millimeter to 12.0 millimeter hook.
- Strong braided strap or a crocheted strap made of sturdy cord.
- Wooden ring or metal ring for hanging.
- Yarn needle and scissors.
Notes and construction overview
This two-tier hanging basket features round, tightly stitched baskets stacked vertically and connected by braided crochet straps or integrated crocheted cords. The baskets are worked in the round with increases to form a level base and then worked up for vertical walls. For structure, use a tight single crochet fabric and consider adding a round of slip stitch on the outer edge to firm the rim.
Step-by-step instructions
Make the top basket base and walls
- With the cotton cord and a large hook, chain two and join to form a ring or use a closed center technique.
- Round one: Chain one and work eight single crochet into the ring. Join with a slip stitch to the first single crochet. You will have eight single crochet.
- Round two: Chain one, work one single crochet into the same stitch, then two single crochet into each stitch around. Join. You will have sixteen single crochet.
- Round three: Chain one. Work one single crochet into the first stitch and then one increase (two single crochet into the next stitch). Repeat around. Join. Continue increasing in this manner—distribute increases evenly across each round—until the circle measures approximately the desired top basket diameter of ten inches. The number of rounds depends on the thickness of the cord and the increase pattern. Typical increase pattern for a flat circle is to add eight additional single crochet evenly spaced every round when using an eight-stitch base.
- Once the base reaches the desired diameter, work straight rounds of single crochet without increases to build the sides. Work approximately six to eight rounds of single crochet for a basket depth of four inches, or adjust to the depth you prefer.
Firm the rim by working one round of slip stitch and then one round of single crochet across the top edge. Fasten off and weave ends.
Make the lower basket
- Repeat steps one through five for the lower basket, making the base slightly smaller or similar in size. For balance, make the lower basket one inch deeper than the top basket, as it will commonly hold heavier items. Work more rounds for depth accordingly.
Prepare connecting straps
- To join the baskets, you will need three or four straps evenly spaced around each basket circumference. Each strap should be braided or crocheted to a length that evenly spaces the top and bottom baskets while leaving room for hanging. An overall hanging length of 24 to 30 inches is comfortable for kitchen use.
- For each strap, cut three equal lengths of cord or yarn, approximately 36 to 40 inches long. Braid the three strands tightly and knot the ends. Optionally wrap the knot in a short crocheted tube to create a neat finish.
Attach straps to baskets
- Mark four evenly spaced points around the rim of the top basket and the corresponding points on the rim of the lower basket. Use stitch markers or pins to ensure even spacing. At each marked point, attach one end of a braided strap by sewing it through the rim with a yarn needle and back through for security. Trim excess.
- Join the free ends of the straps together above the top basket by threading them through a wooden ring or by knotting them into a secure loop for hanging. To achieve a neat finish, hide visible knots inside a small crocheted collar worked around the ring.
Balance and reinforcement
- After assembling, hang the two-tier basket and test balance carefully. If one side pulls down more than the other, adjust strap lengths to even out the weight distribution. Reinforce each strap connection with additional sewing or by working a small slip stitched loop over the attachment point.
Styling and practical use
- Use the top tier for lightweight produce such as lemons, limes, or cloth napkins, and the lower tier for sturdier items such as onions, small jars, or dish brushes. For more kitchen-friendly usage, line the lower basket with a removable washable fabric circle to avoid direct contact between produce and cotton cord fibers.
Troubleshooting and variations
- If the baskets twist after hanging, switch to four straps instead of three for a more stable vertical alignment. If you want a more decorative look, add a round of open stitches to the top edge of each basket to create a frill.
This two-tier crochet hanging kitchen basket is one of the functional projects within the 7 crochet kitchen organizer patterns series, providing vertical storage that saves counter space while adding handcrafted charm.
Crochet Utensil Wall Organizer with Wooden Spoons
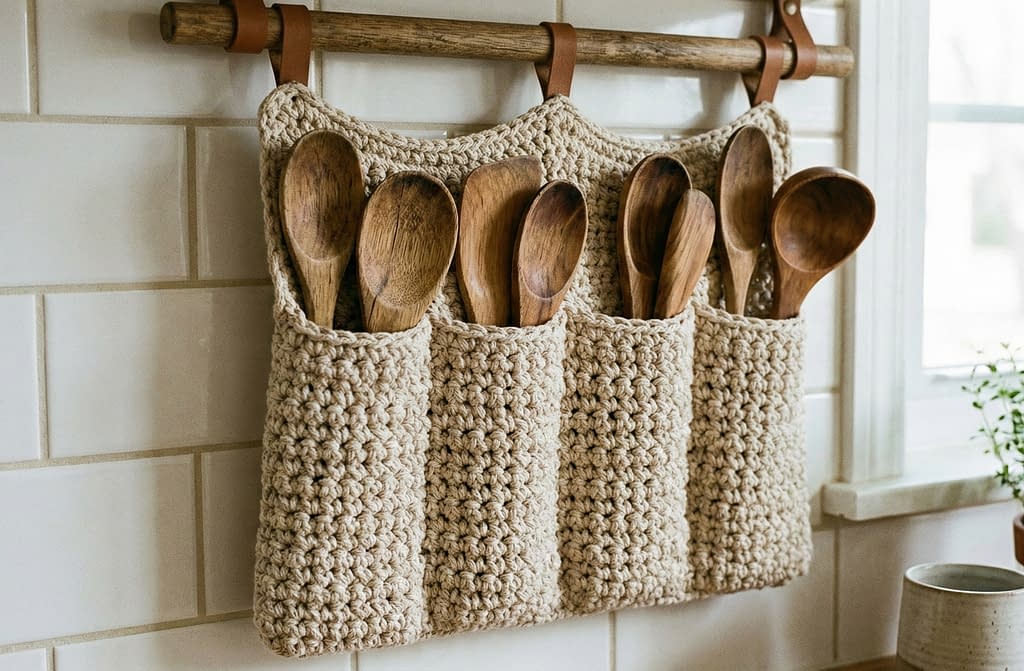
Skill level
Beginner to intermediate. The piece is primarily a series of narrow pockets worked as a strip and attached to a wooden rod. The challenge is creating even pocket widths and securing the organizer to the wall.
Finished size
The wall organizer strip can be approximately 24 inches long and 8 inches tall with six to eight narrow pockets each about 2 to 3 inches wide. Modify width and number of pockets as needed.
Materials
- Chunky beige cotton yarn, approximately 250 grams.
- Crochet hook sized to the yarn; a 6.0 millimeter hook is common.
- Wooden rod or wooden spoon handle to serve as the hanging rod, approximately 20 to 24 inches long.
- Small wooden spoons and kitchen utensils for filling and styling.
- Yarn needle and scissors.
- Optional small wooden beads for decorative fringe.
Notes and construction overview
This utensil wall organizer consists of a wide strip with multiple narrow pockets created by working post stitches or by simple single crochet ridges. The strip is then folded at the top to create a rod pocket or attached directly to a wooden rod with loops. The finishing includes sewing vertical seams to form pockets and adding a dense top band to receive the wooden rod.
Step-by-step instructions
Create the foundation strip
- Chain fifty-two stitches using the chunky beige cotton yarn. This foundation will determine the total width of the organizer. Adjust the chain number to achieve your desired width, adding or removing chains in increments that maintain the pocket spacing.
- Row one: Chain one, turn. Work one single crochet into each chain across. You will have fifty-one single crochet at the end of the row.
- Row two: Chain two, turn. Work one half double crochet into each stitch across. Continue alternating rows of single crochet and half double crochet for a total of eight to ten rows to create a sturdy fabric.
Mark pocket divisions
- Decide how many pockets you want. For six pockets across a 24 inch strip, divide the width into six equal sections of approximately four inches each. Use stitch markers or small lengths of scrap yarn to mark the vertical lines that will become pocket seams.
- If you prefer pockets of different widths, place markers accordingly. Each pocket will be formed by sewing vertical seams from the top down to the depth you want the utensils to be held securely.
Fold and form the rod casing
- Fold the top edge of the strip toward the wrong side by approximately two inches to create a casing for the wooden rod. Pin or clip the folded edge in place.
- Work a round of single crochet along the folded edge to secure the casing. Stitch through all layers evenly to create a firm tube. Leave one small gap near either end for sliding the wooden rod in, or do not close fully if you will tie the rod into place.
Sew vertical pocket dividers
- Using the yarn needle and a length of matching yarn, sew vertical seams at each pocket marker. Start at the top casing and sew down to the desired pocket depth, typically six to seven inches. Use an even backstitch or running stitch to create a neat internal pocket wall. Knot securely and hide the ends on the inside.
- For additional pocket security, sew a horizontal anchoring stitch across the lower portion of each pocket to secure the bottom and stop the seam from widening under the weight of utensils.
Create a hanging loop or mount
- Slide the wooden rod through the casing and mount it on small wall brackets or hooks. Alternatively, attach two loops of cord to the outer edges of the casing and hang the organizer from two mounting hooks to display on a subway tile backsplash.
Add wooden spoon display
- Insert wooden spoons, spatulas, and ladles into the pockets. For a balanced look, place larger utensils near the center and smaller utensils near the edges. The vertical pockets keep utensils organized and protect delicate spatula edges from rubbing against hard surfaces.
Finishing touches and durability tips
- If pockets feel too loose, add another round of single crochet around the pocket openings to tighten the mouth. To create visual interest, work a decorative braid between pockets by chaining a short cord and attaching with small slip stitches at each pocket top.
- To preserve the yarn from moisture when storing wet utensils, line the lower inch of each pocket with a thin waterproof material glued or sewn inside. Remove and replace lining as needed.
This crochet utensil wall organizer with wooden spoons provides easy access to daily tools and is a straightforward example from the larger set of 7 crochet kitchen organizer patterns that elevates kitchen function with handcrafted style.
Crochet Spice Pocket Kitchen Organizer
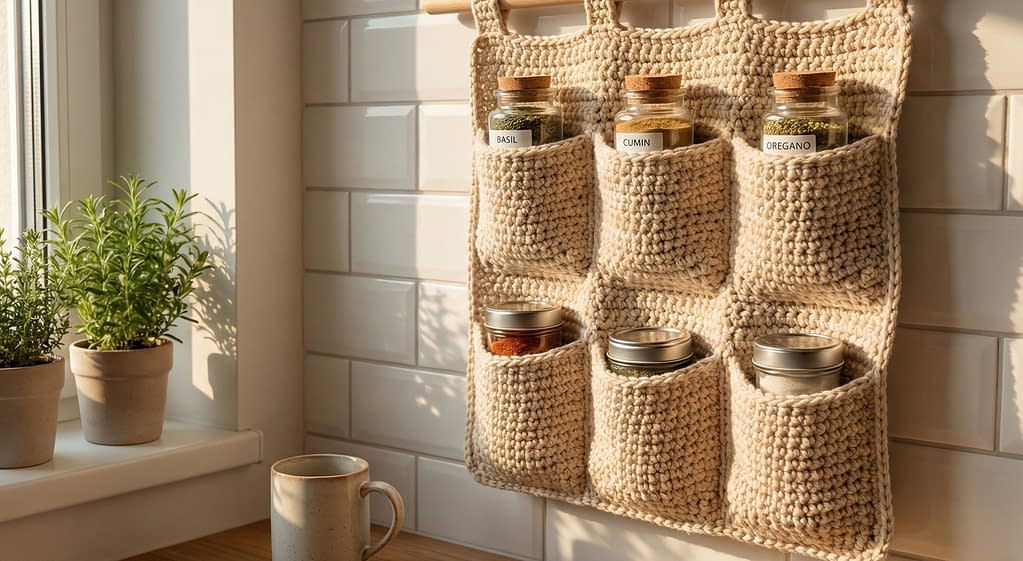
Skill level
Beginner to intermediate. This pattern focuses on working flat panels, creating evenly spaced vertical pockets, and reinforcing edges so the organizer can hold the weight of spice jars without stretching.
Finished size
Approximately 18 inches wide by 22 inches tall, with five to seven vertical pockets, each about 2.5 to 3 inches wide and 6 to 7 inches deep. The size can be adjusted easily by changing the number of pockets or the height of the panel.
Materials
- Worsted weight cotton yarn in neutral tones such as beige, taupe, or light gray, approximately 300 to 400 grams
- Crochet hook, 4.5 millimeter to 5.0 millimeter, chosen to produce a firm fabric
- Yarn needle and scissors
- Wooden dowel, metal rod, or sturdy stick for hanging
- Optional: small wooden buttons, leather cord, or fabric strip for reinforcement
- Optional: stitch markers
Notes and construction overview
This crochet spice pocket kitchen organizer is constructed as one large rectangular backing panel with narrower pocket panels layered on top. Vertical seams are sewn to form individual spice pockets. The strength of this organizer comes from dense stitches, reinforced top edges, and careful seaming. This pattern is ideal for tiled kitchen walls where vertical storage helps free cabinet space.
Step-by-step instructions
Backing panel
- Begin by chaining a number of stitches equal to the desired width of the organizer. For an 18 inch wide organizer, chain approximately seventy stitches using worsted weight cotton yarn and a 5.0 millimeter hook. Adjust this number if your tension differs.
- Row one: Chain one, turn. Work one single crochet into the second chain from the hook and into each chain across. This creates a stable foundation row.
- Row two: Chain two, turn. Work one half double crochet into each stitch across.
- Continue alternating rows of single crochet and half double crochet until the panel measures approximately 22 inches tall. This alternating stitch pattern creates a thick, supportive fabric that resists stretching when jars are added.
- Fasten off and weave in the yarn tail neatly on the wrong side of the panel.
Pocket panels
- Decide how many pockets you want. Five pockets suit standard spice jars well, while seven narrower pockets work for small containers. Divide the width of the backing panel evenly to determine the width of each pocket.
- For each pocket panel, chain a length equal to the width of one pocket plus two extra stitches for seam allowance.
- Row one: Chain one, turn. Work single crochet into each chain across.
- Row two: Chain two, turn. Work half double crochet across.
- Continue alternating these two rows until the pocket panel reaches a height of approximately 7 inches. This height keeps spice jars secure while allowing labels to remain visible.
- Make as many identical pocket panels as needed for your chosen number of pockets.
Attaching pockets to the backing panel
- Lay the backing panel flat with the right side facing up. Position the pocket panels vertically, aligning their bottom edges with the bottom edge of the backing panel. Space them evenly across the width.
- Pin or clip each pocket panel in place. Use stitch markers to ensure straight alignment.
- With a yarn needle and matching yarn, sew along both vertical sides of each pocket panel using a whip stitch or mattress stitch. Stitch through the pocket panel and backing panel only, keeping stitches small and tight.
- Secure the bottom edge of each pocket panel with a line of stitching to prevent jars from pushing through.
Reinforcing the top edge and hanging system
- To strengthen the top of the organizer, work one row of single crochet evenly across the top edge of the backing panel.
- Fold the top edge down about one inch to form a casing for the wooden dowel. Stitch along the folded edge using single crochet or a sewing stitch with the yarn needle. Leave the ends open.
- Slide the dowel through the casing. Attach cord, leather straps, or hooks to the dowel ends for wall mounting.
Finishing and practical tips
- Weave in all remaining yarn ends securely.
- Insert spice jars into the pockets, placing heavier jars toward the center for balance.
- If the pockets stretch slightly over time, add a horizontal reinforcement stitch across the upper third of each pocket to tighten the opening.
This crochet spice pocket kitchen organizer is a highly practical addition to the full collection of 7 crochet kitchen organizer patterns, offering efficient vertical storage with a clean, organized look.
Crochet Countertop Kitchen Organizer Basket
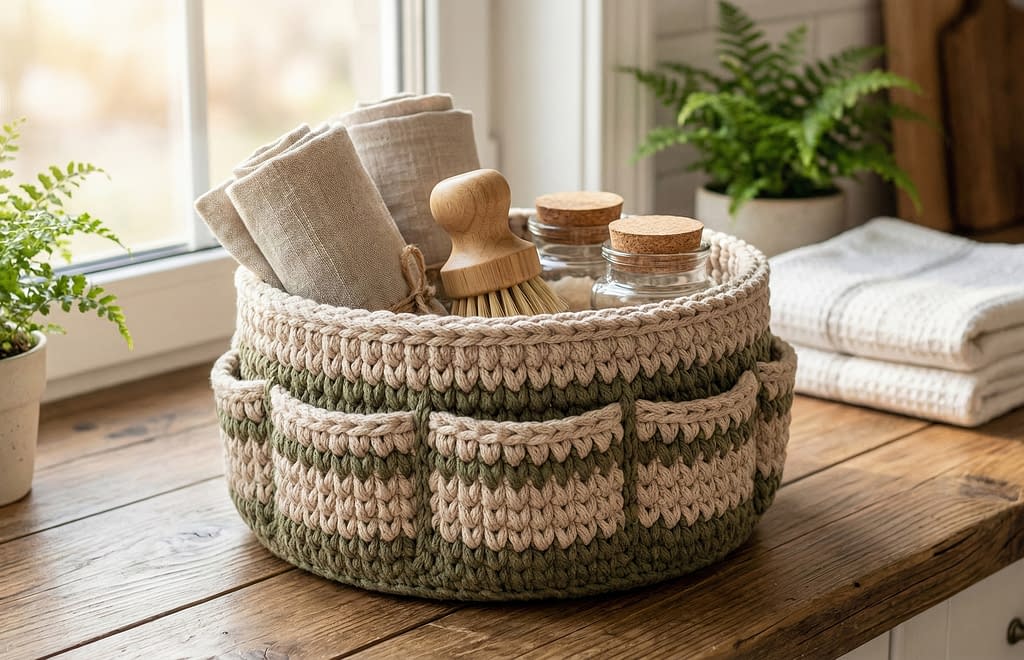
Skill level
Beginner to intermediate. This pattern is worked in the round and emphasizes structure and stability, making it an excellent learning project for shaping sturdy baskets.
Finished size
Approximately 10 inches in diameter and 6 inches tall, with outer pockets around the circumference. Size can be increased or reduced by adjusting the base diameter and number of rounds.
Materials
- Thick cotton yarn in beige and olive green tones, approximately 350 to 450 grams total
- Crochet hook, 6.0 millimeter to 7.0 millimeter, depending on yarn thickness
- Yarn needle and scissors
- Optional: stitch markers
- Optional: stiff cardboard or plastic circle for added base support
Notes and construction overview
This countertop basket is worked from the base upward in continuous rounds. Outer pockets are added afterward by crocheting or sewing small panels onto the exterior. The key to a successful countertop organizer is dense stitching and a firm base that holds its shape even when filled with towels and tools.
Step-by-step instructions
Base of the basket
- Begin with a slip knot and chain two. Join to form a ring.
- Round one: Chain one. Work eight single crochet into the ring. Join with a slip stitch.
- Round two: Chain one. Work two single crochet into each stitch around. Join. You will have sixteen stitches.
- Round three: Chain one. Work one single crochet into the first stitch, then two single crochet into the next stitch. Repeat around. Join.
- Continue increasing in this manner, adding evenly spaced increases in each round, until the base measures approximately 10 inches across. The base should lie flat without curling.
Building the sides
- Once the desired base size is reached, stop increasing. Work one round of single crochet through the back loops only. This creates a sharp corner and helps the basket sides stand upright.
- Continue working single crochet in both loops for each round until the basket reaches a height of about 6 inches.
- To strengthen the rim, work one round of slip stitch followed by one round of half double crochet. Fasten off and weave in ends.
Creating outer pockets
- Decide how many outer pockets you want. Four evenly spaced pockets work well for brushes and rolled towels.
- For each pocket, chain a length equal to the desired pocket width, typically ten to twelve stitches.
- Row one: Chain one, turn. Work single crochet across.
- Row two: Chain two, turn. Work half double crochet across.
- Continue alternating rows until the pocket panel measures approximately 4 inches tall.
- Position each pocket panel on the outside of the basket. Sew the sides and bottom edges to the basket using a yarn needle, leaving the top edge open.
Optional reinforcement
- If extra structure is desired, cut a cardboard or plastic circle slightly smaller than the basket base and insert it inside before use. This helps maintain shape under heavier items.
Finishing and styling
- Place rolled kitchen towels, cleaning brushes, and small jars inside the basket.
- Position the basket on a wooden countertop and pair it with a folded towel stack and a small potted plant for a modern farmhouse look.
This crochet countertop kitchen organizer basket completes the functional side of the 7 crochet kitchen organizer patterns by offering a flexible, movable storage solution that requires no wall mounting.
Colorful Crochet Utensil Holder Set
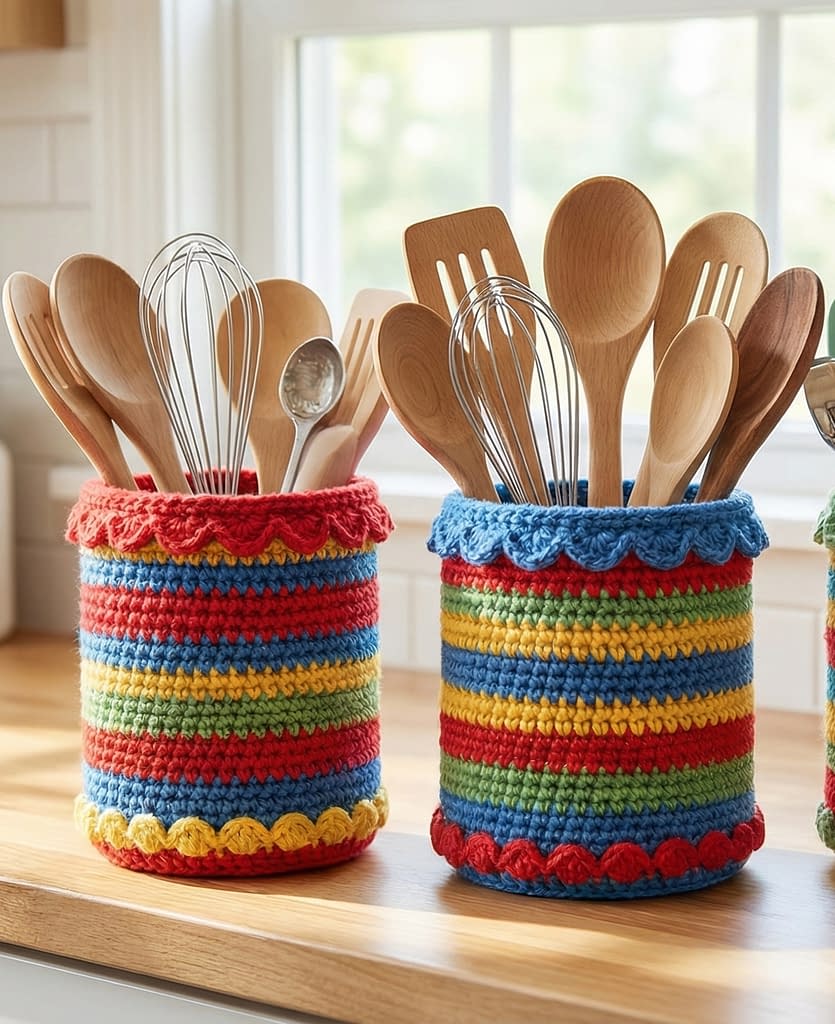
Skill level
Beginner. This pattern uses simple stitches worked in the round and is ideal for practicing color changes and consistent tension.
Finished size
Each cylindrical holder measures approximately 4 inches in diameter and 6 inches tall. Make multiple holders in varying heights if desired.
Materials
- Medium weight cotton yarn in multiple colors such as red, blue, yellow, and green, approximately 100 grams per holder
- Crochet hook, 4.5 millimeter to 5.0 millimeter
- Yarn needle and scissors
- Optional: stitch marker
Notes and construction overview
These utensil holders are worked in continuous rounds from the base upward. Color changes create bold stripes, while scalloped stitch edging adds decorative interest. The cylindrical shape is simple but effective for holding spoons, whisks, and other tools.
Step-by-step instructions
Base of the holder
- With the first color, chain two and join to form a ring.
- Round one: Chain one. Work eight single crochet into the ring. Join with a slip stitch.
- Round two: Chain one. Work two single crochet into each stitch around. Join.
- Round three: Chain one. Work one single crochet into the first stitch, then two single crochet into the next stitch. Repeat around. Join.
- Continue increasing evenly until the base reaches approximately 4 inches in diameter.
Building the sides and color changes
- Once the base size is reached, stop increasing. Work one round of single crochet through the back loops only to define the base edge.
- Begin working single crochet in both loops for each subsequent round to build the sides.
- To change colors, complete the last single crochet of the round with the new color pulled through the final loop. Cut the old color, leaving a tail for weaving in.
- Continue working rounds, changing colors every two or three rounds to create stripes. Keep tension even to maintain straight sides.
- Work until the holder reaches a height of approximately 6 inches.
Decorative scalloped edge
- For the final round, work a scalloped edging: chain one, skip one stitch, work five double crochet into the next stitch, skip one stitch, slip stitch into the next stitch. Repeat around.
- Fasten off and weave in all ends securely on the inside.
Finishing and use
- Make additional holders using different color combinations for a coordinated set.
- Place wooden spoons, whisks, and cooking tools inside each holder.
This colorful crochet utensil holder set adds a cheerful, handmade accent to the full set of 7 crochet kitchen organizer patterns and works beautifully on open counters or shelves.
Conclusion
These seven crochet kitchen organizer patterns work together to create a kitchen that is both functional and visually inviting. From hanging produce storage and wall-mounted spice pockets to countertop baskets and colorful utensil holders, each pattern is designed to be adaptable, durable, and beginner-friendly. By choosing sturdy cotton yarns, working dense stitches, and following the step-by-step instructions carefully, you can build a coordinated set of organizers that reduce clutter while showcasing your crochet skills. Together, these projects offer long-lasting handmade solutions that bring warmth, order, and personal style into everyday kitchen spaces.


