
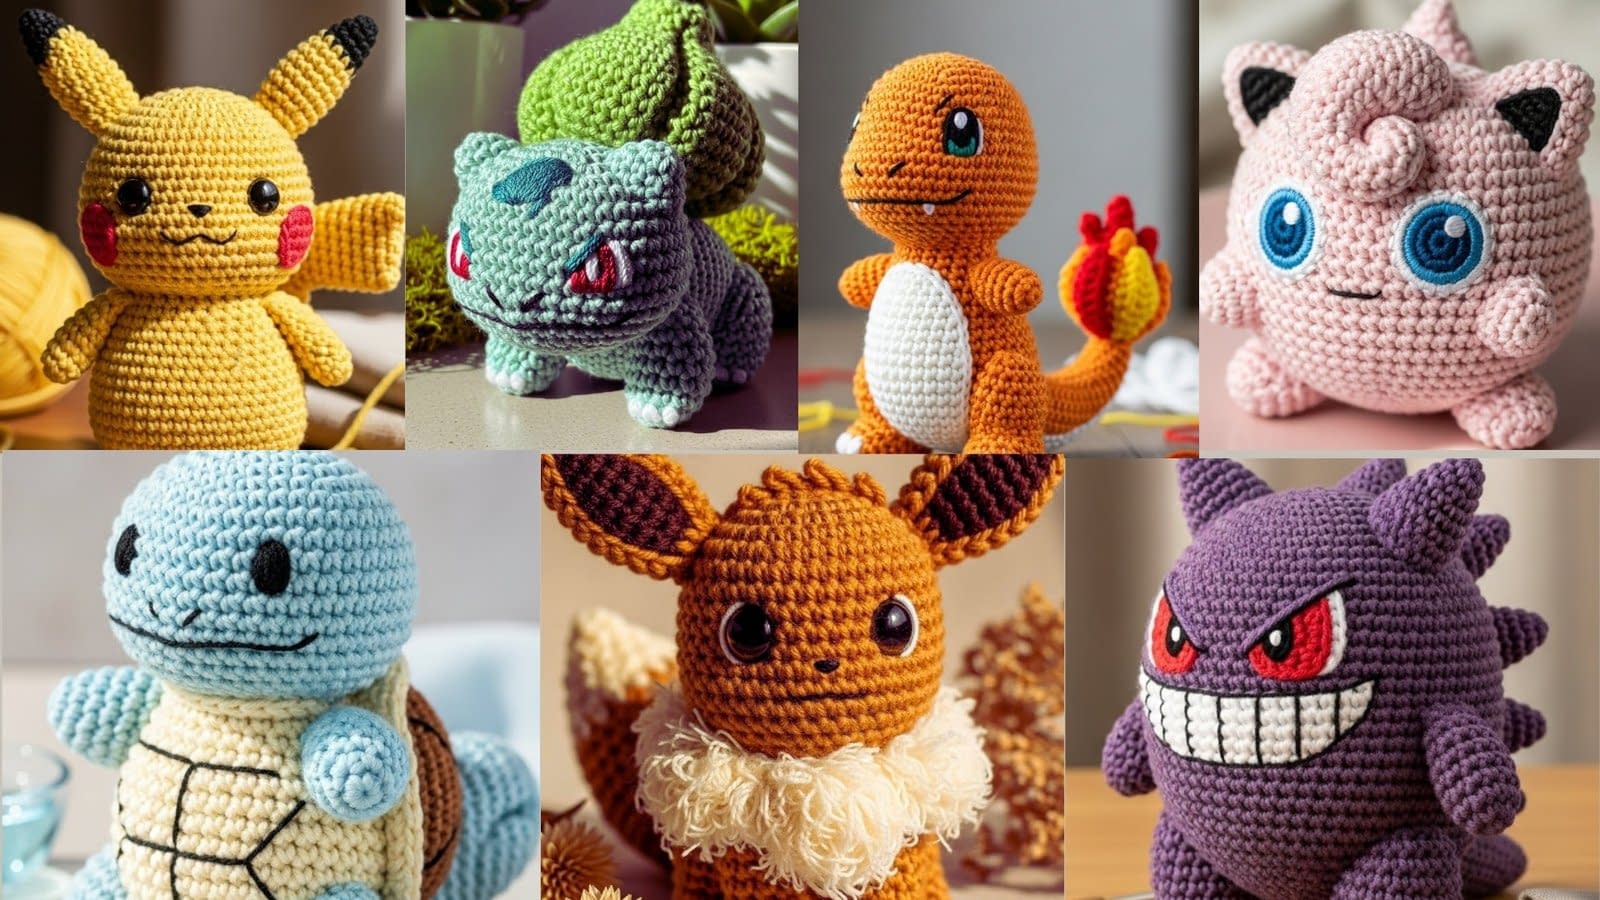
In this comprehensive guide to “8 Mini Amigurumi Pokemon Patterns,” you will find complete, slow-paced, step-by-step tutorials for creating small, highly detailed crochet versions of beloved Pokemon. Each pattern is written to be beginner-friendly while providing enough nuance and professional finishing tips to satisfy intermediate makers. The instructions use full stitch names and avoid abbreviations so that you can follow easily without needing a shorthand key. The first part of this post covers the first four characters: Pikachu, Bulbasaur, Charmander, and Squirtle. When you are ready, I will continue with the remaining four patterns.
Each mini amigurumi is designed to be roughly three to four inches tall when made with the recommended yarn and hook. Where appropriate, finished sizes, skill level, materials, and alternative adjustments are given. I will also include assembly and finishing recommendations that help your amigurumi look clean and professional, plus suggestions for variations and photography tips to match the high-quality image prompts you provided.
Make sure to read each materials list before you begin, and gather the recommended tools. Use the same yarn weight across pieces if you wish to create a consistent set. Keep tension even and work in continuous rounds unless the pattern explicitly instructs to join and turn. Have patience and take breaks when finishing small details such as eyes and embroidery.
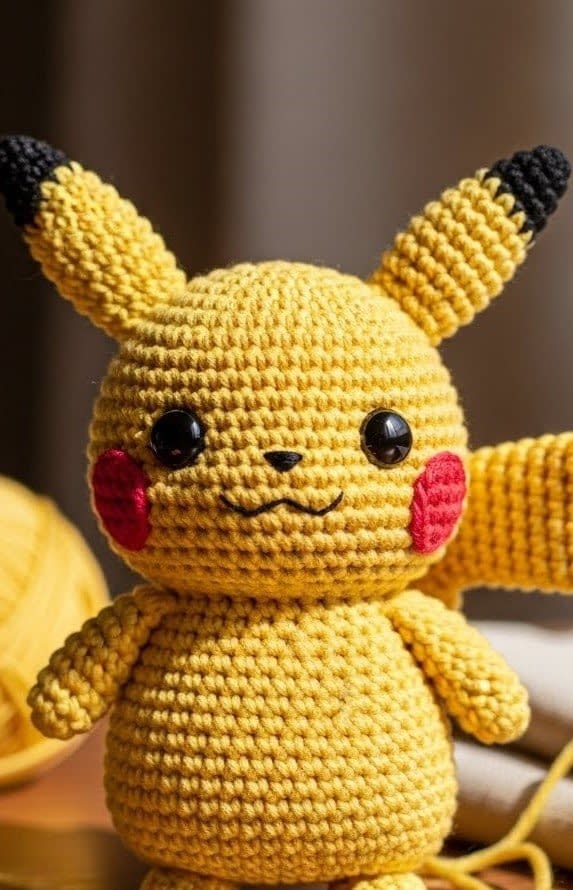
Pattern 1 — Mini Amigurumi Pikachu
Skill level
Beginner to intermediate. Simple shaping and finishing; requires basic increases, decreases, and surface embroidery.
Finished size
Approximately 3.0 to 3.5 inches tall when made with worsted weight yarn (category 4) and a 3.5 millimeter crochet hook. Adjust the finished size by changing hook size and yarn weight.
Materials
- Worsted weight yarn (category 4): yellow (main), brown (ear tips and back stripe), red or pink for cheek embroidery, small scrap of black for nose and mouth.
- Crochet hook: 3.5 millimeter.
- Safety eyes: 6 millimeter black or glossy black beads; alternatively embroider eyes with black yarn.
- Polyester fiberfill stuffing.
- Yarn needle for sewing and weaving in ends.
- Stitch marker.
- Small pair of scissors.
- Optional small amount of embroidery floss in white for eye highlights if not using safety eyes.
Notes
Work in continuous rounds for smooth amigurumi shaping unless a round is specified to be joined. The pattern uses full stitch names: chain, single crochet, increase (two single crochets in one stitch), and decrease (single crochet decrease combining two stitches). If you prefer firmer fabric, use a 3.0 millimeter hook with the same yarn. Keep stitches tight to prevent fiberfill from showing.
Head and Body (worked continuously for a cute single-piece look)
This version works the head and body as one continuous piece to create a compact mini amigurumi.
Start with the head:
- Magic ring: Make a magic ring and work four single crochet into the ring. Pull the ring closed. (Total: 4 stitches.)
- Round 1: Increase in each stitch around by making two single crochet in each stitch. (Total: 8 stitches.)
- Round 2: Single crochet in next stitch, increase in next stitch. Repeat from * to * around. (Total: 12 stitches.)
- Round 3: Single crochet in next two stitches, increase in next stitch. Repeat from * to * around. (Total: 16 stitches.)
- Round 4: Single crochet in next three stitches, increase in next stitch. Repeat from * to * around. (Total: 20 stitches.)
- Round 5: Single crochet in next four stitches, increase in next stitch. Repeat from * to * around. (Total: 24 stitches.)
- Round 6: Single crochet in next five stitches, increase in next stitch. Repeat from * to * around. (Total: 28 stitches.)
- Rounds 7–10: Single crochet in each stitch around for four rounds to form the front of the head. (Total: 28 stitches per round.)
- Round 11: Single crochet in next five stitches, single crochet decrease over next two stitches. Repeat from * to * around. (Total: 24 stitches.)
- Round 12: Single crochet in next four stitches, single crochet decrease over next two stitches. Repeat from * to * around. (Total: 20 stitches.)
- Insert safety eyes between rounds 8 and 9, spaced about 6 to 8 stitches apart depending on desired expression. If embroidering eyes, wait until stuffing begins to be added.
- Round 13: Single crochet in next three stitches, single crochet decrease over next two stitches. Repeat from * to * around. (Total: 16 stitches.)
- Begin stuffing firmly but not so tightly that the stitches stretch.
- Round 14: Single crochet in next two stitches, single crochet decrease over next two stitches. Repeat from * to * around. (Total: 12 stitches.)
- Round 15: Single crochet in next stitch, single crochet decrease over next two stitches. Repeat from * to * around. (Total: 8 stitches.)
- Round 16: Single crochet decrease around until a small opening remains. Fasten off leaving a long tail for sewing the body portion if making head separately. If continuing into the body, do not fasten off.
If working head and body as one piece, continue without fastening off:
- Rounds 17–19: Single crochet around to lengthen the neck slightly. (Total: 8 stitches per round.)
- Round 20: Single crochet in next stitch, increase in next stitch. Repeat from * to * around. (Total: 12 stitches.)
- Round 21: Single crochet in next two stitches, increase in next stitch. Repeat from * to * around. (Total: 16 stitches.)
- Round 22: Single crochet in next three stitches, increase in next stitch. Repeat from * to * around. (Total: 20 stitches.)
- Rounds 23–26: Single crochet in each stitch around for four rounds to form the upper body. (Total: 20 stitches per round.)
- Round 27: Single crochet in next three stitches, single crochet decrease over next two stitches. Repeat from * to * around. (Total: 16 stitches.)
- Round 28: Single crochet in next two stitches, single crochet decrease over next two stitches. Repeat from * to * around. (Total: 12 stitches.)
- Start stuffing the body firmly, shaping a rounded base.
- Round 29: Single crochet in next stitch, single crochet decrease over next two stitches. Repeat from * to * around. (Total: 8 stitches.)
- Round 30: Single crochet decrease around to close the bottom. Fasten off and weave tail through remaining stitches; pull closed and secure.
Ears (make two)
Ears are small, flat triangles with a slight curve.
- With yellow, chain 6.
- Row 1: Single crochet in second chain from hook and in each chain across. (Total: 5 single crochet.)
- Row 2: Chain 1, turn. Single crochet across. (Total: 5 single crochet.)
- Row 3: Chain 1, turn. Single crochet decrease over the first two stitches, single crochet in remaining stitch. (Total: 3 single crochet.)
- Row 4: Chain 1, turn. Single crochet decrease over first two stitches, single crochet in last stitch. Fasten off leaving a tail for sewing.
- With brown, embroider or crochet a small triangular tip at the top: With brown, attach yarn to the top stitch and single crochet three stitches to create a darker tip. Fasten off and weave ends.
Arms (make two)
Short stubby arms.
- Magic ring: Make a magic ring and work five single crochet into the ring. Pull the ring closed. (Total: 5 single crochet.)
- Rounds 1–3: Single crochet in each stitch around for three rounds. (Total: 5 stitches per round.)
- Fasten off leaving a tail for sewing. Lightly stuff with fiberfill if desired.
Cheeks and facial features
- Use red or pink yarn to embroider small round cheeks just below the eyes. Create a small satin stitch circle approximately five to seven millimeters in diameter.
- Use black yarn to embroider a tiny nose by making one small satin stitch between the eyes slightly below.
- Use black yarn to add a tiny curved mouth with a few short back stitches.
Tail
A lightning-bolt tail is iconic for Pikachu. For a mini version, use flat shaping.
- Chain 8.
- Row 1: Single crochet in third chain from hook and across. (Adjust to get correct width; typical starting width is three stitches.)
- Row 2: Chain 1, turn. Single crochet across.
- Continue shaping with decreases to form a zigzag outline: at the outer edges, single crochet decrease one stitch to create an angled point, then single crochet a couple of rows, then increase to create the next point.
- After achieving a short lightning-bolt silhouette about one and one-half to two inches long, switch to brown yarn for the tip and single crochet across two to three rows to create the darker tip.
- Fasten off leaving a tail for sewing.
Assembly
- Position the ears on top of the head and sew securely through the head fabric, ensuring even spacing and symmetry. Use the tail of yarn to secure tightly and weave in the ends.
- Sew the arms to the sides of the body at about the midpoint between head and base. Use small, even stitches and hide ends inside the body.
- Attach the tail to the lower back center. Position the tail so that it balances the figure when standing.
- Add any final shaping with a small amount of stuffing or by adjusting stitches.
- Weave in all ends and trim excess yarn.
Finishing and photography tips
- Smooth the yarn fuzz with a fine tooth comb or gently steam from a distance to remove wrinkles.
- Position Pikachu on a warm wooden surface with soft, natural side lighting to match the image prompt. Include a ball of yellow yarn and crochet hooks as props.
Variations and tips
- For a smaller Pikachu, use sport weight yarn with a 2.5 millimeter hook.
- For a plush, velvety look, choose a slightly fuzzy yarn such as a brushed acrylic.
- Add a small keyring attachment if you want to make a keychain.
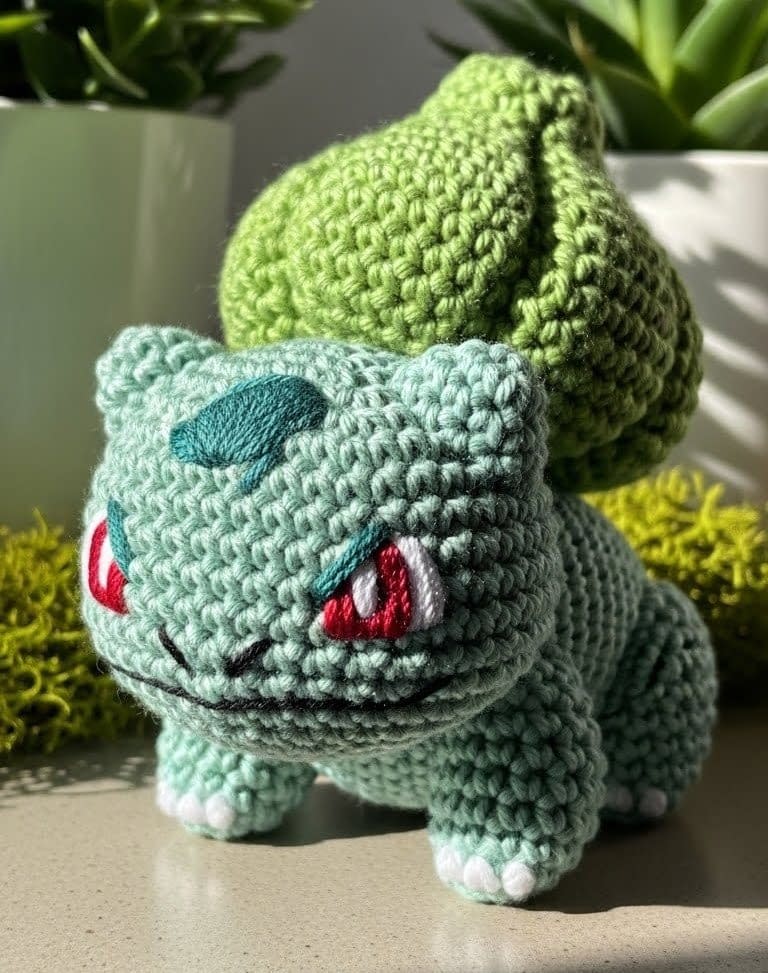
Pattern 2 — Mini Amigurumi Bulbasaur
Skill level
Beginner to intermediate. Requires shaping of a bulb element and seamed body parts.
Finished size
Approximately 3.0 to 3.5 inches long and about 2.5 inches tall when made with worsted weight yarn and a 3.5 millimeter crochet hook.
Materials
- Worsted weight yarn (category 4): muted pastel green (main), darker green for spots and bulb details, cream or light green for belly if desired.
- Crochet hook: 3.5 millimeter.
- Safety eyes: 6 millimeter black or dark brown.
- Polyester fiberfill stuffing.
- Yarn needle.
- Stitch marker.
- Small amount of red embroidery thread for eye highlights if desired.
- Optional small felt pieces for additional detail.
Notes
Bulbasaur features a rounded body with a bulb on the back that can be either firmly stuffed or filled with a small core to ensure shape. Work the body in one piece and sew the bulb on afterwards.
Body and head (worked as one)
- Magic ring: Work six single crochet into the magic ring. Pull closed. (Total: 6 stitches.)
- Round 1: Increase in each stitch around. (Total: 12 stitches.)
- Round 2: Single crochet in next stitch, increase in next stitch. Repeat around. (Total: 18 stitches.)
- Round 3: Single crochet in next two stitches, increase in next stitch. Repeat around. (Total: 24 stitches.)
- Round 4: Single crochet in next three stitches, increase in next stitch. Repeat around. (Total: 30 stitches.)
- Rounds 5–8: Single crochet in each stitch around for four rounds to form the head and upper body. (Total: 30 stitches per round.)
- Round 9: Single crochet in next three stitches, single crochet decrease over next two stitches. Repeat around. (Total: 24 stitches.)
- Round 10: Single crochet in next two stitches, single crochet decrease over next two stitches. Repeat around. (Total: 18 stitches.)
- Insert safety eyes between rounds 6 and 7, spacing them about 8 stitches apart to achieve Bulbasaur’s wide-set eyes.
- Round 11: Single crochet in next stitch, single crochet decrease over next two stitches. Repeat around. (Total: 12 stitches.)
- Start stuffing head firmly.
- Round 12: Single crochet decrease around to close the neck slightly but keep an opening to continue into the torso.
- Rounds 13–16: Increase to widen for the torso: Round 13: Single crochet in next stitch, increase in next stitch. Repeat around. (Total: 18 stitches.) Round 14: Single crochet in next two stitches, increase in next stitch. Repeat around. (Total: 24 stitches.) Round 15–16: Single crochet in each stitch around for two rounds. (Total: 24 stitches.)
- Rounds 17–20: Work even to shape the body length. (Total: 24 stitches per round.)
- Round 21: Single crochet in next two stitches, single crochet decrease over next two stitches. Repeat around. (Total: 18 stitches.)
- Round 22: Single crochet in next stitch, single crochet decrease over next two stitches. Repeat around. (Total: 12 stitches.)
- Round 23: Single crochet decrease around to close the bottom. Fasten off and close as for Pikachu.
Legs (make four; two front and two back)
Legs are short and squat. Make two slightly larger back legs and two slightly smaller front legs.
Front legs (make two):
- Magic ring: Work five single crochet into the ring. Pull closed. (Total: 5 stitches.)
- Rounds 1–3: Single crochet in each stitch around for three rounds. (Total: 5 stitches per round.)
- Flatten the piece and single crochet through both layers across the short edge to create a foot shape or leave round and sew directly to the body. Fasten off leaving a tail for sewing. Lightly stuff with fiberfill.
Back legs (make two):
- Magic ring: Work six single crochet into the ring. Pull closed. (Total: 6 stitches.)
- Rounds 1–4: Single crochet in each stitch around for four rounds. (Total: 6 stitches per round.)
- Fasten off leaving a tail for sewing. Lightly stuff.
Bulb on back
The bulb is made with layered stitches for a rounded dimensional look.
- With darker green, magic ring and work six single crochet into the ring. Pull closed. (Total: 6 stitches.)
- Round 1: Increase in each stitch around. (Total: 12 stitches.)
- Round 2: Single crochet in next stitch, increase in next stitch. Repeat around. (Total: 18 stitches.)
- Round 3: Single crochet in next two stitches, increase in next stitch. Repeat around. (Total: 24 stitches.)
- Rounds 4–6: Single crochet in each stitch around for three rounds. (Total: 24 stitches per round.) This creates the main sphere.
- Round 7: Begin shaping with decreases: Single crochet in next two stitches, single crochet decrease over next two stitches. Repeat around. (Total: 18 stitches.)
- Stuff firmly but shape the bulb so that the top remains rounded and the base is slightly flattened for sewing to the body.
- Round 8: Continue decreasing gently to close about two-thirds; leave opening for attaching. Fasten off leaving a tail for sewing.
Add layered leaf details:
- Crochet small leaf panels separately by chaining 6, working single crochet and half double crochet stitches across to create elongated leaf shapes. Make three to five small leaves and sew around the base of the bulb.
Spots and facial features
- Use darker green to embroider small oval spots on Bulbasaur’s back and head. Make three to five spots varying in size.
- Use red thread to add highlights to the eyes if desired, or add small white stitches for light reflections.
- Use black yarn to embroider a small mouth and nostrils.
Assembly
- Sew the legs to the underside of the body: two at the front and two at the back. Ensure that the body sits flat and balanced.
- Position the bulb centrally on the back and sew around the base with a strong whip stitch. Secure firmly and weave in ends inside the bulb or body.
- Attach leaves around the bulb base, and sew any additional spots or details.
- Weave in all ends and trim.
Finishing and photography tips
- Place Bulbasaur on a neutral ceramic or stone surface with soft daylight and small potted plants in the background to imitate an earthy, handcrafted aesthetic.
- Ensure that the bulb is always photographed at an angle that shows its layering and dimension.
Variations and tips
- To make a slightly chubbier Bulbasaur, add two rounds to the torso before beginning decreases.
- For a more plush feel, use a slightly larger hook and extra stuffing in the bulb.
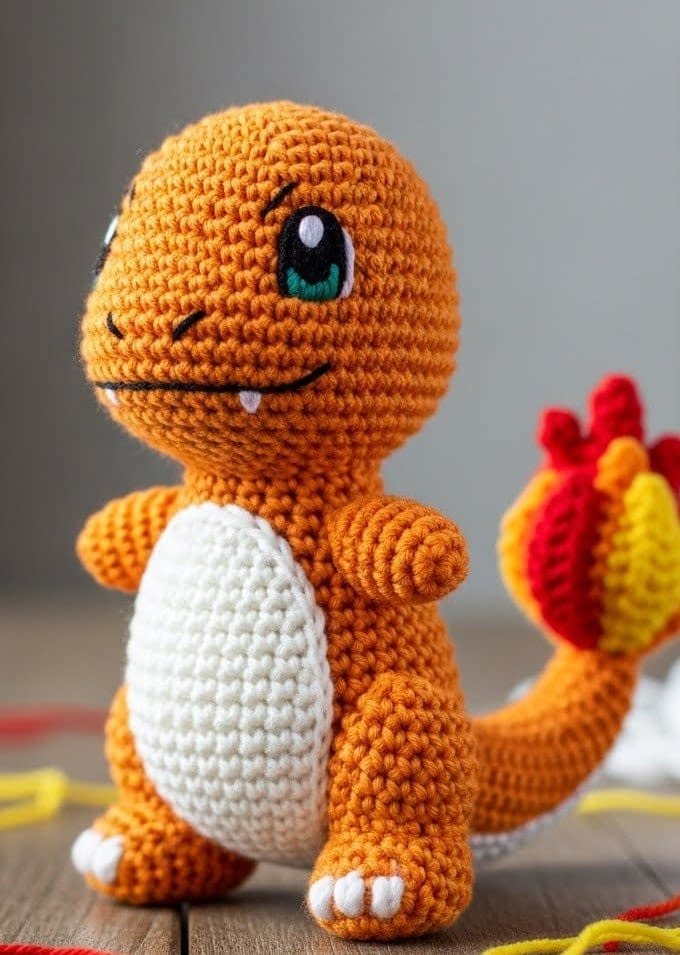
Pattern 3 — Mini Amigurumi Charmander
Skill level
Beginner to intermediate. The piece includes a small flame element which requires color transitions and layered yarn shaping.
Finished size
Approximately 3.0 to 3.5 inches tall when made with worsted weight yarn and a 3.5 millimeter crochet hook.
Materials
- Worsted weight yarn (category 4): warm orange (main body), cream or white for belly panel, red, orange, and yellow for the flame.
- Crochet hook: 3.5 millimeter.
- Safety eyes: 6 millimeter black.
- Polyester fiberfill stuffing.
- Yarn needle.
- Stitch marker.
- Small pair of embroidery scissors.
Notes
Charmander’s flame is delicate. Use layered small crocheted flame pieces sewn together and lightly stiffened with a small amount of glue or diluted fabric stiffener if you want it to stand up more dramatically.
Body and head (worked continuously)
- Magic ring: Work six single crochet into the magic ring. Pull closed. (Total: 6 stitches.)
- Round 1: Increase in each stitch around. (Total: 12 stitches.)
- Round 2: Single crochet in next stitch, increase in next stitch. Repeat around. (Total: 18 stitches.)
- Round 3: Single crochet in next two stitches, increase in next stitch. Repeat around. (Total: 24 stitches.)
- Rounds 4–7: Single crochet in each stitch around for four rounds. (Total: 24 stitches per round.)
- Round 8: Single crochet in next three stitches, increase in next stitch. Repeat around. (Total: 30 stitches.)
- Round 9: Single crochet in each stitch around to shape the head. (Total: 30 stitches.)
- Insert safety eyes between rounds 6 and 7. Space according to desired expression—closer together will look more playful.
- Round 10: Begin decreases for the lower part of the head: Single crochet in next three stitches, single crochet decrease over next two stitches. Repeat around. (Total: 24 stitches.)
- Round 11: Single crochet in next two stitches, single crochet decrease over next two stitches. Repeat around. (Total: 18 stitches.)
- Stuff head firmly.
- Round 12: Single crochet in next stitch, single crochet decrease over next two stitches. Repeat around. (Total: 12 stitches.)
- Rounds 13–16: Increase to shape the torso similar to previous patterns: Round 13: Single crochet in next stitch, increase in next stitch. Repeat around. (Total: 18 stitches.) Round 14: Single crochet in next two stitches, increase in next stitch. Repeat around. (Total: 24 stitches.) Round 15–16: Single crochet around for two rounds.
- Rounds 17–20: Single crochet in each stitch around to form the torso length.
- Round 21: Begin decreases: Single crochet in next two stitches, single crochet decrease over next two stitches. Repeat around. (Total: 18 stitches.)
- Round 22: Single crochet in next stitch, single crochet decrease over next two stitches. Repeat around. (Total: 12 stitches.)
- Round 23: Single crochet decrease around to close the bottom. Fasten off and close securely.
Belly panel
For the cream-colored belly panel:
- Chain 6.
- Row 1: Single crochet in second chain from hook and in each chain across. (Total: 5 single crochet.)
- Row 2: Chain 1, turn. Single crochet across.
- Row 3: Chain 1, turn. Single crochet decrease over the first two stitches, single crochet in the remaining stitches to form a slight curve. Fasten off leaving a tail for sewing.
- Sew the belly panel to the front underside of the torso aligning centrally.
Arms and legs
Arms (make two):
- Magic ring: Work five single crochet into the ring. Pull closed. (Total: 5 stitches.)
- Rounds 1–3: Single crochet in each stitch around for three rounds.
- Lightly stuff and sew to the sides of the torso.
Legs (make two):
- Magic ring: Work six single crochet into the ring. Pull closed. (Total: 6 stitches.)
- Rounds 1–4: Single crochet in each stitch around for four rounds.
- Flatten and single crochet through both layers to create a foot or simply sew to the underside. Fasten off leaving tail for sewing.
Tail and flame
Tail:
- Chain 10.
- Row 1: Single crochet in third chain from hook and across to create a narrow tube. Continue working in rounds to form a tail tube approximately one and one-half to two inches long.
- Stuff the tail lightly and taper the end with decreases before attaching the flame.
Flame (make a layered flame out of three small pieces)
Small inner flame (yellow):
- Chain 4.
- Row 1: Single crochet in second chain from hook and across.
- Shape into a teardrop with single crochet decrease at the tip; fasten off leaving a tail for sewing.
Middle flame (orange):
- Chain 5.
- Row 1: Single crochet across and shape with increases near the base and decreases toward the tip to create a curved flame.
- Fasten off leaving tail.
Outer flame (red):
- Chain 6.
- Work a slightly larger curved flame using single crochet, half double crochet, and single crochet decrease to create layered edges.
- Stack the yellow, orange, and red pieces and sew them together at the base; if desired, lightly treat with a fabric stiffener to keep the flame upright.
Attach flame to the tip of the tail by sewing securely through the base of the flame and the tail end. Secure firmly and weave in ends.
Assembly
- Sew arms and legs in place.
- Attach tail and flame.
- Make small embroidered nostrils and a smiling mouth with black thread.
- Add a tiny cream spot on the belly by sewing the belly panel in place.
Finishing and photography tips
- Style Charmander on a rustic tabletop with scattered yarn strands and embroidery scissors for a playful studio vibe.
- Capture the flame detail using a shallow depth of field and side lighting.
Variations and tips
- For a softer flame, do not stiffen; for a more dramatic standing flame, layer more orange and red and add a light bit of clear-drying fabric stiffener.
- For a tiny keychain, reduce the hook to 2.5 millimeters and use sport weight yarn.
Pattern 4 — Mini Amigurumi Squirtle
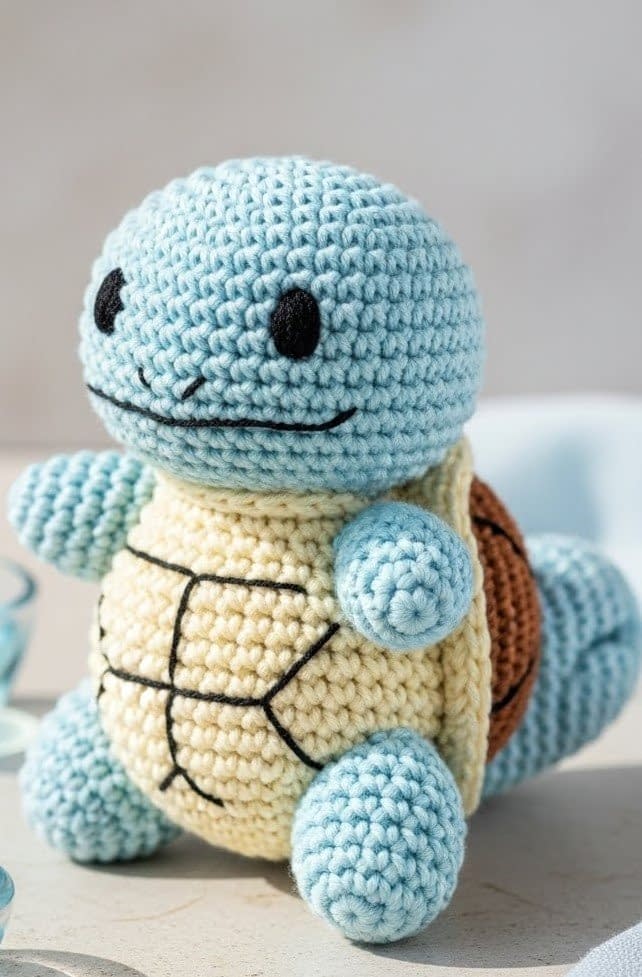
Skill level
Beginner to intermediate. Involves color change for the shell and texturing for the shell ridges.
Finished size
Approximately 3.0 to 3.5 inches tall and 2.5 to 3.0 inches wide across the shell when made with worsted weight yarn and a 3.5 millimeter crochet hook.
Materials
- Worsted weight yarn (category 4): pastel blue for the body, brown for the outer shell, cream or pale yellow for the inner shell.
- Crochet hook: 3.5 millimeter.
- Safety eyes: 6 millimeter black.
- Polyester fiberfill stuffing.
- Yarn needle and stitch marker.
Notes
The shell is created as a separate panel with an outer brown piece and an inner cream piece sewn together and attached to the back. Textured ridges can be added with surface slip stitches or by crocheting raised slip stitch lines.
Head and body (worked continuously)
- Magic ring: Work six single crochet into the ring. Pull closed. (Total: 6 stitches.)
- Round 1: Increase in each stitch around. (Total: 12 stitches.)
- Round 2: Single crochet in next stitch, increase in next stitch. Repeat around. (Total: 18 stitches.)
- Round 3: Single crochet in next two stitches, increase in next stitch. Repeat around. (Total: 24 stitches.)
- Rounds 4–7: Single crochet in each stitch around for four rounds. (Total: 24 stitches per round.)
- Insert safety eyes between rounds 6 and 7. Space them slightly closer for Squirtle’s friendly face.
- Round 8: Single crochet in next three stitches, increase in next stitch. Repeat around. (Total: 30 stitches.)
- Round 9: Single crochet in each stitch around to shape the head.
- Round 10: Begin decreases: Single crochet in next three stitches, single crochet decrease over next two stitches. Repeat around. (Total: 24 stitches.)
- Round 11: Single crochet in next two stitches, single crochet decrease over next two stitches. Repeat around. (Total: 18 stitches.)
- Start stuffing head firmly.
- Round 12: Single crochet in next stitch, single crochet decrease over next two stitches. Repeat around. (Total: 12 stitches.)
- Round 13: For the torso, increase to 18 stitches by making increases evenly: Single crochet in next stitch, increase in next stitch. Repeat around. (Total: 18 stitches.)
- Rounds 14–17: Single crochet in each stitch around to build torso length. (Total: 18 stitches per round.)
- Round 18: Begin decreasing proportionally: Single crochet in next two stitches, single crochet decrease over next two stitches. Repeat around. (Total: 12 stitches.)
- Round 19: Single crochet decrease around to close bottom. Fasten off and close securely.
Shell panels
Inner shell (cream):
- Chain 10.
- Row 1: Single crochet in second chain from hook and across, then continue with short rows to form an oval panel approximately one and three-quarter inches across.
- Fasten off leaving a tail for sewing.
Outer shell (brown):
- Chain 12.
- Row 1: Single crochet in second chain from hook and across.
- Continue working back and forth, increasing at the ends to form a rounded oval slightly larger than the inner shell.
- Add texture by working surface slip stitches in concentric rings or by crocheting a few rows of double crochet where you want raised ridges.
- Fasten off leaving a tail for sewing.
Assemble shell by placing the inner shell on top of the outer shell with the right sides facing outward; sew around the edge with an even running stitch to attach. Stuff lightly between the two shell layers before closing to create a plump shell.
Arms and legs
Arms (make two):
- Magic ring: Work five single crochet into the ring. Pull closed. (Total: 5 stitches.)
- Rounds 1–3: Single crochet in each stitch around for three rounds.
- Fasten off leaving a tail for sewing.
Legs (make two):
- Magic ring: Work six single crochet into the ring. Pull closed. (Total: 6 stitches.)
- Rounds 1–4: Single crochet in each stitch around for four rounds.
- Fasten off leaving a tail for sewing.
Assembly
- Sew arms to the upper sides of the torso and legs to the underside.
- Position the shell on the back, centering it and sewing through the outer shell and into the body fabric to hold it firmly. Ensure that the shell sits naturally and slightly angled.
- Add any surface slip stitch ridges with brown yarn to emphasize shell segments.
- Weave in and hide ends inside the shell or body.
Finishing and photography tips
- Place Squirtle on a light stone surface with subtle water-inspired props such as a small glass bowl to achieve the water-themed scene.
- Photograph from a slightly higher angle to show both the face and the shell texture.
Variations and tips
- To make a standing Squirtle, shape the bottom of the legs flatter by performing a row of single crochet through both layers of the foot to create a flat base.
- For a toy with more pronounced shell segmentation, stitch the segments onto the outer shell before assembling.
Pattern 5 — Mini Amigurumi Eevee
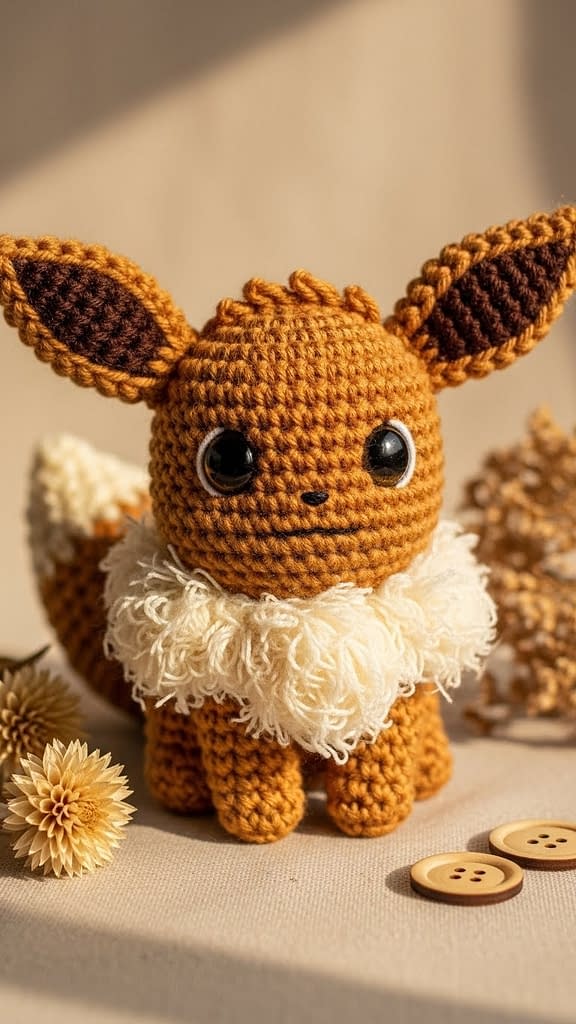
Skill level
Beginner to intermediate. This pattern focuses on shaping a soft, fluffy collar and a tapered tail. It requires basic increases, decreases, and simple surface finishing.
Finished size
Approximately 3.0 to 3.5 inches tall when worked with worsted weight yarn and a 3.5 millimeter crochet hook. Changing hook size or yarn weight will change the finished dimensions.
Materials
- Worsted weight yarn (category 4): warm brown for the body, darker brown for ear tips and tail band, cream for the collar and inner ear.
- Crochet hook: 3.5 millimeter.
- Safety eyes: 6 millimeter black or glossy brown.
- Polyester fiberfill stuffing.
- Yarn needle.
- Stitch marker.
- Small pair of scissors.
- Optional small amount of embroidery thread for eye highlights.
Notes
Work in continuous rounds for smooth shaping unless otherwise noted. The fluffy collar is created with looser, larger stitches to give volume; use a slightly larger hook for the collar if you prefer extra fluff. Keep tension consistent on the body pieces so the collar stands out in contrast.
Head and body (worked as one)
- Magic ring: Create a magic ring and work six single crochet into the ring. Pull the ring closed. (Total: 6 stitches.)
- Round 1: Increase in each stitch around by working two single crochet in each stitch. (Total: 12 stitches.)
- Round 2: Single crochet in the next stitch, increase in the next stitch. Repeat from * to * around. (Total: 18 stitches.)
- Round 3: Single crochet in the next two stitches, increase in the next stitch. Repeat from * to * around. (Total: 24 stitches.)
- Round 4: Single crochet in the next three stitches, increase in the next stitch. Repeat from * to * around. (Total: 30 stitches.)
- Rounds 5–8: Single crochet in each stitch around for four rounds to build the head. (Total: 30 stitches per round.)
- Insert safety eyes between rounds 6 and 7. Space them about eight to ten stitches apart for a sweet, alert expression.
- Round 9: Single crochet in the next three stitches, single crochet decrease over the next two stitches. Repeat from * to * around. (Total: 24 stitches.)
- Round 10: Single crochet in the next two stitches, single crochet decrease over the next two stitches. Repeat from * to * around. (Total: 18 stitches.)
- Begin stuffing the head firmly but avoid overfilling which will distort stitch definition.
- Round 11: Single crochet in the next stitch, single crochet decrease over the next two stitches. Repeat from * to * around. (Total: 12 stitches.)
- Round 12: Single crochet decrease around until a small opening remains if you are closing the head separately. If you are continuing into the body, maintain the fabric and continue as below.
If you choose to work head and body continuously:
13. Rounds 13–14: Single crochet around for two rounds to form a short neck. (Total: 12 stitches per round.)
14. Round 15: Single crochet in the next stitch, increase in the next stitch. Repeat from * to * around. (Total: 18 stitches.)
15. Round 16: Single crochet in the next two stitches, increase in the next stitch. Repeat from * to * around. (Total: 24 stitches.)
16. Rounds 17–20: Single crochet in each stitch around for four rounds to form the torso. (Total: 24 stitches per round.)
17. Round 21: Single crochet in the next two stitches, single crochet decrease over the next two stitches. Repeat from * to * around. (Total: 18 stitches.)
18. Round 22: Single crochet in the next stitch, single crochet decrease over the next two stitches. Repeat from * to * around. (Total: 12 stitches.)
19. Begin stuffing the torso firmly, shaping a rounded base.
20. Round 23: Single crochet decrease around to close the bottom. Fasten off and weave the tail through the remaining stitches; pull closed and secure.
Ears (make two)
- With warm brown, chain 6.
- Row 1: Single crochet in second chain from hook and in each chain across. (Total: 5 single crochet.)
- Row 2: Chain 1, turn. Single crochet across. (Total: 5 single crochet.)
- Row 3: Chain 1, turn. Single crochet decrease over the first two stitches, single crochet in remaining stitches. (Total: 3 single crochet.)
- Row 4: Chain 1, turn. Single crochet decrease to shape the tip. Fasten off leaving a tail for sewing.
- With cream yarn, create a small inner ear piece by chaining 4 and working two rows of single crochet; sew inside the ear to create contrast.
Collar
The collar is intended to be looser and fluffier to create volume.
- With cream yarn and optionally a larger hook (for example, 4.0 millimeter), chain 12.
- Row 1: Single crochet in second chain from hook and in each chain across. (Total: 11 single crochet.)
- Row 2: Chain 1, turn. Work a row of half double crochet across for additional height if desired. Use longer stitches such as half double crochet or double crochet to produce a looser, more voluminous fabric.
- Fold the strip slightly and sew the ends together to form a collar ring. Attach the collar to the base of the head by stitching through the inner edge of the collar and into the neck area, pulling slightly so the collar fans outward.
Arms and legs
Arms (make two):
- Magic ring: Work five single crochet into the magic ring. Pull closed. (Total: 5 single crochet.)
- Rounds 1–3: Single crochet in each stitch around for three rounds. Lightly stuff and sew to the body sides.
Legs (make four for a sitting or standing variation; for a standard Eevee make two front legs and two small hind feet if desired):
- Magic ring: Work six single crochet into the ring. Pull closed. (Total: 6 single crochet.)
- Rounds 1–4: Single crochet in each stitch around for four rounds. Flatten and single crochet through both layers if a flatter foot is desired; otherwise sew as is.
Tail
Eevee’s bushy tail is shaped with increases and a cream tip.
- With warm brown, chain 8.
- Row 1: Single crochet in second chain from hook and across to create a narrow strip.
- Continue working short rows, adding increases at the base to create a gentle flare. For example, increase by working two single crochet in the first and last stitches of several rows so that the base widens.
- When the tail is approximately two inches in length, switch to cream yarn and work two to three rows to create the lighter tip.
- Stuff lightly and shape by sewing a few anchoring stitches along the length to make the tail sit in a curve.
Facial features and finishing
- Embroider a small nose with dark brown yarn between and slightly below the eyes.
- Use dark brown or black yarn to create a small mouth and a few whisker dots if desired.
- Sew ears symmetrically on the top of the head and attach the collar so it frames the face.
- Attach the tail to the lower back, centering it so the figure balances.
Finishing and photography tips
- For a cozy aesthetic, position Eevee on a neutral fabric backdrop with dried flowers and wooden buttons nearby.
- Use soft warm lighting and gently fan the collar to create volume before photographing.
Variations and tips
- For a more realistic fur-like collar, substitute the collar yarn with a novelty fluffy yarn and use a larger hook.
- To create a keychain, reduce the pattern using sport weight yarn with a 2.5 millimeter hook and add a keyring at the top of the head.
Pattern 6 — Mini Amigurumi Jigglypuff
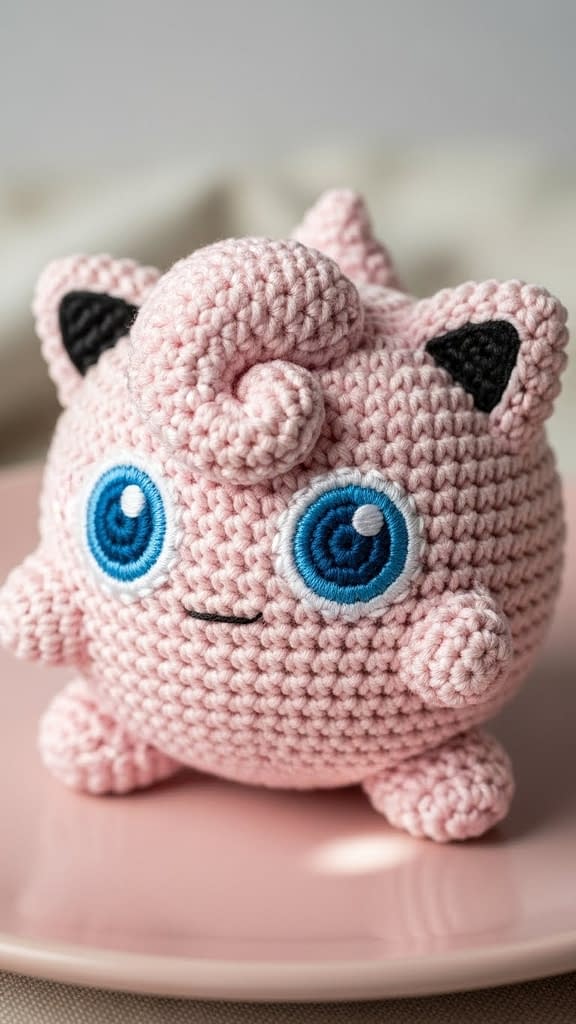
Skill level
Beginner. The pattern focuses on achieving a round, pillowy shape and adding large embroidered eyes and a small curl detail.
Finished size
Approximately 2.5 to 3.0 inches in diameter when made with worsted weight yarn and a 3.5 millimeter crochet hook.
Materials
- Worsted weight yarn (category 4): pastel pink for the body, small amounts of white and blue for eye detailing.
- Crochet hook: 3.5 millimeter.
- Polyester fiberfill stuffing.
- Yarn needle.
- Safety eyes are optional; embroidered eyes using darker blue and white threads are recommended for the large, expressive look.
- Stitch marker.
- Small amount of black embroidery thread for mouth and eye outline.
Notes
Jigglypuff is essentially a sphere with a small curl. Work tightly in continuous rounds for a smooth shape.
Body (complete sphere)
- Magic ring: Make a magic ring and work six single crochet into the ring. Pull the ring closed. (Total: 6 stitches.)
- Round 1: Increase in each stitch around. (Total: 12 stitches.)
- Round 2: Single crochet in the next stitch, increase in the next stitch. Repeat from * to * around. (Total: 18 stitches.)
- Round 3: Single crochet in the next two stitches, increase in the next stitch. Repeat from * to * around. (Total: 24 stitches.)
- Round 4: Single crochet in the next three stitches, increase in the next stitch. Repeat from * to * around. (Total: 30 stitches.)
- Rounds 5–9: Single crochet in each stitch around for five rounds to expand the sphere. (Total: 30 stitches per round.)
- Round 10: Single crochet in the next three stitches, single crochet decrease over the next two stitches. Repeat from * to * around. (Total: 24 stitches.)
- Round 11: Single crochet in the next two stitches, single crochet decrease over the next two stitches. Repeat from * to * around. (Total: 18 stitches.)
- Start stuffing the sphere firmly, maintaining a round shape.
- Round 12: Single crochet in the next stitch, single crochet decrease over the next two stitches. Repeat from * to * around. (Total: 12 stitches.)
- Round 13: Single crochet decrease around until closed. Fasten off and weave the end through remaining stitches; pull tight and secure.
Curl on top
- Chain 6.
- Row 1: Single crochet in second chain from hook and in each chain across.
- Continue working a tapered spiral or short tube by increasing then decreasing slightly to form a curl shape. For a neat curl, create a short spiral of single crochet in rounds: work a small tube of single crochet, then wind it into a curl and stitch in place at the top of the sphere.
- Fasten off and stitch the curl securely onto the top center of the head.
Eyes (embroidered recommended)
Large, expressive eyes are the focal point.
- Use blue embroidery thread to stitch a large oval on the front of the sphere. Start with a small outline using back stitch to mark the eye shape.
- Fill the oval with satin stitch or closely placed long and short stitches for a smooth appearance.
- Add a smaller white stitched circle for the highlight near the top of the blue area.
- Outline the eye with a thin ring of black embroidery thread to define the shape and add eyelashes as desired on the top outer edge.
- Repeat symmetrically for the second eye.
If using safety eyes:
- Insert safety eyes between rounds 6 and 7 with a spacing of six to eight stitches depending on desired proportion.
- Embroider white highlights using small French knots or satin stitches.
Mouth
- With black embroidery thread, stitch a small smiling mouth below the eyes using back stitch. For a cute expression, make the mouth small and slightly curved.
Optional arms and feet
Jigglypuff often is shown without distinct limbs; for added charm, create four tiny stubby limbs.
Arms and feet (make four):
- Magic ring: Work four single crochet into the ring. Pull closed. (Total: 4 stitches.)
- Rounds 1–2: Single crochet in each stitch around for two rounds.
- Fasten off leaving tail for sewing. Attach two to the sides for arms and two to the bottom as feet.
Assembly and finishing
- Sew the curl securely on top of the head.
- Add facial embroidery last so that the features are centered and aligned.
- Weave in ends and trim.
Finishing and photography tips
- Style Jigglypuff on a pale pink ceramic plate or soft fabric to enhance the delicate aesthetics.
- Use studio lighting to create a soft glow that makes the yarn appear pillowy.
Variations and tips
- For a slightly larger Jigglypuff, add two rounds to the expansion portion.
- For a plush toy that can sit more stably, add small felt discs to the underside of the feet or make the feet slightly flatter.
Pattern 7 — Mini Amigurumi Snorlax
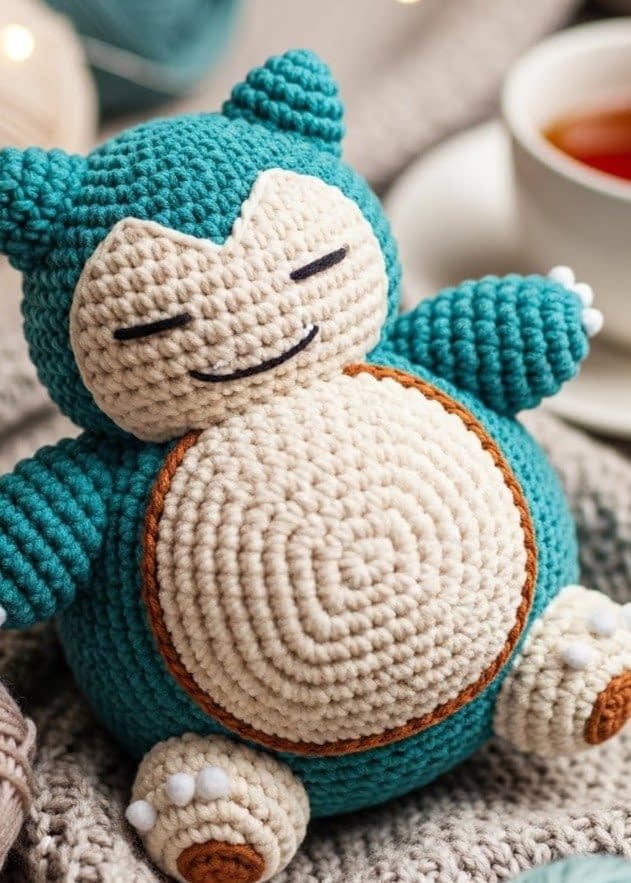
Skill level
Intermediate. Snorlax requires working with thicker, denser fabric for a squat, plush body and careful shaping to create a chubby, relaxed form.
Finished size
Approximately 4.0 to 4.5 inches tall and 3.0 to 3.5 inches wide when made with worsted weight yarn and a 3.5 millimeter crochet hook.
Materials
- Worsted weight yarn (category 4): deep teal or dark slate for the body, cream for the belly and face.
- Crochet hook: 3.5 millimeter.
- Polyester fiberfill stuffing.
- Yarn needle.
- Two small safety eyes or black yarn for embroidered closed eyes.
- Stitch marker and small pair of scissors.
Notes
Snorlax benefits from dense, evenly packed stuffing to achieve a plush, stable look. Use firm single crochet tension and stuff gradually to maintain rounded contours.
Body and head (worked as one)
- Magic ring: Make a magic ring and work eight single crochet into the ring. Pull the ring closed. (Total: 8 stitches.)
- Round 1: Increase in each stitch around by working two single crochet in each stitch. (Total: 16 stitches.)
- Round 2: Single crochet in the next stitch, increase in the next stitch. Repeat from * to * around. (Total: 24 stitches.)
- Round 3: Single crochet in the next two stitches, increase in the next stitch. Repeat from * to * around. (Total: 32 stitches.)
- Round 4: Single crochet in the next three stitches, increase in the next stitch. Repeat from * to * around. (Total: 40 stitches.)
- Rounds 5–9: Single crochet in each stitch around for five rounds to expand a broad head and shoulder area. (Total: 40 stitches per round.)
- Round 10: Single crochet in the next three stitches, single crochet decrease over the next two stitches. Repeat from * to * around. (Total: 32 stitches.)
- Round 11: Single crochet in the next two stitches, single crochet decrease over the next two stitches. Repeat from * to * around. (Total: 24 stitches.)
- Insert safety eyes between rounds 6 and 7 or plan to embroider closed eyes later; for Snorlax a simple embroidered closed eye is often more characterful.
- Round 12: Single crochet in the next stitch, single crochet decrease over the next two stitches. Repeat from * to * around. (Total: 18 stitches.)
- Begin stuffing head to create a rounded, soft top.
- Rounds 13–18: Increase to form the broad torso: Round 13: Single crochet in the next stitch, increase in the next stitch. Repeat from * to * around. (Total: 27 stitches.) Round 14: Single crochet in the next two stitches, increase in the next stitch. Repeat from * to * around. (Total: 36 stitches.) Rounds 15–18: Single crochet in each stitch around to build the torso depth. (Total: 36 stitches per round.)
- Continue working even until the body reaches desired length. For a compact Snorlax, four to six rounds of even single crochet are typical.
- Round 19: Begin decreases to form the lower body: Single crochet in next three stitches, single crochet decrease over next two stitches. Repeat from * to * around. (Total: 30 stitches.)
- Round 20: Single crochet in next two stitches, single crochet decrease over next two stitches. Repeat from * to * around. (Total: 24 stitches.)
- Stuff the torso firmly, shaping broad belly and back.
- Round 21: Continue decreasing gradually until the opening is small. Fasten off and weave tail through remaining stitches to close.
Belly panel
The cream belly is a large oval sewn to the front.
- Chain 18.
- Row 1: Single crochet in second chain from hook and in each chain across. (Total: 17 single crochet.)
- Row 2: Chain 1, turn. Single crochet across.
- Continue working short rows, shaping the oval by adding a few stitches at the center rows and decreasing near the ends as needed to create a broad rounded oval that covers most of the lower front torso.
- Fasten off leaving a long tail for sewing.
Arms and legs
Arms (make two short, wide arms):
- Chain 8.
- Row 1: Single crochet in second chain from hook and in each chain across. (Total: 7 single crochet.)
- Rows 2–4: Chain 1, turn. Single crochet across to create a short flattened arm. Fold and single crochet through both layers across one short edge to create a thicker arm, or sew as a flat piece.
- Lightly stuff and sew to the upper sides of the torso.
Legs (make two large, rounded feet):
- Magic ring: Work eight single crochet into the ring. Pull the ring closed. (Total: 8 stitches.)
- Rounds 1–5: Single crochet in each stitch around for five rounds to produce a stout, rounded foot.
- Flatten the foot slightly and sew to the underside of the body to create a stable base. For a sitting Snorlax, position the legs forward and slightly outward.
Face details
- With cream yarn, create a partial face panel where the cheeks and nose sit by crocheting a small oval and sewing onto the head.
- Use black embroidery thread to create small closed-eye lines: stitch a gentle curved line for each eye to convey Snorlax’s content sleeping expression.
- Embroider a small smile or relaxed mouth centered below the nose area.
Assembly
- Sew the belly panel to the front of the torso, centering and smoothing the edges so the panel sits flat.
- Attach arms to the upper sides, positioning them slightly forward as if relaxed.
- Sew the feet to the underside in a balanced arrangement to allow the figure to sit.
- Weave in all tails and secure firmly.
Finishing and photography tips
- Style Snorlax on a knitted blanket with neutral tones and yarn skeins around to evoke a comforting, sleepy atmosphere.
- Use soft ambient lighting and include a warm cup of tea prop to enhance the cozy mood.
Variations and tips
- For a larger, huggable Snorlax, use bulky yarn and a larger hook, increasing rounds proportionally.
- To achieve a more sculpted face, add a small piece of felt behind the embroidered eyes to give slight projection.
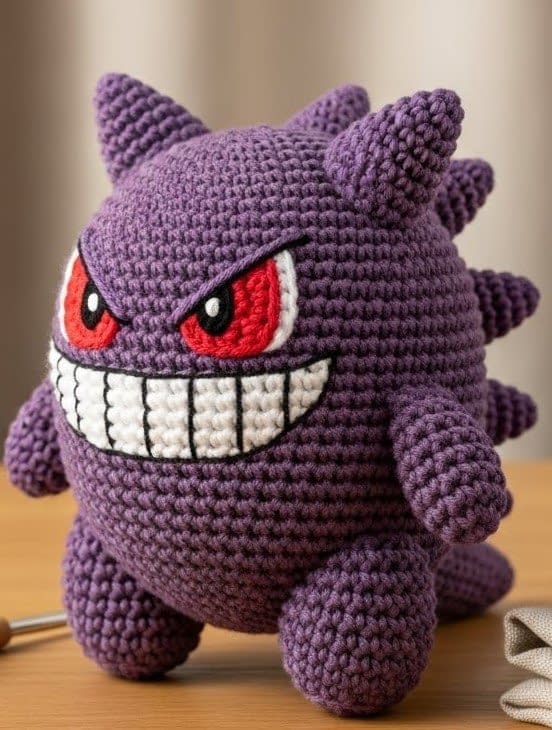
Pattern 8 — Mini Amigurumi Gengar
Skill level
Beginner to intermediate. Gengar requires sharp shaping for the grin and small embroidered spikes for dimension.
Finished size
Approximately 3.0 to 3.5 inches tall and wide when worked with worsted weight yarn and a 3.5 millimeter crochet hook.
Materials
- Worsted weight yarn (category 4): deep purple for the body, black and red for facial details, white for eye highlights.
- Crochet hook: 3.5 millimeter.
- Polyester fiberfill stuffing.
- Yarn needle.
- Safety eyes are optional; large embroidered white eyes with red pupils yield a characterful look.
- Stitch marker and small pair of scissors.
Notes
Gengar is rounded and slightly squat with pointed ears and small spikes. Work with moderate stuffing so the grin holds shape. Embroider the grin carefully to get a precise, mischievous expression.
Body and head (worked as one)
- Magic ring: Make a magic ring and work six single crochet into the ring. Pull the ring closed. (Total: 6 stitches.)
- Round 1: Increase in each stitch around. (Total: 12 stitches.)
- Round 2: Single crochet in the next stitch, increase in the next stitch. Repeat from * to * around. (Total: 18 stitches.)
- Round 3: Single crochet in the next two stitches, increase in the next stitch. Repeat from * to * around. (Total: 24 stitches.)
- Round 4: Single crochet in the next three stitches, increase in the next stitch. Repeat from * to * around. (Total: 30 stitches.)
- Rounds 5–8: Single crochet in each stitch around for four rounds to build a broad head. (Total: 30 stitches per round.)
- Round 9: Single crochet in the next three stitches, single crochet decrease over the next two stitches. Repeat from * to * around. (Total: 24 stitches.)
- Round 10: Single crochet in the next two stitches, single crochet decrease over the next two stitches. Repeat from * to * around. (Total: 18 stitches.)
- Insert safety eyes if desired between rounds 6 and 7; otherwise plan to embroider large white eyes as described below.
- Round 11: Single crochet in the next stitch, single crochet decrease over the next two stitches. Repeat from * to * around. (Total: 12 stitches.)
- Rounds 12–14: Increase slightly to widen the torso: Round 12: Single crochet in the next stitch, increase in the next stitch. Repeat from * to * around. (Total: 18 stitches.) Rounds 13–14: Single crochet in each stitch around to build torso length.
- Continue working even until the body shape is squat and proportionate. Begin gradual decreases to close the base and stuff firmly.
Ears (make two)
- With deep purple, chain 6.
- Row 1: Single crochet in second chain from hook and in each chain across. (Total: 5 single crochet.)
- Row 2: Chain 1, turn. Single crochet across.
- Row 3: Chain 1, turn. Single crochet decrease to shape a tapered ear tip. Fasten off leaving a tail for sewing.
- Slightly curve and sew ears to the top sides of the head at a slight forward angle to capture Gengar’s sly posture.
Spikes (make three to five)
- Chain 4.
- Row 1: Single crochet in second chain from hook and in each chain across. (Total: 3 single crochet.)
- Row 2: Chain 1, turn. Single crochet decrease over the first two stitches to shape a point. Fasten off leaving a tail for sewing.
- Arrange the spikes along the upper back center and sew securely, spacing them evenly for a subtle dimensional ridge.
Eyes and grin
Eyes:
- For embroidered eyes, use white yarn to stitch two large ovals on the front of the head. Outline each oval with black threading for definition.
- Use red yarn or red embroidery thread to stitch the pupils centrally and add small white satin stitch highlights near the top edge of each pupil.
Grin:
- Sketch the smile lightly with a removable fabric marker or place pins to mark the corners and center.
- With black yarn, use back stitch to create a wide grin that extends toward the cheeks and tapers to a smirk. The grin should be slightly jagged to emulate Gengar’s teethless but mischievous expression.
- Add short vertical stitches within the grin to suggest tooth-like serration, spacing them evenly.
Arms and feet
Arms (make two):
- Magic ring: Work five single crochet into the ring. Pull closed. (Total: 5 single crochet.)
- Rounds 1–2: Single crochet in each stitch around for two rounds to make short arms.
- Fasten off leaving tail for sewing.
Feet (make two):
- Magic ring: Work six single crochet into the ring. Pull closed. (Total: 6 stitches.)
- Rounds 1–3: Single crochet in each stitch around for three rounds to create small rounded feet.
- Fasten off leaving tail for sewing.
Assembly
- Sew the ears symmetrically near the top of the head with a slight forward tilt.
- Attach the arms to the sides and feet to the underside so the figure can sit balanced.
- Sew the spikes down the upper back and secure well.
- Embroider the grin and eyes last so that facial expressions are centered and proportional.
Finishing and photography tips
- Place Gengar on a light oak wooden table with a neutral beige fabric backdrop to match the image prompt.
- Use side lighting from the left to highlight the deep purple yarn texture and the grin details; a shallow depth of field emphasizes the face.
Variations and tips
- To create a more sinister Gengar, use a slightly darker purple yarn and position the eyes closer together.
- For a softer, rounder Gengar, add a row or two of single crochet during the torso expansion.
Conclusion
You now have full, step-by-step patterns for all eight mini amigurumi Pokémon: Pikachu, Bulbasaur, Charmander, Squirtle, Eevee, Jigglypuff, Snorlax, and Gengar. Each pattern includes detailed materials lists, clear shaping instructions that avoid shorthand, assembly guidance, finishing touches, and photography suggestions that match the professional, studio-style image prompts you provided.


