
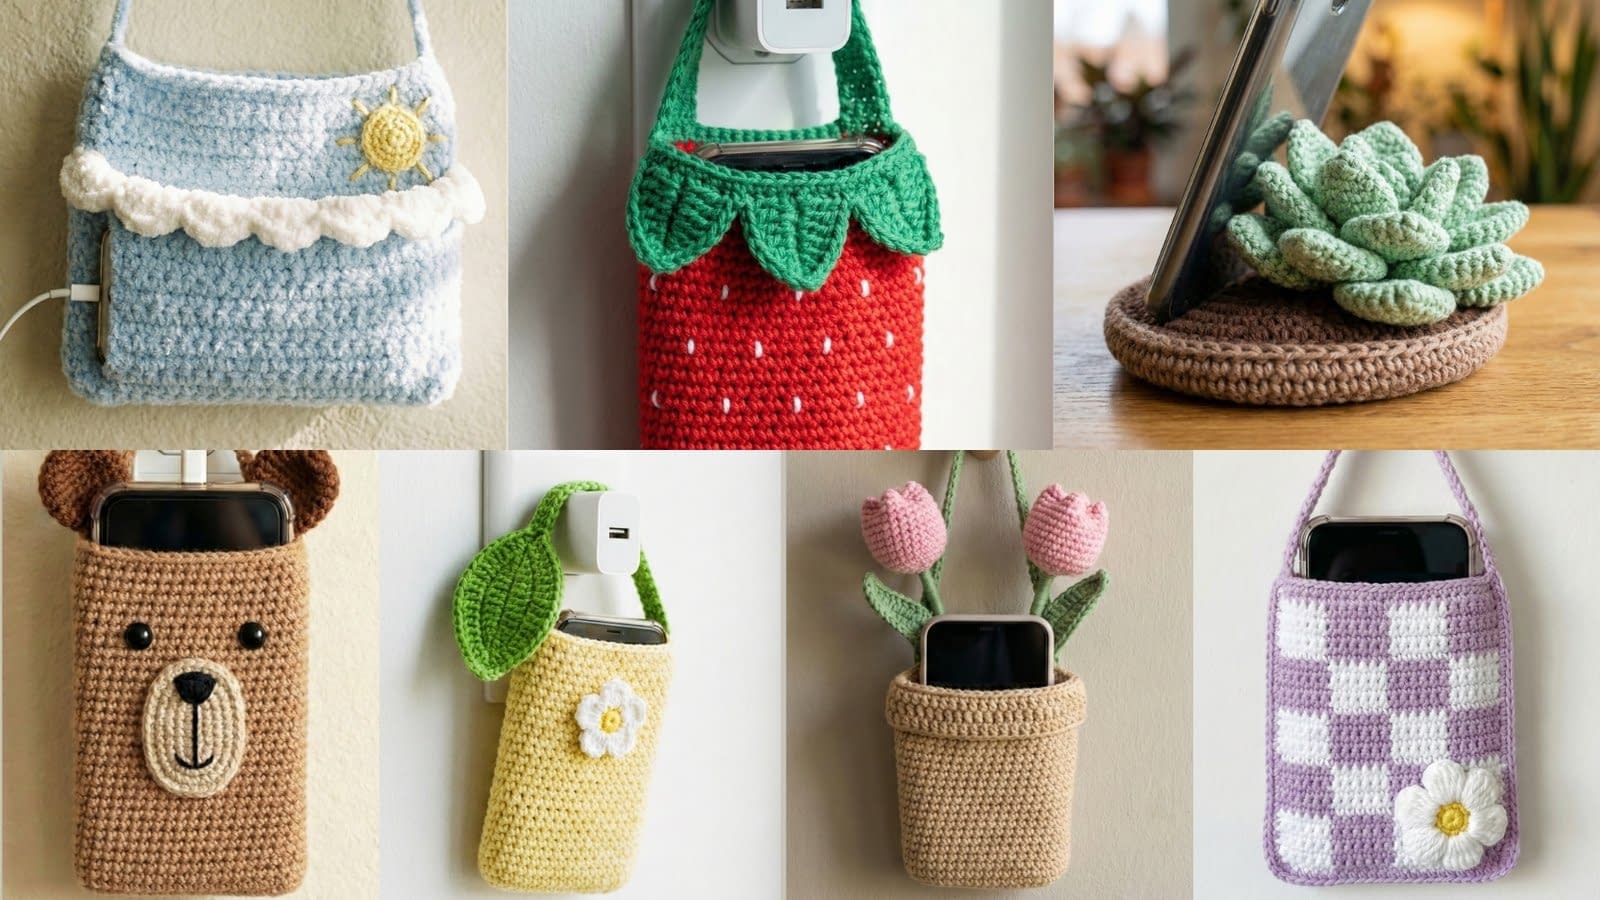
Crocheting small, functional accessories is one of the most satisfying ways to combine creativity with daily usefulness. This collection of seven crochet phone holder patterns shows how to transform basic stitches into lively, handmade pockets and stands that protect your device, brighten your space, and make ideal gifts. In this post you will find thoroughly detailed, step-by-step instructions for each design, starting with the first four patterns: the Little Lemon Wall Hanger, the Cloudy Sky Pocket, the Teddy Bear Wall Buddy, and the Succulent Desktop Stand. Each pattern includes a full materials list, finished size guidance, clear shaping instructions using full stitch names, assembly and finishing techniques, and ideas for variations and photography.
Little Lemon Wall Hanger
Skill level and finished size
Skill level: Beginner to intermediate. This pattern uses basic stitches with simple shaping for the pouch and a small applique for decoration.
Finished size: Approximately three and one half inches wide by six inches tall when worked with worsted weight yarn and a four millimeter hook. Adjust the finished size by changing yarn weight or hook size.
Materials
- Worsted weight cotton or cotton-blend yarn in lemon yellow for the pouch body, bright green for the loop, white and yellow for the small flower center.
- Crochet hook four millimeter.
- Yarn needle for sewing and weaving ends.
- Scissors.
- Optional small plastic snap or button for a closure if you prefer a flap with a secure fastening.
- Optional small amount of stuffing for the flower if you want a slightly raised bloom.
Gauge
Gauge is not critical for this small accessory, but a suggested gauge for planning is approximately fourteen single crochet stitches and sixteen rows in a four inch by four inch square worked in single crochet using the specified yarn and hook. If your gauge produces a significantly larger or smaller pouch, adjust hook size to achieve the desired finished dimensions.
Notes and construction overview
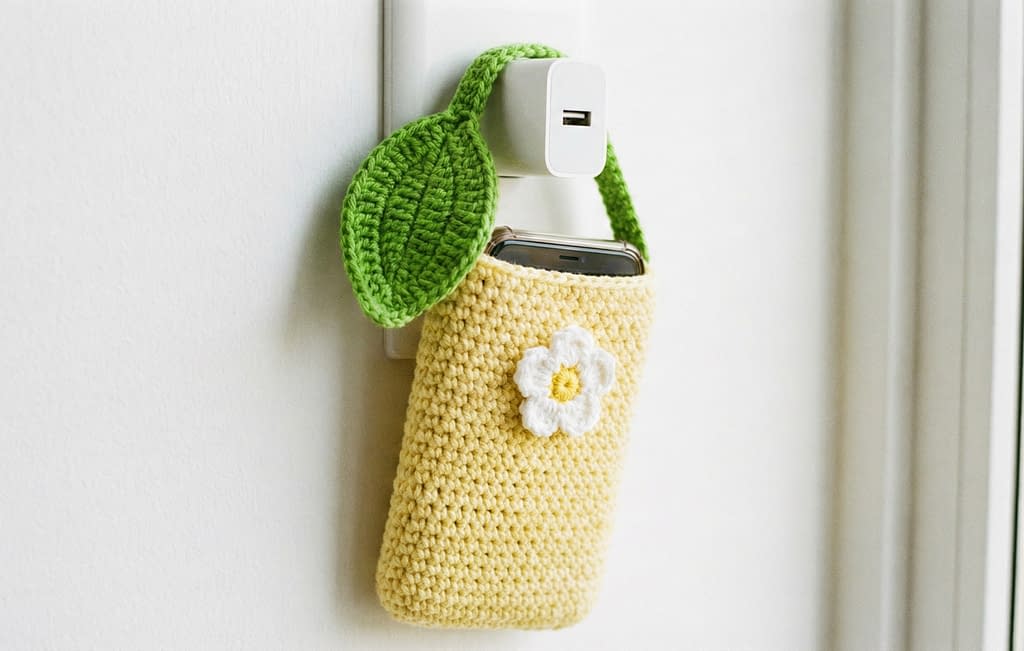
The Little Lemon Wall Hanger is a simple rectangular pouch worked in rounds as a tube or worked as two panels and sewn. The top of the pouch is left open to insert a phone vertically; the hanging loop attaches to the top and slips over a wall charger or outlet. A small flower applique is made separately and stitched to the front.
There are two construction options. Option A: work the pouch in joined rounds from bottom up, decreasing slightly toward the top if desired. Option B: work two identical rectangular panels and seam the sides. The step-by-step below uses Option B because it is easier to control symmetry and to add a decorative flap if desired.
Pattern: Pouch panels (make two)
Begin with the front panel.
- Foundation chain: Chain fifteen. This chain will form the base width; adjust the number of chains in multiples of one to increase or decrease pouch width. The example dimensions specified above use fifteen chains.
- Row one: Single crochet in the second chain from the hook and in each chain across. You will have fourteen single crochet stitches across. Chain one and turn.
- Row two through row thirty: Single crochet in each stitch across, chain one and turn at the end of each row. Continue until the panel measures approximately six inches from the starting chain to the top edge or until you reach the desired height. Keep your tension even to avoid warped edges.
- Fasten off and weave in the starting and ending tails, leaving a twelve inch tail for seaming if you plan to whip stitch the panels together.
Make a second panel the same size and shape.
Pattern: Hanging loop
- With bright green yarn, chain twenty. The length should allow the loop to slip easily over a standard wall charger. If you want a longer loop for decorative hanging, add more chains.
- Row one: Starting in the second chain from the hook, single crochet in each chain across to the end. You will have nineteen single crochet stitches. Fasten off leaving a tail for sewing.
- Fold the loop in half lengthwise and use the yarn tail to stitch the two short edges together to form a sturdy loop. Alternatively, single crochet the short ends together for a cleaner finish.
Pattern: Flower applique
- With white yarn, chain five and join with a slip stitch to form a small ring.
- Round one: Chain two to count as the first half double crochet, then work nine half double crochet into the ring. Join with a slip stitch to the top of the beginning chain two. You will have ten half double crochet in total.
- Round two: For each of the ten half double crochet stitches, work the following petal sequence: chain three, slip stitch into the same stitch to form a small loop, then slip stitch into the next stitch and repeat. You will create ten small looped petals. Fasten off leaving a tail.
- With yellow yarn, embroider a small French knot or use a short length of yarn to create a tiny round center and sew it to the middle of the white petals. If you prefer a slightly three dimensional look, add a small amount of stuffing under the yellow center before sewing.
Assembly
- Place the two rectangular panels with right sides facing. Align edges carefully so the top opening of the pouch is even.
- Using the twelve inch tail and tapestry needle, whip stitch the two long sides together leaving the top base edge open for insertion. Ensure your stitches are even and secure so the seam lies flat.
- Turn the pouch right side out through the top opening so the seam is on the inside.
- Position the hanging loop at the top center of the back panel, with the raw ends of the loop aligned inside the pouch. Securely stitch the loop into place by sewing through the back panel and around each loop end several times for strength. Reinforce with a small rectangle of fabric or felt on the inside if desired.
- Sew the flower applique to the front of the pouch in the desired position. Ensure the flower is securely fastened with multiple passes of the needle and yarn so it will not come loose with use.
- If you prefer a flap closure, fold the top edge of the front panel down toward the phone entry by approximately one inch and stitch the sides of that fold in place to form a small tuck. Add a small button and loop or snap if you want a secure closure.
Finishing and care
Weave in all loose ends and trim remaining tails. Block very gently if necessary by pinning the pouch to shape on a towel and spraying lightly with water, then allowing to dry. Cotton yarn may stretch slightly when damp; check fit before final finishing.
To clean, hand wash in cool water with mild detergent and reshape while damp. Avoid machine washing to preserve the structure and appliques.
Variations and tips
- Make the pouch wider or taller by increasing the foundation chain or adding more rows.
- Use a contrasting border at the top edge for visual interest.
- Replace the flower with an appliqued lemon slice by crocheting a small circle in yellow and stitching a thin white or green border.
- For a sturdier pouch, add a lining of lightweight fabric sewn into the inside before attaching the hanging loop.
- When photographing the Little Lemon Wall Hanger for a blog or shop, use bright natural light and a clean white or pastel background to complement the lemon yellow.
Cloudy Sky Pocket
Skill level and finished size
Skill level: Beginner. This pocket uses simple shaping and a scalloped trim that resembles a soft cloud edge.
Finished size: Approximately three inches wide by six inches tall. Adjust by changing hook and yarn.
Materials
- Worsted weight yarn in pastel baby blue for the body, white for the scalloped cloud trim, and a small scrap of yellow for a tiny sun applique.
- Crochet hook four millimeter.
- Yarn needle, scissors.
- Optional lightweight interfacing or a thin fabric lining for additional structure.
Gauge
As with the Little Lemon Wall Hanger, gauge is flexible. As a guideline, expect approximately fourteen single crochet stitches and sixteen rows in a four inch square using the recommended yarn and hook.
Notes and construction overview
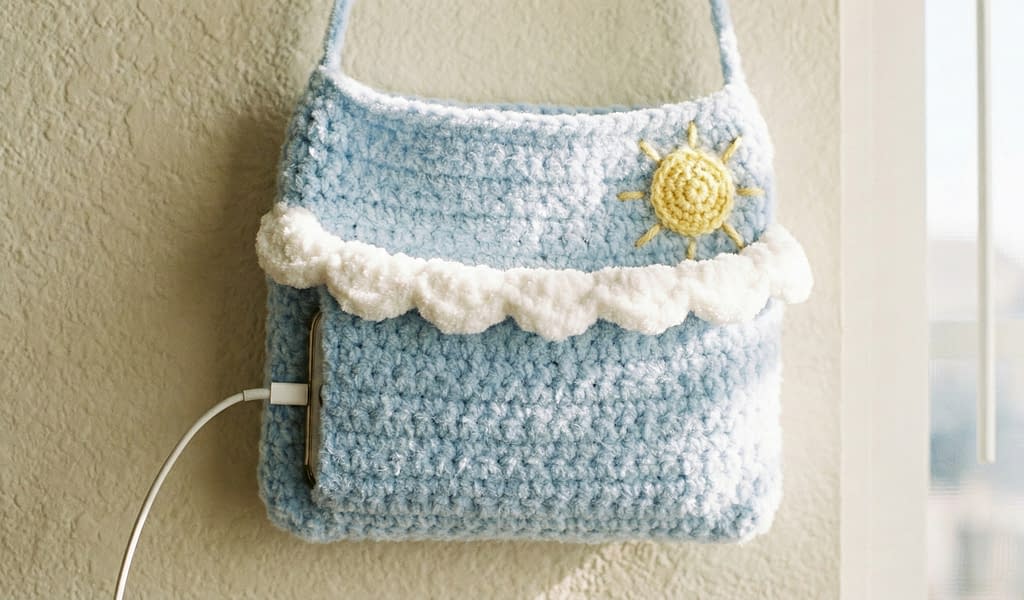
The Cloudy Sky Pocket is a soft, dreamy phone pocket with a scalloped white trim along the top edge to resemble clouds and a small yellow sun appliqued on the corner. The pocket may be worked in joined rounds as a flat rectangle or as two panels and sewn. The pattern below uses two panels for ease of seam alignment and trimming.
Pattern: Panels (make two)
- Foundation chain: Chain thirteen.
- Row one: Single crochet in the second chain from the hook and in each chain across for a total of twelve single crochet stitches. Chain one and turn.
- Rows two through twenty-eight: Single crochet in each stitch across, chain one and turn. Continue until the panel is approximately six inches tall or the desired height.
- Fasten off leaving a twelve inch tail for seaming.
Make an identical back panel.
Pattern: Scalloped trim (cloud edge)
- With white yarn, join with a slip stitch to the top edge of the front panel at one side. If you prefer a scallop on both sides, you may add trim to both front and back.
- Row one: Single crochet evenly across the top edge to the opposite side. Space your single crochet evenly to avoid pulling the top edge. Join with a slip stitch to the first single crochet if you are working in one continuous round.
- Round two (scallops): Chain three, skip one stitch, and work the following sequence into the next stitch: five double crochet, then skip one stitch and slip stitch into the next stitch. Repeat the chain three, skip one, five double crochet, skip one, slip stitch sequence across the top edge. Adjust the number of chains and skipped stitches if your top edge has a different stitch count; the goal is to create a gentle series of rounded scallops that puff out slightly over the top of the pocket.
- Fasten off and weave in ends.
Pattern: Tiny sun applique
- With yellow yarn, chain five and join with a slip stitch to form a ring.
- Round one: Chain two, and work seven half double crochet into the ring. Join with a slip stitch to the top of the beginning chain two. You will have eight half double crochet total.
- To make tiny sun rays, chain three and slip stitch into every other stitch around the circle. This creates short rays of chain loops. Fasten off and sew the sun to the front corner of the pocket.
Assembly
- Place front and back panels right sides together and whip stitch the two long sides, leaving the top base open for insertion. Reinforce the seam with a second pass if desired.
- Turn the pocket right side out. Attach the white scalloped trim to the top edge if you did not attach it before seaming. If the trim was attached prior to seaming, check that the seam does not distort the scallops and re-stitch any scallops that require adjustment.
- Sew the tiny yellow sun to the front panel in the upper corner. Secure the ends thoroughly.
- Optionally add a small loop at the top center of the back panel for hanging on a charger. Use green or blue yarn for an unobtrusive look.
Finishing and styling
Weave in ends, block gently if desired, and style against a neutral or very light backdrop to emphasize the pastel coloring. Soft morning light works well in photography to highlight the fuzzy texture of the yarn.
Variations and troubleshooting
- If the scalloped edge puckers, reduce the number of double crochet in each scallop or add more base single crochet stitches so the top edge has enough room for the scallops.
- Use a fuzzy or boucle yarn to emphasize a cloudlike texture, but be aware that very textured yarn can make precise scallops more difficult to achieve.
- For extra softness, add a thin fabric lining and weld the lining to the inside seam with small hand stitches.
Teddy Bear Wall Buddy
Skill level and finished size
Skill level: Beginner to intermediate. This project introduces simple appliques such as ears and a snout and relies on tidy stitch work for a minimalist animal face.
Finished size: Approximately four inches wide by five and one half inches tall.
Materials
- Worsted weight yarn in latte brown for the pouch body, beige for the muzzle, and black embroidery yarn for the nose and simple facial features.
- Crochet hook four millimeter.
- Yarn needle, stuffing for the ears if you wish them to be slightly padded, scissors.
- Optional small felt backing to reinforce the muzzle or nose.
Gauge
Gauge is not critical for the Teddy Bear Wall Buddy; an approximate gauge of fourteen single crochet stitches and sixteen rows for a four inch square is suitable.
Notes and construction overview
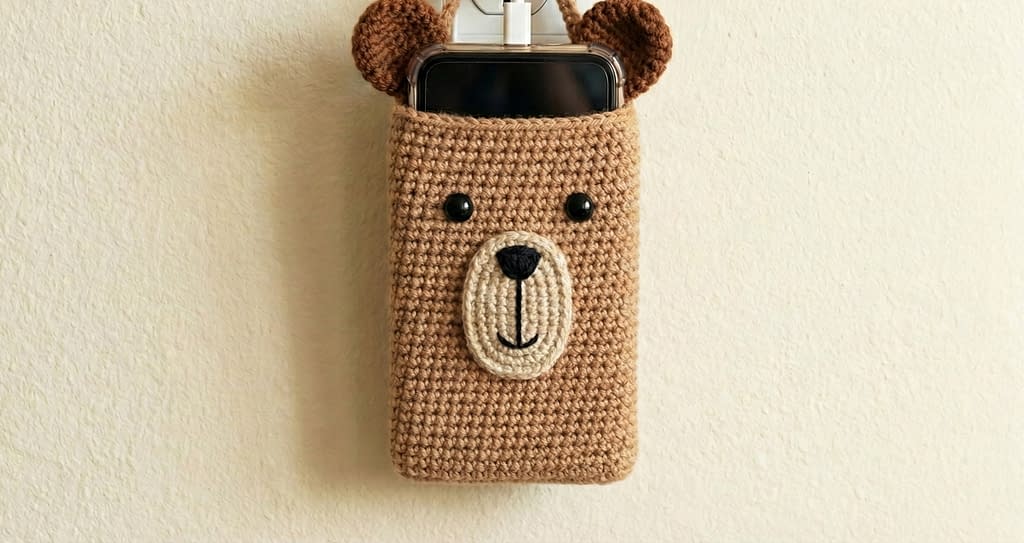
The Teddy Bear Wall Buddy is a rectangular pouch with two small round ears attached to the top corners and a simple embroidered snout on the front. The ears may be crocheted separately and sewn in place or created as short surface appliques. The body of the pouch may be made as a single rectangle folded and seamed on the sides for a neat finish.
Pattern: Body (single panel, folded)
- Foundation chain: Chain sixteen.
- Row one: Single crochet in the second chain from the hook and in each chain across for a total of fifteen single crochet stitches. Chain one and turn.
- Rows two through twenty-four: Single crochet in each stitch across, chain one and turn at the end of each row. Continue until the panel measures approximately eleven inches tall. This will yield a finished pouch height of about five and one half inches after folding the panel in half. The extra length accounts for seam allowance and turning.
- Fasten off leaving a long tail for seaming.
Pattern: Ears (make two)
- With latte brown yarn, chain two.
- Round one: Work six single crochet into the second chain from the hook and join with a slip stitch to create a small circle.
- Round two: Chain one, work two single crochet in each stitch around for a total of twelve single crochet. Join with a slip stitch.
- Round three: Chain one, work the following sequence around: single crochet in the first stitch, two single crochet in the next stitch. Repeat this repeat across the round to expand the ear slightly. You will have approximately eighteen single crochet at the end of round three. Fasten off leaving a tail for sewing.
- If you prefer padded ears, add a small amount of stuffing before sewing the ear onto the pouch.
Pattern: Snout applique
- With beige yarn, chain five and join to form a small ring.
- Round one: Chain one and work eight single crochet into the ring. Join with a slip stitch.
- Round two: Chain one, work one half double crochet in each stitch around if you prefer a slightly raised snout, then fasten off leaving a tail.
- Thread the tail through a yarn needle and flatten the snout slightly while sewing it to the front center of the pouch. If you want a more oval snout, slightly shape it while sewing.
Assembly
- Fold the rectangular body panel in half with right sides together so the top edges align. Seam the two side edges with a whip stitch or mattress stitch leaving the top open. Reverse the pouch to the right side through the top opening.
- Position the ears at the top corners of the pouch. Sew each ear firmly into place by stitching through both the ear base and the top row of the pouch. If ears are padded, ensure the stuffing is enclosed and the seam remains flat.
- Attach the beige snout to the front center of the pouch a little below the top edge. Embroider a small black nose using simple back stitch or satin stitch and two little black eyes with French knots or small satin stitches above the snout. Keep the face minimalist and stylized to match the modern look.
- Add a hanging loop at the back top center if you intend to hang the pouch from a charger. Stitch securely.
Finishing and care
Weave in all ends on the inside of the pouch. If you used stuffing for ears, ensure the seams are reinforced. Hand wash gently and reshape while damp.
Styling and gift ideas
The Teddy Bear Wall Buddy is an excellent gift for children and for anyone who appreciates a cozy, handmade accent. For gifting, consider pairing the pouch with a small phone charm or a coordinating keychain.
Succulent Desktop Stand
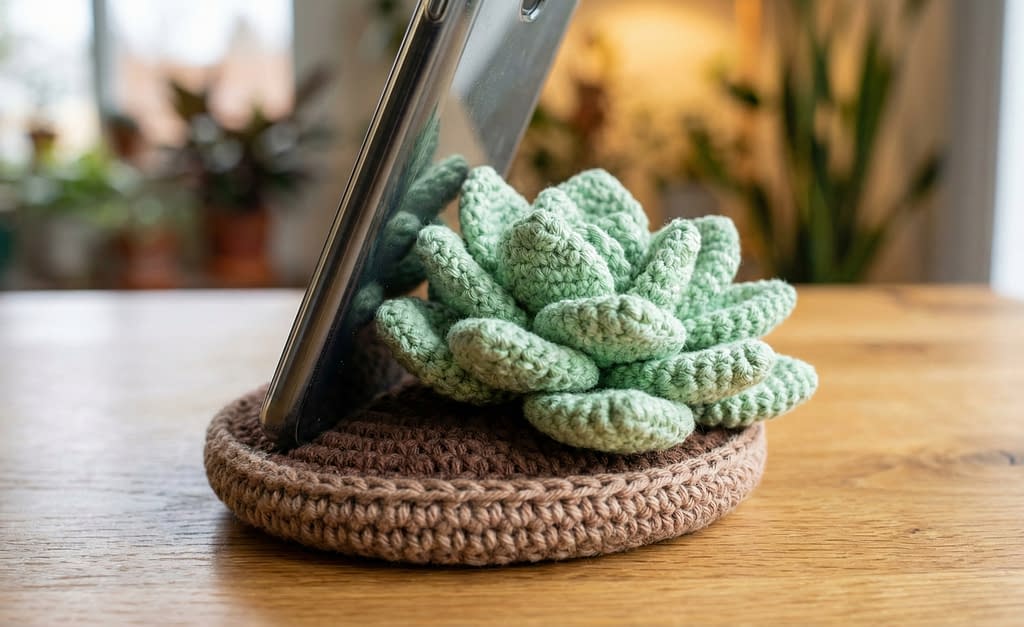
Skill level and finished size
Skill level: Intermediate. This project includes three-dimensional shaping to form a succulent backrest and a circular base that acts as “soil.” The structure must be stable enough to hold the phone at a viewing angle.
Finished size: Base diameter approximately two and one half to three inches. Backrest height approximately three inches. The stand will hold most smartphones in portrait orientation. Adjust sizes proportionally to fit different phone sizes.
Materials
- Worsted weight yarn in light green for the succulent and brown for the base soil.
- Crochet hook four millimeter.
- Yarn needle, scissors.
- A small piece of thin cardboard or a stiff interfacing circle to insert into the base for stability, or small scraps of tightly wound scrap yarn to fill the base.
- Optional hot glue and fabric for affixing the cardboard insert if you prefer additional stability.
Notes and construction overview
The Succulent Desktop Stand is a small, freestanding phone stand with a circular base that supports a chubby succulent-shaped backrest formed from layered increases and a simple shaping technique. The phone leans against the succulent, which provides both function and decoration. Because the stand supports the phone, reinforce the base and backrest securely and consider inserting a firm disc into the base to distribute weight.
Pattern: Base (soil)
- With brown yarn, chain two and join to form a ring.
- Round one: Chain one, work eight single crochet into the ring. Join with a slip stitch. Eight single crochet stitches total.
- Round two: Chain one, work two single crochet in each stitch around for a total of sixteen single crochet. Join with a slip stitch.
- Round three: Chain one, work the following repeat around: single crochet in the first stitch, two single crochet in the next stitch. Repeat to expand the circle to approximately twenty-four single crochet or to a diameter of about two and one half inches. The exact number of stitches depends on your tension and your yarn.
- Round four through round six: Single crochet in each stitch around to build height approximately one half inch. After the desired height is achieved, fasten off leaving a long tail to close the gap and finish the base.
- Insert a small firm disc cut from cardboard or interfacing into the inside of the base to stiffen the stand. If using cardboard, protect it from moisture by covering with a small fabric circle and hot gluing into place. If you prefer an all-yarn approach, tightly pack the base with scrap yarn until firm.
Pattern: Backrest succulent
The backrest is formed by making a rounded cluster of overlapping leaves. There are many ways to approach succulent shaping; the following method uses multiple partial rounds of increases and short leaves worked in rows and attached in a spiraling fashion.
- With light green yarn, chain five and join with a slip stitch to create a small ring for the first leaf base.
- Leaf one: Chain two, work one single crochet into the ring, chain two, turn, and work the following across the chain foundation: half double crochet in the second chain from the hook, double crochet in the next chain, half double crochet in the next chain. Fasten off leaving a tail to stitch the leaf to the base.
- Position the leaf on the base and sew it in place at a slight angle so it projects upward and outward.
- Repeat steps to create eight to twelve small leaves of the same size, stitching each to the base in a circular pattern. Slightly vary the angle of each leaf and the placement so the succulent appears layered and natural.
- After attaching the first ring of leaves, make a second ring of slightly larger leaves. Chain seven for the foundation loop of each larger leaf and work a short row of single crochet, half double crochet, double crochet, half double crochet, single crochet to shape each leaf. Attach these larger leaves to the circumference just behind the first ring.
- Continue adding rings of leaves until the succulent backrest reaches a height of approximately three inches or until it provides sufficient support for a phone leaning against it.
- Once all leaves are attached, reinforce the base of the succulent by sewing through the underside and anchoring many stitches into the top of the base so the backrest is stable.
Assembly and finishing
- Ensure the base is firmly packed and the cardboard or interfacing disc is secured. The stand must be stable when supporting a phone.
- Sew the succulent backrest to the center back of the base with multiple secure passes. The attachment should prevent wobbling and distribute the phone weight evenly.
- If the succulent tends to tip, add a small felt pad to the underside of the base for additional friction on smooth surfaces.
- Weave in all tails and trim excess yarn.
Styling and photography
Photograph the Succulent Desktop Stand on a natural wood table with shallow depth of field to create a soft bokeh background. A neutral background and a single accent prop such as a small notebook or pen will keep the focus on the stitch detail and plant-like form.
Variations and troubleshooting
- For a taller backrest, add more leaf rings and increase leaf size gradually.
- If the structure is too floppy, insert a small stiff wire into the backrest leaves during construction for internal support and shape retention. Cover the wire fully with yarn.
- Use a denser hook or slightly smaller hook size to make the stitches tighter and the stand firmer.
Sweet Strawberry Pouch

Skill level and finished size
Skill level: Beginner to intermediate. The Sweet Strawberry Pouch uses basic stitches and simple shaping and includes a small colorwork detail (white seed embroidery) and a green leaf rim and loop. It is friendly for crocheters who can maintain even tension and follow simple shaping instructions.
Finished size: Approximately three inches wide by six inches tall when worked with worsted weight cotton yarn and a four millimeter crochet hook. Adjust the foundation chain and number of rows to increase or decrease the finished size.
Materials
- Worsted weight cotton or cotton-blend yarn in bright red for the body, green for the top rim and hanging loop, and a small amount of white yarn for embroidered seed details.
- Crochet hook four millimeter.
- Yarn needle for seaming and embroidery.
- Scissors.
- Optional small button or snap if you prefer to secure the pouch with a flap.
- Optional small piece of interfacing or thin cotton fabric for lining.
Gauge
Gauge is flexible for this accessory. As a guideline, a four inch by four inch square worked in single crochet should contain approximately fourteen single crochet stitches and sixteen rows using the recommended yarn and hook. If your gauge differs, adjust the foundation chain and row count to achieve the desired width and height.
Notes and construction overview
The Sweet Strawberry Pouch is a simple rectangular pouch worked as two panels and seamed together. The bright red body is embellished with small white embroidered seed motifs after assembly. A green top rim is added to create the appearance of the strawberry’s green cap and to form a hanging loop that resembles leaves. Optionally, cut a small leaf-shaped applique and attach it as decoration.
Work the pouch panels first, then add the green rim and loop, embroider the white seeds, and finish with a lining if desired.
Pattern: Front and back panels (make two)
- Foundation chain: Chain sixteen. This chain length will produce a pouch approximately three inches wide. Adjust the chain in single increments to alter width.
- Row one: Single crochet in the second chain from the hook and in each chain across for a total of fifteen single crochet stitches. Chain one and turn.
- Rows two through twenty-eight: Single crochet in each stitch across. At the end of each row, chain one and turn. Continue until the panel measures approximately six inches from the starting chain to the top edge or until the desired height is achieved. Keep stitch tension consistent to prevent warpage.
- Fasten off leaving a twelve inch tail for seaming.
Make a second panel identical in size.
Pattern: Leafed rim and hanging loop
The top rim in green resembles the leafy top of a strawberry and forms a sturdy hanging loop.
- With green yarn, join with a slip stitch to the last row at the top edge of the back panel on the inside of the pouch. If you prefer, attach the rim after seaming the pouch by working into the top edge.
- Round one (rim base): Chain one, single crochet evenly across the top edge of the pouch, working one single crochet in each top stitch. At the corners, add an extra single crochet to maintain an even edge. Join with a slip stitch to the first single crochet if you work this in joined rounds.
- Round two (leaf shaping): Work the following repeat across to create pointed leaf shapes along the top rim: chain three, skip one stitch, slip stitch in the next stitch; then chain three, work one single crochet in the next stitch, work one half double crochet in the next, and work one double crochet in the next stitch, then slip stitch into the next stitch to anchor the leaf. Repeat for each leaf along the rim. Adjust the leaf size if your stitch count or tension differs. Aim for three to five leaf points depending on pouch width. Fasten off leaving a tail for sewing.
- Hanging loop: With green yarn, chain eighteen (or longer if you need a larger loop). Single crochet back across the chain starting in the second chain from the hook. You will have seventeen single crochet stitches; fasten off leaving a long tail.
- Fold the hanging loop ends under and sew them securely to the inside back top edge of the pouch. Reinforce with additional stitches for strength because the loop will bear the pouch’s weight when hanging over a charger.
Pattern: Small white embroidered seeds
- After the pouch is assembled and the rim attached, use white yarn and a yarn needle to embroider small seeds onto the front body of the pouch. Tiny straight stitches and small French knots both work well. For straight stitch seeds, thread a length of white yarn onto the needle, anchor it inside the pouch, and make short vertical or diagonal stitches on the red panel spaced evenly to mimic strawberry seeds. For small French knots, wrap the yarn around the needle once and insert the needle back near the entry point to create a tiny raised seed.
- Plan your seed placement by lightly marking the positions with a removable fabric marker or by sewing temporary basting stitches to guide placement. On a three inch by six inch surface, twenty to thirty small seeds spaced in offset rows replicate a natural strawberry look.
Assembly
- Place the two panels together with right sides facing and align edges. Use a whip stitch or mattress stitch to seam the two sides, leaving the top opening free. Stitch from the bottom tip up to the top rim in even passes to create a neat side seam.
- Turn the pouch right side out through the top opening so the green rim is on the outside and the white seed embroidery is visible on the front.
- Sew the hanging loop to the inside top center on the back panel using multiple passes of the needle to ensure sturdiness. Optionally add a small rectangle of scrap fabric or interfacing inside the top seam to better distribute the force on the loop.
- If you prefer a lined pouch, cut two pieces of thin cotton fabric to the pouch panel size minus seam allowance and hand sew the fabric into the interior before attaching the rim. Secure the lining at the top with small even stitches.
Finishing and care
Weave in all loose ends and trim. If you used cotton yarn, hand wash the pouch in cool water and reshape while damp. Press gently if needed with a warm iron through a pressing cloth to avoid flattening the appliques.
Variations and styling
- Add a small blush blush-pink interior or a contrasting lining in floral fabric for a charming reveal.
- Substitute tiny seed beads for embroidered seeds for a sparkling look. Sew beads individually with a short tail of thread to prevent snagging.
- For a pocket that opens from the top with a flap, fold a short flap from the back panel over the top edge and secure with a small green button on the front.
- Crochet the pouch in a gradient yarn to produce natural shading reminiscent of a strawberry’s ripeness.
Troubleshooting
- If the pouch stretches and the seeds appear misaligned, add a light interfacing lining to preserve shape.
- If your leaf rim puckers, increase the number of base single crochet stitches so the rim has more room for the scalloped or pointed leaf shaping.
Photography tips
Use a bright, high-contrast background such as white or pale wood to emphasize the vivid red and green colors. Close-up shots highlighting the embroidered seeds and cotton yarn texture work well for online listings.
Pastel Tulip Pot
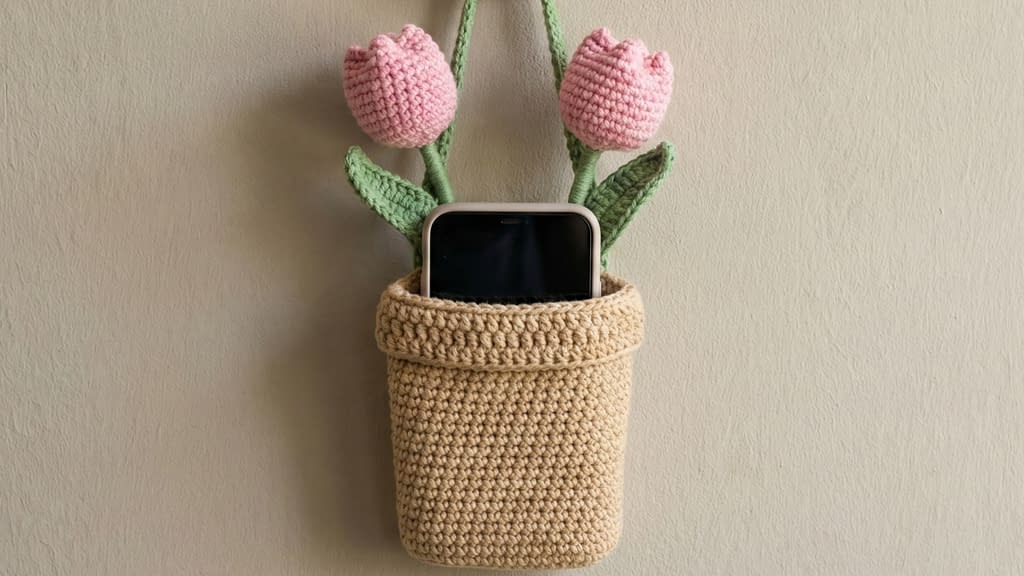
Skill level and finished size
Skill level: Beginner to intermediate. The Pastel Tulip Pot combines simple pouch shaping with a decorative pot-shaped base and two tulip appliques that rise above the rim. The tulips are created as short stems with blossom heads that act as a loop or decorative feature.
Finished size: Approximately three and one half inches wide by six inches tall including the tulip stems when worked in worsted weight yarn with a four millimeter crochet hook. Modify stitch counts and row numbers to suit different phone sizes.
Materials
- Worsted weight yarn in sandy beige or a warm neutral for the pot, light pink for the tulip blossoms, and green for the stems and leaves.
- Crochet hook four millimeter.
- Yarn needle, scissors.
- Optional small amount of stuffing to slightly pad the tulip heads for dimension.
- Optional small piece of interfacing for a sturdier pot top.
Gauge
A suggested gauge is approximately fourteen single crochet stitches and sixteen rows in a four inch square worked in single crochet. Gauge is not crucial but provides a guide when scaling the pattern.
Notes and construction overview
This design emulates a small hanging flower pot with two tulip stems that protrude from behind the pouch and provide a decorative loop or simply a pretty accent. The pot is worked as a rectangular panel folded and seamed, with the pot rim reinforced and the tulips made separately and sewn in place.
Work the pot panel, make the tulips and stems, create the pot rim and optional hanging loop, then assemble and attach the tulips.
Pattern: Pot panel (single panel folded)
- Foundation chain: Chain eighteen. This chain produces a slightly wider pot to comfortably fit modern phones.
- Row one: Single crochet in the second chain from the hook and in each chain across for a total of seventeen single crochet stitches. Chain one and turn.
- Rows two through twenty-six: Single crochet in each stitch across, chain one and turn at the end of each row. Continue until the panel measures approximately eleven inches tall. The panel will be folded in half to form the front and back of the pot, yielding a finished height of approximately five and one half inches.
- Fasten off leaving a long tail for seaming.
Pattern: Pot rim reinforcement
- With sandy beige yarn, fold the top edge of the front panel down approximately one inch toward the exterior of the pouch to form a rim that resembles the lip of a pot. Pin or hold in place.
- Using a tapestry needle and matching yarn, sew across the folded rim close to each side to anchor the fold. For a cleaner look, you may single crochet the folded rim in place by inserting the hook through both layers and working one round of single crochet around the rim. This secures the fold and creates a defined rim.
- If you prefer additional stability, cut a thin strip of interfacing or fabric and stitch it inside the folded rim before securing it. This will keep the rim firm and prevent collapse when the phone is placed inside.
Pattern: Tulip blossom (make two)
- With light pink yarn, chain four and join with a slip stitch to form a small ring.
- Round one: Chain two, work six half double crochet into the ring. Join with a slip stitch to the top of the beginning chain two. You will have seven half double crochet total counting the initial chain two as the first stitch if you prefer an initial chain two; otherwise make six half double crochet evenly into the ring and adjust counts. The goal is to create a small rounded bloom.
- Round two: Chain two, work one half double crochet into the same stitch, then work one half double crochet in the next stitch, then chain three and slip stitch into the base ring to create a small petal loop. Repeat the petal loop sequence around to create a slightly layered tulip shape. Fasten off leaving a tail for sewing. Add a small tuft of stuffing between inner layers before final assembly if you want a plump blossom.
Pattern: Tulip stem and leaf
- With green yarn, chain fifteen to twenty depending on desired stem height. For a two and one half to three inch stem, twenty chains are a good starting point.
- Row one: Single crochet in the second chain from the hook and in each chain across for a total of length minus one single crochet stitches. Chain one and turn.
- Rows two through three: Single crochet in each stitch across to build a narrow stem. Fasten off leaving a long tail for attaching.
- Leaf: With green yarn, chain seven. Row one: Single crochet in the second chain from the hook and in each chain across for a total of six single crochet. Chain one and turn. Row two: Single crochet across. To shape a leaf, on the next pass work a half double crochet in the first stitch, double crochet in the middle stitch, and half double crochet in the last stitch, then fasten off and attach the leaf to the stem by sewing at the desired height.
Assembly
- Fold the pot panel in half with right sides together and seam the two sides using a mattress stitch or whip stitch to create a neat side seam. Leave the top edge open.
- Turn the pot right side out through the top opening so the rim is visible and the seam is on the interior.
- Insert the leafed green stems behind the rim by sewing the stems into the inside top seam. Stitch securely with several passes of the needle to anchor the stems. Position the two tulips so they stagger slightly for a natural look.
- Securely sew the tulip blossoms to the tops of the stems. Ensure the blossoms will sit above the rim when the phone is inserted so they appear as if the flowers are growing from the pot.
- Add a hanging loop by creating a short green strap as described in earlier patterns and sewing it to the inside back of the rim.
- If desired, add a small decorative tag or tiny heart applique to the pot front.
Finishing and care
Weave in all tails neatly inside the pot. If you added stuffing to the tulips, ensure seams are reinforced so stuffing cannot escape. Hand wash gently in cool water and reshape while damp.
Variations and styling
- Create three or more tulips in varying pastel colors for a fuller look.
- Make the pot in a textured stitch such as moss stitch or half double crochet to imitate glazed ceramic textures.
- Substitute a cork or felt disk in the base interior to act as a stabilizer if you prefer the pot to rest on a surface when not hanging.
Troubleshooting
- If the stems flop, add a length of thin florist wire inside the stem and completely cover it with yarn. Secure the wire ends well within the pot interior to prevent scratching.
- If the rim looks uneven after attaching the blooms, gently block the rim by pinning it to the desired shape and lightly steaming or spritzing; allow to dry fully.
Photography tips
Photograph the Pastel Tulip Pot outdoors in soft light or near a bright window to emphasize pastel tones. Include a shallow depth of field to keep focus on the tulips and the pot rim while softening background detail.
Checkered Daisy Hanger
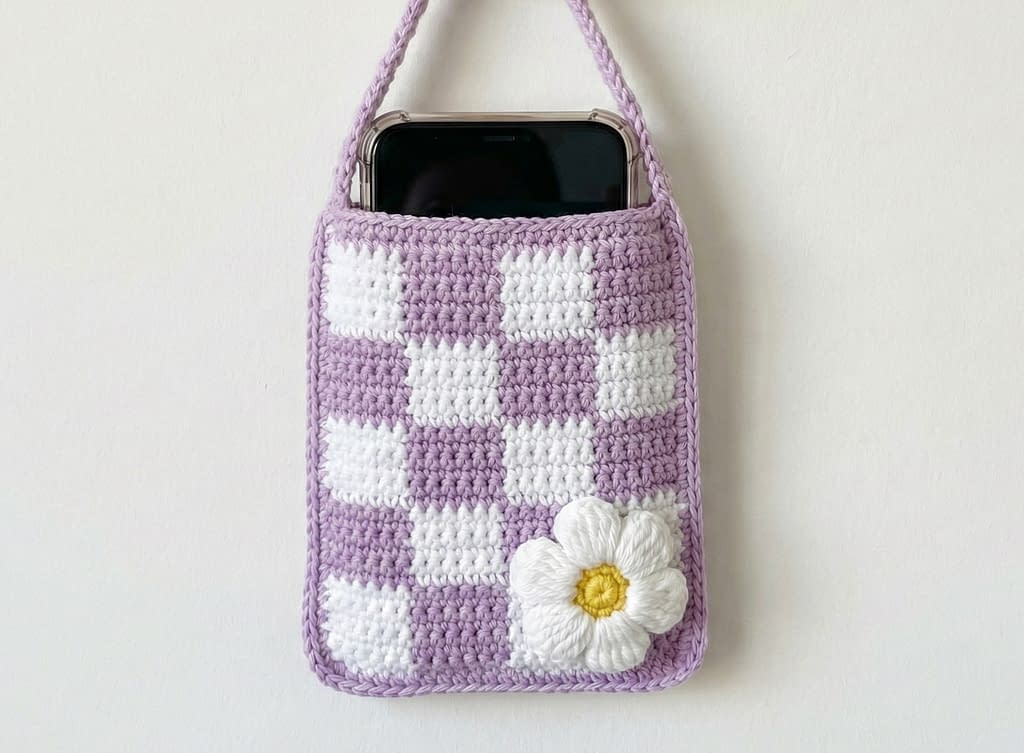
Skill level and finished size
Skill level: Beginner to intermediate. This project introduces simple color changes and a small appliqué daisy. The checkerboard body uses two contrasting colors and a tidy finish.
Finished size: Approximately three inches wide by six inches tall when worked in worsted weight yarn with a four millimeter crochet hook. Adjust chain count and row number to suit phone dimensions.
Materials
- Worsted weight yarn in lilac purple and white for the checkerboard body.
- White yarn for the daisy appliqué and a small scrap of yellow for the daisy center.
- Crochet hook four millimeter.
- Yarn needle and scissors.
- Optional small amount of interfacing for structure.
Gauge
As with the other small accessories, gauge is not critical but a suggested gauge is approximately fourteen single crochet stitches and sixteen rows per four inch square. Adjust pattern counts proportionally if your gauge differs substantially.
Notes and construction overview
The Checkered Daisy Hanger is a rectangular pouch that features a two-tone checkerboard pattern worked in simple blocks and finished with a clean border. A single puffy daisy appliqué is attached at the bottom right corner for a playful accent. This pouch is ideal for crocheters who want to practice color changes and simple surface appliqué.
This pattern uses mosaic-style checkerwork achieved by alternating small blocks of color across rows. For clarity and beginner friendliness, the pattern below demonstrates a straightforward method using single crochet color blocks worked in rows.
Pattern: Checkerboard panels (make two)
- Foundation chain: Chain sixteen with lilac purple. This chain will produce a pouch approximately three inches wide but may be adjusted.
- Row one: With lilac purple, single crochet in the second chain from the hook and in each chain across for a total of fifteen single crochet stitches. Chain one and turn.
- Rows two and three: Continue working two rows of single crochet in lilac purple. Keep stitches even and maintain consistent tension.
- Switch to white yarn to create the next set of color blocks. Join white yarn with a slip stitch to the first stitch at the beginning of the row.
- Rows four and five: Work two rows of single crochet in white.
- Rows six and seven: Switch back to lilac purple and work two rows of single crochet.
- Continue alternating color blocks in two-row vertical bands across the panel until the panel reaches the desired height, approximately six inches. Maintain the two-row block repeat throughout to create a clean checkerboard when panels are placed together.
- Fasten off leaving a twelve inch tail for seaming.
- Make a second panel identical in sequence so that when the panels are placed right sides together the checker pattern aligns.
Tips for color changes: When changing colors at the end of a row, complete the final yarn-over of the last single crochet with the new color so the transition is clean and knot-free. Carry color inside the work only for short distances; if you plan to carry color over more than three stitches, instead cut and rejoin yarn to prevent bulky floats.
Pattern: Daisy appliqué
- With white yarn, chain five and join with a slip stitch to form a small ring.
- Round one: Chain two and work eight half double crochet into the ring. Join with a slip stitch to the top of the beginning chain two.
- Round two: For each half double crochet around, work the following petal formation to create a puffy petal: chain three, slip stitch into the base ring to anchor the petal, then slip stitch into the next stitch. Repeat around to form eight small looped petals.
- Center: With yellow yarn, make a small round for the daisy center. Chain three, join to form a small ring, work six single crochet into the ring, fasten off leaving a tail. Sew the yellow center to the center of the white petals.
- Make the daisy slightly puffy by adding a small bit of stuffing under the yellow center before final sewing. Use small secure stitches to hold the shape.
Assembly
- Place the two checkerboard panels with right sides together, aligning the color blocks so the checkerboard pattern matches. Use pins to keep panels aligned if needed.
- Seam the two long sides using a mattress stitch or whip stitch. Take care to keep tension even and avoid pulling the color blocks out of alignment.
- Turn the pouch right side out through the top opening.
- Attach a short lilac hanging loop by chaining an appropriate number and single crocheting back across as described in previous patterns. Securely stitch the loop to the inside back top seam.
- Sew the daisy appliqué to the bottom right corner of the front panel. Use small, nearly invisible whip stitches to attach the petals and a few secure stitches through the center to anchor the piece.
Finishing and care
Weave in all ends inside the pouch. Blocking is optional; if you block, use minimal moisture and reshape gently. Hand wash cool to preserve the color contrast and appliqué shape.
Variations and styling
- Use different color combinations for the checkerboard to match seasonal palettes or brand colors.
- Add additional daisies or move the daisy to the center for a more symmetrical look.
- Use a lighter or heavier yarn to alter the texture and drape of the pouch.
- Embellish with small beads sewn into the daisy center for extra sparkle.
Troubleshooting
- If the checker blocks do not align perfectly, adjust by one row in one panel to match the other panel before seaming. It is easier to correct alignment at the panel stage than after seaming.
- If color carries create bulky floats on the inside, cut and rejoin the yarn at color boundaries and secure ends neatly to avoid unraveling.
Conclusion
These seven crochet phone holder patterns offer a mix of practical function and charming style—from wall hangers to a freestanding succulent stand—each written with clear materials, step-by-step instructions, and finishing tips so you can make, customize, and gift them with confidence. Use the patterns as written or adapt colors, trims, and sizes to suit your phone and aesthetic; small changes like linings, interfacing, or added appliqués make big differences in durability and look. Happy crocheting—make one to keep, one to give, and enjoy the satisfaction of a handmade piece that is both useful and delightful.


