
Stripes are a timeless design choice that can feel classic, modern, playful, or refined depending on color, scale, and texture. Knit tote bags with stripes are especially rewarding projects because they are practical, adaptable, and ideal for experimenting with yarn choices, stitch patterns, and finishing techniques. From sturdy market bags to sleek everyday totes, stripes add visual interest to simple construction.
This post features seven striped knit tote bag patterns, beginning with four fully detailed, step-by-step tutorials written in clear, long-form instructions. Each pattern includes materials, gauge guidance, construction steps, and finishing ideas to help you create a durable, polished tote. The remaining three patterns complete the collection, offering additional styles and techniques to explore.
Chunky Neutral Wide Stripes Tote
Skill level
Beginner to intermediate. This pattern uses basic flat knitting and simple shaping. The project requires attention to tension when changing yarn colors and a tidy finishing technique for seams and handles.
Finished size
Approximately 15 inches wide at the top by 13 inches tall, not including handles. Depth at the base when boxed is approximately 4 inches. Adjust size by changing yarn, needles, or stitch count in multiples of the stripe repeat.
Materials
- Worsted weight cotton or cotton-blend yarn in three neutral colors: Cream, Oatmeal, Warm Taupe. Each color approximately 250 yards; total about 750 yards. Use yarn with good stitch definition and slight structure.
- Straight knitting needles or circular needles to be used for flat knitting, size 8 US (5.0 mm), or size needed to obtain gauge.
- Stitch markers.
- Tapestry needle for sewing seams and weaving in ends.
- Scissors.
- Measuring tape.
- Optional: thin fusible interfacing and cotton fabric for lining; leather or reinforced straps if preferred.
Gauge
16 stitches and 22 rows = 4 inches in stockinette stitch using the selected yarn and needles. Gauge is not critical for a tote, but matching gauge will help ensure the finished dimensions are as stated and the fabric has suitable drape.
Notes and techniques
- The bag is knit flat as a single rectangular panel and seamed at the sides and base to create the body. Handles are either knitted i-cord straps or sewn leather straps depending on preference.
- To minimize jogs at color changes in stripes, consider using the jogless stripe method when working in flat knitting, or carry small lengths of yarn up the side to avoid many ends.
- For a more durable base, consider adding a sewn interfacing or double-thick base by folding and seaming the lower portion.
Pattern instructions
Materials and preparation steps:
- Select your needle size and yarn. Wind balls and label colors Cream, Oatmeal, Warm Taupe for ease.
- Decide stripe width. This pattern uses wide stripes of 12 rows per color. For a crisp visual repeat, alternate colors in the order Cream, Oatmeal, Warm Taupe, Cream, and repeat until desired length.
- Cast on 60 stitches using the long-tail cast-on method with the Warm Taupe color. Place a marker at the beginning of the row if you wish to keep track of row counts.
Body of the tote:
- Work the base rib for stability: Row 1: With Warm Taupe, knit one, purl one across the row for a total of 6 rows. This ribbed base will give the bottom some elasticity and structure.
- Switch to stockinette stitch for the body: Row 1 (right side): With Warm Taupe, knit all stitches. Row 2 (wrong side): Purl all stitches. Repeat these two rows maintaining stockinette stitch.
- Work 12 rows in Warm Taupe to form the first wide stripe. Keep tension even and avoid pulling the first and last stitches too tightly.
- At the end of the 12th row, change to Oatmeal. To change color cleanly when working flat, at the end of the row drop Warm Taupe and pick up Oatmeal for the next row. Leave a small tail of each color and weave in later.
- Work 12 rows in Oatmeal in stockinette stitch.
- Change to Cream and work 12 rows.
- Continue this stripe pattern sequence until the panel measures approximately 25 inches from the cast-on edge to the top edge. This length will yield a bag approximately 13 inches tall after seaming and allowing for a folded top edge. Adjust the number of stripe repeats to achieve desired height, making sure to end at a color that will align well when seaming.
Top edge and finishing the body:
- When the panel reaches the desired length, work a neat top finish: Work 6 rows of knit one, purl one ribbing using the same color as the last stripe to create a tidy edge that resists stretching.
- Bind off loosely in pattern to avoid a tight top edge that puckers. Use a tubular or stretchy bind off method if you are familiar with it.
Handles — knitted i-cord option:
- For integrated knitted straps, pick up the desired number of stitches and work i-cord as follows: With double-pointed needles size 6 US (4.0 mm), cast on 4 stitches using the main color. Arrange stitches across three needles and work the i-cord by knitting all stitches, sliding the work to the other end of the needle without turning, and repeating. Continue until strap length measures 20 to 24 inches depending on how you want the tote to sit on the shoulder.
- Create a second strap to match.
- When straps are complete, leave long tails for sewing.
Alternative handles — leather straps:
- Purchase leather handles of the desired length and screw or stitch the hardware according to supplier instructions. If sewing leather handles, reinforce the join area on the bag with a small rectangle of interfacing or a scrap of heavy fabric.
Assembly:
- Block the entire panel gently to even stitches and relax the fabric. Avoid stretching the stripes; pin to measurements and steam lightly if using cotton-blend yarn.
- Fold the panel in half vertically so that the cast-on edge meets the bound-off edge, aligning the side edges. Use a measuring tape to ensure symmetry.
- Using the tapestry needle and matching yarn, seam the two side edges using the mattress stitch for an invisible join. Leave the top open.
- To box the base and create depth, pinch the bottom corner so that the cast-on edge meets the base edge to form a 90-degree angle. With a ruler measure and mark 1.5 inches from the corner along both raw edges. Sew across between these two marks to form a boxed base. Repeat for the second corner.
- Turn the bag to the right side.
Attaching straps:
- Position knitted i-cord straps or leather straps on the inside of the top edge at evenly spaced points, approximately 3 to 4 inches in from each side seam. If using knitted straps, secure them by sewing through the inside top edge and around the strap with numerous passes to distribute strain. Reinforce with a small rectangle of fabric interfacing on the interior.
- Weave in all yarn ends securely, trimming any excess.
Optional lining:
- For extra durability and to prevent stretching, cut lining fabric to match the interior dimensions of the bag with a 1/2 inch seam allowance. Sew the fabric into a lining bag, fold the top edge under 1/4 inch and press. Insert the lining into the knitted bag and hand stitch the folded top edge to the inside of the knitted top edge with small slipstitches for an invisible finish.
Care instructions:
- Wash according to yarn manufacturer recommendations. Cotton totes can usually be hand washed and laid flat to dry. If using leather straps, remove or protect leather before washing.
Variations and styling tips
- To create a more rigid bottom, knit a double base by folding up the cast-on edge and seaming across to create a reinforced base panel.
- For visual interest, alternate stripe widths: 8 rows, 12 rows, 4 rows for a more dynamic rhythm.
- Add an exterior pocket by knitting a rectangular pocket panel in matching gauge and seaming it to the front before final assembly.
Bright Multicolor Thin Stripes — Urban Style Tote
Skill level
Intermediate. The pattern is simple but requires consistent gauge in a finer yarn and careful color management for many narrow stripes. This tutorial will use stockinette stitch with clean selvage edges and optional slipped-stitch details for durability.
Finished size
Approximately 12 inches wide by 14 inches tall with a narrow base depth of approximately 3.5 inches. Slim profile intended to be carried on the shoulder.
Materials
- Sport weight or light worsted weight cotton yarn in multiple saturated colors: Cobalt, Sunflower Yellow, Coral, Teal, Navy, and a neutral for small contrast accents. Total combined yardage approximately 900 yards depending on stripe count.
- Straight knitting needles or circular needles used for flat knitting, size 5 US (3.75 mm), or size required to obtain gauge.
- Stitch markers.
- Tapestry needle.
- Small amount of clear sewing thread for attaching a paperback book pocket if desired.
- Optional: small snap or button and loop for closure.
Gauge
20 stitches and 28 rows = 4 inches in stockinette stitch on size 5 US needles.
Notes and techniques
- Thin stripes are achieved by changing color every two to four rows. To avoid many ends, use a technique of carrying floats for a maximum of three to four stitches across the wrong side when rows are short. With narrow stripes it is often cleaner to twist yarns at the color change to secure without a visible jog.
- If you prefer to avoid floats, cut yarn at each color change and weave in ends, though this increases finishing time.
Pattern instructions
Preparation and stripe planning:
- Plan a stripe sequence and write it down: for example, two rows Cobalt, two rows Sunflower Yellow, two rows Coral, two rows Teal, two rows Navy, two rows Cobalt, repeat. Choose a repeat that pleases your eye and that fits the desired bag height.
- Cast on 72 stitches with the base color using the long-tail cast-on on size 5 US needles.
Base and selvage:
- Work a 1-inch selvage for neat edges: Row 1: Slip the first stitch purlwise with yarn in front, knit across to last stitch, slip the last stitch purlwise. Repeat for 6 rows. The slipped stitch at both edges creates a tidy edge ideal for seaming.
Body with narrow stripes:
- Begin stripe sequence in stockinette stitch while maintaining the slipped edge at both sides. Right side rows: slip first stitch purlwise with yarn in front, knit across, slip last stitch purlwise. Wrong side rows: slip first stitch purlwise, purl across, slip last stitch purlwise.
- Work two rows in each color as planned. When changing color on a right side row, bring the new color up and begin the next row with that color. To create a neat edge, wrap the old color around the new color at the selvage stitch on the wrong side.
- Continue alternating thin stripes until the panel measures approximately 29 inches from cast-on to desired top edge, ending on a color that will give a balanced top band.
Top finishing and closure:
- Work 6 rows of single-rib or garter stitch in the final color to stabilize the top.
- Bind off loosely in pattern.
Handles — knit-on i-cord strap or narrow knitted straps:
- For a slim urban strap that lies flat on the shoulder, knit two narrow straps: cast on 6 stitches and work in garter stitch until straps measure 22 inches. Make sure to check length for comfortable shoulder placement.
- Alternatively, use a simple knitted i-cord as described in the previous pattern for a slimmer rope-like strap.
Optional interior pocket and accessory pocket:
- To create a slot for a paperback or coffee cup, knit a narrow rectangular pocket in matching gauge, approximately 7 inches by 9 inches, and seam to the interior of the bag before final assembly. Reinforce with clear sewing thread and topstitch along the top edge to create a sturdy opening.
Assembly:
- Block the panel gently to relax fabric. Fold panel in half, aligning edges, and seam the side edges with mattress stitch. Box the bottom corners by sewing small triangular seams at each corner approximately 1.25 inches deep to form the base depth.
- Turn right side out and press the top edge with light steam if yarn permits.
Finishing details for urban look:
- Use a color-matched or contrasting topstitch along the top edge to reinforce the opening. If you prefer a polished commercial appearance, hand pick up stitches along the top and knit a folded hem to encase raw edges and strap attachment points.
- Weave in ends carefully on the wrong side, trimming any excess.
Styling and care
- The slim, colorful stripes pair well with a casual street fashion look. Use lightweight cotton yarn for crisp stripes that hold color saturation.
- Machine washing is possible for some cotton yarns; refer to yarn label instructions. Air dry flat to preserve shape.
Variation ideas
- For a more tactile surface and visual interest, alternate one row of stockinette with one row of seed stitch in a neutral to emphasize color shifts without adding significant bulk.
- Add a small leather tab with a snap at the top center for a secure closure that complements the urban aesthetic.
Earthy Tones with Leather Accents — Market Stall Tote
Skill level
Beginner to intermediate. Construction is straightforward yet requires accurate placement of leather hardware and attention to rustic yarn textures.
Finished size
Approximately 16 inches wide by 14 inches tall with a base depth of 5 inches when boxed. Slightly larger and more generous than the slim urban tote to accommodate market purchases.
Materials
- Bulky or aran weight recycled cotton yarn in earthy tones: Terracotta, Olive, Mustard, Deep Brown. Approximately 900 to 1100 yards total depending on size.
- Straight or circular needles for flat knitting, size 10 US (6.0 mm), or size needed to obtain gauge.
- Two leather strap handles approximately 20 to 22 inches long with brass hardware or detachable snap hooks.
- Brass rivets or heavy-duty sewing thread for securing leather to knitted fabric.
- Tapestry needle, scissors, measuring tape.
- Optional: small piece of medium-weight leather or cork for reinforcing points where straps attach on the interior of the bag.
- Optional: lightweight cotton lining and an interior pocket.
Gauge
14 stitches and 20 rows = 4 inches in stockinette stitch with bulky yarn.
Notes and techniques
- Rustic, recycled yarns often have small flecks and a rougher surface. Use this to your advantage for an artisanal, market-ready aesthetic.
- Leather straps create stress points where they attach. Reinforcement with interior patches and careful stitching with heavy-duty thread will extend the life of the bag.
- For an authentic market stall feel, consider using a moss stitch or seed stitch panel for visual texture between the stripes.
Pattern instructions
Planning and cast-on:
- Choose a stripe sequence of medium-width stripes to highlight the earthy palette. For example, 10 rows Terracotta, 10 rows Olive, 8 rows Mustard, 12 rows Deep Brown, repeat until desired height.
- Cast on 64 stitches using a sturdy cast-on such as the long-tail cast-on. Use the Terracotta color for the first stripe.
Bottom stabilization:
- Work 8 rows of garter stitch for a firm base. Garter stitch is knit every row and will provide a dense base less prone to curling.
Body and stripe execution:
- Switch to stockinette stitch after the garter base. Right side rows: knit across. Wrong side rows: purl across.
- Work stripe bands following planned row counts. Because yarns may be thicker, watch tension when carrying colors. If carrying a color across three or four stitches on the wrong side, catch the yarn to avoid long floats that could snag.
- Introduce a textured band if desired: to create a moss stitch panel, Row 1: Knit one, purl one across. Row 2: Purl one, knit one across. Repeat these two rows. Place the moss stitch band between stripes to add handmade texture that evokes artisan market goods.
Top finishing and strap placement preparation:
- When the panel reaches approximately 30 to 32 inches, finish with 4 rows of garter stitch in the last color to mirror the bottom base.
- Bind off loosely.
Strap attachment reinforcement:
- Prepare small rectangles of leather or sturdy fabric approximately 3 inches by 1.5 inches to serve as reinforcement patches on the interior where leather straps attach. Cut two patches for each strap location.
- If using leather straps with rivet hardware, mark strap placement on the exterior bag: place each strap attachment approximately 4 inches in from each side seam and 2 inches down from the bound-off top edge.
- Hand stitch the reinforcement patch to the wrong side interior at the marked location using heavy-duty thread. If using rivets, follow the rivet manufacturer instructions to pierce through the knitted fabric and the leather patch. Use a washer on the interior to distribute stress.
Assembly:
- Block the panel with light steam to even stitches. Fold the panel in half and seam the side edges with mattress stitch. Box the base corners at 2 inches to create a deep base of approximately 5 inches.
- Turn the bag right side out and attach leather straps securely using rivets or heavy-duty stitching.
Optional lining and pocket:
- For a polished stall-ready tote, sew a cotton lining with an interior pocket and slip it inside the knitted shell. Hand stitch the lining to the inside top edge of the bag with small slipstitches for a neat finish.
Finishing touches:
- If brass hardware is used, polish gently with a soft cloth. Trim all yarn ends and secure any loose floats.
- Consider adding a key loop inside with a small leather tab and snap so that personal items are easy to find.
Styling and care
- This tote is designed for everyday use at markets, farmers markets, and artisanal shopping. The recycled cotton yarn will soften with use but maintain structure.
- Spot clean the knitted portion and wipe leather handles with a damp cloth. If the knitted body requires full washing, remove the leather straps if possible and follow yarn care instructions.
Variation ideas
- Add an exterior zippered pocket for secure storage of small items.
- Convert to a crossbody by adding rings and an adjustable strap attachment.
Playful Diagonal Stripes Tote — Lifestyle with Hands and Movement
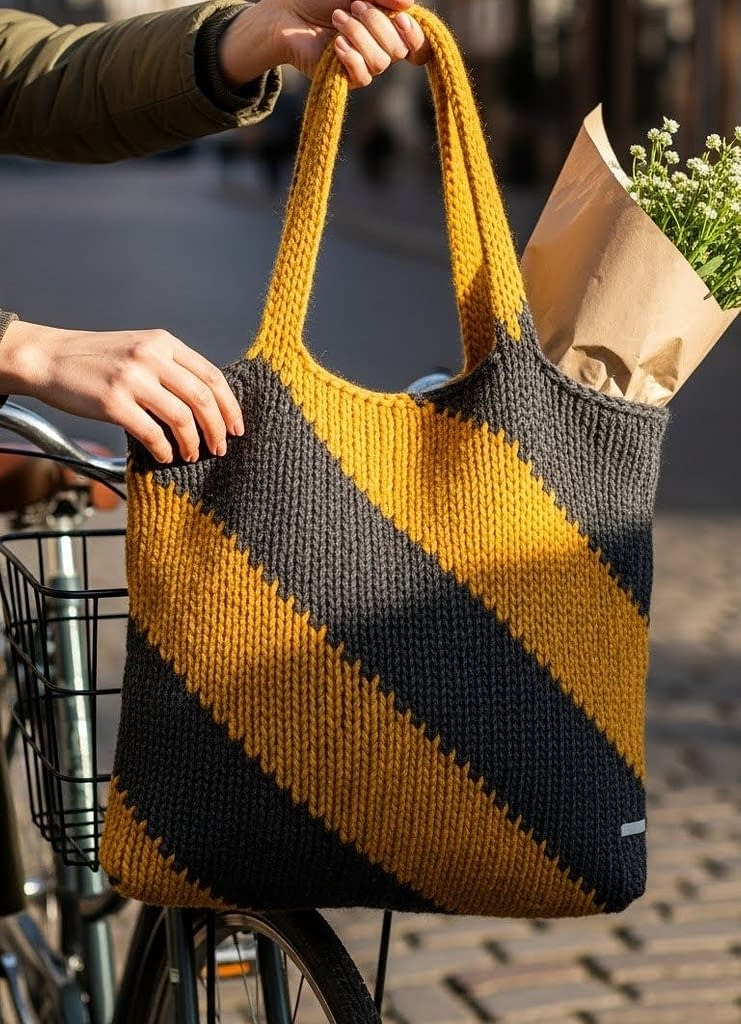
Skill level
Intermediate. This pattern introduces diagonal striping created through controlled increases and decreases, combined with color changes. The construction itself is straightforward, but it requires attention to row shaping, stripe alignment, and consistent tension.
Finished size
Approximately 14 inches wide by 13 inches tall, with a base depth of about 4 inches once boxed. The diagonal fabric creates a slightly dynamic silhouette that softens with use.
Materials
- Chunky weight wool-blend yarn in two high-contrast colors: Mustard (main color) and Charcoal (contrast color). Approximately 700 to 850 yards total, split evenly between the two colors.
- Straight knitting needles or circular needles used for flat knitting, size 10.5 US (6.5 mm), or size required to obtain gauge.
- Stitch markers.
- Tapestry needle.
- Scissors and measuring tape.
- Optional: cotton or canvas lining fabric for stability, especially if carrying heavy items.
- Optional: leather or reinforced knitted handles.
Gauge
14 stitches and 18 rows = 4 inches in stockinette stitch. Gauge is important in this pattern to maintain consistent diagonal angles across the bag.
Design notes and construction overview
- Diagonal stripes are created by shifting color blocks gradually across the fabric using paired increases and decreases.
- The tote is knit flat as a single large panel, then seamed along the sides and base.
- The diagonal effect becomes most visible after blocking, so trust the process while knitting.
- A wool-blend yarn is recommended for texture and light felting along the edges, which enhances durability and gives a tactile, lived-in finish.
Pattern Instructions
Planning the diagonal stripes
Before casting on, decide the stripe width and slope. This pattern uses diagonal stripes approximately 6 stitches wide that travel upward from left to right across the fabric. Each diagonal shift occurs every right-side row.
Color usage follows this sequence:
- Mustard as the dominant base.
- Charcoal introduced gradually to form diagonal bands.
- Colors alternate dominance across the height of the bag.
Cast-on and base
- With Mustard yarn, cast on 64 stitches using the long-tail cast-on method.
- Work 8 rows of garter stitch (knit every row). This forms a sturdy base that resists curling and supports the weight of the bag.
- Place a stitch marker after the first stitch and before the last stitch to help identify edge stitches during shaping.
Establishing the diagonal stripe pattern
- Begin stockinette stitch:
- Right side rows: knit across.
- Wrong side rows: purl across.
- Knit 4 rows in Mustard to establish the base color.
- Begin the first diagonal stripe:
- Right side row: knit 58 stitches in Mustard, then knit 6 stitches in Charcoal.
- Wrong side row: purl all stitches, keeping colors aligned as they appear.
- On the next right side row, shift the Charcoal section left by one stitch:
- Knit 57 stitches in Mustard, then knit 7 stitches in Charcoal.
- Purl across on the wrong side.
- Continue this process on every right side row:
- Each time, reduce the Mustard section by one stitch and increase the Charcoal section by one stitch.
- This gradual shift creates the diagonal stripe moving upward across the fabric.
- Continue until the Charcoal section reaches 32 stitches and the Mustard section is also 32 stitches.
Reversing the diagonal direction
- Once the stripe reaches the center, reverse the slope to create a zigzag effect:
- On the next right side row, knit 33 stitches in Mustard and 31 stitches in Charcoal.
- On each following right side row, increase Mustard by one stitch and decrease Charcoal by one stitch.
- Continue this reversal until the Charcoal section returns to 6 stitches.
- At this point, switch dominance:
- Make Charcoal the main color and repeat the entire diagonal sequence, this time allowing Mustard to form the diagonal stripe.
- Continue alternating dominance every full diagonal repeat until the panel measures approximately 28 inches from cast-on edge to top edge.
Top edge finishing
- End the body with a full stripe pattern completed cleanly at the edge.
- Switch to garter stitch for 6 rows in the dominant color at the top.
- Bind off loosely using a standard bind-off method to avoid tightening the opening.
Handles
Knitted handle option
- With the dominant color, cast on 10 stitches.
- Work in garter stitch until the strap measures approximately 22 to 24 inches.
- Bind off and repeat for the second handle.
Alternative handle option
- For a more rugged, lifestyle-inspired look, use leather or cotton webbing handles. These complement the diagonal energy of the design and add durability.
Assembly
- Block the panel gently, pinning edges straight and allowing diagonal stripes to settle evenly. Light steam works well for wool-blend yarns.
- Fold the panel in half with right sides facing.
- Seam the side edges using mattress stitch for an invisible join.
- Box the bottom corners by sewing a straight seam approximately 1.5 to 2 inches from each corner, creating a stable base.
- Turn the bag right side out.
Attaching handles
- Position handles approximately 3.5 inches in from each side seam.
- Secure handles by sewing through multiple rows of fabric using a reinforced stitch pattern such as a box-and-cross stitch.
- Add a fabric or leather reinforcement patch on the inside for long-term durability.
Optional lining
- Cut lining fabric to match the interior dimensions of the finished bag.
- Sew the lining separately, fold the top edge inward, and hand stitch it to the inside of the knitted top edge with small slipstitches.
- If desired, add an interior pocket before attaching the lining.
Finishing and care
- Weave in all yarn ends carefully along diagonal color transitions to keep the interior smooth.
- Lightly steam or wet block once more after assembly to settle seams.
- Allow natural edge felting to occur with use, which enhances structure and durability.
Variations and troubleshooting
- If diagonal stripes appear uneven, check that color shifts occur only on right side rows and that stitch counts are consistent.
- For sharper diagonal lines, use a tighter gauge or reduce stripe width to 4 stitches.
- For a softer, slouchier bag, increase needle size by one step and skip the garter stitch base.
- To emphasize motion, use a third accent color for occasional diagonal bands.
Classic Navy and White Nautical Stripes Tote
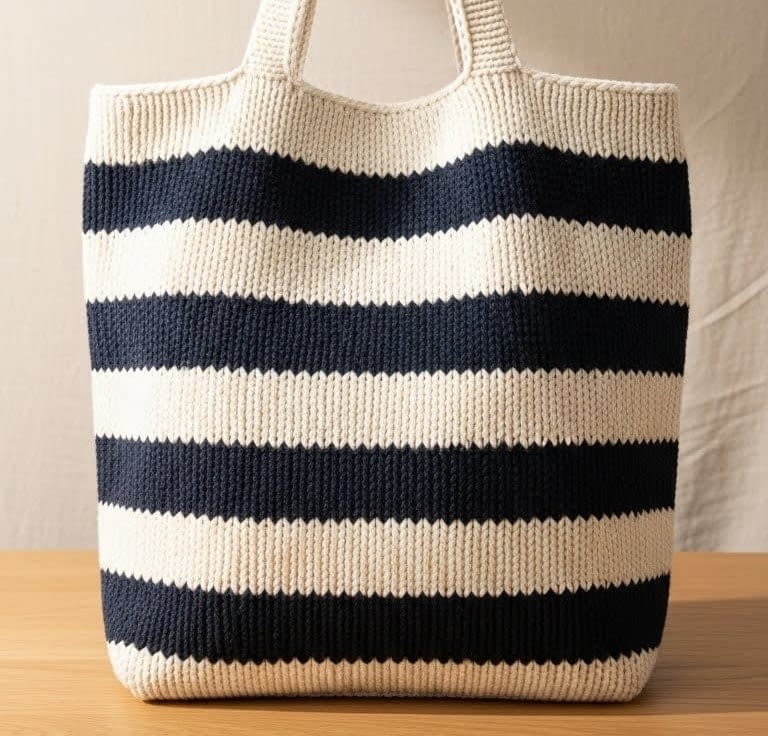
Skill level
Beginner to intermediate. This pattern focuses on clean color changes, durable fabric, and careful alignment of wide stripes for a timeless, coastal-inspired look.
Finished size
Approximately 15 inches wide by 13 inches tall, with a base depth of about 4 inches. This size is ideal for everyday use, beach outings, or casual errands.
Materials
- Worsted weight cotton yarn in Navy Blue and White, approximately 900 yards total (about 450 yards of each color).
- Straight or circular knitting needles for flat knitting, size 7 US (4.5 mm), or size needed to achieve gauge.
- Stitch markers.
- Tapestry needle.
- Scissors and measuring tape.
- Optional: cotton fabric lining, medium-weight interfacing for the base, rope or cotton webbing handles for a nautical finish.
Gauge
18 stitches and 24 rows = 4 inches in stockinette stitch.
Notes and design considerations
- Nautical stripes look best when the stripe width is consistent and bold. This pattern uses wide stripes of equal height to create a balanced, classic appearance.
- Cotton yarn is recommended for durability and stitch clarity.
- Keep careful count of rows to ensure stripes align perfectly when the bag is seamed.
Pattern instructions
Planning and cast-on:
- Decide on stripe width. This pattern uses 10 rows of Navy Blue followed by 10 rows of White.
- With Navy Blue yarn, cast on 62 stitches using a long-tail cast-on method.
Base construction:
- Work the base in garter stitch for strength: knit every row for 8 rows.
- This garter base provides resistance to curling and supports the weight of the contents.
Body of the tote:
- Begin stockinette stitch: right side rows knit across, wrong side rows purl across.
- Continue working 10 rows in Navy Blue.
- Change to White yarn at the beginning of the next right side row. Leave a tail long enough to weave in later.
- Work 10 rows in White.
- Continue alternating Navy Blue and White stripes until the panel measures approximately 28 inches from cast-on edge to top edge, ending with a Navy Blue stripe for visual weight at the top.
Top finishing:
- Work 6 rows of knit one, purl one ribbing in Navy Blue to stabilize the opening.
- Bind off loosely in rib pattern to avoid a tight edge.
Handles:
- For a classic nautical look, use rope or cotton webbing handles. Measure and mark handle placement approximately 3.5 inches in from each side seam.
- Sew handles securely using heavy-duty thread, stitching through the knitted fabric and a small reinforcement patch on the interior.
Assembly:
- Block the panel gently to align stripes.
- Fold the panel in half with right sides facing and seam the sides using mattress stitch.
- Box the bottom corners by sewing a straight seam 1.5 inches from each corner to create a stable base.
- Turn right side out and weave in all ends carefully.
Variations and tips
- Add a small anchor or stripe-stitched motif to the front for subtle embellishment.
- Sew a striped lining using the same navy and white palette for a cohesive interior.
- For a more rigid beach tote, insert a removable base made from plastic canvas covered in fabric.
Soft Pastel Ombre Stripe Tote
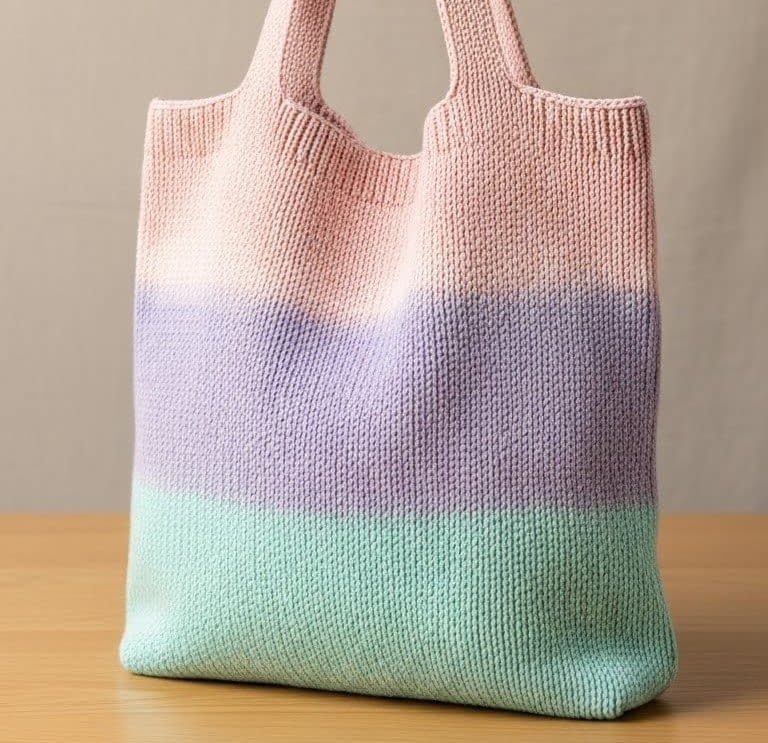
Skill level
Intermediate. This pattern requires careful color transitions and attention to yarn blending for a smooth ombre effect.
Finished size
Approximately 14 inches wide by 12 inches tall with a base depth of 3.5 inches. The fabric has a soft drape and elegant silhouette.
Materials
- Fine worsted or DK weight cotton yarn in pastel shades: Blush Pink, Lavender, Mint Green, plus an optional neutral for edging. Approximately 850 yards total.
- Straight or circular knitting needles for flat knitting, size 6 US (4.0 mm), or size needed to obtain gauge.
- Stitch markers.
- Tapestry needle.
- Scissors, measuring tape.
- Optional: lightweight lining fabric to support the softer fabric.
Gauge
20 stitches and 26 rows = 4 inches in stockinette stitch.
Notes on ombre technique
- Ombre stripes are achieved by gradually changing colors rather than abrupt switches.
- To create smooth transitions, alternate rows of the old and new color for several rows.
- Use the same yarn brand and fiber for all colors to ensure consistent thickness and texture.
Pattern instructions
Planning the color transition:
- Plan three main color sections: Blush Pink transitioning to Lavender, Lavender transitioning to Mint Green.
- Each transition zone will be approximately 8 rows long, alternating colors every row.
Cast-on and base:
- With Blush Pink, cast on 64 stitches.
- Work 6 rows of garter stitch to form a gentle base.
Body and ombre transitions:
- Begin stockinette stitch.
- Work 12 rows in Blush Pink.
- Begin the first transition: alternate one row Blush Pink, one row Lavender for 8 rows total.
- Continue with 12 rows fully in Lavender.
- Begin the second transition: alternate one row Lavender, one row Mint Green for 8 rows.
- Work remaining rows fully in Mint Green until the panel measures approximately 26 inches.
Top finishing:
- Work 4 rows of garter stitch in Mint Green for a soft, delicate top edge.
- Bind off loosely.
Handles:
- Knit two narrow straps using the final Mint Green color. Cast on 8 stitches and work in garter stitch until straps measure 22 inches.
- Bind off and set aside.
Assembly:
- Block carefully to enhance the smoothness of color transitions.
- Seam sides using mattress stitch.
- Box the base corners at approximately 1.25 inches.
- Attach straps securely, reinforcing the attachment points on the inside with small fabric patches.
Variations and troubleshooting
- If color transitions appear harsh, extend the alternating rows to 10 or 12 rows.
- For a more structured look, add a lining and a thin interfacing at the base.
- Avoid pulling too tightly when alternating colors, as this can distort the fabric.
Minimal Black and White Stripe Tote (Refined Edition)
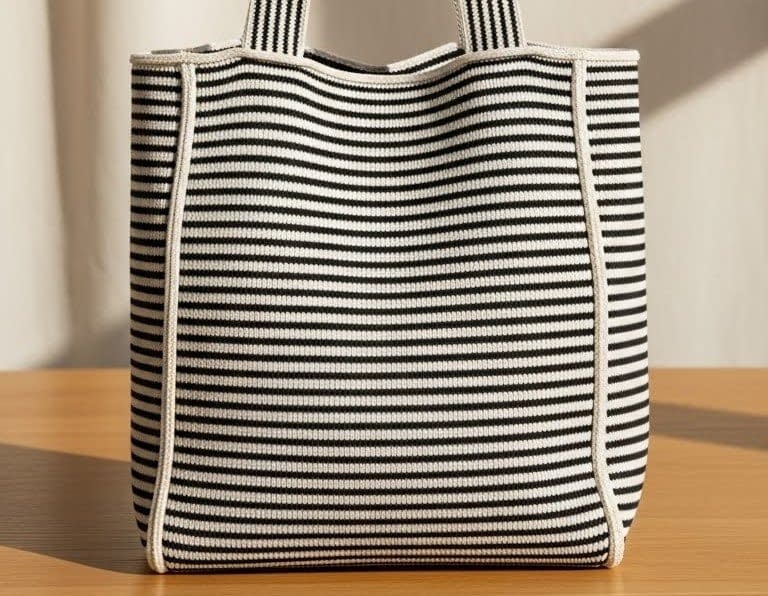
Skill level
Intermediate. Precision and consistency are essential for a high-end, minimalist finish.
Finished size
Approximately 14 inches wide by 13 inches tall with a firm base depth of 4 inches.
Materials
- DK weight cotton yarn in Black and White, approximately 900 yards total.
- Straight or circular knitting needles for flat knitting, size 5 US (3.75 mm).
- Stitch markers.
- Tapestry needle.
- Measuring tape, scissors.
- Optional: fusible interfacing and cotton lining fabric for structure.
Gauge
22 stitches and 30 rows = 4 inches in stockinette stitch.
Design notes
- Narrow stripes emphasize craftsmanship and symmetry.
- This version focuses on flawless finishing and structure rather than decorative elements.
- Keep floats short and secure to maintain a smooth interior.
Pattern instructions
Cast-on and base:
- With White yarn, cast on 70 stitches.
- Work 8 rows of garter stitch for a stable base.
Body and stripe rhythm:
- Begin stockinette stitch.
- Work 4 rows in White.
- Change to Black and work 4 rows.
- Continue alternating 4-row stripes until the panel measures approximately 28 inches.
Top edge refinement:
- Work 6 rows of knit one, purl one ribbing in Black.
- Bind off neatly in rib pattern.
Handles:
- Knit two firm straps: cast on 10 stitches and work in double seed stitch (knit one, purl one; alternate on following rows) until straps measure 24 inches.
- Bind off and block straps lightly.
Assembly:
- Block the panel to ensure crisp stripe alignment.
- Seam sides using mattress stitch.
- Box the bottom corners at 1.5 inches for a sharp base.
- Attach straps with reinforced stitching, hiding joins beneath the ribbed top edge.
- Insert lining if desired and secure along the ribbed edge with slipstitches.
Finishing tips
- Steam lightly for a polished appearance.
- For added durability, sew a removable base insert between lining and knitted fabric.
Final Conclusion
These 7 knit tote bag patterns with stripes show how a simple striped structure can be transformed through yarn choice, stripe width, color placement, and finishing techniques. From chunky and structured designs to soft ombre and minimalist styles, each pattern offers a practical, reusable tote with a distinct look and purpose. Together, they provide clear guidance for building durable, well-finished knit bags while allowing room for customization, making this collection suitable for both learning core techniques and creating polished, everyday accessories.


