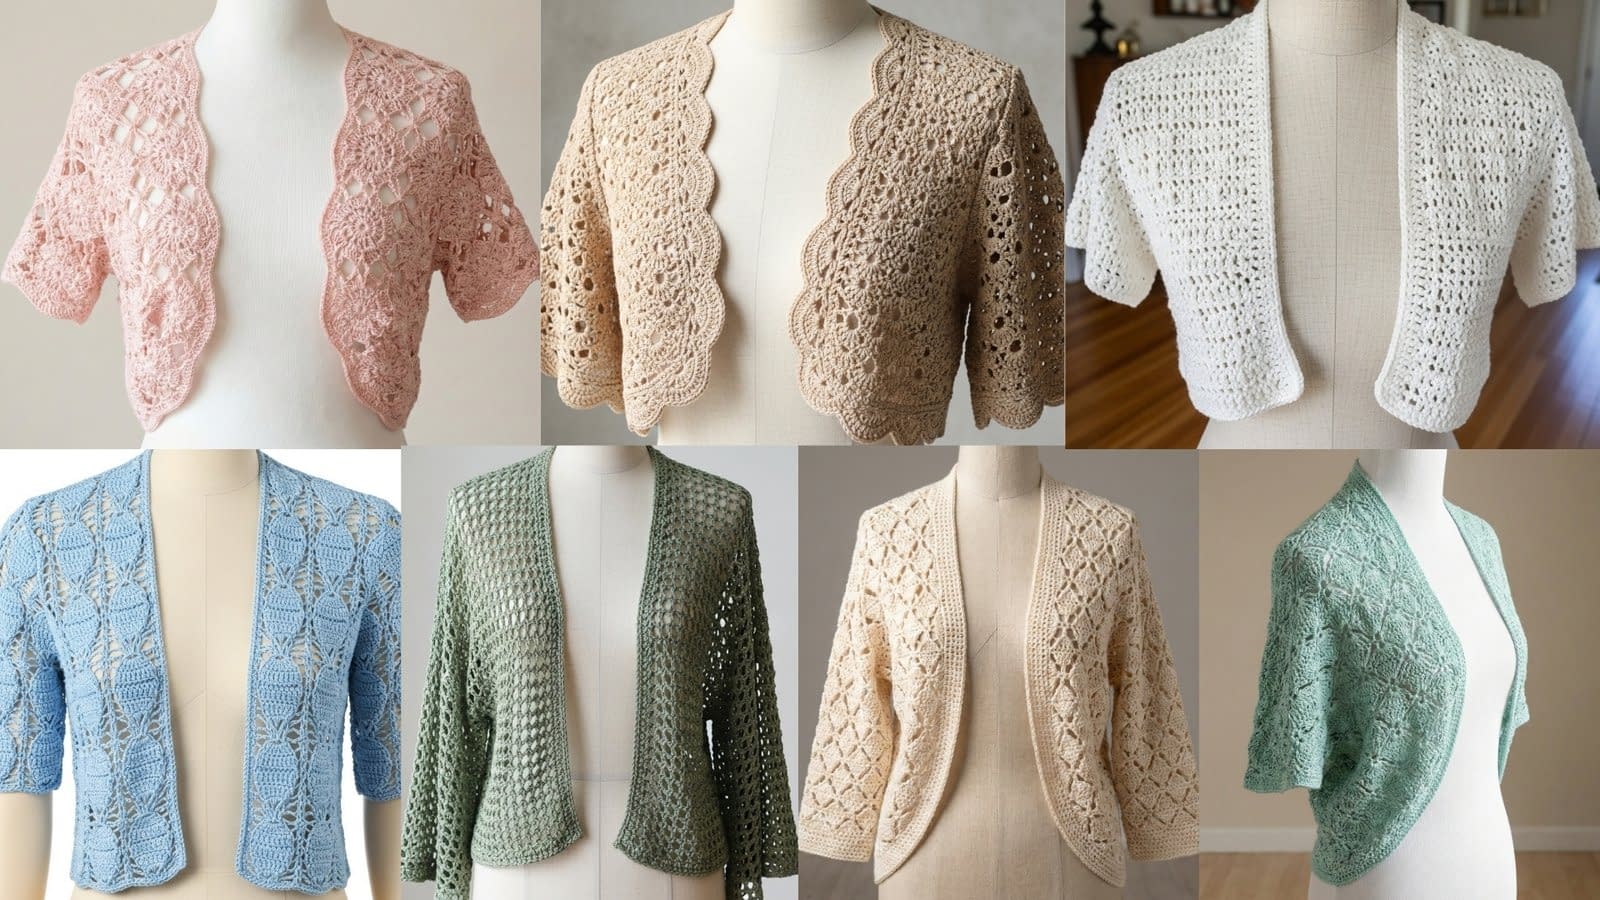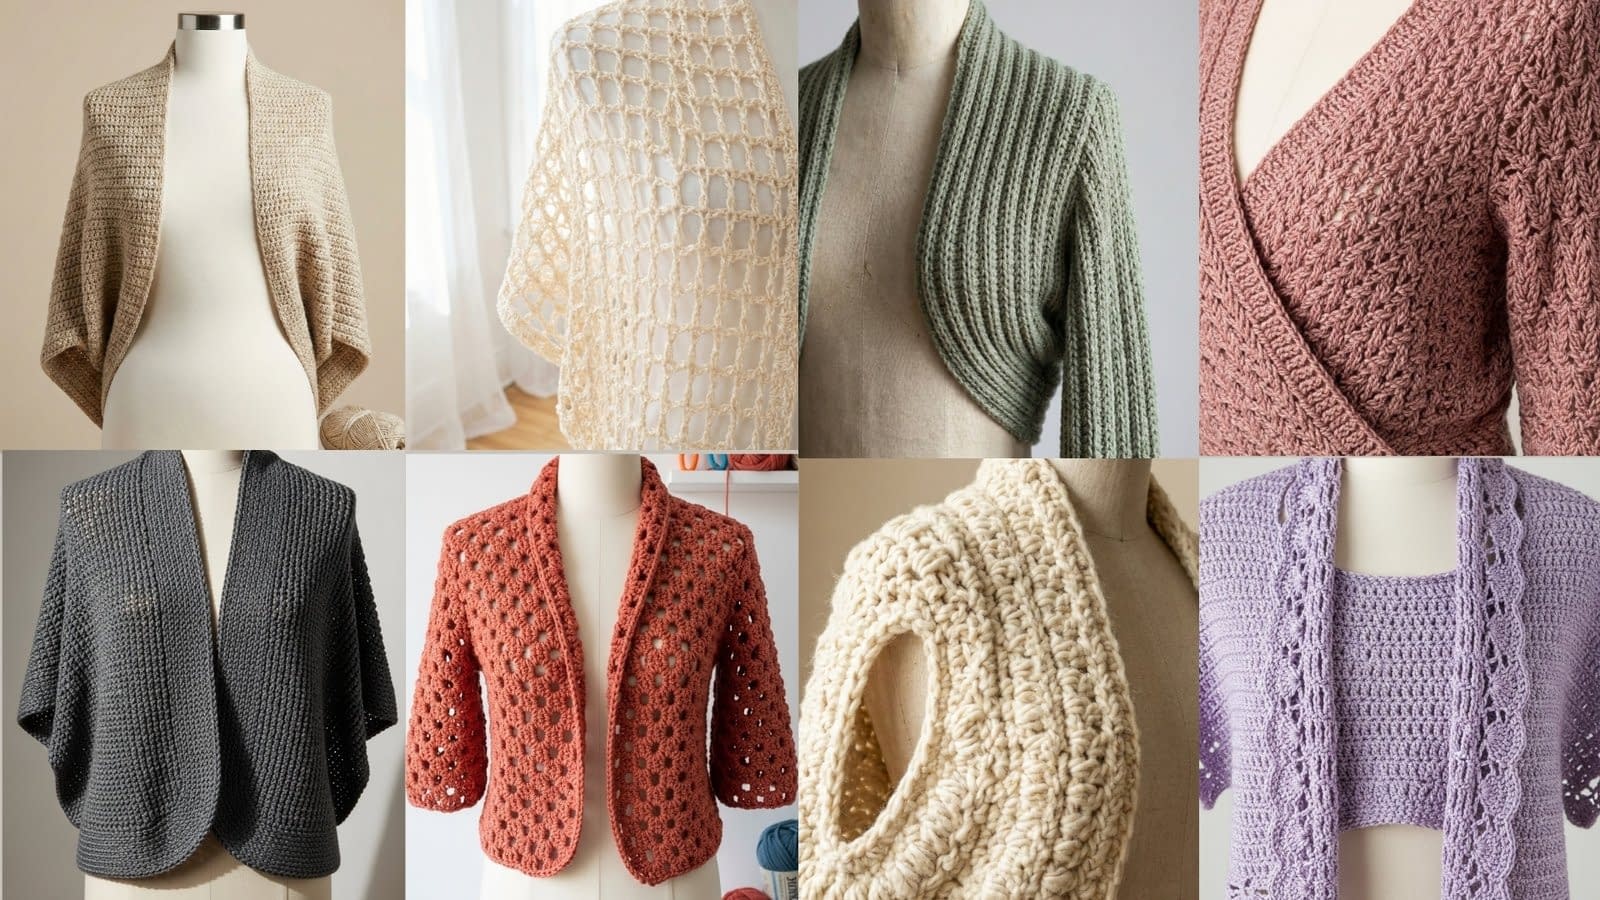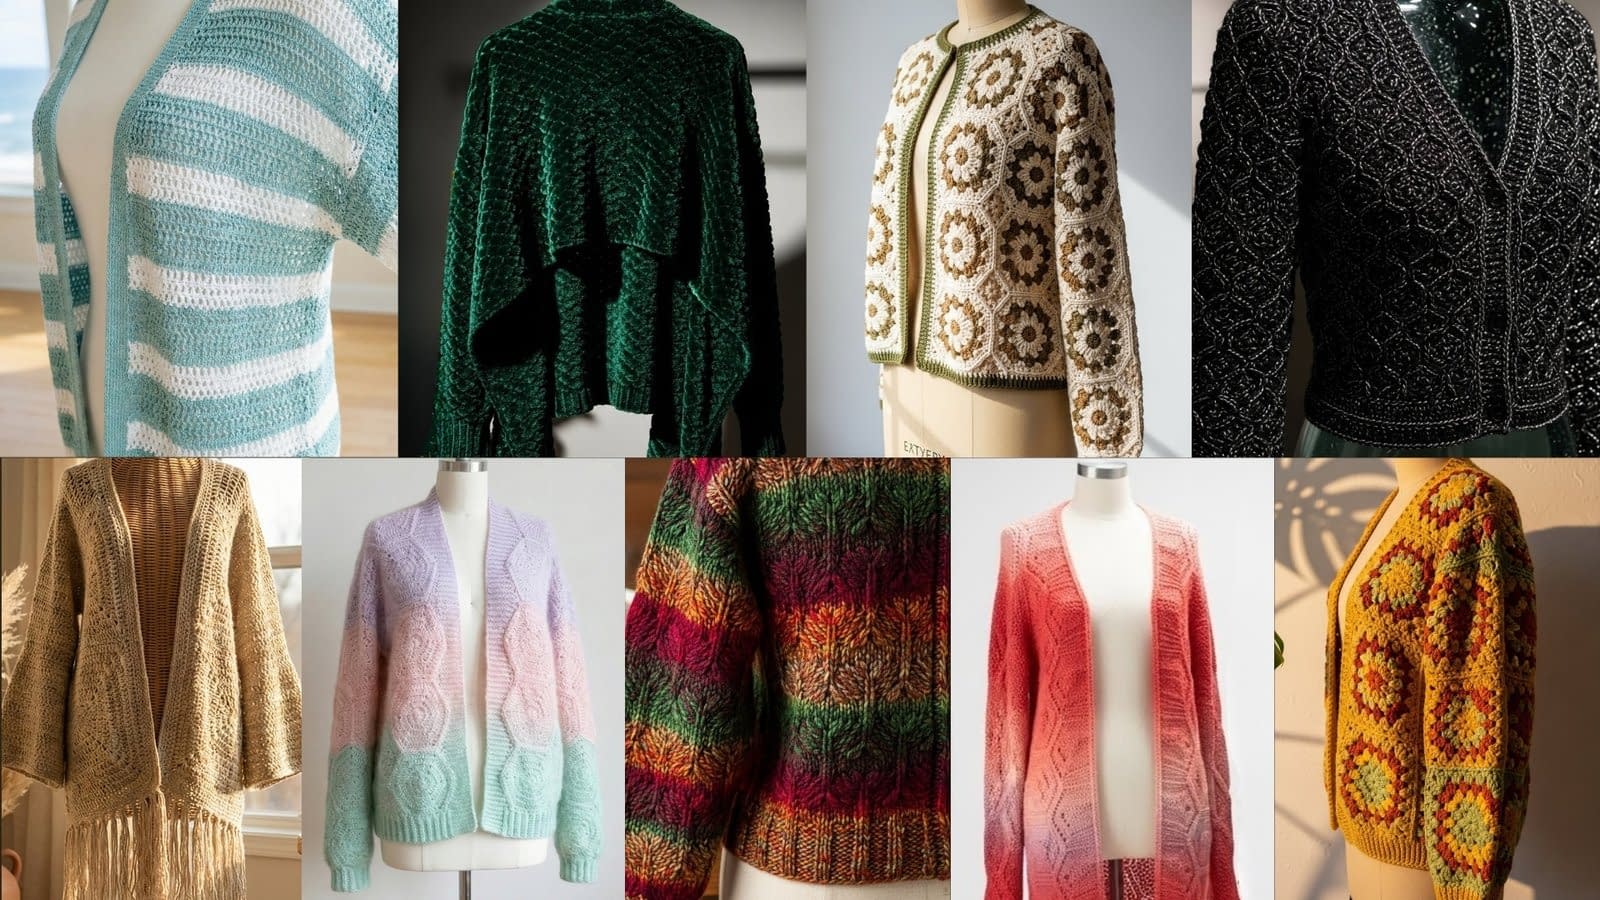
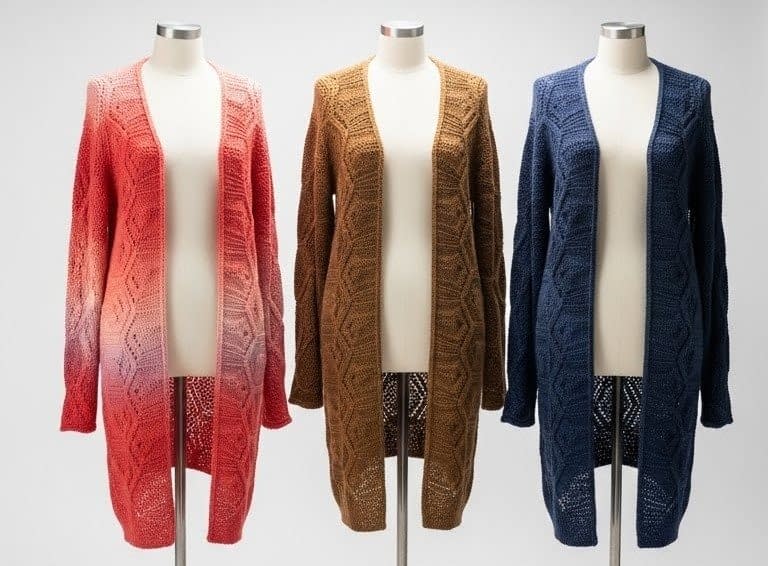
Hexagon cardigans combine simple geometry with beautiful drape, making them an ideal project for crocheters who want garments that read handmade yet polished. Whether you love the retro charm of a granny-square-inspired motif, the airy elegance of lace stitches, or the plush comfort of chenille and mohair blends, hexagon construction gives you modular control over fit, color, and texture. This post, 9 Easy Crochet Hexagon Cardigan Patterns, will be your comprehensive resource for getting started and finishing three complete patterns now; when you are ready, I will continue with the remaining patterns.
You will find very detailed, step-by-step instructions, clear materials lists, stitch explanations using full stitch names, tips for gauge and sizing, methods for joining hexagons, techniques for shaping sleeves and necklines, finishing and blocking guidance, variation ideas, and troubleshooting help. The goal is to make these patterns accessible to confident beginners and reassuringly thorough for intermediate crocheters. Read each pattern in full before starting and keep this post handy while you work.
Before the pattern tutorials, here are a few general notes that apply across all nine hexagon cardigan patterns in this series.
General materials, tools, and stitch glossary
Materials and tools (general guidance)
- Yarn: Choose yarn weight and fiber according to the pattern. The patterns below specify recommended yarn weights. Use yarn that is comfortable against the skin; for bulky textures choose wool or wool blends; for lightweight garments choose cotton, linen, or cotton-blend threads.
- Crochet hook: Use the hook size that achieves the gauge specified for each pattern. A common starting point for worsted weight yarn is a 5.0 millimeter hook, but always check gauge.
- Tapestry needle for weaving ends and sewing motifs.
- Scissors.
- Blocking tools: Blocking mat, rustproof pins, optional spray bottle or steam iron for blocking.
- Stitch markers to mark rounds, joins, or important points for shaping.
- Measuring tape to check gauge and finished measurements.
- Optional: buttons, snaps, small trim, tassels, or beads for embellishment.
Stitch glossary (full names)
- Chain: chain
- Slip stitch: slip stitch
- Single crochet: single crochet
- Half double crochet: half double crochet
- Double crochet: double crochet
- Treble crochet: treble crochet
- Magic ring: magic ring (explain: create a small adjustable loop to work the first round into)
- Shell: a group of multiple double crochet stitches worked into the same stitch or space, described explicitly for each usage
Gauge and sizing
Gauge is critical for garments. Each pattern provides a recommended gauge swatch size and stitch count. Make a sample square or circle using the recommended yarn and hook, wash and block it as you will at the end, and measure the number of stitches and rows per 4 inches (10 centimeters). If you have more stitches than the gauge, use a larger hook; if you have fewer stitches than the gauge, use a smaller hook.
Hexagon basics
A hexagon motif for garments is a six-sided motif built by increasing from the center with evenly spaced increase rounds so the panel lies flat. Hexagon motifs may be worked in rounds or in joined rows that create a flat hexagon. There are several common ways to join hexagons: whip stitch with a tapestry needle, single crochet join by inserting the hook through both motifs and working a single crochet, or join-as-you-go methods that allow you to attach a finished hexagon directly to an assembled piece. Choose the joining method that best suits your desired look: invisible whip stitch for a flat seam, single crochet for a ridged decorative seam, or join-as-you-go if you prefer to assemble as you make each motif.
Crochet Christmas Tree Gift Card Holder Pattern
Skill level: Beginner to intermediate (simple shaping and finishing)
Finished size: Approximately 3.5 inches wide by 5.5 inches tall (fits most standard gift cards vertically). Adjust size by changing hook size or yarn weight.
Materials
- Worsted weight yarn (weight category 4): approximately 30 to 50 yards of green for the tree main color.
- Small amount of brown worsted weight yarn for the trunk.
- Tiny scraps of red, yellow, or white for ornaments and star.
- Crochet hook: 4.0 millimeter (G) or a size that gives you neat tension with the chosen yarn.
- Tapestry needle for sewing and weaving in ends.
- Scissors.
- Optional small button or snap for closure.
- Optional small sequin beads or contrasting yarn for ornaments.
Abbreviations used in text (full names)
This pattern intentionally uses full stitch names rather than shorthand in order to be beginner-friendly. For convenience while you work, the stitch names are written out in full within the instructions.
Notes on construction
The holder is worked in two identical triangular panels that form the front and back. Each triangular panel is worked in short rows that increase evenly at two corners to form an isosceles triangle. After making two panels, you will seam the sides together leaving the top base open to create a pocket. A small flap is optional at the top to secure the gift card. Embellish the front panel with a small trunk, embroidered ornaments, sequins, or a tiny star.
Pattern instructions
Triangle panel (make two identical panels)
- With green yarn, chain four, and join with a slip stitch to the first chain to form a ring. This is the foundation ring.
- Round or Row 1: Chain two, which will count as the first half double crochet of the row. Work three half double crochet stitches into the ring. You will have four half double crochet stitches total in the first row. Do not slip stitch to join; treat this as a short-row triangular start instead of a joined circle.
- Row 2: Chain two, then turn the work so you are working back across the short row. To create the triangular increases at the two corners, work the following into the first stitch: half double crochet, chain one, half double crochet. Then work half double crochet stitches across to the last stitch. In the last stitch work half double crochet, chain one, half double crochet. These chain-one junctions create the increases at the two outer corners of the triangle.
- Row 3 and subsequent rows: Repeat the procedure in Row 2. At the beginning of each row chain two and turn. Work one half double crochet into the first stitch, followed by chain one, and one half double crochet into the same stitch to form the left corner increase. Work half double crochet stitches evenly across the row. In the last stitch work one half double crochet, chain one, and one half double crochet in the last stitch to form the right corner increase.
- Continue repeating Row 2 until the triangle measures approximately 5.5 inches tall, or until the triangle reaches the desired length for the holder. Count the stitches at the base to note the number; this can help you make the second panel identical. Fasten off, leaving a tail of about 12 inches for sewing.
Texture option
For a textured look, alternate rows with double crochet every other row, or work every third row as a double crochet row. If you choose to introduce double crochet rows, maintain the same corner increase technique (double crochet, chain one, double crochet) to preserve the triangular shape.
Trunk (optional)
- With brown yarn, chain six.
- Row 1: Single crochet into the second chain from the hook and across. You will have five single crochet stitches.
- Rows 2 to 4: Chain one, turn, and single crochet across. Adjust the number of rows so that the trunk height measures approximately one half inch to one inch proportionally to the triangle size. Fasten off, leaving a 12-inch tail for sewing.
Make the second panel
Repeat the triangle instructions to create a second identical panel. Ensure that both are the same height and that you have the same stitch count at the base so that alignment is easy during assembly.
Assembly — forming the pocket
- With right sides facing together, align the two triangle panels carefully so that edges match.
- Thread a tapestry needle with matching green yarn. Starting at one side along the long edge, whip stitch or slip stitch through both layers along the two long sides only, leaving the wide base (top of triangle) open to form a pocket. Whip stitch will create a nearly invisible seam, while slip stitch may produce a slightly decorative edge. If you prefer the card to be inserted from the bottom, seam the base and leave the point open, but top insertion is most convenient and matches the design intent.
- If you intend for the trunk to be visible on the front only, stitch the brown trunk to the bottom tip of the front panel, sewing through the front panel only. Use the 12-inch tail to secure it neatly and weave in ends.
Flap and closure
- To make a small flap for closure: fold the base (the wide end) of the front panel down approximately one inch toward the front of the triangle. With matching yarn, stitch a line across the sides to secure the fold so that it forms a tiny flap that can tuck over the top edge of the inserted gift card.
- Alternatively, attach a small button and create a small loop of chain stitches on the flap to loop over the button for a secure close. You may instead sew a snap to the flap and the back panel for a cleaner closure.
Ornament and star decoration
- To add ornaments: embroider small French knots or attach tiny sequins to resemble ornaments on the tree. Use contrasting yarn colors and a tapestry needle to embroider small knots. For a French knot with yarn, insert the needle from the back to the front, wrap the yarn around the needle two or three times, and then insert the needle back very close to the coming out point while holding the wraps gently, pulling through to form a small knot.
- To create a tiny star: with yellow yarn create a small five-point star as follows. Make a magic ring or a small loop; chain two, make single crochet stitches into the ring as needed for a tiny star body. For a neat star, you can crochet five short chains and join them in the ring with single crochet stitches to form the points, then secure and sew to the top of the tree.
Finishing
- Weave in all loose ends with a tapestry needle.
- If needed, use a very light steam or a gentle blocking to flatten and shape the panels, taking care with synthetic or delicate yarns.
- Add optional hanging loop by attaching a small chain of stitches at the top center and sewing the ends to the back.
Variations and finishing ideas
- Layered tree: work three triangles of graduated sizes and stitch only at the back so the front becomes a layered, dimensional tree.
- Horizontal pocket: seam only along the bottom to create a horizontal pocket that accepts a card sideways.
- Ornament accents: crochet tiny bobbles, pom-poms, or small star appliques and sew onto the front.
- Gift tag: attach a contrasting yarn loop to convert the holder into a little ornament that doubles as a gift tag.
Tips and troubleshooting
- Keep tension even. Missing increases will skew the triangle.
- Mark the central base stitch at the widest edge to ease symmetrical ornament placement.
- If the triangle becomes slightly cupped, check for missed chain-one corner spaces or inconsistent stitch counts.
- For very small yarn or fine tension, reduce hook size to match gauge.
Pattern 2 — Classic Granny-Hexagon Cardigan (Beginner to Intermediate)
Skill level: Beginner to intermediate (basic stitch work, joining hexagons, simple shaping)
Finished sizes: This pattern explains how to make sizes Small, Medium, Large, and Extra Large by varying the number of hexagons and rows. The pattern provides modular instructions so you can scale to your preferred measurements.
Materials
- Worsted weight yarn (weight category 4) or aran weight yarn depending on desired drape. Estimate yarn usage by size:
- Small: approximately 1,000 to 1,200 yards
- Medium: approximately 1,200 to 1,500 yards
- Large: approximately 1,500 to 1,800 yards
- Extra Large: approximately 1,800 to 2,200 yards
- Crochet hook: 5.0 millimeter recommended as a starting point; adjust to obtain gauge.
- Tapestry needle.
- Blocking mat and pins.
- Stitch markers.
- Optional: buttons or toggle closures.
Finished measurements and planning
Because hexagon cardigans are modular, plan the layout before you stitch. For a relaxed, slightly oversized fit, assemble hexagons in a grid that forms a back panel, two front panels, and sleeves. A common layout for a cardigan uses hexagons arranged in rows: for example, a back panel consisting of a 4 by 3 hexagon grid, two front panels each of 2 by 3 hexagon grids, and sleeves made from hexagon strips. The size of each hexagon depends on yarn and hook; measure one completed hexagon after blocking to estimate how many you will need for your chosen size.
Gauge
Work a sample hexagon, block it, and measure across the widest point from flat side to flat side, and also measure from corner to corner. For this pattern, a typical target is one hexagon measuring approximately 6.5 inches from side to side when using worsted weight yarn and a 5.0 millimeter hook. Adjust hook and yarn accordingly.
Hexagon motif — Classic granny hexagon (make multiple)
The classic granny hexagon is built in rounds with clusters of double crochet that radiate outward and chain spaces that form the hexagon corners.
- Begin with a magic ring, or chain four and join with a slip stitch to form a ring if you prefer that method.
- Round 1: Chain three (this counts as the first double crochet), then work two double crochet into the ring, chain two, and work three double crochet into the ring. Repeat this cluster of three double crochet, chain two four more times so that you have six clusters separated by chain-two corners. After the sixth cluster, join with a slip stitch to the top of the beginning chain three. You now have a small six-sided shape.
- Round 2: Slip stitch into the first chain-two space to position, chain three (counts as first double crochet), work two double crochet into the same chain-two space, chain one, then work three double crochet into the same chain-two space. This creates an increase at the corner with a chain-one space between corner shells for stability. Move to each chain-two corner space and repeat corner shell: three double crochet, chain one, three double crochet. Between corners, in the side chain-one space from the previous round, work three double crochet to broaden the sides. Continue around and join with a slip stitch to the top of the beginning chain three.
- Round 3: Repeat the corner increase pattern: slip stitch to the first side space, chain three, work two double crochet, chain one, work three double crochet in the corner spaces. For the side shell spaces place three double crochet clusters across each side to expand the hexagon evenly. At each corner maintain the three double crochet, chain one, three double crochet structure. Continue repeating rounds until the hexagon equals your desired size; for example, stop when hexagons measure approximately 6.5 inches across.
Note: When working clusters across sides, count stitches to ensure each side expands evenly and the hexagon lies flat. You can adjust by adding or omitting side clusters if necessary.
Blocking the hexagons
After making the number of hexagons needed for your layout, wet block or steam block each motif. Pin them to a blocking mat, shaping into perfect hexagons with flat edges. Allow to dry completely. Blocking ensures uniform size and easier joining.
Joining hexagons
There are three recommended joining methods:
- Whip stitch seam: Place two hexagons with right sides facing, align edges, and use a tapestry needle to whip stitch through the back loops only for a discreet seam. This yields a nearly invisible join.
- Single crochet seam: With right sides facing, use a crochet hook and work single crochet stitches through both layers along the matched edges to create a decorative raised seam. This will add a ridge that can be a design element.
- Join-as-you-go method: When working the final round of a hexagon, substitute slip stitches into the corresponding edge spaces of the adjacent assembled motifs to connect them without sewing later. This method is efficient but requires careful alignment.
For a classic look, join hexagons using the whip stitch across the entire cardigan assembly.
Assembly layout and construction
- Determine layout: For a medium size example, assemble a back panel of four hexagons wide by three hexagons high (4 by 3 grid). Front panels may be two hexagons wide by three hexagons high each. Sleeve panels can be constructed from strips of three hexagons lengthwise and three hexagons around.
- Joining the back panel: Join hexagons horizontally to create rows. Join the rows vertically to complete the panel, using your chosen seam method and ensuring consistent stitch tension.
- Front panels: Assemble two identical front panels. If you prefer an opening with a band for buttons, leave an edge of hexagons unjoined along the front edge where you will attach a button band later.
- Sleeves: For simple sleeves, join hexagons into a rectangular strip that will be seamed into a tube. Alternatively, construct gusseted sleeves by placing hexagons in a tapered arrangement to fit the armhole for a more fitted sleeve.
- Joining panels: With right sides facing, sew the shoulders together by joining the top hexagon edges of the front panels to the top edge of the back panel. Leave space for the neck opening according to your size plan. For the side seams, align hexagon rows and whip stitch the sides together, leaving openings for the armholes. Insert the sleeve tubes or assembled sleeve panels and seam them into the armholes.
Neckline and collar finishing
For a clean neckline, attach a simple band worked in single crochet evenly around the neck opening. To work the band:
- With the right side facing and using worsted weight yarn, join yarn to the center back of the neck.
- Work a round of single crochet evenly around the neck, placing two single crochet stitches into corner joins where the hexagon corners form sharper points to avoid puckering.
- Work two to three rounds of single crochet or half double crochet for a wider collar, depending on desired look. For a shawl collar, work additional rounds and fold to the front, sewing the folded edge down to create structure.
Button bands and closures
For button bands, attach a single crochet band to the front edges. To create buttonholes:
- While working the second round of the band, place a chain-two or chain-three space at the positions where buttons will be placed, then continue single crochet. On the opposite band, count to match the positions and sew buttons in place.
- For toggles or ties, attach cords by chaining to desired length and sewing ends securely to the inside of the front panels.
Finishing and care
- Weave in all ends thoroughly.
- Block the assembled cardigan lightly to even out seams and set the shape.
- Store loosely folded; for wool blends, consider moth-resistant storage.
- Machine washing is not recommended for delicate fibers; hand wash and lay flat to dry when necessary. For synthetic blends, check yarn label for care instructions.
Troubleshooting and tips
- To avoid a bulky seam at joins, trim extra tails and use smaller stitches when whip stitching.
- If hexagon sizes vary slightly, selectively add an extra round to smaller motifs before joining to equalize size.
- If the sleeve opening is too tight, add a row of hexagons or widen by replacing some join rounds with more generous single crochet bands.
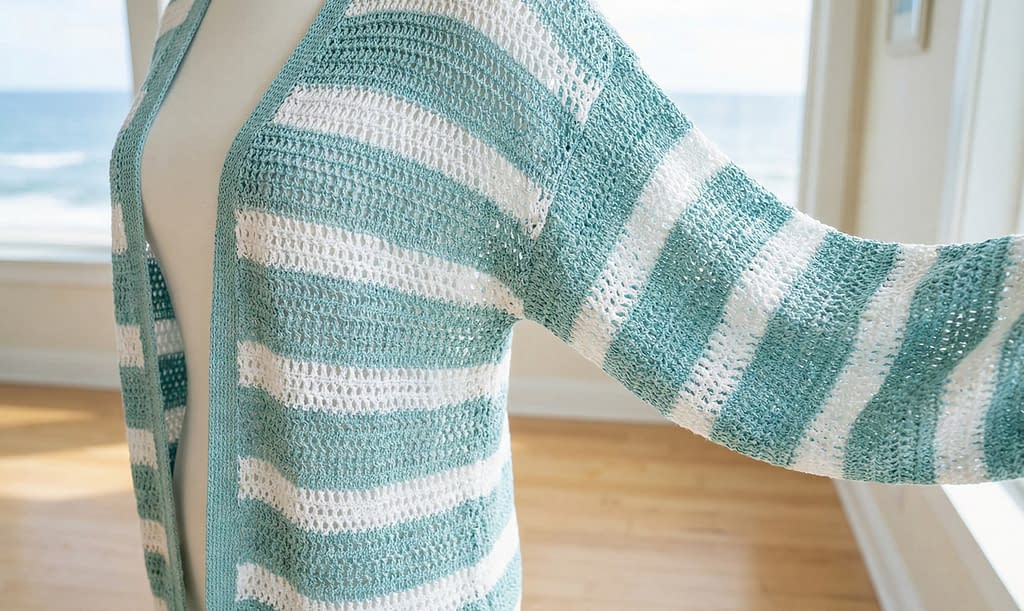
Pattern 3 — Lightweight Lace Hexagon Cardigan in Seafoam Stripes
Skill level: Beginner to intermediate (lace stitch knowledge, joining hexagons, shaping)
Inspiration: A lightweight cotton hexagon cardigan in seafoam blue and crisp white stripes with open stitchwork and graceful drape.
Materials
- Sport weight or light worsted weight cotton yarn depending on desired drape. For a summer cardigan, choose cotton or cotton blend with good stitch definition.
- Recommended yarn quantity (approximate):
- Small: 900 to 1,100 yards
- Medium: 1,100 to 1,300 yards
- Large: 1,300 to 1,600 yards
- Crochet hook: 4.0 millimeter recommended as a starting point for sport to light worsted weight; adjust for gauge.
- Tapestry needle, stitch markers, scissors.
- Blocking supplies.
Design notes
This cardigan uses hexagon motifs with lace-like openwork on each panel, accented by alternating stripes of seafoam blue and crisp white. The cardigan is draped on a minimalist aesthetic with clean edges, and the hexagons are arranged so the garment has a fluid silhouette with generous sleeves.
Lace hexagon motif — working the lace motif
- Begin with a magic ring or chain four and join into a ring.
- Round 1: Chain three (counts as first double crochet). Work two double crochet into the ring, chain two, then work three double crochet into the ring. Repeat this pattern to form six corner clusters separated by chain two spaces. Join with slip stitch to the top of the beginning chain three.
- Round 2: Slip stitch to the first chain-two corner space. Chain three, double crochet twice into the corner space, chain two, and double crochet three into the same corner space. These corner shells will create the hexagon points. For lace texture along the sides, work the following sequence between corners: chain one, skip two stitches, double crochet into the next stitch, chain one, skip two stitches, double crochet, and so on, forming small chain-one mesh panels. Continue around, joining at the end of the round.
- Round 3: Continue to expand the hexagon, maintaining a decorative mesh on the sides. Work triple cluster groups at the corners and add rows of double crochet separated by chain-one mesh spaces on the sides. For each successive round, maintain symmetry by repeating the pattern across all six sides.
Work alternating color rounds to create stripes. For seafoam and white stripes, plan to change color at a round boundary and carry color neatly by fastening off the previous color and joining the next at the beginning of the round, or use a subtle carry method along the inside of the last round if the yarn allows.
Size of motif and gauge
After completing one lace hexagon and blocking, measure across the flat sides. Aim for a hexagon around 5.5 to 6.0 inches across for lightweight yarn. Adjust hook size to meet this measure.
Assembly layout
- For a mid-length cardigan, a suggested layout is:
- Back panel: 4 hexagons wide by 3 hexagons high
- Front panels: each 2 hexagons wide by 3 hexagons high
- Sleeves: two or three hexagons in circumference by desired sleeve length
- Because lace motifs are more delicate, use a single crochet joining method to stabilize seams and provide a slightly structured edge.
Joining and seam stabilization
- With right sides together, slip stitch through corresponding stitches or chain spaces for an unobtrusive join. Alternatively, use a single crochet join on the right side to create a clean, narrow ridge that helps the drape hold.
- When joining in contrasting white, consider joining in seafoam for a subtle transition, or use white to highlight the seams as a design feature.
Sleeve shaping
- For a relaxed sleeve, gently assemble hexagon strips into a rectangular panel and seam into a tube.
- To create a bell sleeve effect, increase the number of hexagons toward the hem of the sleeve by adding an extra hexagon on one or two rows, ensuring even expansion.
- For fitted sleeves, decrease by changing to smaller hexagons near the cuff or adding single crochet rounds to reduce circumference.
Edging and finishing
- For a delicate finishing, work two rounds of single crochet around all raw edges to stabilize and provide weight so the cardigan hangs well.
- For a decorative touch, work a final round of picot edging or a shell border in the contrasting white to frame the garment.
- For buttonless open-front styling, add a narrow band of half double crochet along the front edges to give a finished look without adding bulk.
Blocking and final shaping
- Block the assembled cardigan gently by pinning it to the exact dimensions you desire, shaping the lace panels to open the mesh and set the stripe lines.
- Allow to dry completely before wearing or storing.
Styling and wearing suggestions
- Wear over a fitted tank or lightweight dress to let the lace show through.
- Because cotton has less natural stretch than wool, ensure the cardigan has comfortable wearing ease across the shoulders and bust.
- If you prefer more drape, substitute a bamboo-cotton blend yarn or add a viscose blend for a softer hand.
Troubleshooting and tips
- If the hexagons do not lie flat, check that corner increases are consistent and that the chain spaces are not too tight.
- When changing colors, weave in ends neatly on the wrong side to avoid visible carries in lace.
- If seams pucker, add an additional round of single crochet along the seamline to relax tension.
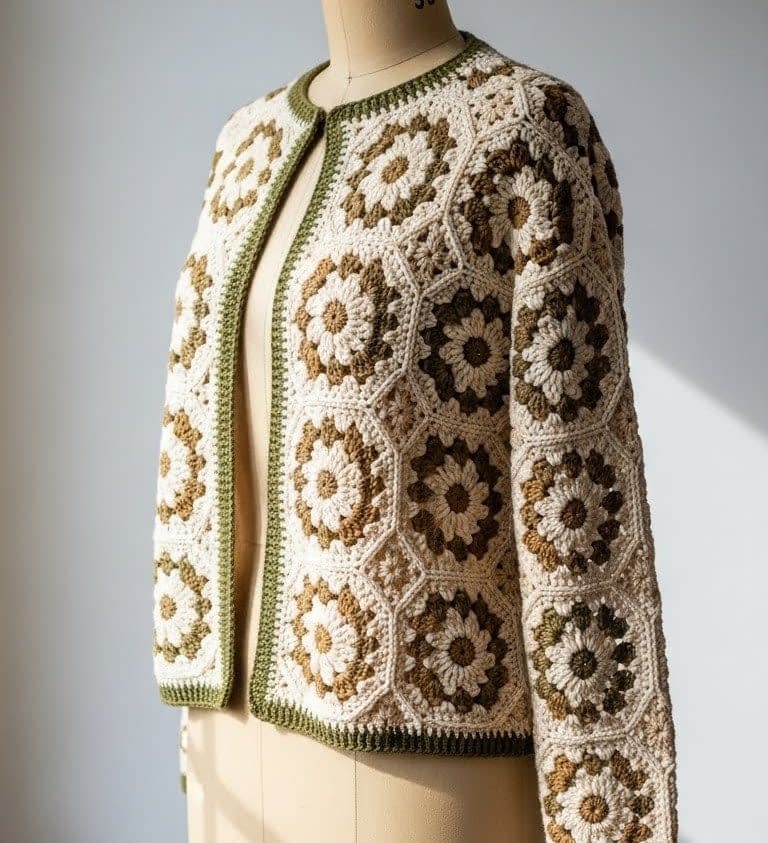
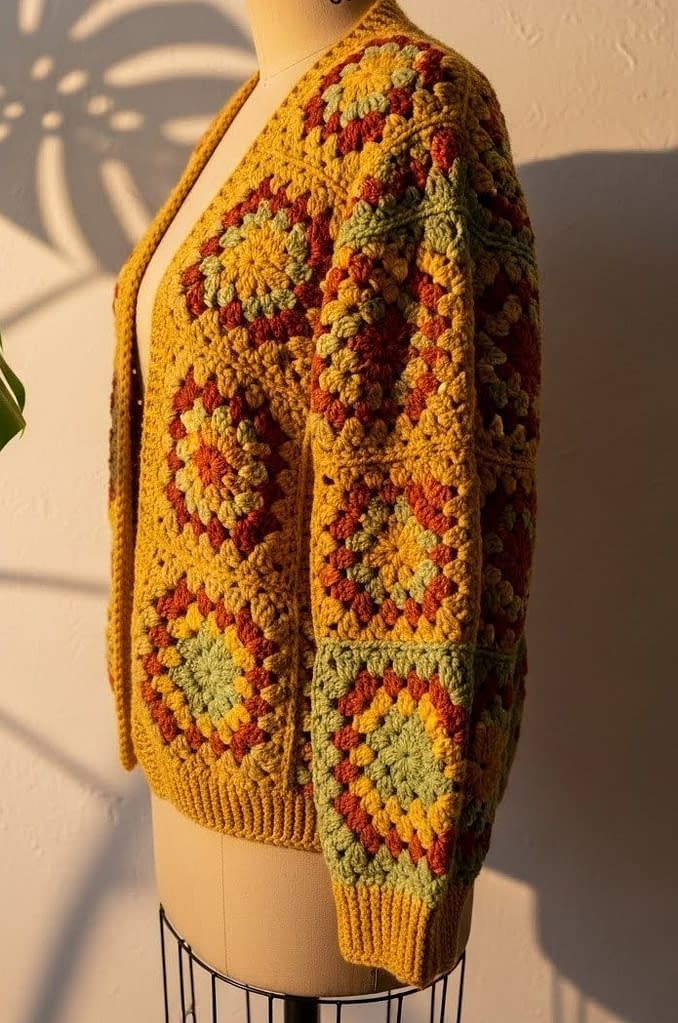
Pattern 4 — Chunky Retro Granny Hexagon Cardigan (Mustard, Burnt Orange, Avocado)
Skill level: Beginner to intermediate (comfortable with double crochet stitches, color changes, and garment assembly)
Style focus: Bold retro look with thick texture and strong visual impact
Finished fit: Relaxed, cozy, slightly oversized cardigan with structured drape
Design overview
This cardigan is built from large, chunky hexagons inspired by classic granny-square aesthetics. The use of a retro color palette gives it a vintage feel, while the thick yarn creates warmth and structure. Because the yarn is bulky, the construction is fast and highly rewarding, making this an excellent garment project for crocheters who want visible progress.
Materials
- Bulky or super bulky weight yarn (weight category 5 or 6) in three colors:
- Mustard yellow (main color)
- Burnt orange (secondary color)
- Avocado green (accent color)
- Estimated yarn usage:
- Small to Medium: 1,200 to 1,500 yards
- Large to Extra Large: 1,600 to 2,000 yards
- Crochet hook: 8.0 millimeter or 9.0 millimeter (adjust for gauge)
- Tapestry needle
- Stitch markers
- Scissors
- Blocking supplies (light blocking only)
Gauge
Make one complete hexagon using the planned color sequence and hook size. After light blocking, measure across flat sides. A target size is approximately 9 to 10 inches across per hexagon. Adjust hook size if necessary.
Color planning
A suggested color rotation per hexagon:
- Center round: Mustard yellow
- Second round: Burnt orange
- Third round: Avocado green
- Fourth round: Mustard yellow again
Keep the same color order for all hexagons to maintain a cohesive retro appearance.
Hexagon motif instructions (chunky granny hexagon)
Foundation
- Create a magic ring.
- Chain three (counts as the first double crochet).
- Work two double crochet stitches into the ring.
- Chain two to form a corner space.
- Work three double crochet stitches into the ring.
- Repeat steps 4 and 5 four more times so that you have six groups of three double crochet stitches separated by chain-two spaces.
- Join with a slip stitch to the top of the starting chain three.
Round 2
- Slip stitch into the nearest chain-two corner space.
- Chain three.
- Work two double crochet stitches into the same space.
- Chain two.
- Work three double crochet stitches into the same corner space.
- In the space between corners, work three double crochet stitches.
- Repeat around, placing corner increases in each chain-two space.
- Join with a slip stitch.
Round 3 and beyond
- Continue building the hexagon by adding side clusters between corners.
- In each new round, every side will have one additional three–double-crochet cluster.
- Always maintain corners as three double crochet, chain two, three double crochet.
- Change colors at the end of rounds for clean stripes.
- Stop when hexagon reaches desired size.
Fasten off and weave in ends securely.
Number of hexagons and layout
- Back panel: 3 hexagons wide by 2 hexagons high
- Front panels: 1 hexagon wide by 2 hexagons high on each side
- Sleeves: 2 hexagons per sleeve, joined lengthwise
This layout creates a cropped, boxy cardigan. For longer length, add an additional row of hexagons at the bottom.
Assembly
- Block all hexagons lightly to even out edges.
- Join hexagons using whip stitch with matching yarn for flat seams.
- Assemble the back panel first.
- Join front panels to the back at shoulder edges.
- Attach sleeves by aligning sleeve hexagons to armholes.
- Seam side edges from hem to underarm.
Edging and finishing
- Work two rounds of single crochet around the front opening, neckline, and hem.
- For a bold finish, use avocado green for the edging.
- Add optional oversized buttons or leave open for casual styling.
Tips
- Because bulky yarn shows stitch definition clearly, keep tension even.
- Avoid over-blocking; bulky yarn holds shape naturally.
- Use sturdy yarn blends to prevent sagging.
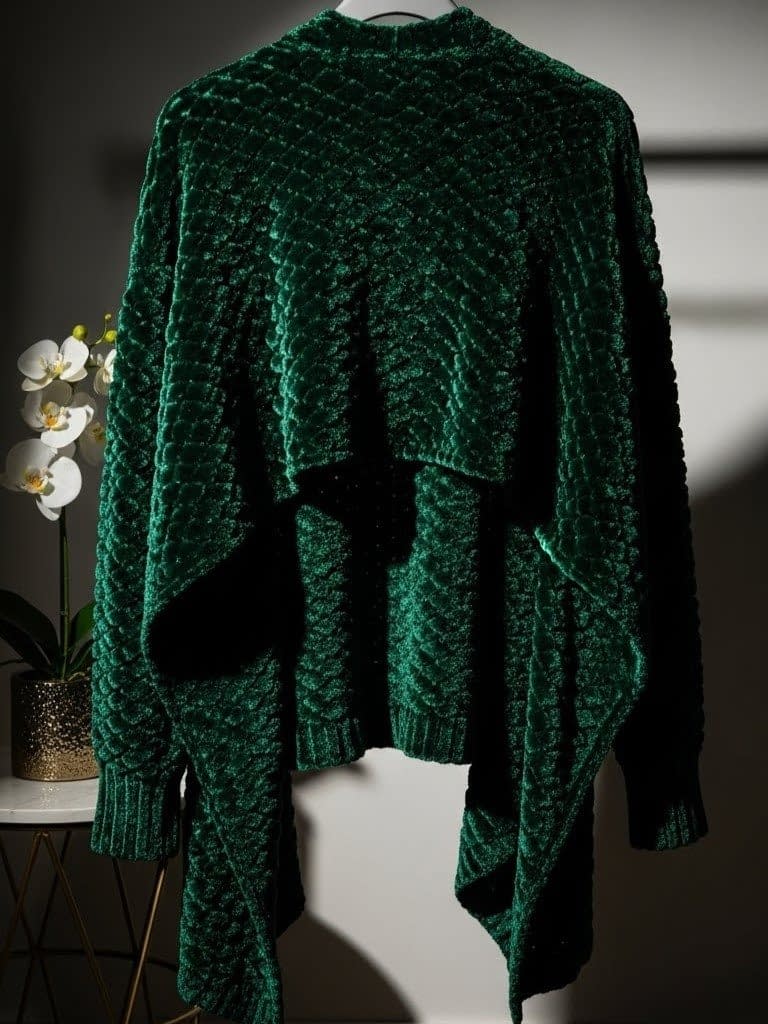
Pattern 5 — Elegant Chenille Velvet Hexagon Cardigan (Emerald Luxe)
Skill level: Intermediate (experience with slippery yarns recommended)
Style focus: Plush, dramatic, luxurious texture
Finished fit: Soft drape with sculptural back geometry
Design overview
This cardigan is made from chenille velvet yarn, giving it a rich, luminous surface and dramatic depth. The hexagon construction creates a striking geometric drape at the back, while the plush yarn elevates the cardigan into a statement garment suitable for evening wear or high-fashion layering.
Materials
- Chenille velvet yarn (bulky weight recommended) in deep emerald green
- Estimated yarn usage:
- Medium: approximately 1,400 yards
- Large: approximately 1,700 yards
- Crochet hook: 7.0 to 8.0 millimeter
- Tapestry needle (large eye)
- Stitch markers
- Scissors
Yarn handling notes
Chenille yarn has limited stitch memory and can shed if handled roughly.
- Avoid frogging repeatedly.
- Use slow, deliberate movements.
- Keep stitch tension consistent but relaxed.
Gauge
Work one hexagon and gently lay flat without aggressive blocking. Aim for approximately 8.5 inches across.
Hexagon motif instructions (solid velvet hexagon)
Foundation
- Create a magic ring.
- Chain two (counts as the first half double crochet).
- Work seven half double crochet stitches into the ring.
- Join with a slip stitch.
Round 2
- Chain two.
- Work two half double crochet stitches into each stitch around.
- Join with a slip stitch.
Round 3 — forming hexagon corners
- Chain two.
- Work one half double crochet in the next stitch.
- In the next stitch, work two half double crochet, chain one, two half double crochet. This forms a corner.
- Work one half double crochet in each of the next two stitches.
- Repeat the corner increase five more times.
- Join with a slip stitch.
Subsequent rounds
- Continue expanding by adding one half double crochet stitch per side between corners.
- Always maintain corners as two half double crochet, chain one, two half double crochet.
- Stop when desired size is reached.
Fasten off with a long tail for joining.
Assembly layout
- Back: 2 large hexagons joined vertically
- Front panels: 1 hexagon each
- Sleeves: worked directly from armholes with additional rounds for seamless shaping
Sleeve construction (worked in the round)
- Attach yarn at armhole opening.
- Work rounds of half double crochet evenly around the opening.
- Increase slightly every third round for bell-shaped sleeves.
- Continue until desired sleeve length is reached.
Finishing
- Do not aggressively block.
- Light steam from a distance if necessary.
- Weave ends carefully to avoid yarn breakage.
Tips
- This cardigan is heavy; reinforce shoulder seams with an extra line of stitching.
- Avoid hanging during storage to prevent stretching.
Pattern 6 — Ethereal Mohair Ombre Hexagon Cardigan
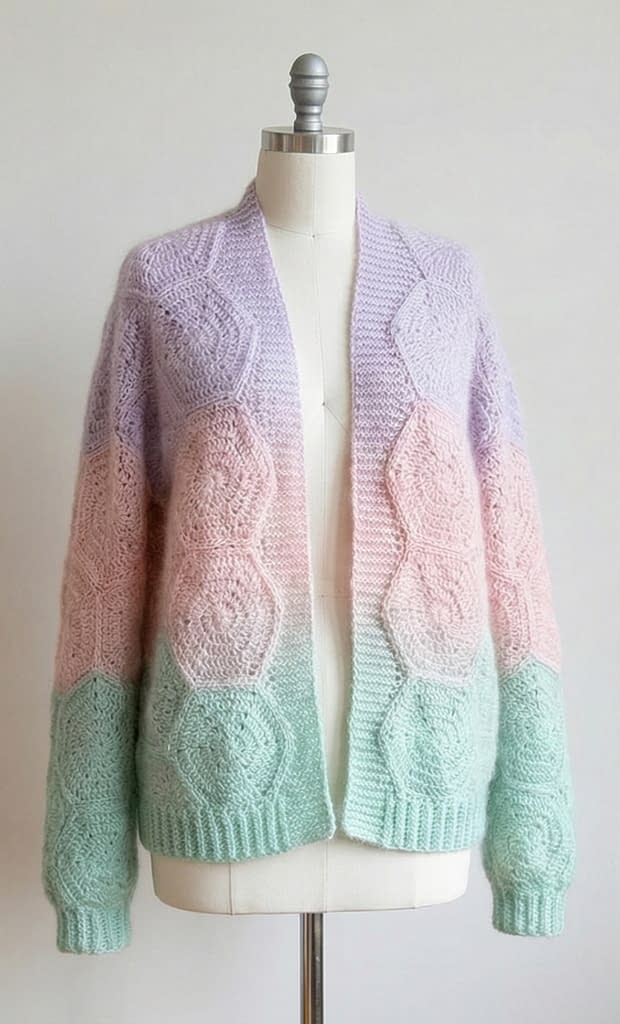
Skill level: Intermediate
Style focus: Light, airy, romantic texture
Finished fit: Flowing silhouette with soft halo
Design overview
This cardigan uses mohair-blend yarn with a gradual ombre shift from lavender to baby pink to mint green. The hexagons appear almost cloud-like, blending seamlessly into each other. This is an ideal pattern for statement layering over simple outfits.
Materials
- Mohair blend yarn with long color transitions
- Yarn usage:
- Small to Medium: 1,200 to 1,500 yards
- Large: 1,700 yards
- Crochet hook: 6.0 millimeter
- Tapestry needle
- Stitch markers
- Blocking mats and pins
Working with mohair
- Use good lighting to see stitches clearly.
- Avoid frogging when possible.
- Place stitch markers at corners.
Gauge
Blocked hexagon should measure approximately 7 inches across.
Lace hexagon motif instructions
Foundation
- Create a loose magic ring.
- Chain four (counts as one double crochet and chain one).
- Work two double crochet stitches into the ring.
- Chain one.
- Repeat until six clusters are formed.
- Join with a slip stitch.
Round 2
- Slip stitch into chain-one space.
- Chain four.
- Work two double crochet into the same space.
- Chain one.
- In the next chain-one space, work three double crochet, chain one.
- Repeat around.
Round 3
- Add chain spaces between clusters to create airy texture.
- Maintain six evenly spaced corners.
- Expand until desired size is achieved.
Assembly
- Back panel: 3 hexagons arranged in a triangular formation
- Front panels: 1 hexagon each
- Sleeves: open, draped sleeves formed by adding rounds directly to armholes
Joining
Use join-as-you-go slip stitch method to preserve softness and reduce bulk.
Edging
- Work a single round of loose single crochet.
- Finish with a chain-loop edging for decorative softness.
Blocking
- Wet block gently.
- Pin lightly to avoid overstretching.
- Allow to dry completely.
Tips
- Let the ombre yarn flow naturally; avoid cutting unless necessary.
- Pair with neutral clothing to let color transitions shine.
Pattern 7 — Boho Linen and Hemp Hexagon Cardigan with Tassels
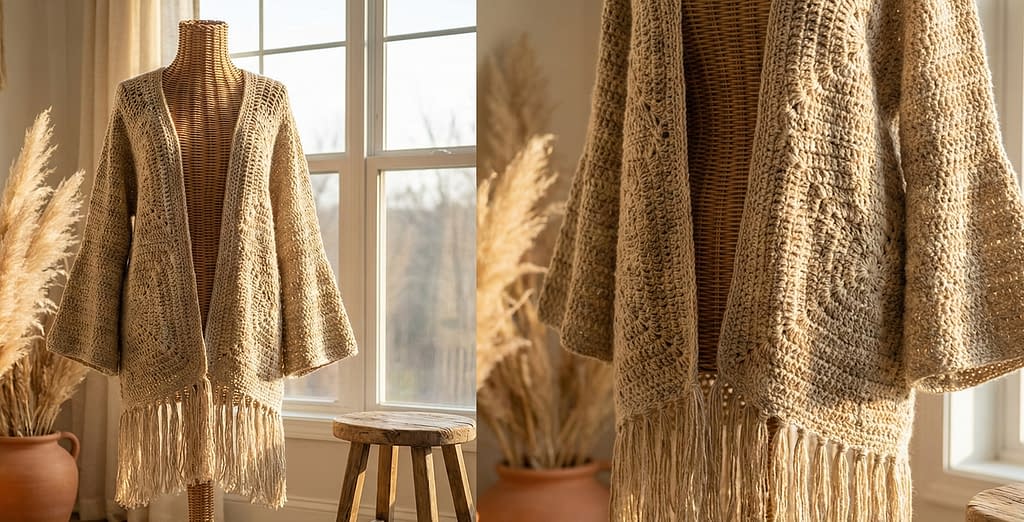
Skill level: Intermediate (working with natural fibers; tassel and finishing techniques)
Style focus: Earthy, textured boho look with long bell sleeves and organic details
Finished fit: Relaxed and drapey, naturally slouchy with soft structure from linen/hemp fibers
Materials
- Linen or linen-hemp blend yarn, worsted weight or sport-to-worsted blend depending on desired drape. Suggested fiber: linen with a small percentage of soft cotton for comfort. Amounts below assume worsted-weight linen:
- Small: approximately 1,400 yards
- Medium: approximately 1,700 yards
- Large: approximately 2,000 yards
- Crochet hook: 5.0 millimeter recommended as a starting point; adjust to obtain gauge
- Tapestry needle
- Scissors
- Stitch markers
- Blocking mat and rustproof pins
- Optional: small amounts of contrasting yarn to wrap tassels
- Optional: wooden beads for tassel decoration
Design notes and yarn handling
Linen and hemp yarns are strong and breathable but have less elasticity than wool, so tension must be consistent. Linen relaxes and softens after wearing and laundering. Because the fibers can be stiff before breaking in, plan for gentle blocking and extended wear so the garment gains character. Tassels add a boho accent and may be attached at the hem or sleeve edges.
Gauge and motif size
Make a single hexagon motif and wet-block it gently to allow linen fibers to relax, then measure across the flat sides. Aim for hexagons approximately 6 to 7 inches across for worsted linen with a 5.0 millimeter hook. Adjust hook if hexagons are smaller or larger than desired.
Hexagon motif — textured linen hexagon (make multiple)
This motif emphasizes a combination of half double crochet rows and open chain spaces to allow linen’s natural texture to show.
- Create a magic ring.
- Round 1: Chain two (this counts as the first half double crochet). Work five additional half double crochet stitches into the ring so that there are six half double crochet stitches including the beginning chain two. Do not join with a slip stitch; instead, treat this as the first short-row base for a hexagon formed by corner increases.
- Round 2: Chain two and turn. Work into the first stitch the following sequence to form the first corner: half double crochet, chain one, half double crochet. Work half double crochet stitches across the short row until you reach the last stitch and work half double crochet, chain one, half double crochet into the last stitch to form the second corner. Continue working in short-row fashion so that each row’s ends are corner increases. Alternatively, you may transition to true rounds with chain spaces at corners by joining and continuing in the round using three half double crochet clusters at corners separated by chain-one or chain-two spaces; choose the method that results in the flatter hexagon for your yarn choice.
- Round 3 and subsequent rounds: For added airy texture, alternate rounds as follows:
- Texture round: Work a round of half double crochet stitches across each side between the corner clusters.
- Mesh round: Work a round consisting of one double crochet, chain one, skipping one stitch pattern across the sides to create subtle lace that enhances drape.
- Continue alternating texture and mesh rounds, maintaining corner increases at each corner as either half double crochet, chain one, half double crochet or three half double crochet clusters separated by chain-one spaces, until hexagon reaches the desired dimension.
- Fasten off and weave in ends. Make the required number of hexagons based on your chosen layout.
Recommended layout and sizing
A flattering boho layout for a relaxed fit:
- Back panel: 4 hexagons wide by 3 hexagons high
- Front panels: 2 hexagons wide by 3 hexagons high each
- Sleeves: Create bell sleeves by joining hexagons in vertical strips that flare: for each sleeve, assemble a vertical column of three hexagons and then add additional hexagons around the lower row to create expansion for the bell shape
Adjust layout for longer or shorter length by adding or removing hexagon rows.
Joining and seams
Because linen is less elastic, a stable seam is important to prevent distortion. Recommended joins:
- Whip stitch join using a tapestry needle and matching yarn for a flat, unobtrusive seam.
- For slightly decorative seams, use single crochet join on the right side, working through both layers and placing two single crochet into corner spaces to preserve alignment.
Join hexagons one row at a time to maintain consistent edge alignment and reduce stress on the fabric as you rotate panels into place.
Sleeve shaping and tassel placement
- Construct sleeve strips as described and fold into tubes. Join sleeve seams using whip stitch.
- Attach each sleeve tube to the armhole: position with right sides together and seam evenly around the opening. Use stitch markers to match corner junctions and midpoints.
- For bell sleeves, add one or two extra hexagons around the lower sleeve circumference. Join them with the same method used for body seams.
Tassel placement:
- Decide where the tassels will hang: at the hem, along the lower edge of the sleeve, and optionally at front panel corners.
- To make a tassel: wind yarn around a small cardboard piece of the desired length, fold the wound yarn to make a loop at the top, secure the top with a small wrap of contrasting yarn, cut the bottom loops, and tie a small knot under the wrap to secure. Trim to even length.
- Attach tassels by threading the loop through the edge with a crochet hook and pulling the tails through the loop to form a lark’s head knot. Add a wooden bead before securing if desired. Space tassels evenly around the hem, for example every 2 inches or every second hexagon corner for a balanced boho look.
Edge finishing
Work a round of single crochet around all raw edges to stabilize and create a tidy finish. Because linen can stiffen, the single crochet band will maintain the garment shape and provide subtle weight. For an organic aesthetic, work one additional decorative round of chain-loop trim or small picot edging.
Blocking and final care
- Gently wet the assembled garment and pin it to shape on a blocking mat. Because linen relaxes significantly, take care to set final dimensions during blocking.
- Allow to dry completely.
- Care: hand wash or machine wash on gentle cycle in cool water and lay flat to dry to prevent excessive stretching. Avoid tumble drying.
Variations and troubleshooting
- For a lighter-weight cardigan, use a sport-weight linen and a smaller hook but plan for increased hexagon count.
- If seams pull, add a narrow single crochet band along the seamline on the inside to spread tension.
- If the garment is too stiff initially, wear it and launder once or twice to soften the fibers.
Pattern 8 — Modern Metallic-Accent Black Hexagon Cardigan
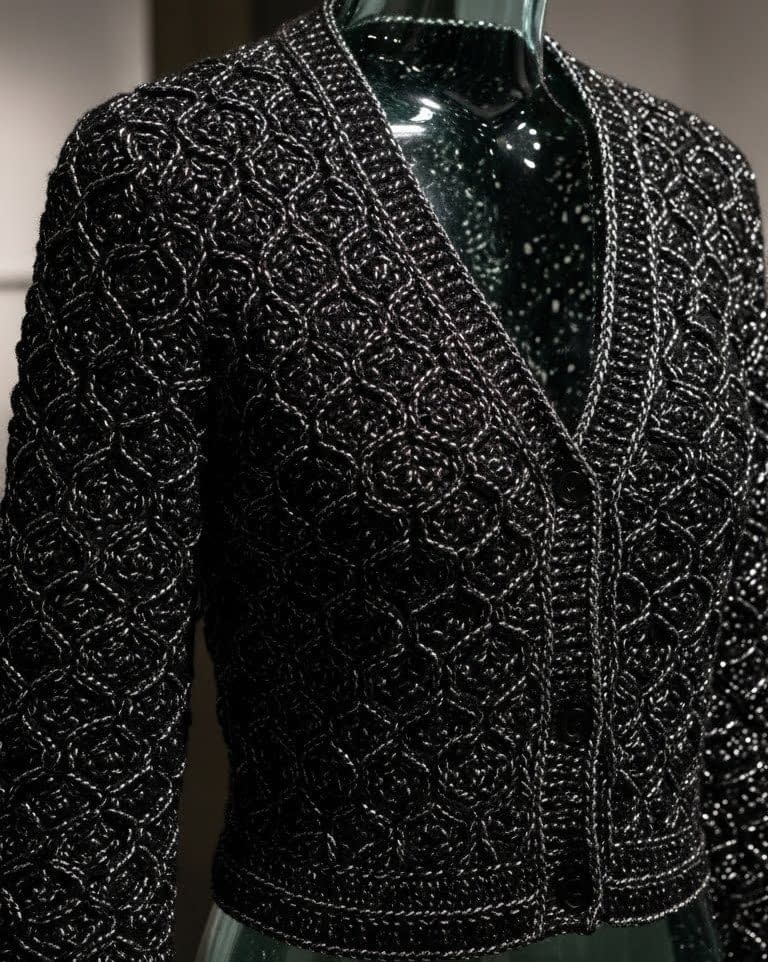
Skill level: Intermediate to advanced (working with metallic thread and mixed yarns; precise finishing)
Style focus: Sleek modern silhouette with subtle metallic sparkle and sharp geometric lines
Finished fit: Structured and slightly fitted to emphasize silhouette and metallic glint
Materials
- Main yarn: Black worsted weight yarn in a smooth merino blend or cotton-nylon blend for structured stitch definition
- Metallic fiber: lightweight silver metallic thread or a ribbon metallic strand suitable for garment use; because metallic thread can be abrasive, plan to hold the metallic strand together with the main yarn or use a soft metallic-blend yarn that is designed for wearability
- Recommended approach: hold both the black main yarn and a single strand of metallic fiber together when working body edges or specific rounds where metallic highlights are desired
- Estimated yardage:
- Small: 1,200 to 1,400 yards main yarn; 150 to 250 yards metallic thread for accents
- Medium: 1,400 to 1,600 yards main yarn; 200 to 300 yards metallic thread
- Large: 1,700 to 2,000 yards main yarn; 300 to 400 yards metallic thread
- Crochet hooks: 4.0 millimeter for main body work; 3.5 millimeter for tighter metallic rounds if necessary
- Tapestry needle suitable for metallic thread; use a large-eye needle that will not fray the metallic strand
- Scissors
- Stitch markers
- Blocking tools
Working with metallic thread safely
- Metallic thread can snag and fray. To achieve the glint effect without discomfort against the skin, hold the metallic strand together with the black main yarn when working accent rounds rather than using the metallic on its own.
- Avoid placing metallic yarn directly where it will contact skin if it is rough; prefer metallic rounds on external edges or incorporate a lining if necessary.
- Avoid excessive frogging; plan color placement carefully.
Gauge and motif scale
Aim for hexagons approximately 5.5 to 6.5 inches across when blocked, using worsted yarn and a 4.0 millimeter hook. Because the design relies on a crisp geometric silhouette, it is important that each hexagon is uniform in size.
Hexagon motif — structured single crochet hexagon
This motif uses single crochet and chain spaces to create a tight, structured hexagon with sharp angles suitable for metallic highlighting.
- Make a magic ring.
- Round 1: Chain one (does not count as a stitch). Work six single crochet stitches into the magic ring. Pull the ring closed and join with a slip stitch to the first single crochet.
- Round 2: Chain two (counts as a half double crochet if preferred to create small height; however for structure remain with single crochet-based increases to keep edges compact). Work the following sequence to create six sides: single crochet into the next stitch, then at corner points work single crochet, chain one, single crochet into the same stitch to form a corner increase. Place one single crochet into each subsequent stitch along the side. Repeat around so that each corner consists of single crochet, chain one, single crochet. Join with a slip stitch.
- Round 3: For each side between corners, work one or two single crochet stitches depending on side length from the previous round to maintain flatness. At each corner continue to work single crochet, chain one, single crochet to preserve crisp points.
- Continue rounds, maintaining single crochet across the sides and chain-one corner spaces. If sides become too short and the hexagon cups, add one additional single crochet into the side clusters in subsequent rounds. Work until hexagon reaches desired finished size.
Metallic accent rounds
- Decide whether to highlight the last one or two rounds of each hexagon with the metallic strand held together with the black yarn or to work specific rounds entirely in metallic.
- For subtle sparkle, work the final round as follows: holding the black yarn and the metallic thread together, work a round of single crochet or slip stitch around the hexagon, ensuring even tension. The metallic will catch light while the black base maintains structure.
- For bolder contrast, add a single row of metallic single crochet along the front opening, cuffs, and hem after assembly.
Assembly and shaping
- Assemble hexagons into panels using the single crochet join for a slightly raised seam that echoes the garment structure. With the right sides facing and the black yarn held together with the metallic strand where desired, join hexagons by inserting the hook through both matching side spaces and working single crochet through both pieces.
- For a modern tailored fit, arrange hexagons into a back panel of three hexagons wide by three hexagons high, front panels each 1.5 to 2 hexagons wide depending on bust coverage, and sleeves that are tapered. Smaller hexagon modules create sharper shaping around the neckline and shoulders.
Neckline and edges
- To preserve the sculptural look, create a narrow band of tight single crochet around front edges, neckline, and hem. For a high-contrast finish, hold the metallic thread with the black yarn for the edge rounds.
- If a fuller collar is preferred, work additional rounds of half double crochet and then fold and stitch down to create a shawl-like collar with a metallic trim.
Lining option
For maximum comfort when wearing metallic thread near the skin, consider adding a lightweight lining of cotton voile or silk charmeuse sewn into the garment along the shoulders and neckline. Attach the lining after assembly by stitching along seam allowances and hand sewing for an invisible finish.
Care
- Metallic fibers and blended yarns are delicate. Hand wash in cool water with mild detergent and lay flat to dry.
- Do not bleach or tumble dry.
- Avoid excessive agitation during washing to prevent metallic breakage.
Troubleshooting and tips
- If the metallic thread frays during weaving in, secure ends with a small knot and a dab of fabric glue on the wrong side for permanence.
- If the seams look bulky, remove one round from the hexagon edge or use a smaller hook only for the joining rounds to compress the seam.
- If the metallic appears too bright, change to a softer pewter metallic or reduce the number of metallic rounds.
Pattern 9 — Thick-and-Thin Variegated Wool Hexagon Cardigan (Cozy Autumn Palette)
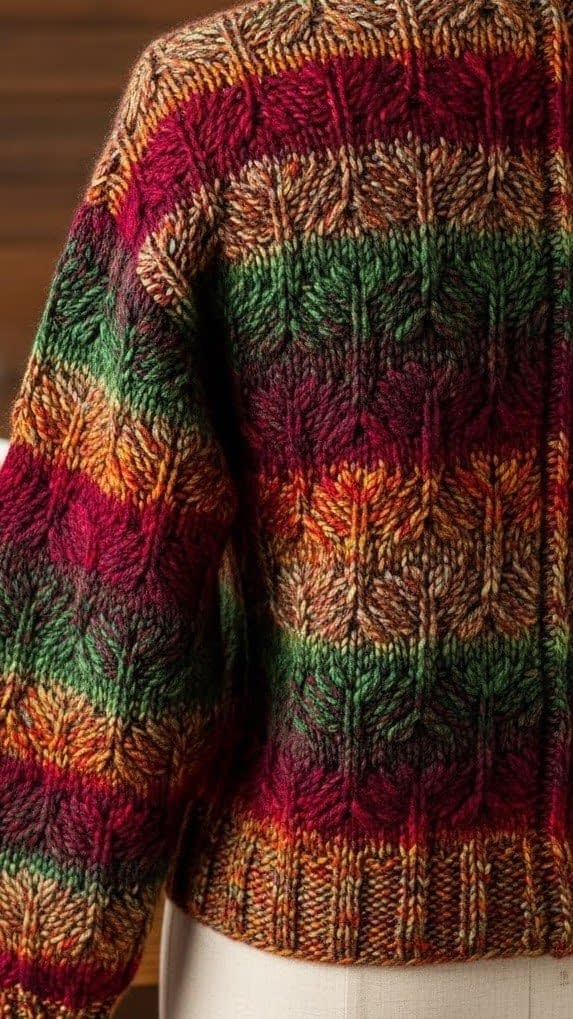
Skill level: Beginner to intermediate (working with thick-and-thin roving yarn; shaping and ribbing)
Style focus: Cozy, handcrafted texture with rich variegation and ribbed cuffs for contrast
Finished fit: Warm and oversized with emphasis on handcrafted texture and visible joins
Materials
- Thick-and-thin roving-style variegated wool yarn in autumnal colors (burgundy, copper, forest green). This yarn typically has sections of thick roving alternated with thinner plied areas; it yields a rich, handcrafted appearance.
- Recommended quantities:
- Small: 900 to 1,200 yards (because roving yarn is bulky it will cover less yardage per weight)
- Medium: 1,200 to 1,500 yards
- Large: 1,500 to 1,900 yards
- Crochet hook: 10.0 millimeter to 12.0 millimeter depending on roving thickness; start with a 10.0 millimeter hook and adjust for gauge
- Contrasting worsted weight yarn in a solid color for ribbed cuffs and button bands (for structural stability)
- Tapestry needle
- Scissors
- Stitch markers
- Blocking tools (blocking lightly; roving yarn can felt with aggressive handling)
Working with thick-and-thin roving yarn
- Because the yarn is uneven, it is important to maintain consistent tension and to plan motif size by measuring after blocking.
- Avoid frequent pulling or frogging; slipping the yarn off the hook may cause roving to fuzz.
- Use a contrasting stable yarn for edges and cuffs to provide structure where needed.
Gauge and motif size
Create a single hexagon motif and block it gently. Aim for hexagons approximately 8 to 9 inches across for a bulky roving yarn and a 10.0 millimeter hook. Expect slight variation due to the yarn character; compensate by measuring several motifs and averaging the dimensions to estimate layout.
Hexagon motif — robust roving hexagon
This motif uses half double crochet and double crochet stitches to create a pleasing balance of density and openness.
- Begin with a magic ring.
- Round 1: Chain two (counts as the first half double crochet). Work five additional half double crochet stitches into the ring for a total of six half double crochet stitches. Join with a slip stitch to the top of the chain two if desired.
- Round 2: Chain two and begin building corners by working two half double crochet, chain two, two half double crochet in the corner spaces to form the hexagon points. Between corners work two half double crochet per side cluster to widen the hexagon.
- Round 3: Transition to a combination of double crochet and half double crochet along sides to create subtle ribbed texture. For example: double crochet, double crochet, half double crochet across each side, maintaining corner increases as two half double crochet, chain two, two half double crochet.
- Round 4 and beyond: Add one or two clusters per side per round to expand the hexagon. Because the yarn is thick-and-thin, the stitches will vary in visual thickness; this is desirable for the handcrafted effect.
Fasten off and leave a long tail for joining.
Ribbed cuffs and bands
The cuffs and front bands benefit from a stable contrasting yarn that will stand up to wear.
- Using worsted-weight solid yarn and a 5.0 millimeter hook, work front bands and cuff bands separately after assembly.
- To create a vertical ribbed appearance, work alternating rounds of front post double crochet and back post double crochet along the band:
- Round 1: With right side facing, join yarn and work a round of single crochet evenly.
- Round 2: Chain two. Work a front post double crochet around the first stitch, then a back post double crochet around the next stitch, alternating front post and back post double crochet across the round to create a rib effect.
- Continue working rounds of alternating front post double crochet and back post double crochet until the band measures the preferred width, typically 1.5 to 3.0 inches for cuffs and 2.0 to 4.0 inches for front bands.
- For cuffs, work the ribbing in the round inside the sleeve opening for a snug fit.
Assembly and shaping
- Block hexagons lightly and assemble into panels.
- Suggested layout for a roomy autumn cardigan:
- Back panel: 3 hexagons wide by 3 hexagons high
- Front panels: 1.5 to 2 hexagons wide by 3 hexagons high
- Sleeves: Constructed from hexagon strips and finished with ribbed cuffs
- Join hexagons with a whip stitch using the roving yarn where possible, then reinforce seams with the contrasting yarn on inside if needed to prevent overstretching.
- Attach ribbed cuffs to sleeve openings by sewing the ribbed cuff round to the inside of the sleeve edge; use small, even stitches to keep the seam invisible from the outside.
Neckline and closure options
- For a cozy look, work a wide ribbed shawl collar using the contrasting yarn and the front post/back post double crochet technique. Create the collar as a long band and then fold and sew the lower edge to form a double-layer collar.
- Buttons: use large wooden or leather buttons to complement the rustic look. Create buttonholes in the front band by chaining an appropriate number of stitches in a round and skipping the same number in the corresponding location when working the opposite band.
- Alternatively, use toggles or leather ties for a handcrafted closure.
Finishing and care
- Weave in all ends securely, as roving yarn ends can work loose.
- Because roving wool may shed initially, shake the finished garment outdoors before the first wear and brush gently if necessary.
- Care: Hand wash in cool water with mild wool detergent and lay flat to dry. Avoid agitation and hot water to prevent felting. For heavily soiled areas, spot clean carefully.
Variations and problem solving
- To reduce weight for less bulk, alternate rows of roving yarn hexagons with rounds of lighter-weight yarn to thin the fabric.
- If seams appear uneven due to yarn thickness variation, add a narrow single crochet border in contrasting yarn along the seamline to visually unify the joins.
- If cuffs stretch, pick up fewer stitches for the ribbing round and work tighter tension for a firmer cuff.
Conclusion
These 9 Easy Crochet Hexagon Cardigan Patterns demonstrate how a simple geometric shape can create a wide variety of beautiful, wearable garments. By changing yarn type, stitch texture, color placement, and finishing details, each pattern offers a unique look while using the same easy-to-follow construction method.
You prefer lightweight layers, cozy textured cardigans, or bold statement pieces, this collection provides flexible designs that can be adapted to different skill levels, body sizes, and personal styles. Once you understand the hexagon structure, these patterns become endlessly customizable, making them ideal projects for both learning and creative exploration.