
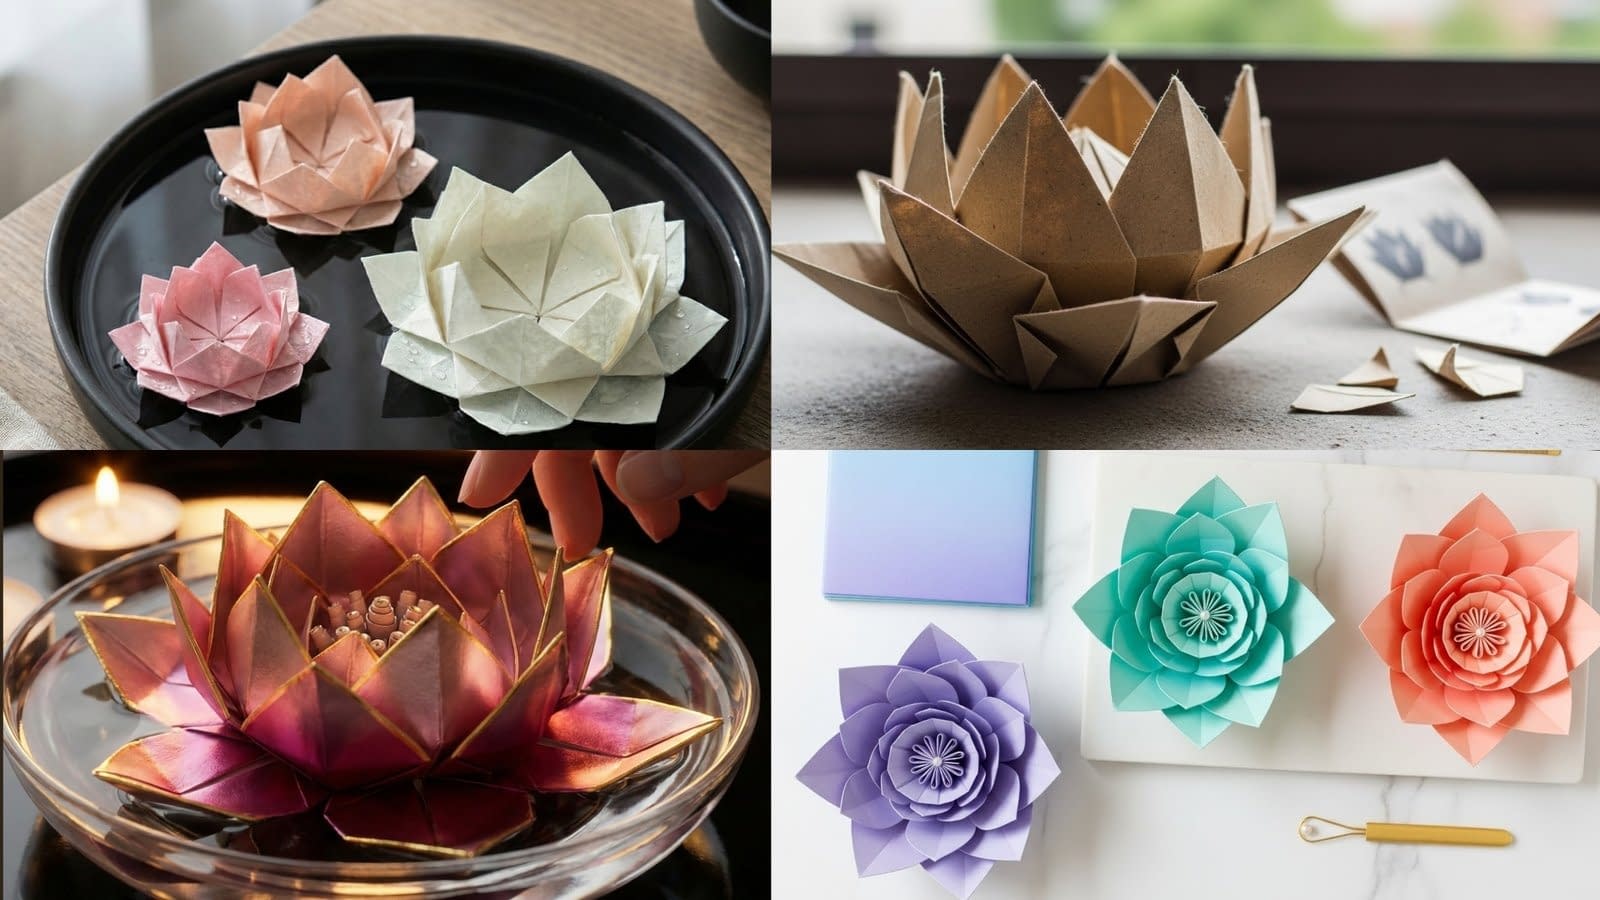
The lotus is a timeless motif — elegant, sculptural, and deeply satisfying to fold. In this long-form guide you’ll get four fully developed origami lotus flower tutorials that span looks and materials: the delicate Classic Water-Lily in textured washi pastels, the dramatic Jewel Lotus in metallic foil, the rustic Eco-Kraft Lotus made from recycled kraft paper, and the Modern Ombre Lotus designed for clean product shots. Each tutorial includes a materials list, exact fold sequences, cutting and shaping guidance, when and where to use glue (and which adhesives work best), finishing touches, styling and photography tips, troubleshooting, and creative variations.
This post is written so you can follow each tutorial start-to-finish. Read the overview to pick which one you want to make first, and then jump to the detailed step-by-step section for the version you’ve chosen.
Tools and materials (universal guide)
Paper choices and size recommendations
- Square paper is the foundation. For single-layer lotus flowers, start with squares sized 10 cm (4 in), 15 cm (6 in), and 20 cm (8 in) for small, medium, and large flowers. For multi-layer or showpiece lotuses, use 25–30 cm (10–12 in).
- For each of the four tutorials you’ll want different paper stocks:
- Classic Water-Lily: textured washi paper 80–120 gsm (light but with body).
- Jewel Lotus: metallic foil-backed paper or foil-crease paper (thin, 60–90 gsm). Avoid ultra-thin foil that tears easily.
- Eco-Kraft Lotus: recycled kraft paper, 100–160 gsm (heavier paper gives natural fray).
- Modern Ombre Lotus: smooth ombré paper or premium origami paper 70–100 gsm.
Tools
- Bone folder or scoring tool (for crisp creases).
- Sharp scissors or craft knife (for any cutting).
- Ruler and pencil.
- Tweezers (slender wooden tweezers are ideal for delicate shaping).
- Glue: white PVA glue (for porous papers), quick-drying tacky glue, and for metallic foil use double-sided tape, PVA with a hairdryer to set, or low-absorbency craft glue that won’t stain foil.
- Small beads or pearls for stamen centers (optional).
- Paper toothpicks or thin rolled paper for stamen construction.
- Optional: spray starch or light starch for stabilizing delicate washi petals.
Adhesive notes
- Avoid over-gluing. Origami beauty comes from clean folds. Use glue only where necessary: attaching multiple layers, securing a rolled stamen, or reinforcing bases.
- For foil: use thin strips of double-sided tape or micro-dots of clear craft glue placed with a toothpick.
- For kraft: PVA glue bonds well; use sparingly and press with a bone folder to avoid visible bleed.
- For washi: PVA can darken wet fibers; use archival craft glue or glue sticks for tiny tucks.
Basic folding vocabulary (quick primer)
Before diving into each tutorial, a few fold names you’ll see repeatedly:
- Valley fold: fold toward you, creating a V-shaped crease.
- Mountain fold: fold away from you, creating an inverted V.
- Blintz fold: fold all four corners of the square into the center.
- Petal fold: lift a flap and squash or fold into a petal shape.
- Reverse fold: fold a point inside-out along an existing crease.
With those terms in mind, let’s make lotus flowers.
Classic Water-Lily (Textured washi pastels) — soft, layered flatlay

Materials
- Three squares of textured washi: 20 cm (large), 15 cm (medium), 10 cm (small). Colors: soft pink, peach-blush, mint cream.
- Bone folder, tweezers, small dish of water (for styling), slim tufted brush (optional).
- Small rolled-paper stamen beads or a tiny pearl.
- PVA or archival micro-glue for the stamen.
Overview
This is a layered, delicate lotus built by stacking three sizes. The design uses a classic petal fold built from the blintz base, then shaped petal tips and a tiny rolled stamen.
Step-by-step folding instructions
Prepare your sheets
- Square check: ensure each paper is perfectly square. Trim if necessary: align edges and cut with a sharp blade to avoid ragged edges.
- Lightly pre-crease: on textured washi, run a bone folder gently along each planned fold to keep fibers from tearing.
Fold the petal base (repeat for each size)
- Valley fold the square diagonally both ways and unfold. You should have an X crease.
- Blintz fold: fold each corner into the center point where the diagonals meet.
- Turn the model over so the folded flaps are down.
- Fold each corner into the center again — you will now have a smaller square.
- With one side toward you, perform a petal fold on each of the four corners: lift the top flap up and squash it flat into a petal — fold the bottom edge up while flattening the sides so the shape looks like a pointed petal. Use the bone folder to make a crisp petal crease.
- Repeat for all four petals. You now have one flower base.
Create layered petals
- For the largest piece, gently open the petals at the top, easing them outward — do not fully unfold; you want rounded, cupped petals. Gently curl petal tips outward by rolling the edge over a toothpick or the length of a tweezers handle for natural curvature.
- For the medium and small pieces, repeat the same steps but leave the petal cups slightly tighter so they nest inside larger petals.
Make the stamen (rolled paper)
- Cut a 1.5 cm × 6–8 cm strip of washi or thin paper.
- Put a tiny dot of glue at one end, roll tightly around a toothpick to make a bead; allow glue to set.
- Trim the end and remove the toothpick. Attach the rolled stamen with a tiny dot of glue in the center of the smallest lotus.
Stack and secure
- Stack the medium on top of the large, aligning centers. Press gently on the base only — avoid pressing petals flat.
- If you want permanent assembly, place three micro-dots of glue at the base between layers (under the petals where they meet) using a toothpick. Let dry with a lightweight weight (not on top of petals).
- Top with the small lotus and glue the stamen in place.
Cutting and shaping notes
- Classic water-lily uses pure folding, no cutting required except to make the rolled stamen. Trim only if your petals look too long — snip a tiny curve at the tip and re-curl.
When to use glue
- Use glue sparingly: for the stamen, to secure stacked layers, and to attach a pearl bead if using one. Avoid glue on visible petal faces.
Styling and photography tips (for soft flatlay)
- Arrange the finished lotus in a shallow matte black dish with a thin film of water. Use natural window light from the left and include small water droplets with a spray bottle.
- For inset step panel photos, photograph fold 1, mid-fold, and finished bloom on a neutral linen napkin. Use a 50mm macro equivalent, f/2.8, to capture shallow depth of field and visible paper fiber texture.
Jewel Lotus (Metallic foil & evening glow) — dramatic close-up

Materials
- One square of gradient metallic foil paper (25 cm recommended for a display piece).
- Gold gilding pen or metallic edge leaf (if you want extra gilded edges).
- Small glass bowl, 2 tiny floating candles (optional), micro-dots of double-sided tape or clear tacky glue.
- Thin rolled paper bead or a tiny beaded stamen.
- Tweezers, toothpicks.
Overview
The Jewel Lotus uses delicate folding with special attention to preserving the metallic sheen. Petal shaping should emphasize specular highlights and micro-creases rather than soft fiber texture.
Step-by-step folding instructions
Prepare the foil paper
- Handle with clean, dry hands — oils will dull metallic sheen.
- Cut or square the foil sheet to size with a sharp blade; do not score heavily.
Fold the base
- Make diagonal valley folds in both directions and unfold.
- Blintz fold each corner to the center. The foil will hold creases crisply.
- Turn over and fold each corner to center one more time.
- Perform petal folds similar to the Classic version but keep creases sharp and shallow — avoid over-manipulation that can tear foil.
Petal shaping for metallic
- For each petal, after the petal fold, pinch the petal edges slightly to mimic gilded petal ridges. Use the bone folder at the back side to create a subtle raised edge.
- Use a gold-gilding pen or apply a thin strip of metallic leaf to the petal edges if desired — apply the adhesive and then the leaf, and press carefully. For small areas, a gilding pen is cleaner.
Stamen and center detail
- Create a tiny rolled bead from a non-metallic paper (thin tissue or washi) and gild the outer edge with metallic paint if desired.
- Glue the stamen into the center using a micro-dot of clear craft glue; press with tweezers and hold until tacky.
Floating presentation considerations
- If you float the lotus in water with lit floating candles, ensure the base is stable. Use a small disk of clear plastic under the lotus (hidden beneath inner petals) adhered with removable double-sided tape if you want the flower to float perfectly centered.
- Do not drip water on metallic leaf areas or gilding; blot any water immediately.
Glue and finishing
- Use double-sided tape to attach layers when possible because it minimizes wetting and staining.
- If glue is required, apply micro-dots with a toothpick at hidden joints.
Photography tips for dramatic close-ups
- Use a macro lens at f/2.0 for extremely shallow DOF. Backlight the subject with a warm source to create rim light and bring out metallic edges.
- Use a glossy black lacquer tray underneath the bowl to enhance reflections and specular highlights.
- Include a faint hand or fingertip at the edge of the frame for scale as described in the Jewel Lotus vision.
Eco-Kraft Lotus — rustic, natural outdoor scene

Materials
- Recycled kraft squares: 20 cm–25 cm depending on desired size. Choose a heavier weight 120–160 gsm for texture.
- Scissors for intentional fraying, sandpaper (fine) to roughen edges, PVA glue.
- Instruction sheet or scrap pieces for styling.
- Natural twine or hemp (if making a garland).
Overview
The Eco-Kraft Lotus celebrates imperfection: visible fibers, frayed edges, and uneven hands-on folding. This tutorial explains how to intentionally encourage a rustic look and where to use glue for reinforcement.
Step-by-step folding instructions
Prepare and distress
- Square your kraft paper. For an authentic frayed look, cut the square slightly oversized then sand the edges lightly to create roughness.
- You can give visible fold marks by creasing firmly with the bone folder and then re-opening slightly to let fibers show.
Fold the base (similar to blintz lotus)
- Valley fold diagonals and perform a blintz fold (corners to center).
- Turn over and fold corners to center again. Perform petal folds: lift top flap and create a broad, rustic petal by slightly offsetting the crease — don’t align perfectly; this creates an organic petal shape.
- For a multi-petal look, cut the final flattened square into 4 equal square sections before performing petal folds, then assemble petals into a layered bloom (this is the main time cutting is useful).
If using cut petals: cut-and-assemble method
- Cut four 8 cm × 8 cm squares (or proportional sizes) from your kraft sheet.
- Fold each into a petal shape: valley fold diagonally, fold corners inward, and shape the petal by rounding the top edge with scissors to create a natural petal silhouette.
- Lightly scuff the top edges with sandpaper for texture.
- Stack the petals in a circular arrangement: offset each layer slightly and secure at the base with a generous dot of PVA glue. Press and allow to dry under a small weight (not on the petals).
Stamen and finishing
- Use a short piece of twine or a small rolled paper tuft as the stamen; glue in place.
- If you plan to make a garland, punch a small hole at the base and thread twine through before securing with glue.
When to use glue
- Use glue to secure multiple cut petals, reinforce bases, or attach to garlands.
- PVA is forgiving and works well with kraft; it soaks in and dries matte.
Styling and usage ideas
- Place near a balcony ledge or photograph with natural greenery in the background for a lifestyle snapshot.
- Leave paper scraps and a folded instruction page casually nearby to create authenticity.
Modern Ombre Lotus — minimalist studio product shot

Materials
- Ombré gradient paper squares in three colors (indigo → lavender, teal → aqua, coral → peach). Sizes: 12 cm, 18 cm, 24 cm.
- White marble slab, gold bone folder, flat-lay ruler, pearl beads, minimal props.
- Tacky glue or glue dots for attaching stamen pearls.
Overview
This is a refined, editorial lotus meant for product photos. The focus is on symmetry, negative space, and sculptural shadows. Slight variations in crease depth will change how the ombré gradient reads on petals.
Step-by-step folding instructions
Prepare
- Choose paper with a smooth gradient; ensure the gradient direction is consistent for each flower (e.g., darker at base, lighter at petal tips).
- Square the sheets and pre-crease with a bone folder for crisp geometry.
Fold the base
- Diagonal folds, then blintz twice as with previous designs.
- On the final petal fold, angle the petal slightly outward to create clean, sculptural spaces between petals. Use the bone folder to keep edges crisp and straight — you want hard shadows.
Decorative stamen with pearl
- For each flower, insert a small rolled paper stamen and secure a 2–3 mm pearl bead on top with a tiny amount of tacky glue.
- If beads are heavy relative to the paper, glue the base of the stamen to a small disk of thin cardstock and glue the disk inside the center to distribute weight.
Assembly and presentation
- Arrange the three flowers in ascending size on the white marble slab. Use hard rim light from behind and soft overhead for a clean editorial look.
- Place props (stacked origami squares, gold bone folder, ruler) with significant negative space — less is more.
When to use glue
- Use small glue dots for pearls, and micro-dots for stacked layers if you plan to ship the flowers or handle them frequently.
- Avoid glue on visible faces; conceal adhesive under the base.
Photography and product-shot guidance
- Camera angle: a 45° top-down at 85mm equivalent, f/3.2 gives slight background blur and crisp shadows.
- Use hard rim light to create sculptural edges and bring out the ombré gradient.
- Keep the background minimal and use the ruler and bone folder to convey scale.
Troubleshooting common folding problems
Paper tearing at petal tips
- Cause: thin paper, overfolding, or repeated folding.
- Fix: use slightly heavier paper, reinforce the tip with a tiny dot of glue under the petal (hidden), or mask the tip with a tiny bead.
Petals won’t stay cupped
- Cause: weak creases or paper too stiff.
- Fix: crease more sharply with a bone folder; for stiff paper, steam lightly from a distance and reshape quickly; for washi, a small amount of spray starch can help hold curves.
Visible glue marks
- Cause: applying too much glue or wrong glue type.
- Fix: use micro-dots of glue, apply with a toothpick, blot excess immediately, or switch to double-sided tape for metallic and show pieces.
Asymmetrical petals
- Cause: inconsistent folding or misaligned center.
- Fix: start with a perfectly square sheet; mark the center lightly with a pencil for first-time folding; take extra time at the blintz fold to align corners precisely.
Variations and creative uses
Multi-color center
Stack small contrasting-color lotuses to create two-toned centers. Use glue dots under the base center to secure.
Lantern cluster
String several Eco-Kraft lotuses on natural twine to create a rustic garland for an outdoor table.
Floating centerpiece
Create a pool centerpiece using Jewel Lotus flowers floating in glass bowls with tealight candles. Add thin clear plastic disks hidden beneath for stability.
Wearable brooch
Mount a small Modern Ombre Lotus on a brooch backing using glue and thin felt underlayer.
Care, storage, and longevity
- Keep paper flowers away from direct prolonged sunlight to avoid fading, especially for washi and ombré paper.
- Store flat in a shallow box with tissue between layers to prevent petal deformation.
- For display, avoid humid environments (can warp kraft) and keep metallic pieces dry.
- Dust with a soft brush or canned air on low; avoid wiping painted or gilded areas.
Final thoughts and next steps
Making paper lotus flowers is both a meditative craft and a design skill. These 4 Origami Lotus Flower Tutorials give you a broad palette — from the ethereal Classic Water-Lily to the show-stopping Jewel Lotus, the honest Eco-Kraft Lotus, and the clean Modern Ombre Lotus. Each tutorial is adaptable: scale the squares up for dramatic centerpieces or down for delicate jewelry and cards.


