
9 stylish, easy-to-follow paper spiral flower projects you can make at home — from a classic spiral rose to a fringed blossom for garlands. This long, practical guide explains materials, cutting and folding techniques, glue choices, shaping tips, and dozens of uses so you’ll know exactly how to make beautiful, durable paper spiral flowers every time.
Paper spiral flowers are one of the most forgiving and versatile paper-craft projects. They can be scaled from tiny embellishments to large statement blooms, made from any paper weight, and adapted for cards, hair clips, bouquets, wreaths, garlands, or party decor. This guide covers:
- Tools and paper choices that suit each project.
- The core spiral-cutting and rolling method you’ll reuse.
- 9 complete tutorials with precise cutting, folding, gluing and assembly instructions.
- Troubleshooting, variations, and finishing touches for professional-looking results.
Use the 9 projects to practice one technique at a time, then combine ideas to create custom flowers.
Materials and tools: what to prepare
Before starting, gather common supplies. The list below covers everything used across the 9 projects.
Core materials
- Paper (various types recommended below)
- Cardstock (65–110 lb / 176–300 gsm) for sturdier blooms
- Plain printer paper or scrapbook paper for lighter petals
- Reclaimed book pages or sheet music for vintage look
- Floral wire (20–24 gauge) and floral tape (green) for stems
- Glue: clear-drying PVA craft glue (white glue), a low-temp hot glue gun, and glue dots or double-sided tape for quick holds
- Scissors (sharp pair) and a precision craft knife for detailed cuts
- Pencil, eraser, ruler, and a round object for tracing (cup or compass)
- Quilling tool or thin dowel/pencil for rolling
- Bone folder or the blunt edge of a butter knife for curling/creasing petals
- Paint, ink pads, or tea/coffee for distressing edges (optional)
- Decorative centers: buttons, beads, brads, or rolled paper for stamens
Paper selection tips
- For classic spiral roses, lightweight cardstock (65–80 lb) or mixed-weight scrapbook paper works best. Too thin paper flops; too thick paper resists curling.
- For highly textured or large blooms, use heavier cardstock (100–110 lb) and rely on a hot glue gun for a secure hold.
- For delicate, ruffled fringed flowers, lightweight paper like crepe paper or tissue paper gives the best movement. Crepe paper stretches and shapes well.
- Recycled book pages create a vintage look but tear more easily—cut slowly and reinforce the center with a small punched circle.
Core technique: how to cut and roll a spiral
Every project below uses the spiral-cut-and-roll idea. Master this once and the 9 flowers will be simple.
Preparing a circular template (measurements and method)
- Choose a circle diameter. Common sizes:
- Small blossom: 2.5–3 inches (6–7.5 cm) diameter
- Medium bloom: 4–5 inches (10–12.5 cm) diameter
- Large statement: 6–8 inches (15–20 cm) diameter
- Trace the circle onto your paper using a cup, compass, or circle cutter. You can also use a square (6×6 in) and cut freehand spiral — but circles give the most predictable petals.
- Draw a spiral path inside the circle that runs from the outer edge inward. Aim for a continuous line where the spiral band width equals the petal “strip” width. For a 6-inch circle, a spiral strip about 1/2 inch (12 mm) wide works well. Leave a small center circle (about 3/8–1/2 inch / 9–12 mm) uncut to act as a base to hold the rolled flower.
Cutting the spiral
- Use sharp scissors or a craft knife and follow the spiral line. Cut smoothly to avoid jagged edges. Keep the outside edge even — jaggedness will show after rolling.
- For intricate petals (fringes), cut the spiral band with small perpendicular cuts along the outer edge, stopping about 1–3 mm from the inner edge so the strip is still continuous.
Rolling the spiral
- Start at the outer end of the spiral. Hold the outermost edge between thumb and index finger, and roll tightly toward the center using a quilling tool or pencil to guide and keep even tension.
- Keep the roll tight at first to form a solid center, then relax slightly as you approach the center for a natural petal flare.
- Apply a small dot of glue to the small center circle or the wound base once you reach the center. Press to secure. If using PVA, hold for 10–20 seconds until tacky; hot glue secures instantly.
- For added durability, tuck the small center flap under the base and add a few glue dots to the underside.
Shaping the petals
- After rolling, gently press the outer edge outward and curve petals with a bone folder, shaping them away from the center to open the bloom.
- For curled petals, use the bone folder or the blunt edge of a pencil to curve the paper outward. For creased petals, fold slight accordion pleats at the base of the spiral band before rolling.
Now apply that core technique to the 9 projects.
Project 1 — Classic Spiral Rose (beginner-friendly)
A clean, elegant spiral rose that works as a card topper or gift embellishment.
Materials
- 6-inch (15 cm) circle of 65–80 lb cardstock
- Sharp scissors
- Quilling tool or pencil
- White craft glue or glue dot
- Optional: ink pad for edge distressing
Steps
- Trace a 6-inch circle on cardstock and draw a spiral 1/2 inch wide, leaving a 3/8-inch center.
- Cut the spiral smoothly in one continuous motion. Steady your wrist and rotate the paper as you cut.
- Take the outermost end and begin rolling tightly around the pencil for the first 6–8 rotations to make a neat center.
- Slightly loosen the tension as you continue rolling so the petals sit naturally. Stop at the center and add a small dot of white glue to the center circle; press the rolled flower onto it and hold for 10–15 seconds.
- Let the glue dry completely. If desired, ink the petal edges before shaping for depth. Gently fan open outer petals and roll petal edges slightly back with a bone folder.
When to use glue
- Use a glue dot for instant hold if applying to a card.
- Use white craft glue if you want a cleaner, invisible dry seam (allow drying time). Hot glue will melt thin cardstock and can show through — avoid it for thin paper roses.
Tips
- If the flower loosens, add a tiny glue dot to the base underside between coils to secure.
- For a tighter center, start rolling around a toothpick instead of a pencil.
Project 2 — Double-Layer Spiral Flower (full-bodied bloom)
Create depth by stacking two spirals of different sizes.
Materials
- Two circular templates: 5-inch and 3.5-inch diameters
- Cardstock for both layers (contrasting colors suggested)
- Glue gun (low-temp) or PVA glue
- Scissors, quilling tool
Steps
- Cut two spirals — a larger outer spiral (5 in) with a strip width around 5/8 inch and a smaller inner spiral (3.5 in) around 1/2 inch.
- Roll and secure the smaller spiral first. Let it dry.
- Roll the larger spiral, but do not shape its petals fully yet. Place the small, finished coil on top of the larger coil’s center and apply a ring of glue to the underside of the small coil. Press and hold until secure.
- Shape both layers independently — curl outer petals more dramatically and inner petals tighter for contrast.
When to use hot glue vs PVA
- Hot glue is excellent for thick cardstock and for quickly bonding layers. Use low-temp to prevent scorching and bubbling.
- PVA is better when you want a more invisible bond and time allows for drying.
Uses
- Wedding boutonnieres, gift toppers, decorative boxes, or layered centerpieces.
Project 3 — Fringe Spiral Flower (textured carnation look)
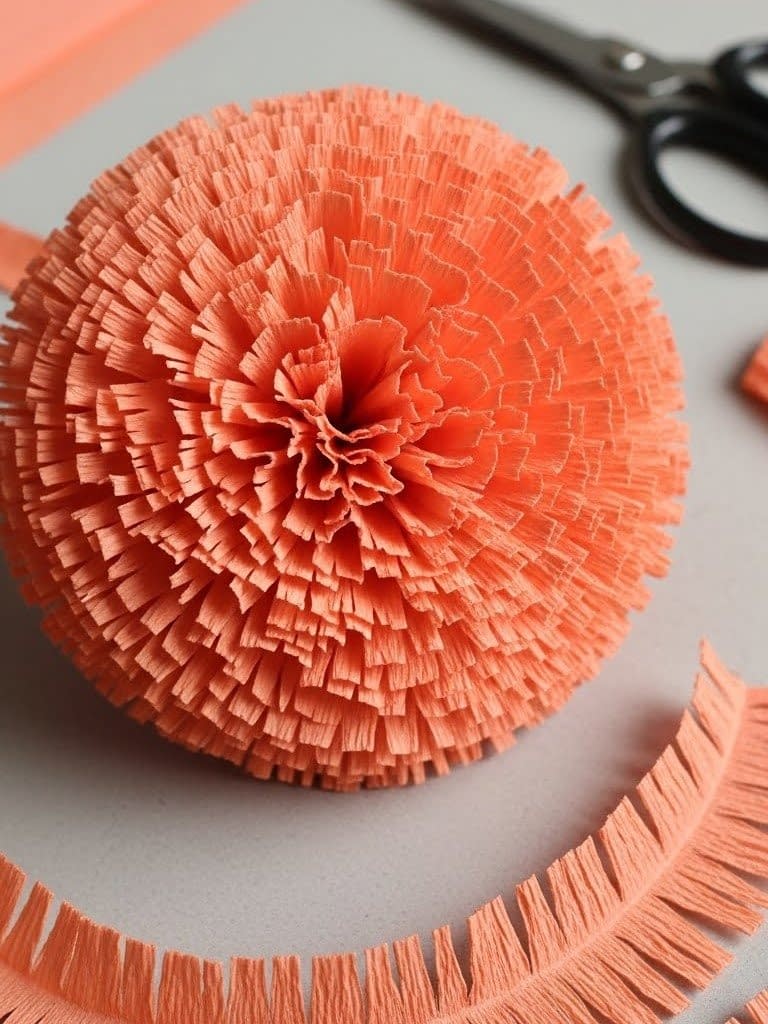
Fringed edge gives a ruffled, carnation-style appearance.
Materials
- 6–8 inch circle of crepe paper or lightweight paper
- Sharp scissors with a fine point
- White glue or hot glue for heavier crepe
- Floral wire and tape (if making stems)
Steps
- Trace your circle. Cut a spiral 1/2–3/4 inch wide, leaving a 1/2-inch center hub.
- Along the outer edge of the spiral band, make closely spaced vertical cuts (about 1/8–1/16 inch apart) stopping 2–3 mm short of the inner edge so the strip remains continuous. These are your fringes.
- Begin rolling from the outer end. While rolling, compress the fringe slightly inward using your fingers to build a dense ruffled look.
- Secure the center with glue. For crepe paper, hot glue will adhere faster and is stronger; use small dots to avoid lumps.
- If you want a stem, push a length of floral wire under the base and secure with glue. Wrap with floral tape for a finished stem.
Tips
- For softer edges, comb the fringe lightly with your fingers after gluing.
- To create a two-tone effect, use a lighter shade on the fringe and a darker center layer beneath.
Project 4 — Vintage Book-Page Spiral Flower (aged, shabby-chic)

Use old book pages or sheet music for texture and character.
Materials
- Reclaimed book pages or sheet music (avoid valuable books)
- Tea or coffee (optional) for extra aging
- 4–6 inch circle template
- Glue and scissors
Steps
- If you want darker, aged edges, lightly brush tea or coffee around the circle and let dry completely before cutting.
- Trace and cut the spiral carefully — book paper tears easily so use slow, controlled cuts.
- Roll and secure with PVA glue, pressing the center firmly. Because the paper is thin, a small disc of heavier cardstock glued to the base will reinforce it and make attaching to a stem or backing easier.
- Optional: ink the edges lightly to enhance contrast, then shape petals gently.
Uses
- Vintage-themed invitations, framed wall art (mount several on a textured background), or mixed-media projects.
Reinforcement tip
- After rolling, glue a 1-inch circle of cardstock to the underside to protect the base and make gluing to other surfaces easier.
Project 5 — Patterned Spiral Flower with Wired Stem (bouquet-ready)

A decorative floral wire stem allows you to use spiral flowers in arrangements.
Materials
- 5–6 inch patterned scrapbook paper or double-sided paper
- 20–24 gauge floral wire
- Floral tape (green)
- Hot glue gun (low-temp) or strong PVA
- Scissors, quilling tool
Steps
- Cut a spiral from the patterned paper (strip width about 1/2 inch). For double-sided patterned paper, the inside and outside will both look finished.
- Roll and secure the center with hot glue. Place a small drop of glue on the underside of the central circle.
- While the glue is still tacky, press the head of a floral wire into the base so ~1 inch (2.5 cm) of wire is embedded under the center. Hold until the glue sets.
- Wrap the wire and base with floral tape, stretching slightly to activate the adhesive and cover any exposed glue or paper edges. Wrap down the wire to cover it completely.
- Shape the petals as desired. You now have a wired flower ready to arrange.
Tips for stronger stems
- For heavy cardstock, use two pieces of floral wire twisted together for extra support before taping.
- If the head is heavy, anchor it to a small dowel or skew and tape the dowel to the wire for reinforcement.
Project 6 — Layered Peony Spiral (frilly center)

What it looks like
A lush, fuller bloom with a fringed center that mimics peony or carnation textures.
Supplies and size suggestion
- Crepe paper or lightweight paper for the fringe center, medium weight for outer spiral.
- Circle diameter: 8–10 in (20–25 cm).
- Spiral width: inner 1/8 in (3 mm) fringe band, outer 3/8–1/2 in (10–12 mm).
Cutting and assembly steps
- Start with a large circle (8–10 in). In the center, draw two concentric circles: an inner circle 1 in (25 mm) diameter and an outer guiding circle about 1.5 in (40 mm).
- For a two-part flower, cut a narrow spiral for the center from lightweight paper or crepe: width ~1/8 in with many small scallop cuts along the length to create fringe. This spiral will become the tufted center.
- Roll the fringed spiral tightly, glue the end to form a pom-pom center.
- For the outer petals, cut a broader spiral from heavier paper (3/8–1/2 in width). Roll linking it around the fringed center and secure with PVA glue at the base.
- Press the base until glue holds. Use a bone folder to curl outer petal edges outward for a full open peony look.
When and where to use glue
- Use PVA between paper layers; it soaks in slightly and creates a stronger bond for multiple layers.
- Use hot glue to attach stems or heavier embellishments to the base.
Project 7 — Twisted Spiral Tulip (petal-pointed edges)

What it looks like
A more sculpted flower with pointed petal tips — excellent for modern arrangements.
Supplies and size suggestion
- Medium cardstock (160–200 gsm).
- Circle diameter: 6 in (15 cm) for single stems.
- Spiral width: 1/2 in (12 mm) but taper each segment to a pointed tip.
Cutting and folding steps
- Draw a spiral but add slight angular points to each outer arm by trimming the outer edge to a point every 1/2 inch.
- Cut the spiral. Before rolling, pre-fold each point slightly inward along the midpoint to create a petal crease. This pre-fold gives definition.
- Roll from the outer tip but after rolling 2–3 layers, rotate the roll and “fan out” petal tips and press slightly to create a tulip profile.
- Secure with PVA at the base. For a crisp look, use a dab of hot glue between the first two outer petals to hold them slightly separated.
- Attach to a stem with hot glue; wrap with floral tape.
Shaping detail
- Use a bone folder to press a gentle crease down the center of each petal to emulate a central vein.
- For a natural effect, slightly twist some petals outward with fingers.
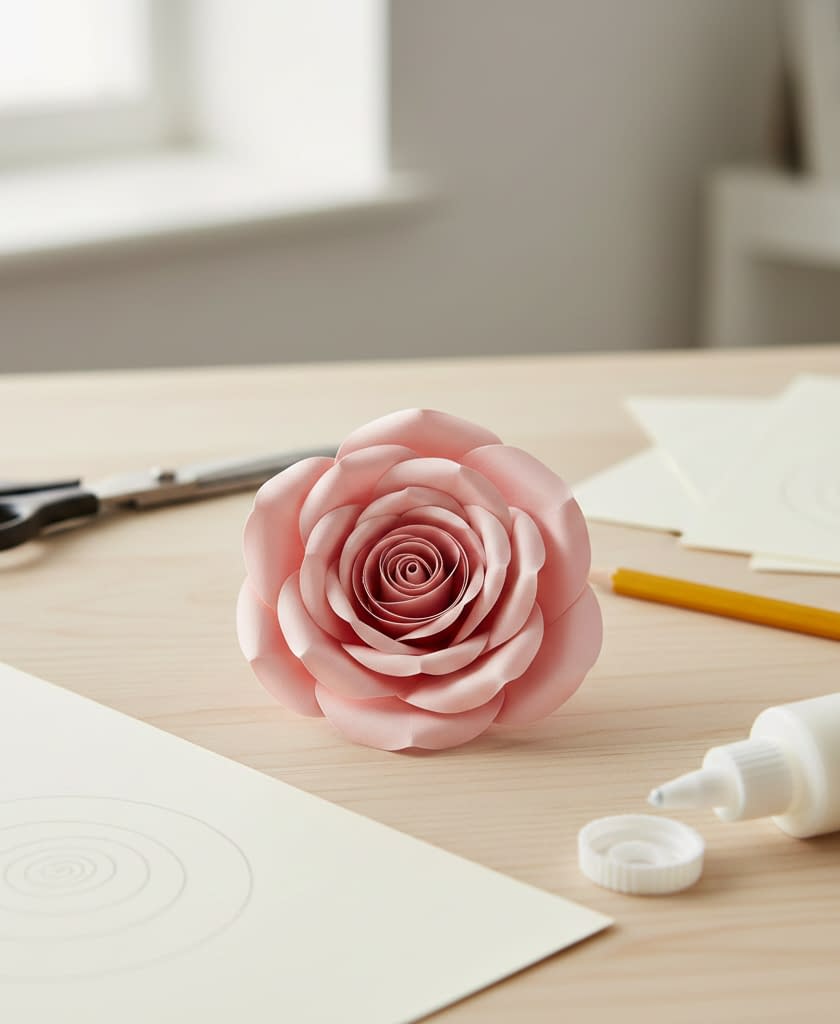
Project 8 — Double Spiral Ombre Flower (stacked spirals for dimension)

What it looks like
Two spirals—an inner smaller spiral and an outer larger spiral—stacked to create depth and color gradation.
Supplies and size suggestion
- Two papers of different shades for an ombre effect (e.g., pale pink inner, darker pink outer) or two patterns.
- Inner circle diameter: 3–4 in; outer circle: 7–8 in.
- Spiral width: inner 1/4 in, outer 1/2 in.
Cutting and assembly steps
- Cut the inner small spiral and roll it tightly, securing with PVA.
- Cut the outer larger spiral and roll loosely to create broader outer petals.
- Glue the inner rolled flower on top of the outer flower’s center with a pea-sized PVA dot. Hold until set.
- To add a professional touch, slightly offset the rolled center as you glue to create an asymmetrical, natural look.
- Add a thin circle of cardstock under the entire base to stabilize if mounting on a wreath or board.
Variations and uses
- Stack multiple small spirals of differing shades for graduated centers.
- Use metallic or glittered paper for the inner spiral to create a focal glint.
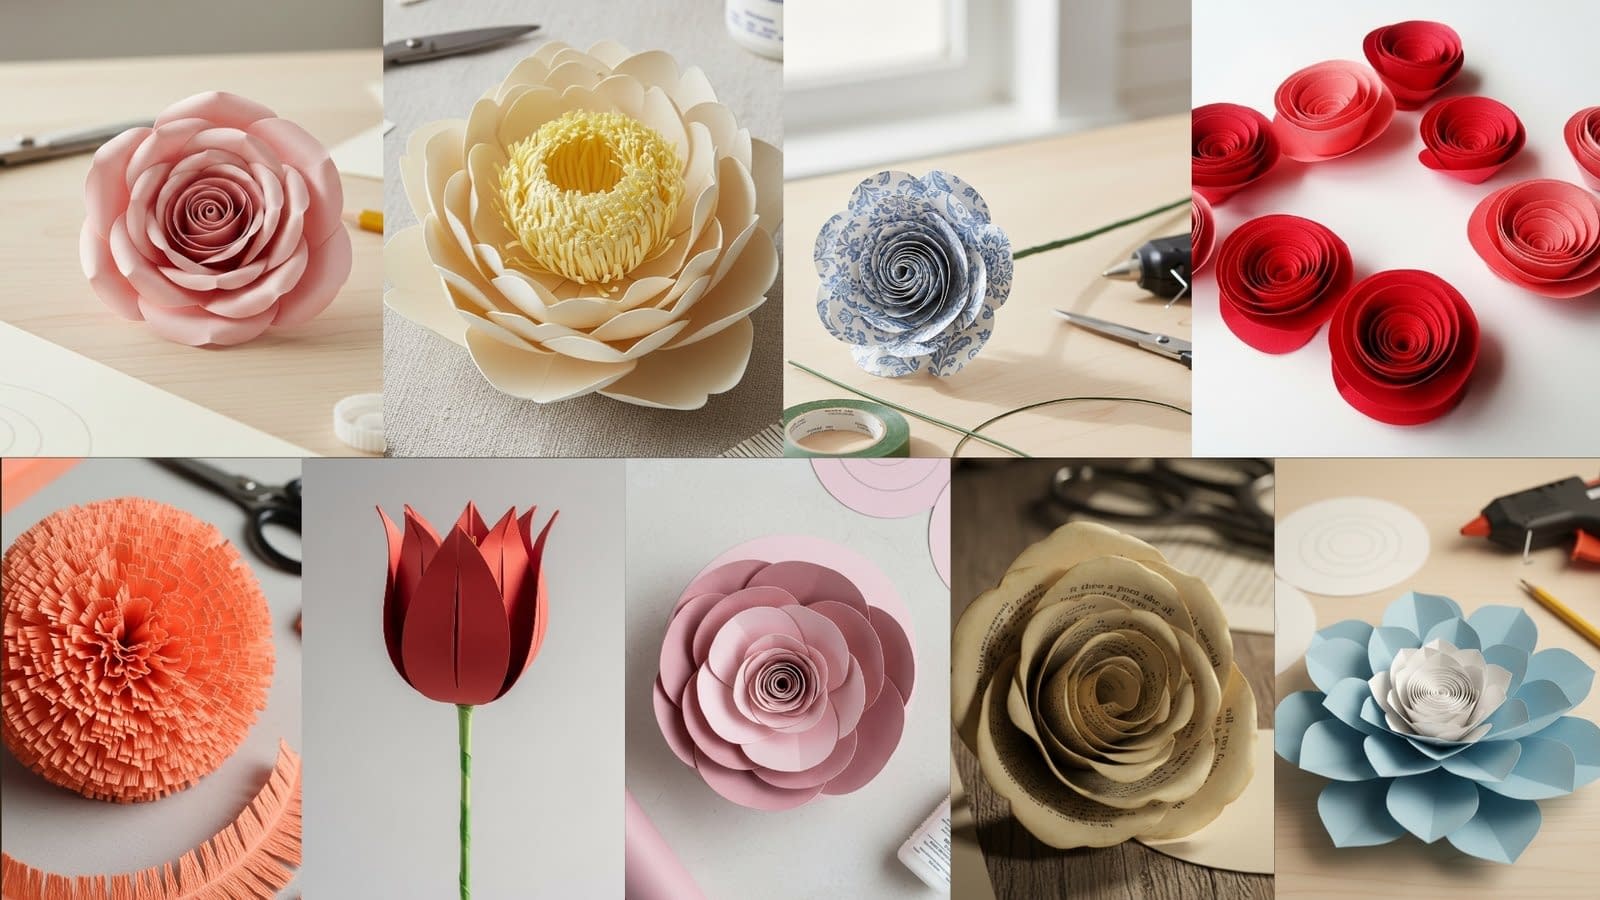
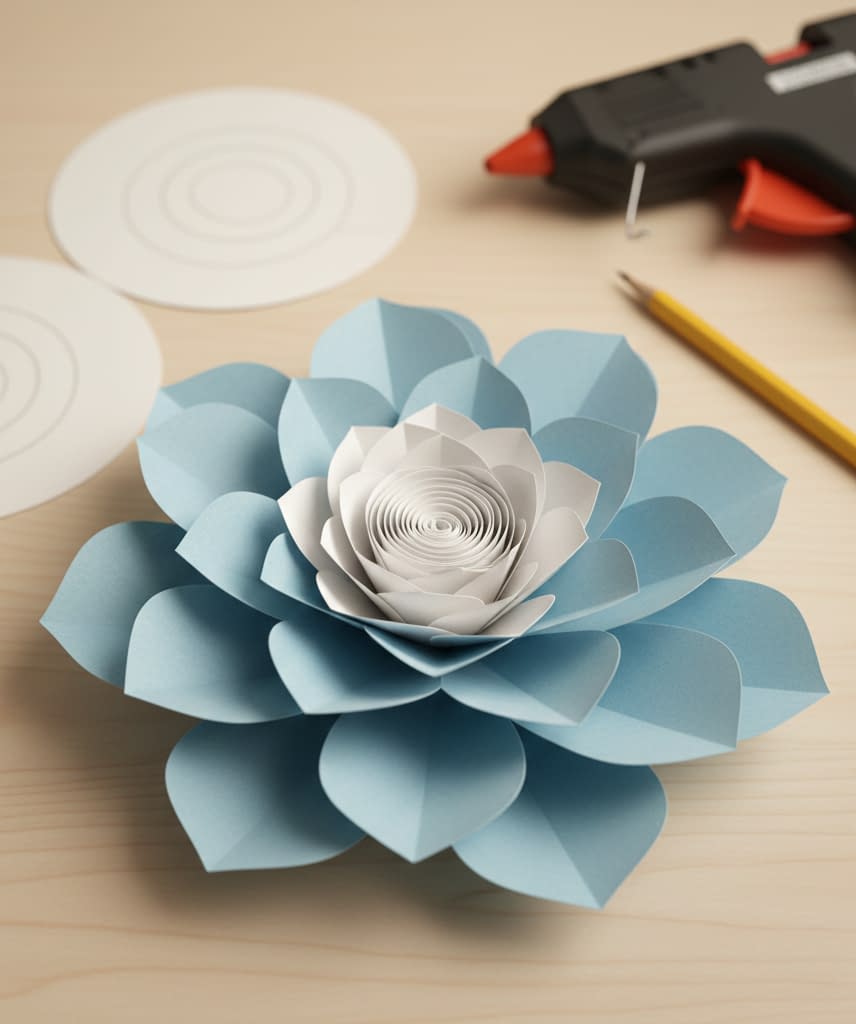
Project 9 — Easy Rolled Paper Spiral Roses (Classic Flat-Base Style)

This tutorial creates the exact type of paper spiral roses shown in the image: clean, smooth, evenly layered roses with a flat base, no stem, and a polished decorative look. These flowers are ideal for wall decor, gift boxes, shadow frames, cards, and craft projects for beginners and kids.
Materials
- Colored paper or light cardstock (red, pink, or any solid color)
- Pencil
- Round object (cup, bowl, or lid)
- Sharp scissors
- White craft glue or glue dots
- Pencil, skewer, or thin marker for rolling
- Flat work surface
Step-by-step tutorial
Step 1: Choose and prepare the paper
Use smooth, medium-weight paper. Cardstock works best if you want firm petals like the image. Avoid very thin paper, as it loses shape.
Lay the paper flat on the table and smooth out any bends before tracing.
Step 2: Draw the circle
Trace a circle that is about 5 to 6 inches wide. This size gives you a full rose without making it bulky.
Make sure the circle edges are clean and even. Uneven edges will show once the flower is rolled.
Step 3: Draw the spiral
Inside the circle, draw a continuous spiral moving inward.
- Keep the spiral width consistent, about the width of your finger.
- Do not make the spiral too thin or too wide.
- Leave a small solid circle in the center, about the size of a coin. This will become the flower’s base.
Step 4: Cut the spiral carefully
Start cutting from the outer edge and slowly follow the spiral line.
Rotate the paper as you cut instead of moving the scissors too much. This helps keep the cuts smooth and round.
When finished, lay the spiral flat on the table. It should look like a long curled ribbon with a circle at the end.
Step 5: Start rolling from the outside
Pick up the outer end of the spiral.
Hold the paper between your thumb and index finger and place a pencil or skewer against it. Begin rolling the paper inward.
The first few rolls should be tight. This forms the rose center.
Step 6: Control the petal spacing
As you continue rolling, loosen your grip slightly.
Let the paper relax naturally so the layers stack evenly. Do not pull or stretch the paper.
Keep the bottom edge of the spiral aligned as you roll so the base stays flat.
Step 7: Secure the base with glue
When you reach the center circle, stop rolling.
Apply a small amount of white glue to the center circle. Use just enough to cover the surface, not so much that it seeps out.
Press the rolled rose firmly onto the glued base and hold it in place for 15–20 seconds.
Place the flower on the table and allow it to dry completely.
Step 8: Shape the petals
Once dry, gently adjust the outer petals using your fingers.
Pull the outer layers slightly outward to give the rose a natural open look.
If desired, lightly curl the petal edges backward using a pencil for a softer finish.
Step 9: Repeat for a matching set
Repeat the same steps to create multiple roses.
Using the same circle size and spiral width will give you a uniform set like the image, perfect for decorative layouts.
Where to use these spiral roses
- Wall art and framed craft projects
- Gift box and present toppers
- Cardmaking and scrapbook embellishments
- Table decor for events
- Kids’ craft activities and classroom projects
Variations and decorative finishes
Centers and stamens
- Roll a tiny spiral from a contrasting color and glue at the center.
- Use a cluster of small beads or a pearl for a classic look.
- Create paper fringed stamens (narrow strip rolled and fanned) for realistic centers.
Edge treatments
- Lightly ink the edges for depth.
- Paint petal tips with watercolor for subtle ombré.
- Use metallic pens to highlight the highest petal edges for an elegant finish.
Mixing papers
- Combine crepe paper outer layers with cardstock centers to get both volume and structure.
- Sandwich a pattern between two layers—one patterned, one solid—to achieve a layered color peek-through.
Care, storage, and transport
- Paper flowers are not waterproof. Avoid exposure to rain or direct water. For occasional dampness, keep away from prolonged humidity.
- To flatten temporarily (for shipping), place the flower between sheets of tissue paper and lay a flat, heavy object on top. When ready, gently re-fluff and reshape. Avoid creasing petals with heavy pressure.
- Store in a shallow box with tissue dividers to prevent crushing. For long-term storage, humidity control helps preserve shape.
Troubleshooting common problems
Flower bursts open or unravels
- Cause: Insufficient glue at the base.
- Fix: Apply a small dot of glue between coils at the underside and press. Alternatively, glue a small circle of cardstock under the base to lock coils.
Paper tears when cutting or rolling
- Cause: Paper too thin or cuts too fast.
- Fix: Use slower cutting strokes and switch to a higher-weight paper. Reinforce the center with a small circle of cardstock before rolling.
Glue shows through or leaves lumps
- Cause: Excess glue or hot glue misapplied.
- Fix: Use smaller dots of glue or glue dots. For PVA, allow adequate drying and clamp gently until set. Practice with scrap paper to get the glue amount right.
Petals look flat and lifeless
- Cause: Rolled too tightly or not shaped.
- Fix: Gently fan open the petals and use a bone folder to curl edges outward. Lightly run the folder along the outer petal edge to give a natural curve.
Project-combining ideas and advanced techniques
- Make a layered bouquet by combining wired patterned flowers with crepe fringed flowers for texture contrast.
- Create a floral wreath on an embroidery hoop by hot-gluing several spiral flowers to a base, spacing them evenly and adding leaves from painted cardstock.
- Incorporate LED fairy lights woven through a garland of mini spiral blossoms for evening events. Use battery-powered lights with thin wire to hide the battery pack behind foliage.
Final tips for perfect spiral flowers every time
- Practice the spiral cut on scrap paper first to find the ideal strip width for your selected circle size.
- Use a quilling tool for small flowers and a pencil/dowel for larger ones to keep the roll even.
- Work in small batches: cut all spirals first, then roll and glue in rounds to build speed and consistency.
- Keep petal shaping subtle—the most realistic flowers have gentle curves, not harsh folds.
- Experiment with two-tone, double-layer, and fringed combinations to create signature styles.
Conclusion
These 9 Paper Spiral Flowers DIY projects give you a complete toolkit—from essential materials and cutting technique to 9 ready-to-make designs, finishing ideas, and troubleshooting advice. Use the classic spiral rose to learn the method, then expand into fringed carnations, layered blooms, vintage book-page flowers, mini garlands, and wired bouquet flowers. With a few simple tools and paper scraps, you’ll be able to create decoration-ready flowers for gifts, events, and everyday craft projects.


