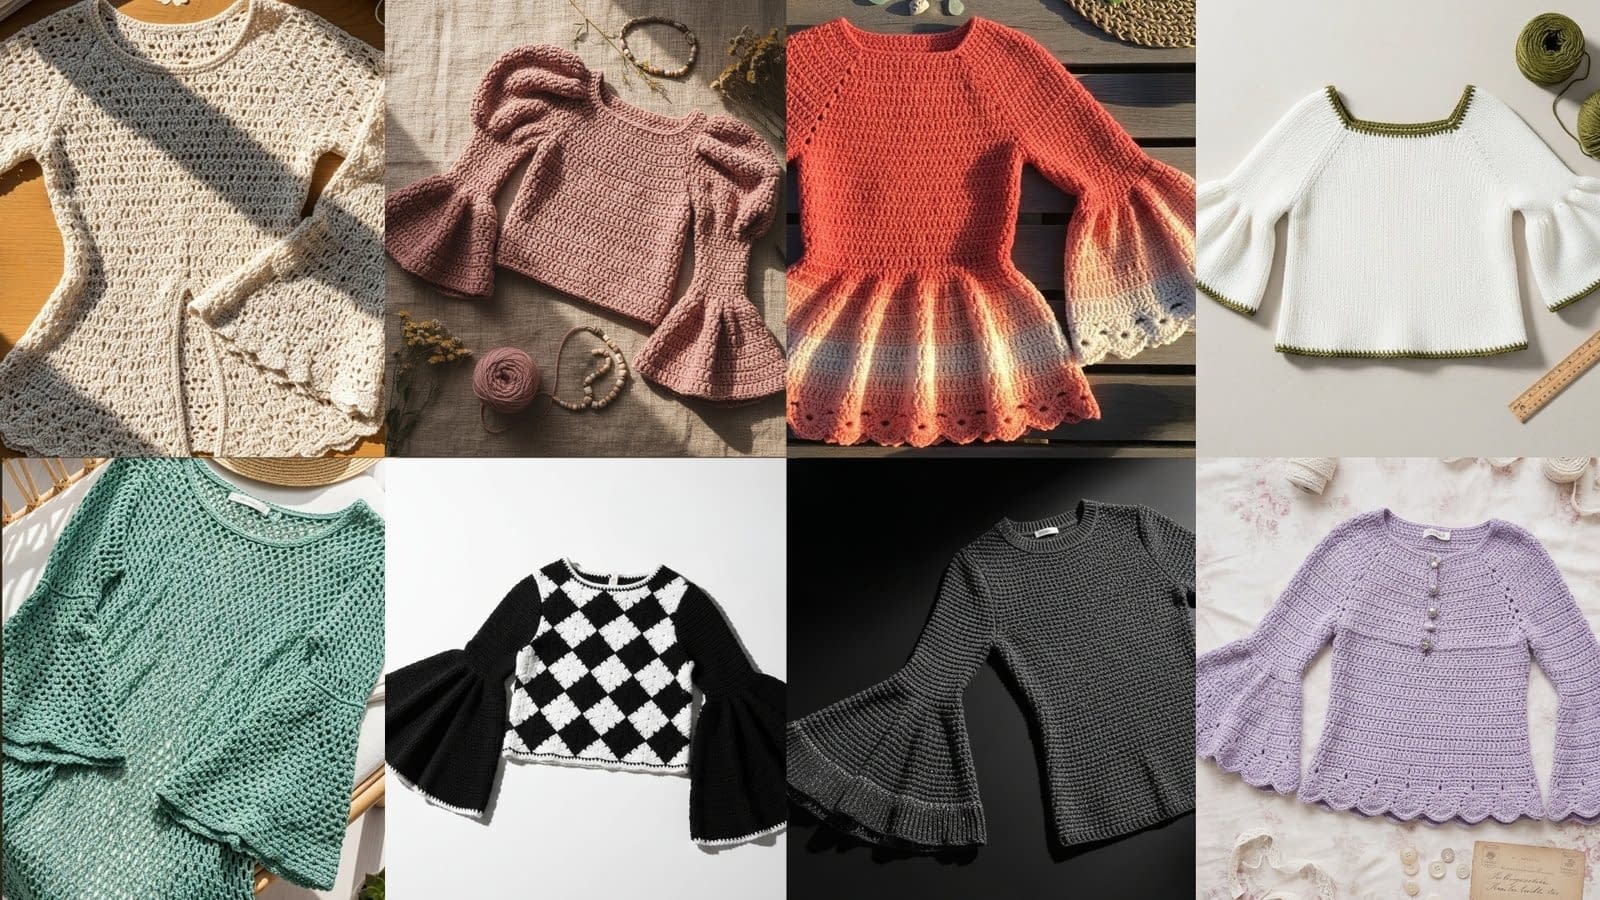
Bell sleeve tops are an elegant and wearable way to bring motion and personality to crochet garments. The bell sleeve silhouette flatters many body types: the fitted bodice balances the dramatic sleeve flare, creating a feminine and relaxed look that is both contemporary and timeless. Whether you prefer vintage lace, bohemian volume, modern minimal lines, or a sunlit ombré effect, a well-written pattern paired with careful shaping and finishing will help you create a garment you will reach for season after season.
This post is the full, long-form tutorial series for the first half of a collection titled 8 Crochet Bell Sleeve Top Patterns. Each pattern below is written to be easy to follow, uses full stitch names rather than shorthand, and explains how to adapt the stitch counts to different sizes. Every pattern includes skill level guidance, finished measurements, a complete materials list, gauge and swatch instructions, clear step-by-step construction for the body and sleeve, assembly instructions, finishing and blocking advice, plus useful variations and troubleshooting tips.
Work the sample gauge swatch before you begin. Measurements are provided for Small, Medium, and Large; I include adaptable formulas and sample stitch counts so you can calculate your own foundation if your tension differs. Use the pattern as both a literal set of instructions and as a guide for adapting to your preferred yarn or size. All stitch names are written in full so the instructions remain clear for crocheters learning garment construction. At your request I will continue with the remaining four patterns when you are ready; for now the post covers patterns 1 through 4 in complete detail.
Vintage Lace Bell Sleeve Top — Soft Cream

Skill level
Beginner–intermediate. The lace shell stitch is forgiving and repetitive, and the shaping is straightforward. This pattern requires comfortable use of chain stitch, single crochet, half double crochet, and double crochet.
Finished measurements (sample)
Small: Bust 34 inches finished (allow 2 to 3 inches positive ease)
Medium: Bust 38 inches finished
Large: Bust 42 inches finished
Finished length from shoulder to hem: approximately 20 inches (adjust by lengthening or shortening body rows).
Materials
- Light worsted or sport weight cotton yarn (look for a yarn that blocks well and has stitch definition) — approximately:
- Small: 800 to 900 yards
- Medium: 900 to 1050 yards
- Large: 1050 to 1200 yards
- Crochet hook: 3.5 millimeter for a firm fabric; 4.0 millimeter if you prefer a softer drape (choose according to your swatch)
- Stitch markers
- Yarn needle for weaving ends
- Tape measure
- Blocking pins and a flat surface for blocking
- Optional: small decorative buttons for shoulder detail if desired
Gauge
Make a 4 inch by 4 inch swatch in the lace shell pattern using your chosen hook. Example gauge to aim for with recommended yarn and hook for this pattern: 18 double crochet stitches and 10 rows = 4 inches in the pattern stitch. Your gauge may differ; measure carefully and adjust hook size to match.
Notes and design overview
This top is worked in two main flat panels: back and front. The lace shell stitch creates an airy vintage texture while maintaining structure across the body. The bell sleeves are worked separately and seamed into the armholes; the bell flare is created by working alternating shell increase rows and longer shell clusters near the cuff.
This pattern is written to be adjustable. You will be given sample foundation chain lengths for sizes Small, Medium, and Large. If your gauge differs, follow the method described in the gauge and sizing section to calculate a foundation chain that matches your measurements.
How to calculate your foundation chain
- Decide the finished bust measurement you want (for example, for a 34 inch bust with 2 inches positive ease target 36 inches finished). Divide the finished bust by two to get half-width across the front or back (for 36 inches finished this is 18 inches each panel).
- Measure stitches per inch from your swatch (for example, if your swatch shows 4.5 stitches per inch multiply by the half-width in inches).
- Because the lace shell pattern repeat is a multiple of six stitches plus two (shell stitch repeat: six stitches per repeat, plus two edge stitches), round your calculated chain to the nearest number that fits the repeat: multiple of six plus two. I provide sample chain counts below for common sizes based on a typical gauge; adjust as needed with your own swatch.
Foundation chain (sample)
- Small: Chain 86 (this assumes a gauge similar to the swatch—adjust if your swatch differs; 86 = multiple of 6 plus 2)
- Medium: Chain 96
- Large: Chain 102
These chain lengths produce the front or back panel width in the sample gauge. If you calculate a different chain from your swatch, ensure the number of foundation chains is a multiple of six plus two.
Lace shell stitch pattern (explanation)
The lace shell stitch in this pattern is formed by repeating a shell cluster followed by a small open chain space to make a delicate scalloped texture.
A shell cluster for this pattern is: work five double crochet into the same stitch to form the fan or shell. The lace row alternates shells and single double crochet separators to maintain openness.
Body panel — instructions (front and back)
Work two identical panels for back and front. Both panels are worked flat in rows.
Row 1: Chain foundation to the length for your size (see sample chain counts above). Row 1 is worked across this chain foundation. After the foundation chain, begin the first row as follows. For clarity, count the chains carefully.
Row 1: Starting in the fourth chain from the hook, work one double crochet in that chain. Skip two chains. Work five double crochet into the next chain (this creates the first shell). Skip two chains, work one double crochet into the next chain. Repeat across the row until you reach the final chain; finish the row with one double crochet in the last stitch so the row begins and ends with a double crochet outside the shell pattern. Turn your work.
Row 2: Chain three (this chain three counts as the first double crochet of the row), then work two double crochet into the top of the first shell from the previous row to anchor. Then chain one, skip the middle double crochet of the next shell below, and work one double crochet into the single double crochet space to create separation. Continue across repeating the sequence of shell, chain one, and double crochet. End the row with the chain three into the top of the final shell and turn.
Row 3 and subsequent rows: Repeat Row 2 until the panel measures the desired length from hem to underarm. For the sample finished length to underarm use approximately 15 inches (assuming 20 inch full length and 5 inch sleeve cap and shoulder allowances), but adjust according to your preferred top length. Fasten off and weave in ends. Make the second panel identical.
Neckline shaping (option for shallow scoop or crew)
This pattern leaves a modest neckline by default: when both front and back panels are complete to underarm, place the panels together and mark a center point for the neckline. For a scoop neckline on the front panel only, work neckline shaping across the next few rows before seaming shoulders as follows:
Neckline shaping for front panel only
Row 1 (at top of front panel): Work across until you reach the center 8 to 12 stitches depending on size; leave these stitches unworked for the neckline opening, turning the work and continuing on the remaining stitches. On the next row work back across the stitches you left, leaving the center stitches again. Repeat until the desired depth is reached. The exact number to leave and the number of rows will vary by size; test by placing the piece on and adjusting.
Alternatively, you may leave neckline shaping until after seaming the shoulders and work an edging around the neckline with single crochet to create a finished crew neckline.
Sleeve construction — bell sleeve method
The bell sleeves are worked flat as a long trapezoid: start at the sleeve cap (the narrow top) and increase gradually toward the cuff to achieve the bell shape. Working the sleeve flat makes stitch pattern matching simpler.
Step 1: Measure armhole circumference on the seamed body after joining the side seams. Add one to two inches ease for comfort. Divide the armhole circumference by two to calculate the number of sleeve stitches you will need for the top of the sleeve (this will be the sleeve cap width when seamed). Work a gauge swatch in the lace pattern and calculate how many stitches match the half-armhole measurement, then chain that number as a foundation chain.
Step 2: Foundation chain for sleeve cap (sample): for Small chain 34, for Medium chain 38, for Large chain 42 (adjust per your swatch and armhole measurement).
Row 1: Work lace shell pattern across the foundation chain matching the body stitch sequence used (start and finish to mirror the body edge). Turn.
Increase scheme for bell flare: On every eighth row increase by one shell on each side by working the shell cluster into the edge chain space or by adding additional double crochet transitions to create an extra fan at the beginning and end of the row. Continue in this manner until sleeve width at the cuff reaches your desired flare measurement—for example a 20 to 24 inch cuff circumference flat (40 to 48 inches around) will produce a dramatic bell; a 16 to 18 inch cuff circumference flat will be more subdued.
Length of sleeve: For a long bell sleeve, work until sleeve measures 18 inches from cap to cuff; for three-quarter sleeve aim for 13 inches.
Finishing sleeve cuff: Work an edging of single crochet or a scalloped shell to match the body. For example, work a round of single crochet around the sleeve edge, then one round of small shells (three double crochet in same stitch, skip two stitches) to give a scalloped finish. Fasten off.
Assembly
- Block both front and back panels flat to the same measurements and allow to dry.
- With right sides together, align the shoulder edges and sew the shoulder seams with a mattress stitch or slip stitch seam. Leave approximately 4 to 6 inches at the top of each shoulder if you wish to incorporate a small shoulder opening or button detail.
- Seam the side seams from hem up to the point where the sleeve opening begins, leaving the armhole opening space as measured earlier for sleeve insertion.
- Insert the sleeve: With wrong sides together, align the sleeve cap seam to the underside of the armhole and sew evenly around the armhole opening. Ease the sleeve top if necessary to distribute the cap evenly.
- Finish the neckline with one round of single crochet and one round of small shells if desired.
Finishing and blocking
Weave in all ends neatly. Block the finished top to the target measurements; gentle steam block or wet block according to yarn recommendations. Blocking opens the lace and sets the shell stitch. Pay special attention to sleeve edges to create a graceful bell curve.
Variations and tips
- To make a longer hem, add extra body rows before shaping the armholes.
- For extra drape at the sleeve cuff, use a slightly larger hook for the last few increase rows.
- Add small pearl beads by threading them onto the yarn before crocheting or sew on sequins after blocking for a delicate vintage look.
Boho Puff Bell Sleeve Top — Dusty Rose

Skill level
Intermediate. This pattern uses puff stitch construction at the shoulder and works into taller shell and cluster stitches for volume. Familiarity with working puff stitches and controlled increases is required.
Finished measurements (sample)
Small: Bust 35 inches finished; Medium: Bust 39 inches finished; Large: Bust 44 inches finished. Length from shoulder to hem: 20 inches sample.
Materials
- Worsted weight cotton or cotton blend yarn (smooth, slightly elastic) — approximately:
- Small: 1000 yards
- Medium: 1100 yards
- Large: 1250 yards
- Crochet hook: 4.5 millimeter for body; 5.0 millimeter optional for puff stitches to ensure loft
- Stitch markers
- Yarn needle
- Optional small wooden beads or ceramic bead necklace to style the finished top
Gauge
Example gauge: 14 double crochet stitches and 9 rows = 4 inches in stockinette-style double crochet fabric. Because puff stitches are taller, determine puff stitch row gauge separately.
Design overview
The Boho Puff Bell Sleeve Top features a puffed shoulder constructed with puff stitches that then flow into a dramatic bell cuff. The body is slightly relaxed and worked in alternating textured rows to complement the sleeve volume.
Pattern construction overview
This top is worked in two panels for front and back up to the underarm, then joined for a brief yoke or fitted shoulder area with puff stitch placements. Sleeves are worked in the round from the top down or flat depending on preference. The puff shoulder detail is created by placing puff stitches across the shoulder section and anchoring with rows of double crochet across the body.
Foundation chain (sample)
Because the stitch gauge and visual texture are important, chain counts are provided per size as a starting point and should be adjusted if your gauge differs.
- Small: Chain 92
- Medium: Chain 102
- Large: Chain 112
These chain counts are chosen to work with the stitch multiple used (multiple of four plus two for balance between puff clusters and spacing).
Stitch definitions
Puff stitch for this pattern: Yarn over, insert hook into indicated stitch, yarn over and pull up a loop; repeat yarn over and pull up a loop into the same stitch three more times so you have nine loops on the hook (for a four-loop puff). Yarn over and pull through all nine loops, chain one to close the puff. Chain one between puffs when the pattern indicates open spacing.
Body panels (front and back) — detailed instructions
Row 1: Chain the foundation number for your size. For the first row work one double crochet in the fourth chain from the hook, then continue across working one double crochet into each foundation chain until the row end. Turn.
Row 2: Chain two (this chain two will function as an upright for half double crochet if desired) and work a row of alternating half double crochet and double crochet for a subtle texture. For example, work one half double crochet into the first stitch, then one double crochet into the next stitch; repeat across. Turn.
Row 3: Start the puff stitch shaping row near the shoulder area. Work in pattern across the row until you reach the armhole shaping portion at the required height. The puff stitches will be concentrated along the uppermost rows to produce the shoulder volume. When you reach the armhole depth point, measure and mark the armhole and continue the remainder of the row across. Fasten off and repeat for the second panel.
Armhole shaping for the body: For a clean set-in feeling though the sleeve is dramatic, shape a shallow armhole by decreasing two stitches at the armhole edge every other row for four rows total. This produces a gentle slope that accepts the puffed sleeve cap.
Puff shoulder yoke (optional)
If you prefer a decorative yoke, join the front and back panels at the shoulders with a slip stitch or mattress stitch leaving a small opening for the neckline. On the joined shoulder area work one to two rows of puff stitch across the top to accent the shoulder transition. Space puff stitches every three to four stitches depending on the scale you like.
Sleeve construction — top-down bell sleeve
This sleeve is easiest to execute top-down in the round, joining to the armhole after the sleeve cap is worked flat in a short row style.
Step 1: With right side facing and the armhole opening available, attach yarn at the underarm seam and work a round in single crochet around the armhole edge to set a uniform base.
Step 2: For the sleeve cap work a short number of increases in the first few rounds to create the ease. Example: Round 1 of sleeve: work one single crochet evenly around the armhole edge placing increases (two single crochet in one stitch) where necessary to reach the cap circumference measured in the earlier armhole step.
Step 3: Once sleeve cap is formed (approximately 6 to 8 rounds depending on size), begin working puff stitch rows in rounds or in alternating rounds with double crochet rows. To create the bell flare, every eighth round increase by placing additional puff stitch clusters at even intervals across the round. Work the bell sleeve to the desired length; a long bell often measures 18 inches from the sleeve cap. To flare more quickly, increase at every sixth round instead.
Finishing sleeve cuff: Work three rounds of double crochet, then a final round of single crochet to give the cuff definition. Optionally work a lacy picot or small shell round to accent.
Assembly and finishing
- Block front and back panels and sleeves gently to shape the puff stitches.
- Seam shoulders and side seams, insert sleeves by matching underarm seams, and ease the sleeve cap into the armhole.
- Work a tidy neckline edging around the neck with one round of single crochet followed by one round of chain spaces if you prefer a boho scallop.
Styling tips and variations
- Use slightly thicker yarn for more pronounced puff stitches.
- Add a decorative tassel at the hip seam or a narrow waist cord for a bohemian silhouette.
- For a crop variation, shorten the body by three to five inches before seaming.
Modern Minimal Bell Sleeve Top — Chalk White with Olive Trim

Skill level
Beginner. This pattern is a great first garment project for crocheters who favor clean lines and simple shaping. The stitches are mainly single crochet, half double crochet, and tidy edging for a modern look.
Finished measurements (sample)
Small: Bust 34 inches finished
Medium: Bust 38 inches finished
Large: Bust 42 inches finished
Body length: 19 inches shoulder to hem by default; adjust to preference.
Materials
- Mercerized cotton DK weight yarn or sport weight cotton with crisp stitch definition — approximately:
- Small: 700 yards
- Medium: 800 yards
- Large: 900 yards
- Contrasting olive color for trim: 100 to 150 yards
- Crochet hook: 3.5 millimeter for the body; 3.0 millimeter for crisp trim if desired
- Stitch markers, tapestry needle
- Blocking tools
Gauge
Example gauge: 20 single crochet stitches and 24 rows = 4 inches. The single crochet fabric produces a clean, minimal look.
Design notes
This design relies on a simple fitted body with precise shaping and a contrasting olive trim along neckline and sleeve hems. The bell sleeve is created by working a slightly wider sleeve panel and finishing with a gentle outward curve at the cuff.
Foundation chain (sample)
Use this foundation chain as a starting point and rescale by measuring your swatch.
- Small: Chain 108
- Medium: Chain 120
- Large: Chain 132
These chain counts match the single crochet gauge and produce a neat minimalist panel.
Body panel instructions
Row 1: Chain the foundation length for your size. Work one single crochet in the second chain from the hook and in each chain across. Turn the work.
Row 2: Chain one (this counts as the turning chain), work one single crochet in each stitch across. Turn.
Continue working even in single crochet until the panel measures to the underarm height you desire. For a refined minimal top consider working 14 inches before armhole shaping to produce a slightly cropped but wearable silhouette for modern styling.
Armhole shaping: To create clean armholes without complex decreases, fasten off at the point where you will seam the shoulder and construct sleeves separately. Alternatively, if you want an armhole curve, decrease one stitch at each armhole edge every other row for three to five rows until the desired curve is reached.
Neckline shaping: For a neat crew neck, measure and mark the center of the front panel and work across until the last 14 to 16 stitches remain, fasten off the center stitches across the next two rows leaving a shallow neckline. A simpler method is to seam the shoulders and then work the neckline with an edging.
Sleeve construction — flat minimal bell sleeve
This sleeve is worked flat to create a clean rectangular panel that will flare slightly at the cuff.
Step 1: Measure the armhole circumference and determine the number of sleeve stitches needed at the top edge. Chain the number calculated using the single crochet gauge. Sample top chain: Small chain 40, Medium chain 44, Large chain 48.
Step 2: Work even in single crochet for four to six rows to form the sleeve cap area. Then begin subtle increases every sixth row by adding one single crochet increase at each sleeve edge to produce a gentle bell. Continue until the cuff width reaches the desired measurement; for a modern bell keep the cuff relatively restrained (for example, 20 to 24 inches flat).
Step 3: For a crisp finish, complete the sleeve with a two-row olive color trim: first row in single crochet in olive, second row in half double crochet in olive or with a simple picot edge for contrast. Fasten off.
Assembly
- Block panels flat and align front and back.
- Seam shoulders using a neat slip stitch or mattress stitch.
- Seam side seams up to the armhole depth measured earlier.
- Insert sleeves using even easing and sew into place.
- Work olive trim around neckline and the sleeve hems. To make the neckline look tailored place stitch markers every 1 inch to ensure an even stitch distribution for the trim.
Finishing and styling
Press or steam-block carefully for a crisp minimalist appearance. The mercerized cotton will polish to a subtle sheen, and the olive trim will pop against the chalk white body.
Variation: Add a subtle olive waistline tie or small side slits for ease of movement.
Sunset Ombre Bell Sleeve Top — Coral to Peach Gradient

Skill level
Intermediate. This pattern involves color transitions and ombre blending, as well as smooth shell and scalloped edging work. Familiarity with changing yarn colors in rows and carrying yarn or using gradient cakes will speed the process.
Finished measurements (sample)
Small: Bust 34 to 36 inches finished
Medium: Bust 38 to 40 inches finished
Large: Bust 42 to 44 inches finished
Length: 20 inches shoulder to hem sample. Sleeve length varies; sample is long bell at 18 inches.
Materials
- A gradient yarn cake or several skeins that blend from coral to peach to cream. Choose a yarn that transitions smoothly — a cotton-blend or light worsted is ideal.
- Small: 900 yards
- Medium: 1000 yards
- Large: 1150 yards
- Crochet hook: 4.0 millimeter recommended
- Stitch markers, yarn needle, blocking pins
- Decorative elements: small seashells or a woven straw accent for styling (optional)
Gauge
Example gauge: 16 double crochet stitches and 10 rows = 4 inches in shell pattern. Make a gradient swatch to establish color change points.
Design overview
This top celebrates color flow from a coral body into peach sleeves with cream scalloped edges. The shell stitch is used across the body with denser shells at the hemline, gradually opening toward the sleeves where lighter colors cap the scallops.
Foundation chain (sample)
- Small: Chain 90
- Medium: Chain 100
- Large: Chain 110
These counts align with a shell pattern multiple of five plus one for symmetry in this design. If your swatch shows different stitches per inch, calculate a new foundation as explained earlier and ensure the chain fits the pattern multiple.
Shell stitch explanation for this pattern
This shell is a three-double-crochet shell: work three double crochet into the same stitch to create a compact shell. Shells are spaced by single double crochet stitches and chain one eyelets to produce textured space.
Body panel — step-by-step
Row 1: Chain the foundation length for your size. Work one double crochet into the fourth chain from the hook, then continue as follows to form the shell pattern: work three double crochet into the next chain, chain one, skip two chains, work one double crochet; repeat the shell sequence across until the end of the row, finishing with one double crochet in the final chain. Turn.
Row 2: Chain three (counts as first double crochet), work two double crochet into the top of the first shell below, then chain one, work one double crochet into the chain space between shells of the previous row. Continue across repeating shells and double crochet separators. Turn.
Continue in the shell pattern, changing colors according to your ombre plan. To achieve a smooth gradient, change color every four to six rows or work with a gradient yarn cake that changes color gradually. When changing color, finish the last double crochet of the row with the new color so the color change occurs at the beginning of the next row for a neater join.
Work the front and back panels to the same underarm length. For neckline shaping on the front panel, work shallow decreases as described in previous patterns or leave shaping to the neckline edging later.
Color transition guidance
For a natural ombre:
- Work the lower body in coral for approximately the first one third of body rows.
- Transition to coral-peach blend for the middle third by alternating rows of coral and peach or by changing colors every two rows.
- Complete the top part of the body and the upper sleeve rows in peach and finish the sleeve edge in cream for a light scallop.
If using a single skein gradient cake, mark the color change points on your sample swatch so you can match panels.
Sleeve construction — graduated bell sleeve
For a graceful ombre bell, work the sleeve in rounds from the top down or flat as a long trapezoid as described below. Because the color transition is important, consider working the sleeve in joined rounds and change color at the beginning of a round to maintain clean horizontal bands.
Step 1: Measure armhole circumference and determine top sleeve stitches. Chain foundation for the sleeve cap in the shell pattern multiple, for example Small chain 36, Medium chain 40, Large chain 44.
Step 2: Work the sleeve cap for three to four rounds in the main peach color with the shell pattern in rounds. Then begin the increase scheme for the bell: increase by adding an extra shell cluster every eighth round on each side of the panel or by increasing shell repeats evenly across the round to maintain a circular shape if working in the round.
Step 3: Continue working in the shell pattern and change color gradually toward cream at the cuff. For a soft scalloped cuff, switch to cream for the last four rows and finish with one row of small three-double-crochet shells to form a scalloped edge.
Assembly
- Block all panels and sleeves carefully to even out stitches and set the ombre bands.
- Seam shoulders and side seams, then insert sleeves matching ombre transitions so the color flow remains harmonious along the shoulder-to-sleeve join.
- Work a narrow border around the neckline in cream to tie the look together.
Finishing touches and variations
- Add delicate scallop embellishments to the hem in cream for a beachy finish.
- To make the ombre more subtle, alternate two rows of one color with two rows of the next color for a blended stripe effect.
- For extra movement at the sleeve cuff, omit the final single crochet round and allow the scallop shells to remain open and airy.
Black and White Harlequin Bell Sleeve Top

Skill level
Intermediate to advanced. This pattern requires careful stitch counting to maintain the diamond motif, confident color changes, and clean tension control to preserve the sharp contrast between black and white sections.
Finished measurements (sample)
Small: Bust 34 to 36 inches finished
Medium: Bust 38 to 40 inches finished
Large: Bust 42 to 44 inches finished
Finished length: approximately 20 inches from shoulder to hem.
Sleeve length: 18 inches for a dramatic bell sleeve.
Materials
- Smooth acrylic or cotton blend yarn with excellent stitch definition
- Color A: Black (main contrast color)
- Color B: White (secondary contrast color)
Yardage: - Small: 1000 yards total
- Medium: 1150 yards total
- Large: 1300 yards total
- Crochet hook: 4.0 millimeter
- Stitch markers
- Yarn needle
- Blocking tools
- Optional: contrasting stitch markers to track diamond centers
Gauge
Example gauge: 16 double crochet stitches and 10 rows = 4 inches in diamond pattern fabric. Because colorwork can tighten tension, swatch carefully and adjust hook size if necessary.
Design overview
This top features a bold harlequin diamond pattern across the body, transitioning into solid black bell sleeves edged with a fine white picot trim. The garment combines strong graphic contrast with elegant sleeve movement, making it ideal for statement wear.
Diamond pattern structure (important)
The harlequin motif is built from offset blocks of double crochet stitches. Each diamond spans eight stitches wide and eight rows tall. Maintaining alignment is essential. Use stitch markers at the center of each diamond to stay oriented.
Foundation chain (sample)
The foundation chain must be a multiple of eight plus two.
- Small: Chain 98
- Medium: Chain 114
- Large: Chain 130
Adjust using your swatch if your stitch count differs.
Body panel instructions (front and back)
Row 1: With white, chain the foundation length for your size. Starting in the fourth chain from the hook, work one double crochet in each chain across. Turn.
Row 2: Chain three. Work one double crochet in each stitch across. Turn.
Rows 3 to 10: Begin diamond shaping.
- Rows 3 and 4: With black, work double crochet across the row, but mark every eighth stitch with a stitch marker.
- Rows 5 and 6: Switch to white. Work double crochet across, centering the color change so that white stitches form the interior of the diamond shape.
- Rows 7 and 8: Switch back to black, decreasing one stitch at each side of the diamond center by working two double crochet together at marked points.
- Rows 9 and 10: With white, increase at the diamond edges by working two double crochet into the same stitch.
This sequence completes one diamond unit vertically. Repeat this sequence until the body reaches the underarm length.
Continue working the pattern until the panel measures approximately 15 inches from hem to underarm. Fasten off. Repeat for the second panel.
Neckline shaping
For a clean neckline that does not disrupt the diamond motif:
- Seam shoulders first.
- After seaming, work one round of single crochet evenly around the neckline using black yarn.
- Follow with a second round of white single crochet for contrast.
Sleeve construction — solid bell sleeve
The sleeves are intentionally worked in solid black to visually anchor the bold body pattern.
Step 1: Measure the armhole circumference. Calculate the sleeve cap stitch count using your double crochet gauge.
Sample sleeve cap chains:
- Small: Chain 40
- Medium: Chain 44
- Large: Chain 48
Row 1: With black, work one double crochet in the fourth chain from the hook and in each chain across. Turn.
Rows 2 to 6: Work even in double crochet to form the sleeve cap.
Increase rows for bell shaping:
- Every sixth row, increase one stitch at each sleeve edge by working two double crochet into the first and last stitches.
- Continue until the cuff width reaches approximately 22 to 26 inches flat.
Cuff edging:
- Switch to white.
- Work one round of single crochet evenly.
- Work a picot trim by chaining three, slip stitching into the next stitch, and repeating around the cuff.
Assembly
- Block all panels flat.
- Seam shoulders and side seams.
- Insert sleeves, matching the underarm seam to the sleeve midpoint.
- Secure sleeve seams neatly to maintain the clean silhouette.
Variations
- Reverse colors for a white-dominant top with black accents.
- Shorten the body and sleeves for a cropped, fashion-forward version.
Lightweight Mesh Bell Sleeve Top — Seafoam Green

Skill level
Beginner to intermediate. This pattern uses simple mesh stitches and basic increases, making it an excellent warm-weather garment project.
Finished measurements (sample)
Small: Bust 34 to 36 inches
Medium: Bust 38 to 40 inches
Large: Bust 42 to 44 inches
Length: 20 inches body, 17 inches sleeve.
Materials
- Linen-blend or cotton yarn with subtle texture
- Small: 800 yards
- Medium: 900 yards
- Large: 1050 yards
- Crochet hook: 4.5 millimeter
- Stitch markers
- Yarn needle
- Blocking tools
Gauge
Example gauge: 14 double crochet stitches and 8 mesh rows = 4 inches.
Design overview
This top is airy and breathable, constructed with a simple open mesh pattern that drapes beautifully. The bell sleeves hang naturally, emphasizing the lightness of the fabric.
Mesh stitch explanation
The mesh stitch is created by alternating double crochet stitches and chain spaces.
Mesh pattern repeat:
- One double crochet
- Chain one
- Skip one stitch
Foundation chain (sample)
Foundation chain must be an even number.
- Small: Chain 90
- Medium: Chain 100
- Large: Chain 110
Body panels
Row 1: Chain foundation. Work one double crochet in the fourth chain from the hook, chain one, skip one chain, and repeat across. End with one double crochet. Turn.
Row 2: Chain three. Work one double crochet into the next double crochet below, chain one, skip the chain space, and repeat across. Turn.
Repeat Row 2 until the body reaches the desired underarm height, approximately 15 inches.
Neckline
After seaming shoulders, work one round of single crochet evenly around the neckline to stabilize the mesh and prevent stretching.
Sleeve construction — flowing mesh bell sleeve
Step 1: Measure armhole circumference and calculate sleeve top stitches.
Sample sleeve cap chains:
- Small: Chain 38
- Medium: Chain 42
- Large: Chain 46
Row 1: Work mesh pattern across foundation.
Increase scheme:
- Every fourth row, add one additional chain space at each sleeve edge by chaining two instead of one.
- This gradually increases sleeve width and creates the bell shape.
Continue until sleeve measures 17 inches long.
Cuff finish:
- Work one round of single crochet.
- Optional second round of slip stitch for a clean edge.
Assembly
- Block gently to open the mesh.
- Seam shoulders and sides.
- Insert sleeves and secure evenly.
Variations
- Add a drawstring waist using surface crochet.
- Work shorter sleeves for a summer tee version.
Romantic Eyelet Bell Sleeve Top — Lavender

Skill level
Intermediate. Eyelet placement and decorative details require attention but the construction is straightforward.
Finished measurements (sample)
Small: Bust 34 inches
Medium: Bust 38 inches
Large: Bust 42 inches
Length: 21 inches body, 18 inches sleeves.
Materials
- Smooth cotton yarn with gentle sheen
- Small: 900 yards
- Medium: 1050 yards
- Large: 1200 yards
- Crochet hook: 4.0 millimeter
- Decorative buttons or pearls
- Yarn needle
- Blocking tools
Gauge
Example gauge: 16 half double crochet stitches and 12 rows = 4 inches.
Design overview
This design highlights delicate eyelet rows and soft romantic shaping. Decorative buttons at the neckline or sleeve cuffs add refinement.
Eyelet stitch explanation
Eyelet row:
- Yarn over, insert hook, pull up loop
- Yarn over and pull through two loops
- Chain one
- Skip one stitch
Foundation chain (sample)
Chain multiple of two plus one.
- Small: Chain 101
- Medium: Chain 113
- Large: Chain 125
Body panels
Rows 1 to 3: Work half double crochet evenly across.
Row 4: Work eyelet row across.
Repeat this four-row sequence until underarm height is reached.
Sleeve construction
Step 1: Chain sleeve cap foundation based on armhole measurement.
Row 1: Half double crochet across.
Row 2: Eyelet row.
Increase every fifth row by adding one half double crochet at each edge.
Finish with decorative edging and optional sewn buttons.
Assembly
- Block panels flat.
- Seam shoulders and sides.
- Insert sleeves.
- Add button details after blocking.
Variations
- Replace buttons with lace ribbon ties.
- Shorten sleeves for a soft everyday version.
Elegant Evening Bell Sleeve Top — Charcoal with Metallic Thread

Skill level
Advanced. Fine gauge crochet and metallic thread require consistent tension and patience.
Finished measurements (sample)
Small: Bust 34 inches
Medium: Bust 38 inches
Large: Bust 42 inches
Length: 20 inches body, 18 inches sleeves.
Materials
- Fine-gauge cotton or silk blend yarn in charcoal
- Metallic thread (silver or graphite)
- Crochet hook: 3.0 millimeter
- Yarn needle
- Blocking tools
Gauge
Example gauge: 18 single crochet stitches and 22 rows = 4 inches.
Design overview
This top is designed for evening wear, combining dense stitchwork with subtle metallic highlights at the neckline and cuffs.
Construction notes
The metallic thread is carried alongside the main yarn only at accent rows to avoid stiffness.
Foundation chain (sample)
- Small: Chain 112
- Medium: Chain 124
- Large: Chain 136
Body panels
Rows 1 to 10: Work single crochet evenly.
Accent row: Join metallic thread and work one row of half double crochet.
Repeat this sequence until underarm height.
Sleeve construction
Step 1: Work sleeve cap in single crochet.
Step 2: Increase gradually every sixth row.
Final accent:
- Work last two rows with metallic thread held together with main yarn.
- Finish with a slip stitch edging.
Assembly and finishing
- Block gently using steam rather than soaking.
- Seam carefully to preserve stitch definition.
- Finish neckline with metallic accent round.
Variations
- Replace silver metallic with gold for warmer tones.
- Shorten sleeves for a refined cocktail top.
Conclusion
This collection of 8 Crochet Bell Sleeve Top Patterns showcases how one silhouette can be transformed through stitch choice, shaping, texture, and color. From vintage lace and romantic eyelets to modern minimal lines, bold graphic contrast, airy mesh, and elegant metallic accents, each pattern offers a distinct style while reinforcing essential garment-making skills. Together, these designs help build confidence in crochet clothing construction, encourage customization, and provide versatile, wearable pieces that can be adapted for everyday wear or special occasions.