
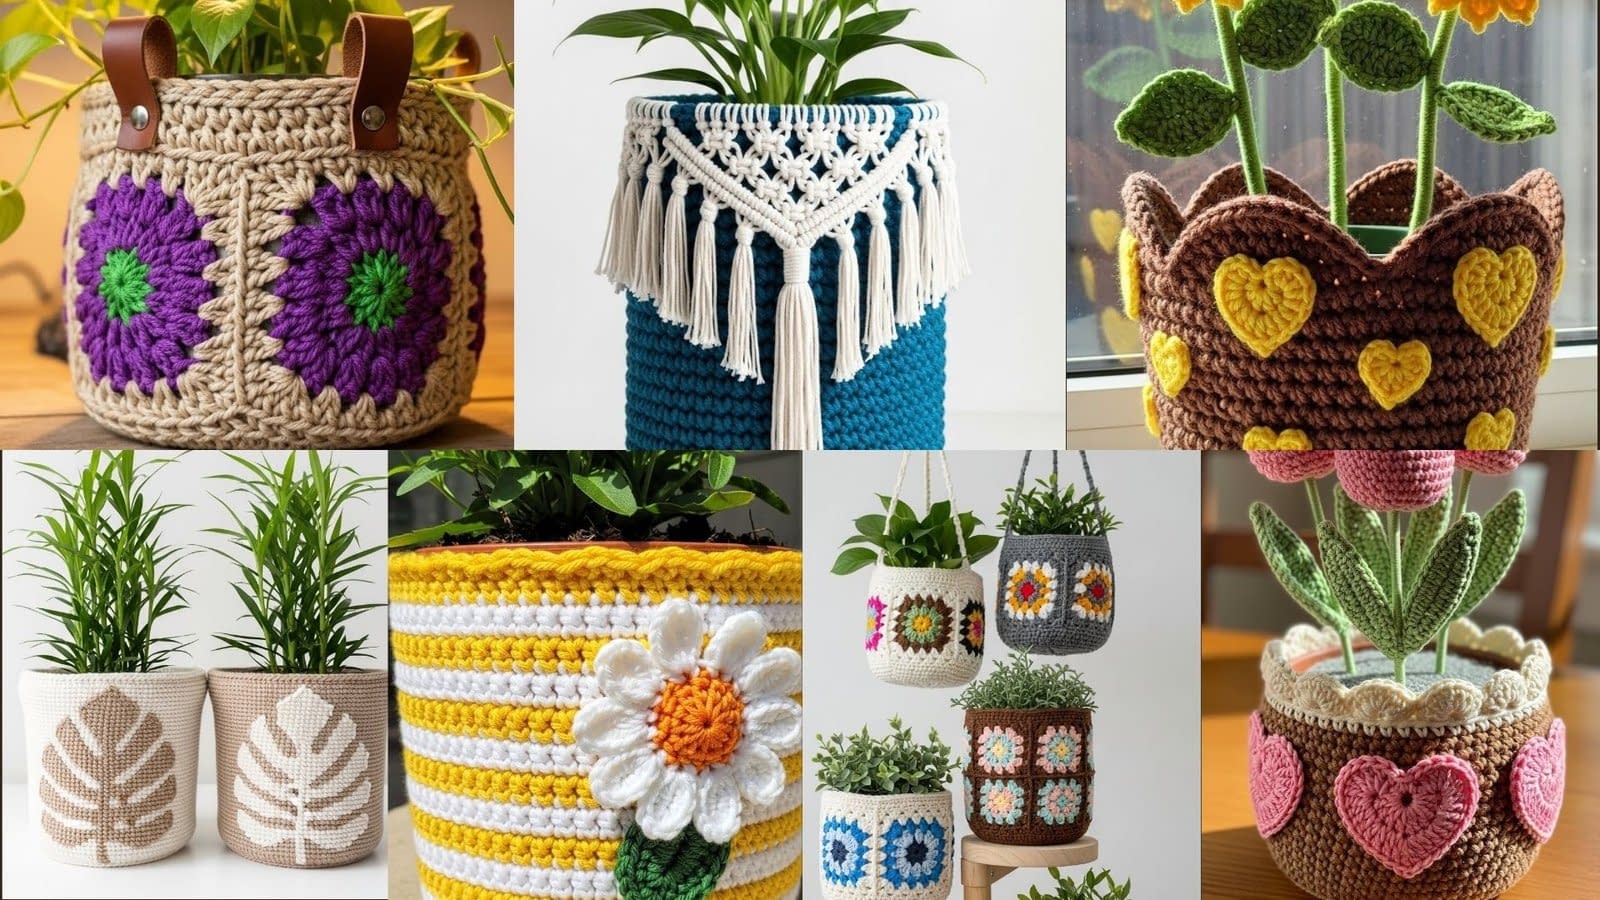
Crochet flower pot covers are one of the most charming ways to bring handcrafted warmth into your home. They add texture, personality, and color to any corner of a room while also giving you a chance to explore new stitches, motifs, shaping techniques, and decorative elements. Whether you enjoy using classic granny squares, tapestry colorwork, textured appliques, or three–dimensional crochet flowers, each handmade cover transforms even the simplest plant into a meaningful decorative piece.
This guide presents seven crochet flower pot cover patterns, each inspired by a unique visual aesthetic—from rustic floral designs to Scandinavian simplicity and colorful bohemian collections. Each pattern is written with great detail, using long-form, step-by-step explanations that help even newer crocheters build confidence while still providing structure and clarity that more advanced crocheters appreciate. Every flower pot cover includes a skill level, finished size notes, materials, special techniques, and a full written pattern broken down into panels, shaping steps, assembly, and decorative options.
Below are the first three patterns, written in complete detail. Let me know when you are ready for patterns four to seven.
Crocheted Tulip and Heart Pot

Skill level
Beginner to intermediate (simple shaping, applique attaching, and three–dimensional flower construction)
Finished size
Designed to fit a small round pot approximately 4 inches tall and 4 inches wide. You may adjust the size by changing your hook or yarn weight, or by adding additional rounds for greater height.
Materials
Worsted weight number four yarn in warm brown for the pot cover base
Worsted weight number four yarn in cream for the scalloped rim
Worsted weight number four yarn in pink for the hearts and tulips
Worsted weight number four yarn in green for the tulip stems and leaves
Crochet hook size 4.0 millimeters
Yarn needle and scissors
Stitch markers for keeping track of increases
Optional small amount of stuffing for the tulip heads if you prefer a fuller look
Notes
This pot cover is worked in continuous rounds from the bottom up. The hearts are made separately and sewn onto the pot cover. The tulips and stems are created as three–dimensional appliques that can be placed inside the pot, attached to a foam base, or stitched directly into the cover if you prefer them fixed in place.
Instructions
Base of pot cover
Step 1: Create the foundation circle
Create a slip knot and chain four. Join the last chain to the first chain with a slip stitch to form a small ring. Insert your hook into the center of the ring and begin working the first round into the ring space.
Step 2: Round one
Make two chains which count as the height of your first half double crochet stitch. Work nine additional half double crochet stitches into the center of the ring. You now have ten half double crochet stitches in total. Do not join the round. Place a stitch marker at the start of the round to help track the continuous spiral shape.
Step 3: Round two
Work two half double crochet stitches into each stitch around the circle. This doubles your stitch count. You will now have twenty stitches. Move the stitch marker up to keep track of your new round beginning.
Step 4: Round three
Increase round
Work one half double crochet stitch into the first stitch, then work two half double crochet stitches into the next stitch. Repeat this sequence around the entire circle. You will now have thirty stitches.
Step 5: Round four
Work one half double crochet stitch into the first two stitches, then work two half double crochet stitches into the next stitch. Repeat this pattern around. You will now have forty stitches. Continue adjusting the size of this base circle depending on how large your pot is. As long as the circle is slightly smaller than the pot’s bottom circumference, the cover will stretch nicely for a snug fit.
Building the pot wall
Step 6: Forming the sides
Once your circle matches the diameter needed, work the next full round by placing one half double crochet stitch into each stitch around with no increases. This helps the circle curve upward to form the pot walls.
Step 7: Side height
Continue working one half double crochet stitch into each stitch around until the height measures roughly four inches or your pot’s height minus the depth of the scalloped rim. Keep your tension firm for structure.
Creating the scalloped rim
Step 8: Attaching cream yarn
Join the cream yarn at the start of a round. Work one single crochet stitch into each stitch around for one round to create a smooth transition.
Step 9: Scallops
To make one scallop, skip one stitch, work five double crochet stitches into the next stitch, skip the following stitch, and work one single crochet into the next stitch. Repeat this sequence around the top edge. Adjust the number of scallops as needed to keep the spacing consistent.
Fasten off and weave in the ends.
Heart appliques
Step 10: Creating one heart
Create a magic ring. Into the ring, work three chains, three double crochet stitches, three half double crochet stitches, one double crochet stitch, three half double crochet stitches, and three double crochet stitches. Finish with three chains and join with a slip stitch into the ring. Pull the ring closed to tighten the heart shape. Make at least three hearts.
Step 11: Attaching hearts
Place them evenly spaced around the pot cover. Use your yarn needle and matching pink yarn to stitch each heart securely.
Three–dimensional tulips
Step 12: Making the tulip head
Create a magic ring. Work six single crochet stitches into the ring. Pull tight.
Round two: Work two single crochet stitches into each stitch around.
Round three: Work one single crochet stitch into each stitch.
Round four: Repeat round three.
Round five: Work one single crochet stitch into the first stitch, then create a small petal by working two double crochet stitches and one single crochet stitch all in the next stitch. Repeat this petal sequence around to form scalloped tulip edges.
Stuff lightly if desired.
Step 13: Stems and leaves
For each stem, chain the height you prefer and work one single crochet stitch into each chain back down to the beginning.
For leaves, chain eight, work one single crochet stitch in the second chain from the hook, then one half double crochet, one double crochet, one double crochet, one half double crochet, and one single crochet. Slip stitch at the end. This creates a leaf shape.
Step 14: Assembly
Attach stems to tulip heads with a few strong stitches. Insert tulips into the pot or stitch them directly into the inside rim if you prefer stability.
Conclusion for pattern
You now have a charming crocheted tulip and heart pot cover with three–dimensional tulips adding height and whimsy. This design brings texture, color, and playful detail to your indoor plants.
Boho Granny Square Pot and Hanging Basket Collection

Skill level
Intermediate (granny square construction, seaming, light shaping, and basic color changes)
Finished size
This pattern creates three pot covers and two hanging baskets. Each pot cover fits standard small to medium pots approximately 4 to 6 inches tall and wide. Hanging baskets may be adjusted in depth by adding more rounds.
Materials
Worsted weight number four yarn in cream, brown, pink, blue, green, grey, and assorted pastel colors for flower square motifs
Crochet hook sizes 4.0 millimeters and 5.0 millimeters depending on desired drape
Stitch markers
Yarn needle and scissors
Wooden plant stand for display (optional)
Twine or matching yarn for hanging basket loops
Notes
Each pot cover is formed using classic floral granny squares. You may mix and match colors according to the aesthetic you prefer. The hanging baskets are worked in continuous rounds with optional floral squares added as decorative patches.
Instructions
Flower granny squares
Step 1: Center flower
Choose a color for the flower center. Create a magic ring. Work twelve double crochet stitches into the ring and pull tight. Join with a slip stitch.
Step 2: Petal round
Switch to your petal color. Chain three. Work two double crochet stitches into the first stitch, then chain one. Work three double crochet stitches into the next stitch followed by one chain. Repeat this around until you have eight clusters. Join with a slip stitch.
Step 3: Square shaping
Switch to your background color. In one chain space, work three double crochet stitches, chain two, and three double crochet stitches to create a corner. In the next chain space, work three double crochet stitches. Alternate corners and straight sides around the motif until you form a full square. Join with a slip stitch and fasten off.
Make enough squares to assemble each pot cover. For one medium pot you usually need eight squares.
Assembling a pot cover
Step 4: Seaming
Arrange squares according to your preferred color layout. Seam the squares together using whip stitch or mattress stitch. Create a tube shape that fits snugly around your pot. Seam the bottom by stitching another square or circle of single crochet rounds to close the base if desired.
Step 5: Finishing edge
Work one or two rounds of single crochet stitches around the top edge of the pot cover for a polished finish.
Creating the hanging baskets
Step 6: Base
Create a magic ring and work ten single crochet stitches into the ring. Do not join.
Round two: Work two single crochet stitches into each stitch around.
Round three: Work one single crochet stitch into the first stitch and two single crochet stitches into the next stitch. Repeat this pattern around. Continue increasing until the circle matches the bottom width you want.
Step 7: Wall height
Work one single crochet stitch into each stitch around without increasing. Continue until the height matches your desired basket depth.
Step 8: Adding floral squares
Make two floral squares and stitch them to the exterior of the hanging basket.
Step 9: Creating hanging loops
Cut three long strands of yarn. Attach them evenly spaced around the basket’s rim. Braid them together for strength. Tie at the top to create a loop.
Conclusion for pattern
This collection blends bohemian charm with floral colorwork and versatile sizing. The mix of granny squares and simple basket shaping makes it a fun project set perfect for decorating plant corners or gifting plant lovers.
Rustic Flower Motif Pot with Leather Handles

Skill level
Intermediate to advanced (working with multiple motifs, seaming, optional handle installation)
Finished size
Designed to fit a medium pot approximately 5 to 6 inches tall. You can modify the height by adding or removing motif rounds.
Materials
Worsted weight number four yarn in beige, purple, and green
Small brown leather strips for handles
Metal rivets and rivet punch tool (optional)
Crochet hook size 4.0 millimeters
Yarn needle and scissors
Stitch markers
Notes
This pot cover uses large floral motifs with petal layers worked outward from the center. The motifs are then joined together to create a rustic, handcrafted container. Leather handles add a finishing touch inspired by farmhouse decor.
Instructions
Creating the flower motif
Step 1: Flower center
Use green yarn. Create a magic ring and make eight single crochet stitches into the ring. Pull tight and join with a slip stitch.
Step 2: First petal round
Switch to purple yarn. Chain three and work two double crochet stitches in the same stitch. Chain one. Into the next stitch, work three double crochet stitches and chain one. Repeat this around until you have eight clusters. Join with a slip stitch.
Step 3: Second petal layer
Chain five. Skip one cluster and slip stitch into the top of the next cluster. These chain arches will form the support for the second petal layer. Continue this around.
Step 4: Building petal depth
Into each chain arch, work one single crochet stitch, one half double crochet stitch, three double crochet stitches, one half double crochet stitch, and one single crochet stitch. This forms a full petal. Repeat in every chain arch around.
Step 5: Square shaping
Switch to beige yarn. Begin forming a square by working one corner at each of four points: three double crochet stitches, two chains, and three double crochet stitches in the same space. Build the sides by working three double crochet stitches into each space between petals. Continue until the motif is fully square. Fasten off.
Make at least six motifs for a medium pot cover.
Assembling the pot cover
Step 6: Joining motifs
Place the motifs side by side. Work a whip stitch through the back loops only to join the motifs into a cylindrical shape.
Step 7: Bottom panel
Create a flat circle using continuous single crochet increase rounds until the circle matches the width of the motif cylinder. Stitch the bottom panel to the motifs.
Adding leather handles
Step 8: Installing handles
Cut two small leather strips. Position them on opposite sides at the top edge of the pot cover. Attach using rivets or sew them directly with thick yarn.
Finishing
Step 9: Edging
Work one round of single crochet stitches around the top edge to create a clean border.
Scandi Leaf Motif Pot Cover Duo

The Scandi Leaf Motif Pot Cover Duo brings a clean, minimalist style to indoor plants while using the tapestry crochet technique to create bold, modern leaf silhouettes. This set includes two coordinating pot covers that reverse the color arrangement, creating a balanced and contemporary display. The first pot cover is worked in a cream-colored base with a beige leaf motif, while the second one features a beige base with a cream-colored leaf motif. Both pieces offer structure, warmth, and visual interest without overwhelming the simplicity of Scandinavian décor.
This pattern set is an excellent project for crocheters who want to learn colorwork in the round while maintaining consistent tension. The result is a polished pair of pot covers perfect for side tables, shelves, and minimalist home styling.
Skill Level
Advanced beginner to intermediate (tapestry crochet colorwork + consistent tension in the round)
Finished Size
Designed to fit a medium plant pot approximately 5.5 inches tall and 5 to 6 inches in diameter.
Adjust size easily by changing yarn weight, hook size, or stitch count.
Materials
Worsted weight category number four yarn in two contrasting neutral colors
Color A: cream
Color B: beige
Crochet hook size 4.5 millimeters
Yarn needle
Stitch markers
Scissors
Notes
These pot covers are worked in continuous rounds using single crochet stitches.
You will carry the unused color inside the stitches as you work the tapestry section.
Maintain consistent tension when carrying the yarn strands so the fabric stays smooth.
Instructions
Base and Body Setup
Step 1. Begin with Color A for the first pot cover. Create a slip knot and chain two.
Step 2. Work six single crochet stitches into the second chain from the hook to form a small circle.
Step 3. Work continuous rounds, increasing evenly on each round to expand the base. Continue until the circle matches the diameter of the bottom of your plant pot.
Step 4. Once the base is the correct size, begin the sides by working one single crochet stitch into each stitch around without further increases.
Step 5. Continue for several rounds until the sides reach approximately one and one half inches tall. This section will prepare the pot cover for the leaf motif that follows.
Leaf Motif Colorwork Section
Step 1. Introduce Color B by placing it behind the working yarn of Color A and crocheting over it to secure.
Step 2. Begin following your leaf motif chart row by row, switching colors whenever the chart indicates.
Step 3. To change colors, stop before completing the last yarn-over of a stitch, pick up the new color, and complete the stitch in the new color.
Step 4. Carry the unused color neatly inside the stitches, keeping tension even so the fabric does not pucker.
Step 5. Continue the colorwork as the leaf shape expands upward, creating a bold, centered leaf design.
Step 6. After completing the motif, continue working several rounds of single crochet in Color A to build the top rim of the pot cover.
Top Rim
Step 1. Work four to six additional rounds in single crochet with Color A to create a clean, minimalist upper edge.
Step 2. Slip stitch into the next stitch, fasten off, and weave in all loose ends.
Make the Second Cover
Repeat the exact same steps using Color B as the main color and Color A as the motif color so that both pot covers complement each other as a reversed pair.
Variations
Use a larger hook and bulky yarn for oversized planters.
Switch the leaf motif to other simple designs such as geometric triangles or circles.
Add a single line of contrasting color at the top rim for a bold Scandinavian accent.
Macramé-Style Tassel Pot Cover

This Macramé-Style Tassel Pot Cover blends crochet texture with the decorative flow of macramé-style fringe. It is tall, cylindrical, and visually striking, making it perfect for enhancing living rooms, entryway tables, or plant corners. The deep teal blue body adds richness, while the bright white tassel fringe introduces contrast and dimension. This piece is especially appealing for makers who enjoy combining different fiber arts aesthetics in one project.
Skill Level
Confident beginner to intermediate (simple cylinder + tassel and fringe finishing)
Finished Size
Approximately 8 inches tall and 6 inches wide, sized for a medium indoor plant.
You may adjust height or width by adding or subtracting stitch rounds.
Materials
Worsted weight category number four yarn:
Main color deep teal blue
Accent color white
Crochet hook size 5.0 millimeters
Yarn needle
Scissors
Ruler for measuring tassels
Notes
The pot cover is worked in continuous rounds from the base upward.
Tassels and fringe are attached after the main pot cover is completed.
Instructions
Base and Cylinder
Step 1. Use the main color yarn to begin with a slip knot. Chain two.
Step 2. Work six single crochet stitches into the second chain from the hook to form a circle.
Step 3. Work continuous rounds, increasing evenly each round until the base is the width of your plant pot.
Step 4. Once the base is correct, begin forming the sides by working one single crochet stitch into each stitch around without increases.
Step 5. Continue this process until the height of the pot cover reaches about eight inches, creating a tall cylinder.
Top Rim Preparation
Step 1. Work one final round of single crochet to tighten the edge slightly.
Step 2. Slip stitch into the next stitch and fasten off securely.
Step 3. Weave in the end.
Creating the Macramé-Style Tassels
Step 1. Cut several strands of white yarn, each measuring approximately fifteen inches long.
Step 2. Fold three strands at a time in half to form a bundle.
Step 3. Insert your crochet hook under a stitch at the upper rim and pull the folded midpoint of the strands through just enough to create a loop.
Step 4. Pull the loose ends through that loop and tighten gently to form a secure lark’s head knot.
Step 5. Continue attaching bundles evenly around the rim until the entire upper edge is surrounded by tassels.
Shaping the Fringe
Step 1. Once all tassels are attached, use a ruler to measure equal length and trim the tassels so they fall smoothly.
Step 2. For a layered look, leave some tassels slightly longer and some slightly shorter.
Variations
Use multiple accent colors for a bohemian look.
Attach wooden beads to the tassels before trimming for added detail.
Create a double-tier fringe by adding tassels lower on the body of the pot cover.
Sunflower and Heart Pot

This cheerful Sunflower and Heart Pot combines warm brown yarn with bright yellow heart appliques and three vibrant crocheted sunflowers. It adds an uplifting and sunny element to any shelf or window ledge. The structure of the pot is similar to the tulip version but uses sunflower details to create a completely different theme. This pattern is ideal for advanced beginners interested in creating small three-dimensional flowers that stand upright.
Skill Level
Advanced beginner (appliques + three dimensional crocheted flowers)
Finished Size
Pot cover: approximately 5 to 6 inches tall
Sunflowers: approximately 4 inches tall each
Stems are adjustable by altering chain length and stuffing yarn tension
Materials
Worsted weight category number four yarn
Brown for pot body
Yellow for appliques and sunflower petals
Green for leaves and stems
Dark brown for sunflower centers
Crochet hook size 4.0 millimeters
Yarn needle
Fiberfill stuffing (optional for stems)
Scissors
Notes
The pot cover is worked from the base upward.
Flowers are created separately and attached after shaping.
Heart appliques are added before final assembly.
Instructions
Pot Body
Step 1. With brown yarn, chain two.
Step 2. Work six single crochet stitches into the second chain from the hook.
Step 3. Work continuous rounds, increasing evenly until the base reaches the diameter of your plant pot.
Step 4. Begin forming the sides by working one single crochet stitch into each stitch without increasing.
Step 5. Continue crocheting until the pot reaches approximately six inches tall.
Step 6. Fasten off and weave in ends.
Heart Appliques
Step 1. With yellow yarn, chain two.
Step 2. Work all of the following stitches into the second chain from the hook in this order: one treble crochet stitch, two double crochet stitches, one treble crochet stitch, two double crochet stitches, and one treble crochet stitch.
Step 3. Pull yarn tight to form the heart shape.
Step 4. Make multiple hearts and sew them onto the pot body evenly spaced.
Sunflowers
Step 1. Sunflower Center: with dark brown yarn, chain two and work eight single crochet stitches into the second chain.
Step 2. Work one round of single crochet stitches to slightly enlarge the circle.
Step 3. Petals: switch to yellow yarn. In one stitch work a slip stitch, one half double crochet stitch, one double crochet stitch, one half double crochet stitch, and another slip stitch. Repeat in each stitch around to form a full set of petals.
Step 4. Leaves: create leaf shapes using green yarn by chaining seven, then working single crochet, half double crochet, double crochet, half double crochet, and single crochet back down the chain.
Step 5. Stems: chain the desired length and work one single crochet stitch into each chain. Add slight stuffing if you want structural firmness.
Step 6. Attach the flowers to the pot by sewing stems securely inside the upper edge.
Variations
Use white petals for a daisy version.
Add more hearts in contrasting colors for a playful theme.
Create layered petals for extra fullness.
Striped Daisy Pot Cover

The Striped Daisy Pot Cover is bright, cheerful, and reminiscent of a sunny spring morning. With alternating yellow and white stripes, a scalloped upper edge, and a large daisy applique, this pot cover brings instant charm to any plant display. This project is beginner-friendly but includes decorative edging and a simple flower applique that helps new crocheters expand their skills.
Skill Level
Beginner to advanced beginner (simple striping + applique)
Finished Size
Approximately 6 inches tall and 5 inches wide, suitable for standard indoor pots.
Materials
Worsted weight category number four yarn
Yellow
White
Orange for daisy center
Green for leaf
Crochet hook size 4.0 millimeters
Yarn needle
Scissors
Notes
This pot cover is worked from the base upward.
Stripe changes occur at the end of each round.
Instructions
Base
Step 1. With yellow yarn, chain two and work six single crochet stitches into the second chain.
Step 2. Continue increasing in rounds until the base is the size of your plant pot bottom.
Step 3. Switch to white yarn and begin stripe pattern.
Body Stripes
Step 1. Alternate two rounds of yellow followed by two rounds of white.
Step 2. Continue this sequence until the pot reaches about six inches tall.
Step 3. End with yellow for the scalloped rim.
Scalloped Rim
Step 1. In one stitch work one single crochet stitch.
Step 2. In the next stitch work one half double crochet stitch and one double crochet stitch.
Step 3. In the same stitch work another half double crochet stitch and one single crochet stitch to form a scallop.
Step 4. Repeat all around.
Daisy Applique
Step 1. Center: with orange yarn, chain two and work eight single crochet stitches into the second chain.
Step 2. Petals: with white yarn, in each stitch work a slip stitch, one half double crochet stitch, one double crochet stitch, one half double crochet stitch, then one slip stitch.
Step 3. Leaf: with green yarn, chain seven, then work single crochet, half double crochet, double crochet, half double crochet, and single crochet back down the chain.
Step 4. Attach the daisy to the side of the pot cover.
Variations
Use pastel colors for a softer look.
Work thinner stripes if you enjoy more color transitions.
Add more daisies to create a full floral theme.
Conclusion
Crocheting flower pot covers is one of the most rewarding ways to combine functionality with creativity, and this collection of seven detailed patterns offers a wide range of styles for every taste and skill level. Whether you prefer the playful charm of tulips and sunflowers, the rustic appeal of textured motifs, the refined geometry of Scandinavian designs, or the bold artistry of fringe and stripes, each pattern provides step-by-step guidance that makes success accessible even for newer crocheters.
Every pot cover in this set serves a purpose beyond decoration. They allow you to personalize your living space, create thoughtful handmade gifts, and practice new techniques such as tapestry colorwork, applique assembly, three dimensional flower construction, and decorative edging. Each pattern is designed to be adaptable, meaning you can adjust colors, sizes, yarn weights, and embellishments to suit your personal style and home décor.
With clear instructions and comprehensive detail, these seven crochet flower pot cover patterns help makers build confidence while creating pieces that feel truly special. Whether you choose to complete one or the entire set, your finished pot covers will bring texture, warmth, and handcrafted charm to your home for years to come.


