
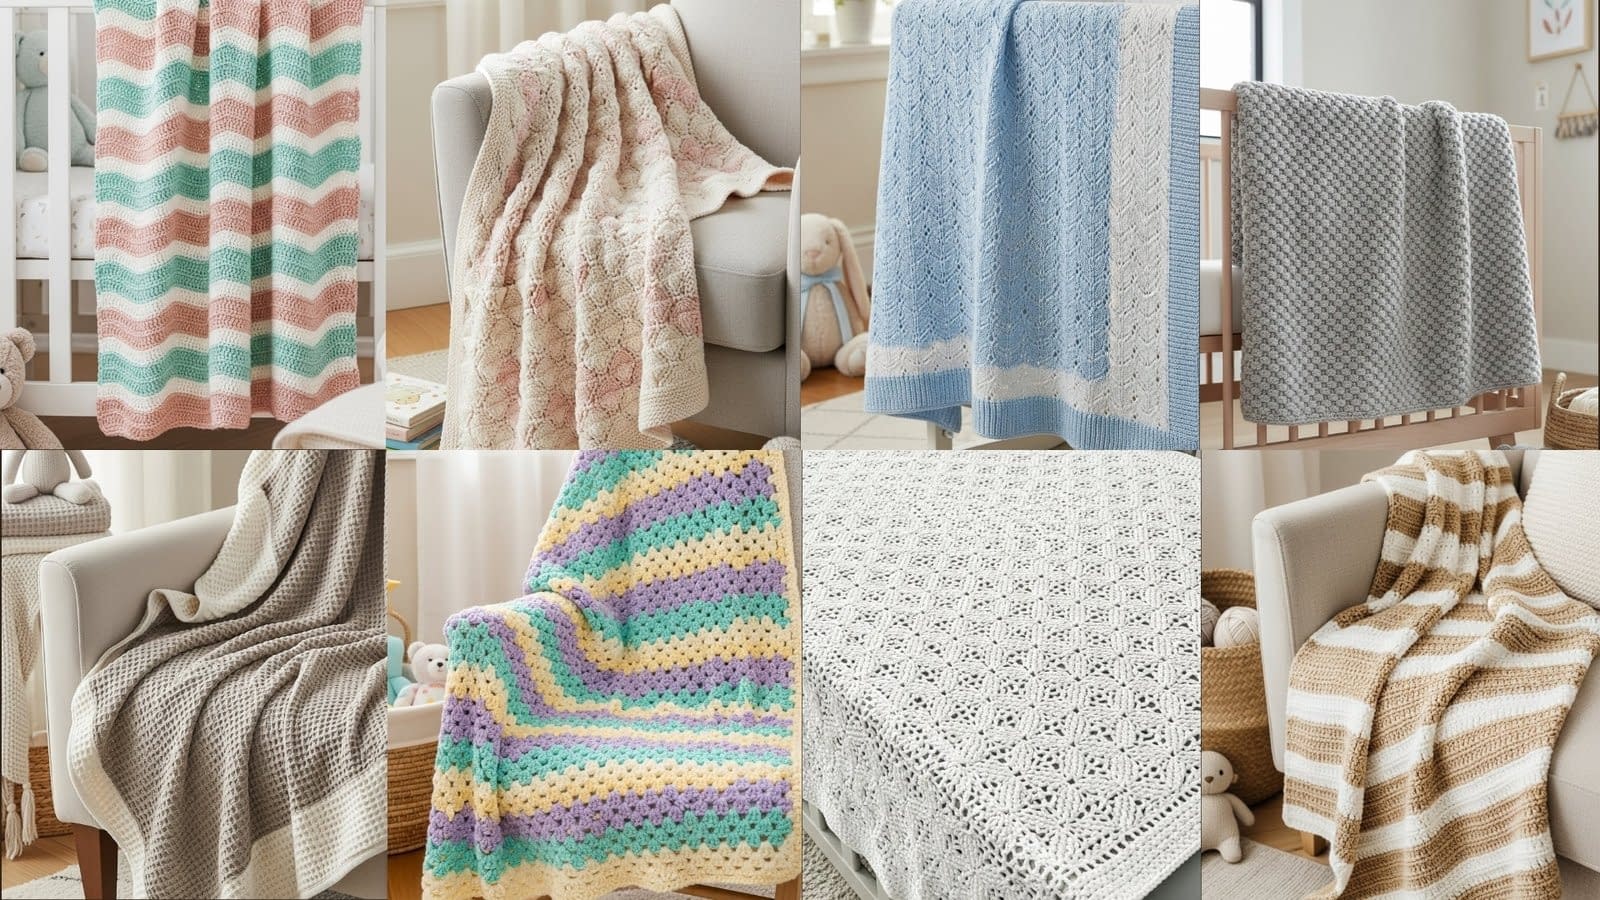
Creating a baby blanket is one of the most meaningful and enjoyable projects in crochet. It is a thoughtful gift, a keepsake that often stays with families for years, and a useful piece that brings both warmth and comfort to a little one’s daily routine. When making a blanket that will be used frequently, it is important to choose designs that are lightweight, soft, and easy to care for, while still providing enough warmth for naps, stroller rides, cuddles, and everyday use.
This guide, 8 Warm and Lightweight Baby Blanket Crochet Ideas for Everyday Use, focuses on blankets that are gentle on delicate skin, breathable enough for warmer climates or indoor use, but still warm enough to feel cozy. These patterns avoid heavy or dense stitches and instead highlight techniques that create soft drape, smooth texture, and balanced airflow. Each baby blanket is crafted to be practical while still maintaining a beautiful, polished appearance.
Soft Ripple Baby Blanket
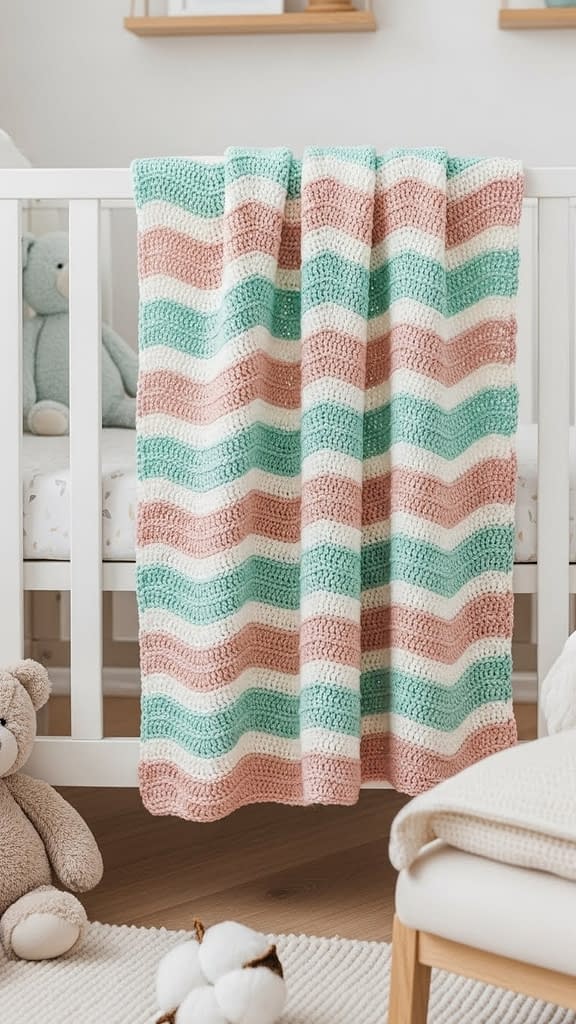
A warm, flowing ripple design that creates a gentle wave effect across the blanket. Despite its visual movement, this blanket remains lightweight because the stitch pattern alternates high and low points, allowing natural airflow throughout the fabric.
Skill Level
Beginner to intermediate (simple increases and decreases, consistent stitch placement).
Finished Size
Approximately 32 inches wide and 36 inches long. You may adjust by increasing or decreasing the starting chain in multiples of 12 plus 3.
Materials
• Medium weight yarn number four, soft acrylic or cotton blend
• Crochet hook size 5.0 millimeters
• Yarn needle
• Scissors
Notes
• Ripple blankets are built through increases at peak points and decreases at valley points.
• Keep your attention on the stitch counts in each peak and valley because consistency creates smooth waves.
• The blanket is crocheted in long horizontal rows.
Instructions
Foundation Row
- Begin by creating a slip knot.
- Create a chain that is twelve chains multiplied by your desired width. For the listed size, create a chain of seventy-five chains.
- Add three additional chains at the end to begin your first row.
Row One
- Begin in the fourth chain from the hook. Place one double crochet stitch into this chain.
- Place one double crochet stitch in each of the next four chains.
- In the next chain, create a peak by placing two double crochet stitches in the same chain.
- Continue by placing one double crochet stitch in each of the next five chains.
- Create the first valley: in the next three chains, work the following decrease section.
• Yarn over, insert the hook into the next chain, pull up a loop, yarn over, pull through two loops but keep two loops remaining on the hook.
• Repeat this process across the next two chains so that you now have four loops on your hook.
• Yarn over and pull through all loops at once.
This completes a three-stitch decrease. - Continue by placing one double crochet stitch in each of the next five chains.
- Create another peak by placing two double crochet stitches in the same chain.
- Continue this peak-and-valley structure across the row, finishing the row with one double crochet stitch in each of the final chains.
Fasten off only if changing color; otherwise, turn.
Row Two
- Chain three to begin your next row. This counts as your first double crochet stitch.
- Place one double crochet stitch into the stitch after the turning chain.
- Place one double crochet stitch in the next four stitches.
- Create your peak by placing two double crochet stitches in the same stitch.
- Continue with one double crochet stitch in the next five stitches.
- Create a valley by working another three-stitch decrease exactly as explained above.
- Repeat across the row.
- End with one double crochet stitch in each of the final stitches.
- Turn the blanket and continue.
Rows Three and Beyond
Repeat the structure of row two. Continue repeating until your blanket reaches your desired length. For the listed size, complete approximately sixty-five rows.
Finishing
- Fasten off the yarn, leaving an eight-inch tail.
- Weave the yarn gently through the edges using a yarn needle.
- For a clean border, you may work one round of single crochet stitches around the entire blanket edge, placing three single crochet stitches in each corner.
Variation Ideas
• Add stripes by changing colors at the beginning of any row.
• Use a smaller hook for tighter ripples or a larger hook for a softer drape.
• Use pastel colors for a soothing nursery look or bold colors for a modern feel.
Lightweight Shell Stitch Baby Blanket
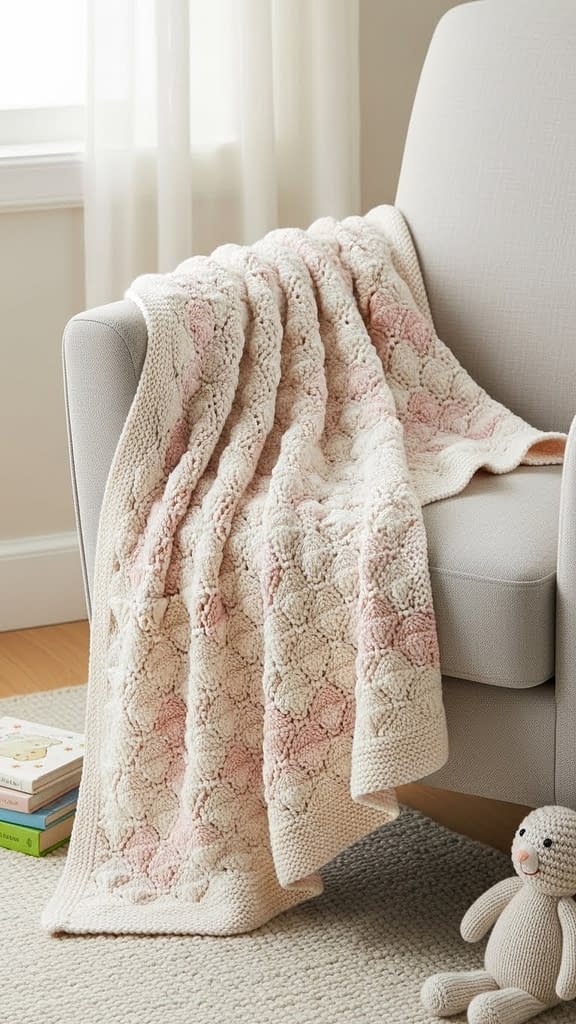
This blanket uses shell stitches to create a delicate, airy design. The open structure allows excellent breathability, making it ideal for warmer seasons and indoor naps.
Skill Level
Beginner friendly (only requires chain and double crochet stitches).
Finished Size
Approximately 30 inches wide and 34 inches long. Adjust width by starting with a multiple of six chains plus two.
Materials
• Light or medium weight yarn number three or number four
• Crochet hook 4.5 millimeters
• Yarn needle
• Scissors
Notes
• Shell stitches are groups of multiple double crochet stitches placed into one stitch.
• This blanket grows quickly and creates natural softness with minimal effort.
• Maintain relaxed tension to avoid overly dense shells.
Instructions
Foundation Row
- Begin with a slip knot.
- Create a chain of ninety-eight chains for the suggested size.
- Add two additional chains for turning.
Row One
- Begin in the second chain from the hook.
- Place one single crochet stitch in that chain.
- Skip two chains.
- In the next chain, create a shell by placing five double crochet stitches into the same chain.
- Skip two chains.
- Place one single crochet stitch into the next chain.
- Repeat this sequence across the row: skip two chains, create a five-double-crochet shell, skip two chains, and place one single crochet stitch.
- End the row with one single crochet stitch in the final chain.
- Turn.
Row Two
- Chain three. This counts as your first double crochet stitch.
- Place two additional double crochet stitches in the same stitch. This forms a half-shell at the edge of your blanket.
- Skip the next two double crochet stitches.
- Place one single crochet stitch into the third double crochet stitch of the previous row’s shell.
- Skip the next two double crochet stitches.
- Create a new shell by placing five double crochet stitches in the next single crochet stitch.
- Continue this pattern across the row.
- End with a half shell: place three double crochet stitches in the last single crochet stitch.
- Turn.
Row Three and Beyond
Repeat row two for the remainder of the blanket. Continue until the blanket measures the desired length. The recommended length is approximately forty rows.
Finishing
- Fasten off gently.
- Weave in all yarn tails.
- Optional: create a simple border by working one row of single crochet stitches around the entire edge.
Variation Ideas
• Change colors every two rows for striped shells.
• Use gradient yarn to make the shells blend beautifully.
• Create a scalloped border by adding shells along the edges.
Modern Moss Stitch Baby Blanket
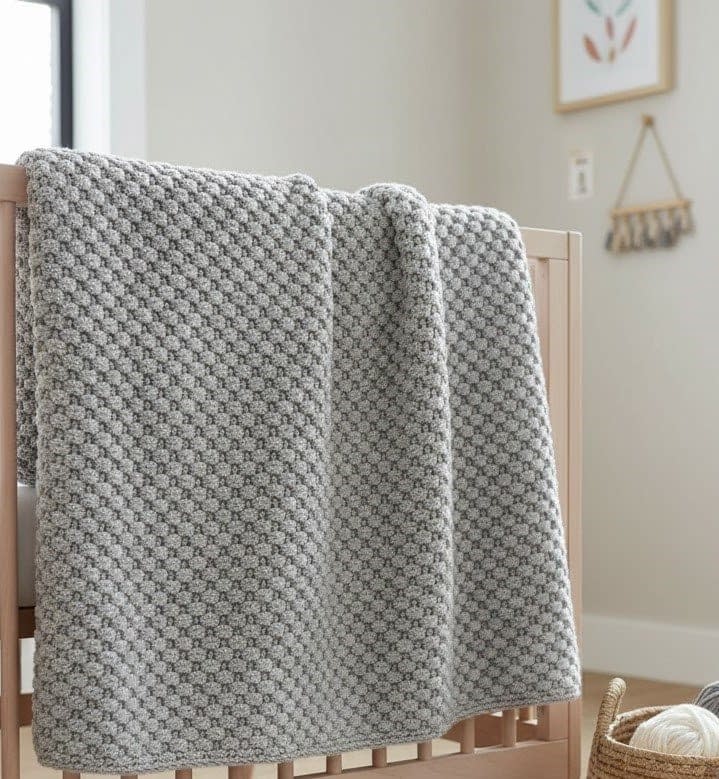
The moss stitch creates a tight but breathable fabric using alternating chain spaces and single crochet stitches. The result is a blanket with a modern, woven texture that is soft, flexible, and perfect for everyday use.
Skill Level
Complete beginner friendly.
Finished Size
Approximately 32 inches wide and 38 inches long. Adjust width by starting with an even number of chains.
Materials
• Medium weight cotton or cotton-blend yarn number four
• Crochet hook size 5.0 millimeters
• Yarn needle
• Scissors
Notes
• Moss stitch is sometimes known as linen stitch or granite stitch.
• The stitch pattern alternates between single crochet stitches and chain spaces.
• Maintain even tension for a consistent woven appearance.
Instructions
Foundation Row
- Begin with a slip knot.
- Create ninety chains for the width.
- Turn your work.
Row One
- Beginning in the second chain from the hook, place one single crochet stitch.
- Chain one.
- Skip one chain.
- Place one single crochet stitch in the next chain.
- Continue this sequence across the foundation chain: one single crochet stitch, chain one, skip one chain, one single crochet stitch.
- End with one single crochet stitch in the last chain.
- Turn.
Row Two
- Chain one.
- Place one single crochet stitch into the first stitch.
- Chain one.
- Place one single crochet stitch into the next chain space from the previous row.
- Continue alternating chain ones and single crochet stitches worked into chain spaces across the entire row.
- End with one single crochet stitch in the last stitch.
- Turn.
Rows Three and Beyond
Repeat row two until the blanket reaches your desired length. For the suggested blanket size, work approximately eighty rows.
Finishing
- Once finished, fasten off your yarn.
- Weave in all ends using a yarn needle.
- For a clean look, add a border: single crochet evenly around all edges, placing three single crochet stitches in each corner.
Variations
• Alternate two colors every row to create a checkerboard effect.
• Use variegated yarn to produce subtle shifts in tone.
• Add wide stripes for a contemporary look.
Lacy V-Stitch Baby Blanket
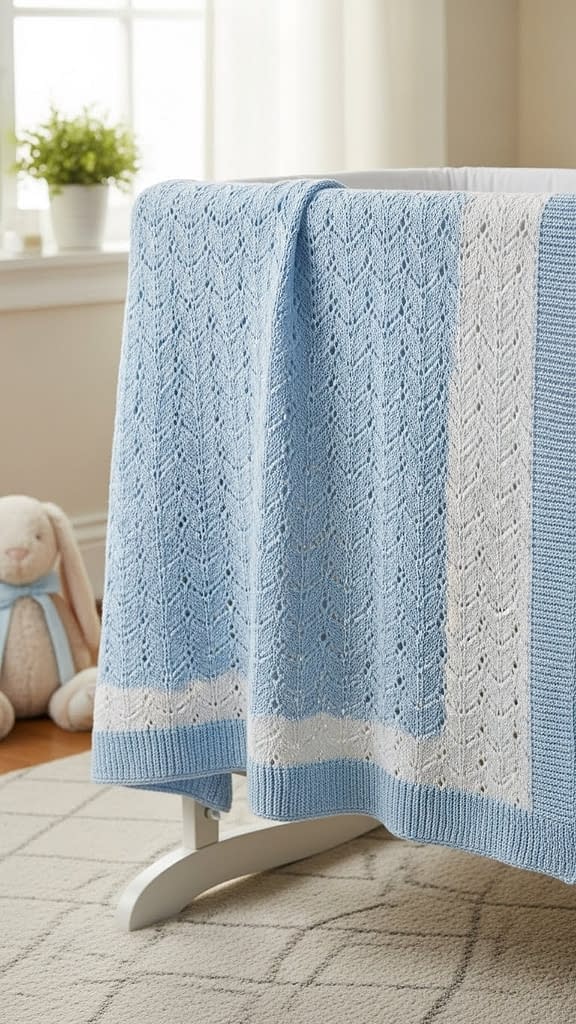
A soft, open blanket with delicate V-shaped clusters that create a luxurious, airy drape. The blanket feels light yet warm, making it ideal for indoor days, stroller covers, or gentle nap blankets.
Skill Level
Beginner to intermediate (simple cluster pattern).
Finished Size
Approximately 30 inches wide and 35 inches long. Adjust width by starting with a multiple of three chains plus one.
Materials
• Lightweight yarn number three or soft cotton blend
• Crochet hook 4.0 millimeters
• Yarn needle
• Scissors
Notes
• The V-stitch is formed by placing one double crochet stitch, one chain, and one more double crochet stitch into the same stitch.
• The blanket is airy but structured, allowing even airflow without feeling too open.
• This stitch works quickly, making it ideal for gifts.
Instructions
Foundation Row
- Begin with a slip knot.
- Create a chain of ninety-four chains for the blanket width.
- Turn.
Row One
- Place one single crochet stitch in the second chain from the hook.
- Chain one.
- Skip one chain.
- In the next chain, work one double crochet stitch, one chain, and one double crochet stitch into the same chain to create a V-stitch.
- Chain one.
- Skip one chain.
- Place one single crochet stitch in the next chain.
- Continue the sequence of single crochet stitches, chain ones, V-stitches, chain ones, and skipped chains across the row.
- End with one single crochet stitch in the final chain.
- Turn.
Row Two
- Chain three. This will function as your first double crochet stitch.
- Locate the first V-stitch space below.
- Into that chain space of the V-stitch, place one double crochet stitch, one chain, and one double crochet stitch.
- Chain one.
- Place one single crochet stitch in the next single crochet stitch below.
- Continue repeating V-stitch clusters into each V-stitch space of the row below, with one chain between clusters.
- End with one double crochet stitch placed in the final single crochet stitch of the previous row.
- Turn.
Rows Three and Beyond
Repeat row two until your blanket reaches the desired length. For the suggested size, complete roughly seventy rows.
Finishing
- Fasten off gently, leaving a tail of about eight inches.
- Weave all ends securely.
- Optional border: work one row of single crochet stitches around the entire blanket edge to stabilize the lace pattern.
Variations
• Alternate V-stitches and open mesh rows for more lace.
• Use two colors, changing every two rows, for soft stripes.
• Add a scalloped edging for a decorative finish.
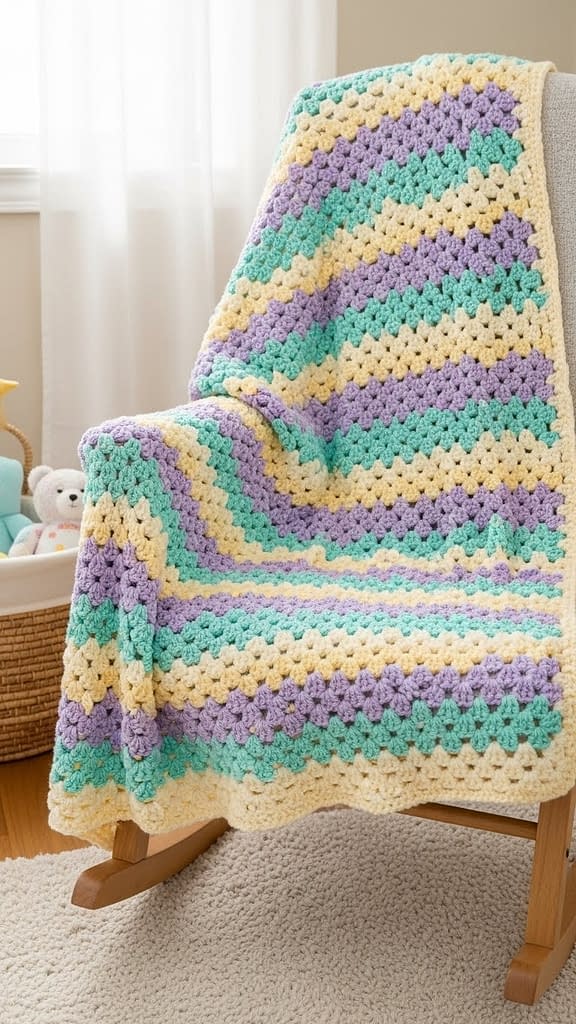
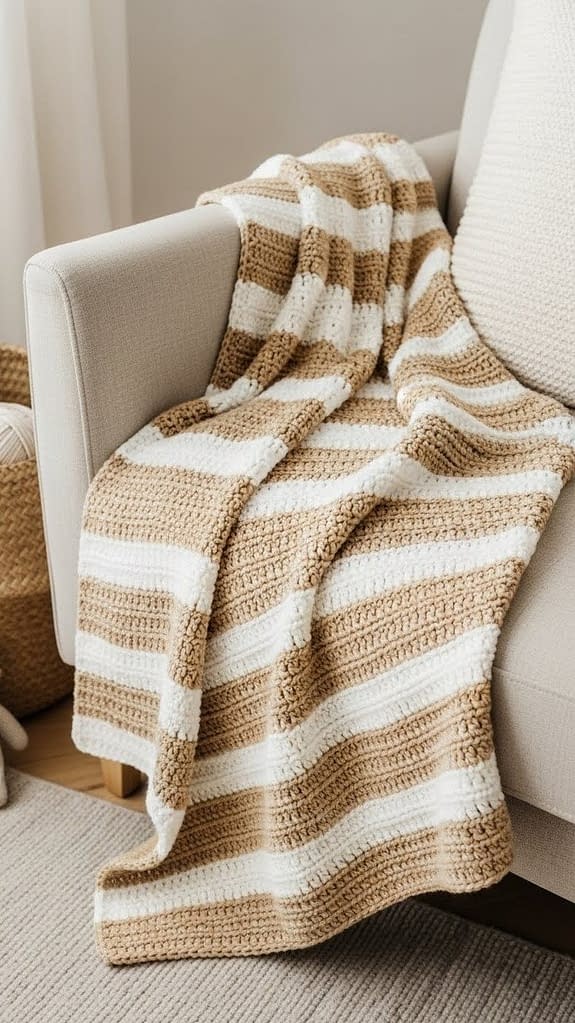
Lightweight Granny Stripe Baby Blanket
Skill Level
Beginner to intermediate (classic cluster technique; consistent spacing).
Finished Size
Approximately 30 inches wide × 36 inches long. Adjust width by adding or subtracting multiples of three foundation chains and adjust length by adding or reducing rows.
Materials
• Worsted weight yarn number four — two or more colors as desired (approximately 900–1,100 yards total depending on color changes)
• Crochet hook size 5.0 millimeters
• Yarn needle for weaving ends
• Scissors
• Measuring tape
• Optional stitch markers to mark the first stitch of a row
Notes
• This blanket uses classic granny clusters composed of three double crochet stitches placed together in the same space.
• The pattern is worked in horizontal rows and is especially beginner-friendly because the repeat is short and easy to track.
• For even edges, begin and end each row with the same turning chain and finish the last cluster placed in the edge space.
• If changing colors, join the new color in the final yarn-over and pull-through of the last double crochet cluster to create a neat join. Fasten off each color when switching, or carry colors up the side if stripes are narrow.
Instructions
Foundation Row
- Make a slip knot and place it on your hook.
- Chain one hundred and twenty chains for the width listed. For an alternate width, make your chain a multiple of three plus two additional chains for the turning chain.
- Do not fasten off. Turn your work to begin Row One.
Row One — Establishing the First Row of Clusters
- Chain three; this chain counts as your first double crochet stitch for the row.
- Skip two chains. Into the next chain, work three double crochet stitches into the same chain space. This forms your first granny cluster.
- Skip two chains. Into the next chain, work three double crochet stitches into the same chain space.
- Continue across the foundation: skip two chains, then place a three-double-crochet cluster into the next chain. Repeat this pattern until you reach the last chain.
- When you reach the final chain, work one double crochet stitch into that last chain to provide a straight edge.
- Turn your work.
Row Two — Building the Stripe Repeat
- Join your chosen color if you plan stripes; otherwise continue with the same color. To join a new color neatly, attach the new yarn in the top of the turning chain of the previous row using a slip knot and small tail to be woven in later.
- Chain three; this chain counts as your first double crochet.
- Into the chain space directly above the cluster from the previous row, work three double crochet stitches into that chain space. This places clusters directly on top of the previous row’s clusters and creates the classic granny stripe look.
- Continue by working three double crochet stitches into each cluster space across the row.
- At the end of the row, work one double crochet stitch into the top of the turning chain from the row below to keep your edge straight.
- Turn your work.
Row Three and Onward — Repeat for Length
- Repeat Row Two for the remainder of the blanket.
- If you are creating stripes, change color at the beginning of any row by fastening off the previous color and joining the next in the top of the turning chain as described. For neat color joins, leave a six- to eight-inch tail and weave in later.
- Continue repeating until the blanket reaches your desired length; the recommended finished length is thirty-six inches.
Color and Tension Tips
- Maintain even tension when switching colors to avoid puckering at joins.
- If carrying colors up the side, twist the unused yarn at the end of the row to anchor it and keep the edge tidy.
- For clean color transitions, consider using a surface slip stitch join along the edges after finishing to hide carried yarn.
Assembly
- After completing the final row, cut your yarn and fasten off, leaving a tail of about twelve inches for weaving.
- Use a yarn needle to weave in all loose ends on the wrong side of the blanket. Weave each tail back through several rows to secure it.
- Lay the blanket flat on a clean surface and gently shape the edges by hand. Light blocking is optional for acrylic blends; if using natural fibers, a gentle steam block will even the stitches without compressing the clusters.
Variations and Finishing Tips
• For a softer border, work one round of single crochet stitches around the blanket after finishing, placing three single crochet stitches in each corner to keep corners flat.
• For a scalloped edge, work one round of shell stitches around the perimeter: place five double crochet stitches into every third stitch along the edge.
• Use four narrow stripes of color for a classic look or many colors for a playful, scrap-friendly blanket.
• Substitute a larger hook and hold two strands together for a chunkier granny stripe while keeping the same stitch logic.
Soft Waffle Texture Baby Blanket
Skill Level
Beginner to intermediate (requires familiarization with front post double crochet stitches and consistent patterning).
Finished Size
Approximately 32 inches wide × 36 inches long. Adjust width by adding or removing stitches in multiples explained in the foundation instructions and alter length by continuing or reducing rows.
Materials
• Worsted weight yarn number four — approximately 1,000 yards depending on size and border choices
• Crochet hook size 5.5 millimeters
• Yarn needle for finishing
• Scissors
• Optional stitch markers to mark pattern repeats or corners
• Measuring tape to monitor progress
Notes
• The waffle texture is formed by working front post double crochet stitches combined with regular double crochet stitches. The raised and recessed squares form a grid that is soft and insulating but not heavy.
• Maintain even tension: front post stitches draw fabric inward if pulled too tight, so relax your hands and keep consistent tension throughout.
• For a neater edge, the foundation chain should be slightly loose; a tight chain may cause edge pulling.
Instructions
Foundation Row
- Make a slip knot on your hook.
- Chain one hundred and twelve chains for the width indicated. The starting chain must be a multiple of four plus two additional chains. If you wish to customize width, make your chain length a multiple of four and then add two turning chains.
- Turn your work and prepare for Row One.
Row One — Base Row
- Work one double crochet stitch into the fourth chain from the hook.
- Work one double crochet stitch into each chain across the foundation until you reach the final chain.
- Place one double crochet stitch into the final chain to complete the row.
- Turn your work.
Row Two — Begin Waffle Texture
- Chain two. This chain does not count as a double crochet; it acts as a turning chain to prepare for the row.
- Work one double crochet stitch into the first stitch.
- Work one front post double crochet stitch around the next stitch: to do this, yarn over, insert the hook from front to back to front around the post of the indicated stitch from the row below, yarn over, pull up a loop, yarn over and pull through two loops, yarn over and pull through the remaining two loops to complete the front post double crochet stitch.
- Work one double crochet stitch in the next stitch.
- Work one double crochet stitch in the next stitch.
- Repeat the sequence across the row: front post double crochet stitch, double crochet stitch, double crochet stitch, front post double crochet stitch, maintaining the established spacing.
- End the row with one double crochet stitch in the final stitch.
- Turn your work.
Row Three — Alternate Rows to Create Grid
- Chain two and turn.
- Work one double crochet stitch in the first two stitches.
- Work one front post double crochet stitch around the next front post double crochet from the row below. This will create the vertical height that forms the square.
- Continue the established repeat, working two double crochet stitches, then a front post double crochet stitch around the front post stitch of the row below, moving across the row until the end.
- End the row with one double crochet stitch in the last stitch.
- Turn your work.
Repeat Rows Four and Beyond — Build the Texture
- Repeat Rows Two and Three alternately for the remainder of the blanket. The alternating front post and double crochet rows build the raised waffle squares.
- For the recommended blanket length, work approximately eighty rows, or until the blanket measures about thirty-six inches long. Check measurements periodically with a tape measure.
Edge and Border Recommendations
- To finish, work a clean border by first working one round of single crochet stitches evenly around all four sides. Place three single crochet stitches in each corner to allow for crisp corners and prevent cupping.
- For a slightly thicker border, follow the round of single crochet with one round of half double crochet stitches worked evenly.
Assembly
- Fasten off and leave a tail of about twelve inches.
- Use a yarn needle to weave in all ends into the wrong side of the fabric, following the path of the waffle ridges where possible to hide tails.
- Block lightly if you are using a natural fiber or if the waffle texture appears uneven; gentle steam blocking while the blanket is pinned to shape will help even out the surface.
Variations and Finishing Tips
• Use a two-color technique by alternating yarn colors every few rows to emphasize the waffle texture.
• For a plush finish, use a boucle or brushed yarn as long as the stitch definition remains visible.
• To make a baby stroller-sized blanket, reduce the number of starting chains but maintain the multiple-of-four rule and the same row count proportionally.
• A ribbed border made with front post and back post double crochet stitches complements the waffle surface beautifully.
Openwork Diamond Lace Baby Blanket
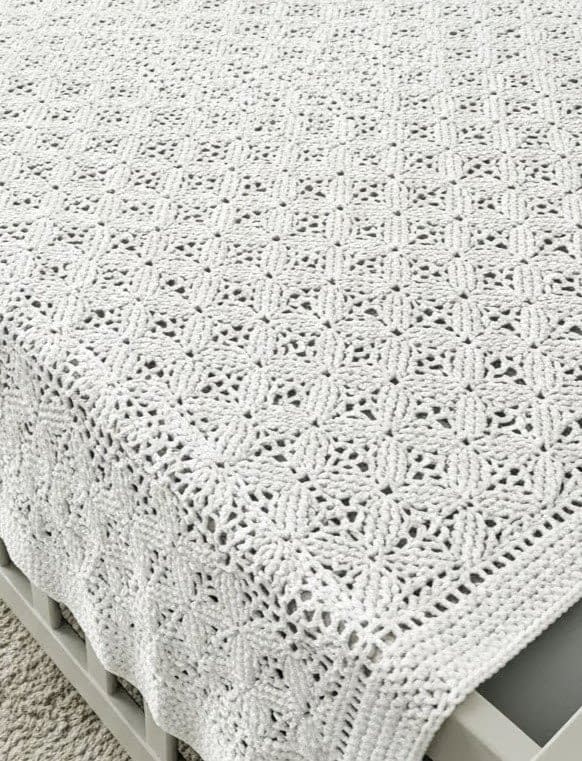
Skill Level
Intermediate (requires careful counting and consistent placement of chain spaces and double crochet stitches to form geometric diamond shapes).
Finished Size
Approximately 30 inches wide × 38 inches long. Adjust width by increasing foundation chain using the multiple specified in the Notes section and change length by adding or reducing full diamond repeats.
Materials
• Lightweight yarn number three (sport weight) or a soft cotton blend suitable for baby blankets — approximately 900 yards depending on size and openwork density
• Crochet hook size 4.5 millimeters
• Stitch markers to mark diamond apexes or repeats (recommended)
• Yarn needle for weaving ends
• Scissors
• Blocking mat and pins for shaping the lace after finishing (optional but recommended for best lace appearance)
Notes
• The stitch repeat for the diamond lace requires a foundation chain that is a multiple of ten plus one additional chain for the turning chain.
• Diamond shapes are formed by alternating rows of increased chain spaces and closed double crochet placements.
• Keep a stitch marker at the first stitch of each row if you find yourself losing your place in long lace rows.
Instructions
Foundation Row
- Make a slip knot and chain one hundred and forty-one chains for the width specified. This chain is a multiple of ten plus one. For a custom width, calculate the multiple of ten for the desired width and add one additional chain.
- Turn your work and prepare for Row One.
Row One — Foundation Lace Row
- Starting in the fourth chain from the hook, work one double crochet stitch.
- Chain one.
- Skip one chain.
- Work one double crochet stitch in the next chain.
- Continue the pattern across the foundation: one double crochet stitch, chain one, skip one chain, one double crochet stitch. This establishes evenly spaced chain pockets which will form the diamond framework.
- When you reach the end of the row, work one double crochet stitch in the final chain to finish the base.
- Turn your work.
Row Two — Begin Diamond Formation
- Chain three; this chain counts as a double crochet for the row.
- In the first chain space created in Row One, work one double crochet stitch.
- Chain two, skip the next chain space, and work one double crochet stitch in the following chain space.
- Continue this pattern across the row: double crochet into chain spaces, chain two to create elongation, and place double crochet stitches to build the opening of the diamond shape.
- Turn your work.
Row Three — Expand the Diamond
- Chain three. Work one double crochet stitch into the chain space immediately below.
- Chain three to create a larger opening, then work one double crochet stitch into the next chain space.
- Continue increasing the chain spacing at the centers of the diamonds on alternating rows so that the diamond shapes grow over a series of rows.
- Turn your work.
Row Four — Begin Diamond Closure
- Chain three. Work one double crochet stitch into the next chain space.
- Chain one to reduce the opening slightly.
- Work double crochet stitches spaced to begin closing the diamond apexes created in the previous expanding rows.
- Continue following the sequence of increased spacing rows then reduced spacing rows to create a repeating diamond motif across the fabric.
- Turn your work.
Repeat the Diamond Sequence
- The diamond pattern is a sequence of expanding and contracting rows that form the full diamond. Typically, a complete diamond repeat spans eight to ten rows depending on how large you make the openings.
- Repeat the sequence of increases (longer chain spaces) and decreases (shorter chain spaces with more double crochet stitches) until the blanket reaches the desired length. Keep careful count of rows to ensure that your diamonds remain symmetrical.
- For the stated finished size, repeat diamond units until the blanket measures about thirty-eight inches long.
Edge Stabilization
- Because the lace is open, stabilize the top and bottom edges by working one row of single crochet stitches if the edges feel too loose. Work one single crochet stitch into each stitch across to create a sturdy top and bottom edge.
- For side edges, you may work one round of single crochet stitches around the entire blanket after finishing to provide a clean finish.
Assembly
- Fasten off the last yarn and leave a twelve-inch tail for weaving.
- Use a yarn needle to carefully weave in ends on the wrong side of the blanket, following lace lines where possible so the ends remain hidden.
- Block the blanket on a flat blocking surface to open and shape the diamonds. Pin the edges and diamond points evenly to create symmetrical motifs, then steam or wet-block according to the yarn manufacturer’s recommendations.
Variations and Finishing Tips
• For a softer, more drapey lace, use a silk blend or bamboo yarn; for a crisper look, use cotton.
• To make the lace more prominent, work a narrow picot border: chain three, slip stitch into the same stitch, repeated around the edge.
• Add subtle color shifts by changing color at the beginning of diamond repeats rather than mid-diamond. This keeps color changes visually balanced.
• Use stitch markers at the center top of each diamond while working to maintain consistent placement.
Simple Textured Half Double Crochet Baby Blanket
Skill Level
Beginner (straightforward repetition using half double crochet stitches with a textured variant using the third loop).
Finished Size
Approximately 34 inches wide × 36 inches long. Adjust width by adding or subtracting foundation chains and adjust length by adding or reducing rows until the desired measurement is reached.
Materials
• Worsted weight yarn number four — approximately 1,000 yards depending on size and border choices
• Crochet hook size 5.0 millimeters
• Yarn needle for weaving in ends
• Scissors
• Measuring tape
Notes
• This blanket creates a modern ridged texture by alternating rows worked into the top two loops and rows worked into the third loop behind the stitch.
• The third loop technique produces a raised rib on the front side that reads as subtle horizontal ridges.
• Work a loose foundation chain so edges do not pull tight.
Instructions
Foundation Row
- Make a slip knot and chain one hundred and ten chains for the width specified. For a different width, chain the desired number ensuring an even count for uniform rows.
- Turn your work and begin Row One.
Row One — Base Row of Half Double Crochet
- Work one half double crochet stitch into the third chain from the hook. To work a half double crochet stitch, yarn over, insert the hook into the indicated chain, yarn over and pull up a loop, yarn over and pull through all three loops on the hook.
- Continue to place one half double crochet stitch into each chain across the row until you reach the end.
- Turn your work.
Row Two — Third Loop Texture
- Chain two to begin the row; this acts as your turning chain and will not count as a stitch.
- Work one half double crochet stitch into the third loop of the first stitch of the previous row: to find the third loop, turn the previous row so you can see the back loops; the third loop sits behind the two top loops and creates a tuck that forms the ridge on the front. Insert your hook into that third loop, yarn over, pull up a loop, and finish the half double crochet through all three loops on the hook.
- Continue placing half double crochet stitches into the third loop of each stitch across the row. Working into the third loop produces a subtle raised ridge on the front side of the fabric and leaves a smooth back side.
- Turn your work.
Row Three — Standard Half Double Crochet Row
- Chain two. Work one half double crochet stitch into the top two loops of each stitch across the row. This will flatten the row slightly and create a complementary surface to the ridged row below.
- Turn your work.
Repeat Rows Four and Onward — Alternate Texture
- Repeat Row Two and Row Three alternately to build the textured rib pattern: one row worked into the third loop for ridges, and one row worked into the top loops for flattening.
- Continue alternating until the blanket reaches the desired length. For the recommended dimension, work about seventy to eighty rows depending on your tension.
Border Options
- For a simple finishing edge, work one round of single crochet stitches around the entire blanket, placing three single crochet stitches in each corner.
- For a modern framed look, follow the single crochet round with two rounds of slip stitch worked into the back loop only; this creates a narrow, neat frame.
Assembly
- Fasten off and leave a twelve-inch tail for weaving.
- Weave in all yarn tails on the wrong side of the blanket with a yarn needle, following stitch lines to keep the finishing invisible.
- Lay the blanket flat and check for evenness; adjust edges by easing stitches with your fingers if needed. Light blocking is optional if using natural fibers.
Variations and Finishing Tips
• For a chunkier feel while keeping the same texture, use a larger hook and hold two strands of lighter yarn together.
• Add a contrast color border of two or three rounds to frame the textured surface.
• For a gender-neutral palette, consider soft neutrals like warm beige, pale gray, or soft sage.
• To make a stroller-sized blanket, reduce the number of foundation chains and keep the same row count proportionally.
Conclusion
These eight baby blanket crochet patterns offer a variety of textures, stitches, and designs suitable for every skill level. From soft shells and ripples to cozy waffle and lace textures, each blanket is warm, lightweight, and perfect for everyday use. With detailed step-by-step instructions, you can confidently create beautiful, practical blankets that are both functional and cherished keepsakes.


