
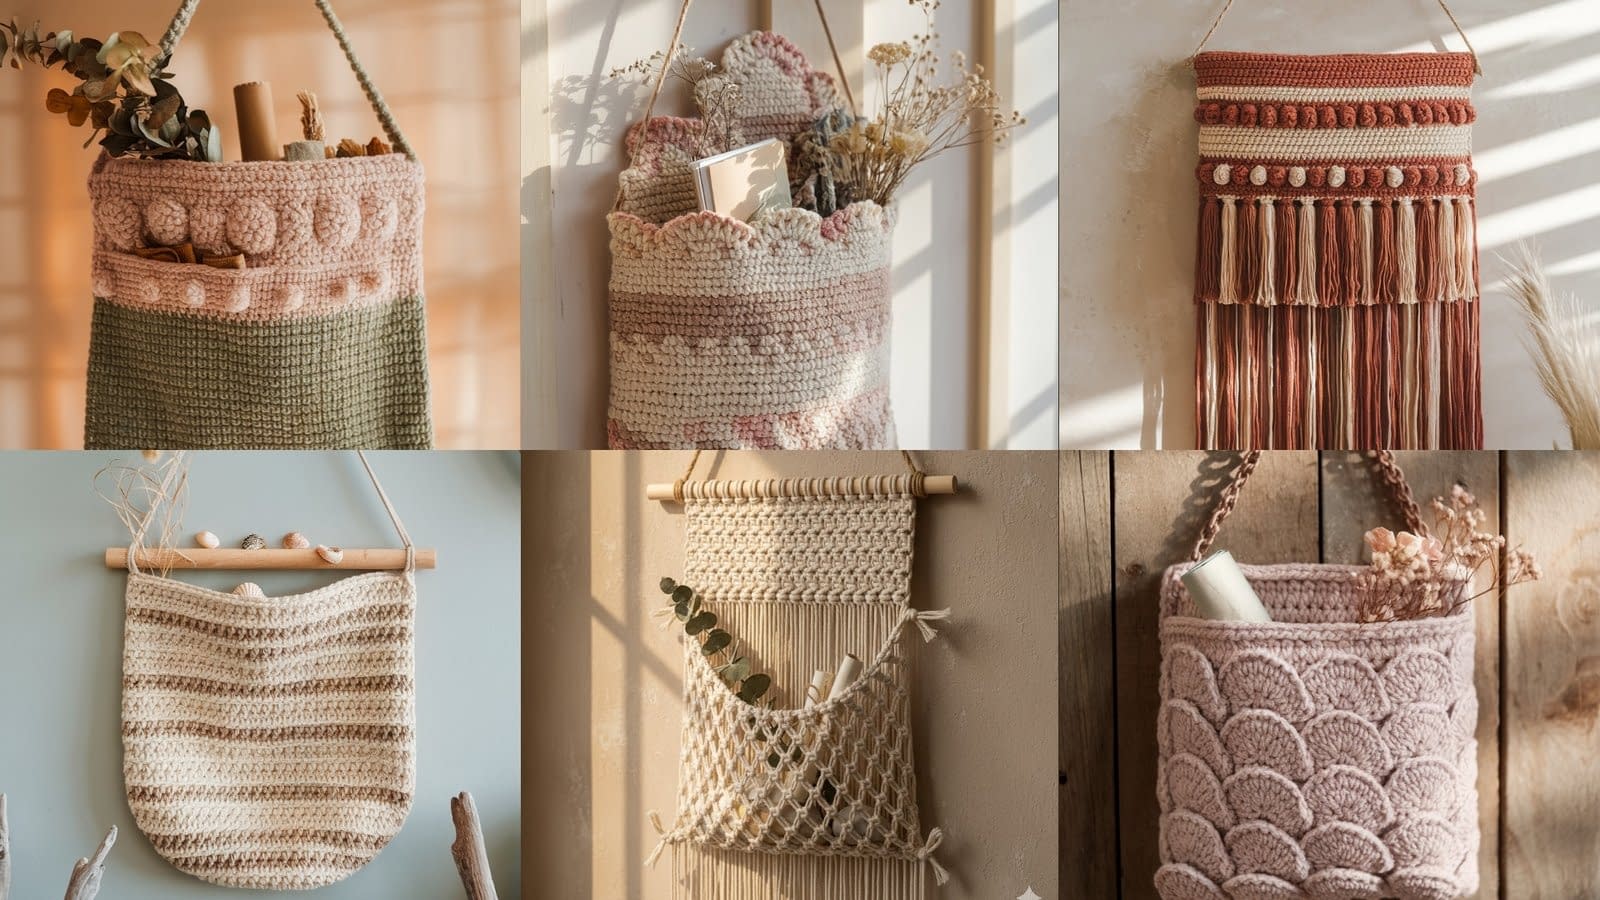
Boho home décor is known for its warm textures, natural fibers, eclectic layering, and relaxed but artistic personality. One of the most charming additions to this style is the Boho Crochet Wall Pocket. These wall pockets combine storage functionality with the beauty of handmade fiber art, giving your home both character and practicality. Whether you’re organizing mail, storing craft supplies, holding dried flowers, or simply adding a decorative touch, Boho Crochet Wall Pockets are versatile pieces that can elevate any room.
In this guide, you will explore six unique Boho Crochet Wall Pocket designs. Each one includes detailed instructions, from the type of yarn you should choose to how you should shape, fold, attach, or assemble your pieces. These tutorials are designed to be beginner-friendly yet thorough enough to satisfy experienced crocheters who want precision. As you work through these six patterns, you will learn important construction concepts like forming sturdy bases, shaping pockets, adding decorative stitches, attaching loops, creating fringes, and blocking your pieces for a polished finish.
This long-form, in-depth blog post aims to give you everything you need to make durable and aesthetically pleasing wall pockets. Throughout the content, the title “Boho Crochet Wall Pocket” appears naturally to support SEO while ensuring a smooth reading experience. Let’s begin exploring these designs in detail.
The 6 Boho Crochet Wall Pocket Designs

1. The Woven Meadow Boho Wall Pocket
This design mimics the natural textures of woven baskets while staying true to crochet techniques. It features a sturdy rectangle with a folded-over pocket and decorative top loops for hanging.
Materials
- Medium weight cotton yarn (for durability)
- 4.5 mm crochet hook
- Scissors
- Tapestry needle
- Optional: wooden dowel for hanging
Structure Breakdown
The Woven Meadow Boho Crochet Wall Pocket is built from a single rectangular panel. After crocheting a firm base, you fold the lower portion upward to form the pocket. The secret to its basket-like appearance lies in alternating front post and back post stitches.
Steps
Step 1: Crochet the base rectangle
- Create a foundation chain long enough to match your desired width. For example, chain 42 for a medium-sized pocket.
- Work one row of single crochet into each chain. This row keeps the foundation stable.
- For the remaining rows, alternate one row of front post double crochet and one row of back post double crochet.
- Continue until the rectangle reaches three times the height of your desired pocket depth. This extra length allows enough fabric to fold neatly.
Step 2: Shape the pocket
- Lay the rectangle flat on a table.
- Measure one-third of the height from the bottom edge.
- Fold this section upward, pressing gently with your hands to define the crease.
- Using a tapestry needle and matching yarn, whip stitch the left and right sides to secure the pocket in place. Insert the needle only through the outer loops at the edge to maintain clean seams.
Step 3: Create the hanging loops
- At the top edge of the rectangle, attach your yarn to the first stitch.
- Chain 12 to 15 stitches depending on your desired loop size.
- Slip stitch back into the next stitch on the row to form a loop.
- Repeat across the edge to make three evenly spaced loops.
Step 4: Optional wooden dowel installation
Slide the dowel through the loops, ensuring even spacing. The dowel provides structure and a polished finish.
Step 5: Blocking
Since the stitches are textured, lightly steam-block the piece to set its shape without flattening the texture.
This Woven Meadow Boho Crochet Wall Pocket is perfect for holding lightweight items like mail, postcards, or small bundles of dried herbs.
2. The Desert Fringe Wall Pocket

This design features a chevron-inspired stitch pattern, long fringe, and a spacious pocket. It captures the warmth and earthy feel associated with bohemian desert décor.
Materials
- Worsted weight cotton yarn
- 5 mm hook
- Scissors
- Measuring tape
- Tapestry needle
Structure Breakdown
The Desert Fringe Boho Crochet Wall Pocket is formed by making a triangular base that transitions into a straight-sided panel. You then fold the lower point upward to create the pocket and add long decorative fringe.
Steps
Step 1: Create the triangular base
- Start with a magic ring.
- Chain 3 (counts as a double crochet), then make 2 double crochets into the ring.
- Chain 2 to form the point, then work 3 more double crochets into the ring.
- Pull the ring tight.
- Turn, chain 3, and place 2 double crochets into the first stitch.
- Work double crochets evenly until you reach the chain-2 space at the point.
- In the chain-2 space, make 2 double crochets, chain 2, and 2 double crochets.
- Continue this increase pattern until the triangle reaches your desired width.
Step 2: Work straight rows
Once the base is wide enough, continue working double crochet rows without increases. Make about 12–16 rows for a medium-sized wall pocket.
Step 3: Fold the triangle
- Lay the piece flat.
- Take the bottom point and fold it upward until the tip sits about one-third up the panel.
- Smooth the fabric to create a clean pocket shape.
Step 4: Stitch the pocket
- With a tapestry needle, join the left and right edges of the folded triangle using whip stitch.
- Make sure your stitches are tight enough to support small objects.
Step 5: Add fringe
- Cut yarn strands twice the length you want the fringe to be.
- Fold each strand in half.
- Insert your hook under a stitch at the bottom edge, pull up the folded center, and tug the ends through to secure.
- Repeat across the bottom.
Step 6: Create a hanging loop
Chain 20, then slip stitch to the opposite corner of the top edge to form a hanging cord.
This Desert Fringe Boho Crochet Wall Pocket is excellent for décor-only purposes or for holding extremely light items.
3. The Coastal Rope Stitch Wall Pocket

This design resembles seaside rope textures and features a deep pocket with a ribbed back panel.
Materials
- Sturdy cotton rope-style yarn
- 6 mm hook
- Scissors
- Tapestry needle
- Metal ring for hanging
Structure Breakdown
The Coastal Rope Stitch Boho Crochet Wall Pocket consists of a ribbed rectangular back panel and a smaller rectangular front panel that forms the pocket.
Steps
Step 1: Create the back panel
- Chain the width you prefer.
- Work one row of single crochet.
- For each following row, crochet only into the back loops to create ribbing.
- Continue until the panel is about 14–18 inches tall.
Step 2: Create the front panel
- Chain a width slightly smaller than the back panel.
- Work single crochets into each stitch.
- Continue rows until the height of this panel equals about half the height of the back panel.
Step 3: Shape and attach the pocket
- Lay the smaller panel on the bottom portion of the larger panel.
- Align the edges carefully before stitching.
- Use a tapestry needle to whip stitch along the sides and bottom edge.
Step 4: Add the metal ring
- Fold the top two inches of the back panel over the ring.
- Using the tapestry needle, stitch the flap down securely so the ring stays attached.
- Ensure your stitches are tight because the ring will carry the full weight of the wall pocket.
This Coastal Rope Stitch Boho Crochet Wall Pocket works beautifully in entryways, bathrooms, or craft rooms.
4. The Vintage Shell Stitch Wall Pocket

A delicate yet structured wall pocket with shell stitch detailing. This expanded version keeps the original concept but greatly deepens the step-by-step guidance, shaping instructions, folding clarity, and finishing details.
Materials
- Light worsted cotton yarn
- 4 mm crochet hook
- Scissors
- Tapestry needle
- Optional: lightweight cotton fabric for lining
- Fabric glue (if lining is added)
- Pins for shaping and folding
Steps
Step 1: Base panel
- Begin by chaining 41 stitches. This width produces a medium-size wall pocket that showcases the shell stitch pattern clearly.
- Work one row of single crochet across to create a strong, steady foundation.
- Switch to the shell stitch pattern:
- Work five double crochets into one stitch,
- Skip two stitches,
- Work a single crochet,
- Skip two stitches and repeat.
- Continue working shell rows until the panel reaches a height of 11–13 inches.
- Make sure the shell pattern remains aligned vertically. If shells drift diagonally, stop, unravel a few rows, and correct your stitch placements.
Step 2: Fold the pocket
- Lay the completed panel flat on a table.
- Measure the height and divide into thirds. Fold the bottom upward one-third of the total height to create the pocket.
- Carefully shape the fold by guiding the shell stitches so that the curved shell edges overlap cleanly.
- Pin the sides in place so the fold remains stable before sewing.
Step 3: Stitch sides
- Thread a long yarn tail into your tapestry needle.
- Using either a slip stitch seam (for a subtle join) or whip stitch (for a decorative ridge), sew the left and right sides of the folded panel.
- Insert your needle under full stitches, not only the loops, to ensure the pocket stays strong and doesn’t stretch outward.
- Remove pins once seams are complete.
Step 4: Add a scalloped top edge
- Work a decorative row along the top flap to enhance the shell stitch aesthetic.
- You may use:
- Slightly larger shells for dramatic scallops, or
- Picots for a daintier lace-like trim.
- Ensure you crochet evenly across the entire top to prevent curling.
Step 5: Add loop
- Chain 18–22 stitches, depending on your preferred hanging length.
- Attach both ends securely to the top corners using tight slip stitches or whip stitches.
- Tug lightly to test the loop strength before hanging.
5. The Macramé-Inspired Knot Pocket

This design blends crochet and knotting techniques to create a lightweight, airy pocket with handmade charm. This expanded version gives complete detail on cutting strands, forming stable knots, shaping the netting, and constructing a secure pocket.
Materials
- Cotton cord-style yarn
- 6 mm crochet hook
- Scissors
- Tapestry needle
- Wooden dowel
- Pins (optional)
Steps
Step 1: Crochet the upper band
- Chain a length that matches your wooden dowel end to end.
- Work tight, dense single crochet rows until the band measures about 2 inches tall.
- Keep your tension firm, because the band must support the weight of the knotted netting.
- Do not stretch the band while working; allow the stitches to settle naturally so the dowel fits correctly.
Step 2: Create knotted strands
- Cut multiple long strands of yarn, each measuring 3–4 feet.
- Fold each strand perfectly in half.
- Insert your hook under the bottom edge of the crocheted band and pull the fold through to form a loop.
- Wrap the loose ends through the loop, tightening until secure. This forms a lark’s head knot, the foundation knot used in macramé.
- Continue adding strands until the entire bottom edge is densely covered.
Step 3: Form the pocket using knots
- Divide the hanging strands into small groups of 4–6 strands each.
- Start tying square knots to create a structured netting pattern:
- Bring left outer strand over the center strands.
- Bring right outer strand over and under to lock the knot.
- Work at least 3–4 rows of square knots, spacing each row roughly 1.5 inches apart for an open net or closer together for a tight pocket.
- Once the netting reaches about 10–12 inches in length, fold the bottom of the net upward.
- Tie the side strands together in pairs along both edges to form a stable pouch shape.
- Trim any extra long ends or incorporate them into the fringe if desired.
Step 4: Insert dowel
- Slide the wooden dowel through the upper crocheted band.
- Ensure the dowel fits snugly and does not distort the crochet band.
- Attach a hanging cord or leave the dowel ends exposed for mounting directly on hooks.
This wall pocket gives a macramé-style look but includes enough crochet to appeal to fiber artists who enjoy both crafts.
6. The Layered Texture Wall Pocket

This version focuses on a multi-stitch surface with deep texture and strong structural integrity. The expanded tutorial explains how to build clean transitions between stitch sections, control folding, reinforce seams, and create a durable hanging cord.
Materials
- Worsted-weight cotton yarn
- 5.5 mm hook
- Scissors
- Tapestry needle
- Optional: lightweight lining fabric
- Fabric glue
Steps
Step 1: Create base using moss stitch
- Chain the width you want for your pocket, usually 35–45 stitches depending on size preference.
- Begin working in the moss stitch (single crochet, chain one, skip one, repeat).
- Continue moss stitch rows until your panel reaches 6–7 inches tall.
- Keep your tension consistent; the moss stitch should lay flat without curling.
- If the edges begin to curve inward, block lightly or widen your chains slightly.
Step 2: Add texture panel
- Switch to a bobble stitch or puff stitch panel.
- Work 8–10 rows of texture, allowing the raised bumps to stand prominently on the surface.
- Maintain the same stitch count as the moss stitch panel below to avoid narrowing.
- The textured panel becomes the decorative front of the wall pocket.
Step 3: Fold and attach
- Fold the bottom section upward, ensuring the textured bobble panel sits clearly on the front.
- Align the edges carefully before stitching to avoid a tilted pocket.
- Stitch the sides firmly using a whip stitch or mattress stitch.
- Insert the needle deeply between stitches for extra reinforcement, especially since textured panels are heavier.
Step 4: Reinforce top edge
- Work a full row of slip stitches across the top edge to provide strength.
- This step prevents stretching when the pocket is filled.
- If you want added rigidity, work two slip-stitch rows.
Step 5: Add hanging cord
- Chain 20–30 stitches depending on how long you want the wall pocket to hang.
- Attach both ends securely to the upper corners.
- Pull firmly to test stability before use.
Final Tips for Making a Strong Boho Crochet Wall Pocket
Choose Strong Yarns
Cotton is the best choice for durability and structure.
Block Carefully
Steam-blocking enhances shape without flattening texture.
Secure Seams
Use strong, tight whip stitches for stronger pockets.
Avoid Overloading
These pockets are decorative. Avoid heavy items.
Conclusion
The world of handmade décor thrives on creativity, texture, and thoughtful craftsmanship, and the Boho Crochet Wall Pocket fits beautifully into this aesthetic. With the six designs explored in this guide, you now have a collection of deeply detailed, fully explained, and carefully structured patterns that you can use to enhance your home or gift to others. Each wall pocket design offers a unique combination of texture, form, and function, allowing you to choose the style that best suits your space or mood. By following the comprehensive steps and folding, shaping, stitching, and assembly instructions, you can create pieces that are both durable and artistically charming.


