
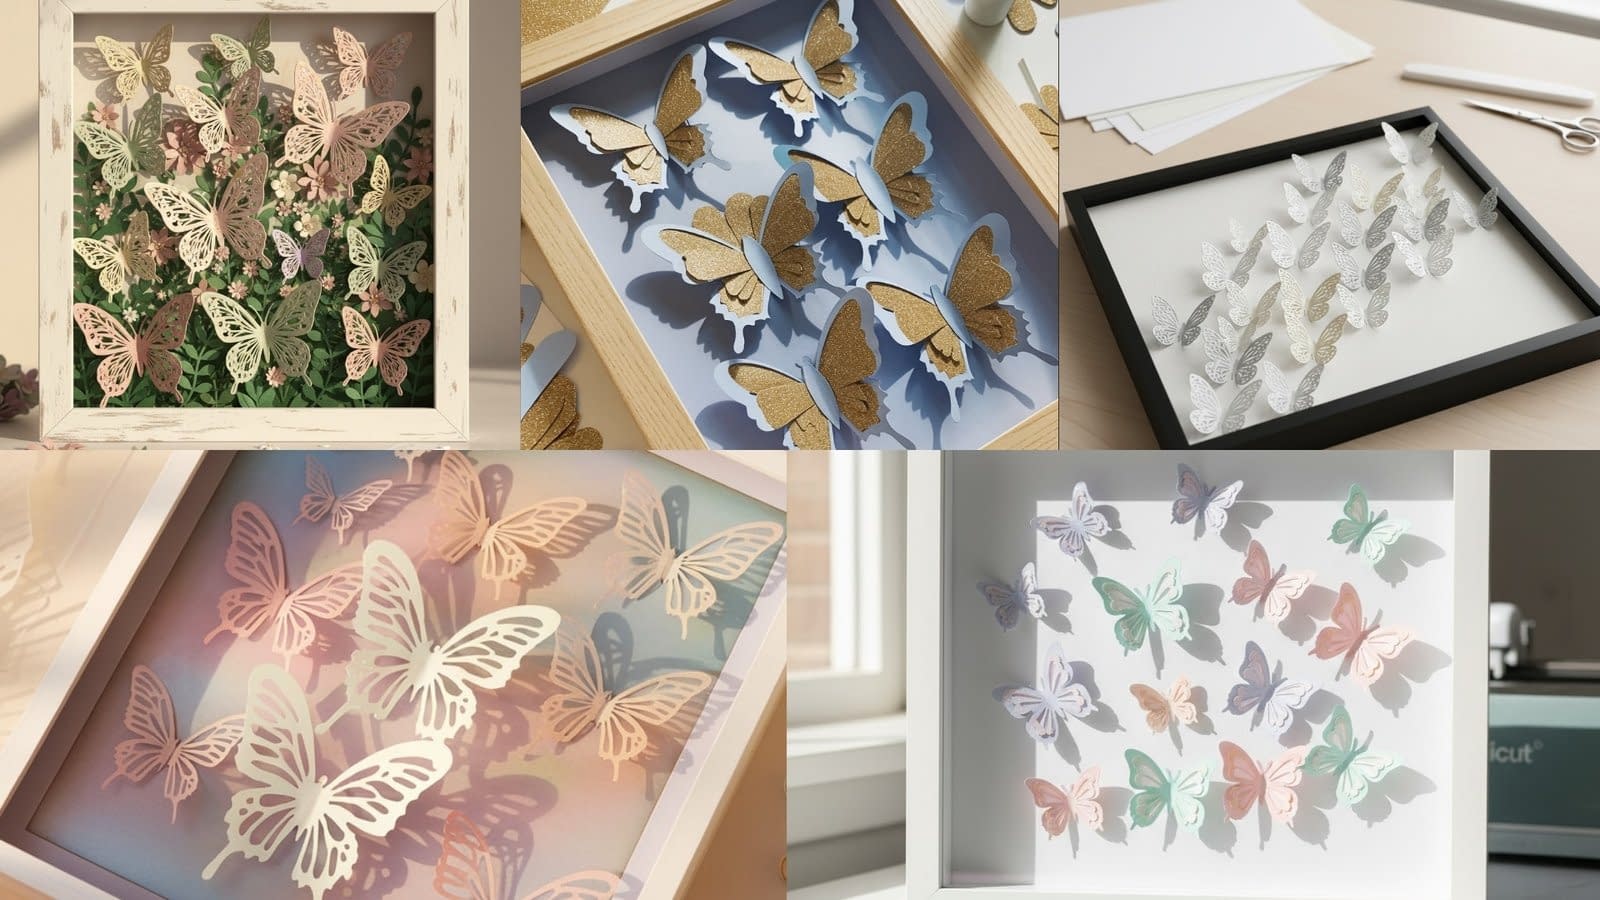
Crafting a Cricut Paper Butterfly Shadow Box is one of the most relaxing and visually satisfying projects you can make with a Cricut machine. These delicate paper butterflies bring depth, dimension, and personality to any space. Whether you enjoy soft pastels, bold glittery layers, elegant vellum wings, or minimalist monochrome styles, this long and detailed tutorial will guide you through creating five unique designs.
Each design includes a clear materials list and highly detailed steps that explain exactly how to cut the shapes, fold the wings, glue the layers, mount the butterflies, and assemble the shadow box. This guide also helps you understand how to choose color palettes, layer materials properly, and achieve a polished finish that looks professional and gift-worthy.
This is a long, comprehensive post designed to give you a deep understanding of the entire crafting process. You can follow each design as written or combine multiple techniques to create your own custom Cricut paper butterfly shadow box.
Design 1: Layered Pastel Butterfly Shadow Box

Materials
• Five pastel cardstock colors (pink, lavender, mint, pale yellow, sky blue)
• White or cream cardstock for the background
• Foam tape or foam dots
• Light tacky glue
• Cricut machine and StandardGrip mat
• Spatula and scraper tools
• 10×10 shadow box
Step 1: Choose and Prepare the Butterfly Shapes
Select butterfly SVGs that include a solid base layer and a detailed top layer. For a soft pastel look, choose butterflies with rounded edges and gentle wing curves rather than sharp or geometric designs.
Resize your butterflies in Cricut Design Space. A good variety is between 2 inches to 3.5 inches wide. This variation helps create a balanced composition once placed in the shadow box.
Step 2: Cutting the Cardstock Layers
Place the pastel cardstock on the StandardGrip mat, making sure it is flat with no bubbles. Press it gently with the scraper tool to ensure a secure grip.
Select the cardstock cut setting that matches your chosen paper thickness. For most pastel cardstocks (around 65 lb), the standard fine-point blade setting works well.
Cut each butterfly layer separately. Always check the detailed top layers to ensure clean cuts. If the design includes tiny wing cutouts, use a little extra pressure or turn on the “More Pressure” setting.
Step 3: Removing the Cut Pieces Without Curling
Slide your spatula under each butterfly, starting from the edge of the paper and working slowly. Lift the cut piece while pressing the remaining paper flat with your other hand. This prevents curling and maintains crisp shapes for clean layering.
Handle detailed top layers gently, avoiding pressure on delicate areas.
Step 4: Assembling the Layered Butterflies
Place the solid butterfly base on your table. Add a fine line of tacky glue along the center of its body. Avoid the wings entirely; they must remain free for dimension.
Align the detailed top layer precisely over the base and press only on the glued center.
Once the glue sets slightly, lift the top wings gently by pinching with your fingers. Start at the center crease and slowly work outward. Curl the wings upward to create a soft, three-dimensional look.
Repeat for all butterflies.
Step 5: Preparing the Background
Cut a square of white or cream cardstock that fits your shadow box. For added elegance, lightly score diagonal lines or create a subtle pattern. This keeps the background interesting without distracting from the butterflies.
Step 6: Planning the Layout
Lay the butterflies on the background without glue yet. A flowing diagonal arrangement works beautifully for this pastel theme. Larger butterflies look best near the center, with smaller ones placed toward the edges.
Take your time adjusting the spacing. This layout will define the final appearance of your shadow box.
Step 7: Attaching the Butterflies
Place foam tape or a foam dot directly on the body of each butterfly. Avoid the wings so they remain lifted.
Press each butterfly firmly onto the background, ensuring the foam tape adheres fully.
Step 8: Adding the Design to the Shadow Box
Insert the completed background into the shadow box. Secure it tightly and ensure none of the butterfly wings touch the glass.
This pastel design results in a soft, airy Cricut paper butterfly shadow box ideal for nurseries, bedrooms, or spring decor.
Design 2: 3D Vellum and Cardstock Butterfly Shadow Box

Materials
• White cardstock for the base wings
• Vellum paper for the upper wings
• Optional pearlescent cardstock accents
• Clear-drying glue (important for vellum)
• Foam dots
• Cricut machine and LightGrip or StandardGrip mat
• 9×9 shadow box
Step 1: Selecting the Right Butterfly Designs
Choose butterflies with open wing details that suit vellum. Vellum looks best when light passes through delicate shapes. Use two-layer SVGs: one cardstock base and one vellum top.
Step 2: Cutting Cardstock and Vellum
Cut the cardstock layers with the standard cardstock setting.
For vellum, choose the vellum setting. If your machine tends to tear vellum, decrease the pressure slightly. Smooth the vellum gently onto the mat. Do not stretch or press too hard because vellum dents easily.
Cut the vellum layers and remove them carefully.
Step 3: Lifting Vellum Without Damage
Use the spatula at a shallow angle. Slide slowly under the vellum piece. Support the material with your fingers as it lifts to prevent creasing.
Step 4: Layering Cardstock and Vellum
Place the cardstock base layer flat. Apply a small amount of clear glue along the body only. Lay the vellum wing piece on top.
Press down gently on the glued area. Leave the wings untouched.
Once dry, curl the vellum wings upward. Vellum bends easily, so make slow, gentle motions. Aim for a soft curve rather than a sharp fold.
Step 5: Preparing the Background
Use a white or pearl-toned background. You may add a large filigree circle or geometric shape cut from cardstock to create a decorative backdrop. Attach this base element flat with glue.
Step 6: Arranging the Butterflies
Clustered layouts work beautifully with vellum butterflies because their translucent wings create a floating effect.
Start from the center and place butterflies outward in an expanding circle or soft wave.
Step 7: Attaching Butterflies With Foam Dots
Attach each butterfly using a foam dot on the body. This gives them height so light passes under their wings.
Make sure no vellum wings touch the glass once framed.
Step 8: Assembling the Shadow Box
Insert the design into your shadow box frame. Check for spacing and adjust if needed before closing the frame fully.
This design produces an elegant, airy Cricut paper butterfly shadow box with a soft glow created by the vellum wings.
Design 3: Glittered Layered Butterfly Shadow Box

Materials
• Glitter cardstock for top layers
• Solid cardstock for base layers
• Optional metallic cardstock for middle layers
• Foam tape
• Strong tacky glue
• Cricut machine and StrongGrip mat
• 12×12 shadow box
Step 1: Choosing Butterfly Layer Templates
Look for triple-layer SVGs that include a solid base, a decorative middle layer, and a detailed glitter top. This structure adds richness and depth.
Choose sizes between 2.5 and 4 inches wide for a bold composition.
Step 2: Cutting the Base Layers
Place solid cardstock on a StandardGrip mat. Cut using the normal cardstock setting.
Step 3: Cutting the Metallic Layers
If adding a metallic middle layer, use the foil or metallic cardstock setting. Press the material firmly to the mat for clean, sharp cuts.
Step 4: Cutting Glitter Cardstock
Place glitter cardstock glitter-side up on the StrongGrip mat. Smooth the surface carefully.
Use the glitter cardstock cut setting.
Glitter cardstock is thicker and sometimes requires two passes. Inspect cuts before removing the mat.
Slowly lift the cut pieces. Glitter may shed slightly; wipe your mat afterward.
Step 5: Assembling Three-Layer Butterflies
Start with the solid base. Add glue to the body and attach the metallic layer.
Add glue again to the body and attach the glitter layer.
Allow the glue to set, then curl each wing using your fingers. Begin at the center and work outward in smooth, rounded motions.
Step 6: Preparing a Bold Background
Use a deep background like navy, black, charcoal, or burgundy. Deep colors highlight glitter details and create contrast.
Cut a clean, flat square that fits your shadow box.
Step 7: Creating a Radiating Layout
Arrange butterflies in a radiating circular pattern or a fan shape. Place larger butterflies near the center and smaller ones on the outer edges.
This arrangement gives the finished piece an energetic, celebratory look.
Step 8: Attaching Butterflies to the Background
Use foam tape to attach each butterfly’s body. This spacing adds dramatic depth and allows glitter to catch the light from all angles.
Step 9: Framing the Design
Insert into a 12×12 shadow box. Deeper frames work best because layered glitter butterflies lift higher than flat designs.
This glitter-focused Cricut paper butterfly shadow box is perfect for gifts, celebration decor, or striking wall art.
Design 4: Monochrome Minimalist Butterfly Shadow Box

Materials
• Three shades of the same color (for example, navy, medium blue, and pale blue)
• White background cardstock
• StandardGrip mat and Cricut machine
• Foam tape
• Tacky glue
• 8×8 or 10×10 shadow box
Step 1: Selecting Simple Butterfly Outlines
Choose SVGs with clean, simple wing shapes. Avoid overly detailed cutouts for this minimalist design.
You may use single-layer butterflies or two-layer butterflies with subtle top designs.
Step 2: Cutting the Butterflies
Cut at least 12 to 15 butterflies in three sizes. Ensure each size includes all three shades.
Use 65 lb cardstock for easier curling and shaping.
Step 3: Folding and Shaping the Wings
Before assembling, lightly fold the butterflies along the body crease. Do this by holding the body between your thumb and index finger and folding the wings upward.
To shape the outer wings, roll them slightly inward with your fingers. This creates a smooth, natural curve rather than a sharp bend.
Step 4: Preparing the Background
Use a plain white cardstock square. The simplicity of the background enhances the gradient effect.
Step 5: Creating a Gradient Layout
Arrange butterflies from darkest color at the bottom to the lightest shade at the top.
You can form:
• A rising diagonal line
• A curved swoosh shape
• A gentle vertical gradient
Take your time shaping the design before attaching anything.
Step 6: Gluing the Butterflies
Attach some butterflies flat with a line of glue along the body only.
Others should be attached using foam tape for added dimension.
Alternate raised and flat butterflies for a balanced look.
Step 7: Framing
Place the completed design into your shadow box. Ensure the wings are lifted but not pressed against the glass.
This monochrome Cricut paper butterfly shadow box is simple, modern, and suitable for nearly any room.
Design 5: Floral Layered Butterfly Shadow Box

Materials
• Floral-patterned cardstock or floral mandala SVGs
• Solid cardstock for butterfly bases
• Delicate filigree butterfly top layers
• Foam dots
• Tacky glue
• Cricut machine
• 10×10 or 12×12 shadow box
Step 1: Creating the Floral Background
Choose a floral mandala or layered flower cluster SVG. Cut the largest floral shape in a light color like cream or soft pink. Cut the smaller inner layers using complementary shades.
Attach the largest floral shape flat onto the background.
Use foam tape behind the smaller floral layers to create elevation and depth.
Step 2: Cutting the Butterfly Bases
Cut simple solid butterflies in a color that contrasts against the floral background so they stand out clearly.
Step 3: Cutting Filigree Butterfly Tops
Choose delicate filigree designs. Cut them slowly using a sharp fine-point blade.
Detailed cuts require clean material placement on the mat. Smooth the cardstock carefully before cutting.
Lift each filigree layer gently and avoid bending the intricate curls and loops.
Step 4: Assembling the Butterflies
Glue each filigree layer onto its solid base, applying a thin line of glue along the body only.
Once attached, shape the wings by lifting, curling, and adjusting until they appear layered and natural.
Step 5: Adding Butterflies to the Floral Base
Position butterflies around the floral design. Some should sit directly on flower petals while others hover above using foam dots.
Add variations in height to create a highly dimensional design.
Step 6: Optional Micro Decorations
You can add tiny features such as:
• Small rolled-paper spirals
• Mini paper flowers
• Metallic dots near the butterfly bodies
These simple details enhance the romantic floral look.
Step 7: Framing Your Completed Design
Because this design includes many raised layers, use a deeper shadow box to avoid flattening the pieces.
Insert the design carefully and secure it fully.
This floral Cricut paper butterfly shadow box is richly textured and beautifully layered, making it perfect for special gifts, weddings, or feminine wall decor.
Final Thoughts
These five Cricut Paper Butterfly Shadow Box designs offer a wide variety of styles, materials, and techniques. Whether you’re drawn to soft pastels, translucent vellum, shimmering glitter, clean monochrome themes, or intricate floral layers, each design provides step-by-step instructions to help you craft a polished and dimensional piece.
The detailed processes of cutting, folding, gluing, arranging, and framing give you the confidence to create professional-looking shadow boxes for your home, your craft shop, or thoughtful handmade gifts. Each technique can also be mixed and matched so you can develop a style of your own.


