
Welcome to this comprehensive guide to 9 Aesthetic Crochet Hair Hoop Patterns: Unique 3D DIY Headband Tutorials. If you love handmade accessories, enjoy slow craft details, or are looking to create thoughtful gifts and product-ready pieces, this post is written for you. The patterns in this series combine classic crochet techniques with sculptural three-dimensional elements—petals, tiny strawberries, miniature bees, and delicate lace ties—that transform an ordinary hair hoop into an eye-catching accessory.
This post will walk you through the first three patterns in great depth. Each tutorial contains a clear skill-level designation, finished dimensions with guidance on how to adjust size, a detailed materials and tools list, notes and tips to avoid common pitfalls, and step-by-step instructions written out fully in long-form, beginner-friendly language. Each stitch name is written out in full rather than in shorthand; for example, use the phrase single crochet rather than sc, half double crochet rather than hdc, and double crochet rather than dc. If you are newer to crochet, the instructions and glossary-style explanations in each pattern will help you follow every stage.
I will present three full patterns now:
- Delicate Pastel Floral Vine Headband (lacey, elegant)
- Soft Cream Vintage Blossom Halo (luxury bridal vibe)
- Pastel Garland with Tiny Strawberries & Bows (cute and whimsical)
When you are ready, say continue and I will publish the remaining six patterns with the same level of depth and clarity. Let us begin with the first pattern.
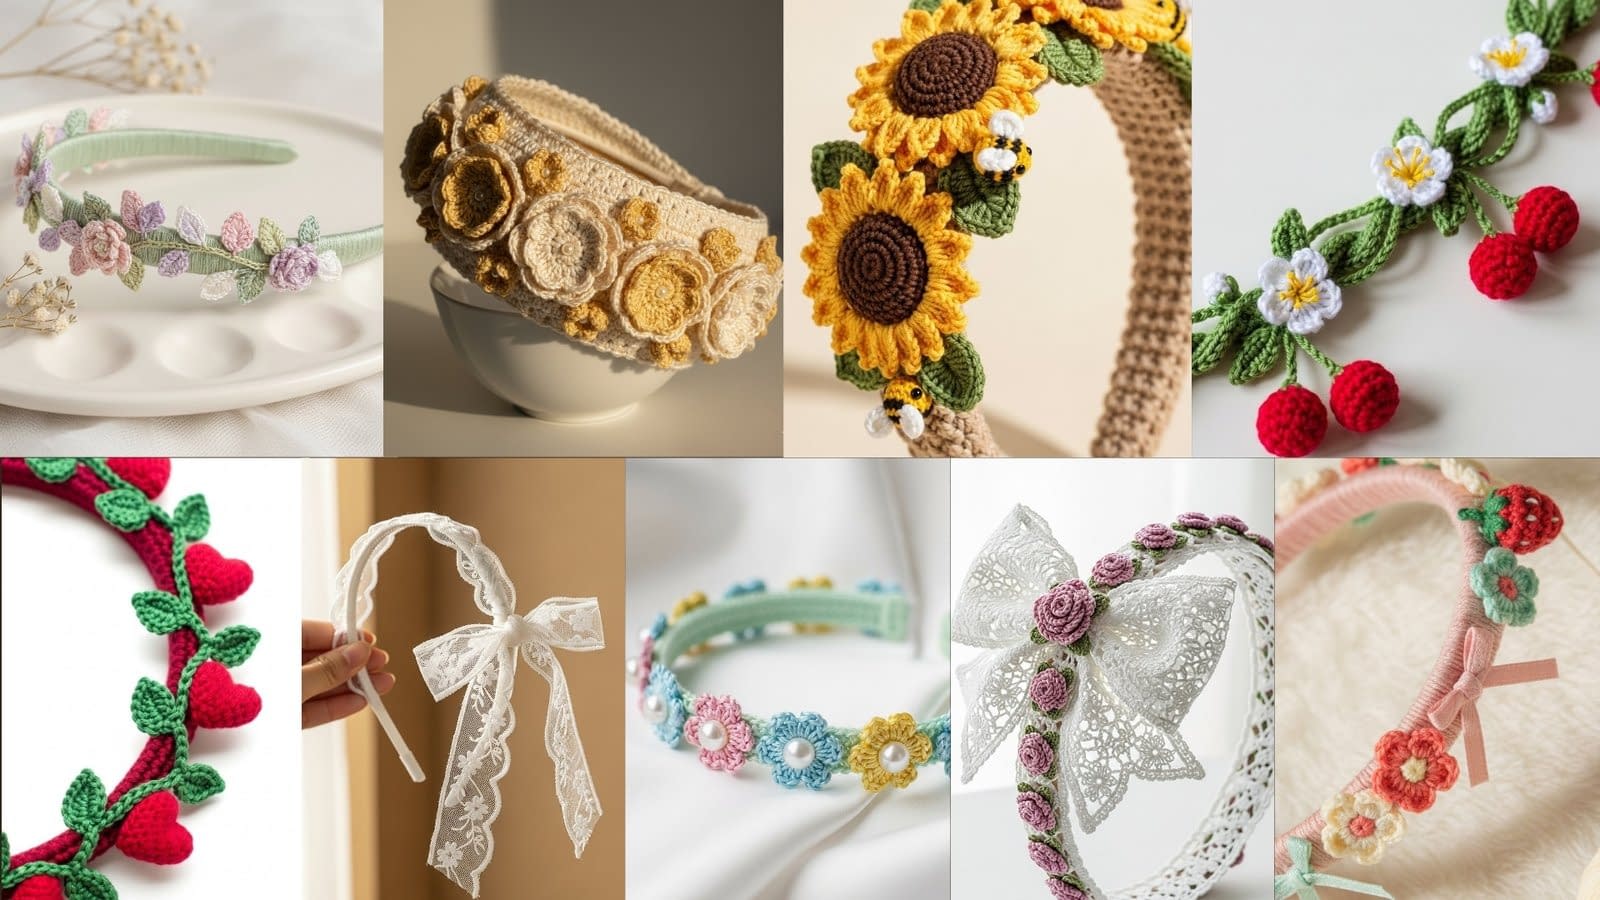
Delicate Pastel Floral Vine Headband (lacey, elegant)
Skill level
Beginner to intermediate. This pattern uses basic stitches and simple shaping. It requires patience for small assembly work and working three-dimensional layered petals.
Finished size
The finished headband will fit an average adult head with an inner circumference of approximately 22 inches and a visible band width of about one quarter inch. The floral clusters add approximately three quarters of an inch in depth at their fullest points. Adjust the finished fit by selecting a different hair hoop base size or by changing the stitch tension and yarn weight. Using a thicker yarn or a larger hook will increase the dimensions; using a thinner thread and a smaller hook will reduce them.
Materials
- Slim metal hair hoop, approximately 22 inches inner circumference, plain finish. Choose a base that is flexible but keeps shape.
- Worsted weight cotton yarn for the wrapped band: pale sage green, approximately 30 yards. A mercerized cotton is preferred for a smooth finish.
- Fingering or sport weight cotton or cotton-blend yarn for petals and leaf details: pastel pink, lavender, ivory, and mint green. Small amounts—approximately 5 to 15 yards per color—are sufficient.
- Crochet hook sizes: 3.25 millimeter (D) for the band wrapping; 2.25 millimeter (B) for fine petals and leafwork. Use the smaller hook for decorative elements to keep them crisp.
- Tapestry needle with a blunt tip for sewing pieces and weaving in ends.
- Small sew-on clear beads or an embroidery needle for tiny bead centers, optional.
- Fine sewing thread matching the sage green for securing wraps and attaching decorative pieces.
- Small pair of sharp scissors.
- Blocking tools as needed: small pins and a flat surface for shaping petals.
- Optional: fabric glue for reinforcing the ends under the band.
Notes and design overview
This headband is constructed in two main phases. Phase one is wrapping the slim metal band with the sage green yarn to create a neat base. Phase two is creating small layered petals and leaves separately and attaching them to the wrapped band in clusters. Each petal is crocheted as a narrow spiral or small petal motif and then layered to form a tiny blossom. The pattern emphasizes fine threadwork and gentle petal curl; therefore, blocking and gentle shaping are important.
Preparatory steps
- Prepare the hair hoop by wiping down with a soft cloth to remove oils. If the metal surface is very smooth and slippery, consider a tiny friction dot (a small drop of fabric glue allowed to dry) at the starting point to prevent unraveling.
- Decide the placement of three to five floral clusters along the top front half of the headband. Mark the positions with small, removable clips or threads. A central cluster and two spaced clusters to either side create a balanced composition.
Band wrapping: step-by-step
- Thread the sage green yarn through the tapestry needle and secure the working end by tying a small single overhand knot around the hair hoop at the chosen starting point on the inner underside of the band. Pull the knot snugly but do not create a bulky bump; the knot will be hidden under additional wraps.
- Hold the yarn tail against the hoop to begin wrapping. Wind the yarn tightly and evenly around the band in a single direction, laying each wrap snugly next to the previous wrap so that no metal shows through. Keep the tension even to avoid gaps and unevenness.
- Continue wrapping until you have covered the entire inward-facing section and the outward-facing top portion where you will affix petals. For a fully covered band, continue around the whole circumference; for a partially covered decorative band, wrap at least the front half.
- When you reach the finishing point, tuck the working yarn under several wraps and use the tapestry needle to weave the tail through the wrapped yarn for about one inch. Cut off any excess and flatten the weave with your thumb to secure. If additional security is desired, add a drop of clear fabric glue to the tucked end and allow to dry.
Petal and small blossom construction
Each tiny blossom will be made of three layered petals constructed as follows.
Petal (make 20–30 total in mixed colors)
- With the 2.25 millimeter hook and chosen petal color, create a foundation chain of six chain stitches. Slip stitch into the second chain from hook to create a small loop.
- Into the ring or foundation chain work one single crochet in the first stitch, one half double crochet in the next stitch, two double crochet in each of the next two stitches to create a gently rounded top, then one half double crochet and one single crochet to taper the other side. This sequence forms a petal shape with a higher center and tapered edges.
- Fasten off leaving a six-inch tail for sewing. Gently curve the petal edges by pinching the base and lightly wetting the petal with a dry cloth; allow to dry flat while pinched to create a subtle curl. Repeat to make the required number of petals in varying pastel shades.
Layered blossom assembly (make 8–10 blossoms)
- Choose three petals for each blossom in graduated sizes or colors. Arrange petals so that the wider parts overlap slightly and the tapered bases align.
- Thread the tapestry needle with a six-inch tail of matching yarn. Insert the needle through the petal bases from front to back, then through the next petal, and so on, stitching them together with two or three small stitches to maintain a slight fan shape. Make sure the stitches pass only through the bases of the petals so they remain free and dimensional.
- Add a tiny bead to the center of each blossom if desired. Secure the bead with a small knot and hide the tail by threading it under the wrapped band or through the blossom layers. Trim excess thread.
Leaf construction (make 10–12 leaves)
- With mint green yarn and the 2.25 millimeter hook, chain seven. In the second chain from hook work one single crochet, then one half double crochet, one double crochet, one half double crochet, and one single crochet to create a tapered leaf shape. Slip stitch to the final chain and fasten off leaving a tail for sewing.
- Block leaves gently to shape them and create a slight natural curve.
Attaching blossoms and leaves to the band
- Decide the exact placement for the first cluster. Position the layered blossom on the wrapped band and use the tapestry needle with sage green sewing thread to make a secure stitch through the blossom base and into the wrapped yarn several times. Keep stitches small and neat.
- Add leaves behind and slightly to the side of the blossom, anchoring them individually with small stitches so they fan naturally. Attach smaller single petals as filler flowers by stitching them in place so the cluster looks organically grown along the band.
- For a subtle, secure attachment, weave the sewing thread into the wrapped band and knot on the underside of the band where the initial knot can be concealed. Make sure there are no rough knots or sharp tails that could irritate the scalp.
Finishing touches and care
- Inspect all attachments for loose threads. Secure any tails by weaving them deeply into the wrapped yarn.
- If you used glue to reinforce ends, allow the piece to dry completely before wearing.
- To clean, spot clean the headband with a damp cloth and mild soap. Avoid soaking or machine washing to preserve the shaped petals.
Variations and customization
- Create a monochrome version in ivory for bridal settings. Use pearlescent bead centers for a subtle sparkle.
- For a bohemian look, add glass seed beads and slightly larger leaves.
- Use metallic thread for the wrap to create a modern, slightly edgy accessory.
Troubleshooting and tips
- If petals lay flat instead of curling, re-block them by dampening lightly and pinching the bases until dry.
- If the wrapped band feels too sticky against hair, add a thin felt lining inside the band for comfort.
- For even spacing, mark the band with removable pins before attaching decorations.
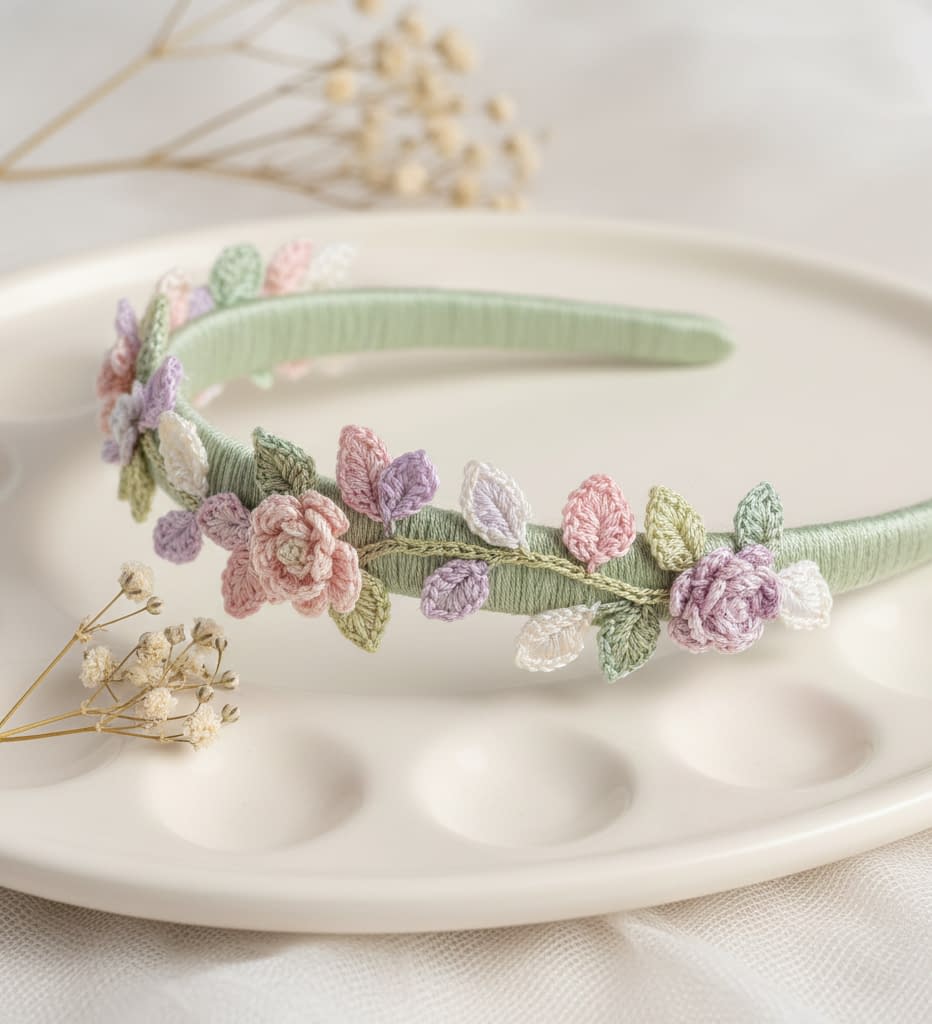
Soft Cream Vintage Blossom Halo (luxury bridal vibe)
Skill level
Intermediate. This project uses textured lace stitches, picot edges, sculpting of petals with picot and lace stitches, and requires careful placement to achieve a luxurious finish.
Finished size
A wide halo headband approximately 1.25 inches in visual width with clustered blossom sections that extend up to 1 inch in depth. This size sits comfortably on most adult heads and creates an elevated bridal silhouette. Adjust the finished width by using bulkier yarn or changing the pattern density.
Materials
- Wide hair hoop base or fabric-covered millinery headband base, one piece approximately 22 inches in inner circumference or sized to the wearer. Select a base with a slightly wider profile than a slim band so that the lace covering lays flat.
- Mercerized cotton thread or fingering weight yarn in creamy ivory for the base covering, approximately 80 to 120 yards. Choose yarn with a slight sheen for a subtle bridal luster.
- Butter yellow fingering yarn and dusty pearlized bead centers for blossom accents.
- Crochet hooks: 2.75 millimeter and 3.25 millimeter to create varied textures. Use the 3.25 millimeter for larger lace patterns and the 2.75 millimeter for picot sculpting.
- Tapestry needle, small sewing pins, blocking mat, and optional millinery wire for shaping larger petals.
Notes and design overview
This pattern emphasizes sculpted blossom clusters formed with picot edges and three-dimensional rosebuds. The wide halo is covered completely with mercerized cotton using lace patterns interspersed with clusters of layered blossoms and small bud clusters with pearlized bead centers. The picot stitch will provide delicate scalloping on petal edges; making accurate picots and consistent tension is essential for the refined look.
Preparing the halo base
- If using a fabric-covered millinery base, detach any loose fabric to expose the base for secure stitching. If the base is very slick, tack a very thin cotton ribbon to the top to provide more grip for the lace covering.
- Determine the direction the halo will be worn and mark the center point. This will guide symmetric placement of blossom clusters.
Lace covering: step-by-step
- With the mercerized cotton and the 3.25 millimeter hook, create a long strip of lace that will wrap around the hoop. Chain a foundation long enough to cover the length; for most bases chain approximately 200 to 220 chains depending on gauge. Join with a slip stitch to form a ring, taking care not to twist the strip. If working in flat strips to seam later, make two strips and seam them neatly.
- Work the first row in a repeating pattern of double crochet and chain spaces to create an open lace mesh: for example, chain three to count as first double crochet, double crochet in the fourth chain, chain two, skip two chains, double crochet in next chain, repeat across. Maintain even tension.
- Subsequent rows combine double crochet, picot points and chain spaces to sculpt a subtle scalloped edge. A sample repeat: chain one, single crochet in the base of the previous double crochet, chain three, slip stitch into the next stitch to form a small loop, single crochet to anchor, then double crochet into the chain space on the next repeat. The small chain loops will produce the airy lace when blocked.
Creating the layered blossoms and bud clusters
Large blossom (make 6–8)
- Using the butter yellow yarn and the 2.75 millimeter hook, chain eight. Slip stitch into the second chain from hook to form a small loop.
- Into the loop work a sequence of single crochet, half double crochet, two double crochet, one half double crochet, and one single crochet to form a petal shape. Repeat this sequence three times into the loop to create three petal lobes that form a larger blossom base.
- For the picot sculpting, at the top edge of each petal work a small picot by chaining three and slip stitching into the base stitch; this creates a tiny decorative point that will catch the light in photographs.
- Fasten off leaving a six-inch tail for sewing and gently shape the blossom with blocking to define the petals.
Tiny bud clusters (make 12–16)
- With ivory yarn and the 2.75 millimeter hook, create a small puff-style bud: chain two, then into the ring work five single crochet, then one slip stitch in the ring to close. Draw up the center tail and secure to form a small curled bud. Add a pearlized bead to the center and secure with matching thread.
Assembly: covering the base and attaching floral elements
- Wrap or stitch the lace strip around the headband base so that the lace sits flat and smooth. Use small mattress stitches to secure the lace to the base at regular intervals, keeping stitches hidden under the lace pattern. Avoid pulling too tightly and causing the base to bend.
- Place large blossoms at the center and two smaller blossoms on each side to create an elegant halo effect. Anchor each blossom by sewing through the lace and base multiple times to ensure that the heavier blossom does not shift.
- Intersperse bud clusters and tiny pearl bead centers along the lace between the larger blossoms. The subtle variations between large blossoms and bud clusters will create a three-dimensional, editorial bridal appearance.
Shaping and final touches
- Use a light touch of steam to shape any petals that require sculpting, holding the piece carefully and avoiding direct contact with the iron.
- Check that all beads and pearls are tightly secured with strong knots and that no threads are exposed.
- If desired, add a thin strip of soft silk or satin on the underside of the halo to protect the wearer from any possible roughness.
Styling and care
- This halo reads as a luxury bridal accessory under soft, warm lighting. It photographs well in golden-hour rim light because the mercerized cotton will pick up subtle highlights.
- Clean by spot cleaning only. Store on a flat surface, ideally in a box with acid-free tissue to maintain shape.
Variations
- Create a tonal version using ivory and champagne yarn for a monochromatic high-end look.
- Substitute coral or dusty rose blossoms for a vintage-inspired palette suited to bridesmaids.
Pastel Garland with Tiny Strawberries & Bows (cute and whimsical)
Skill level
Beginner to intermediate. The components are small and require careful finishing, but the stitches are straightforward and forgiving. This pattern is suitable for makers who want playful, colorful accessories.
Finished size
Designed as a slim crochet hoop approximately 22 inches inner circumference with decorative elements that extend no more than three quarters of an inch from the band. Individual strawberries measure approximately one quarter inch to three eighths inch in width depending on tension.
Materials
- Slim hair hoop approximately 22 inches inner circumference.
- Blush pink worsted or light worsted weight yarn for the wrapped hoop base, approximately 30 yards.
- Fingering weight yarns for tiny flowers, strawberries, and bows in coral, mint, cream, and soft yellow. Small scraps (5 to 10 yards each) are sufficient.
- Crochet hooks: 3.25 millimeter for the wrapping and 2.25 millimeter for small motifs.
- Small wooden buttons or decorative beads for styling props (optional).
- Yarn needle, small scissors, blocking pins, and a small piece of white felt for lining if desired.
Notes and design overview
This design combines alternating motifs along a slim wrapped hoop: tiny five-petal flowers, miniature crocheted strawberries with textured seeds, and teeny ribbon bows. The overall aesthetic is playful and tactile. The strawberries are stuffed lightly to provide sculptural texture; for such small work, use a tiny bit of fiberfill or tightly wound yarn scraps.
Hoop wrapping
- Using blush pink yarn and a 3.25 millimeter hook or working with the yarn and tapestry needle, wrap the hoop evenly from one end to the other. Keep wraps snug to avoid gaps. For a secure finish, weave the start and end tails under the adjacent wraps and add a small stitch or two with a tapestry needle. Trim excess.
Tiny five-petal flower (make 24–30)
- With cream yarn and a 2.25 millimeter hook, chain four and join with a slip stitch to form a small ring.
- Chain one to count as the first single crochet. Into the ring work five single crochet to create a small disk. Pull the tail to close the center hole tightly.
- To form petals, work the following into each single crochet: chain three, slip stitch in the base of the next stitch to form a small loop, then move to the next single crochet and repeat. This will create five small petal loops. Fasten off leaving a tail for sewing. Flatten and shape each petal loop slightly with a damp cloth and allow to dry.
Miniature strawberry (make 12–16)
- With coral yarn and a 2.25 millimeter hook, chain four and join with a slip stitch to form a ring. Into the ring work six single crochet. Pull the center tight.
- Round two: chain one, work a single crochet in the first stitch, then work one half double crochet in the next stitch, then two double crochet in next stitch, then one half double crochet in next, and one single crochet in the last stitch to shape a small tapered berry. This sequence will form a slightly elongated body. Adjust the number of stitches to achieve a plump shape.
- Stuff very lightly with a small tuft of fiberfill or a tightly wound scrap of yarn. Do not overstuff; the strawberry must remain soft.
- Round three: work a round of slip stitches to close the opening and secure stuffing. Fasten off leaving a tail for sewing.
- For textured seeds, use tiny french knots of cream or pale yellow embroidery thread distributed evenly on the surface, or embroider small surface single crochet dots by inserting a contrasting thread and pulling small loops to the surface, tying off and hiding tails inside the berry.
Teeny ribbon bow (make 12–16)
- Using mint yarn and a 2.25 millimeter hook or working with ribbon if preferred, create a small rectangle by chaining six and then working single crochet across for two to three rows to form a tiny band.
- Remove from hook and fold the rectangle into a bow shape, pinching the center and sewing a small wrap of contrasting yarn to hold the bow form. Trim ends neatly.
Assembly: alternating motifs
- Plan the motif sequence before attaching it to the hoop: for example, flower, strawberry, bow, flower, strawberry, bow, and so on. This creates a repeating playful rhythm.
- Attach each motif to the wrapped hoop by sewing through the base of the motif and then under several wrapped bands. For the strawberries anchor through the base and also take a stitch or two through the side of the hoop for added security. Ensure that knots are concealed in the wrapped yarn.
- Space motifs evenly, approximately 3/4 to 1 inch apart, or tighten spacing for a busier look. Use removable pins or thread markers to preview spacing.
Styling, display, and photography tips
- This pastel garland photographs beautifully on a fluffy cream surface with skeins of pastel yarn and small wooden buttons to convey handmade charm. Use natural diffuse daylight to preserve true colors.
- For product photography, arrange props so that the focus remains on the texture of the strawberries and fiber details. Use extreme close-ups to show yarn fibers and the tiny seed textures.
Care and variations
- Spot clean only. Avoid machine washing due to the small stuffed strawberries and delicate bows.
- To convert this into a holiday or seasonal piece, substitute tiny pumpkins or acorns in place of strawberries.
- For children or infant wear, ensure that all small parts are securely sewn and consider omitting beads or any elements that could pose a choking risk.
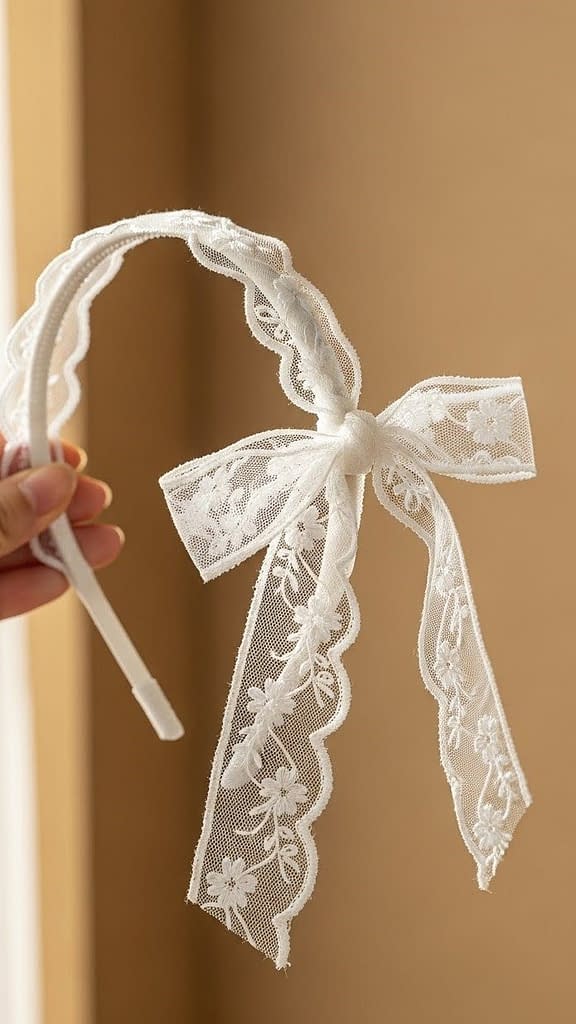
Sheer Lace Side-Tie Headband
Skill level
Beginner to intermediate. The crochet work itself is simple and minimal, but precision is required for lace handling, neat attachment, and refined finishing so the final piece looks elegant rather than bulky.
Finished size
The headband fits a standard adult head with an inner circumference of approximately 22 inches. The lace side tie measures approximately 2.5 to 3 inches in total length including tails, depending on personal preference. The lace should remain delicate and light, sitting flat against the band rather than protruding outward.
Materials
- Slim black plastic hair hoop, smooth finish
- Fine lace-weight or fingering-weight white cotton thread for the lace tie, approximately 10 to 15 yards
- Crochet hook size 1.75 millimeter or 2.0 millimeter
- Tapestry needle
- Fine sewing needle and matching white sewing thread
- Small scissors
- Pins for positioning
- Optional lightweight fusible interfacing scrap for added stability
Notes and design overview
This design focuses on restraint and refinement. The headband itself is not fully wrapped or covered; instead, it features a single sheer embroidered lace tie attached slightly off-center. The lace is not shaped into a bow and should never look oversized. The beauty of this pattern lies in subtle texture, transparency, and placement. The lace tie is crocheted as a narrow strip with scalloped edges, then gently knotted to form a soft side tie.
Creating the sheer lace strip
Foundation and base row
- With white lace-weight cotton and a 1.75 millimeter hook, create a foundation chain of twenty-two chain stitches. This length creates a narrow lace strip that can be knotted without bulk.
- Turn the work and single crochet into the second chain from the hook. Continue working one single crochet into each chain across the row. You will have twenty-one single crochet stitches.
- Chain one and turn the work.
Lace edging row
- Work one single crochet into the first stitch.
- Chain three, then slip stitch into the same stitch to form a small scalloped loop.
- Skip the next stitch. In the following stitch, work one single crochet, chain three, and slip stitch into the same stitch.
- Repeat this pattern across the row, creating evenly spaced scalloped loops along one edge of the strip.
- At the end of the row, chain one and turn.
Finishing edge
- Work one single crochet into each stitch across, anchoring the lace loops neatly.
- Fasten off, leaving a twelve-inch tail for sewing.
Shaping the side tie
- Gently block the lace strip by lightly misting it with water and pinning it flat. Allow it to dry completely.
- Once dry, loosely tie a simple overhand knot slightly off-center along the strip. The knot should look soft and organic, not tight or compressed. Adjust the tails so they are short and balanced.
Attaching the lace to the headband
- Position the lace tie slightly off-center on one side of the headband. This placement should feel intentional and asymmetrical rather than decorative in the middle.
- Using a fine sewing needle and matching white thread, stitch the lace strip to the plastic headband by taking small hidden stitches through the underside of the lace and around the headband.
- Secure with multiple tiny stitches to ensure durability, but avoid visible stitching on the top surface.
- Knot securely on the underside of the headband and trim excess thread.
Finishing and care
- Inspect the lace to ensure it lies flat and that the knot is soft and elegant.
- Trim any stray fibers.
- Spot clean only with a damp cloth. Avoid pulling on the lace tie during wear.
Variations
- Use ivory or pale blush lace thread for a warmer look.
- Add subtle floral embroidery using a single strand of embroidery thread for extra detail while maintaining transparency.
- Attach two even smaller lace ties for a mirrored but still minimal aesthetic.
The Sun-Kissed Sunflower & Honeybee Hoop

Skill level
Intermediate. This pattern includes three-dimensional flowers, textured stitches, and miniature amigurumi-style bees. Patience and careful stitch counting are important.
Finished size
The finished headband measures approximately 22 inches in inner circumference. Sunflowers measure approximately 1.75 to 2 inches in diameter, and honeybees measure approximately three quarters of an inch in length.
Materials
- Thick hair hoop base
- Worsted weight cotton yarn in tan or light brown for the base, approximately 50 yards
- Worsted weight yarn in bright yellow, dark brown, and green for sunflowers
- Fingering or sport weight yarn in yellow, black, and white for honeybees
- Crochet hook sizes 4.0 millimeter and 3.0 millimeter
- Small amount of fiberfill stuffing
- Tapestry needle
- Stitch marker
- Scissors
Notes and design overview
This design celebrates texture and warmth. The base hoop is wrapped or crocheted using a V-stitch pattern to create visible depth. Large sunflowers are the focal elements, with tiny honeybees nestled among green leaves. The result is bold, cheerful, and tactile.
Base hoop covering with V-stitch texture
Foundation wrap
- Secure the tan yarn to the headband using a slip knot.
- Work single crochet stitches tightly around the headband, inserting the hook under the band and pulling yarn through to anchor each stitch. Continue until the entire band is evenly covered.
- Join the final stitch to the first with a slip stitch and fasten off.
V-stitch texture layer
- Attach yarn again at any point on the band.
- Chain three. Skip one base stitch, then work one double crochet, chain one, and one double crochet into the next stitch. This forms one V-stitch.
- Skip one stitch and repeat around the band.
- Join with a slip stitch and fasten off, weaving in ends neatly.
Sunflower construction
Center disk
- With dark brown yarn and a 3.0 millimeter hook, chain four and join with a slip stitch to form a ring.
- Work ten single crochet stitches into the ring. Pull the tail to close the center tightly.
- Join with a slip stitch and fasten off.
Petals
- Attach bright yellow yarn to any stitch on the center disk.
- Chain three, then work two double crochet stitches into the same stitch.
- Chain three and slip stitch into the same stitch to form one petal.
- Repeat in each stitch around the disk to create a full sunflower.
- Fasten off and gently shape petals with your fingers.
Leaf construction
- With green yarn, chain nine.
- Work one single crochet into the second chain from the hook, one half double crochet into the next stitch, three double crochet stitches into the next three stitches, one half double crochet, and one single crochet.
- Slip stitch into the final chain and fasten off.
Honeybee construction
Body
- With yellow yarn and a 2.75 millimeter hook, chain four and join with a slip stitch.
- Work six single crochet stitches into the ring.
- Continue working in a spiral, increasing evenly until you have twelve stitches.
- Work two rounds alternating yellow and black yarn to create stripes.
- Stuff lightly with fiberfill.
- Decrease evenly to close the body and fasten off.
Wings
- With white yarn, chain five and slip stitch into the first chain to form a loop.
- Work six single crochet stitches into the loop.
- Fasten off, leaving a tail for sewing.
Assembly
- Attach sunflowers to the headband by sewing through the center disk and base stitches multiple times.
- Position leaves behind sunflowers and secure individually.
- Sew honeybees between flowers, angling wings upward slightly for a lifelike appearance.
Finishing and care
- Check that all elements are firmly attached.
- Spot clean only.
- Store flat to prevent petal distortion.
Variations
- Add more bees for a playful look.
- Use burnt orange petals for an autumn sunflower version.
The Victorian Lace & Satin Rose Bow
Skill level
Intermediate to advanced. This pattern requires careful lace tension, shaping, and layered assembly.
Finished size
The wide lace headband measures approximately 1.5 inches in width. The oversized lace bow measures approximately 3.5 inches across.
Materials
- Wide headband base
- Fine white cotton thread for lace work, approximately 120 yards
- Dusty pink yarn for roses, fingering weight
- Crochet hook sizes 2.0 millimeter and 2.75 millimeter
- Tapestry needle
- Blocking tools
- Optional satin ribbon for internal bow support
Notes and design overview
This design draws inspiration from Victorian accessories. The lace band is intricate and airy, while the oversized bow and tiny roses add romantic drama. Balance is essential: the bow should be statement-sized but still refined.
Lace band construction
Foundation
- Chain a length long enough to wrap around the headband base, approximately 180 to 200 chains depending on gauge.
- Join with a slip stitch to form a ring.
Lace pattern
- Chain three, then work a repeating pattern of double crochet, chain two, skip two stitches around the ring.
- On the next round, work single crochet into chain spaces, adding chain picot points every third stitch for decorative edging.
- Continue for three to four rounds until the lace reaches the desired width.
Lace bow construction
- Work a flat lace rectangle using the same pattern as the band, measuring approximately 3.5 inches wide and 2 inches tall.
- Block the rectangle flat and allow it to dry.
- Pinch the center tightly and wrap with matching thread to form a bow shape. Secure firmly.
Satin rose construction
Rose spiral
- With dusty pink yarn, chain twenty.
- Work two double crochet stitches into each chain across to create a ruffled strip.
- Roll the strip tightly from one end to form a rose shape, sewing through the base as you roll to secure.
Assembly
- Sew the lace band securely onto the headband base.
- Attach the lace bow to one side of the band.
- Sew tiny roses along the band and at the center of the bow for a cohesive look.
Finishing and care
- Steam lightly to set lace shape.
- Trim all threads carefully.
- Store in a box to protect the bow shape.
Variations
- Replace roses with pearl clusters for a bridal version.
- Use antique cream thread for an aged Victorian effect.
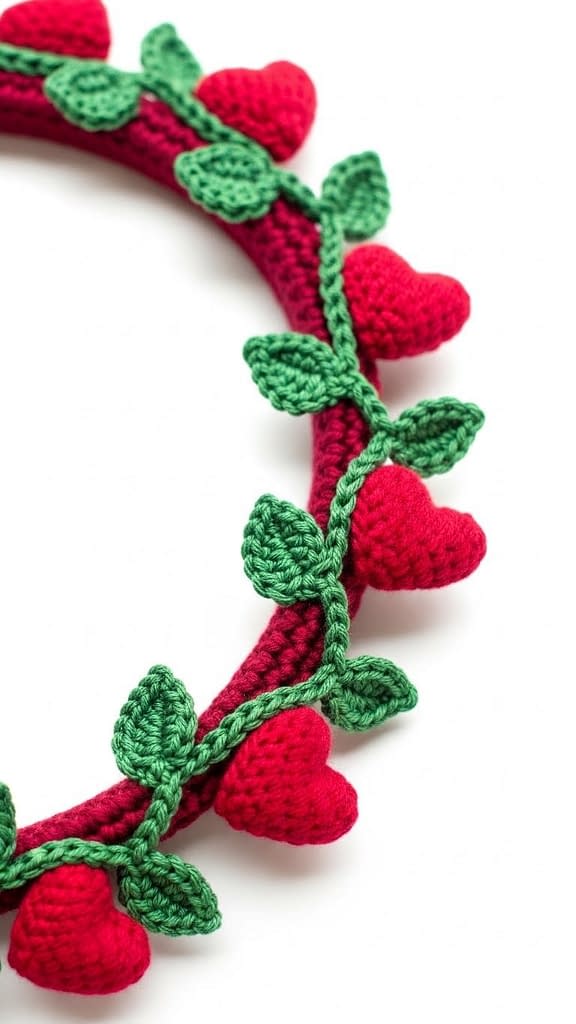
The “Amour” Red Heart & Leafy Vine Headband
Skill level
Intermediate. This pattern combines clean, consistent stitch work with three-dimensional stuffed motifs and decorative surface wrapping. Accuracy and even tension are important to achieve a polished, romantic finish.
Finished size
The finished headband fits an average adult head with an inner circumference of approximately 22 inches. The vine wraps around the full circumference of the band, while the hearts protrude approximately three quarters of an inch from the surface. The overall profile remains comfortable and balanced for everyday wear.
Materials
- Slim to medium-width hair hoop base
- Worsted weight yarn in deep burgundy red for the base, approximately 40 yards
- Fingering or sport weight yarn in emerald green for the vine and leaves, approximately 25 yards
- Fingering weight yarn in red for the hearts, approximately 20 yards
- Crochet hook sizes 3.5 millimeter and 2.75 millimeter
- Small amount of fiberfill stuffing
- Tapestry needle
- Stitch markers
- Scissors
Notes and design overview
This design evokes a romantic, storybook aesthetic. A deep burgundy base supports a winding green vine created with chain stitches, along which small stuffed hearts and leaf sprigs are placed. The contrast between the smooth base, raised vine, and plush hearts creates visual and tactile depth. The hearts should appear soft and sculptural rather than flat.
Base covering
Wrapping the headband
- Attach the burgundy yarn to the underside of the headband using a small knot.
- Wrap the yarn tightly and evenly around the band, laying each wrap snugly against the previous one so the base is fully covered.
- Continue wrapping around the entire circumference.
- Secure the end by weaving the tail under several wraps with a tapestry needle. Trim excess yarn.
Leafy vine construction
Vine wrapping
- Attach emerald green yarn at the underside of the band.
- Create a chain of three chain stitches.
- Lay the chain diagonally across the wrapped band and secure it with a small stitch through the chain and into the wrapped base using a tapestry needle.
- Continue chaining and stitching intermittently so the vine appears to spiral naturally around the headband.
- Keep spacing organic rather than perfectly uniform for a hand-grown appearance.
Leaf creation (make 10–14 leaves)
- With emerald green yarn and a 2.75 millimeter hook, chain six.
- Work one single crochet into the second chain from the hook, one half double crochet into the next stitch, one double crochet into the next stitch, one half double crochet into the next stitch, and one single crochet into the final stitch.
- Fasten off, leaving a tail for sewing.
- Shape each leaf gently by pinching the center vein.
Heart construction (make 8–12 hearts)
Heart body
- With red yarn and a 2.75 millimeter hook, chain four and join with a slip stitch to form a ring.
- Into the ring work three single crochet stitches, three half double crochet stitches, three double crochet stitches, three half double crochet stitches, and three single crochet stitches.
- Join with a slip stitch and fasten off, leaving a tail for sewing.
Shaping and stuffing
- Fold the heart slightly at the top center to create the classic heart indentation.
- Stuff lightly with fiberfill, shaping gently with fingers so the heart is plump but not overstretched.
- Use the yarn tail to stitch the base closed securely.
Assembly
- Attach leaves to the vine first, sewing through the base of each leaf and anchoring into the wrapped band.
- Sew hearts along the vine at irregular intervals, ensuring each heart is firmly secured.
- Adjust placement so the hearts appear to grow naturally from the vine rather than sitting on top of it.
Finishing and care
- Inspect all stitching for loose ends.
- Spot clean only with a damp cloth.
- Store flat to maintain the shape of the hearts.
Variations
- Use pale pink hearts on an ivory base for a softer romantic look.
- Add tiny embroidered initials on one heart for a personalized gift.
The Ethereal Pearl & Pastel Daisy Thin Band
Skill level
Beginner to intermediate. The stitches are simple, but the small scale requires patience and attention to detail.
Finished size
The finished headband is very thin, approximately one eighth inch wide, with small daisies measuring about half an inch across. Designed to sit lightly on the head like a piece of jewelry.
Materials
- Thin hair hoop base
- Mercerized cotton thread in pale mint green, approximately 25 yards
- Fingering weight yarn in pastel blue, pastel pink, and soft yellow for daisies
- Small white pearl beads, one per flower
- Crochet hook size 2.25 millimeter
- Fine sewing needle and thread
- Tapestry needle
- Scissors
Notes and design overview
This design is inspired by fine jewelry and bridal accessories. The mercerized cotton provides a subtle sheen, while the pearl centers elevate the daisies into an elegant, ethereal piece. The flowers should be evenly spaced and delicately attached.
Band covering
- Wrap the pale mint green yarn evenly around the headband base, keeping tension consistent.
- Secure the start and end by weaving tails beneath the wraps.
- Ensure the band remains smooth and slender.
Daisy construction (make 10–14 daisies)
Flower base
- With the chosen pastel color and a 2.25 millimeter hook, chain four and join with a slip stitch to form a ring.
- Work five single crochet stitches into the ring.
Petal formation
- Into each single crochet stitch, work the following sequence: chain three, slip stitch into the same stitch.
- Repeat around to create five delicate petals.
- Fasten off, leaving a tail for sewing.
Pearl center
- Thread a fine sewing needle with matching thread.
- Pass the needle through the center of the flower, add one pearl bead, and stitch back through the flower to secure.
- Knot securely on the back and trim excess thread.
Assembly
- Position daisies evenly along the top half of the headband.
- Sew each daisy through its center and into the wrapped band with small, hidden stitches.
- Ensure the daisies sit flat against the band without tilting.
Finishing and care
- Check pearl security carefully.
- Spot clean only.
- Store wrapped in tissue to prevent pearls from scratching other items.
Variations
- Use all white daisies for a bridal version.
- Alternate pearl sizes for subtle visual interest.
The Dainty Cherry & Blossom Garland
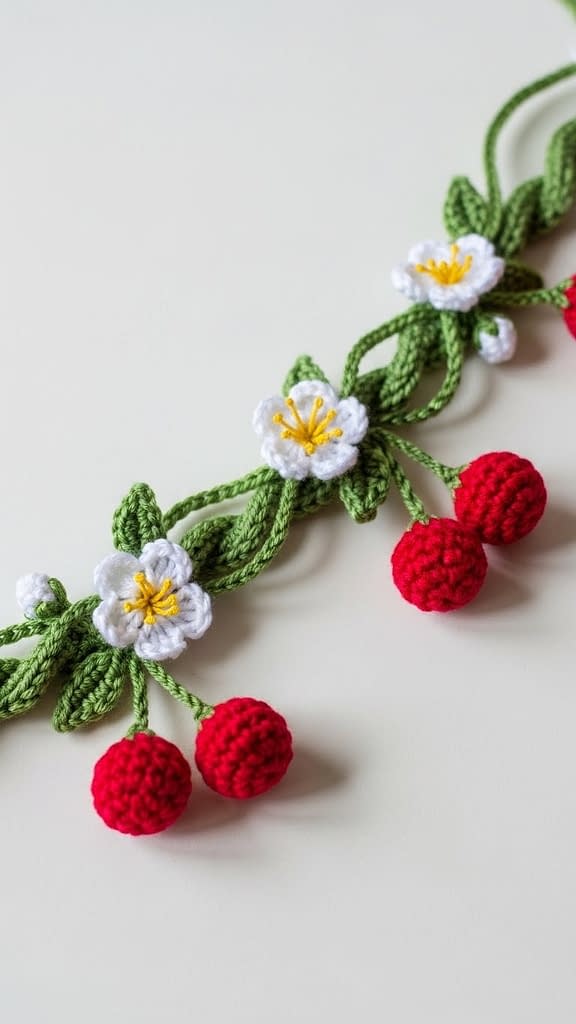
Skill level
Beginner to intermediate. This pattern involves very small motifs and hanging elements, requiring careful attachment.
Finished size
The headband fits an average adult head with an inner circumference of approximately 22 inches. Cherry pompoms measure approximately one quarter inch in diameter.
Materials
- Slim hair hoop base
- Fingering weight yarn in forest green for the vine, approximately 30 yards
- Fingering weight yarn in white and yellow for blossoms
- Fingering weight yarn in bright red for cherries
- Crochet hook size 2.25 millimeter
- Small amount of fiberfill
- Tapestry needle
- Scissors
Notes and design overview
This pattern mimics a delicate garden vine. Tiny white blossoms with yellow centers are paired with dangling cherry pompoms that add movement and charm. The key is balance: cherries should be small and lightweight so they do not pull on the band.
Vine wrapping
- Wrap the forest green yarn around the headband base, twisting slightly every few wraps to give a natural vine appearance.
- Secure the yarn ends neatly on the underside.
Cherry blossom construction (make 10–14)
Blossom base
- With white yarn, chain four and join with a slip stitch.
- Work five single crochet stitches into the ring.
Petals
- Into each stitch, work chain three and slip stitch to form five petals.
- Fasten off and lightly shape.
Center
- With yellow yarn, embroider a small french knot at the center of each blossom.
Cherry pompom construction (make 8–12)
Cherry body
- With red yarn, chain four and join with a slip stitch.
- Work six single crochet stitches into the ring.
- Increase evenly to ten stitches and work one round even.
- Stuff lightly and decrease to close.
- Fasten off, leaving a long tail.
Hanging thread
- Use the yarn tail to create a short hanging strand approximately half an inch long.
- Secure the strand to the vine during assembly.
Assembly
- Sew blossoms along the vine at regular intervals.
- Attach cherry pompoms beneath blossoms using the hanging strands so they appear to dangle naturally.
- Secure all attachments firmly to prevent movement during wear.
Finishing and care
- Trim all threads carefully.
- Spot clean only.
- Store flat or hang gently to preserve the dangling cherries.
Variations
- Replace cherries with tiny berries in other colors for seasonal versions.
- Add extra blossoms for a fuller garland look.
Conclusion
This completes the full tutorial series for 9 Aesthetic Crochet Hair Hoop Patterns: Unique 3D DIY Headband Tutorials. Across all nine designs, you have explored a wide range of crochet techniques, from delicate lace and fine threadwork to plush three-dimensional motifs and sculptural embellishments. Each pattern was designed to be visually distinct while sharing core construction principles that allow you to build confidence and consistency as a maker.
These headbands are ideal for personal wear, thoughtful handmade gifts, bridal and event accessories, or small-batch handmade businesses. By adjusting color palettes, yarn types, and motif placement, you can easily adapt each design to suit different seasons, audiences, and styles.


