Paper flowers offer a timeless beauty that fresh flowers simply cannot match. Among the most beloved of all paper crafts is the tulip, a symbol of perfect love and elegance. Whether you are a seasoned origami artist or a beginner looking for a rewarding weekend project, creating an 8 tulip paper bouquet is a delightful way to bring color into your home or create a heartfelt, handmade gift.
This comprehensive guide will walk you through eight distinct styles of paper tulips, inspired by various crafting techniques ranging from traditional origami to realistic cardstock modeling. We will explore every fold, cut, and glue application in minute detail to ensure your results are nothing short of spectacular. Below, we begin with the first four exquisite patterns.
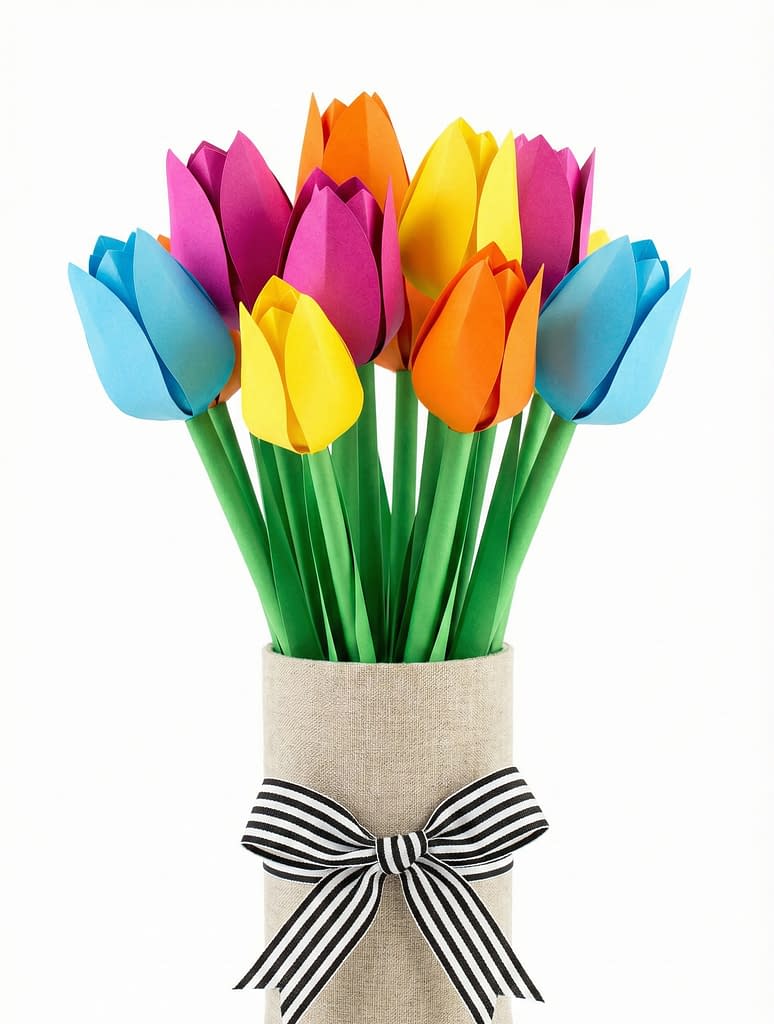
1. The Classic Vibrant Jar Display

The first pattern in our collection of 8 tulip paper bouquet ideas focuses on the traditional inflatable origami tulip. This style is instantly recognizable by its geometric, balloon-like shape and is often displayed in a clear jar to showcase the vibrant variety of colors. This project is perfect for using standard origami paper and serves as a fantastic introduction to the art of paper folding.
Materials Needed
To achieve the look shown in the first visual, you will need square origami paper in a variety of bright primary colors—red, yellow, orange, dark blue, and pink. You will also need green paper for the stems and leaves, a pair of scissors, and a clear glass masonry jar for the final display. If your paper is colored on one side and white on the other, begin with the white side facing up to ensure the final tulip is fully colored.
Folding the Water Bomb Base
Begin by placing your square paper on a flat surface. Fold the paper in half diagonally to form a large triangle. Open it up and fold it diagonally the other way. Open it again. You should now have an X crease pattern. Flip the paper over. Fold the paper in half horizontally (rectangle fold), open it, and then fold it in half vertically. Open it again.
Push the center of the square upwards slightly so it pops up. Bring the left and right sides of the horizontal crease down to meet the center of the bottom edge. As you do this, the top edge will naturally come down to flatten on top. You will be left with a triangle shape that has two layers on each side. This is known as the Water Bomb Base.
Constructing the Bulb
Rotate the triangle so the long edge is at the bottom. Take the bottom right corner of the top layer and fold it up to meet the top point of the triangle. Do the same with the bottom left corner of the top layer. Flip the paper over and repeat this step on the back side. You should now have a smaller diamond shape.
Look closely at the side corners of your diamond. Take the right corner of the top layer and fold it slightly past the vertical center line. Take the left corner of the top layer and fold it over so it overlaps the right fold you just made. Tuck the flap of the left fold into the pocket of the right fold. Press this down firmly to lock it in place. Flip the paper over and repeat this fold and tuck process on the back side. Ensure the distance you fold past the center is equal on both sides to keep the flower symmetrical.
Inflating and Shaping
Locate the small hole at the bottom of the diamond. Hold the folded sides gently and blow a sharp breath of air into the hole. The paper will inflate like a small balloon. Once inflated, use your fingers to sharpen the creases of the four walls of the tulip. Finally, peel back the four tips at the top of the flower to create the blooming petals. Curl them outwardly slightly for a more organic look.
Creating the Simple Rolled Stem
For this specific pattern, the stems are simple, sturdy green tubes. Take a sheet of green paper and cut it into a long rectangle. Apply a thin line of glue along one long edge. Start rolling the paper tightly from the opposite corner or edge, rolling diagonally to create a long, thin tube. Roll it all the way to the glued edge and seal it.
Assembly
Insert the top of the green stem into the hole at the base of your inflated tulip head. If the fit is loose, apply a small dot of glue to the tip of the stem before inserting it. Arrange your colorful collection into a clear masonry jar. The beauty of this 8 tulip paper bouquet pattern lies in the chaos of color, so mix the red, blue, and yellow flowers thoroughly for a playful, vibrant centerpiece.
2. The Elegant White Cardstock Tulip
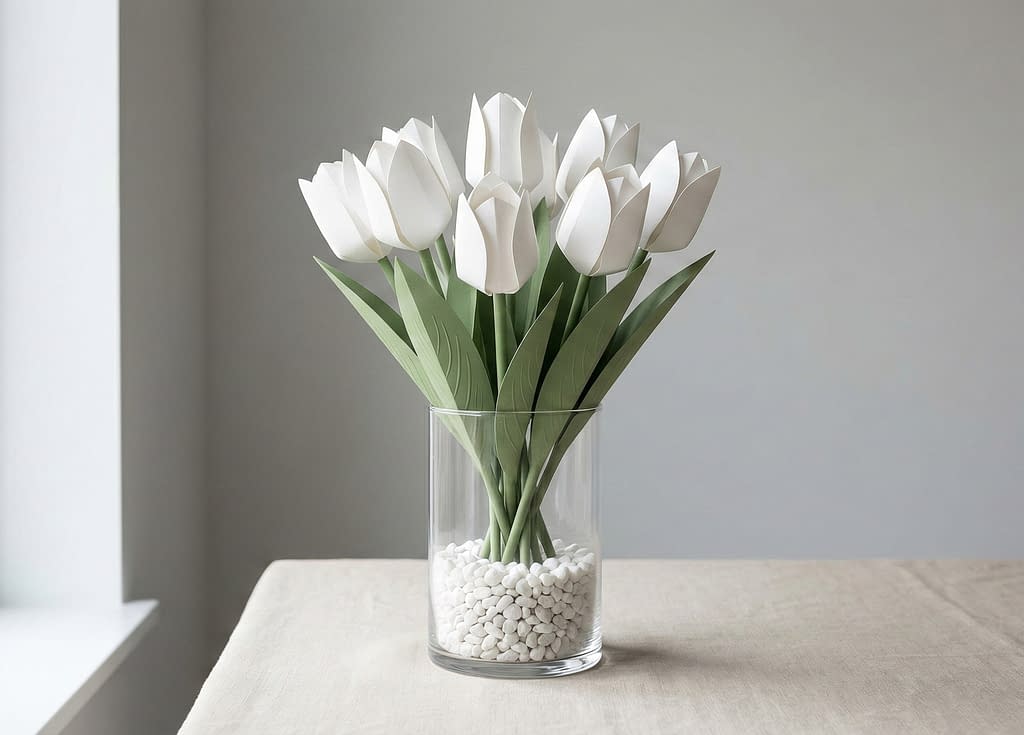
Moving away from geometric folds, our second pattern mimics the smooth, organic curves of a real white tulip. This style uses a cut and glue technique rather than pure origami, resulting in a sophisticated, seamless bloom that looks stunning in a minimalist glass vase with white stones.
Materials Needed
You will need high-quality white cardstock or heavy construction paper. Regular printer paper is too flimsy for this design. You will also need thick floral wire for the stems, green floral tape, a hot glue gun, and scissors.
Cutting the Petals
Unlike the previous pattern, this tulip is constructed from individual petal shapes. You need to cut out six identical petal shapes for each flower. The shape should resemble a rounded spoon or a wide teardrop with the bottom clipped flat. To ensure uniformity, draw a template on a piece of scrap cardboard first, then trace this onto your white cardstock. You will need six petals per flower.
Shaping the Curves
Flat paper will not look realistic, so you must shape the petals. Take a pair of scissors and gently run the blade along the surface of the paper petal (similar to how you would curl a gift ribbon) to give it a generous inward curve. Be careful not to crease the paper; you want a smooth, cup-like curvature. For the base of the petal, pinch the flat bottom edge slightly to create a deeper cup shape.
Assembling the Bud Layer
Take your floral wire and wrap it completely in green floral tape to create a textured stem. If you want a thicker stem like the image, you can wrap a layer of tissue paper around the wire before applying the floral tape.
Begin assembly by taking your first curled petal and gluing the bottom edge to the tip of the wire stem. The petal should curve inward, concealing the tip of the wire. Take the second petal and glue it next to the first, overlapping slightly. Take the third petal and complete the inner circle. These three petals should form a tight, closed bud shape.
Adding the Outer Layer
Now, attach the remaining three petals. These should be glued in the gaps between the inner petals (staggered placement). Glue them slightly lower on the stem than the first layer. These outer petals should cup the inner bud. Once the glue is dry, you can gently bend the tips of the outer petals outward to simulate a flower that is just beginning to open.
Final Presentation
Place these white tulips in a cylindrical glass vase. To replicate the serene look of the image, fill the bottom of the vase with small white pebbles or faux stones. This anchors the stems and adds to the clean, monochromatic aesthetic that makes this specific 8 tulip paper bouquet idea so elegant.
3. The Bold Contrast Wrapped Bouquet

The third design in our 8 tulip paper bouquet series revisits the origami inflatable tulip but elevates it through dramatic presentation. The focus here is on creating a high-contrast gift bouquet using black wrapping paper and a striking red bow, which makes the bright colors of the tulips pop.
Materials Needed
You will need stiff origami paper in vivid neon colors—specifically hot pink, bright blue, orange, and yellow. You also need stiff black craft paper for the bouquet cone, a wide red satin ribbon, green paper for stems, and strong craft glue.
Folding Crisp Geometric Tulips
Because this bouquet is wrapped tight, the tulips need to be very structural. Follow the Water Bomb Base instructions from Pattern 1 exactly. However, for this variation, when you tuck the flaps into the pockets, crease them down with significant pressure or a bone folder. We want the tulips to look like faceted gems.
When you inflate the tulips, do not over-inflate them to the point of being round. Keep them slightly boxy to maintain that modern, geometric appeal. Peel the petals back only slightly; keeping the flower somewhat closed helps it maintain its shape when pressed against other flowers in the wrapping.
Constructing the Black Paper Cone
The wrapping is just as important as the flowers in this design. Take a large square of black craft paper or thin poster board. Roll it into a tight cone shape. To do this, hold one corner and curl the adjacent corner around to meet it, adjusting the tightness of the point until the top opening is wide enough to hold your flowers. Secure the seam with double-sided tape or hot glue so no adhesive is visible on the outside.
The top of the cone should be uneven, with the back point rising higher than the front, cradling the flowers. If your cone is level, trim the front edge down with scissors to create a sloping opening that reveals the blooms.
The Finishing Red Bow
Insert your stemmed origami tulips into the cone. Pack them tightly so they support each other. You may need to trim the stems to different lengths—keep the back stems longer and the front stems shorter to create a domed arrangement.
Cut a long length of red satin ribbon. Tie a large, floppy bow around the middle of the black cone. The red against the black creates a stunning visual anchor. Use a small dot of hot glue behind the knot of the bow to prevent it from sliding down the smooth black paper. This pattern is ideal for romantic gifts or graduation presents where a dramatic visual impact is desired.
4. The Pastel Spring Collection with Origami Leaves
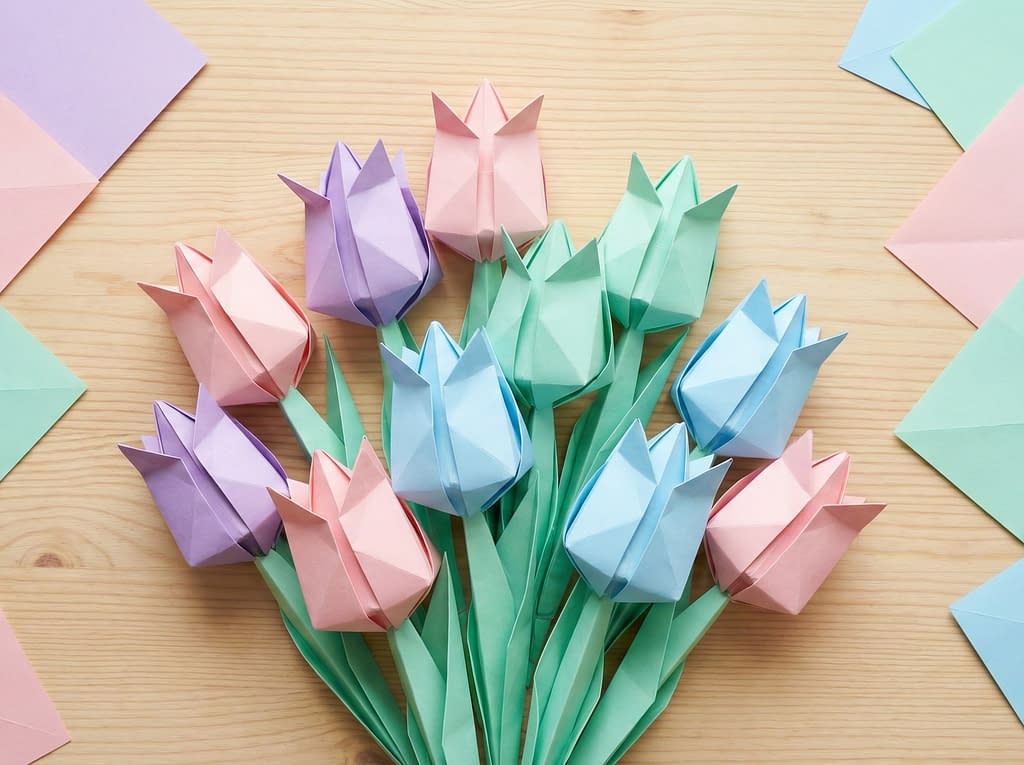
Our fourth entry in the 8 tulip paper bouquet list features a soft, pastel palette and introduces a specific origami leaf technique. Unlike the rolled tubes of the first pattern, these tulips feature long, slender, folded leaves that add sophistication to the arrangement.
Materials Needed
Select square origami paper in soft pastel shades: lavender, baby pink, mint green, and pale blue. You will also need square green paper for the leaves (same size as the flower paper) and wooden skewers or thin dowels to use as the core for the stems.
Folding Soft Pastel Blooms
Fold the tulip heads using the standard inflatable method described in Pattern 1. However, because pastel paper often shows creases more visibly than dark paper, be very precise with your initial folds. Wash your hands before starting to avoid transferring any oils or dirt to the light-colored paper.
When peeling back the petals of these pastel tulips, use a round pencil to curl the tips firmly. The goal is a very open, welcoming flower shape that looks soft despite the geometric folds.
Folding the Long Slender Leaf
This pattern distinguishes itself with its foliage. Start with a square of green paper. Fold it in half diagonally to make a triangle, then unfold it. Lay the paper like a diamond. Fold the bottom left edge to align with the center crease. Fold the bottom right edge to align with the center crease. You now have a kite shape (this is the Kite Base).
Now, fold the new bottom left edge to the center crease again. Repeat on the right side. The shape is becoming much narrower. Do this one more time: fold the bottom edges to the center crease again. The paper should now be very long and thin, resembling a spear.
Turn the paper over. Fold the bottom point up to meet the top point. Fold the entire shape in half vertically (like closing a book) so the raw edges are on the inside. You should now have a long, slightly curved leaf shape. Gently pull the inner layer out slightly to give the leaf volume and a natural curve away from the stem.
Creating the Arrangement
Prepare your stems by wrapping wooden skewers in green floral tape or green paper strips. Attach the tulip heads to the top. Adhere the folded leaf to the lower third of the stem using a dab of glue on the inside of the leaf fold.
For this specific flat lay aesthetic or wooden table display, arrange the tulips so the pastel colors are evenly distributed. The combination of the sharp, slender leaves and the soft, rounded pastel blooms creates a balanced and serene composition, perfect for Easter decorations or spring table settings.
5. The Rustic Burlap Wrapped Arrangement
The fifth entry in our 8 tulip paper bouquet guide focuses on texture and home decor integration. While the flowers themselves use the accessible water bomb origami base we explored earlier, the presentation is elevated using a rustic fabric wrap. This design sits beautifully on a farmhouse dining table or a wooden bookshelf, bringing a cozy, handmade charm to the room.
Materials Needed
For the flowers, gather origami paper in a cheerful mix of colors: cyan, magenta, bright yellow, and tangerine. For the display, you will need a clean, empty tin can or a straight-sided glass jar. You also need a piece of beige burlap, canvas, or linen fabric, a hot glue gun, green paper for stems, and some twine or jute string.
Constructing the Sturdy Base
Before folding the flowers, prepare the vase. Cut a strip of your beige burlap or canvas fabric. The strip should be wide enough to cover the height of your tin can or jar and long enough to wrap around it with a slight overlap.
Apply a line of hot glue vertically down the side of the can. Press one end of the fabric strip into the glue. Wrap the fabric tightly around the can, pulling it taut to ensure there are no wrinkles. Apply another line of glue at the end and press the fabric down to seal the seam. For a cleaner look, fold the raw edge of the fabric under before gluing it down.
Folding the Flowers
Follow the standard inflatable tulip instructions detailed in Pattern 1. However, for this specific 8 tulip paper bouquet style, focus on making the creases extra sharp. Use the edge of a ruler or a bone folder to flatten every fold. This sharpness contrasts beautifully with the soft, textured fabric of the vase. Make about 10 to 12 flowers to ensure a full, lush look that hides the opening of the can.
Creating Thick Stems
The visual appeal of this arrangement relies on the density of the green stems. Instead of simple rolled tubes, try a reinforced stem. Take a bamboo skewer and apply glue to it. Roll your green paper around the skewer. This makes the stem rigid and allows you to push it firmly into the floral foam or Styrofoam you will place inside the can.
Final Assembly
Cut a piece of floral foam to fit snugly inside your fabric-wrapped can. Insert the stems of your tulips into the foam. Start from the center with the tallest flowers and work your way out to the edges with slightly shorter stems. This creates a dome shape. The bright, smooth paper against the rough, neutral beige fabric creates a delightful visual balance.
6. The Miniature Crepe Paper Bud Bouquet
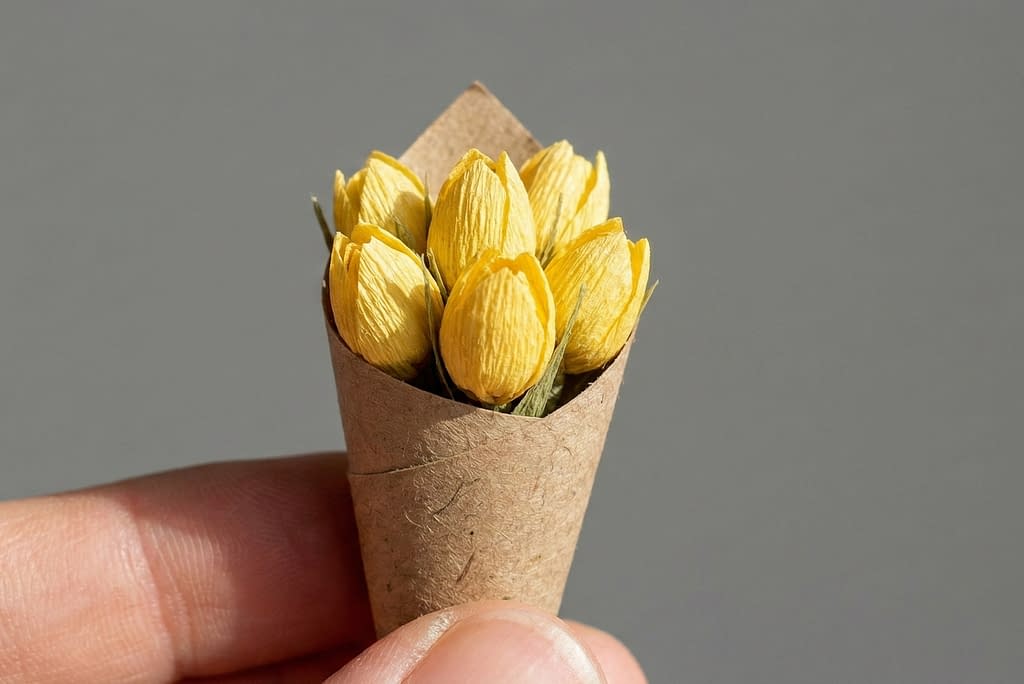
Moving away from origami, the sixth idea in our 8 tulip paper bouquet collection introduces crepe paper. Crepe paper is fantastic for flower making because it stretches, allowing you to mold organic curves. This specific pattern features small, yellow tulip buds wrapped in a brown kraft paper cone, perfect for a miniature gift or a boutonniere-style accessory.
Materials Needed
You will need yellow crepe paper (fine or heavy weight works), green floral tape, thin floral wire, and brown kraft paper for the wrapping. You will also need tacky glue and scissors.
Cutting the Strip
Cut a strip of yellow crepe paper approximately 4 inches long and 2 inches wide. Make sure the grain of the crepe paper (the vertical lines) runs vertically, parallel to the short side. This is crucial because you need to stretch the paper horizontally.
The Twist Method
Locate the center of your rectangular strip. Twist the strip in the middle completely, twisting it 180 degrees, as if you were wringing out a towel. Fold the strip in half at the twist point, bringing the two ends together. You now have a double-layered shape that is rounded at the top (the twist) and open at the bottom.
Forming the Bud
Hold the two loose ends at the bottom. Put your thumbs inside the folded crepe paper near the top (the twist) and gently pull the paper outwards. The crepe paper will stretch and cup, creating a bulbous, hollow shape that mimics a tulip petal. Because you folded it over, the twist at the top naturally creates the look of closed petals converging.
Repeat this process to make three of these twisted petal shapes.
Assembly on Wire
Take a piece of floral wire. Place the three twisted petals around the tip of the wire, overlapping them so they hug each other tightly to form a closed bud. Wrap the base of the petals (where the paper ends meet the wire) tightly with floral tape. Continue wrapping the tape down the wire to create the green stem.
The Kraft Paper Wrap
To mimic the visual, take a small square of brown kraft paper. Roll it into a very tight, narrow cone. Insert three or four of your yellow crepe buds into the cone. Secure the cone with a dab of glue or a small piece of tape. This miniature 8 tulip paper bouquet variation is all about texture and the charm of small things.
7. The Minimalist Pink Cone Presentation
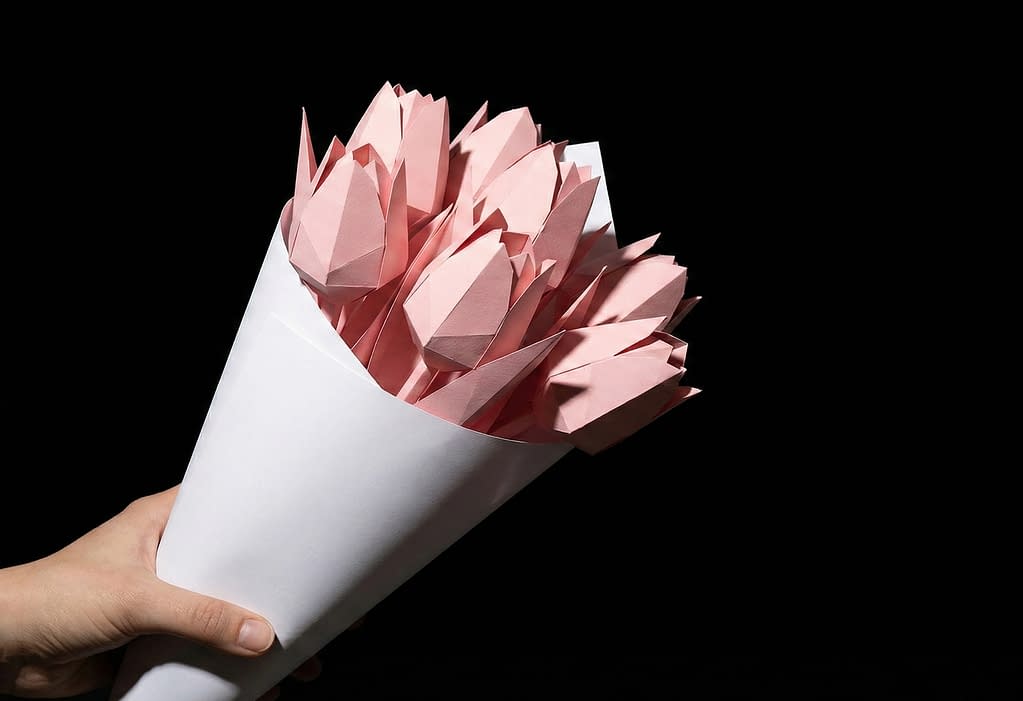
Our seventh design returns to the clean lines of geometric paper craft but focuses on a high-fashion, minimalist presentation. The visual features monochromatic pink blooms set against a stark black background, wrapped in pure white paper. This style creates a striking modern art aesthetic.
Materials Needed
You need high-quality origami paper in a soft, dusty pink or rose quartz color. Avoid neon pinks; a muted tone looks more sophisticated. You also need pristine white bond paper or semi-gloss white wrapping paper, scissors, and clear tape.
Precision Folding
Since this design relies on minimalism, any mistake in the folding will be obvious. Follow the Water Bomb Base instructions from Pattern 1, but be incredibly precise with your corners. When you inflate the tulip, try to keep the four sides perfectly symmetrical.
Do not curl the petals back too much. For this look, a semi-closed, “cup” shape is preferred over a fully bloomed, wide-open flower. This keeps the silhouette streamlined and modern.
The Clean White Wrap
Cut a large square of your white paper. Unlike the messy, organic wrap of the rustic bouquet, this cone needs to be sharp. Roll the paper into a cone shape, but keep the top opening relatively narrow. The goal is for the cone to look like a sleek vase, not a loose wrapper.
Arrangement Strategy
Group your pink tulips together before placing them in the cone. Hold the stems in your hand and adjust the heights so they form a perfect sphere or dome. Use a rubber band to bind the stems together in this arrangement before dropping them into the white cone. This ensures they don’t shift around and ruin the clean symmetry.
This specific 8 tulip paper bouquet concept is excellent for modern office decor or as a sophisticated gesture for a colleague, where a traditional floral pattern might feel too busy.
8. The Realistic Giant Crepe Bloom
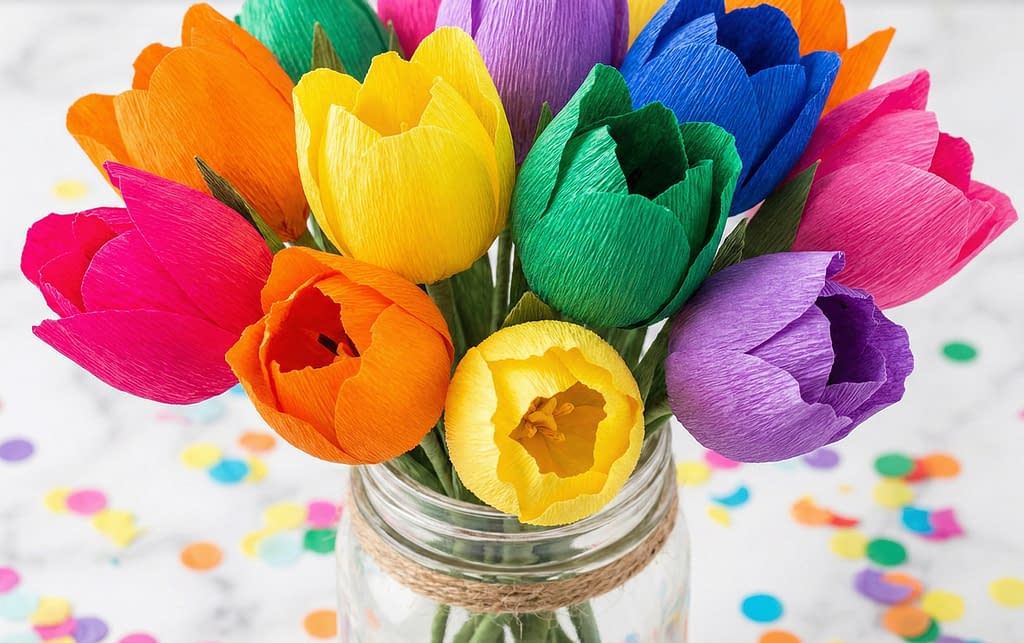
The final masterpiece in our 8 tulip paper bouquet guide is the large-scale, realistic crepe paper tulip. Shown in the final visual in a glass jar with twine, these flowers are larger, more colorful, and use advanced shaping techniques to rival the real thing.
Materials Needed
You need heavy Italian crepe paper (180g is ideal) in vibrant colors: deep purple, golden yellow, bright orange, and grassy green. You also need thick gauge floral wire (16 or 18 gauge), a hot glue gun, and tissue paper for the flower center.
Creating the Center (Pistil and Stamen)
Real tulips have a prominent center. Take a small ball of tissue paper and glue it to the top of your floral wire. Cover this ball with a small square of black or dark yellow crepe paper to create the pistil. You can also cut tiny fringes of black paper and glue them around this center to represent the stamens.
Cutting and Shaping Petals
Cut six individual petals for each flower from your colored crepe paper. The shape should be a large oval with a tapered bottom.
The magic happens in the shaping. Hold a petal with two hands, thumbs in the center. Pull firmly outwards with your thumbs to stretch the crepe paper significantly in the middle. This creates a deep “spoon” shape. Then, gently ruffle the very top edge of the petal to give it a frilled, natural look.
Layering the Bloom
Glue the first three petals to the stem, arranging them evenly around the center pistil. They should curve inward, hugging the center.
Now, glue the remaining three petals in the spaces between the first layer. Place these slightly lower on the stem. Once the glue is set, gently bend these outer petals open. The heavy crepe paper will hold its shape, allowing you to create a very wide, open bloom that looks like a tulip at the peak of its life.
The Leaf Attachment
Cut long, lance-shaped leaves from green crepe paper. Apply a thin line of glue down the center of the leaf and press a piece of thin wire into it. This wiring allows you to bend the leaf realistically. Attach two leaves to the bottom of the stem, curving them so they droop slightly under their own weight.
Final Display
Place these large, heavy blooms in a sturdy glass jar. Wrap a piece of rustic twine around the neck of the jar several times and tie it in a simple knot. This creates a farmhouse-chic look that highlights the sophisticated craftsmanship of the flowers.
Conclusion
You have now explored an incredible variety of designs for your 8 tulip paper bouquet project. From the simple joy of the inflatable origami model to the intricate sculpting of Italian crepe paper, there is a technique here for every skill level and every decorative style. We hope you enjoy the process of folding, cutting, and shaping your way to a beautiful, everlasting garden.