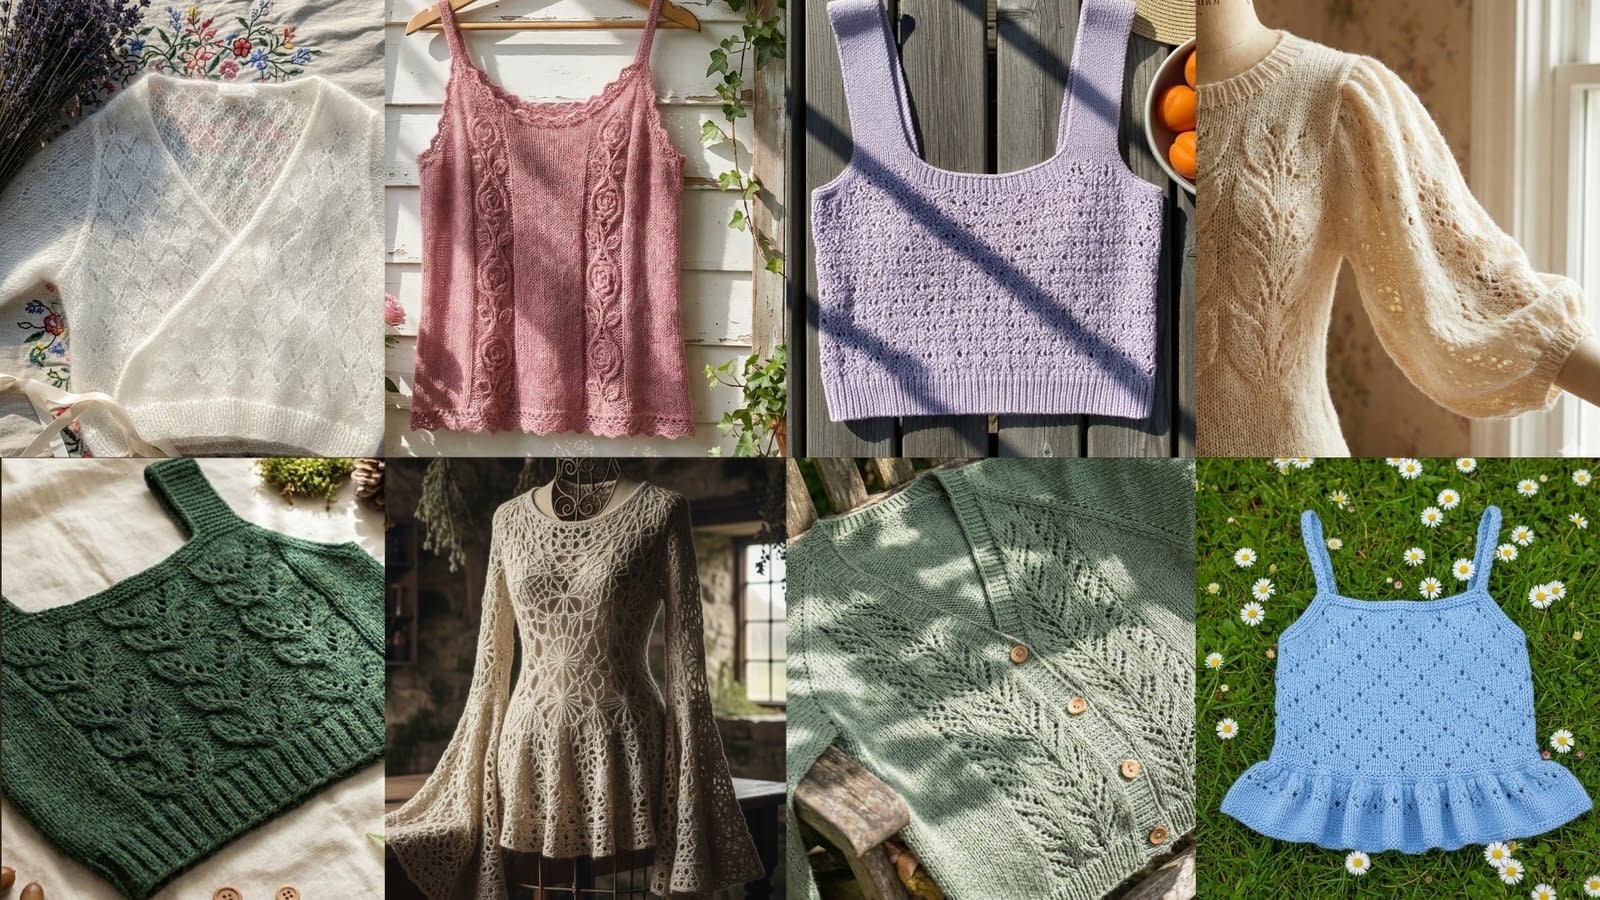
Cottagecore is more than a trend; it is a way of crafting garments that feel lived-in, gentle, and rooted in nature. Lace knit tops are the perfect vehicle for that aesthetic: delicate openwork, natural fibers, soft silhouettes, and tactile textures that invite touch. In this post you will find eight lace knit top patterns designed for the cottagecore wardrobe. Because these patterns demand careful, long-form instruction, this first installment contains four complete patterns written in full detail. Each pattern includes materials, gauge, clear step-by-step knitting instructions written without shorthand, construction notes, finishing techniques, and styling suggestions so you can knit with confidence and achieve professional results.
Before you begin any lace project, take time to choose an appropriate yarn and to swatch carefully. Lace depends on even tension, precise increases and decreases, and thoughtful blocking. Natural fibers such as cotton, linen, silk blends, bamboo-cotton, and lightweight wool blends respond beautifully to lace patterns and give that soft, lived-in cottagecore feel.
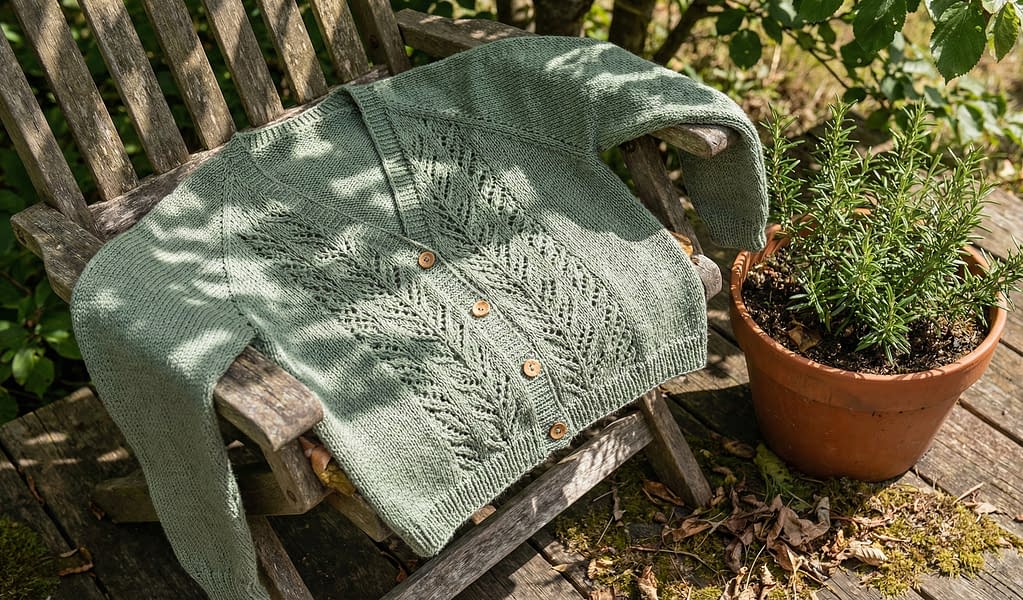
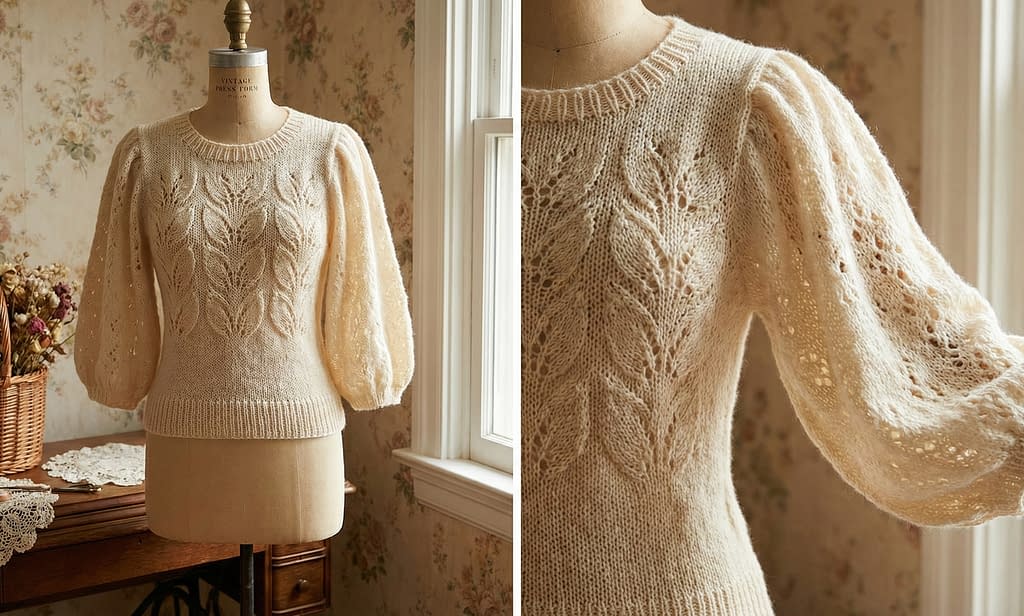
Fern and Forest Sage Cardigan
Skill level
Beginner to intermediate. The cardigan uses simple lace repeats, basic increases and decreases, and straightforward seaming. Familiarity with knit and purl stitches, yarn over, decrease techniques, and reading a stitch repeat is useful.
Finished sizes
This pattern is written to yield a relaxed cardigan intended to be worn slightly oversized. Finished bust measurements are approximately:
• Small: 36 inches (91.5 centimeters)
• Medium: 40 inches (101.5 centimeters)
• Large: 44 inches (111.5 centimeters)
• Extra Large: 48 inches (122 centimeters)
Length from shoulder to hem is approximately 24 inches (61 centimeters); adjust by adding or subtracting body rows.
Materials
• Worsted weight yarn (weight category 4): 900 to 1200 yards (820 to 1100 meters) depending on size and sleeve length. Use a cotton-linen blend in sage green for the cottagecore look.
• Circular knitting needles 5.0 millimeters and 4.0 millimeters, or sizes required to obtain gauge. Use a 32-inch (80 centimeter) cable or longer for the body in the round if preferred.
• A set of double-pointed needles in the same size for sleeve cap shaping, or use the magic loop technique on circular needles.
• Rustic wooden buttons, 6 to 8 pieces depending on style.
• Tapestry needle for seaming and weaving in ends.
• Stitch markers.
• Measuring tape.
• Blocking pins and a flat surface for blocking.
Gauge
16 stitches and 22 rows in stocking stitch (knit one row, purl one row) equals 4 inches (10 centimeters) measured after blocking. Gauge for the fern lace pattern will be close to this; always block your lace swatch before taking final gauge.
Notes on construction
This cardigan is worked in separate pieces: back, two fronts, and set-in sleeves. The fern lace stitch is a vertical motif of elongated leaves created by a combination of yarn overs and decreases. The lace pattern is both decorative and forgiving, but consistent stitch count is essential to maintain the motif. The cardigan uses a modest amount of shaping at the shoulders and waist to maintain a soft, slightly tailored silhouette. Button bands are worked separately and applied at the end for a neat finish.
Stitch glossary and technique descriptions
Because this pattern avoids stitch abbreviations, here are the stitch techniques described in full:
• Knit one: Insert the right-hand needle into the next stitch on the left-hand needle from left to right, wrap the working yarn around the right-hand needle and draw the loop through, slipping the original stitch off the left-hand needle.
• Purl one: Insert the right-hand needle into the next stitch on the left-hand needle from right to left, bring the working yarn forward between the needles, wrap the yarn around the right-hand needle and draw the loop through, slipping the original stitch off the left-hand needle.
• Yarn over: Bring the yarn forward between the needles and then over the right-hand needle to the back to create a new loop that creates an eyelet in the fabric.
• Knit two together: Insert the right-hand needle into the next two stitches on the left-hand needle as if to knit, knit them together as one stitch to decrease one stitch.
• Slip slip knit decrease: Slip the next stitch knitwise to the right-hand needle, slip the following stitch knitwise to the right-hand needle, insert the left-hand needle into the fronts of the two slipped stitches from left to right and knit them together through the back loops to create a left-leaning decrease.
• Center double decrease: Slip two stitches together knitwise to the right-hand needle, knit the next stitch, pass the two slipped stitches over the knit stitch to create a centered decrease that leans evenly.
Fern lace stitch pattern
Work the fern lace pattern over a multiple of eight stitches plus two edge stitches for the side selvedge if you prefer. Below is one full repeat described row by row for right-side and wrong-side rows. Maintain edge stitches as knit one at the beginning of right-side rows and purl one at the beginning of wrong-side rows to create a neat side edge useful for seaming.
Right-side row (row one): Knit one for edge stitch, then repeat across each pattern repeat: knit two, yarn over, knit two together, yarn over, knit two. End with knit one as edge stitch.
Wrong-side row (row two): Purl all stitches across, maintaining yarn overs as purlable eyelets.
Row three: Knit one as edge stitch, then repeat: yarn over, knit two together, knit two, knit two together through the back loops, yarn over, knit two. End with knit one.
Row four: Purl across.
Continue the pattern alternating the right-side and wrong-side treatments; the pattern forms vertical fern leaves when blocked.
Back piece instructions
1. Cast on the appropriate number of stitches for the chosen size on five millimeter needles. For example, for a medium cast on 160 stitches. If you prefer a slightly looser fabric, add four to eight stitches distributed evenly.
2. Work in ribbing for the hem: knit one, purl one ribbing for four rows (or until the hem measures approximately one inch or desired length). This small amount of ribbing gives a stable edge that will not roll.
3. Change to four millimeter needles if your gauge requires and begin the fern lace stitch pattern across the entire width. Place stitch markers at the center stitch to aid later shaping.
4. Continue working the fern lace pattern until the back measures approximately sixteen inches from the cast-on edge to the shoulder binding point, or until you reach the desired length. Measure frequently.
5. For armhole shaping, bind off four stitches at the beginning of the next two right-side rows. Then decrease one stitch at each end every other row three times by knitting two together at the start of the row and performing slip slip knit at the end of the row to shape a gentle armhole curve. Maintain lace pattern as much as possible; where lace pattern is interrupted by decreases, follow the lace chart visually to preserve motif continuity.
6. Continue until the armhole measures approximately eight inches from the bind off, or until the length matches your preferred armhole depth.
7. For shoulder shaping, bind off ten stitches at the beginning of the next two right-side rows, then bind off the remaining stitches for the neck opening. Adjust counts for your size.
Front pieces (make two, left and right)
Each front is worked similarly to the back but with shaping for the neckline and button band.
1. Cast on half the number of stitches used for the back plus any extra stitches if you prefer an overlap. For example, for a medium, cast on 82 stitches.
2. Work the same hem ribbing for four rows.
3. Begin fern lace pattern across the width. On the side that will be the center front edge, substitute one stitch for a vertical edge stitch and keep it in stockinette to make a clean surface for the button band later.
4. For bust shaping, you may increase one stitch at the underarm on the side seam at a rate of one stitch every eight rows three times to improve fit. Use a make one increase to maintain a smooth line.
5. When the front piece measures the same length as the back to the armhole, shape the armhole matching the back: bind off four stitches at the armhole edge, then decrease at the armhole edge three times every other row.
6. When you reach the point to shape the neckline, begin gradual neckline shaping on the center front edge by binding off two stitches at the center front edge every fourth row until the desired neckline depth is reached. Maintain lace pattern on the main body. The outer shoulder edge is worked to match the back and should mirror the back shoulder bind off count.
Sleeves
Set-in sleeves create a soft, slightly tailored appearance.
1. Cast on 48 stitches for a medium size using five millimeter needles. Adjust cast-on for larger or smaller sizes by adding or subtracting four stitches per size increment.
2. Work in knit one, purl one ribbing for the cuff for two inches.
3. Change to four millimeter needles and begin fern lace stitch across the sleeve. Increase one stitch at each end every six rows until the sleeve cap shaping will begin. The sleeve should measure approximately 14 inches from cuff to underarm when the decreases begin.
4. For the sleeve cap, bind off four stitches at the beginning of the next two rows, then decrease one stitch at each end every other row until the height of the sleeve cap matches the armhole depth measured on the back piece. Finish by binding off remaining stitches.
Assembly and finishing
1. Block each piece to the exact measurements before seaming. Spritz gently with water and pin to shape on a blocking surface, ensuring lace motifs open evenly. Allow to dry completely.
2. With right sides together, sew the shoulder seams using mattress stitch for an invisible seam.
3. Set the sleeves into the armholes using small stitches and aligning the center of the sleeve cap with the shoulder seam. Sew the side and sleeve seams in one continuous seam on each side.
4. Pick up stitches along the center front edges and the neckline using five millimeter needles. Knit a neat button band: knit one row, purl one row for six rows, then bind off loosely. Alternatively, pick up fewer stitches and knit an applied i-cord for a slim finish.
5. Sew on wooden buttons evenly spaced along the button band. If you prefer a closed band, work buttonholes in the band row by binding off and casting on two stitches or by working a yarn over and decrease sequence to make neat slits.
6. Weave in ends and give a final light block to settle the seams.
Variations and styling tips
• Use a lighter fingering weight linen-silk blend for a more draped cardigan; adjust needle size and gauge accordingly.
• Add a scalloped lace edge to the hem by working a single repeat of a picot or shell edging when picking up for the hem band.
• For a cropped version, reduce the back length by two to four inches and shorten the sleeve length for a summer cardigan.
• Pair the cardigan with a high-waisted skirt and a linen camisole for classic cottagecore styling.
Morning Mist Mohair Wrap Top
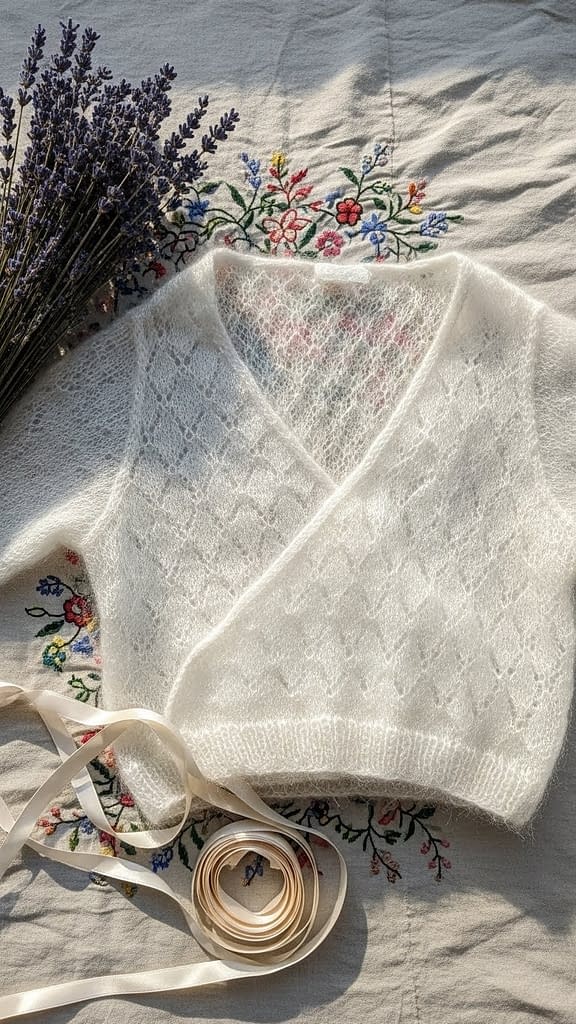
Skill level
Intermediate. Requires working with a mohair-silk halo yarn, which can be slippery and delicate, and lace mesh that benefits from careful tension control and blocking.
Finished sizes
Finished bust measurements:
• Small: 34 inches (86.5 centimeters)
• Medium: 38 inches (96.5 centimeters)
• Large: 42 inches (106.5 centimeters)
This wrap top is designed to fit with minimal negative ease; it wraps and ties, so the fit is adjustable.
Materials
• Silk-mohair laceweight yarn held double to create a fluffy halo. Estimate yarn requirements at 600 to 900 yards (550 to 820 meters) depending on size and wrap length.
• Circular needles 4.0 millimeters for working with double strands. Length 24 to 32 inches for flat working in rows.
• Satin ribbon for ties or use knitted i-cord straps.
• Tapestry needle, blocking tools.
Gauge
22 stitches and 28 rows of stockinette stitch using both strands together equals 4 inches (10 centimeters) after blocking. Lace openness will increase after blocking.
Notes on construction
This is a wrap-style ballet top with long satin ribbons for tying. The body is worked flat in panels that wrap across the bust and tie at the side. The fabric has an intensely fluffy halo because of the silk-mohair fiber. Knitting with mohair requires patience: avoid pulling tight, and do not frog aggressively because the fibers cling.
Diamond lace mesh stitch pattern
The diamond lace mesh is built from yarn overs and paired decreases to form an open, airy fabric.
Right-side row: Knit across, performing the lace pattern as: knit two, yarn over, knit two together, knit one, slip slip knit decrease, yarn over, knit two.
Wrong-side row: Purl across, maintaining yarn over loops as purlable stitches.
Make a small swatch of several repeats and block it to ensure the mesh opens as expected.
Construction overview
This top is made of three panels: left wrap, back, and right wrap. Each wrap panel overlaps at the front and is finished with long satin ties that are either integrated or sewn on afterward.
Left wrap panel
1. Cast on the number of stitches appropriate for the size on four millimeter needles. For example, for a medium cast on 120 stitches.
2. Work two inches of knit one, purl one ribbing for the lower edge. This provides a gentle point to anchor the wrap.
3. Begin the diamond lace mesh across the row. Place stitch markers to indicate pattern repeats.
4. Work straight in the lace mesh until the panel measures the desired wrap length from hem to underarm, approximately 12 inches for most sizes.
5. For shaping the bust, increase one stitch at the side seam every twelve rows once or twice to help the wrap curve across the chest. Use a make one increase loosely so the open texture remains consistent.
6. At the underarm, bind off or leave stitches live according to how you will construct the back panel. Many knitters prefer to leave live stitches for grafting later.
Back panel
1. Cast on the appropriate number of stitches to match the width between wrap panels. For medium, cast on 80 stitches.
2. Work the same ribbing for two inches.
3. Begin lace mesh and work until the back panel measures the same height as the wrap panels to the underarm.
4. Shape shoulder and neck by binding off central stitches and working each shoulder separately to match the front wrap shoulder height.
Right wrap panel
Work the mirror image of the left panel. For a crisp finish, place the right wrap panel such that the outer edge is finished with a neat selvedge row to receive the satin ribbon if you plan to sew the ribbon on afterward.
Straps and ties
1. For long satin ribbons, measure the desired length; typical tie length is 40 to 60 inches to allow wrapping and bow tying.
2. Alternatively, create knitted i-cord straps using three double-pointed needles or a small circular needle. Cast on four stitches and work knit across for the i-cord until you reach the required length. Attach i-cord to corner points using secure stitching.
Assembly and finishing
1. Block all panels gently. Mohair clouds will expand with blocking; use light steam or a gentle spritz and do not press the fibers.
2. Sew the shoulder seams using mattress stitch.
3. Join the side seams asymmetrically if the design calls for wrap overlap. Sew carefully to preserve lace continuity.
4. Attach satin ribbons with small stitches along the inner edges or weave the ribbon through a few openwork eyelets near the side seam to create an integrated tie.
5. Trim loose ends and give a light final steam to settle the mohair halo.
Tips for working with silk-mohair
• Use a smooth metal needle to help the delicate mohair slide easily.
• Keep a second strand of fingering weight yarn handy to hold together if you desire more body while maintaining halo.
• If you make a mistake, use small scissors to cut the yarn carefully and pick up stitches with a fine needle; avoid frogging long sections.
Styling
This wrap top pairs beautifully with high-waisted skirts or breezy linen trousers. The soft halo catches light and gives the appearance of an ethereal second skin, perfect for cottagecore photography and quiet summer afternoons.
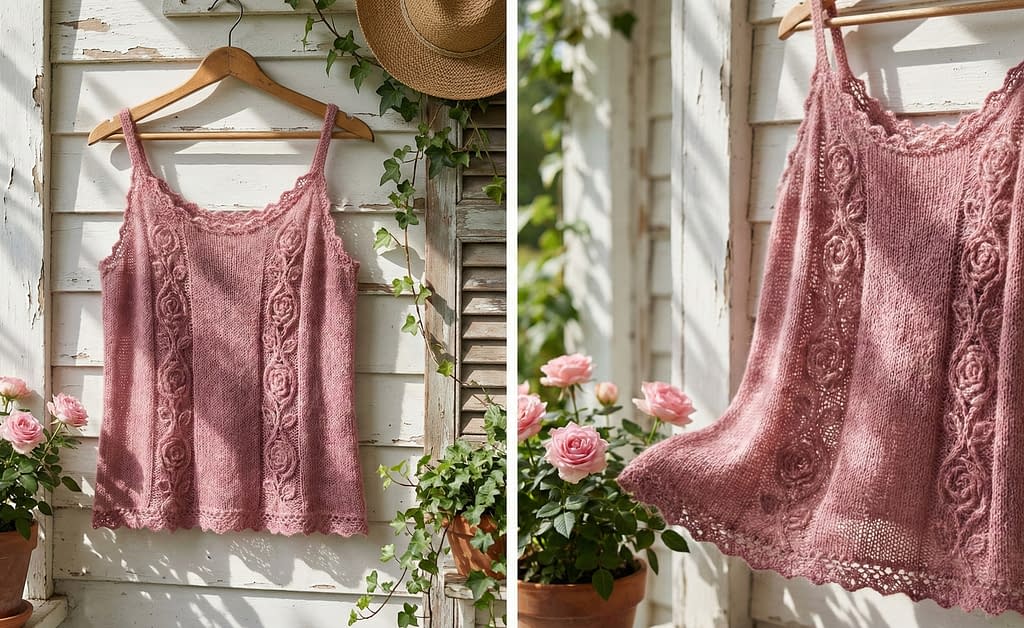
Wild Rose Lace Tank Top
Skill level
Beginner to intermediate. Pattern uses vertical lace panels and scalloped edges; shaping is minimal and the fit is relatively straightforward.
Finished sizes
Designed to be a fitted tank top. Finished bust circumference is approximately:
• Small: 32 inches (81 centimeters)
• Medium: 36 inches (91.5 centimeters)
• Large: 40 inches (101.5 centimeters)
Adjust by changing needle size or adding knit one, purl one waist shaping.
Materials
• Sport weight or light DK weight yarn in dusty rose. Approximately 600 to 800 yards depending on size and length. A soft cotton or cotton blend works well for summertime wear.
• Needles 4.0 millimeters for main body and 3.5 millimeters for ribbing if necessary.
• One vintage-style wooden hanger for display and blocking shape, if desired.
• Stitch markers, tapestry needle, blocking supplies.
Gauge
20 stitches and 28 rows in stockinette stitch equals 4 inches after blocking. The lace will open more after blocking; measure your lace swatch after blocking.
Notes on construction
This tank top features vertical flowing lace panels inspired by climbing roses. The scalloped lace edging along the neckline and hem is achieved by performing additional yarn over and decrease sequences at the edges. The top is worked flat in two panels, then seamed at the sides. Thin straps are worked separately and sewn on.
Vertical rose lace panel pattern
The lace motif consists of a series of elongated eyelets and paired decreases forming a floral vertical column.
Right-side row: Knit one edge stitch, then repeat the pattern across the panel: knit three, yarn over, knit two together, knit five, slip slip knit decrease, yarn over, knit three. End with knit one edge stitch.
Wrong-side row: Purl all stitches, taking yarn overs as purlable stitches.
Repeat this four-row sequence to maintain the vertical panels.
Front panel instructions
1. Cast on the number of stitches required for your size on four millimeter needles. For a medium size cast on 120 stitches.
2. Work one inch of knit one, purl one ribbing for a stable lower edge.
3. Work the vertical rose lace panel across the width, placing markers between repeats. For width shaping at the waist, perform a decrease of one stitch at each side every twenty rows to create a gentle taper. Use a knit two together at the start of the row and slip slip knit at the end.
4. When you reach the height desired for the armhole, bind off four stitches at the armhole edge and continue the lace pattern across the remaining stitches for the shoulder. For a classic tank neckline, at the center front begin shaping by binding off the central ten stitches and work each side separately to create the slight scoop neck. The lace motif will continue uninterrupted on each shoulder.
5. Work to shoulder height and bind off.
Back panel instructions
1. Cast on the same number of stitches as the front.
2. Repeat the lower ribbing and lace pattern until the armhole depth matches the
front panel.
3. For the back neckline, bind off fewer central stitches to achieve a higher back neck if desired. Work each shoulder separately and bind off stitches to match the front shoulder height.
Straps
1. Work thin knitted i-cord straps: cast on four stitches and work knit across in the round for an i-cord until the strap measures approximately 9 to 10 inches for a medium size.
2. Join the strap ends securely to the inside of the shoulder with small mattress stitch to avoid bulky seams.
Scalloped edging
1. For the neckline and hem, pick up stitches along the edge using 3.5 millimeter needles. Work one round of single crochet borders by knitting one stitch, purl one, then work a scallop row: in selected stitch groups perform five yarn overs and a series of decreases to create a scallop arc; this can be accomplished by working a mini shell of five double crochets in bridge techniques if you know crochet. If you prefer to remain purely knitted, work a small picot bind-off by casting on three stitches and binding them off to create decorative points.
2. Exercise caution to maintain even tension so the scallops sit flat.
Assembly and finishing
1. Block panels to exact measurements, allowing lace to bloom. Pin the scalloped points to ensure consistent shape.
2. Seam the side edges using mattress stitch, aligning lace panels so motifs continue seamlessly across the seam.
3. Sew straps in place.
4. Weave in all yarn tails and steam lightly without flattening the scallops.
Variations and finishing touches
• Add a narrow band of contrasting lace at the hem for a vintage touch.
• For a semi-sheer look, choose a lighter fingering weight yarn and use smaller needles to keep the lace delicate.
• Consider embroidering tiny rosebuds into the base of the vertical lace panels after blocking for an heirloom finish.
Woodland Vines Lace Crop Top

Skill level
Beginner to intermediate. Pattern contains vine lace motifs across the front panel and uses simple shaping and ribbed edges. The rustic yarn texture lends itself to forgiving tension.
Finished sizes
This crop top is designed to sit at or slightly above the natural waist. Finished bust measurements:
• Small: 30 inches (76 centimeters)
• Medium: 34 inches (86.5 centimeters)
• Large: 38 inches (96.5 centimeters)
Length from underarm to hem is approximately 10 inches; adjust according to preference.
Materials
• Aran or worsted weight yarn in deep forest green with a slightly rustic texture. Estimate 500 to 700 yards depending on size.
• Needles 5.0 millimeters for the body and 4.0 millimeters for ribbing.
• Small wooden buttons, pinecone props for styling if desired.
• Stitch markers, tapestry needle, blocking supplies.
Gauge
18 stitches and 24 rows in stockinette stitch equals 4 inches after blocking.
Notes on construction
The crop top is worked flat in two pieces. The vine lace motifs twist across the front and are designed to be placed symmetrically. Wide straps and ribbed edges grant the piece structure and comfort. Because the yarn is slightly rustic, small irregularities will lend charm rather than detract.
Woodland vine lace motif
The motif uses paired decreases and yarn overs to create thin twisting vine lines. Place each motif across the front panel separated by stockinette background stitches to enhance visibility.
Right-side row: Knit two for the border, then for each motif repeat: knit three, yarn over, knit two together, knit four, slip slip knit decrease, yarn over, knit two. End with knit two border stitches.
Wrong-side row: Purl across the row.
Repeat the four-row sequence to build vines of desired height.
Front panel instructions
1. Cast on the number of stitches required for the size on five millimeter needles. For a medium cast on 96 stitches.
2. Work three-quarters of an inch of knit one, purl one ribbing for a firm lower edge.
3. Begin the vine lace motif across the front, placing motifs evenly with background stockinette columns between them. Use stitch markers to define motif boundaries.
4. Continue the vine motif until the front measures approximately seven inches from the lower edge.
5. For the peplum-like flare at the hem, begin a simple increase row: increase one stitch at each side every fourth row four times, worked as a make one increase to provide a gentle outward flare.
6. For armhole and strap shaping at the top, bind off three stitches at each armhole edge, then decrease one stitch at each armhole edge every other row twice. Continue to the shoulder and bind off remaining stitches.
Back panel instructions
1. Cast on the same number of stitches as the front and work ribbing.
2. Work a simpler texture or repeat the vine motif for continuity; many knitters prefer stockinette for the back for a cleaner finish.
3. Shape the armholes to mirror the front and bind off the center back stitches if you would like an opening for a keyhole closure.
Straps and finishing
1. Work wide straps by picking up the edge stitches at the shoulder and knitting an i-cord or a two-by-two rib strip until desired strap width and length are achieved. For a medium size, straps measuring two inches wide by nine inches long work well.
2. Attach small wooden buttons as decorative elements or use them to secure a small cap at the strap base if desired.
3. Block pieces to open the lace and align motif symmetry.
4. Seam the side seams and attach straps using secure, small stitches.
Styling and variations
• For more rustic authenticity, use a lightly heathered green yarn to give the vines depth.
• Add small wooden or bone buttons down the center back as an accent.
• To make the top more versatile, add a removable lace peplum by crocheting or knitting a separate ruffle and attaching it to the lower edge with small button loops.
Lavender Fields Square-Neck Tank

Skill level
Beginner to intermediate. The tank uses an all-over geometric eyelet mesh pattern with straightforward shaping for the neckline and armholes. Familiarity with knit one, purl one, yarn over, knit two together, and basic bind off and cast on techniques is required.
Finished sizes
This pattern is written for three sizes with suggested finished bust measurements:
• Small: 34 inches (86.5 centimeters)
• Medium: 38 inches (96.5 centimeters)
• Large: 42 inches (106.5 centimeters)
Length from shoulder to hem is approximately 20 inches (51 centimeters); shorten or lengthen by adjusting the number of body repeats.
Materials
• Bamboo-cotton blend yarn, sport to light DK weight, in a pale lavender color. Required yardage: Small 700 yards (640 meters), Medium 800 yards (730 meters), Large 900 yards (820 meters). Bamboo-cotton gives crisp stitch definition and cool hand for summer wear.
• Straight or circular needles 4.0 millimeters for body and 3.5 millimeters for ribbing if needed. Use needle size necessary to achieve gauge.
• Stitch markers, tapestry needle for weaving in ends, measuring tape, blocking pins and surface.
• Optional small ceramic bowl of apricots and a straw hat for photography.
Gauge
Twenty stitches and twenty-eight rows of stockinette stitch equals 4 inches (10 centimeters) after blocking. Because the lace will open when blocked, always measure gauge after blocking a swatch worked in the eyelet mesh.
Notes on construction
This tank is worked flat in two pieces: front and back. The square neckline is created by binding off and shaping the center front stitches and working shoulders separately. The eyelet mesh repeats across the body produce an attractive grid lace that casts patterned shadows in bright sunlight. Thin straps are formed by picking up stitches or by sewing prepared i-cord straps to the shoulder points.
Stitch glossary and mesh pattern description
All stitch names are written in long form.
• Knit one: Insert the right-hand needle into the next stitch on the left-hand needle from left to right, wrap the working yarn around the right-hand needle and draw the loop through, slipping the original stitch off the left-hand needle.
• Purl one: Insert the right-hand needle into the next stitch on the left-hand needle from right to left, bring the working yarn forward between the needles, wrap the yarn around the right-hand needle and draw the loop through, slipping the original stitch off the left-hand needle.
• Yarn over: Bring the yarn forward between the needles and then over the right-hand needle to the back to create a new loop.
• Knit two together: Insert the right-hand needle into the next two stitches on the left-hand needle as if to knit, knit them together as one stitch to decrease one stitch.
• Slip slip knit decrease: Slip the next stitch knitwise to the right-hand needle, slip the following stitch knitwise to the right-hand needle, insert the left-hand needle into the fronts of the two slipped stitches and knit them together through the back loops to create a left-leaning decrease.
Eyelet mesh pattern, worked over a multiple of six stitches plus two selvedge stitches if a selvedge is desired:
Row one, right side: Knit one for selvedge stitch, then repeat across: knit two, yarn over, knit two together, knit one; finish with knit one selvedge.
Row two, wrong side: Purl across, taking yarn overs as purlable loops.
Row three, right side: Knit one selvedge, then repeat across: knit one, yarn over, knit two together, knit two; finish with knit one selvedge.
Row four, wrong side: Purl across.
Repeat these four rows for the full mesh.
Front panel instructions
1. Cast on the number of stitches required to reach the desired bust width plus a small ease. For a medium size cast on 176 stitches on four millimeter needles. If a selvedge stitch is preferred for neat seaming, cast on two extra stitches.
2. Work two inches of knit one, purl one ribbing for the hem to give a stable finish that will not roll.
3. Change to four millimeter needles if required by your gauge, and begin the eyelet mesh pattern across the entire row. Place stitch markers every pattern repeat to aid later shaping.
4. Continue working the eyelet mesh until the piece measures approximately 14 inches from the cast-on edge for the front before commencing the square neckline shaping. Measure carefully and compare to the back panel measurement to ensure alignment.
5. To shape the square neckline, work to the center of the row and then bind off the central twenty stitches for a medium size to create the neckline gap. For symmetry, work the remainder of the row to the armhole edge. For small and large sizes, adjust the number of bound-off center stitches by plus or minus four stitches.
6. Continue working each shoulder separately. On the side edges where the strap will attach, maintain the mesh pattern for the shoulder stitches across the required number of rows until shoulder height matches the back shoulder. When shoulder height is reached, bind off the shoulder stitches leaving live stitches for the strap if you plan to work the strap seamlessly, otherwise bind off and graft the straps later.
Back panel instructions
1. Cast on the same number of stitches as the front and work the hem ribbing in the same manner.
2. Begin the eyelet mesh and work straight until the panel measures the same length as the front to the underarm point.
3. For a higher back neck, bind off the central twelve stitches for a medium size and then work each shoulder separately to match the front shoulder height.
4. Bind off shoulder stitches.
Straps
Option A — Picked-up straps
1. Using three point five millimeter needles, pick up stitches evenly across each shoulder edge, placing a small number of stitches to create a thin strap. For a medium size pick up ten stitches.
2. Work knit one, purl one ribbing for the strap until it reaches the desired length of approximately nine to ten inches. Make an identical strap for the opposite shoulder. Bind off and stitch the ends securely to the inside of the garment.
Option B — I-cord straps
1. Using a double-pointed needle set or a small circular, cast on four stitches and work i-cord by knitting across and sliding the stitches to the opposite end of the needle without turning the work, continuing until the cord measures the desired length. Attach the cord to the shoulder edges with small stitches to avoid bulk.
Assembly and finishing
1. Block the front and back panels gently to the exact measurements. Because the bamboo-cotton will hold crisp edges, pin the square neckline carefully so that the corners remain true.
2. With the right sides together, use mattress stitch to seam the side edges. Align the mesh pattern so that the eyelets form a regular grid across the seam.
3. Attach straps as described in your chosen method. For a neat interior finish, sew the strap ends to the inside of the shoulder with slip stitches or mattress stitch to create an invisible attachment.
4. Weave in all yarn tails on the wrong side. Perform a light steam block to relax the fibers and open the mesh evenly.
Variations and styling suggestions
• For a cropped version, reduce the body length by three to four inches and finish with a narrow picot hem for vintage charm.
• For a lined tank suitable for modesty or warmer weather, sew a lightweight cotton lining to the inside after assembly.
• Wear this pale lavender tank with a full linen skirt and a straw hat for a picnic-ready cottagecore look.
Heirloom Bell-Sleeve Tunic
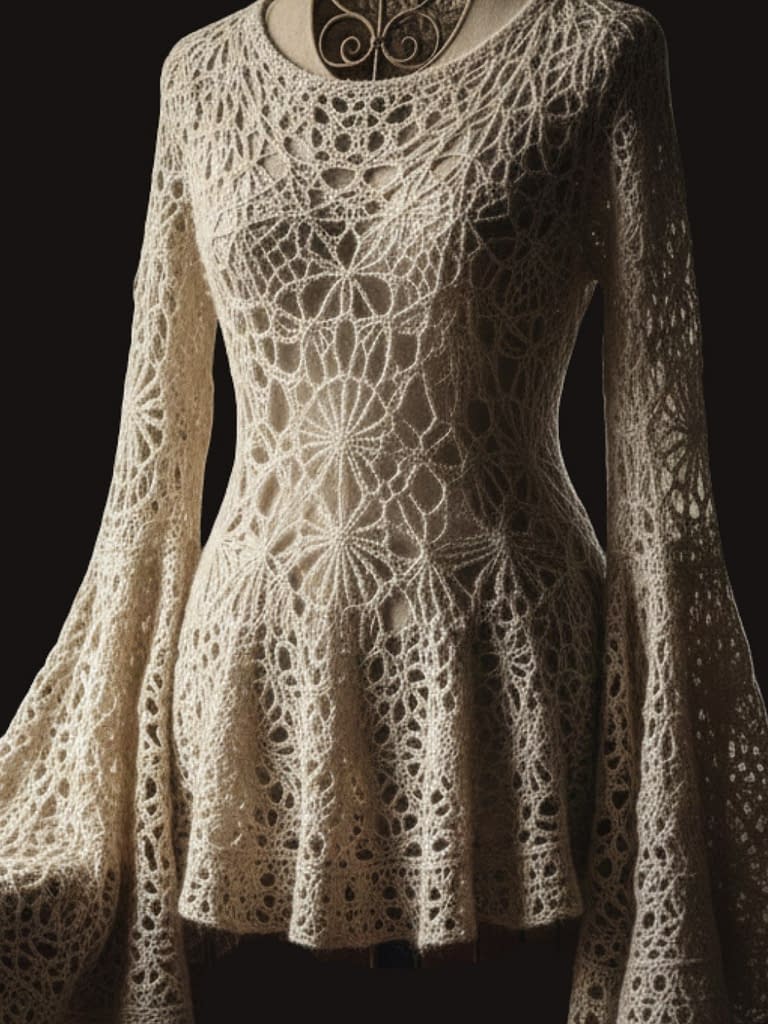
Skill level
Intermediate to advanced. This tunic features a full doily-style lace pattern throughout and dramatic bell sleeves that require more length of yarn and careful blocking. Familiarity with lace repeats, centered double decreases, and shawl-style shaping will be beneficial.
Finished sizes
This loose, tunic-length garment is forgiving in fit. Finished bust measurements:
• Small: 40 inches (101.5 centimeters)
• Medium: 44 inches (111.5 centimeters)
• Large: 48 inches (122 centimeters)
Tunic length from shoulder to hem approximately 30 inches (76 centimeters). Sleeve length is long and flared with an overall dramatic bell silhouette.
Materials
• Raw, textured linen yarn or a linen blend in an unbleached cream color. Linen provides a slightly stiff drape that suits structured lace motifs. Required yardage is large: Small 1200 yards (1100 meters), Medium 1400 yards (1280 meters), Large 1600 yards (1460 meters).
• Circular needles 5.0 millimeters with long cable for working body in the round or flat in large pieces. Use a longer cable to accommodate many stitches.
• Stitch markers, tapestry needle, blocking wires and a large flat surface capable of accommodating the wide bell sleeves.
• Optional dried herbs for staging photographs and a vintage wire dress form for display.
Gauge
Fifteen stitches and twenty-two rows in stockinette stitch equals 4 inches after blocking. The doily lace will open significantly after blocking; therefore, measure your gauge with a blocked lace swatch.
Notes on construction
The tunic is worked in separate pieces: back, two fronts, and sleeves. The spiderweb doily lace requires attention to stitch counts and pattern repeats; a full lace chart is recommended for those who read charts. Because linen has low elasticity, maintain slightly looser tension than usual to allow the lace to bloom.
Stitch glossary and doily lace description
All decreases and increases are described in full text.
• Center double decrease: Slip two stitches together knitwise to the right-hand needle, knit the next stitch, then pass the two slipped stitches over the knit stitch to create a centered decrease. This decrease maintains vertical symmetry in lace motifs.
• Yarn over: Bring the yarn forward between the needles and then over the right-hand needle to the back, creating an extra loop.
• Knit three together: Insert the right-hand needle into the next three stitches on the left-hand needle as if to knit, knit them together as one stitch to create a dramatic decrease when called for in the lace.
Doily lace repeat (example, worked over a multiple of sixteen stitches for a central medallion pattern):
Right-side row: Knit across following motif sequence: knit two, yarn over, knit two together, yarn over, knit four, center double decrease, knit four, yarn over, knit two together, yarn over, knit two.
Wrong-side row: Purl all stitches.
This produces an ornate spiderweb-like radial pattern when repeated and blocked.
Back piece instructions
1. Cast on the number of stitches appropriate for the size on five millimeter needles. For a medium cast on 176 stitches if you will work a wide tunic back.
2. Work three inches of knit one, purl one ribbing to form a neat hem that will help the linen hold shape.
3. Change to the doily lace stitch and begin working the full lace motif across the entire back. Because the motif is charted, consult the lace chart or write down the sixteen-stitch repeat on a separate sheet to avoid losing place. Use stitch markers at the end of each repeat.
4. Continue the lace until the back measures approximately eighteen inches from the cast-on edge or until you reach the underarm depth for your figure.
5. For the armhole shaping, bind off six stitches at each armhole edge and then decrease at the armhole edge one stitch every other row three times, using knit two together and slip slip knit decreases to maintain motif symmetry. Follow the lace repeat carefully so the spiderweb motifs remain balanced.
6. Continue until the armhole measures approximately nine inches from the initial bind off, or until you match your preferred armhole depth.
7. Bind off shoulder stitches as required for your size leaving neck opening as shaped by the pattern.
Front pieces (left and right)
1. Cast on the same number of stitches as for the back. Work the hem ribbing identically.
2. Begin the doily lace pattern. For the front neckline shaping, at the center front begin shaping earlier by binding off a central group of stitches to create the desired neck width and depth. For a wide, shallow neck bind off twelve stitches for a medium; bind off fewer for a higher neckline.
3. Work each side of the front separately, maintaining the lace pattern on each side shoulder. Adjust the number of central bound-off stitches to achieve a pleasing square or slight scoop shape.
4. Shape armholes to mirror the back and bind off shoulder stitches.
Sleeves — dramatic bell shaping
1. Cast on the number of stitches for the sleeve cuff using five millimeter needles. For a medium size cast on 64 stitches.
2. Work knit one, purl one ribbing for three inches to form a firm cuff that will sit at the lower forearm or wrist depending on desired final sleeve position.
3. Change to the doily lace pattern and begin increasing for the bell shape. Increase by working a yarn over at regular intervals: increase by two stitches (via yarn over and accompanying decrease adjustment) every fourth row twelve to sixteen times until the sleeve reaches the desired flare width at the hem, which may be twenty to thirty inches in circumference when open. Because the sleeve is dramatic, keep a large number of stitches and use marker placement to ensure even increases across the circumference.
4. Continue the lace pattern, allowing the sleeve to reach the full bell length as specified, approximately twenty-two inches from cuff to hem for a dramatic pool. If a shorter bell is desired, reduce increases and length accordingly.
5. For the sleeve cap, reverse the increases gradually by decreasing at the sleeve head until it matches the armhole depth measured on the body pieces. This will create a set-in sleeve that lays smoothly when seamed.
Assembly and finishing
1. Block all pieces with particular attention to the lace motifs. Because the bell sleeves will be very wide, use blocking wires or pins to shape each scallop and open the doily pattern fully. Pin each sleeve flat into a half-circle to ensure graceful flare. Allow the linen to dry completely; linen will stiffen after blocking and retain the shaped lace.
2. Seam the shoulders using mattress stitch or a flat seaming technique.
3. Set the sleeves into the armholes, aligning the center of the sleeve cap with the shoulder seam. Use small stitches and a thin tapestry needle to preserve lace structure during sewing.
4. Seam the sides and sleeves, working from the cuff upward to the underarm to ensure even seaming tension.
5. For any decorative edge at the hem or neckline, pick up stitches and work a single lace repeat or a narrow picot bind-off to mirror the spiderweb motif. Because linen can be crisp, a small knitted edging will sit in harmony with the doily lace.
6. Weave in all ends on the wrong side. Give the entire garment a light final blocking to reestablish motif shape if seams have distorted the lace.
Styling and variations
• For a lighter, draped look, substitute a linen-silk laceweight held double and adjust needle size accordingly; this will produce a softer bell that flows rather than stands.
• To create an heirloom tunic suitable for formal occasions, embellish the neckline with small mother-of-pearl buttons or a narrow embroidered trim sewn after blocking.
• For a shorter, more practical daywear version, reduce the length by six to eight inches and make a less dramatic bell that ends at three-quarter sleeve length.
Forget-Me-Not Peplum Camisole
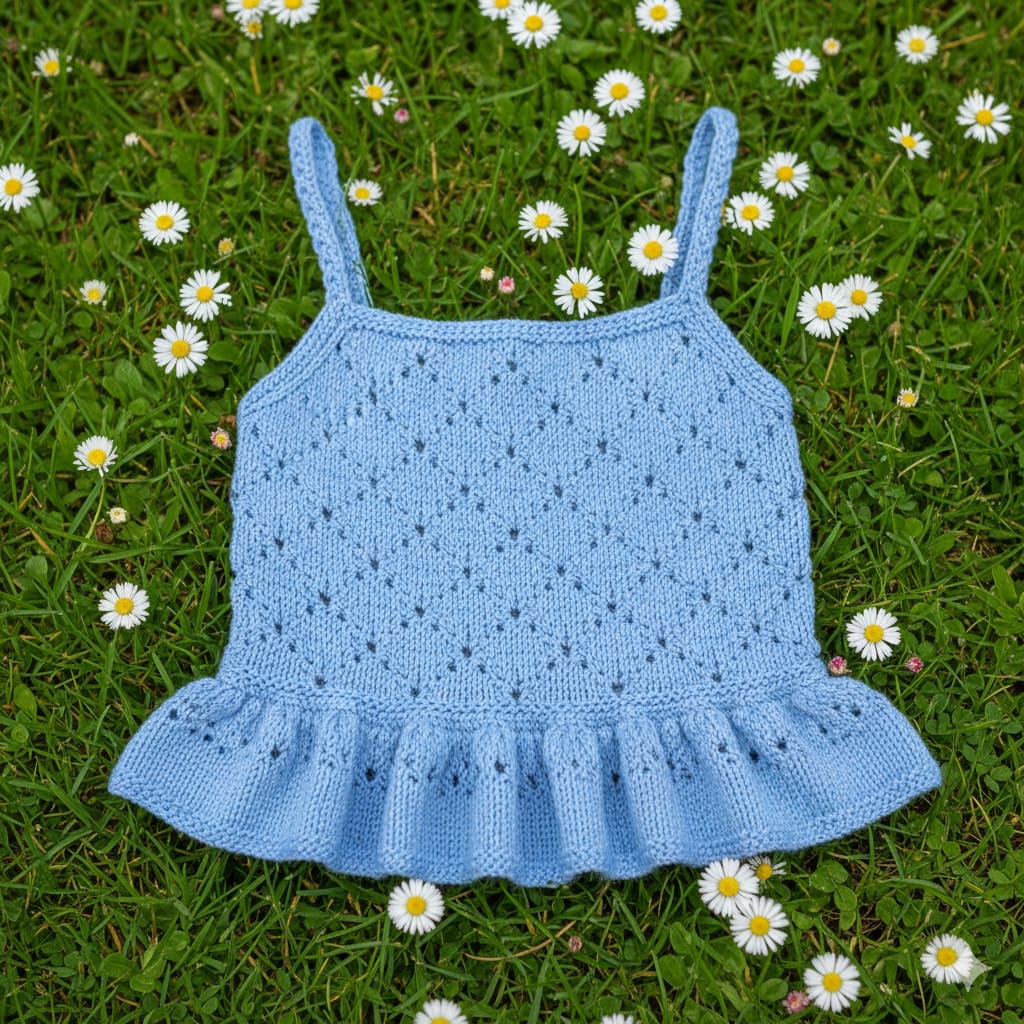
Skill level
Beginner to intermediate. The camisole is designed to be delicate and feminine, with a fitted bodice and a flared peplum created by lace increases. It requires familiarity with short rows, eyelet lace, and finishing techniques for narrow i-cord straps.
Finished sizes
Fitted measurements with negative ease for a close, flattering fit:
• Small: 32 inches (81 centimeters) bust with 0.5 to 1 inch negative ease
• Medium: 36 inches (91.5 centimeters) bust
• Large: 40 inches (101.5 centimeters) bust
Length from shoulder to hem is approximately 18 inches, with peplum depth of approximately 3.5 inches.
Materials
• Soft cotton yarn in baby blue, sport weight, that holds stitch definition for the tiny floral eyelets. Yardage required: Small 600 yards (550 meters), Medium 700 yards (640 meters), Large 800 yards (730 meters).
• Needles 4.0 millimeters for main body and 3.5 millimeters for straps if desired.
• Stitch markers, tapestry needle, blocking pins and surface, and fresh daisies for staging photographs if desired.
Gauge
Twenty stitches and twenty-eight rows of stockinette stitch equals 4 inches after blocking. Because the eyelet lace will open, measure gauge after blocking a swatch in the forget-me-not eyelet.
Notes on construction
The camisole is worked flat as two panels with a fitted bodice that flares into a lace peplum at the waist. The delicate eyelet “forget-me-not” motif is created from small clusters of yarn overs and paired decreases that form tiny flower holes. The camisole uses narrow i-cord straps attached to the front and back shoulder points.
Stitch glossary and forget-me-not motif
• Knit one, purl one, yarn over, knit two together, slip slip knit decrease, make one increase: All are described in full in previous patterns.
• Small flower eyelet cluster: A sequence of yarn over, knit two together, yarn over creates a small three-hole cluster that resembles a tiny flower when blocked.
Forget-me-not lace repeat worked over a multiple of eight stitches with two selvedge stitches:
Row one, right side: Knit one selvedge, then repeat across: knit two, yarn over, knit two together, knit two; finish with knit one selvedge.
Row two, wrong side: Purl across.
Repeat this two-row sequence across the bodice. For the peplum, increase using yarn over sequences spaced evenly to create flare.
Front panel instructions
1. Cast on the number of stitches appropriate to the bust measurement plus desired negative ease. For a medium size cast on 164 stitches on four millimeter needles.
2. Work two inches of knit one, purl one ribbing to form a stable lower bodice edge.
3. Begin the forget-me-not lace across the entire row and work until the piece measures approximately 12 inches from the cast-on edge to the natural waistline or until the bodice portion is complete.
4. To shape for the bust, perform small increases under the arm or at the side seam by making one increase every eighth row twice to add subtle shaping. Follow the lace pattern so increases are placed within the stockinette columns or integrated into the lace by adding an extra yarn over followed by an adjacent decrease to maintain motif balance.
5. When the bodice reaches waist level, begin the peplum increases: increase by working yarn over pairs across the row at a rate of one increase pair every eight stitches for the first increase round. Work two to three repeated increase rounds alternating with plain lace rows until the peplum reaches the desired fullness. For a medium, three increase rounds will create a gentle flare.
6. Continue the peplum lace repeats for approximately three and a half inches, allowing the eyelets to form tiny “forget-me-not” flowers as the fabric expands.
Back panel instructions
1. Cast on the identical number of stitches and work the lower ribbing and forget-me-not lace in the same manner.
2. For the back neckline, keep the fabric higher than the front by approximately one and a half inches by delaying any shallow neckline shaping until after the peplum is completed. This offers a modest back finish.
3. Bind off shoulder stitches leaving space for strap attachment.
Straps
1. Work narrow i-cord straps using three double-pointed needles or a small circular needle: cast on four stitches and work i-cord until strap measures approximately eight to ten inches for a medium.
2. Make two straps and attach them to the front and back shoulder points using small, tidy stitches to avoid bulk. If adjustable straps are desired, sew a small button loop at the back and create a buttoned strap length.
Finishing and decorative details
1. Block both panels with gentle steam to open the eyelet clusters into tiny flower shapes. Pin the peplum gently to ensure the scalloped edge created by the lace sits flat and even.
2. With the right sides together, seam the sides using mattress stitch, leaving the top portion of the side seam slightly open if you prefer a small vent.
3. Sew on the i-cord straps securely. Tuck and weave in ends on the wrong side.
4. For a whimsical finish, embroider a few tiny French knots along the base of the peplum to mimic daisy centers or add small seed beads at the center of selected eyelets for heirloom sparkle. Take care not to add weight that will pull the cotton fabric out of shape.
Styling and variations
• For a more romantic look, add a narrow lace trim to the hem by either knitting a small scallop and sewing it to the peplum edge or by crocheting a fine lace border and attaching it after blocking.
• For modesty, sew a lightweight cotton lining to the interior of the bodice only, leaving the peplum free to breathe.
• Pair with a high-waisted linen skirt and sandals for a late-spring cottagecore ensemble.
Cottage Window Lace Shell Top
Skill level
Beginner to intermediate. This sleeveless shell top employs repeating lace blocks resembling old cottage window panes and uses simple shaping. The effect is geometric and airy, ideal for warm weather layering.
Finished sizes
Designed as a comfortable, slightly relaxed shell. Finished bust measurements:
• Small: 36 inches (91.5 centimeters)
• Medium: 40 inches (101.5 centimeters)
• Large: 44 inches (111.5 centimeters)
Length from shoulder to hem approximately 22 inches (56 centimeters).
Materials
• Soft buttercream cotton yarn, fingering to sport weight depending on desired drape. Yardage required: Small 700 yards (640 meters), Medium 800 yards (730 meters), Large 900 yards (820 meters).
• Needles 3.75 to 4.0 millimeters depending on yarn thickness and personal tension. Choose needle size required to obtain gauge.
• Dress form for shaping if you will block on a form, vintage teacups and embroidered cushions for photography staging, and ivy if desired.
• Stitch markers, tapestry needle, blocking pins.
Gauge
Twenty-two stitches and thirty-two rows in stockinette equals 4 inches after blocking. Gauge swatch must be blocked for accurate measurement because the lace blocks will open significantly.
Notes on construction
The shell is worked flat in two pieces. The repeating lace blocks create square motifs that read like small cottage windows when opened. The neckline is a clean boat style and the hem is straight. The shell can be worn on its own or layered over a camisole for modesty.
Stitch glossary and cottage window block pattern
• Knit one, purl one, yarn over, knit two together, slip slip knit decrease, make one increase: All explained in full language.
• A cottage window block is an eight-stitch by eight-row square made by combining openwork and stockinette rectangles that, when repeated, form a patchwork of small windows.
Cottage window lace block repeat over eight stitches plus two selvedge stitches:
Row one, right side: Knit one selvedge, knit two, yarn over, knit two together, knit three; finish with knit one selvedge.
Row two, wrong side: Purl across, treating yarn overs as purlable loops.
Row three, right side: Knit one selvedge, yarn over, knit two together, knit four, yarn over, knit one selvedge.
Row four, wrong side: Purl across.
Row five, right side: Knit one selvedge, knit four, yarn over, knit two together, knit one selvedge.
Row six, wrong side: Purl across.
Row seven, right side: Knit one selvedge, knit two, yarn over, knit two together, knit three; finish with knit one selvedge.
Row eight, wrong side: Purl across.
Repeat these eight rows for a tessellated window pattern.
Front panel instructions
1. Cast on the number of stitches required to reach your hip measurement plus ease. For a medium cast on 176 stitches. Add two selvedge stitches if desired.
2. Work two inches of knit one, purl one ribbing for the hem to provide a neat base that will not curl.
3. Begin the cottage window lace block, placing markers at each eight-stitch repeat to track the blocks across the width.
4. Continue repeating the block pattern across the body, ensuring each block aligns vertically so the “windows” stack neatly. For a structured look, keep the stitch tension even and consistent between blocks.
5. When the front measures approximately sixteen inches from the hem, begin shaping the armholes by binding off four stitches at each armhole edge and then decreasing one stitch at each armhole edge every other row twice to create a gentle armhole curve.
6. To shape the boat neckline, when the front piece reaches the final specified height from hem, bind off the central ten to twelve stitches for a medium measurement to create a wide but shallow neck. Work each shoulder separately to the desired shoulder width and bind off.
Back panel instructions
1. Cast on the same number of stitches as the front.
2. Work the lower ribbing and the same cottage window blocks in identical alignment so that windows continue across the seam when seamed together.
3. For the back neckline, bind off fewer central stitches than the front to create a slightly higher back neck for comfort. Work shoulder shaping to match the front.
4. Bind off shoulder stitches.
Straps and finishing
This shell uses a very clean shoulder with narrow shoulder coverage rather than separate straps.
1. After blocking the panels, use mattress stitch to seam the sides from hem to underarm. Align the window blocks so they mirror across the seam.
2. Pick up stitches along the neckline and armhole edges with the smaller needles and work a narrow three-quarters inch knit one, purl one band or a small rolled hem depending on the desired finish. For a crisp finish, use a single round of slip stitch edging followed by a loose bind off to maintain stretch.
3. Weave in ends on the wrong side and perform a final block to ensure that the window panes sit square and even.
Variations and styling
• For a vintage-inspired variation, work a contrasting colour thin stripe within every third lace block to imitate painted window mullions.
• To make the shell less sheer, knit a simple camisole lining and stitch it to the inside along the shoulder seams and armhole edges.
• For summer gatherings, pair this shell with high-waisted linen trousers and a small stack of antique teacups and a linen napkin for a photo that embodies cottage window charm.
Final Notes on Blocking, Fit, and Care
Blocking
Blocking is an essential final step for all lace garments. Block each piece to the measurements indicated in the pattern using a flat surface and rust-proof pins. For delicate fibers such as mohair, use a light spritz of water and gentle shaping rather than vigorous wet blocking. For linen and cotton, wet block for stronger shaping and let the fabric dry fully to set the lace. Use blocking wires for straight edges where possible.
Fit adjustments
Small fit changes can be made easily:
• To lengthen the body or sleeves, add additional lace repeats in multiples of the stitch repeat count.
• To widen the garment, add additional pattern repeats across the width at the cast-on stage.
• To change fullness in peplums or bell sleeves, adjust the number of increase rounds and the spacing between increases.
Care
• Hand wash cotton, linen, and blended garments in cool water with a mild detergent. Reshape gently and lay flat to dry.
• Avoid tumble drying. Store in a cool, dry place away from direct sunlight to prevent fiber yellowing.
• For mohair and silk blends, use a gentle shampoo for delicates and avoid rubbing the fibers to prevent felting.
Conclusion
These eight lace knit tops bring together everything that makes cottagecore style so comforting—soft textures, airy lacework, floral motifs, and silhouettes that feel timeless and handmade. Whether you love simple tanks, romantic wrap tops, vintage-inspired tunics, or delicate peplums, each pattern gives you a different way to express that slow-living, nature-inspired aesthetic. With clear steps, approachable techniques, and plenty of room to personalize colors and yarns, these designs invite you to enjoy the peaceful rhythm of lace knitting while creating wardrobe pieces that feel meaningful, elegant, and truly your own.