
There is something undeniably magical about the art of lace knitting. Unlike solid fabric, lace is a delicate dance between yarn and needle, where deliberate holes are created to form intricate patterns of flowers, leaves, diamonds, and vines. When this technique is applied to home decor, specifically in the form of a table runner, the result is an heirloom-quality piece that instantly elevates the atmosphere of a room.
You are hosting a formal dinner party, dressing up your farmhouse table for a casual brunch, or simply want to add a touch of handmade texture to your daily life, a lace knit table runner is the perfect project. Many knitters are intimidated by lace, fearing it is too complex or requires advanced mathematics. However, at its core, lace knitting is simply a combination of increases and decreases. If you can knit two stitches together and wrap the yarn around your needle, you can knit lace.
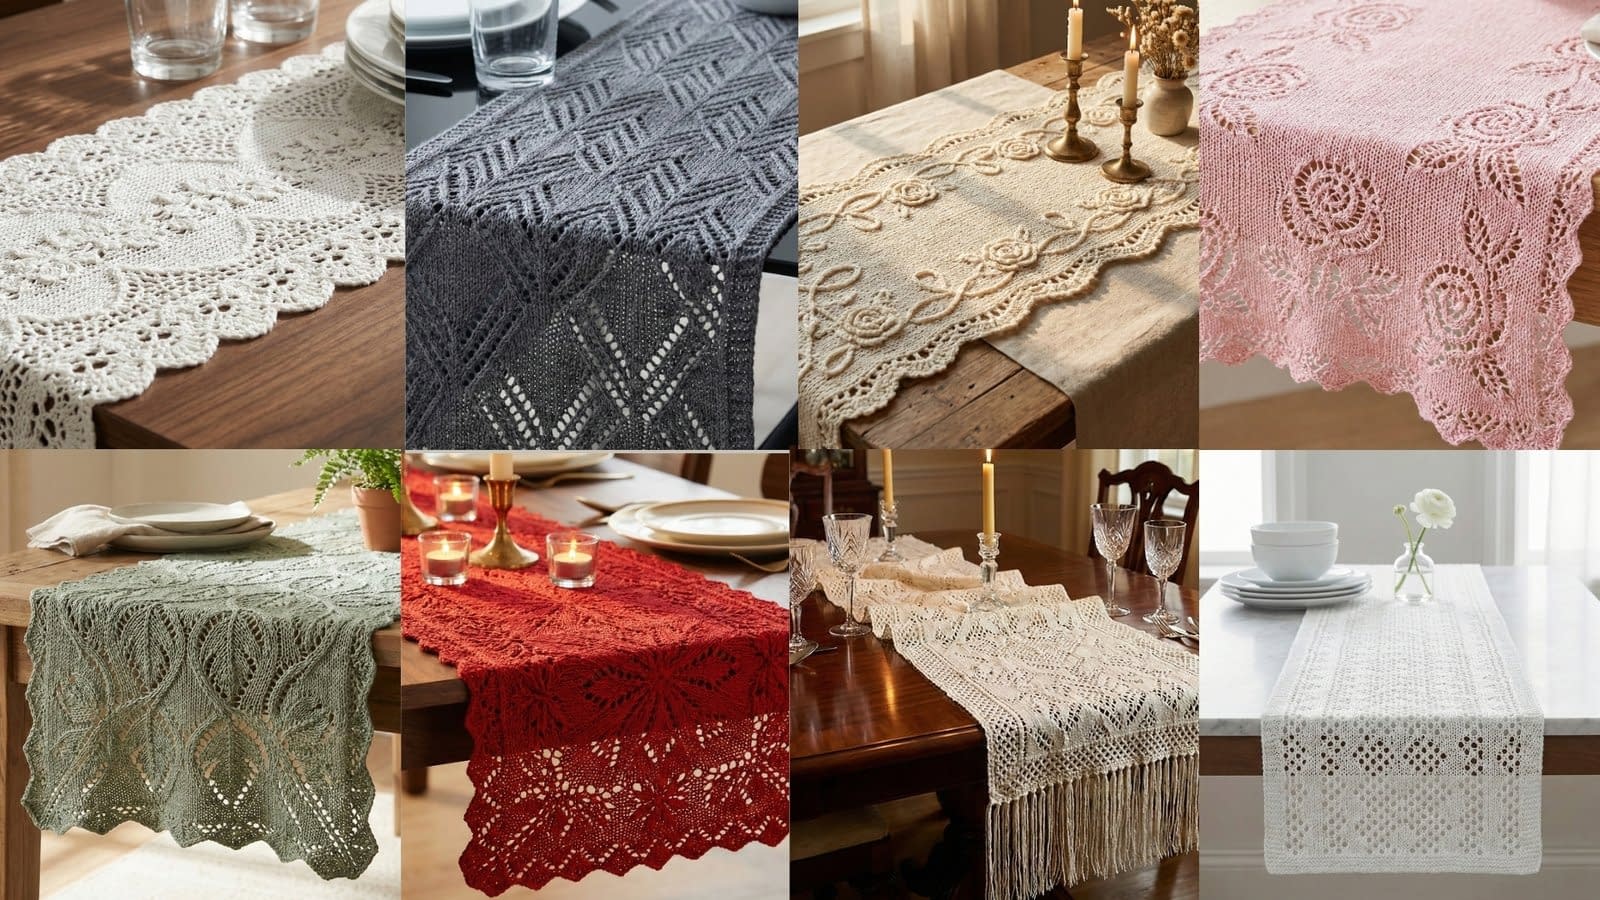
In this comprehensive guide, we will explore 8 Lace Knit Table Runner Patterns. These designs have been curated to suit a variety of aesthetics, from classic white traditions to modern geometric minimalism. Each pattern is written with the beginner and intermediate knitter in mind, avoiding confusing abbreviations and opting for full, descriptive language to ensure your success. We will walk through the materials you need, the specific stitch sequences, and the crucial finishing touches that make lace open up and shine.
Let us pick up our needles and cast on a journey of creativity and elegance.
1. Classic White Lace Knit Table Runner

This design embodies the quintessential elegance of traditional knitting. As described in our visual inspiration, this runner features a pristine white color palette, making it a versatile piece for weddings, anniversaries, or formal dining. The pattern focuses on a repeating floral motif with openwork stitches that allow light to filter through, creating beautiful shadows on a dark wood table. The edges are naturally scalloped by the structure of the lace, eliminating the need for a complex added border.
Skill Level
Beginner to Intermediate. This pattern uses basic lace maneuvers but requires concentration to keep the count correct.
Finished Size
Approximately 14 inches wide by 72 inches long. You can easily adjust the length by knitting more or fewer repeats of the main pattern rows.
Materials
To achieve the soft, matte look described, use a high-quality cotton yarn.
- Yarn: Worsted weight cotton yarn in pure white. You will need approximately 4 to 5 skeins, depending on your tension.
- Needles: Size US 7 (4.5 mm) straight needles or circular needles.
- Notions: Tapestry needle for weaving in ends, scissors, and blocking pins (essential for lace).
Notes
The pattern is worked flat. It is highly recommended to use stitch markers between each repeat of the lace pattern to help you keep track of your place. For this tutorial, we will write out every action fully. “Yarn over” means to bring the yarn to the front of the work and then over the right needle to the back, creating an extra loop.
Instructions
Step 1: Cast On
Cast on 63 stitches. Using a long-tail cast on method is preferred as it provides a firm but elastic edge that matches the flexibility of the lace.
Step 2: The Foundation Rows
Before starting the lace pattern, establish a sturdy edge.
- Row 1 (Wrong Side): Knit the first stitch, purl every stitch across until only one stitch remains, knit the last stitch.
- Row 2 (Right Side): Knit every stitch across the entire row.
- Row 3: Knit the first stitch, purl across to the last stitch, knit the last stitch.
Step 3: The Floral Lace Pattern
This section creates the intricate floral patterns and openwork stitches. You will repeat these four rows until the runner reaches your desired length.
- Row 1 (Right Side): Knit the first 4 stitches (this is your border). Start of repeat: Knit 1 stitch, yarn over, knit 4 stitches, slip one stitch knit-wise then knit the next stitch and pass the slipped stitch over the knit stitch, knit 2 stitches together, knit 4 stitches, yarn over. End of repeat. Repeat the instructions between the “Start of repeat” and “End of repeat” across the row until only 4 stitches remain. Knit the last 4 stitches.
- Row 2 and all even-numbered rows (Wrong Side): Knit the first 4 stitches. Purl every stitch, including the yarn overs from the previous row, until only 4 stitches remain. Knit the last 4 stitches. This creates a garter stitch border on the edges to prevent curling.
- Row 3: Knit the first 4 stitches. Start of repeat: Knit 2 stitches, yarn over, knit 3 stitches, slip one stitch knit-wise then knit the next stitch and pass the slipped stitch over the knit stitch, knit 2 stitches together, knit 3 stitches, yarn over, knit 1 stitch. End of repeat. Repeat this sequence across until 4 stitches remain. Knit the last 4 stitches.
- Row 4: Repeat Row 2 instructions.
Step 4: Continuing the Pattern
Continue repeating Rows 1 through 4. As you work, you will see the “yarn over” holes creating the openwork, while the decreases (knitting stitches together) pull the fabric to create the wave and floral shape. Continue this until the piece measures approximately 71 inches or your desired length.
Step 5: Finishing the Edge
End after completing a Row 4.
- Next Row: Knit every stitch across.
- Next Row: Knit the first stitch, purl across to the last stitch, knit the last stitch.
- Bind Off: Bind off all stitches loosely knit-wise. Do not pull tight, or the end will pucker.
Step 6: Blocking
This is the most important step for the Classic White Lace Runner. Soak the runner in cool water for 20 minutes. Gently squeeze out the excess water; do not wring it. Lay it flat on towels or blocking mats. Pin the edges, stretching the lace aggressively so the floral patterns open up and the scalloped edges are distinct. Let it dry completely before placing it on your walnut table.
2. Vintage-Inspired Cream Lace Knit Table Runner
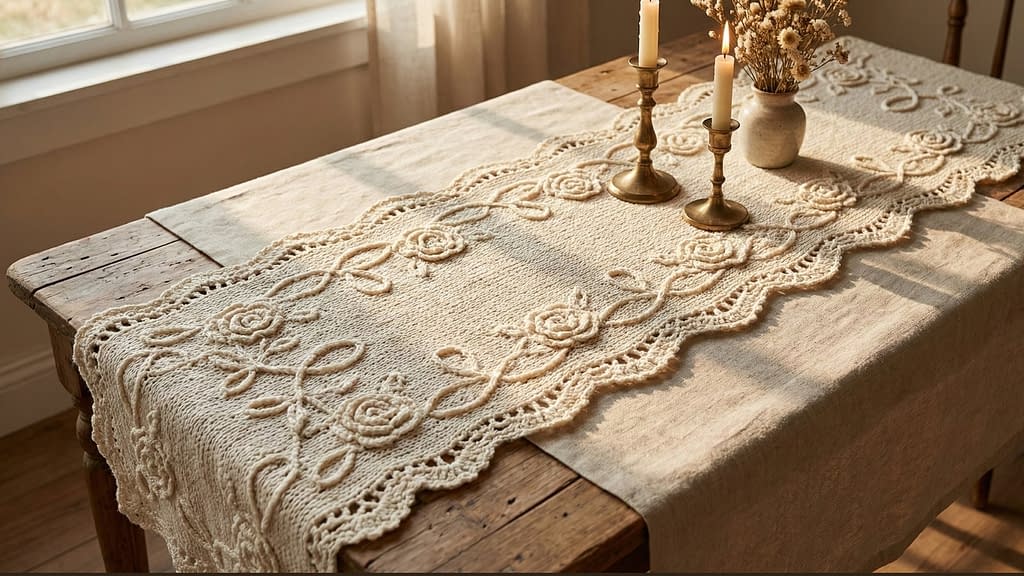
This runner evokes the charm of a rustic farmhouse. The design features vintage-inspired motifs that resemble climbing roses and vines. The cream color adds warmth, and the texture is slightly more robust than the classic white runner, perhaps using a yarn that has a bit of wool content for a handcrafted feel. The lace here is airy, with high stitch definition to highlight the “vines.”
Skill Level
Intermediate. This pattern involves moving stitches to create leaning vines.
Finished Size
Approximately 16 inches wide by 80 inches long.
Materials
- Yarn: DK weight (Double Knitting) yarn in a cream or unbleached natural color. A blend of cotton and linen or cotton and wool works beautifully for that rustic texture.
- Needles: Size US 6 (4.0 mm) knitting needles.
- Notions: Stitch markers, tapestry needle, rust-proof blocking pins.
Instructions
Step 1: Cast On
Cast on 74 stitches using the knitted cast-on method. This method gives a nice, decorative edge that looks good on vintage pieces.
Step 2: Garter Stitch Border
To ensure the runner lies flat on your farmhouse table, we begin with a border.
- Rows 1 through 6: Knit every stitch in every row. This creates three ridges of garter stitch.
Step 3: The Rose and Vine Lace Panel
We will now begin the main pattern. The first and last 4 stitches of every row will always be knit to maintain the side borders.
- Row 1 (Right Side): Knit 4. Pattern Repeat: Knit 1, yarn over, slip one stitch knit-wise, knit one stitch, pass the slipped stitch over, knit 4, knit 2 stitches together, yarn over, knit 1, yarn over, slip one stitch knit-wise, knit one stitch, pass the slipped stitch over, knit 3. End Repeat. Repeat across to the last 4 stitches. Knit 4.
- Row 2 (Wrong Side): Knit 4. Purl all stitches across to the last 4 stitches. Knit 4.
- Row 3: Knit 4. Pattern Repeat: Knit 2, yarn over, slip one stitch knit-wise, knit one stitch, pass the slipped stitch over, knit 2, knit 2 stitches together, yarn over, knit 3, yarn over, slip one stitch knit-wise, knit one stitch, pass the slipped stitch over, knit 2. End Repeat. Repeat across to the last 4 stitches. Knit 4.
- Row 4: Knit 4. Purl all stitches across to the last 4 stitches. Knit 4.
- Row 5: Knit 4. Pattern Repeat: Knit 3, yarn over, slip one stitch knit-wise, knit one stitch, pass the slipped stitch over, knit 2 stitches together, yarn over, knit 5, yarn over, slip one stitch knit-wise, knit one stitch, pass the slipped stitch over, knit 1. End Repeat. Repeat across to the last 4 stitches. Knit 4.
- Row 6: Knit 4. Purl all stitches across to the last 4 stitches. Knit 4.
Step 4: Length and Consistency
Repeat Rows 1 through 6 continuously. You will notice the holes (yarn overs) forming diagonal lines that look like vines, with solid patches resembling rosebuds. Keep your tension consistent. The rustic yarn may have slight thickness variations, which adds to the vintage charm. Continue until the runner is the desired length.
Step 5: Final Border and Bind Off
After finishing your last full repeat of the lace pattern:
- Rows 1 through 6: Knit every stitch in every row to match the bottom border.
- Bind Off: Bind off all stitches loosely.
Step 6: Antique Finish Blocking
Soak and block the runner. When pinning this specific design, try to pin out the scalloped points created by the “vines” at the edges. This accentuates the handcrafted, vintage feel. Once dry, it pairs perfectly with antique brass candlesticks.
3. Modern Geometric Lace Knit Table Runner
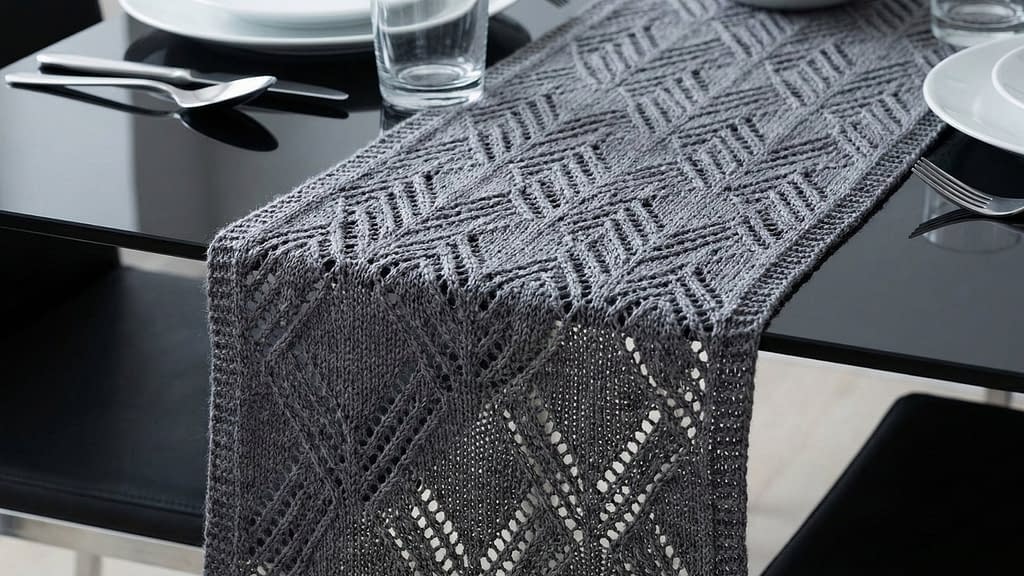
Moving away from florals, this design is for the contemporary home. The pattern features sharp, clean lines forming diamonds and chevrons. The color is a soft gray, and the yarn should be smooth with a slight sheen to emphasize the precision of the geometric shapes. This runner looks best on glass or marble tables where the graphic nature of the lace can stand out.
Skill Level
Intermediate. The geometric pattern requires precise counting to ensure the diamonds align perfectly.
Finished Size
Approximately 13 inches wide by 70 inches long.
Materials
- Yarn: Sport weight mercerized cotton or bamboo blend in soft gray. The “mercerized” quality gives it the sheen mentioned in the prompt.
- Needles: Size US 5 (3.75 mm) needles. Bamboo needles are good here to prevent the slippery yarn from sliding off.
- Notions: Stitch markers are absolutely essential here to mark the repeats of the diamonds.
Instructions
Step 1: Cast On
Cast on 59 stitches. Use a cable cast-on for a firm, straight edge that suits the modern aesthetic.
Step 2: Setup Rows
- Row 1 (Right Side): Knit 3, purl to the last 3 stitches, knit 3.
- Row 2 (Wrong Side): Knit 3, purl to the last 3 stitches, knit 3. (Note: We are using a Stockinette stitch base with a small garter edge).
Step 3: The Diamond Lattice Pattern
The geometric pattern relies on shifting the decrease stitches.
- Row 1 (Right Side): Knit 3 (edge). Repeat: Knit 4, knit 2 stitches together, yarn over, knit 1, yarn over, slip one stitch, knit one stitch, pass slipped stitch over, knit 3. End Repeat. Repeat this section 4 times total. Knit 3 (edge).
- Row 2 and all Wrong Side Rows: Knit 3. Purl all stitches across to the last 3 stitches. Knit 3.
- Row 3: Knit 3. Repeat: Knit 3, knit 2 stitches together, yarn over, knit 3, yarn over, slip one stitch, knit one stitch, pass slipped stitch over, knit 2. End Repeat. Repeat across to last 3. Knit 3.
- Row 5: Knit 3. Repeat: Knit 2, knit 2 stitches together, yarn over, knit 5, yarn over, slip one stitch, knit one stitch, pass slipped stitch over, knit 1. End Repeat. Repeat across to last 3. Knit 3.
- Row 7: Knit 3. Repeat: Knit 1, knit 2 stitches together, yarn over, knit 7, yarn over, slip one stitch, knit one stitch, pass slipped stitch over. End Repeat. Repeat across to last 3. Knit 3.
- Row 9 (Closing the Diamond): This row starts shifting the shape back. Knit 3. Repeat: Knit 1, yarn over, slip one stitch, knit one stitch, pass slipped stitch over, knit 7, knit 2 stitches together, yarn over. End Repeat. Repeat across to last 3. Knit 3.
- Row 11: Knit 3. Repeat: Knit 2, yarn over, slip one stitch, knit one stitch, pass slipped stitch over, knit 5, knit 2 stitches together, yarn over, knit 1. End Repeat. Repeat across to last 3. Knit 3.
Step 4: Completion
Continue repeating the logic of widening and narrowing the space between the yarn overs to form diamonds. The full repeat usually takes 16 to 20 rows depending on how tall you want your diamonds. Knit until the piece reaches your desired length.
Step 5: Finishing
Bind off firmly in pattern. Weave in all ends. For the modern look, when you block this runner, use wires or a ruler to ensure the edges are perfectly straight and the diamonds are symmetrical. The shadows cast by these precise holes on a glass table are stunning.
4. Delicate Pastel Lace Knit Table Runner
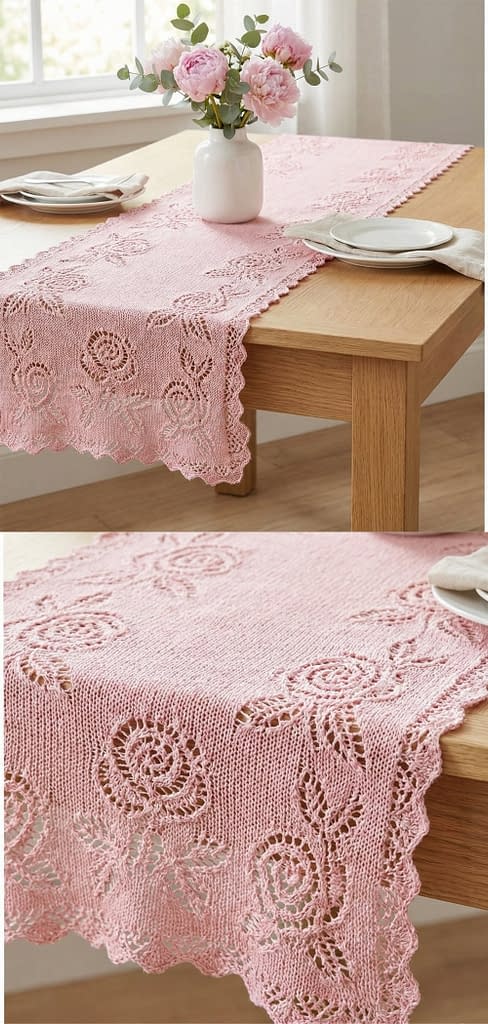
This runner captures the essence of spring. The pastel pink color and the airy, open stitches make it feel incredibly light and delicate. The pattern combines elements of leaf motifs with “faggoting” (a vintage term for open latticework stitches) to create a fabric that looks almost like netting with flowers floating in it.
Skill Level
Intermediate. This project requires handling fine yarn and consistent tension.
Finished Size
Approximately 15 inches wide by 65 inches long.
Materials
- Yarn: Fingering weight or Lace weight yarn in pastel pink. A blend of alpaca and silk would be luxurious, or a fine cotton for durability.
- Needles: Size US 4 (3.5 mm) needles.
- Notions: Fine tapestry needle.
Instructions
Step 1: Cast On
Cast on 65 stitches loosely. A tight cast-on will restrict the airy nature of this design.
Step 2: The Seed Stitch Border
To match the delicate nature of the interior, we will use a seed stitch border which lies flat and looks textured.
- Rows 1-4: Knit 1, Purl 1 repeat across the entire row.
Step 3: Airy Leaf Pattern
This pattern introduces a double yarn over, which creates larger holes for a more open, lacy look.
- Row 1 (Right Side): Work 4 stitches in seed stitch (K1, P1, K1, P1). Repeat: Knit 1, yarn over twice, slip one stitch, knit 2 stitches together, pass the slipped stitch over the knit 2 together stitch, yarn over twice. End Repeat. Repeat until 5 stitches remain. Knit 1, work 4 stitches in seed stitch.
- Row 2 (Wrong Side): Work 4 stitches in seed stitch. Purl across, but when you encounter a “yarn over twice” from the previous row, purl the first loop and knit the second loop. This maintains the stitch count without creating a giant loose loop. Work last 4 stitches in seed stitch.
- Row 3: Work 4 stitches in seed stitch. Repeat: Knit 1, Knit 2 stitches together, yarn over, knit 1, yarn over, slip one stitch, knit one stitch, pass slipped stitch over. End Repeat. Repeat until 5 stitches remain. Knit 1, work 4 stitches in seed stitch.
- Row 4: Work 4 stitches in seed stitch. Purl across to last 4. Work 4 stitches in seed stitch.
Step 4: Building the Fabric
Repeat Rows 1 through 4. The “yarn over twice” technique in Row 1 creates a very open, mesh-like background, while Row 3 stabilizes it with a small leaf structure. This creates the “cozy springtime aesthetic” described in the prompt.
Step 5: Binding Off
Work 4 rows of seed stitch (Knit 1, Purl 1) to match the beginning border. Bind off in seed stitch pattern.
Step 6: Gentle Blocking
Pastel lace requires gentle handling. Soak in lukewarm water with a drop of wool wash. Squeeze gently. When pinning, do not over-stretch; simply open up the lace enough to see the pattern while keeping the yarn soft and fluffy. This runner looks beautiful on a light oak table with fresh flowers.
5. Elegant Ivory Lace Knit Table Runner with Fringe
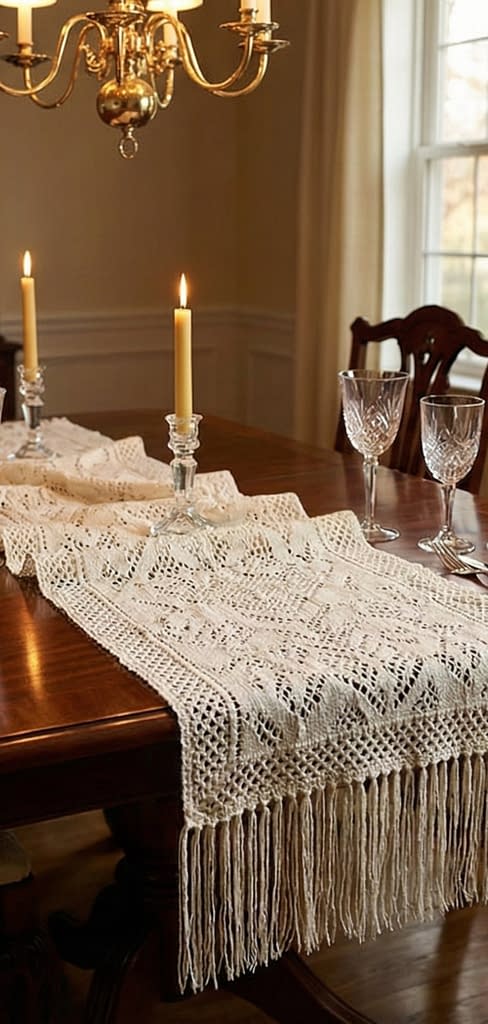
This design introduces a texture element that goes beyond stitches: fringe. As depicted in the visual inspiration, this runner is crafted in a classic ivory tone, featuring intricate lace patterns that flow down the center. However, the showstopper is the fringed edge, which adds movement and a touch of bohemian luxury to the piece. When displayed on a polished mahogany dining table with crystal glassware, the fringe catches the light and adds a tactile dimension that flat lace cannot achieve alone. The stitches here are consistent and airy, providing a stable base for the added weight of the tassels.
Skill Level
Beginner to Intermediate. The knitting itself is rhythmic, and the fringe application is a simple finishing technique that anyone can master.
Finished Size
Approximately 14 inches wide by 74 inches long (excluding fringe). The fringe adds about 4 inches to each end.
Materials
- Yarn: Worsted weight acrylic or wool blend in Ivory. A yarn with a tight twist is better here so the fringe strands do not fray or unravel too messy over time.
- Needles: Size US 8 (5.0 mm) straight or circular needles.
- Notions: A crochet hook (size G/4.0mm or similar) for attaching fringe, a sturdy piece of cardboard (about 4 inches wide) for measuring fringe, and sharp scissors.
Instructions
Step 1: Cast On
Cast on 54 stitches. Use a standard long-tail cast on. Because we are adding fringe to the ends later, the cast-on edge does not need to be decorative, just stable.
Step 2: The Foundation
- Rows 1 through 4: Knit every stitch in every row. This garter stitch base provides a solid anchor where we will later attach the fringe knots.
Step 3: The Horseshoe Lace Pattern
This pattern creates cascading arches that look elegant and provide plenty of visual interest.
- Row 1 (Right Side): Knit 3 (border), Start Repeat: Yarn over, knit 3 stitches, slip one stitch, knit two stitches together, pass the slipped stitch over the knit-two-together stitch, knit 3 stitches, yarn over, knit 1 stitch. End Repeat. Repeat this sequence across until 3 stitches remain. Knit the last 3 stitches.
- Row 2 and all Wrong Side Rows: Knit 3 stitches. Purl all stitches across the row until only 3 stitches remain. Knit the last 3 stitches.
- Row 3: Knit 3. Start Repeat: Knit 1 stitch, yarn over, knit 2 stitches, slip one stitch, knit two stitches together, pass the slipped stitch over, knit 2 stitches, yarn over, knit 2 stitches. End Repeat. Repeat across to the last 3 stitches. Knit 3.
- Row 5: Knit 3. Start Repeat: Knit 2 stitches, yarn over, knit 1 stitch, slip one stitch, knit two stitches together, pass the slipped stitch over, knit 1 stitch, yarn over, knit 3 stitches. End Repeat. Repeat across to the last 3 stitches. Knit 3.
- Row 7: Knit 3. Start Repeat: Knit 3 stitches, yarn over, slip one stitch, knit two stitches together, pass the slipped stitch over, yarn over, knit 4 stitches. End Repeat. Repeat across to the last 3 stitches. Knit 3.
Step 4: Continue the Length
Repeat Rows 1 through 8 continuously. The pattern will look like columns of arches or horseshoes. Continue knitting until the piece measures roughly 72 inches.
Step 5: Bind Off
- Next 4 Rows: Knit every stitch to create the final garter stitch anchor.
- Bind Off: Bind off all stitches firmly.
Step 6: Creating and Attaching the Fringe
This is the defining step for this specific runner.
- Cut the Strands: Wrap your ivory yarn around the 4-inch wide cardboard piece. Cut along one edge. This will give you multiple strands of yarn that are 8 inches long each.
- Group the Strands: Take 3 strands of yarn and fold them in half to create a loop.
- Attach: Insert your crochet hook into the first stitch of your cast-on edge from back to front. Grab the loop of the folded yarn strands with the hook and pull it partially through the stitch.
- Secure: Thread the loose ends of the yarn tails through the loop you just pulled up. Pull the tails tight to knot the fringe securely against the knitting.
- Repeat: Repeat this process in every other stitch along both short ends of the table runner.
- Trim: Once all fringe is attached, lay the runner flat and use sharp scissors to trim the fringe ends in a perfectly straight line.
6. Nature-Inspired Green Lace Knit Table Runner
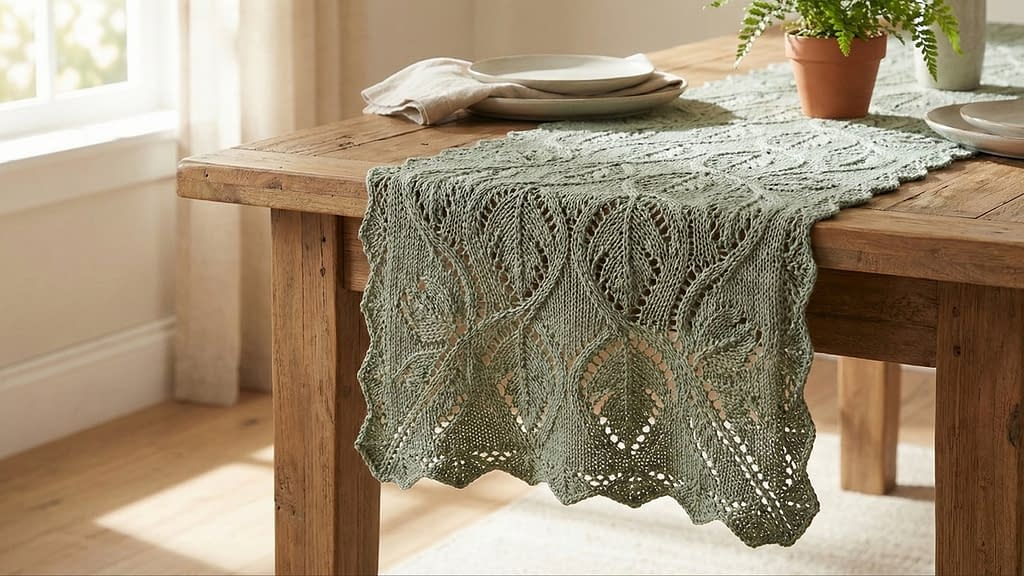
Bringing the outdoors inside, this runner is designed in a calming sage green. The lace motifs mimic the organic shapes of leaves and vines, making it the perfect centerpiece for a natural wood dining table adorned with potted plants or ceramic-ware. Unlike the geometric patterns, the stitches here curve and flow, creating a “scalloped” edge naturally as the pattern widens and narrows. The texture is open and airy, allowing morning sunlight to highlight the fibers.
Skill Level
Intermediate. This pattern uses “double decreases” to create the spine of the leaf.
Finished Size
Approximately 12 inches wide by 68 inches long.
Materials
- Yarn: DK weight yarn in Sage Green. A linen-cotton blend is ideal here as it has a “dry” natural look that suits the botanical theme.
- Needles: Size US 6 (4.0 mm).
- Notions: Stitch markers to separate the leaf repeats.
Instructions
Step 1: Cast On
Cast on 61 stitches. This number accounts for multiple repeats of the leaf motif plus border stitches.
Step 2: The Leaf Panel Pattern
We will work a border of 3 stitches in Garter Stitch (knit every row) on both sides throughout the project.
- Row 1 (Right Side): Knit 3. Start Repeat: Knit 1 stitch, yarn over, knit 2 stitches, slip one stitch knit-wise then knit two stitches together and pass the slipped stitch over (this is a central double decrease), knit 2 stitches, yarn over. End Repeat. Repeat this sequence 6 times. End with Knit 1, then Knit the border 3.
- Row 2 (Wrong Side): Knit 3. Purl all stitches across to the last 3 stitches. Knit 3.
- Row 3: Knit 3. Start Repeat: Knit 2 stitches, yarn over, knit 1 stitch, slip one stitch knit-wise then knit two stitches together and pass the slipped stitch over, knit 1 stitch, yarn over, knit 1 stitch. End Repeat. Repeat across to the last 4 stitches. Knit 1, Knit 3.
- Row 4: Knit 3. Purl all stitches across to the last 3 stitches. Knit 3.
- Row 5: Knit 3. Start Repeat: Knit 3 stitches, yarn over, slip one stitch knit-wise then knit two stitches together and pass the slipped stitch over, yarn over, knit 2 stitches. End Repeat. Repeat across to the last 4 stitches. Knit 1, Knit 3.
- Row 6: Knit 3. Purl all stitches across to the last 3 stitches. Knit 3.
Step 3: Observing the Leaves
As you repeat Rows 1 through 6, you will see vertical columns of leaves forming. The “slip, knit two together, pass over” maneuver creates the central vein of the leaf, while the yarn overs create the widening shape of the leaf blade.
Step 4: Finishing the Runner
Continue the pattern until you reach your desired length. It is recommended to end after completing a Row 6 so the top of the leaves are “closed.”
- Final Rows: Knit two rows of garter stitch (knit every stitch).
- Bind Off: Bind off loosely.
Step 5: Blocking for Shape
When blocking this runner on your mats, pull the scalloped edges outward. Each “leaf” column naturally wants to form a curve at the bottom and top edges. Pin these curves to emphasize the organic, nature-inspired silhouette.
7. Minimalist White Lace Knit Table Runner
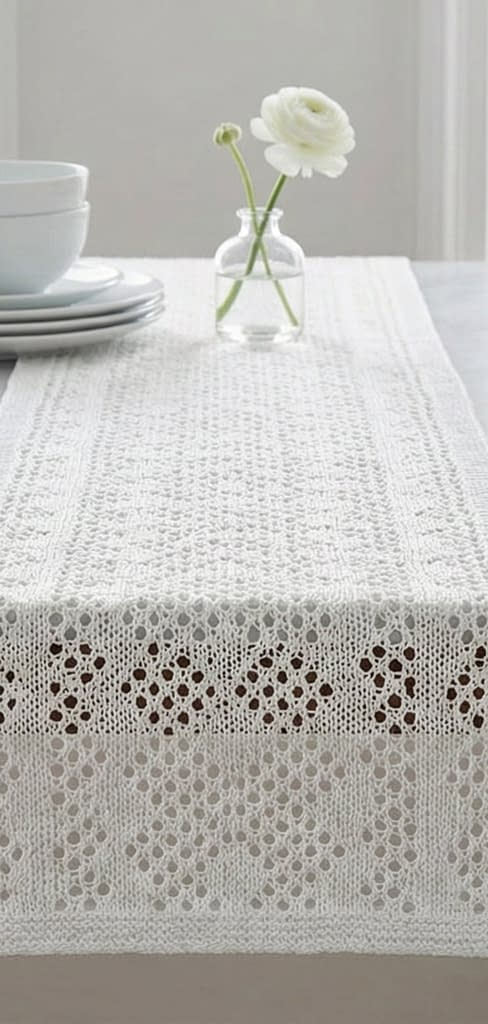
For the modern home that values “less is more,” this minimalist white runner is perfection. The design eschews complex flowers or vines in favor of simple, repetitive openwork stitches and straight, clean edges. The yarn is smooth cotton with a slight sheen, perhaps mercerized, to reflect the clean lines of a marble or glass table. The beauty here lies in the precision of the grid-like lace.
Skill Level
Beginner. This is the simplest lace pattern in the collection, perfect for a first-time lace knitter.
Finished Size
Approximately 11 inches wide by 60 inches long.
Materials
- Yarn: Sport weight mercerized cotton in Pure White.
- Needles: Size US 5 (3.75 mm).
- Notions: A tapestry needle.
Instructions
Step 1: Cast On
Cast on 50 stitches.
Step 2: The Mesh Lace Pattern
This pattern creates a simple grid. The edges are kept straight with a slip-stitch selvedge.
- Setup Row: Knit every stitch across.
- Row 1 (Right Side): Slip the first stitch purl-wise (with yarn in front) to create a smooth edge. Move yarn to back. Knit 1 stitch. Start Repeat: Yarn over, knit two stitches together. End Repeat. Repeat this across until the last 2 stitches remain. Knit the last 2 stitches.
- Row 2 (Wrong Side): Slip the first stitch purl-wise. Purl every stitch across until the last stitch. Knit the last stitch.
- Row 3: Slip the first stitch purl-wise. Move yarn to back. Knit 1 stitch. Start Repeat: Knit two stitches together, yarn over. (Note: The order is reversed from Row 1 to stagger the holes slightly). End Repeat. Repeat across until the last 2 stitches remain. Knit the last 2 stitches.
- Row 4: Repeat Row 2.
Step 3: Establishing the Rhythm
Repeat Rows 1 through 4. This pattern creates a fabric that looks like a net or mesh. It is very stretchy and flexible. Because the pattern is so simple, consistency in your tension is key. If you pull the yarn too tight on the “yarn over,” the holes will be too small. If you leave it too loose, the runner will look sloppy. Aim for a “Goldilocks” tension—just right.
Step 4: Finishing
Knit until the runner is the desired length.
- Final Row: Knit every stitch across on the Right Side.
- Bind Off: Bind off purl-wise on the Wrong Side to keep the edge flat and smooth.
Step 5: Hard Blocking
For a minimalist look, blocking is essential to get straight lines. Use blocking wires threaded through the straight edges if you have them. Stretch the runner tightly to open up the mesh grid into perfect squares. Allow to dry completely before placing on your grey marble table.
8. Festive Red Lace Knit Table Runner
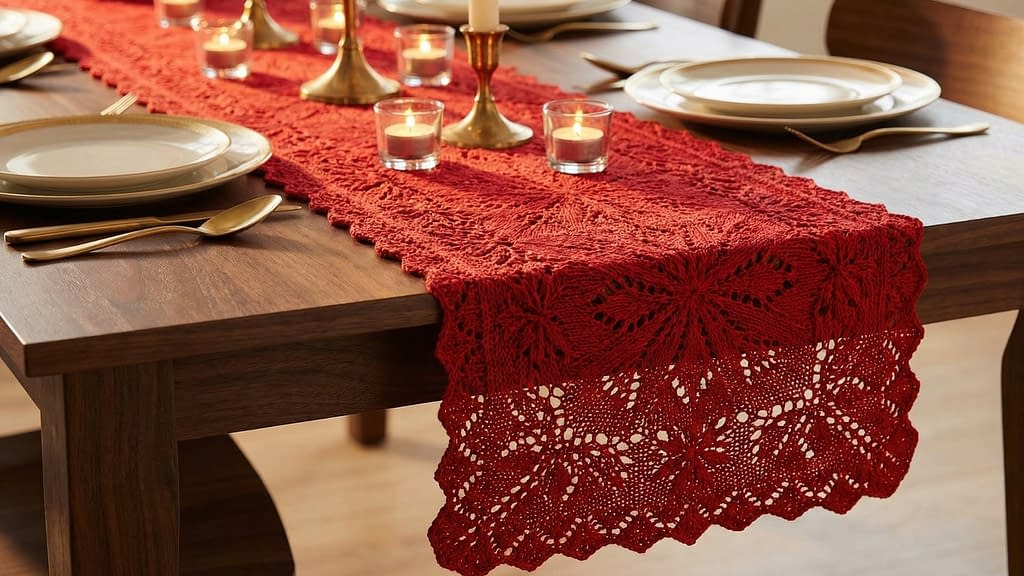
This runner is a celebration of color and pattern. Designed for holiday gatherings or festive dinners, it features a deep, rich red yarn. The lace motifs are designed to look like stars or bursts, arranged within a scalloped border. When placed on a dark wood table with gold accents and candlelight, the red yarn glows, and the star motifs cast beautiful shadows.
Skill Level
Intermediate. The star stitch involves working 3 stitches together, which requires a bit of manual dexterity.
Finished Size
Approximately 14 inches wide by 72 inches long.
Materials
- Yarn: Worsted weight wool or acrylic blend in Deep Red (Cranberry or Burgundy).
- Needles: Size US 7 (4.5 mm).
- Notions: Tapestry needle.
Instructions
Step 1: Cast On
Cast on 57 stitches.
Step 2: The Border
- Rows 1-4: Knit every stitch. This creates a garter stitch border that prevents the festive runner from curling up at the ends.
Step 3: The Star Lace Pattern
We will maintain a 3-stitch garter border on the sides.
- Special Abbreviation – “Make Star”: Purl 3 stitches together but do not drop them off the left needle; yarn over, then purl the same 3 stitches together again. Now drop them off the needle. You have turned 3 stitches into 3 stitches, creating a small knot or “star.”
- Row 1 (Right Side): Knit every stitch across.
- Row 2 (Wrong Side): Knit 3. Purl 1 stitch. Start Repeat: Make Star, Purl 1 stitch. End Repeat. Repeat across until last 3 stitches. Knit 3.
- Row 3: Knit every stitch across.
- Row 4: Knit 3. Purl 3 stitches. Start Repeat: Make Star, Purl 1 stitch. End Repeat. Repeat across until last 5 stitches. Purl 2, Knit 3. (Note: This shifts the stars so they are staggered between the stars of the previous row, forming a diamond layout).
Step 4: The Openwork Variation
To add the “lace” element to the texture, we will alternate the Star sections with Lace Eyelet sections.
- After working Rows 1-4 of the Star Pattern three times (12 rows total), switch to this Lace Section:
- Lace Row 1 (RS): Knit 3. Repeat: Knit 2 stitches together, yarn over. End Repeat. Knit 3.
- Lace Row 2 (WS): Knit 3, Purl across to last 3, Knit 3.
- Lace Row 3: Knit 3. Repeat: Yarn over, slip slip knit (slip two stitches one by one knit-wise, insert left needle into fronts of these two and knit them together). End Repeat. Knit 3.
- Lace Row 4: Knit 3, Purl across to last 3, Knit 3.
Step 5: Structuring the Runner
Alternate between the “Star Block” (12 rows of stars) and the “Lace Block” (4 rows of eyelets). This variation keeps the runner interesting and festive.
Step 6: Finishing
End with a Star Block for symmetry.
- Final Rows: Knit 4 rows.
- Bind Off: Bind off all stitches.
Step 7: Festive Styling
Block the runner to flatten the stars slightly so plates can rest on them. This runner is dense enough to protect the table from hot dishes while looking incredibly decorative.
Conclusion
Knitting a table runner is more than just creating a piece of fabric; it is about setting the stage for memories. Whether you chose the Classic White for a wedding gift, the Nature-Inspired Green for your breakfast nook, or the Festive Red for your holiday feast, you have created something tangible that adds warmth and character to your home.
These 8 patterns demonstrate the incredible versatility of lace knitting. From the strict geometry of the Modern Minimalist runner to the romantic flow of the Vintage Cream design, the same basic tools—needles and yarn—can produce vastly different results.
Do not be afraid to experiment. Try the Geometric pattern in a bold black for a dramatic look, or knit the Delicate Pastel runner in a deep navy for a moody, evening aesthetic. The skills you have practiced here—yarn overs, decreases, fringe application, and blocking—are the foundations of all advanced knitting. So, clear off the dining table, lay down your new handmade masterpiece, and enjoy the beauty of your craftsmanship. Happy knitting!


