
Granny squares are one of the most beloved motifs in crochet, known for their versatility, creativity, and endless possibilities. Among all the variations, floral granny squares stand out because they bring the beauty of flowers into your projects, whether you’re making blankets, pillows, bags, or even clothing. Each square feels like a mini artwork, combining colorful petals, textured stitches, and the charm of traditional crochet techniques.
In this post, we’ll explore 8 floral granny square patterns that range from simple to intricate. Each pattern includes a detailed breakdown of skill level, materials, notes, and step-by-step instructions so that you can create these squares confidently—whether you’re a beginner looking for something new or an experienced crocheter seeking inspiration.
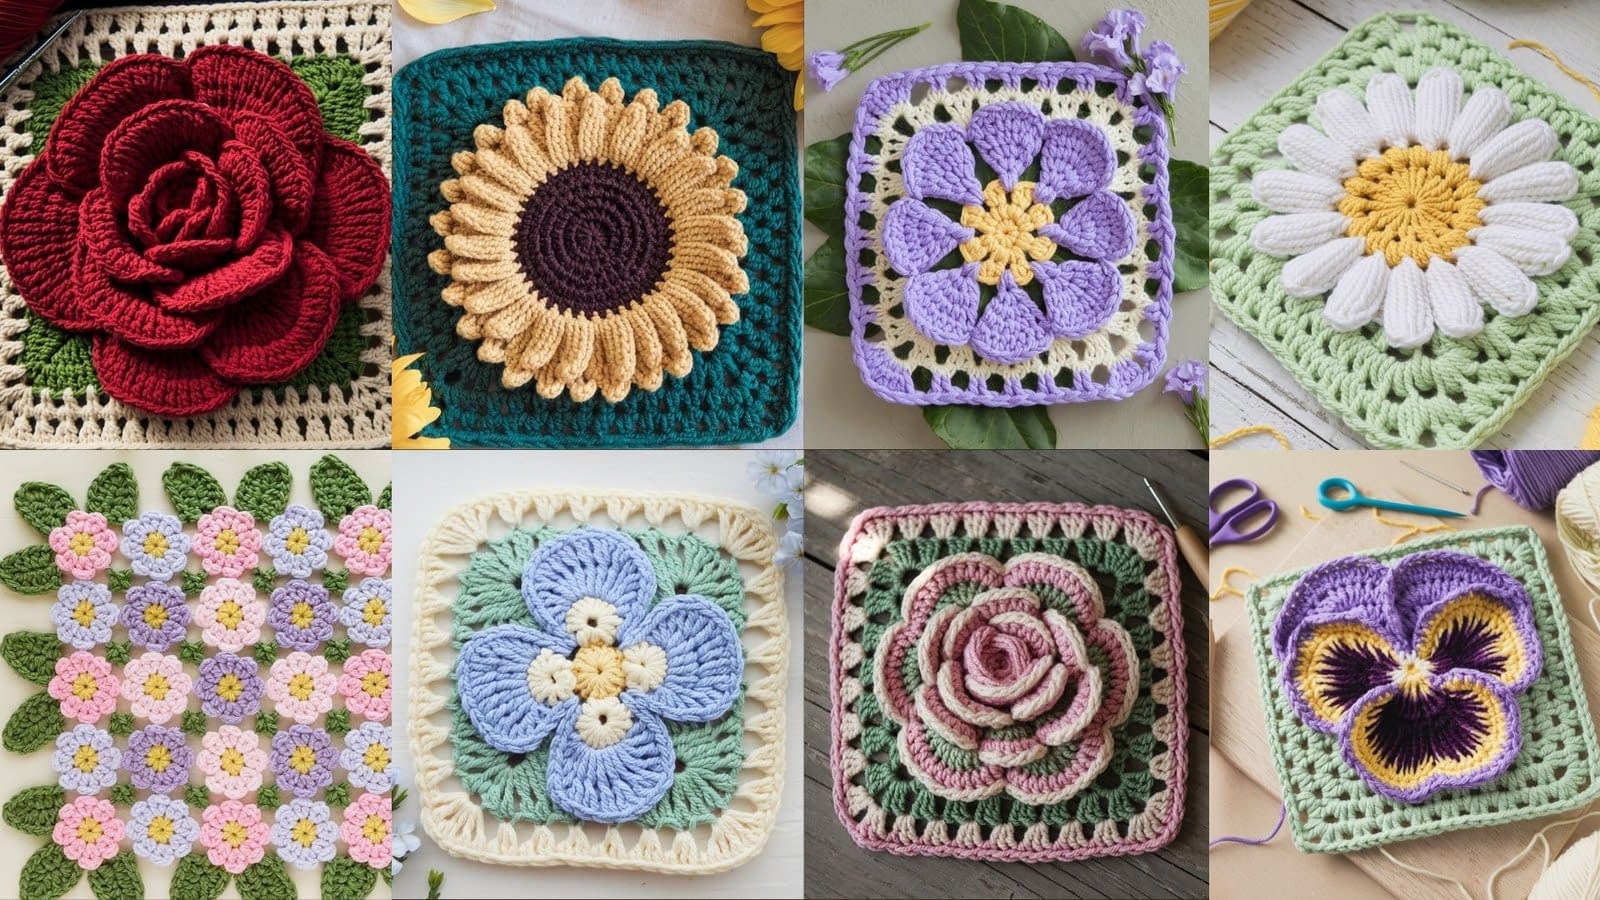
1. Classic Daisy Granny Square
Skill Level: Beginner–Intermediate (basic stitches + color changes)
Finished Size: About 4″ × 4″ (adjustable depending on yarn weight and hook size)
Materials
- Worsted weight (#4) yarn in 3 colors:
- Yellow (center)
- White (petals)
- Background color (any shade you like—blue, green, cream, etc.)
- Crochet hook: 4.0 mm (G)
- Yarn needle and scissors
Notes
- The daisy is crocheted in three stages: the yellow center, white petals, and then the background that transforms the circle into a square.
- Keep your tension even when making the petals so they don’t curl inward.
- Blocking the finished square helps the petals lay flat.
Instructions
Daisy Center (Yellow)
- Start with a magic ring.
- Round 1: Ch 2 (counts as first hdc), then work 11 hdc into ring. Pull tail to close ring tightly. (12 hdc total)
- Sl st to the top of the starting ch 2 to join.
- Fasten off yellow.
Petals (White)
- Join white yarn into any stitch of the yellow round.
- Round 2: Ch 2, dc 2 in the same stitch, ch 2, sl st in next stitch — that makes 1 petal.
- Repeat this sequence around until you have 12 petals. Each petal sits neatly in one stitch of the yellow center.
- Sl st to join at the base of the first petal. Fasten off.
Background & Squaring the Shape (Your chosen color)
- Join background color in any space between two petals.
- Round 3: Ch 3 (counts as dc), 2 dc, ch 2, 3 dc in same space — this is the first corner.
- Ch 1. In the next space between petals, work 3 dc. Ch 1. Continue working (3 dc, ch 2, 3 dc) in the next space for the next corner.
- Repeat this sequence around, creating 4 corners in total. Sl st to join.
- Round 4: Continue working classic granny rounds (3 dc clusters with ch-1 spaces between, and corners made with 3 dc, ch 2, 3 dc). Work until your square is about 4″ across.
- Fasten off, weave in ends.
Finishing & Tips
- Block the square for clean edges.
- If your petals seem loose, lightly steam-block them (don’t press hard, just hover with steam).
- Adjust the hook size if your square curves inward—sometimes moving up 0.5 mm helps.
Variations
- Use pastel petals and a bright center for a spring look.
- Try a black background to make the daisy pop.
- Join several daisy squares together to make a blanket or tote bag.
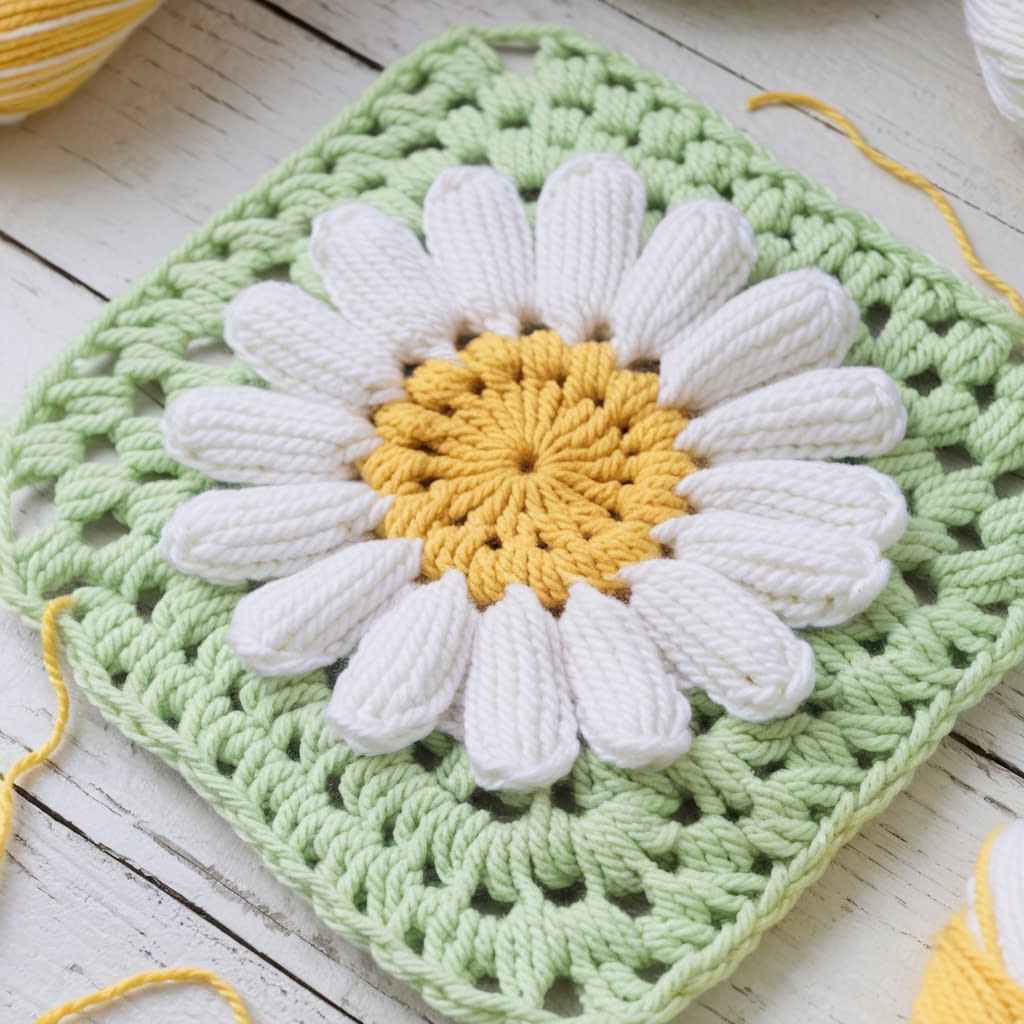
2. Sunflower Granny Square
Skill Level: Intermediate (puff stitches + color changes + layering)
Finished Size: About 5″ × 5″
Materials
- Worsted weight (#4) yarn in 3 colors:
- Brown (center)
- Yellow (petals)
- Green (background)
- Crochet hook: 4.5 mm
- Yarn needle and scissors
Notes
- The sunflower uses puff stitches for a textured center.
- Petals are worked directly into the base and sit slightly on top for a 3D effect.
- Work with even tension; puff stitches can get bulky if pulled too tightly.
Instructions
Center (Brown)
- Start with a magic ring.
- Round 1: Ch 1, 12 sc into ring. Pull tight, sl st to join. (12 sc)
- Round 2: Ch 2 (does not count), puff stitch (yo, pull up a loop 4 times), ch 1 to close puff. Work 1 puff st in each stitch around. (12 puffs)
- Sl st to top of first puff, fasten off.
Petals (Yellow)
- Join yellow yarn between two puff stitches.
- Round 3: Ch 3, dc 2 in next stitch, ch 3, sl st in same stitch — forms a petal.
- Skip 1 st, repeat in next st. Continue around, making 12 petals.
- Fasten off and weave in ends.
Background (Green)
- Join green yarn in a space between two petals.
- Round 4: 3 dc, ch 2, 3 dc in same space (corner made). Ch 1. In next space, 3 dc. Ch 1. Repeat around, making 4 corners. Sl st to join.
- Round 5: Continue granny-style — 3 dc clusters with ch-1 spaces on sides, corners as (3 dc, ch 2, 3 dc).
- Work until square measures about 5″.
Finishing & Tips
- Lightly block the square to flatten petals.
- Use a yarn needle to pull any loose puff stitch loops tight before weaving in ends.
- If your petals are floppy, try using double-strand yarn for the petal round.
Variations
- Make double petals by repeating another round of petals behind the first row (for a fuller sunflower).
- Use orange petals for a bold autumn look.
- Make smaller sunflowers with lighter yarn for coasters.
3. Rose Bloom Granny Square
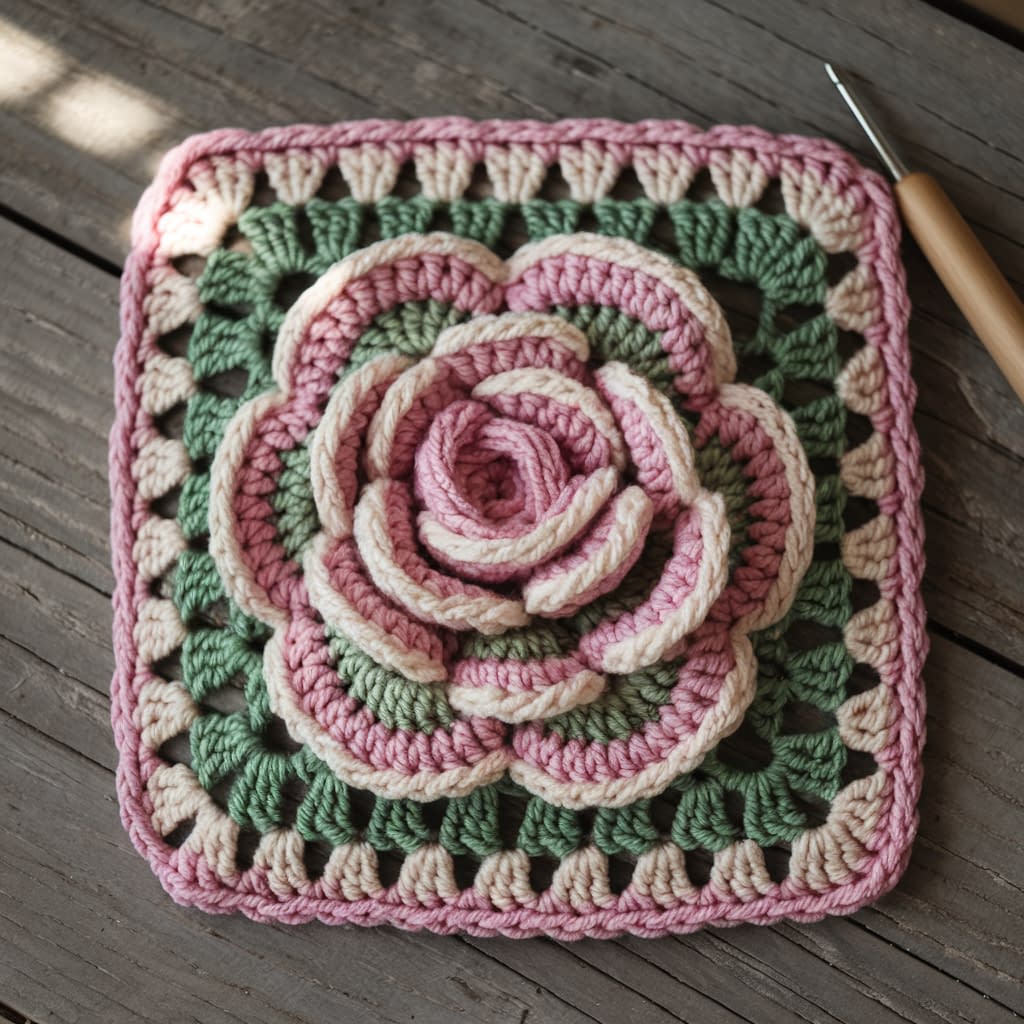
Skill Level: Intermediate–Advanced (layered petals + assembly)
Finished Size: About 6″ × 6″ (can be adjusted by adding more background rounds)
Materials
- Worsted weight (#4) yarn:
- Pink or red (rose)
- Green (leaves)
- Cream or neutral (background)
- Crochet hook: 4.0 mm (G)
- Yarn needle and scissors
Notes
- The rose is worked as a long strip with small scalloped petals, then rolled and stitched into shape.
- Once the rose is formed, leaves are crocheted directly around the base.
- The background is then added to square off the motif.
Instructions
Rose Center (Pink/Red)
- Ch 30.
- Row 1: Dc in the 4th ch from hook, ch 1, skip 1 ch, dc in next — repeat across. You’ll have alternating dc and chain spaces.
- Row 2: Turn. In each ch-1 space: (sc, hdc, dc, hdc, sc). This creates small rounded petals.
- Fasten off, leaving a long tail for sewing.
- Roll the strip into a rose shape, starting from one end. Secure the base by stitching through the layers with the long tail until stable.
Leaves (Green)
- Join green yarn around the base of the rose.
- Ch 6, sc in 2nd ch from hook, hdc, dc, hdc, sc — makes one leaf.
- Repeat 3–4 times around the base, evenly spacing leaves.
Background (Cream or Neutral)
- Join yarn in any space between leaves.
- Round 1: Work 3 dc, ch 2, 3 dc in first space (corner), then 3 dc, ch 1 in next space. Continue around until you have 4 corners.
- Round 2–3: Continue granny square rounds, working clusters on each side and (3 dc, ch 2, 3 dc) in corners.
- Stop when square measures ~6″.
Finishing & Tips
- To make the rose more secure, stitch through multiple layers before adding the background.
- Block the square after attaching to help flatten the bulky rose.
- Use sturdy yarn for petals so they hold their curl.
Variations
- Use variegated yarn for the rose to mimic natural color shifts.
- Create multi-colored roses by alternating 2 shades every few petals.
- For a flat rose (instead of 3D), crochet 3–4 rounds of layered petals worked directly into the base circle instead of rolling a strip.
4. African Flower Granny Square
Skill Level: Intermediate (color changes + shaping from hexagon to square)
Finished Size: About 5″ × 5″
Materials
- Worsted weight (#4) yarn:
- Center color (any bright shade)
- Petal color
- Outline color (to define petals)
- Background color
- Crochet hook: 4.0 mm (G)
- Yarn needle and scissors
Notes
- The African flower starts as a hexagon and is squared off with extra rounds.
- Petals are formed with clusters of dc stitches.
- Choose high-contrast colors to make the flower stand out.
Instructions
Center
- With center color, make a magic ring.
- Round 1: Ch 1, 6 sc into ring. Pull tail tight. (6 sc)
- Round 2: Change to petal color. Ch 3 (counts as dc), dc in same st, ch 1. 2 dc in next st, ch 1 — repeat around. Sl st to join. (12 dc, 6 ch-1 spaces)
Petals
- Round 3: In each ch-1 space, work (sc, hdc, 3 dc, hdc, sc). This forms 6 large petals.
- Sl st to join, fasten off petal color.
Outline
- Join outline color in top of any petal.
- Ch 1, sc around, placing 2 sc in each petal tip. This defines the flower.
- Fasten off.
Hexagon to Square (Background)
- Join background color in any space between petals.
- Round 4: Work 3 dc, ch 2, 3 dc (corner), ch 1, then 3 dc in next space, ch 1 around. Place 4 corners evenly to square off the hexagon.
- Round 5–6: Continue granny rounds until square measures 5″.
Finishing & Tips
- To keep the square from curling, ensure corners are spaced evenly.
- If the hexagon resists becoming square, add an extra filler stitch before corners.
- Block gently to sharpen the square shape.
Variations
- Use bold jewel tones for a stained-glass effect.
- Make several and join into a blanket — the repeating petal pattern creates a striking design.
- Add an extra outline round before squaring to make the petals stand out more.
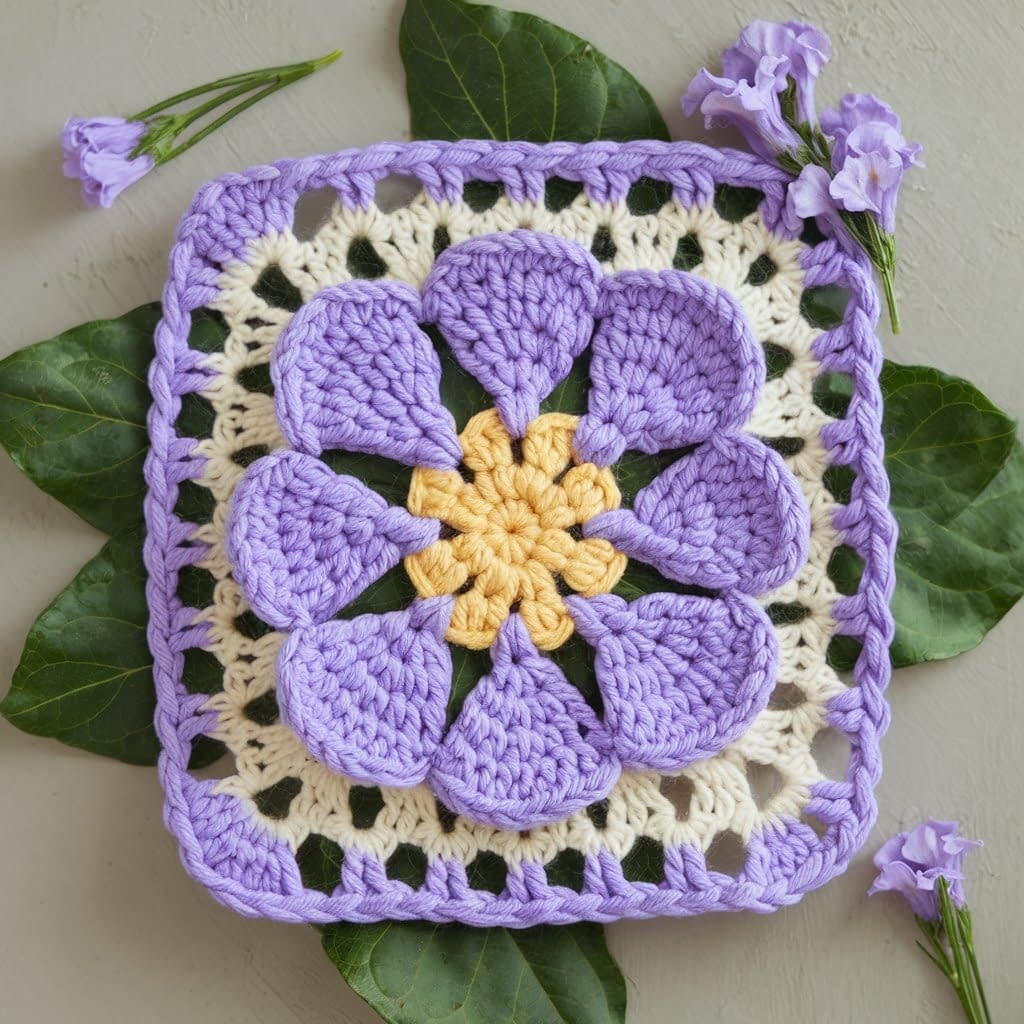
5. Pansy Petal Granny Square
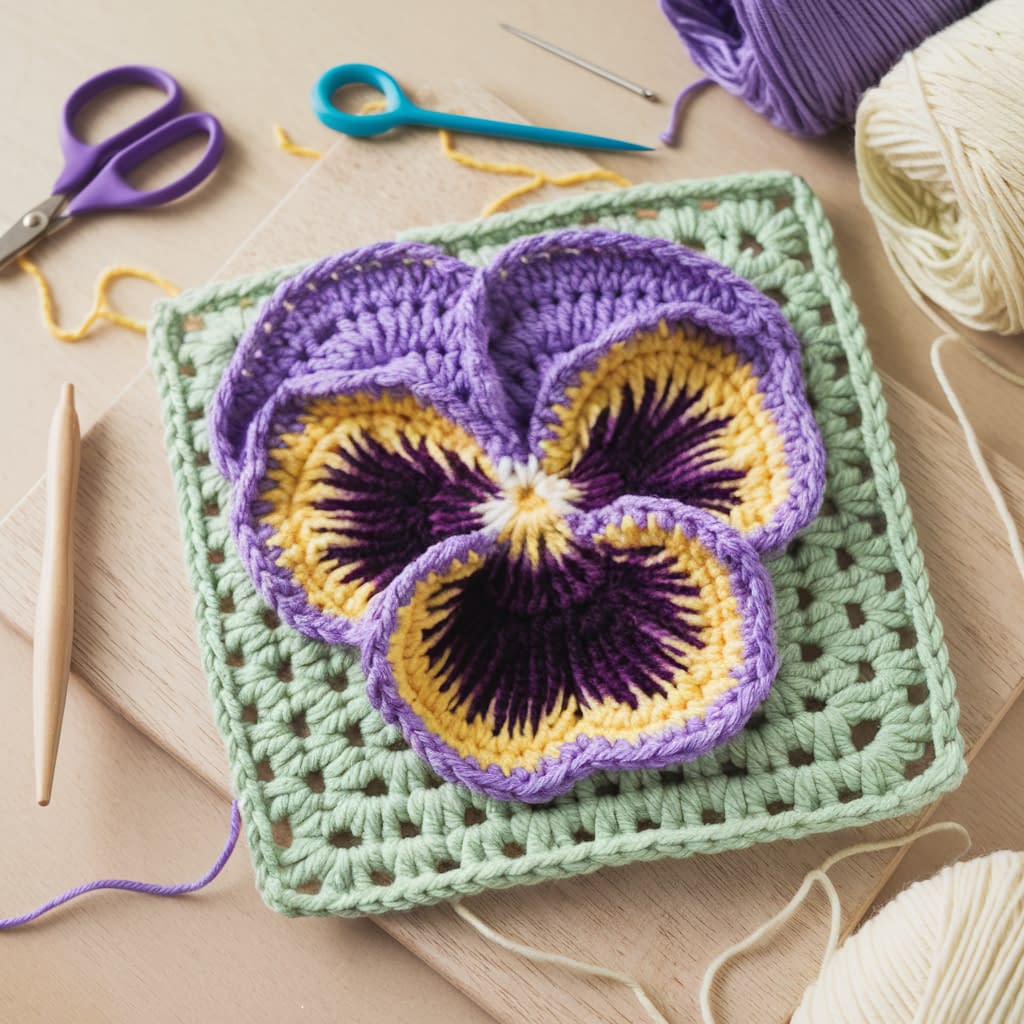
Skill Level: Intermediate (petal shaping with color changes)
Finished Size: About 5″ × 5″
Materials
- Worsted weight (#4) yarn:
- Yellow (flower center)
- Purple (main pansy petals)
- White or lavender (outer petal contrast)
- Green or cream (background)
- Crochet hook: 4.0 mm (G)
- Yarn needle and scissors
Notes
- The pansy has four large petals (two at top, two at bottom) and one smaller center petal.
- The center is yellow with contrasting darker edges to resemble real pansies.
- This motif works beautifully for afghans or cushion covers because the flat pansy design avoids bulk.
Instructions
Center
- With yellow, make a magic ring.
- Round 1: Ch 2 (counts as hdc), 11 hdc in ring. Pull tail tight. Sl st to join. (12 hdc)
Petals (Purple)
- Round 2: Join purple in any st.
- (Ch 3, 2 dc in same st, ch 3, sl st in next st) → repeat around, forming 6 petal bases.
- Round 3: In first ch-3 space, work (3 dc, 2 tr, 3 dc). Sl st in base to secure.
- Repeat in next 4 spaces to form 5 main petals.
- Pansy shape tip: Make top two petals slightly larger by using 3 tr instead of 2.
Outer Petal Layer (White or Lavender)
- Join contrasting yarn behind one top petal.
- Work a row of sc stitches across the back loops only, giving the pansy a layered look.
- This adds dimension and contrast.
Outline & Background (Green or Cream)
- Join background color between petals.
- Round 4: Work granny clusters around — 3 dc, ch 2, 3 dc in corners, (3 dc, ch 1) along sides.
- Round 5–6: Continue until square measures ~5″.
Finishing & Tips
- Block gently, shaping the pansy so top petals are larger and bottom petals curve inward.
- Secure loose ends well — color changes can unravel if not woven properly.
- If petals curl too much, spray block lightly.
Variations
- Try pastel shades for a spring theme.
- Make a darker “blotch” at the center of each petal with embroidery or surface crochet.
- Use variegated yarn for petals to mimic natural pansy streaks.
6. Wildflower Meadow Granny Square
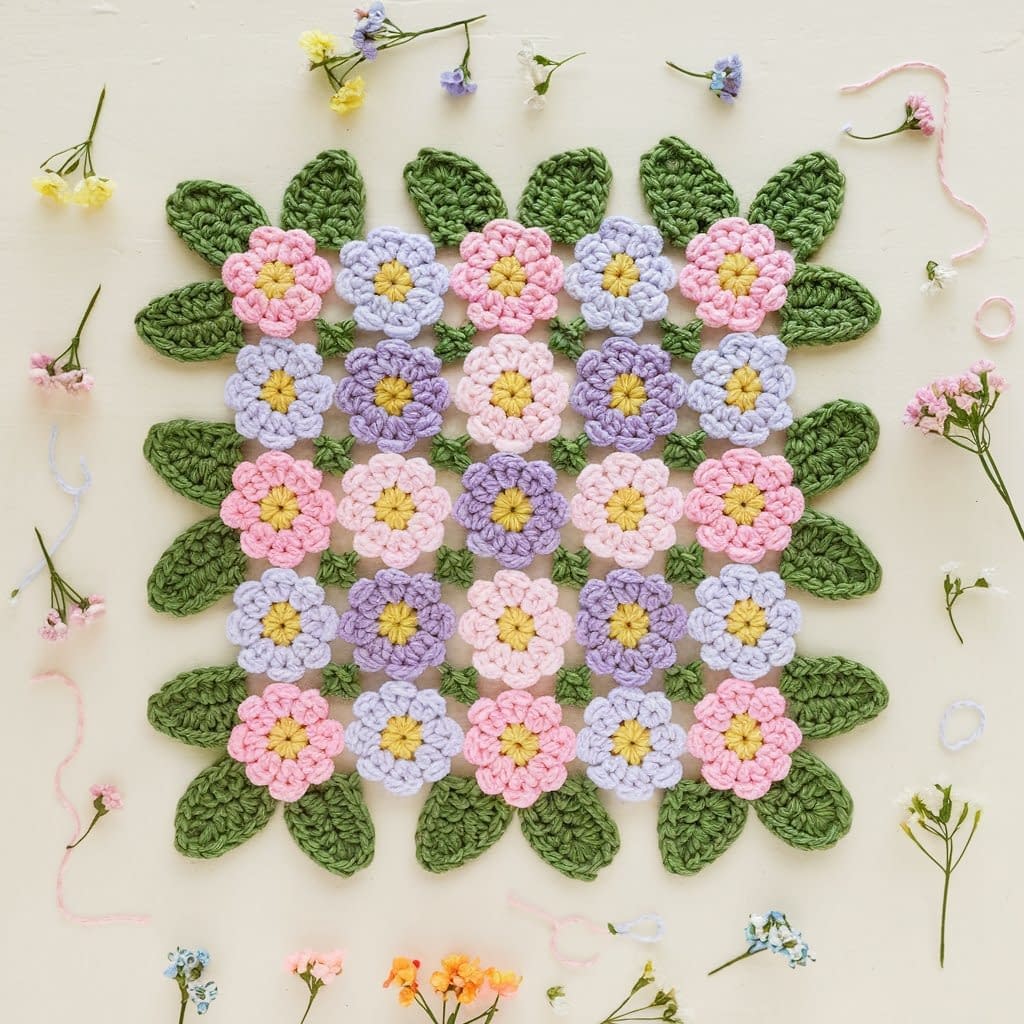
Skill Level: Advanced Beginner–Intermediate (multi-flower assembly)
Finished Size: About 6″ × 6″
Materials
- Worsted weight (#4) yarn:
- Yellow (flower centers)
- Pink, blue, lavender (petals for different flowers)
- Green (leaves)
- Neutral (background)
- Crochet hook: 4.0 mm (G)
- Yarn needle and scissors
Notes
- Unlike single-flower motifs, this square features multiple small flowers in one block.
- Best for afghans where each square looks like a “mini meadow.”
- Flowers are made separately, then attached while crocheting the square.
Instructions
Small Flowers (Make 3–5 in mixed colors)
- With yellow, make a magic ring.
- Round 1: 6 sc into ring, sl st to join. (6 sc)
- Round 2: Change to petal color. Ch 2, 2 dc in same st, ch 2, sl st in next st — repeat around to make 5 petals.
- Fasten off, weave ends.
Assembly & Background
- Arrange flowers in a cluster.
- Using green, work small leaves: Ch 5, sc in 2nd ch, hdc, dc, tr, sl st in flower base. Make 2–3 leaves per flower.
- Once flowers and leaves are in place, begin background.
- Join neutral yarn around outer edges of the cluster.
- Round 1: Sc around, filling gaps between flowers with sc or hdc as needed.
- Round 2: Transition into granny square: 3 dc, ch 2, 3 dc at corners, (3 dc, ch 1) along sides.
- Continue until square is 6″.
Finishing & Tips
- To keep flowers flat, lightly stitch them onto the background before squaring off.
- Mix petal colors for variety — no two squares need to match.
- This pattern is slightly free-form; embrace irregular flower placement for a natural meadow look.
Variations
- Add French-knot embroidery in flower centers for extra detail.
- Use pastel shades for a spring blanket, or bold jewel tones for a rich, vibrant quilt.
- Combine with plain solid granny squares for balance.
7. Forget-Me-Not Granny Square
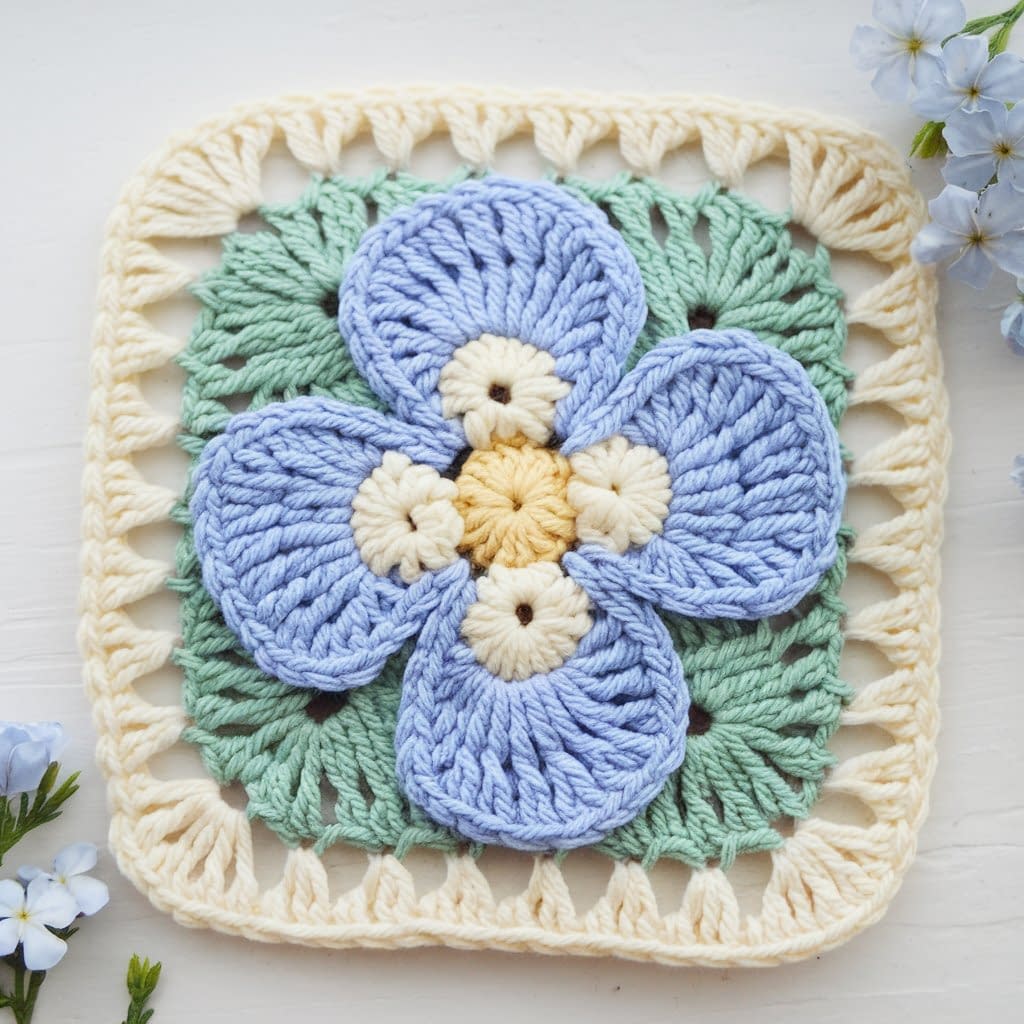
Skill Level: Beginner–Intermediate (simple flower, then squared off)
Finished Size: About 5″ × 5″
Materials
- Worsted weight (#4) yarn:
- Yellow (center)
- Light blue (petals)
- Green or cream (background)
- Crochet hook: 4.0 mm (G)
- Yarn needle and scissors
Notes
- Forget-me-nots are small, delicate flowers with five petals.
- This pattern creates a central five-petal flower surrounded by a solid granny square frame.
- Works beautifully for baby blankets, spring throws, or pastel-themed projects.
Instructions
Flower Center
- With yellow, make a magic ring.
- Round 1: Ch 1, work 5 sc into ring. Sl st to first sc. (5 sc)
Petals (Light Blue)
- Join blue into any sc.
- Round 2: (Ch 2, 3 dc, ch 2, sl st) into same st — forms one petal.
- Repeat in each of the 5 sts around → 5 rounded petals.
- Fasten off and weave ends.
Background & Square Formation
- Join green (or cream) yarn between any two petals.
- Round 3: (Ch 3, 2 dc, ch 2, 3 dc) in first space (corner).
- Then (3 dc, ch 1) in next space between petals.
- Repeat pattern around, forming a square.
- Round 4–5: Continue granny square rounds until size reaches 5″.
Finishing & Tips
- Block square so petals don’t fold inward.
- To highlight the petals, use a slightly darker background shade.
- If the flower center feels loose, tack stitches behind with needle.
Variations
- Try variegated blue yarn for a more natural look.
- Add tiny embroidered white dots on petals for extra texture.
- Make a large project by alternating forget-me-not squares with solid pastel squares.
8. Rose Bloom Granny Square

Skill Level: Intermediate–Advanced (layered petals with textured effect)
Finished Size: About 6″ × 6″
Materials
- Worsted weight (#4) yarn:
- Pink, red, or rose color (bloom)
- Green (background leaves)
- Cream/white (outer square)
- Crochet hook: 4.0 mm (G)
- Yarn needle and scissors
Notes
- The rose is built in layers: a tight center, then multiple petal rounds that “bloom” outward.
- Slightly more advanced because petals are crocheted over previous rounds to create a 3D effect.
- Ideal for pillows, bags, or feature squares in an afghan.
Instructions
Rose Center
- With rose color, make a magic ring.
- Round 1: Ch 2, 12 dc in ring. Sl st to join. (12 dc)
Petal Layers
- Round 2: Ch 3, (dc, ch 1, dc) in next st around. Creates base loops for petals.
- Round 3: Work petals into each loop: (sc, hdc, 3 dc, hdc, sc). Repeat around.
- Round 4: Behind petals, ch 4, sl st in skipped st of Round 2. Repeat, forming new loops.
- Round 5: In each loop, (sc, hdc, 5 dc, hdc, sc) for larger petals.
- Optional: Add another petal layer by repeating Round 4 with ch 5 loops → then Round 5 with bigger petals.
Background & Square Formation (Green + Cream)
- Join green behind last petal layer. Ch 3, 2 dc, ch 2, 3 dc in one space for corner.
- Continue granny clusters around, working into spaces between petals.
- Switch to cream on next round, making the square 6″.
Finishing & Tips
- This rose is dimensional — block carefully without flattening petals.
- Best used in projects where 3D texture is desirable.
- If petals flop too much, lightly tack the tips down with invisible sewing stitches.
Variations
- Try gradient yarn for petals so they shade naturally from dark center to light tips.
- Make a “wild rose” look by using pale pink petals and a yellow center.
- For a rustic look, make the background with linen or natural-tone yarns.
Tips for Working with Floral Squares
Consistency matters: Use the same yarn weight and hook size across all patterns for even joins.
Blocking is essential: Most floral squares need gentle shaping to lie flat.
Play with color: Flowers truly shine when you experiment with bold and subtle contrasts.
Joining methods: Try whip stitch for invisible seams, or continuous join-as-you-go for a neat, unified look.
Borders: A simple single crochet border ties all the squares together beautifully, while lace borders add extra elegance.
Conclusion
Floral granny squares are more than just crochet motifs — they’re a way to bring the beauty of nature into your handmade projects. From the simplicity of the classic daisy to the layered elegance of the rose bloom, each square offers unique texture, color play, and creative potential.


