
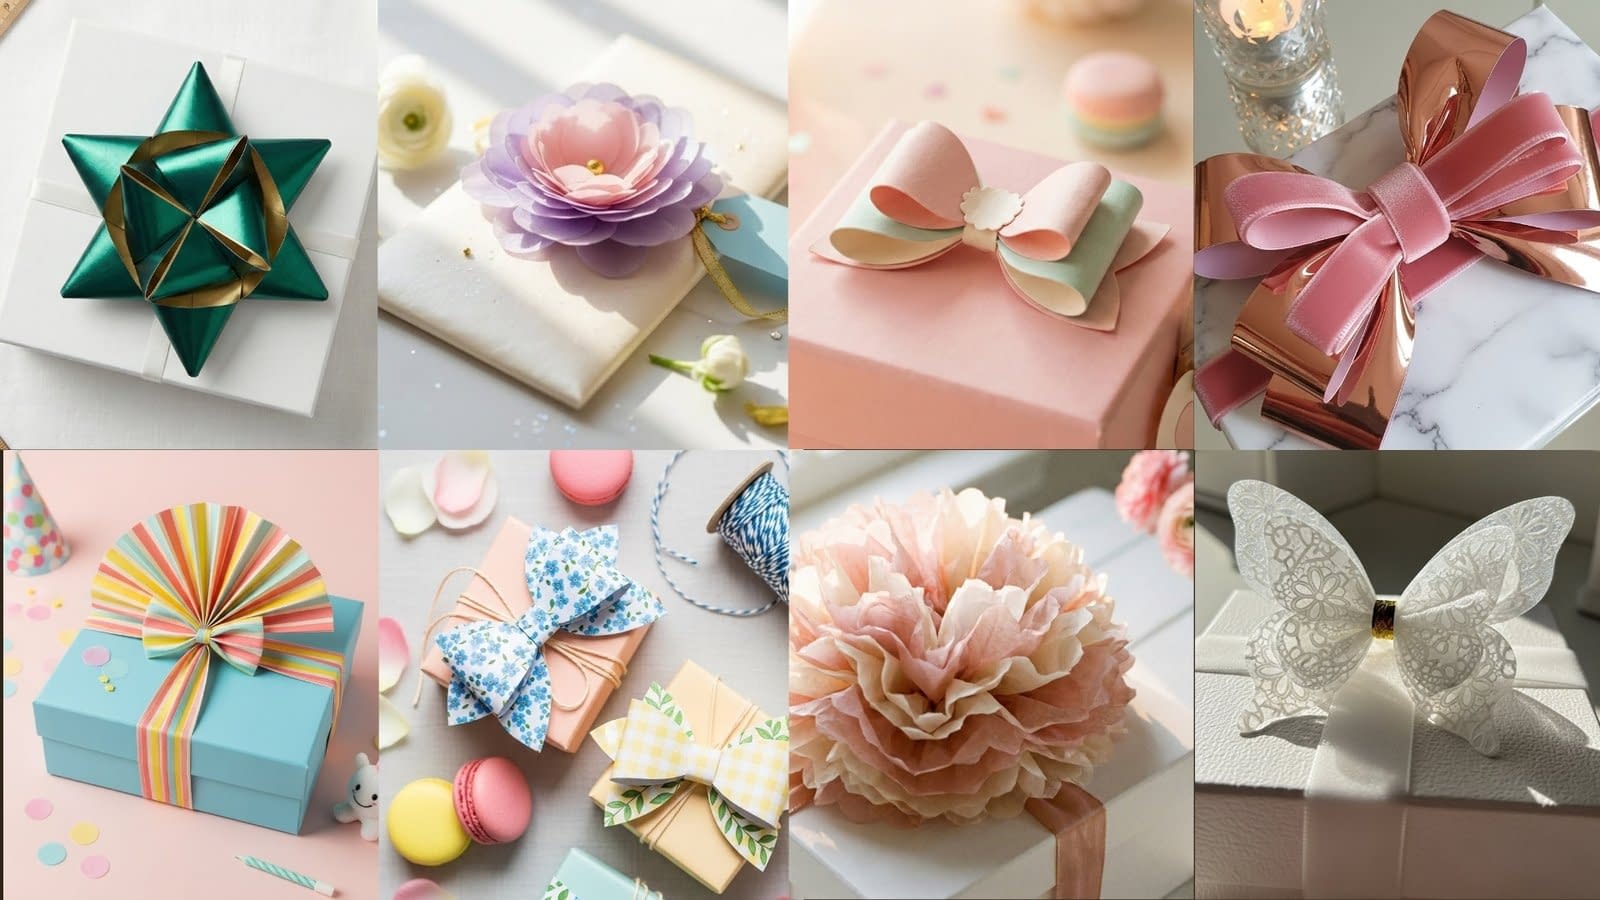
Handmade gift toppers change the whole unwrapping experience. A thoughtful paper bow can turn a simple parcel into a memorable gift, and with the right technique you can make bows that look professional, delicate, playful, or luxurious. This guide presents the first four of eight DIY Paper Bow Gift Toppers tutorials. Each tutorial is written with clear, step-by-step instructions: precise cutting and folding directions, exactly where and when to use glue, recommended tools and materials, styling suggestions, troubleshooting tips, and variations so you can tailor each bow to your project.
These four tutorials cover a range of styles—from soft tissue-paper pom-poms to small kawaii mini-bows—so you’ll learn both loose, tactile construction techniques and crisp, architectural folding methods. I’ll describe measurements, suggested paper weights, how to score and crease cleanly, and how to attach your finished topper to a box in a way that’s secure but removable. Read through the materials and tools list before starting, and keep the step-by-step sequences in order; pausing to dry, score, or adjust as advised will save time and produce much cleaner results.
Materials, Tools, and Glue — what you need
Essential materials (general)
- Tissue paper (single color or ombré), 12 x 12 inches or larger sheets
- Double-sided scrapbook paper (80–100 gsm for small bows)
- Cardstock 200–300 gsm for structured mini-bows
- Metallic foil paper (thin foil-backed paper for mirror shine)
- Vellum sheets (for translucent petal bows)
- Small ribbon scraps (velvet, satin, or thin grosgrain) for centers and ties
- Thin floral wire or craft string (for tying internal structure)
- Hot glue sticks (low-temp for delicate papers, high-temp for heavy cardstock)
- Strong craft glue or tacky glue
- Double-sided tape (foam tape optional for dimension)
- Glue dots (clear, removable)
Essential tools
- Sharp scissors (fine-point for detail work)
- Craft knife and self-healing mat
- Metal ruler (for crisp straight cuts)
- Bone folder or scoring tool (for neat creases)
- Circle punches and scallop punches (optional, speeds work)
- Cutting templates (printed or drawn)
- Tweezers (for tiny folds)
- Clothespins or binder clips (for holding while glue sets)
- Small paintbrush (for spreading liquid glue thinly)
Adhesive guidance — which glue when
- Hot glue: fast-setting, excellent for attaching to boxes and bonding mixed materials (foil to velvet). Use low-temp hot glue for tissue, vellum, and thin papers to avoid scorching and warping.
- Tacky glue / PVA craft glue: best for paper-to-paper joins where you need a little working time and invisible seam; allow drying under light weight or a clip.
- Double-sided tape / glue dots: best for instant, clean attachment to gifts where you may want removability. Use foam double-sided tape when you want the bow to sit proud of the box.
- Glue stick: useful only for lightweight paper where seam strength isn’t critical — avoid for structural bows.
Keep adhesives nearby and test on scrap paper before committing to a final join. With delicate papers (tissue, vellum), less is more — thin beads or small dots of glue prevent puckering.
Tutorial 1 — Dreamy Pom-Pom Tissue Paper Bow (voluminous flower-style)

This soft, fluffy pom-pom bow reads like a flower and is perfect for feminine, romantic wrapping. It’s ideal for bridal gifts, baby showers, and any present you want to feel airy and luxurious.
Finished size and materials
- Finished diameter: 6–9 inches depending on sheet size and number of layers.
- Materials: 8–12 sheets of 12 x 18 inch tissue paper (or 10–15 sheets of 12 x 12 for slightly smaller), thin wired floral tape or ribbon, optional decorative center (rose-gold ribbon, faux pearl).
- Tools: scissors, bone folder or ruler to crease, double-sided tape or low-temp hot glue for final attachment.
Step-by-step construction
- Prepare sheets
- Stack 8–12 sheets of tissue paper neatly, aligning edges.
- For a larger, fuller pom-pom use 12–15 thinner sheets; for a tighter, more controlled puff use 8–10 thicker sheets.
- Fold accordion (fan) style
- With the long edge horizontal, begin folding an accordion fold 1 to 1.5 inches wide (25–40 mm) across the shorter dimension. Keep folds even; use a metal ruler to press down each fold for a sharper crease.
- Continue until the entire stack is folded. The width of the accordion determines petal size: smaller folds = more defined ruffles; larger folds = looser, cloudier petals.
- Round or fringe the edges (two options)
- For a petal-like look, use scissors to round both ends of the folded strip into semicircles.
- For a fringed, textured look, cut thin vertical slits (~1–2 mm apart) along one or both long edges, stopping about 1/2–1 inch from the center fold.
- Secure the center
- Find the center of the accordion fold and wrap a 6–8-inch length of thin floral wire, twist tightly. If using ribbon instead of wire, tie a tight knot and leave tails for a neat center bow.
- If you don’t want twisted wire visible, cover center with a band of ribbon or craft-paper ring glued with a dot of hot glue.
- Fan and separate layers
- Gently fan the folded stack open into a full semi-circle, then begin to separate each tissue layer upward and outward, pulling towards the center to create volume. Work slowly; tissue tears easily.
- Alternate layers from each side to build symmetrical fullness. Fluff until you achieve desired roundness.
- Finish and attach to box
- Trim and neaten outer petals if needed.
- To secure to the gift, either:
- Use a wide glue dot or hot glue on the bottom center and press onto box, or
- Thread the wire tails under the gift ribbon and twist beneath the box for a removable attachment.
- Add a small decorative center (mini faux flower, metallic dot) with a tiny drop of glue for a polished look.
Tips, variations, and troubleshooting
- If tissue tears while separating, back the pull off and use tweezers to lift from a slightly different angle.
- For ombré or two-tone effect: alternate lighter and darker tissue sheets in the stack.
- To store: compress gently and re-fluff before use. Pom-poms made from tissue do not travel well under heavy pressure.
- Use low-temp glue for delicate tissue; high-temp will brown thin paper.
Where to use
Best for bridal showers, baby gifts, Valentine’s Day packages, or any occasion where a soft, romantic aesthetic is desired.
Tutorial 2 — Layered Scrapbook Paper Mini Bows (three sizes flat-lay)

This overhead flat-lay friendly bow is designed for small jewelry-sized gift boxes. It uses double-sided scrapbook paper and builds neat loops for a tidy, photo-ready finish.
Finished size and materials
- Finished sizes: small (1.5–2 in), medium (2.5–3 in), large (3.5–4 in).
- Materials: double-sided scrapbook paper (80–100 gsm), narrow double-sided tape, glue dots, thin cardstock circle bases (optional), baker’s twine or thin ribbon for center knot.
- Tools: metal ruler, craft knife, scoring tool, paper trimmer, small hole punch.
Step-by-step construction (single size, scale for others)
- Cut strips for loops
- For a 3-inch finished bow: cut six strips of paper at 3/4 in x 4 in for inner loops and six strips at 3/4 in x 5.5 in for outer loops. Adjust proportionally for other sizes.
- Use a metal ruler and craft knife for precise, straight edges.
- Score and form loops
- On each strip, mark and score the midpoint using the bone folder for a smooth join. Bring ends together forming a loop; adhere with a small strip of double-sided tape or a half drop of tacky glue on the inside seam. Repeat for all strips.
- For symmetry, ensure seams are centered on the underside of each loop.
- Prepare base and layer
- Cut a small circle base from cardstock (approx. 1.25 in for a 3 in bow). This will hide seams and give a glueable surface.
- Arrange three larger loops evenly around the base, slightly tilted outward, and fix with glue dots. Add the next three large loops offset between the first set to form the outer layer.
- Add inner layer
- Repeat with the smaller loops on top of the outer ones, controlling height by stacking with foam glue dots if you want dimension.
- For a sleek flat-lay look, flatten layers lightly before securing so bow reads well from above.
- Finish center
- Wrap a 1/4-inch strip of contrasting paper or a thin ribbon around the center, glue the ends underneath the base. Alternatively, tie a tiny baker’s twine bow and mount it to the center with a glue dot.
- Attach to box
- Use a square of double-sided tape under the base circle or a single glue dot for removable application. For a secure hold, apply a small dab of hot glue (test on scrap first).
Tips, variations, and troubleshooting
- For crisp lines, use heavier double-sided scrapbook sheets; they hold loop shape better than very lightweight paper.
- If seams show, rotate the base until seams are hidden beneath loops or use a slightly larger base.
- Try mixing patterns—gingham with florals—but keep scale consistent: small prints for small bows, larger prints for larger bows to avoid pattern clash.
Where to use
Perfect for small boxes, jewelry packaging, party favours, and any instance where a neat, tailored presentation is wanted. Works exceptionally well in product photography and Pinterest thumbnails.
Tutorial 3 — Metallic Rose Gold Foil Bow with Velvet Center (luxury mixed-texture bow)

This bow mixes the high-shine of metallic foil with the softness of velvet. The contrast between a stiff, reflective paper and plush ribbon yields a high-end boutique look.
Finished size and materials
- Finished width: 4–6 inches depending on loop count.
- Materials: metallic foil paper (80–120 gsm foil-backed), soft velvet ribbon 3/8 in–1/2 in wide, small circle of 250 gsm cardstock for base, hot glue (high-temp optional for heavy foil), thin wire or heavy-duty double-sided tape.
- Tools: bone folder, metal ruler, scissors, craft knife, cloth to protect work surface from hot glue.
Step-by-step construction
- Prepare metallic loops
- Cut six to eight pairs of loop strips. For a 5 in bow, cut pairs at 1 in x 6 in for main loops and 1 in x 4.5 in for inner loops.
- Score each strip at the midpoint using a bone folder—foil paper benefits from a light score to avoid cracking the metal layer.
- Create loop shapes
- Fold each strip ends together at the score to create a loop, securing seam with a tiny bead of hot glue on the underside. Press seam gently until set.
- Keep seams hidden on the underside of each loop.
- Form the layered structure
- Cut a sturdy base circle (approx. 1.5 in). Arrange the larger metallic loops evenly and glue onto the base with hot glue in a radial pattern. Add the inner loops offset and slightly raised.
- Use minimal hot glue to avoid blistering the foil finish; apply glue to the cardstock base rather than directly to foil if possible.
- Add velvet center
- Cut a 6-in length of velvet ribbon. Tie into a simple knot or small bow. Alternatively, form a wrapped band: wrap ribbon around center and hot-glue ends to the underside of the cardstock base.
- For a neat finished look, trim ribbon tails at an angle or with a dovetail cut.
- Secure to gift
- Because metallic foil can be slippery, use a generous application of hot glue for permanent attachment or place a strip of heavy-duty double-sided tape under the cardstock base for a removable option.
Tips, variations, and troubleshooting
- If foil paper peels where you score, use a slightly shallower score or score only the backing paper and fold gently.
- For very shiny, mirror-like foil, avoid touching the visible surfaces with glue; work from the back or underside.
- Try different textures for the center: a knotted velvet gives softness; a small brooch or faux pearl jewel raises the luxury level.
Where to use
Perfect for wedding gifts, anniversary presents, premium product packaging, or holiday gifts that need a boutique feel.
Tutorial 4 — Mini Layered Scalloped Cardstock Bow (kawaii, miniature topper)

This tiny bow is delicate and cute—kawaii-ready for small pastel boxes. It emphasizes visible paper fibers and scalloped edges for a hand-made charm.
Finished size and materials
- Finished width: approximately 1.25–1.5 inches.
- Materials: lightweight cardstock (200–260 gsm) in pastel shades, scalloped-edge punch or scallop template, small clothespin (optional), glue dots or low-temp hot glue.
- Tools: fine-point scissors, scalloped-edge punch or template, craft knife for interior cuts, small circle punch (1/2 in), tweezers.
Step-by-step construction
- Cut scalloped loops
- Using a scallop punch or by drawing a scalloped strip template, cut six small strips at 1/2 in x 2 in. For a scalloped oval loop, punch two matching scalloped circles and cut them in half lengthwise to make symmetrical scalloped strips.
- Keeping pattern consistent across strips ensures a neat stacked look.
- Score loop midpoints and form
- Lightly score the midpoint of each strip with a bone folder. Bring ends together to form a loop, overlapping by about 1/8 in, and secure with a small piece of double-sided tape or a tiny dot of tacky glue on the underside.
- Layer loops
- Prepare a tiny cardstock base (a 3/4 in circle). Arrange three outer scalloped loops evenly and secure with glue dots. Add three inner loops offset between the outer ones to create a mini full bow.
- Gentle pressure will flatten scallops slightly and help the bow read cute rather than puffy.
- Add scalloped center
- Punch or cut a tiny scalloped circle (3/8 in) and glue it over the center to hide seams and create a visual focal point.
- For an extra kawaii touch, glue a micro heart confetti or tiny pearl on top.
- Attach using a clothespin or glue dot
- For gift-tag convenience, glue the mini bow to the top of a small wooden clothespin. The clothespin can clip onto ribbon or tag.
- Alternatively, use a small glue dot under the base for direct attachment to the box.
Tips, variations, and troubleshooting
- If the scallop punch tears the cardstock, switch to a heavier-weight paper or slow down feed speed through the punch.
- Keep glue minimal; over-gluing flattens scallops and hides the delicate edge.
- For visible paper fibers and “soft” edges, use lightly textured cardstock and avoid over-scoring.
Where to use
Tiny boxes, baked-goods packaging, flat-lay product photos, baby-shower favours, and any present where a sweet, handcrafted touch is desirable.
Common finishing touches and photography tips for all bows
Finishing touches
- Edge inks: lightly brush the outermost edges of paper bows with a soft ink pad for vintage depth.
- Micro-glitter: for vellum or foil, a thin dusting of fine glitter on the center adds sparkle—but test before committing to a large batch.
- Removable vs permanent attachment: use glue dots if you expect the recipient to reuse the box or ribbon. Use hot glue for secure, transport-safe attachment.
Photography & styling suggestions
- For soft bows (tissue, vellum), use diffused window light and a 50mm lens with shallow depth of field to emphasize texture and translucency.
- For metallic and crisp bows, shoot under clean studio light with small aperture (f/5.6–8) to capture micro-reflections and fold edges.
- For flat-lay tutorial images, include step-inset panels (cutting, folding, final assembly) with consistent negative space to match the aesthetic of the bow.
Troubleshooting: quick fixes for common mistakes
- Warped foil or puckered tissue: allow adhesives to dry under light pressure and use minimal glue. Replace any badly warped piece rather than fight it.
- Visible seams: rotate the bow to hide seams underneath, or cover seams with a center band or scalloped circle.
- Torn edges on delicate paper: use a micro-tip pair of scissors and make cuts with the paper supported on a flat surface. For tissue, alternate cutting with tearing for a softer edge.
- Bow won’t sit flat: check base is level; add a small felt pad or foam double-sided tape beneath heavy centers to level the bow.
Closing for part one
You now have four fully detailed tutorials from the full set of 8 DIY Paper Bow Gift Toppers tutorials. Each tutorial includes exact cutting and folding guidance, glue guidance, finishing tips, variations, and where each style works best. When you’re ready, tell me to continue and I’ll deliver the remaining four tutorials (petal vellum bow, butterfly vellum bow, crepe-pleated accordion bow, and the origami star-style metallic bow) with the same level of detail and step-by-step clarity.
Tutorial 5 — Candy-Striped Accordion Crepe Paper Bow (playful, party-ready)

This bright, pleated bow uses thin glossy crepe to create chunky, translucent fans with punchy color—perfect for birthday, baby party, and playful packaging.
Finished size and materials
- Finished width: 4–6 inches (adjust by number of pleats and strip length).
- Materials: thin glossy crepe paper (striped or solid; coral, lemon, mint suggested), narrow matching crepe for banding, 1/8 in clear elastic or floral wire, small glue dots or low-temp hot glue, optional tiny bow or plushie accent.
- Tools: metal ruler, scissors, bone folder or smoothing tool, hot glue gun (low-temp recommended for crepe), craft knife, cutting mat, cloth to protect work surface.
How the bow works (brief mechanics)
Crepe pleating relies on controlled accordion folds to produce translucent ridges that fan out like a handheld fan. The band in the center compresses the pleats and holds the fan shape. Because crepe is elastic, you can control volume by stretching or compressing slightly while pleating.
Step-by-step construction
- Cut and prepare strips
- For a 5 in finished fan-bow, cut two or three strips of crepe paper 1.5–2 in wide by 14–18 in long. Longer strips = larger fan. If using patterned crepe, orient stripes along the length for vertical stripe effect when folded.
- Trim edges straight with a metal ruler and scissors.
- Score lightly (optional)
- Crepe doesn’t need a deep score; you can mark fold lines with a bone folder or your fingernail every 0.5–0.75 in to guide even pleats. For the cleanest result, fold on a flat surface using a ruler as a guide.
- Accordion-fold the strip
- With the long edge horizontal, fold a 1/2–3/4 in accordion fold along the length. Keep each fold the same width—use the ruler to preserve consistency.
- For a chunkier look, use 3/4 in folds; for more delicate pleats, use 1/2 in.
- Secure the center
- Find the center of the folded strip and pinch tightly. Wrap a short piece of clear elastic or thin floral wire around the center and twist to secure. If elastic is used, tie a tiny knot; if wire, twist neatly and fold the tails down.
- Trim wire tails and bend them under; cover the center later with a band of matching crepe or ribbon.
- Fan and shape
- Gently fan the pleats outward on both sides of the center. Crepe will hold curved shape; adjust pleat spacing with your fingers to make a symmetrical fan.
- If making a layered bow, glue the bottom of a smaller fan to the center back of a larger fan offset by 30 degrees, giving a fuller appearance.
- Band or tie the center
- Wrap a 1/2 in wide strip of crepe or a velvet ribbon around the center to hide the tying element. Glue the ends underneath the bow with a tiny drop of low-temp hot glue.
- Add a small decorative accent (mini plushie, candle, confetti) glued to the center for a playful finish.
- Attach to box
- Use a large glue dot or a small pool of low-temp hot glue under the center of the bow. For removable use, thread the elastic/wire tails under the gift ribbon and tie beneath the package.
Tips, variations, and troubleshooting
- If pleats slip, add a small dot of hot glue at the back center where the band will cover it—this secures without visible glue.
- For ombré effects, layer strips in graduated colors before pleating.
- Avoid high-temp glue on thin, glossy crepe as heat can melt/warp the gloss finish—low-temp is safer.
- For a tutorial thumbnail, include three small step panels showing pleating, center tie, and final fan on the box.
Where to use
Birthday parcels, party favour boxes, children’s gifts, and any project needing bright, cheerful presentation.
Tutorial 6 — Floral Petal Vellum Bow (elegant, translucent petals with pearl shimmer)

This dainty bow is constructed from scalloped vellum petals layered to mimic a blossom. The translucent quality of vellum adds luminosity, making it ideal for elegant, Instagram-ready packaging.
Finished size and materials
- Finished diameter: 3–5 inches depending on petal count and sheet size.
- Materials: vellum sheets (90–120 gsm preferably with slight pearl finish), scissors or circle punches, gold-foil dot stickers for centers (or small gold ribbon), craft glue (PVA/tacky glue) or low-temp hot glue, 250–300 gsm cardstock for base.
- Tools: 100mm macro-friendly scissors, scallop punch or circle punch (1–2 in sizes), bone folder, tweezers, small paintbrush for glue.
How the bow works (brief mechanics)
The layered petal construction uses slight offsets and vertical relief to create depth. Because vellum is semi-translucent, glue placement matters: visible glue can cloud the material, so thin applications and hiding glue on the underside produce the best results.
Step-by-step construction
- Cut petals
- Use a 1.75–2.25 in circle punch to cut multiple circles from vellum. For a 4 in final bow, cut 8–12 circles.
- Cut each circle in half to create symmetrical petal halves. Alternatively, cut scalloped oval petals using a template: fold vellum and cut mirrored halves for perfect symmetry.
- Shape petals
- Lightly curl each petal by running the edge across a bone folder or wrapping around a pencil for a gentle convex curve. Don’t over-curve; vellum is fragile and may crease permanently.
- For scalloped petals, press gently at the base to create a small fold that helps petals stand outward.
- Prepare base
- Cut a sturdy cardstock circle (approx. 1.25 in for a 4 in bow). This gives a surface to glue to and keeps glue from showing on the top layer of vellum.
- Layer petals
- Apply a very thin dot of tacky glue near the center underside of a petal and press onto the base, petal pointing outward. Use tweezers for precision.
- Work in a radial pattern: glue 4–6 outer petals, then add an inner ring offset between outer petals. Slightly raise inner petals by placing a tiny foam dot or a folded piece of vellum under their base for dimension.
- Add center embellishment
- Cover the center with a tiny gold-foil dot sticker, a wrapped gold ribbon band, or a small faux pearl glued with a touch of tacky glue.
- If using glitter, apply a minimal amount to only the center to prevent shedding.
- Attach to gift
- Because vellum is delicate, avoid aggressive hot glue directly on top. Apply a small square of double-sided tape under the cardstock base for removable use. For transport-safe permanent attachment, use a small dab of low-temp hot glue under the cardstock base.
Tips, variations, and troubleshooting
- Avoid wet glue on the top surfaces of vellum, since some glues can leave cloudy residue—use tiny amounts and spread with a paintbrush if needed.
- For pearly shimmer, choose vellum with a slight sheen; when photographed with side backlight, the translucency will glow.
- If vellum wrinkles during shaping, lay flat under a heavy book for a few minutes after glueing to flatten and set.
Where to use
Wedding presents, anniversary gifts, refined holiday packages, or any box that benefits from a soft, luxe finish.
Tutorial 7 — Butterfly Vellum Bow (translucent lace-embossed butterfly)

A delicate, butterfly-shaped topper made from milky-white vellum with an embossed lace pattern. Backlit, this bow glows and reads like an ethereal accent—great for feminine, romantic stationery and vanity-styled gifts.
Finished size and materials
- Finished wingspan: 2.5–4 inches.
- Materials: milky-white translucent vellum with embossed lace texture (or emboss pattern by hand with an embossing folder), gold foil tape for wrap, tiny gold ribbon scrap, removable glue dots.
- Tools: craft knife, small cutting mat, metal ruler, embossing folder and machine (optional), bone folder, tweezers, small hole punch for antennae if needed.
How the bow works (brief mechanics)
The butterfly shape is a single-piece or multi-piece assembly that uses pleats or gentle folds to give wings volume and a slight three-dimensional form. The center band compresses the middle for a butterfly waist and hides seams.
Step-by-step construction
- Cut the butterfly shape
- Draw or print a butterfly template sized to your desired wingspan. Place/v trace template onto vellum and cut carefully with a craft knife or sharp scissors. If using an embossing folder, emboss sheets before cutting.
- If you don’t have an embossing folder, create a lace-like pattern with a white gel pen or use a white-on-white patterned vellum.
- Form wing folds for volume
- Lightly score a shallow crease down the center of the butterfly’s body line. Gently fold the wings upward along this crease to create a slight dihedral angle (wings tilted up). This gives a natural raised wing look.
- For more texture, make two small accordion tucks at the base of each wing (1/8 in deep) and secure underside with a tiny glue dot to create a fluttering three-dimensional base.
- Add center band (waist)
- Cut a 1/4 in wide strip of gold foil tape or ribbon. Wrap it around the center, pinching lightly to form the waist. Overlap tape ends on the underside and press firmly.
- If using ribbon, tie a tiny knot and glue the tails underneath. Trim tails neatly.
- Antennae and finishing
- For antennae, use a micro length of gold thread or thin wire and curl with tweezers; attach under the center band with a tiny dot of glue.
- If you want more lift, place a small foam adhesive circle under the center of the butterfly to elevate it slightly above the box surface.
- Attach to gift
- For a vanity or display box, place a removable glue dot under the foam or the center band. For shipment, use a dab of low-temp hot glue at the underside center.
Tips, variations, and troubleshooting
- If embossed pattern fades when folding, avoid creasing directly through highly embossed areas; instead, fold through flatter zones or gently roll the fold.
- For a sunny, glowing effect, position the butterfly on the package so that natural or artificial backlight can shine through the wings.
- To make a double-wing butterfly, cut two identical shapes, glue centers offset slightly, then band together for extra dimension.
Where to use
Sunlit vanity boxes, feminine gift wrap, bridal shower favours, and curated stationery bundles.
Tutorial 8 — Origami Star-Style Six-Point Metallic Bow (geometric, modern)

This crisp, geometric star-style bow folds into a precise six-point star. It looks architectural and modern when crafted from metallic-foil paper. The tutorial includes three assembly-step visuals you should photograph for a how-to: square fold, point formation, and final star on the gift.
Finished size and materials
- Finished diameter: 3–6 inches depending on paper size.
- Materials: metallic-foil paper (deep emerald with matte gold underside recommended), thin double-sided tape, bone folder, small circle or star base (cardstock), thin satin ribbon for final tie.
- Tools: metal ruler, cutting mat, craft knife, scoring tool, corner cutter (optional), bone folder.
How the bow works (brief mechanics)
The star is built from modular origami — multiple folded units (points) lock together around a central base without heavy glue. Each unit is a folded square that interlocks by tucking flaps into pockets formed by neighboring units. Use crisp scoring and precise folding for sharp points and clean reflections.
Step-by-step construction (six-point modular star)
- Prepare paper squares
- Cut six identical squares of metallic-foil paper. For a 4–5 in star, use 3.5–4 in squares. Ensure edges are perfectly straight.
- Work on a clean surface to avoid scratches to the foil.
- Basic folding of one unit (repeat six times)
- Fold square in half diagonally both ways to make an ‘X’ crease, then unfold.
- Fold each corner to the center point, creating a smaller square. Unfold corners so you have crease lines to work from.
- Fold the top and bottom edges to the center line, creating a rectangle. Use the bone folder to press crisp creases.
- Open one side slightly and reverse-fold the corners inward to form a triangular flap; this flap will become a locking tab.
- Tuck the triangular tab into the pocket created by the adjacent folded layer—this creates a unit with one pointed tip and one tucked edge. Repeat for all six squares, ensuring all points face the same way.
- Assemble the star
- Arrange the six units in a circle with pointed tips outward. Tuck the tabs of each unit under the adjacent unit’s flap; the metallic paper’s stiffness will hold the connection if creases are precise.
- Work around the circle, tucking and aligning. If a unit resists tucking, slightly widen the receiving pocket by gently prying the opened layer with your fingernail or a tweezer.
- Once all six units are interlocked, gently press the center to set the joins.
- Secure and finish
- For permanent stability, add a small dot of clear craft glue under each tucked tab (on the underside) and let dry. Use minimal glue to avoid seepage.
- Cover the center underside with a cardstock star or circle to hide joins and provide a clean attachment surface.
- Add a thin satin ribbon tied beneath or a small metallic band wrapped around the center if desired.
- Attach to box and photograph steps
- For a removable presentation, slide a thin ribbon under the star and tie beneath the box. For a permanent bond, apply a small dot of hot glue to the center of the cardstock base and press onto the box.
- Photograph three assembly steps: (1) square paper folded, showing center creases, (2) forming a point and tucking a tab, (3) final star placed on the gift with a clean white backdrop and soft overhead lighting (f/5.6) to capture metallic sheen and crisp folds.
Tips, variations, and troubleshooting
- Precision matters: misaligned squares will distort the star. Use a metal ruler and craft knife to cut exact squares.
- If metallic foil flakes or creases unsightly, flip to the matte underside for inner folds and only show metallic face outside for best reflections.
- For larger stars, reinforce joins with a tiny strip of double-sided tape under each tab.
- Try mixing papers: matte gold underside + metallic emerald exterior creates a beautiful contrast as folds catch the light.
Where to use
Modern, minimalist gift wrapping, corporate gifts, holiday packaging with a luxe modern twist, and curated product photos where geometric forms read as premium.
Final finishing advice for the full set of 8 DIY Paper Bow Gift Toppers tutorials
Secure attachment methods summary
- Removable: glue dots, double-sided tape, threading wire/elastic under ribbon.
- Semi-permanent: low-temp hot glue on cardstock base.
- Permanent/shipment-safe: high-temp hot glue applied under the base (avoid on delicate vellum or tissue).
Grouping and styling suggestions
- Mix and match: pair a metallic star with a small tissue pom-pom for contrast between structured and soft.
- Color harmony: keep one accent color and vary tones across bows to maintain a cohesive palette.
- Photo-ready staging: use negative space, soft natural light for translucent materials, and small step-inset images for tutorials (cut, fold, attach).
Troubleshooting quick reference
- Visible glue: hide under cardstock base or center band; use thin glue layers.
- Tearing when folding: reduce crease depth, use heavier paper, and fold slowly with support.
- Uneven symmetry: re-cut mis-sized strips or re-fold units; origami units often require remaking rather than patching.
Closing and next steps
You now have the complete set of 8 DIY Paper Bow Gift Toppers tutorials with detailed, practical instructions for cutting, folding, gluing, and finishing each bow. These eight tutorials cover soft, romantic tissue pom-poms, precise origami stars, translucent vellum petals and butterflies, playful crepe fans, metallic luxury bows, and small scalloped cardstock toppers—tools and techniques that together form a versatile skill set for any gift-wrapping project.


