
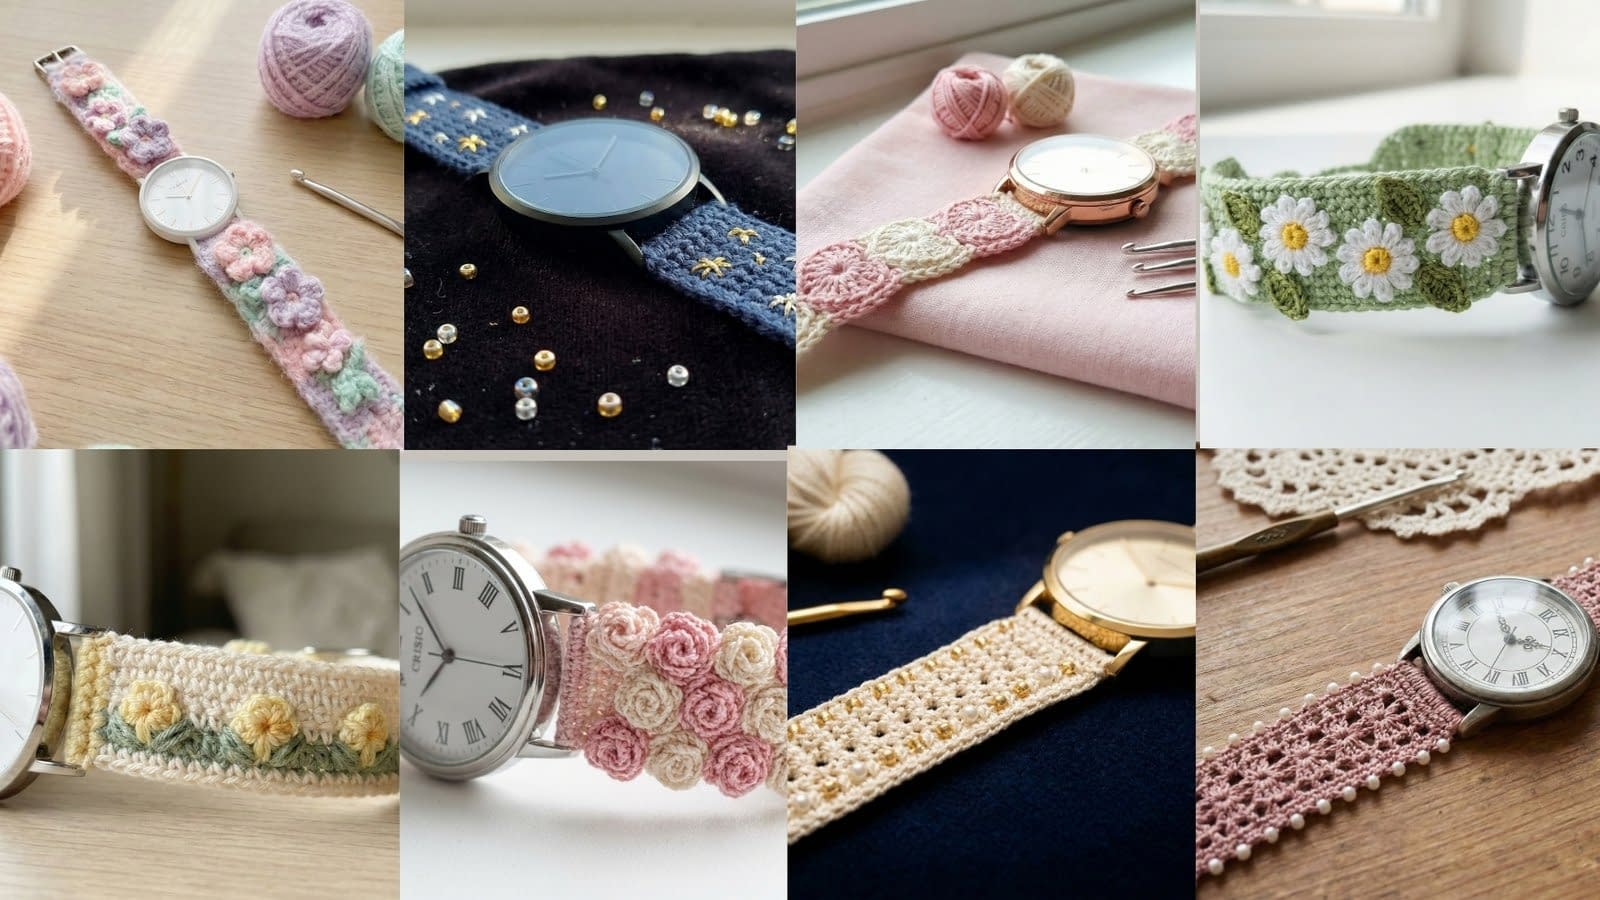
Transforming a simple timepiece into a personalized statement piece is one of the most satisfying projects for a fiber artist. These 8 Crochet Watch Strap Patterns offer a unique blend of functionality and style, allowing you to replace standard leather or silicone bands with soft, textured, and intricate handmade designs. Whether you prefer the subtle shimmer of beads, the romantic touch of vintage lace, or the playful charm of pastel florals, there is a design here to suit every aesthetic.
This comprehensive guide is designed for crafters who appreciate detail. We will explore not just the crochet stitches, but the essential construction techniques that ensure your strap is durable and comfortable. You will learn how to size your strap correctly, how to incorporate beads seamlessly, and how to line your work for a professional finish.
Essential Tools and Materials for Watch Straps
Before diving into the tutorials, it is vital to gather the correct materials. Watch straps require a higher tension and more durable fiber than a typical scarf or blanket.
- Yarn Selection: Mercerized cotton is the gold standard for watch straps. It provides excellent stitch definition, minimal stretch, and a subtle sheen that looks expensive. Avoid wool or acrylics that may fuzz or pill with friction.
- Hook Size: You will generally need a much smaller hook than usual, typically between 1.5 mm and 2.5 mm. This ensures a tight fabric that holds its shape.
- Watch Face: You can recycle an old watch face by cutting off the existing strap or purchase a watch face specifically for jewelry making. Ensure it has bars or loops to attach your yarn.
- Backing Materials: To prevent the crochet fabric from stretching out of shape, we will use felt or thin leather for backing.
- Adhesives: A strong, clear-drying fabric glue is essential for securing the backing and weaving in stubborn ends.
Understanding the Construction
Creating a watch strap involves more than just crocheting a strip. The connection points to the watch face are critical. In these tutorials, we will focus on two main methods: working directly off the watch pins (if removable) or sewing the finished strap around the bars. We will also cover how to finish the strap ends with D-rings, buckles, or button closures. For the most professional look, we will be lining these straps. This involves cutting a precise shape from felt or fabric and gluing it to the back of your work. This step protects your skin from any knots or wire beads and gives the strap a robust, store-bought feel.
1. Beaded Crochet Watch Strap
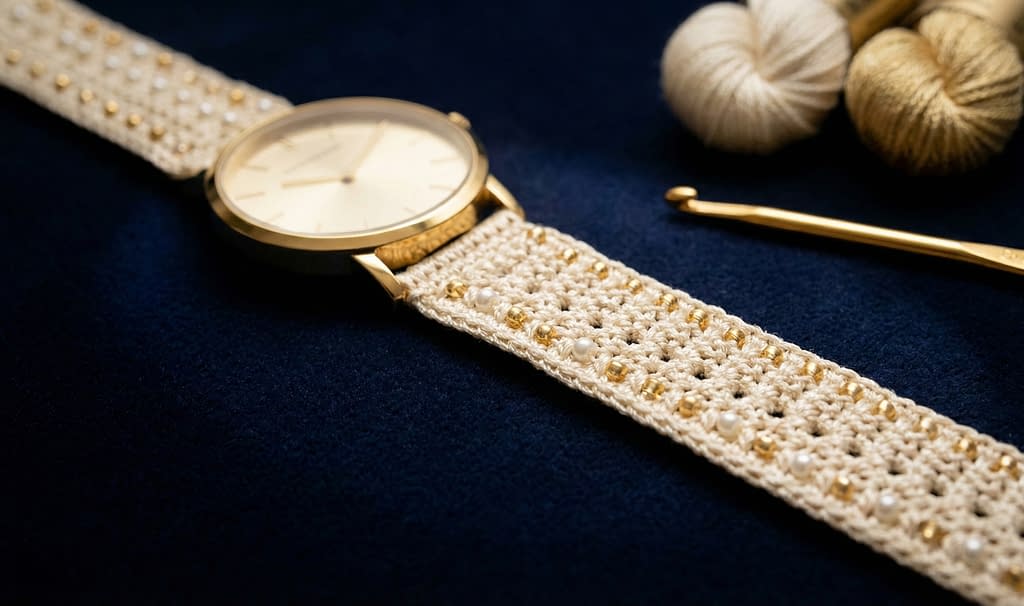
This design epitomizes understated luxury. It features a cream-colored yarn base integrated with tiny gold or pearl beads. The beads are not merely sewn on top but are crocheted into the stitches themselves, ensuring they remain secure. The texture is fine and dense, providing a sturdy backdrop for the shimmer of the beads. This strap pairs perfectly with a gold watch face and is ideal for evening wear or adding a touch of glamour to a daily outfit.
Materials Needed
- Mercerized cotton thread size 10 in cream or ivory.
- Steel crochet hook size 1.5 mm or 1.75 mm.
- Gold seed beads or small glass pearls (size 11/0 or 8/0).
- Beading needle.
- Gold watch face.
- Jewelry clasp or toggle closure.
- Cream felt for backing.
- Fabric glue.
Step 1: Pre-Stringing the Beads
Before you make your first slip knot, you must prepare your yarn. Thread the end of your cream cotton yarn through the beading needle. String approximately 100 to 150 beads onto the yarn. It is always better to have too many beads than too few, as you cannot add more once the yarn is cut without creating a knot. Push these beads further down the skein so they are out of the way while you work the foundation rows.
Step 2: Creating the Foundation
Measure the width of your watch face bars. You want your strap to be exactly this width. Start with a slip knot and chain enough stitches to match this width (usually 6 to 8 chains).
Row 1: Single crochet in the second chain from the hook and in each chain across. Chain 1 and turn. Row 2: Single crochet in each stitch across. Chain 1 and turn.
Check the width against your watch face. It should fit snugly between the lugs. If it is too wide, reduce your starting chain by one; if too narrow, add one.
Step 3: Integrating the Beads
Now you will begin the beaded pattern. You can choose to bead every stitch for maximum shimmer or alternate stitches for a scattered look.
Row 3 (Beaded Row): Insert your hook into the first stitch. Pull up a loop. Slide one bead down the yarn until it sits right next to the hook. Yarn over (capturing the bead) and pull through both loops on the hook. The bead should pop out to the back of the work (which will be the right side). Single crochet in the next stitch without a bead to space them out. Repeat across the row. Chain 1 and turn.
Row 4 (Plain Row): Single crochet in every stitch across. This secures the row below and provides spacing.
Repeat Row 3 and Row 4 until the first half of the strap reaches the desired length for your wrist.
Step 4: Attaching to the Watch
There are two ways to attach this to the watch. The most secure method for this delicate design is to pass the strap end through the watch bar.
Work until the strap is about 1 inch longer than needed. Pass the finished crochet end through the bar of the gold watch face. Fold the crochet fabric back onto itself.
Step 5: Finishing and Lining
Cut a piece of cream felt exactly the same width and length as your crochet strap. This is a crucial step for stability. Apply a thin, even layer of fabric glue to one side of the felt. Carefully press the felt onto the back (wrong side) of your crochet strap. This will hide the messy back side of the beads.
Fold the extra inch of crochet work over the watch bar and use a needle and thread to whip stitch it securely to the felt backing. This creates a loop holding the watch. Repeat the entire process for the second half of the strap attached to the other side of the watch face. Sew a jewelry clasp to the raw ends of the straps to finish.
2. Pastel Flower Crochet Watch Strap
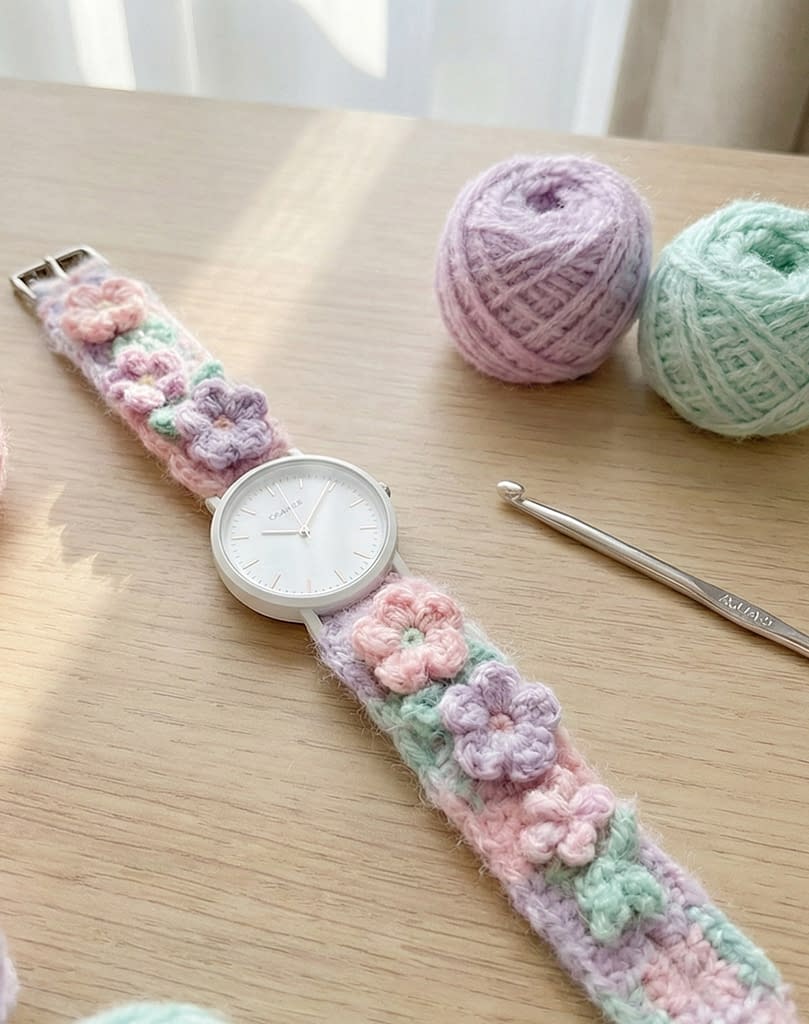
This charming design features a soft, fluffy texture adorned with tiny 3D flowers in pink, lavender, and mint green. The aesthetic is cute and visually delicate, reminiscent of a spring garden. The base is a simple white, allowing the pastel floral details to pop. This strap is perfect for a casual, cheerful look and pairs beautifully with a small white or silver watch face.
Materials Needed
- Fine weight yarn (fingering or sport weight) in white.
- Scrap yarn in pastel pink, lavender, and mint green.
- Crochet hook size 2.0 mm or 2.25 mm.
- Small white watch face.
- Snap buttons or a Velcro dot for closure.
- White fabric or felt for backing.
Step 1: The Base Strap
The base of this strap needs to be fairly simple to support the floral decorations.
Foundation: Chain 8 (or width needed for your watch). Row 1: Single crochet in the second chain from the hook and each chain across. Chain 1, turn. Row 2-End: Work in simple rows of single crochet until you have two strips. One strip should be shorter (the buckle side) and one longer (the hole side), or two equal strips if using a clasp. For this design, we will make two equal strips that meet at the underside of the wrist.
Work until the total length matches your wrist circumference minus the watch face width. Fasten off.
Step 2: Creating Tiny 3D Flowers
You will make the flowers separately and attach them. This allows for cleaner color changes and a true 3D effect.
Make 3 Pink, 3 Lavender, and 3 Mint flowers: Magic Ring. Round 1: Chain 2, make a 2-double crochet cluster into the ring, Chain 2, slip stitch into the ring. Repeat from * to * four more times to create a 5-petal flower. Pull the magic ring tight to close the center. Fasten off, leaving a long tail for sewing.
Step 3: Sewing the Flowers
Lay your white base straps flat. Arrange the flowers in a pleasing pattern, perhaps alternating colors (Pink, Mint, Lavender) down the center of the strap.
Thread the long tail of a flower onto a tapestry needle. Sew the flower firmly onto the white strap. Ensure you stitch through the center and the tips of a few petals so the flower doesn’t flop around. Repeat for all flowers.
Step 4: Lining and Assembly
To hide the sewing threads on the back, you need a lining. Place your crochet strap on top of a piece of white felt or soft cotton fabric. Trace around the shape of the strap with a pencil.
Cut the shape out of the fabric, cutting slightly inside the line (about 1mm) so the backing doesn’t peek out from the front.
Apply fabric glue to the back of the crochet strap, being careful not to use too much as it might seep through. Press the fabric lining onto the glue. Place a heavy book on top and let it dry for at least an hour to ensure a flat, secure bond.
Step 5: Attaching to Watch
Thread the end of the strap through the watch lugs. Fold it back about half an inch. Sew the fold down securely, stitching through both the crochet and the lining. Sew snap buttons on the ends of the straps for an adjustable closure.
3. Heart Pattern Crochet Watch Strap
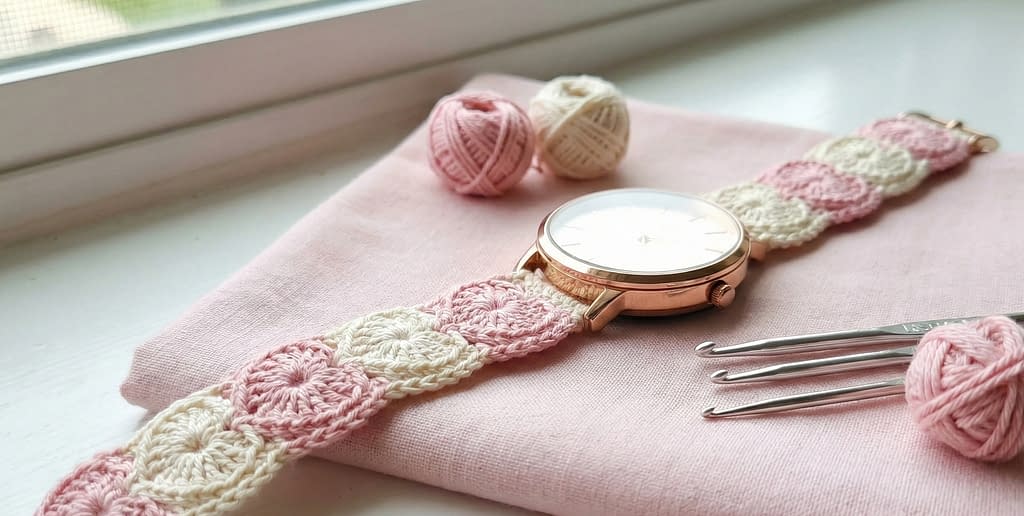
This design is romantic and sweet, featuring small heart motifs in alternating soft pink and cream. The strap is made using a tapestry crochet technique to create a smooth, flat fabric where the hearts are embedded into the pattern rather than sewn on top. It is attached to a rose gold watch face, which complements the pink tones perfectly.
Materials Needed
- Mercerized cotton yarn in Soft Pink and Cream.
- Crochet hook size 2.0 mm.
- Rose gold watch face.
- Rose gold buckle.
- Pink felt for backing.
- Fabric glue.
Step 1: Understanding Tapestry Crochet
For this pattern, you will carry the unused color inside the stitches of the working color. This creates a dense, sturdy fabric ideal for a watch strap. When switching colors, always switch on the last pull-through of the previous stitch.
Step 2: The Graph Pattern
You will work on a grid. Let’s assume a width of 9 single crochet stitches.
Row 1 (Cream): Chain 10. Single crochet in 2nd chain and across (9 stitches). Row 2 (Cream): Single crochet across. Row 3 (Heart Base): 3 Cream, Switch to Pink, 3 Pink, Switch to Cream, 3 Cream. Row 4 (Heart Middle): 2 Cream, 5 Pink, 2 Cream. Row 5 (Heart Top): 2 Cream, 2 Pink, 1 Cream, 2 Pink, 2 Cream. Row 6 (Cream): All Cream. Row 7 (Cream): All Cream.
Repeat Rows 3 through 7 to create a column of hearts running down the length of the strap.
Step 3: Creating the Strap Halves
Make two strips using the heart pattern. Strip A (Short Side): Make this approximately 3 inches long. This side will hold the buckle. Strip B (Long Side): Make this approximately 4.5 inches long. This side will have the holes for sizing.
Step 4: Installing the Buckle (Strip A)
Take the shorter strip. You need to attach the buckle. Pass the end of the strip through the buckle frame. Ensure the prong of the buckle goes through the center stitch of the crochet fabric. Fold the fabric back about 1 inch.
Cut a small rectangle of pink felt that fits inside this folded area to reduce bulk. Glue the felt inside the fold, then sew the folded crochet flap down securely.
Step 5: Finishing the Strap
Cut two strips of pink felt that match the dimensions of your two crochet strips.
For the Long Side (Strip B), you need to reinforce the holes. Before gluing the felt, punch small holes in the felt using a leather punch or thick needle where you want the watch size adjustments to be. Align these with the center of the crochet strip.
Glue the felt to the back of the crochet strips. Once dry, use a sharp needle to pierce through the crochet fabric at the location of the holes you made in the felt. Overcast stitch around these holes (like a buttonhole stitch) to keep them open and neat.
Attach the raw ends of both strips to the rose gold watch face using the fold-over method described in the previous tutorials.
4. Starry Sky Crochet Watch Strap
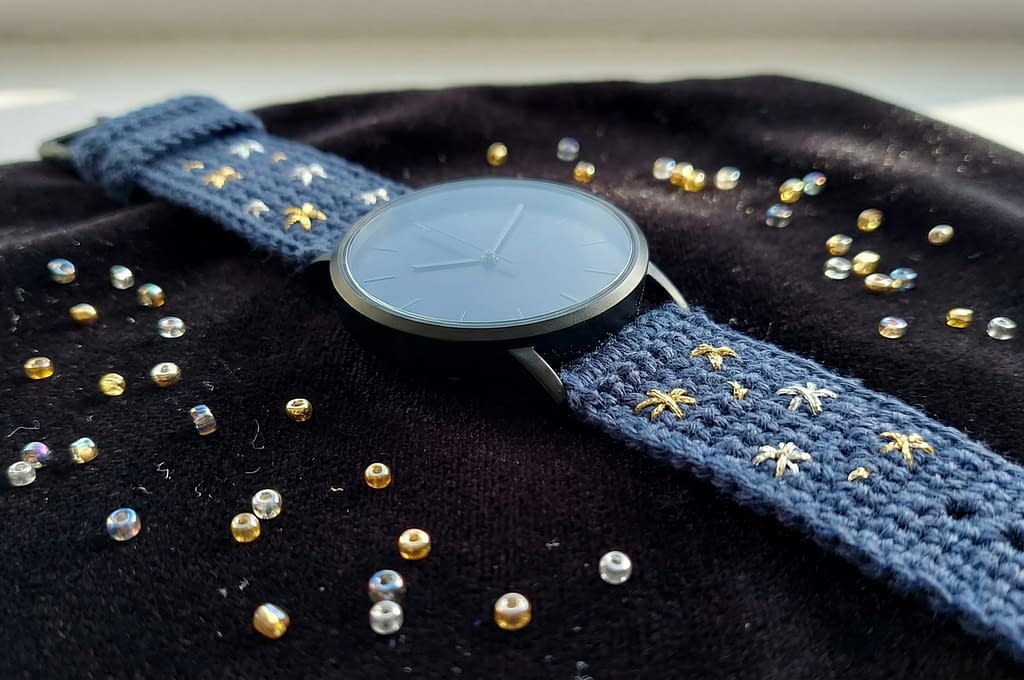
This design captures the magic of a clear night sky. By using a deep midnight blue yarn as the canvas, the tiny embroidered gold and silver stars stand out brilliantly. The aesthetic is elegant yet whimsical, making it suitable for both daily wear and special occasions. The construction focuses on creating a smooth, dense fabric that mimics the velvet of the night sky, attached to a sleek black or silver watch face.
Materials Needed
- Mercerized cotton yarn in Midnight Blue (size 10 or finger weight).
- Embroidery floss in Metallic Gold and Metallic Silver.
- Crochet hook size 1.5 mm or 1.75 mm.
- Embroidery needle with a small eye.
- Black or Silver watch face.
- Dark blue or black felt for backing.
- Fabric glue.
Step 1: Creating the Midnight Canvas
To achieve the “sky” effect, the base strap must be solid and tight so the backing does not show through.
Row 1: Start with a slip knot and chain stitches corresponding to the width of your watch lugs (typically 8 to 10 stitches). Row 2: Single crochet in the second chain from the hook and each stitch across. Chain 1, turn. Row 3: Single crochet in each stitch across. Repeat Row 3 until you have two strips of the required length for your wrist. Maintain a tight tension; if the fabric feels loose, switch to a smaller hook size.
Step 2: Embroidering the Stars
It is easier to embroider the stars before attaching the backing or the watch face.
Thread your needle with a single strand of gold metallic floss. Choose random spots on the strap to place your stars. To make a simple star:
- Bring the needle up from the back at the center point of the star.
- Stitch five small straight lines radiating outward from that center point, like the spokes of a wheel.
- Vary the size of the stars; some can be tiny specks (French knots) using silver thread to represent distant galaxies, while others are larger gold stars.
- Keep the back of the work neat, but do not worry too much about knots as they will be covered.
Step 3: Attaching the Hardware
For a sleek look, use a standard buckle closure. Attach the buckle to the shorter strap by folding the crochet end over the center bar of the buckle.
Sew the fold down securely with the midnight blue yarn. For the watch face connection, insert the raw end of the strap through the watch lugs. Fold it back approximately 0.5 inches.
Step 4: The Protective Lining
Cut a strip of dark blue felt slightly narrower than your crochet strap. This prevents the metallic embroidery threads from scratching your wrist.
Apply a moderate amount of fabric glue to the back of the crochet strap. Press the felt firmly onto the glue. Pay special attention to the edges; run a smooth object, like the handle of your crochet hook, along the edges to seal the felt and yarn together. Allow to dry completely before wearing.
5. Daisy Flower Crochet Watch Strap
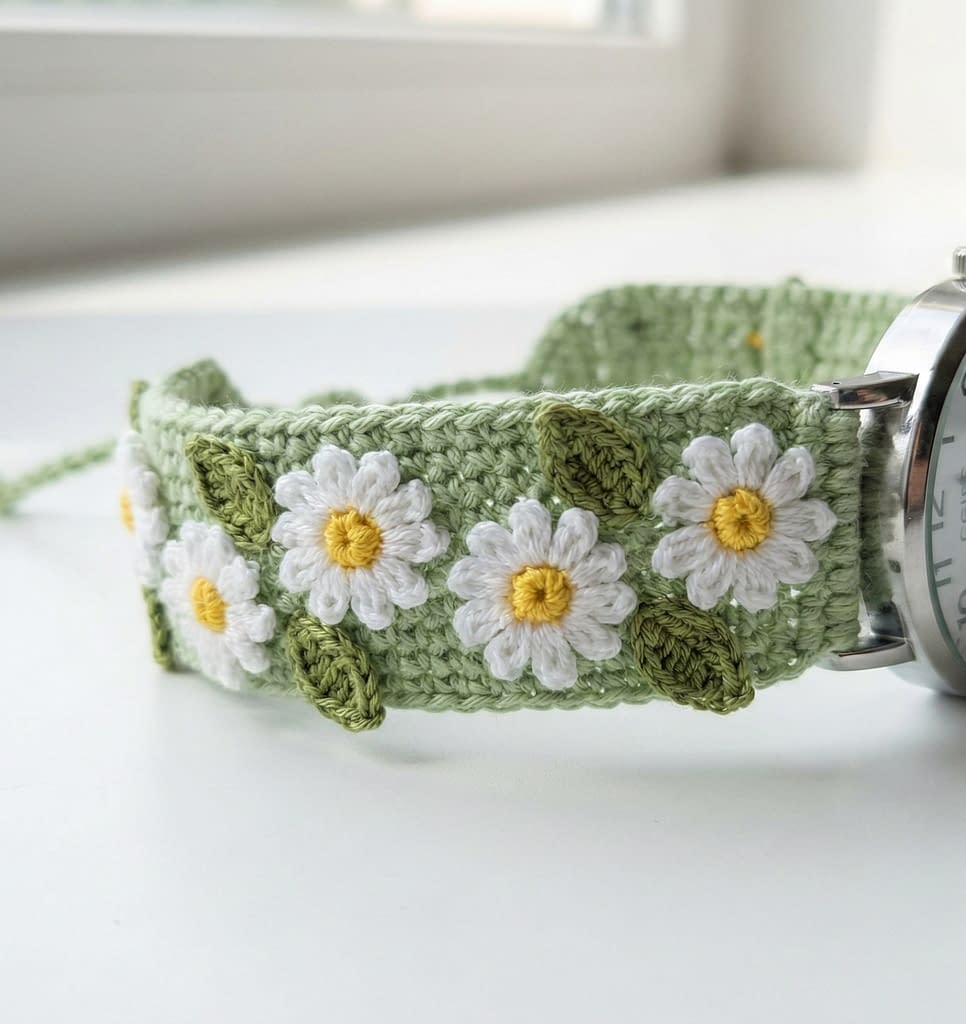
This design is fresh, feminine, and perfect for nature lovers. It features a meadow-green background adorned with cheerful white daisies with bright yellow centers. The key here is the “appliqué” technique, where tiny flowers are made separately and sewn onto a sturdy green base. The texture is rich and tactile, with the 3D flowers rising above the flat strap.
Materials Needed
- Cotton yarn in Sage Green (base), White (petals), and Yellow (centers).
- Crochet hook size 2.0 mm.
- Silver round watch face.
- Green felt or fabric for lining.
- Sewing needle and matching threads.
Step 1: The Green Meadow Base
Create the base strap using the Sage Green yarn.
Foundation: Chain stitches to fit the watch width. Row 1-End: Work in single crochet rows until you reach the desired length. Make two separate pieces: one for the top side of the watch and one for the bottom. Fasten off and weave in ends.
Step 2: Making Micro Daisies
You will need about 3 to 4 daisies for each side of the strap, depending on the length.
Yellow Center: Start with a magic ring. Work 4 single crochet into the ring. Pull tight and slip stitch to the first stitch. Fasten off yellow. White Petals: Join white yarn to any yellow stitch. Chain 2, slip stitch into the same stitch, slip stitch into the next stitch. Repeat from * to * around the circle. This creates very tiny, bumpy petals. Fasten off, leaving a tail for sewing.
Step 3: Making Tiny Leaves
To add realism, crochet tiny leaves directly onto the green strap or make them separately. To make separately: Chain 4. Slip stitch in the 2nd chain from hook, single crochet in the next, slip stitch in the last. Fasten off.
Step 4: Composition and Assembly
Arrange the daisies and leaves on the green straps. Place them somewhat irregularly to mimic a natural field.
Using a sewing needle and thread that matches the flower colors, sew the daisies onto the strap. Stitch through the center of the yellow part to anchor the flower, and make tiny tacking stitches at the tips of the white petals so they lie flat and do not snag on clothing.
Step 5: Lining and Edging
Cut a piece of green felt to match the strap shape. Glue it to the back to cover the sewing knots. For an extra polished look, you can surface slip stitch along the very edge of the green strap to create a defined border before gluing the backing. Attach to the watch face using the standard fold-and-sew method.
6. Vintage Lace Crochet Watch Strap with Beads
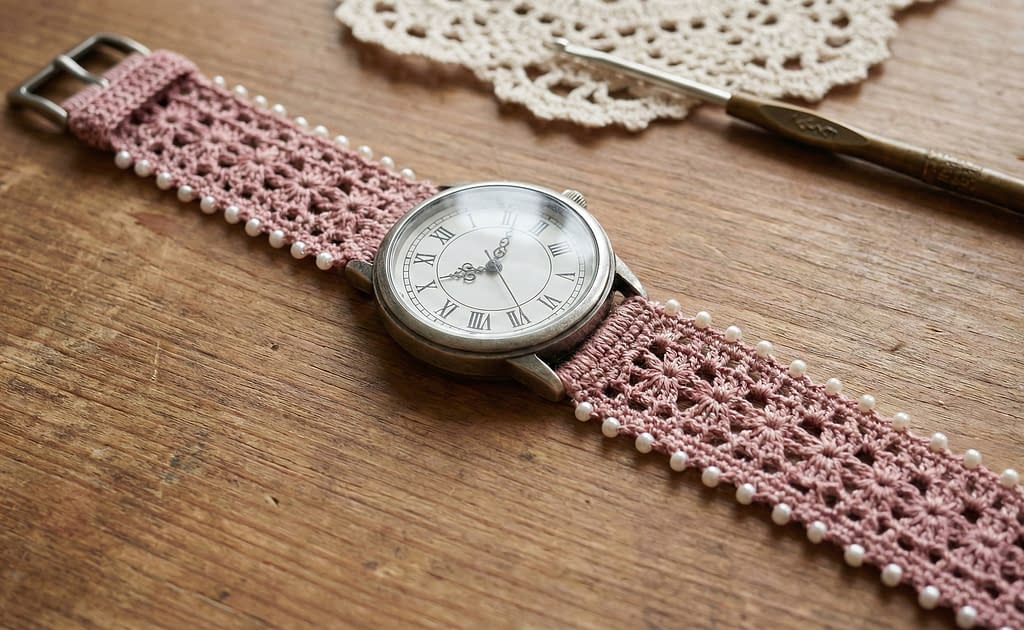
This strap evokes the elegance of a bygone era. Using dusty rose yarn and an openwork lace stitch, it feels light and airy. The addition of pearl beads along the edges adds a sophisticated weight and shimmer. This design works best with an antique-style silver watch face with Roman numerals.
Materials Needed
- Mercerized cotton thread size 20 or 10 in Dusty Rose.
- Steel crochet hook size 1.25 mm or 1.5 mm.
- Small pearl beads (size to match yarn weight).
- Beading needle.
- Antique silver watch face.
Step 1: The Lace Pattern
The strap uses a shell stitch pattern to create the lace effect.
Row 1: Chain a multiple of 4 plus 2. Row 2: Single crochet in the 2nd chain from hook. Skip 1 chain, 5 double crochet in the next chain (Shell made), skip 1 chain, single crochet in the next. Repeat across. Row 3: Chain 3 (counts as double crochet), 2 double crochet in the first single crochet. Single crochet in the center stitch of the next Shell, 5 double crochet in the next single crochet. Repeat across, ending with a half-shell at the edge. Row 4: Chain 1, single crochet in the first double crochet. 5 double crochet in the next single crochet, single crochet in the center of the next Shell. Repeat across.
Repeat Rows 3 and 4 until the strap is the correct length. The sides will naturally have a scalloped edge due to the shells.
Step 2: Adding the Pearls
Unlike the first tutorial where beads were knit in, here we will sew them into the “valleys” of the scalloped edge for a decorative border.
Thread a sewing needle with matching dusty rose thread. Secure the thread at one end of the strap. Bring the needle out at the indentation between two shell scallops. Thread a pearl bead. Insert the needle back into the fabric to secure the bead. travel the thread through the dense part of the stitches to the next indentation and repeat. Do this along both sides of both strap pieces.
Step 3: Delicate Attachment
Because lace is stretchy, you must be careful when attaching it to the watch.
Insert the lace end through the watch bar. Fold it over. Because the fabric is full of holes, use the tail of your starting yarn to sew the fold down, stitching carefully into the solid parts of the shells, not the holes.
Step 4: Stabilizing the Lace
Lace straps can stretch out of shape easily. Cut a strip of matching dusty rose grosgrain ribbon or fabric. The ribbon is preferable as it has a finished edge.
Glue the ribbon to the back of the lace strap. The ribbon will take the tension of the watch so the lace stitches do not pull and distort.
7. Floral Border Crochet Watch Strap

This design is a variation that focuses on a solid center with a decorative floral edge. The main body of the strap is a smooth cream or soft yellow, while the edges feature small picots or color changes that look like tiny buds in sage green or pink. It is understated and clean, suitable for office wear.
Materials Needed
- Cotton yarn in Cream (Main) and Sage Green (Border).
- Crochet hook size 2.0 mm.
- Round silver watch face.
- Cream fabric for backing.
Step 1: The Solid Center
Work a strip of single crochet or half-double crochet in the Cream color. The width should be slightly narrower than the watch lugs (about 2mm less) because the border will add width.
Make the strip the full length required.
Step 2: The Floral Edge
Join the Sage Green yarn to the bottom right corner of the strip.
Border Round: Single crochet in the next 3 stitches along the edge. Chain 3, slip stitch into the first chain (Picot made). Repeat from * to * all the way around the strap. On the corners, work (Single crochet, Picot, Single crochet) in the same stitch to turn the corner smoothly.
Step 3: Detailed Embroidery (Optional)
If you want more floral detail, use a needle and pink embroidery floss to stitch small “V” shapes inside the cream section, resembling tiny tulips or buds rising from the green border.
Step 4: Assembly and Finishing
Attach the strap to the watch face by folding the ends over the bars. Since this strap has a picot edge, ensure you do not fold the picots inside the loop. The fold should happen just before the picot border starts so the decorative edge remains visible near the watch face.
Glue a cream fabric backing to the strip. When cutting the backing, cut it slightly smaller than the cream center so it does not cover the beautiful green picot edge.
8. Romantic Rose Crochet Watch Strap
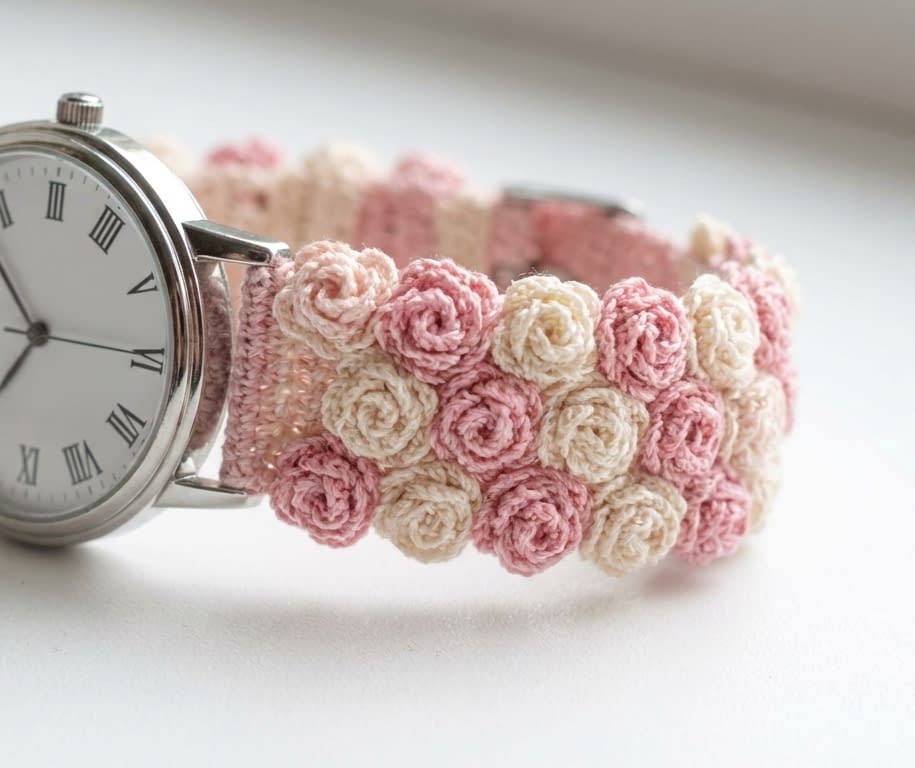
The final pattern is a showstopper featuring a dense cluster of tiny rose-shaped flowers. The entire surface of the strap looks like a bed of roses in soft pink and cream. This is a highly textured, thick strap that works best as a statement piece.
Materials Needed
- Fine cotton yarn in varying shades of Pink and Cream.
- Crochet hook size 2.0 mm or 2.5 mm.
- Classic silver watch face.
- Heavy-duty fabric glue.
- Canvas or leather strip for the base.
Step 1: Creating a Sturdy Base
Because the roses are heavy and textured, a simple crochet chain might sag. It is best to crochet a very tight single crochet base using two strands of yarn held together, or use a pre-made strip of canvas or leather as the core foundation. If crocheting: Chain the width of the watch. Single crochet in every row until you have the length.
Step 2: crocheting the Mini Roses
You will need dozens of these small roses.
Pattern: Chain 10. Row 1: Single crochet in the 2nd chain from hook. Chain 2, skip 1 chain, single crochet in next. Repeat to end. Row 2: Turn. In the chain-2 space, work (Slip stitch, 3 Double Crochet, Slip stitch). Repeat in every chain-2 space. Fasten off, leaving a long tail.
Assembly: You will have a curly strip. Roll the strip into a spiral to form a rosebud shape. Use the tail yarn to stitch through the base of the spiral, securing the layers together.
Step 3: Arranging the Bouquet
Apply a generous layer of fabric glue to your base strap. Press the roses onto the base, packing them tightly together so no base fabric shows. Alternate pink and cream roses for a natural, varied look.
Step 4: Securing the Edges
Once the glue is dry, use a matching pink thread to tack the outer petals of the edge roses to the side of the base strap. This prevents them from catching on things.
Step 5: Final Assembly
Since the rose texture is too thick to fold over the watch pins, you must attach this strap differently. Leave the first and last 0.5 inches of the base strap empty (no roses). Fold this empty flat section over the watch bar and sew it down. Then, sew one or two extra roses directly onto this folded area to cover the seam, seamlessly blending it into the rest of the strap.
Conclusion
Creating your own crochet watch straps is a delightful way to fuse traditional fiber arts with modern functionality. These 8 patterns ranging from the sparkling “Starry Sky” to the textured “Romantic Rose” allow you to customize your timepieces to match any mood or outfit.
Remember, the secret to a long-lasting watch strap lies in the finishing details. Never skip the backing step; a simple strip of felt or leather not only adds comfort but significantly extends the life of your handiwork by preventing stretching. Use high-quality mercerized cotton for durability and sheen, and do not be afraid to experiment with hook sizes to get the tightest, most professional gauge possible. With these tutorials, your watch will be far more than a tool for telling time—it will be a handcrafted work of art.


