
If you have ever winced at the screeching sound of a chair dragging across a hardwood floor or noticed unsightly scratches accumulating on your laminate, you know the importance of floor protection. While felt pads are a common solution, they often peel off, collect dust, and lose their effectiveness over time. This is where the charm and utility of handmade fiber arts come into play. Crochet chair socks are not only a durable alternative to stick-on pads, but they also offer a unique opportunity to inject personality and whimsy into your home decor.
In this comprehensive guide, we will explore 8 chair socks crochet patterns designed to fit a variety of chair leg styles, particularly focusing on slim metal or wooden legs that can be difficult to cover. These designs range from elegant floral motifs to playful animal themes, ensuring there is a style for every room in your house. Whether you are looking to create a cozy cottage vibe or a modern playful aesthetic, these patterns will serve as both functional floor savers and delightful conversation starters.
We have broken down every step of the process, ensuring that even if you are newer to crochet, you can achieve professional results. We will cover yarn selection, tension management for a snug fit, and precise assembly techniques. We will look at exactly how to construct the shapes, where to cut your yarn, and how to attach decorative elements securely so they withstand daily use. Let us pick up our hooks and begin this journey into miniature home decor.
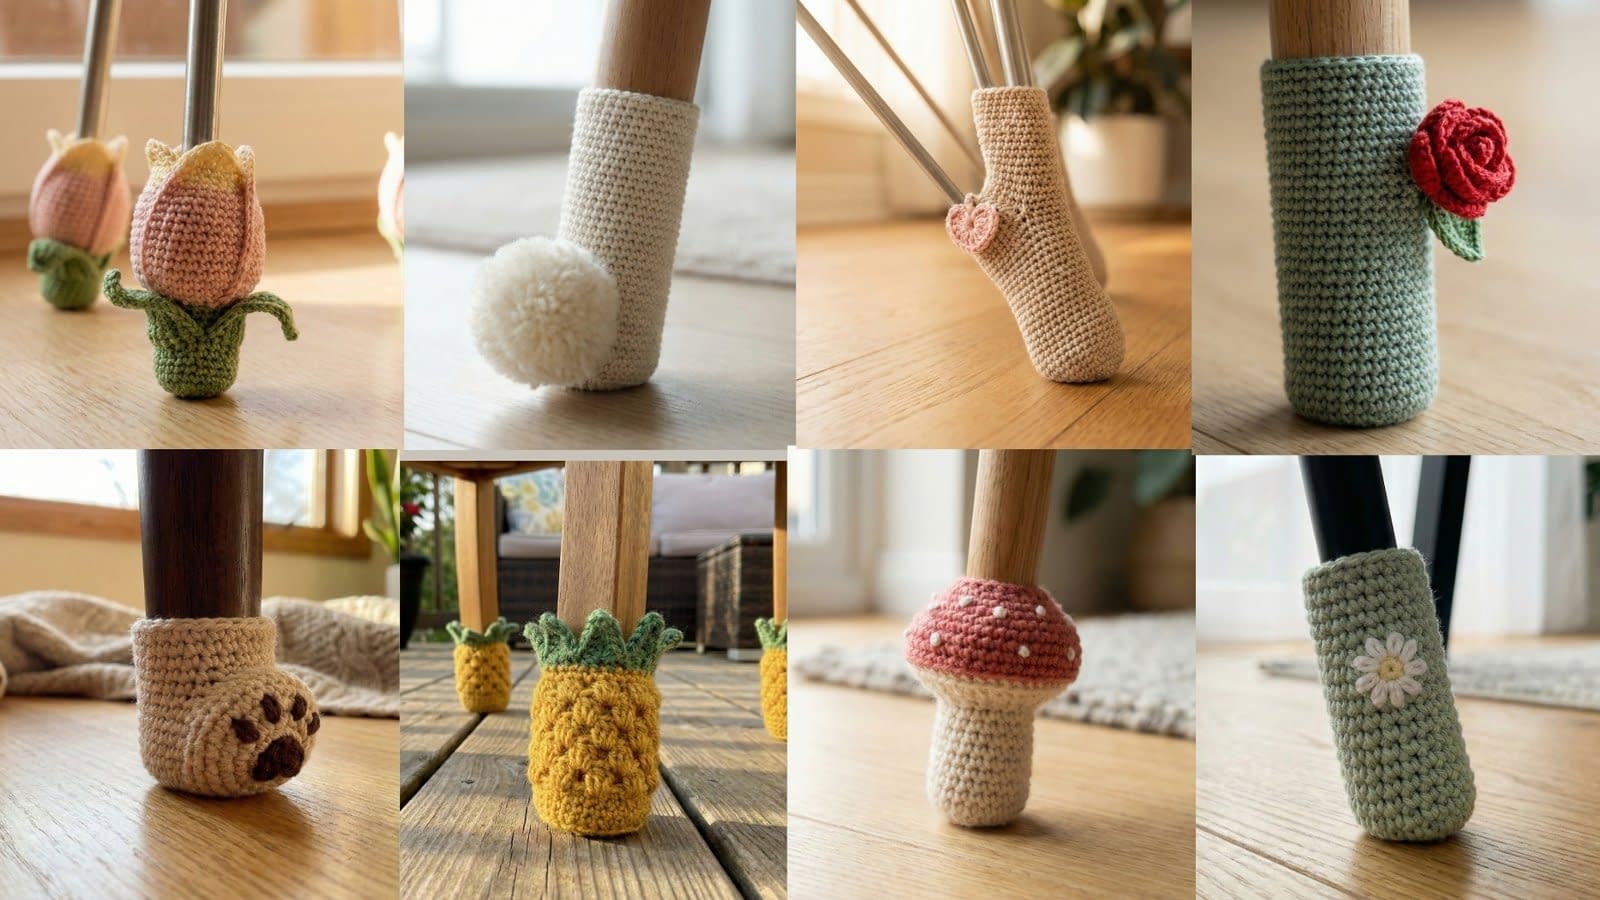
Mini Tulip Bud Chair Socks
The first pattern in our collection transforms your furniture legs into a garden of blooming flowers. As seen in the reference visual, these Mini Tulip Bud Chair Socks feature a lush, bulbous shape that hugs the chair leg, sitting upon a green calyx base. The design mimics a tulip just before it fully opens, with tightly stitched petals in soft blush pink or pale yellow, and green leaves curling outward at the bottom. These are perfect for dining rooms or sunrooms where you want to bring a touch of nature indoors.
Materials Needed
To achieve the delicate definition required for these tiny flowers, you should use a fine cotton yarn, typically classified as fingering or sport weight. Cotton is essential here because it is durable and does not pill as easily as acrylic when dragged against the floor. You will need a soft blush pink or pale yellow for the petals and a grassy green for the base. A 2.5 mm or 3.0 mm crochet hook will help create a stiff, tight fabric that stays up on the chair leg. You will also need a tapestry needle and sharp scissors.
Construction of the Green Calyx Base
Start with the green yarn to create the base of the flower, which serves as the bottom of the sock. Begin by making a magic ring. This technique is preferred over a chain loop because it allows you to pull the bottom hole completely tight, preventing dust from getting inside the sock.
Work 6 single crochet stitches into the magic ring. Pull the tail tight to close. For the second round, work 2 single crochet stitches into each stitch around, giving you a total of 12 stitches. For the third round, follow a pattern of one single crochet in the first stitch, followed by two in the next. Repeat this around until you have 18 stitches. Check the diameter of this circle against your chair leg. It should be slightly smaller than the bottom of the leg; the yarn will stretch, and a tight base is crucial for stability. If you have very wide chair legs, add another round of increases.
Once the flat base is the correct size, work one round of single crochet in the back loops only. This creates a sharp ridge that defines the bottom edge of the sock and helps it sit flat on the floor. After this ridge round, work two or three rounds of regular single crochet to build the very bottom of the cup.
Creating the Leaves
Before switching colors, you will create the small leaves that curl outward. You will work these as surface details or as a ruffled round. For this pattern, we will create them on the final green round. Work a slip stitch, then chain 4. Starting from the second chain from the hook, slip stitch in the first chain, single crochet in the next, and half double crochet in the last chain. Slip stitch back into the next stitch on the main body. This forms a small triangular spike. Repeat this process every 3 or 4 stitches around the perimeter. These spikes will curl naturally; you can shape them with your fingers to point downwards or outwards.
Forming the Tulip Petals
Switch to your pink or yellow yarn. You will join this yarn on the inside of the green round, behind the leaves you just created, to ensure a seamless transition. The goal now is to create the bulb shape.
Work two rounds of plain single crochet to establish the pink color. To create the “bud” look, you need to create texture that resembles overlapping petals. You can achieve this by using the cluster stitch. Work a 3-double-crochet cluster in one stitch, then single crochet in the next two stitches. Repeat this pattern around. The clusters will bulge outwards, looking like thick petals.
Continue working in spirals for about 2 to 3 inches, or until the sock covers enough of the chair leg to be secure. As you near the top, you want the opening to tighten slightly to hug the leg. Switch back to single crochet for the last two rounds. In the final round, decrease by crocheting two stitches together at four evenly spaced points around the circle. This draws the opening in, ensuring the sock does not slide down.
Finishing Details
Cut the yarn, leaving a 4-inch tail. Thread this onto your needle. Weave the end through the stitches on the inside of the sock. Do not just cut it short; run the needle back and forth three times to lock the yarn in place. Flip the sock inside out to double-check that the knot from the magic ring is secure. If it feels loose, tie a knot with the starting tail and weave it in securely. Turn the sock right side out and slide it onto the chair leg. Adjust the green leaves so they flare out attractively.
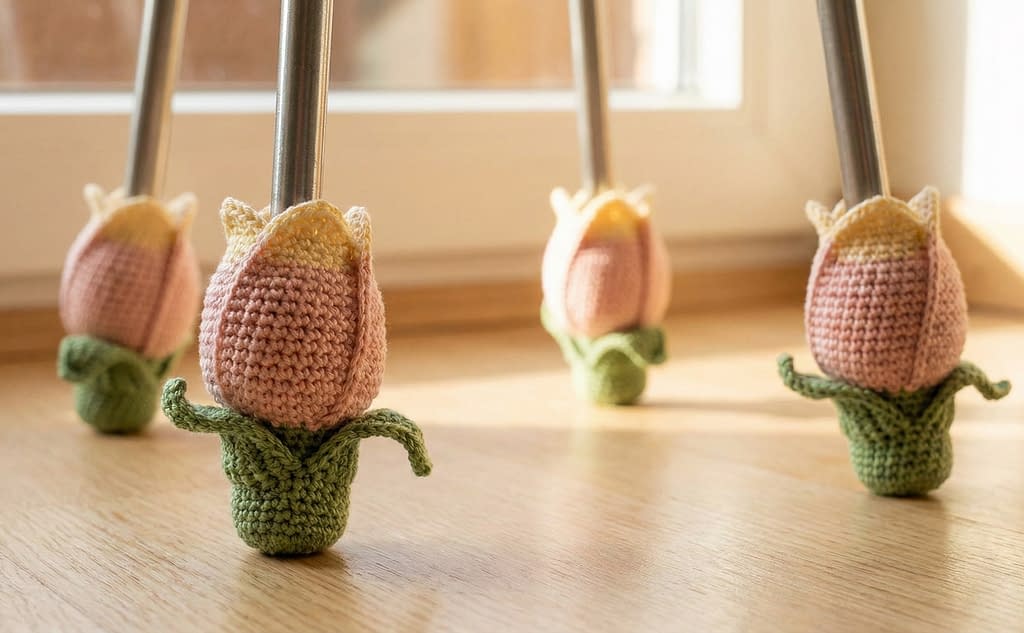
Tiny Bunny Tail Chair Socks
Next, we have a design that focuses on minimalism and texture: the Tiny Bunny Tail Chair Socks. As depicted in the visual guide, this design uses a simple, sleek ivory sock that blends in with modern decor, accented by a delightful, fluffy white pompom at the base. The focus here is on the contrast between the smooth, tight stitches of the sock and the plush softness of the “tail.” These are exceptionally cute for a nursery, a child’s desk, or a vanity chair.
Materials Needed
Select a smooth, mercerized cotton yarn in an ivory or cream shade for the main sock. The smooth finish will keep the look clean and modern. For the tail, you need a different texture. A small amount of white mohair, brushed acrylic, or even a specialty faux fur yarn is ideal to get that fuzzy bunny look. You will need your crochet hook (size appropriate for the cotton yarn, likely 3.0 mm), a fork or a small cardboard template for making the pompom, and a strong sewing thread.
Crochet the Cylinder Sock
The body of this sock is a straightforward cylinder, making it a great project for practicing consistent tension. Start with a magic ring using the ivory yarn. Work 6 single crochets into the ring and close it tight.
Increase in the second round to 12 stitches (2 single crochets in each stitch). In the third round, increase to 18 stitches (1 single crochet, 1 increase). If your chair legs are very thin, stops here. If they are standard width, you might need one more round of increases to reach 24 stitches. The circle should be the same diameter as the chair leg bottom.
Work one round in the back loops only to create the bottom edge. Then, simply single crochet in every stitch around, spiraling upwards. Place a stitch marker at the start of the round so you can keep track of your progress. Continue this simple tube until the sock is approximately 3 inches tall. The simplicity of the stitch work is intentional; it acts as a neutral canvas for the tail.
Finish the top edge with a slip stitch in each stitch around. This reinforces the rim and prevents it from stretching out over time. Cut the yarn and weave in the ends invisibly on the inside.
Making the Miniature Pompom
The bunny tail needs to be small—about the size of a marble or a large blueberry. Standard pompom makers are often too large for this. The “fork method” is perfect here.
Take a standard dining fork. Take your fluffy white yarn and begin wrapping it around the outer two tines or all four tines, depending on how big you want the tail. Wrap it roughly 30 to 40 times. The more you wrap, the denser and fluffier the tail will be.
Cut a separate piece of strong yarn or thread, about 8 inches long. Thread this piece through the middle tine of the fork, wrapping it around the bundle of yarn loops you just made. Tie it as tightly as possible. You may need to use pliers to pull the thread if the yarn is thick. Tie a double knot to secure it.
Slide the bundle off the fork. You will have a loop of yarn tied in the middle. Take sharp scissors and cut the loops on both sides. The yarn will explode outwards into a shaggy ball. Now comes the sculpting. Hold the tail of the tying string and use your scissors to trim the pompom into a perfect sphere. Be aggressive with your trimming; cutting off the straggly ends makes the pompom look dense and professional.
Assembly
Thread the tails of the tying string from the pompom onto a tapestry needle. Position the pompom near the base of the sock, about half an inch up from the bottom edge. You want it low enough to look like a bunny tail but high enough that it does not get dragged on the floor.
Insert the needle from the outside of the sock to the inside, pulling the pompom tight against the crochet fabric. Stitch back and forth through the base of the pompom and the sock fabric at least 4 or 5 times. This is a high-friction area, so security is key. Once attached, tie a sturdy knot on the inside of the sock and weave in the ends.
Little Daisy Button Chair Socks
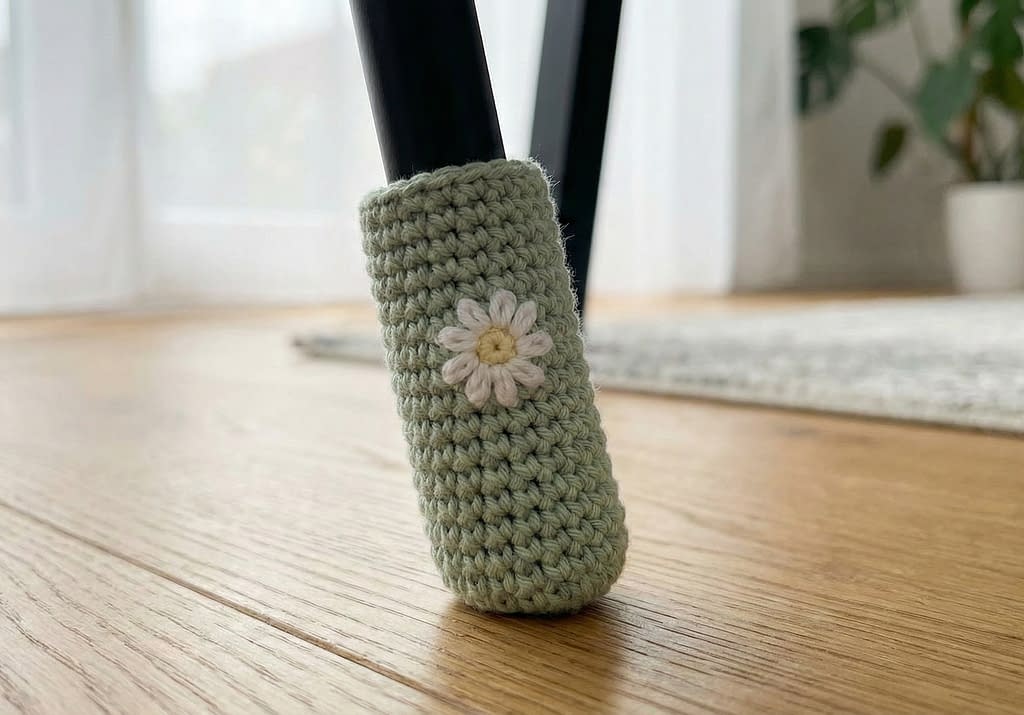
The third pattern brings a fresh, meadow-inspired aesthetic to your furniture. The Little Daisy Button Chair Socks feature a base of calming pastel sage green, adorned with a miniature white daisy appliqué. The flower has a pale yellow center and delicate petals. As shown in the reference image, the daisy sits on the side of the sock like a decorative button. This design is sophisticated enough for a living room yet sweet enough for a bedroom.
Materials Needed
You will need three colors of yarn: sage green for the sock body, bright white for the flower petals, and a sunny yellow for the flower center. Sport weight cotton is recommended for the sock to ensure durability. For the flower, you can use the same weight yarn, or split the plies of a thicker yarn to make it finer, which results in a dainty, flat flower rather than a bulky one. A 3.0 mm hook is suitable for the sock, but you may want to drop down to a 2.0 mm hook for the flower to keep it tight and small.
Constructing the Sage Green Sleeve
Follow the same base construction method as the previous socks. Create a magic ring with the green yarn, increase until the flat circle matches the footprint of your chair leg, and work one round in the back loops to turn the corner.
Continue working in continuous rounds of single crochet. For this design, a slightly taller sock often looks elegant, providing enough vertical space to center the daisy without it looking crowded. Aim for a height of about 3.5 to 4 inches.
To ensure the sock stays up, you can incorporate a hidden elastic trick. On the final round of the top, lay a thin strand of elastic thread along the stitches and crochet over it as you work. Alternatively, you can weave the elastic through the inside of the final round after finishing. This extra grip is helpful for smooth metal legs where yarn tends to slide. Fasten off the green yarn and weave in the ends.
Crochet the Miniature Daisy
The daisy is made separately and sewn on. Start with the yellow yarn. Make a magic ring and work 5 single crochet stitches into it. Pull tight and slip stitch to the first stitch to join. Cut the yellow yarn, leaving a short tail to tie off.
Join the white yarn into any of the yellow stitches. To make the petals, chain 3. Slip stitch into the same stitch where you joined. This creates a small loop. Move to the next yellow stitch, slip stitch into it, chain 3, and slip stitch back into the same stitch. Repeat this around the yellow center. You should end up with 5 small, rounded loop petals.
If you want more defined, pointed petals, change the stitch sequence: slip stitch into the yellow stitch, chain 4, work a single crochet in the second chain from the hook and a half double crochet in the next chain, then slip stitch back into the yellow center. This creates a teardrop shape. Choose the petal style that matches your decor preference.
Attaching the Appliqué
Position the daisy on the side of the green sock. Placement is important; if it is too low, it might get dirty from the floor. Place it approximately 1.5 inches from the bottom edge.
Use a sewing needle and white thread (or a single ply of the white yarn). Stitch through the back loops of the daisy petals and the center, securing them to the green fabric. Do not use glue here; glue can harden and create a pressure point that might scratch the chair leg or leave residue. Sewing ensures the flower moves with the fabric.
Be careful not to stitch all the way through to the other side of the tube, or you will sew the sock shut. Keep your hand inside the sock to separate the layers while you work. Once secure, tie off on the inside and trim the thread.
Mini Bear Paw Chair Socks
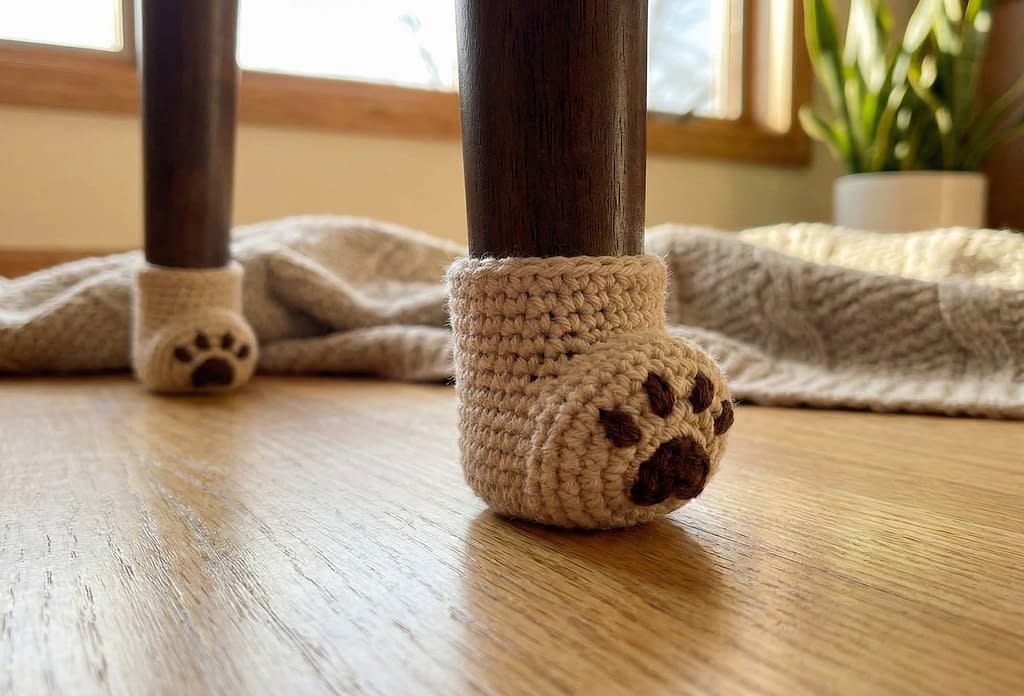
The Mini Bear Paw Chair Socks bring a playful and heartwarming touch to your home, perfect for a child’s playroom or a cozy reading nook. As seen in the reference visual, these socks are designed to look like tiny bear feet, crafted from soft beige yarn with darker brown accents for the paw pads. The shape is slightly more rounded at the bottom to mimic the plushness of a paw, covering only the bottom portion of the chair leg for a snug, slipper-like fit.
Materials Needed
To create the authentic teddy bear look, choose a soft acrylic or wool-blend yarn in a warm beige or “latte” color for the main paw. You will also need a small amount of dark brown or chocolate-colored yarn for the paw pads. A 3.5 mm hook is usually appropriate for worsted weight yarn, which gives the paw a bit of squishy thickness. If you prefer a sleeker look, use sport weight cotton with a 2.5 mm hook. You will also need a tapestry needle and scissors.
Constructing the Paw Base
Begin with the beige yarn. Create a magic ring to ensure the bottom is tightly closed. Work 6 single crochet stitches into the ring and pull it shut.
For the second round, increase in every stitch to get 12 stitches. For the third round, increase in every second stitch to get 18 stitches. Check the size against your chair leg. If you need it slightly wider, work one more round of “single crochet in next 2, increase in next” to reach 24 stitches.
Unlike the previous cylinder socks, we want this one to look a bit more rounded and organic at the toe. Work 2 or 3 rounds of single crochet without increasing. This builds the height of the “foot.”
To create the instep (the top of the paw), we will shape the sock slightly. If you are working with 24 stitches, identify the front 12 stitches that will face outward. On the next round, single crochet normally around the back 12 stitches, but for the front 12, work 6 decreases (single crochet two together). This pulls the front in slightly, mimicking the slope of a paw. On the following round, single crochet evenly around the remaining stitches to form the ankle cuff. Continue the cuff for about an inch to ensure it stays on the leg. Fasten off and weave in the beige ends.
Creating the Paw Pads
The paw pads are the defining feature of this design. You will embroider these directly onto the sock using the dark brown yarn, as crocheting them separately would be too bulky for such a small item.
Thread your tapestry needle with a doubled strand of brown yarn. First, create the main pad in the center of the rounded bottom section. Use a satin stitch technique: sew horizontal lines back and forth closely together to form a solid triangle or oval shape. Keep your stitches tight and neat so the beige doesn’t show through.
Next, create the toes. Position three or four small dots above the main pad. You can make these by sewing 3 or 4 stitches over the same spot (like a French knot or a small satin stitch cluster). Ensure they are evenly spaced.
Finishing
Turn the sock inside out to secure the brown yarn ends. Tie them firmly to the back of the embroidery stitches so they do not unravel when the chair drags. Turn the sock right side out. If the paw shape looks a bit flat, you can place a tiny amount of stuffing or a cotton ball inside the toe tip before putting it on the chair leg, though usually, the chair leg itself fills the shape sufficiently.
Tiny Rosebud Chair Socks
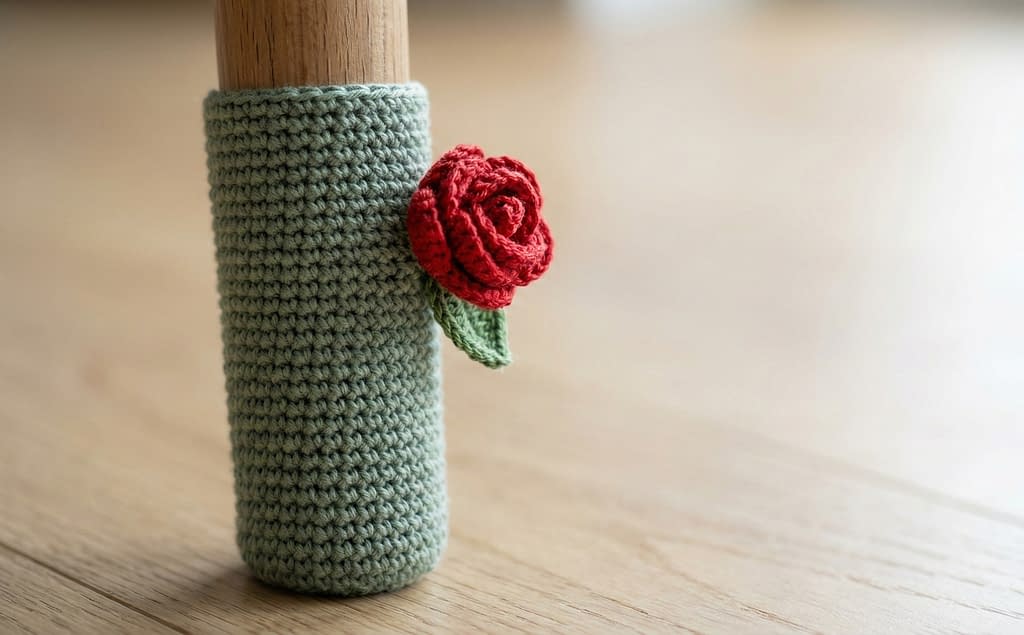
Elegance meets functionality in the Tiny Rosebud Chair Socks. This design features a sleek, muted green sleeve that serves as the stem, adorned with a sophisticated 3D rosebud and a single leaf attached to the side. The visual guide shows a detailed, layered flower structure that looks almost real. These are ideal for a dining room set or a vanity chair where you want a touch of romance without being overly cutesy.
Materials Needed
Choose a muted, sage, or olive green yarn for the “stem” sock part. For the rose, a deep red, dusty pink, or burgundy adds a classic touch. Mercerized cotton is excellent here for stitch definition. Use a 2.5 mm hook to keep the work delicate.
Crochet the Stem Sleeve
Follow the standard cylinder construction used in previous patterns:
- Magic ring with green yarn (6 stitches).
- Increase to the diameter of your chair leg (usually 12, 18, or 24 stitches).
- Work one round in the back loops to define the base edge.
- Work continuous rounds of single crochet until the sock measures approximately 3 to 4 inches tall.
- Finish with a slip stitch round for a neat rim.
Constructing the 3D Rosebud
The rose is made as a rolled strip rather than in the round. This creates the layers of petals seen in the image.
Chain 15 with your red yarn. In the 4th chain from the hook, work 2 double crochets. Skip one chain, slip stitch in the next, skip one chain, work 5 double crochets in the next. Repeat this shell pattern across the chain. You will end up with a scalloped strip that naturally wants to curl.
Fasten off, leaving a long tail (about 8 inches). Start coiling the strip from one end. Roll it tightly at the center to look like a bud, and let the outer scallops flare slightly loosely. This creates the spiral rose shape. Using the long tail and your needle, stitch through the base layers of the coil to lock the spiral in place. Make sure you catch every layer so the center doesn’t pop out.
Creating the Leaf
With green yarn, chain 6. Single crochet in the 2nd chain from the hook. Half double crochet in the next chain. Double crochet in the next chain. Half double crochet in the next chain. Work 3 single crochets in the last chain to turn the corner. Now working down the other side of the chain: Half double crochet, double crochet, half double crochet, single crochet. Slip stitch to the first stitch to join. This creates a small, pointed oval leaf.
Assembly
Position the leaf on the side of the green sock, about 1.5 inches from the bottom. Sew the base of the leaf securely, leaving the tip free to curl slightly. Place the rolled rosebud on top of the leaf’s base. Sew the rose firmly onto the sock, stitching through the bottom of the flower and into the sock fabric multiple times. Because the rose sticks out, it can get knocked, so ensure it is attached very tightly. Check inside the sock to make sure you haven’t sewn the tube shut.
Mini Pineapple Chair Socks
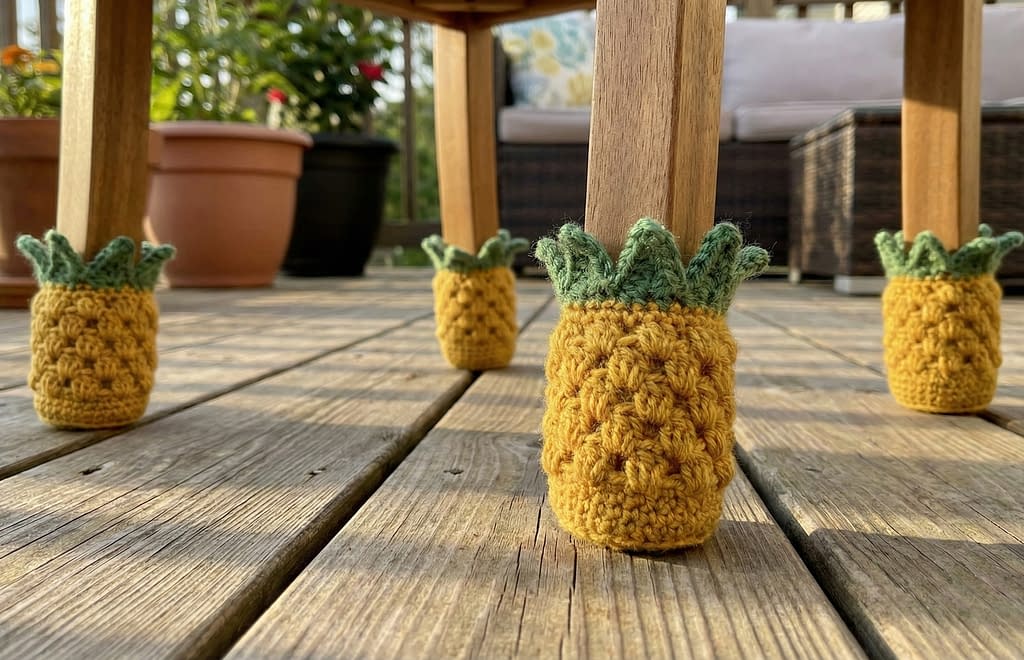
For a burst of tropical fun, the Mini Pineapple Chair Socks are the perfect choice. As depicted in the image, these socks mimic the texture of a pineapple skin using textured stitches in golden yellow, topped with a spiky green crown. They add a vibrant, summery feel to outdoor furniture or a bright kitchen.
Materials Needed
You need a bright golden-yellow yarn and a leaf green yarn. A worsted weight cotton is great here because it holds the texture of the “fruit” well. Use a 3.5 mm or 4.0 mm hook.
Creating the Textured Fruit Base
Start with the yellow yarn and the standard base method (magic ring, increases to chair leg width). Once you have the flat base, work the back-loop-only round to start the sides.
Now, we begin the texture. The “bobble” or “puff” stitch is used to create the pineapple eyes. Round 1 of sides: Single crochet around. Round 2: Single crochet in 2 stitches, Bobble stitch in the next. Repeat around. (To make a Bobble: Yarn over, insert hook, pull up a loop, yarn over, pull through 2 loops. Repeat this 4 times in the same stitch until you have 5 loops on the hook. Yarn over and pull through all loops. Push the bump to the outside.) Round 3: Single crochet in every stitch. This locks the bobbles in place. Round 4: Shift the pattern. Bobble stitch, Single crochet in 2 stitches. This staggers the bobbles so they look like a diamond pattern.
Continue alternating a bobble round and a plain round until the sock is about 2 inches tall. Finish with a plain round of single crochet.
The Green Crown
Switch to green yarn for the final rounds. You will make the leaves directly on the top edge. Join green yarn. Chain 1, single crochet in the first stitch. Chain 4, slip stitch in the 2nd chain from hook, single crochet in next chain, half double crochet in last chain. Skip one stitch on the main sock rim, slip stitch into the next. This creates one triangular leaf spike. Repeat this all the way around the rim. You should have a crown of spikes sticking up.
Finishing
Fasten off and weave in all ends. When you put these on the chair, you may need to fluff the bobbles outward with your fingers to maximize the pineapple effect.
Little Mushroom Chair Socks

These whimsical Little Mushroom Chair Socks turn your furniture legs into a fairy ring. The design features a white or cream stalk at the bottom, topped with a bulging red cap dotted with white specks. The cap overhangs the stalk slightly, creating a true mushroom silhouette as shown in the visual. These are adorable for a cottage-core theme or a child’s bedroom.
Materials Needed
White or cream yarn for the stem, red yarn for the cap, and a scrap of white for the dots. Worsted weight acrylic or wool works well to give the cap some volume. Use a 3.5 mm hook.
Crochet the Stalk
Begin with the cream/white yarn. Create the magic ring and increase to fit the chair leg base. Work the back-loop round, then work straight single crochet rounds for about 1.5 inches. This is the mushroom stem. Do not fasten off.
Creating the Cap Overhang
To make the cap bulge out like a real mushroom, we need to increase rapidly. Switch to red yarn. Round 1 (Red): Work in the Front Loops Only of the white stem. Single crochet 1, Increase in next. Repeat around. This pushes the red fabric outward. Round 2: Single crochet 2, Increase. Repeat around. Round 3-5: Single crochet in every stitch. You should now have a red bowl shape flaring out from the white stem. Round 6: Now we need to decrease to bring the cap back in against the chair leg. Single crochet 2, Decrease. Round 7: Single crochet 1, Decrease. Check the fit. The opening should be just wide enough to slide onto the chair leg. If it is too loose, do one more round of decreases. Finish with a slip stitch round to smooth the edge.
Adding the Spots
Thread a needle with white yarn. Embroider small French knots or simple satin stitches randomly all over the red cap. Keep the knots chunky so they stand out.
Finishing
Secure all ends inside the cap. When placing this on the chair leg, the white stem hugs the leg, and the red cap sits puffed out around it. You may need to stuff the red cap lightly with fiberfill to keep its shape, but usually, the yarn stiffness is enough.
Tiny Heart Charm Chair Socks
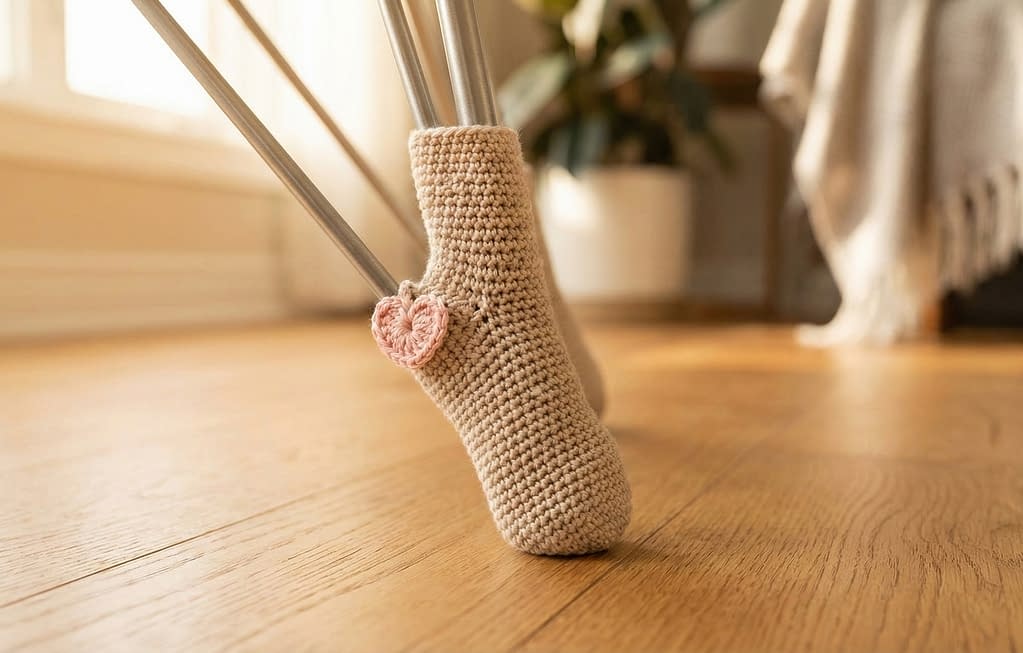
The final pattern in our collection is the Tiny Heart Charm Chair Sock. As seen in the top row of the visual guide, this is a minimalist design. It features a simple, slim beige sock that disappears against a wooden leg, accented by a tiny, hanging pink heart charm attached near the ankle. This style is perfect for those who want a subtle nod to handmade decor without a loud theme.
Materials Needed
Neutral beige or oatmeal yarn for the sock, and a soft pastel pink for the heart. Sport or DK weight yarn keeps it refined. You will need a small jump ring or a loop of yarn to attach the charm.
Crochet the Simple Sleeve
Construct a basic cylinder sock using the beige yarn.
- Magic ring base (6 stitches).
- Increases to fit leg diameter.
- Back loop round for the edge.
- Single crochet spirals for 3 inches.
- Finish with a slip stitch rim. Fasten off and weave in ends.
Making the Micro Heart Charm
To make a heart small enough to be a charm, we work into a single magic ring. With pink yarn: Make a magic ring. Chain 2. Work 2 double crochets into the ring. Work 2 half double crochets into the ring. Chain 1. Work 1 double crochet (this is the bottom point). Chain 1. Work 2 half double crochets. Work 2 double crochets. Chain 2, slip stitch into the ring. Pull the magic ring tight. You have a tiny heart.
Attaching the Charm
You can sew the heart directly onto the sock, or for a “charm” effect, create a small chain loop. Leave a tail on the heart. Thread it onto a needle. Sew the heart onto the side of the sock, near the top cuff. Attach it only by the top two lobes so the bottom point hangs free, or stitch it down completely for durability. For the specific look in the image where it looks like a tag, sew it securely at the side seam area about an inch down from the top edge.
Conclusion
Creating your own crochet chair socks is a rewarding project that combines practicality with creativity. From the intricate petals of the Tiny Rosebud to the playful texture of the Mini Pineapple, these 8 patterns offer a wide range of styles to suit any home.
Remember, the key to successful chair socks is fit. Always measure your chair legs and adjust the base circle size accordingly. Using cotton yarn ensures longevity, and tight tension prevents them from sliding down. Whether you make a matching set for your dining table or mix and match designs for a playful playroom look, these handmade protectors will keep your floors scratch-free and your home full of charm.


