There is something timeless and universally appealing about a rose. It is a symbol of love, beauty, and elegance. In the world of fiber arts, the crochet rose appliqué stands out as one of the most versatile and satisfying projects a crafter can undertake. Whether you are looking to hide a small stain on a favorite sweater, add a touch of romance to a throw pillow, or create a three-dimensional garden on a baby blanket, these crochet flowers are the perfect solution.
Many beginners find reading crochet patterns intimidating due to the heavy use of abbreviations and shorthand. It can be like trying to read a foreign language. That is why this guide is different. In this comprehensive post, we are going to explore eight distinct styles of crochet roses, ranging from flat appliqués perfect for sewing onto clothing, to lush, three-dimensional blooms that look almost real.
We have designed this guide specifically for those who prefer clear, full-sentence instructions. You will not find any confusing abbreviations here. Every stitch is written out by name, and every step is explained with the detail of a personal workshop. We will cover everything from the classic red rose to complex layered varieties, ensuring you have a pattern for every possible need. Grab your favorite hook and some yarn, and let us start this floral journey together.
1. The Classic Deep Red Nested Rose
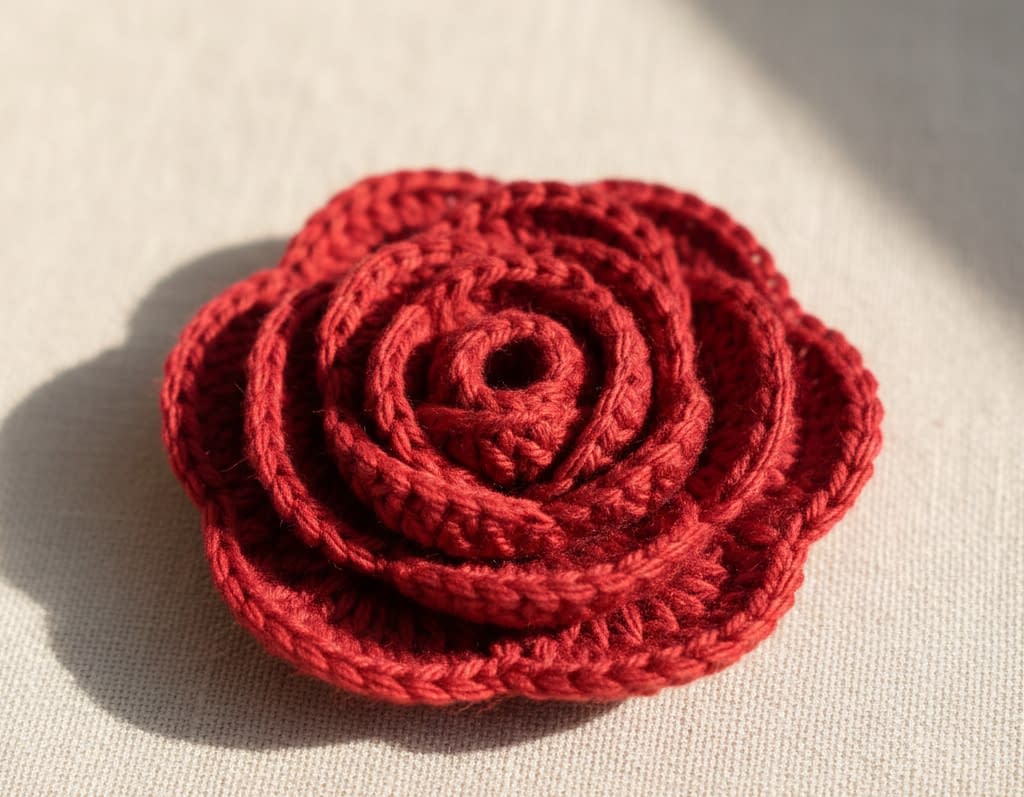
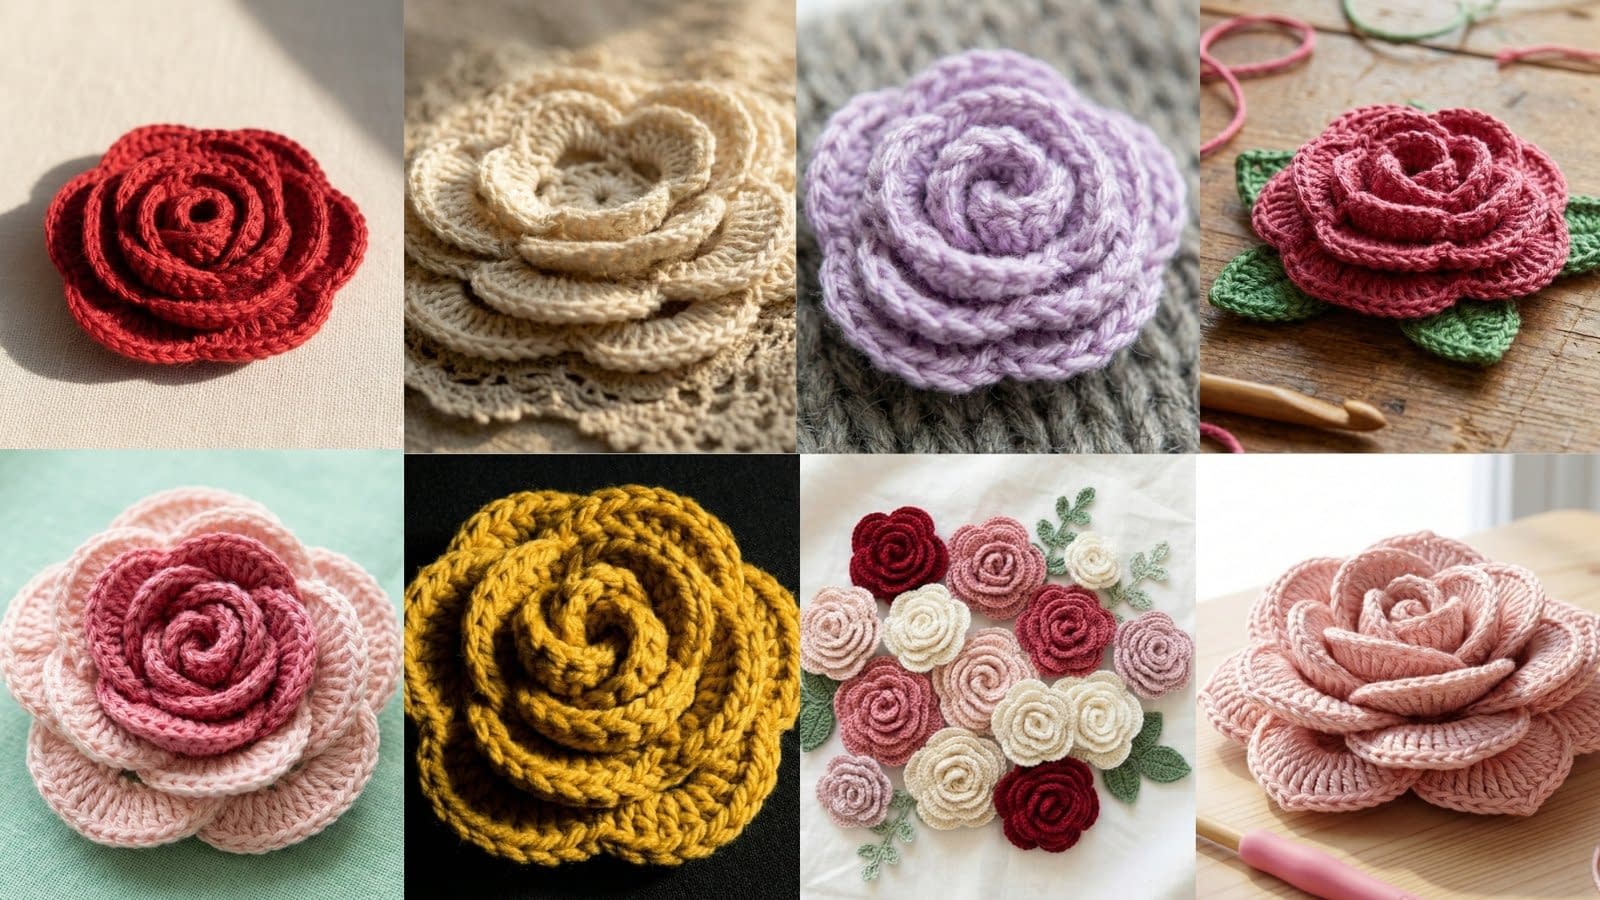
This pattern corresponds to the beautiful, symmetrical red rose shown in the top left of our visual collection. It features a defined center that looks tightly wrapped, opening up into wider petals on the outer edge. This design is perfect for sewing flat onto bags or headbands because the back remains relatively flat while the front offers lovely texture.
Skill Level
Beginner to Intermediate
Materials
Medium weight acrylic or cotton yarn in a deep red color A crochet hook size 4.0 mm or size 5.0 mm, depending on your yarn thickness A yarn needle for weaving in ends Sharp scissors
Notes
This rose is worked in the round, but we will not be joining the rounds with a slip stitch at the end of every row. Instead, we will work in a continuous spiral for the center to give it that organic, wrapped look, and then switch to distinct rounds for the outer petals. Tension is key here; try not to crochet too tightly, or your petals will curl inward too much.
Instructions
Step 1: Creating the Center Bud
Start by creating a slip knot on your crochet hook. You will then chain four stitches. Insert your hook into the very first chain stitch you made and pull the yarn through both the chain and the loop on your hook to form a slip stitch. This creates a small ring.
Step 2: The Foundation Round
Insert your hook into the center of the ring. Yarn over and pull up a loop. Yarn over again and pull through both loops on your hook. This is a single crochet. Make nine more single crochet stitches into the center of the ring for a total of ten single crochet stitches. Do not join the round.
Step 3: Forming the Inner Petals
For the next section, we will start shaping the petals. In the first stitch of the previous round, work one single crochet. In the next stitch, we will create a small petal. To do this, work three half double crochet stitches all into that same stitch. To make a half double crochet, yarn over, insert your hook, pull up a loop, yarn over, and pull through all three loops on your hook. In the next stitch, work one single crochet to anchor the petal. Repeat this pattern (one single crochet, three half double crochets in the next stitch, one single crochet) around the center until you have five small petal bumps.
Step 4: Expanding the Rose
Now we will create larger petals behind the first set. Chain one stitch. Work a single crochet into the back loop only of the next stitch. The back loop is the part of the V-shape at the top of the stitch that is furthest away from you. By working in the back loops, we leave the front loops free, which keeps the inner petals pushed forward.
In the next stitch (working in the back loop only), work five double crochet stitches. To make a double crochet, yarn over, insert hook, pull up a loop, yarn over and pull through two loops, yarn over and pull through the final two loops. Repeat this five times in the same spot. In the next stitch, work a single crochet. Continue this pattern around.
Step 5: The Final Large Petals
For the final, largest layer, you will continue working behind the previous petals. Chain two stitches. Identify the spaces between the petals you just made. You will now work into the stitches from the row below the one you just finished, creating a layered effect. Work a slip stitch to anchor the yarn. In the next available space, work seven double crochet stitches to create a large, wide fan. Slip stitch in the next space to close the petal. Repeat this five times around the flower.
Finishing
Cut the yarn, leaving a tail roughly six inches long. Thread this tail into your yarn needle. Weave the needle through the back of the flower to secure the end. If you plan to sew this rose onto a garment, do not trim the tail yet; use it to sew the appliqué in place.
2. The Vintage Cream Layered Garden Rose
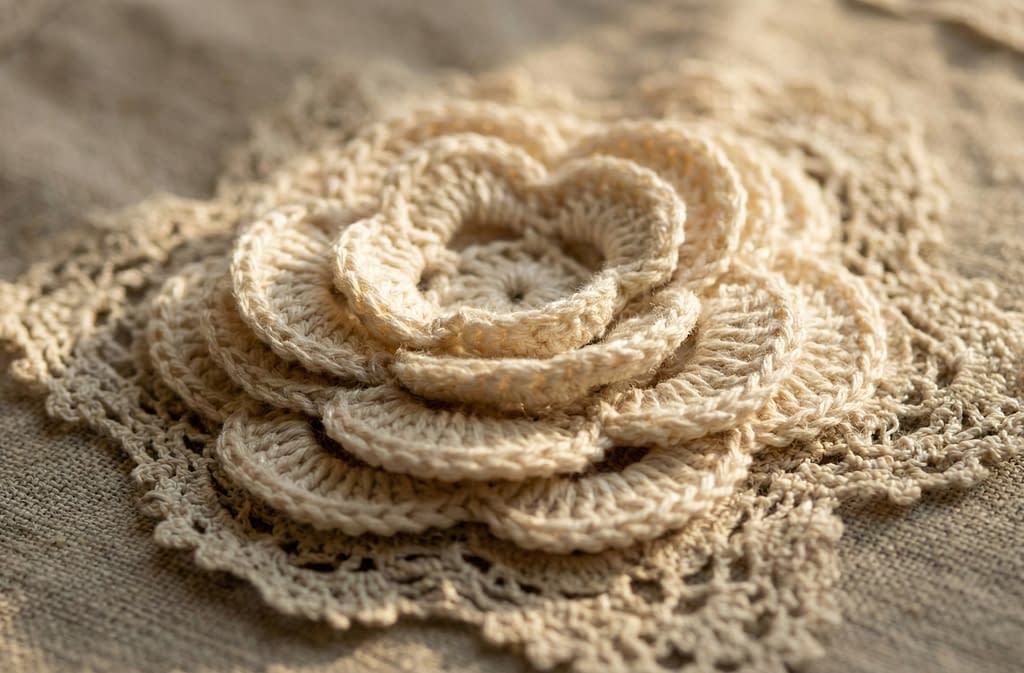
This pattern replicates the elegant cream-colored flower seen in the top middle-left of the collection. This rose is distinct because of its open, ruffled layers that sit directly on top of one another, resembling an old-fashioned garden rose or a camellia. It has a flatter profile than a spiral rose, making it excellent for coasters or heavy blanket appliqués.
Skill Level
Intermediate
Materials
Worsted weight yarn in a cream or off-white color A crochet hook size 3.5 mm or 4.0 mm A tapestry needle Scissors
Notes
This project requires you to be comfortable identifying the “front loop” and “back loop” of a stitch. The entire structure depends on working multiple rounds into the same base circle—first using the front loops to make the small inner petals, and then using the remaining back loops to build the larger outer petals.
Instructions
Step 1: The Base Disc
Begin with a magic ring. If you are uncomfortable with a magic ring, you can chain four and slip stitch to join. Inside this ring, work twelve double crochet stitches. Join the round by slip stitching into the top of the first double crochet. Chain two. In the second round, work two double crochet stitches into every stitch around. You should now have twenty-four stitches. Join with a slip stitch. This flat circle is the base upon which we will build the layers.
Step 2: The First Layer (Inner Ruffles)
We will now work into the front loops only of the small center circle (the first round of twelve stitches you made). Join your yarn with a slip stitch to a front loop of that first round. Chain one. Into the same front loop, work one half double crochet, one double crochet, and one half double crochet. This creates a small scallop. Slip stitch into the next front loop. Repeat this process in every single front loop around the center. This creates a dense ruffle in the very middle of the flower.
Step 3: The Middle Layer
Now, locate the front loops of the second round (the round with twenty-four stitches). Join your yarn to any front loop in this round. Chain one. In the first front loop, work one single crochet. In the next front loop, work five double crochet stitches. In the next front loop, work one single crochet. This forms a distinct petal shape. Repeat this sequence (single crochet, five double crochets, single crochet) all the way around the circle. Join with a slip stitch to the first single crochet.
Step 4: The Outer Layer
We still have the back loops available from that second round where we just placed the middle petals. Turn your work slightly so you can see behind the petals. Join your yarn to a back loop. Chain two. Work seven treble crochet stitches into the same back loop. To do a treble crochet, yarn over your hook twice before inserting it into the stitch. Pull up a loop, then (yarn over and pull through two loops) three times. Skip the next back loop. Slip stitch into the following back loop. Skip the next back loop. Work seven treble crochet stitches into the next. Continue this pattern around. The skipping of stitches allows the large petals to spread out without bunching up too much.
Finishing
Fasten off your yarn. You will have several tails from joining the yarn at different layers. Use your yarn needle to weave these ends into the back of the work. Gently fluff the petals with your fingers to separate the layers and give the rose its full volume.
3. The Dense Lilac Spiral Rose
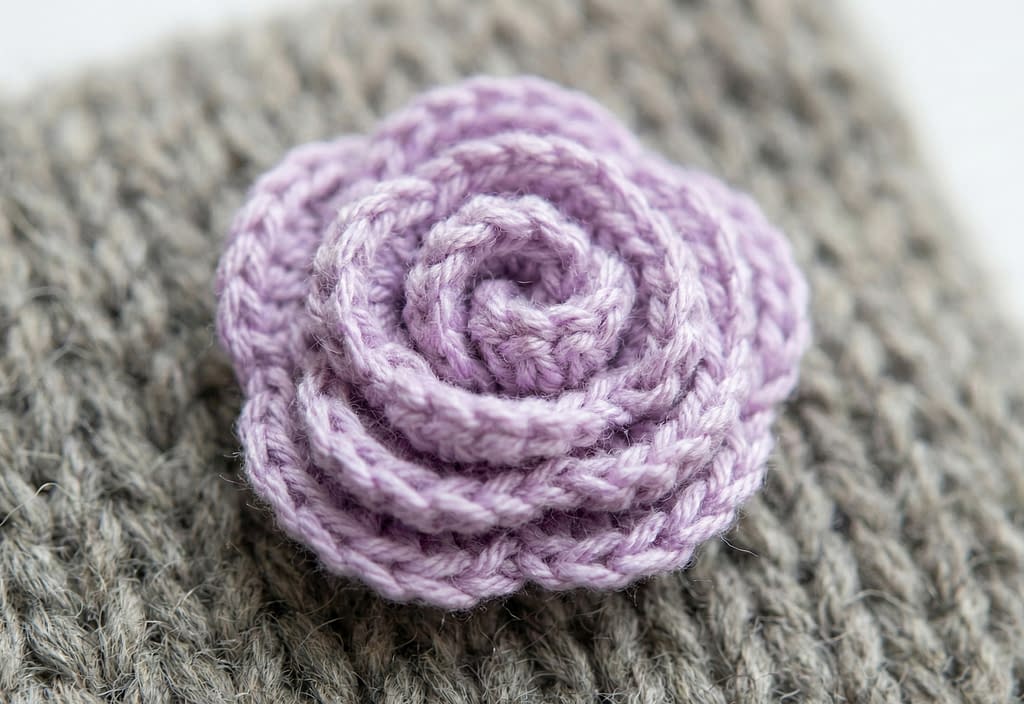
This pattern corresponds to the lush, purple flower shown in the top middle-right of the image. This is constructed differently than the first two. It is not worked in the round; instead, it is a “ribbon” style rose. You crochet a long, curly strip and then roll it up like a cinnamon roll. This technique creates those beautiful, infinite layers of petals packed tightly together.
Skill Level
Beginner
Materials
Light purple or lilac yarn (cotton blends work very well for stitch definition) A crochet hook size 4.0 mm A yarn needle with a large eye Scissors
Notes
The length of your starting chain determines the size of the rose. A longer chain results in a larger, fuller flower with more rotations. The instruction below creates a medium-sized rose. Because this flower is rolled, the assembly step is just as important as the crocheting steps.
Instructions
Step 1: The Foundation Chain
Start by making a slip knot. Chain fifty-one stitches. This might seem long, but the strip will coil up, reducing the final width significantly.
Step 2: The Setup Row
Work one single crochet stitch into the second chain from your hook. Work one single crochet into every chain stitch all the way to the end. You should have fifty single crochet stitches. Chain two and turn your work over to start the next row.
Step 3: Creating the Petal Arches
In the first stitch, work one double crochet. Chain two. Skip the next stitch. In the next stitch, work one single crochet. Chain two. Skip one stitch. In the next stitch, work one double crochet, chain two, and another double crochet into the same stitch (this forms a V-shape). Repeat the instructions between the asterisks (*) until you reach the last few stitches. End with a single crochet in the final stitch. Turn your work.
Step 4: The Petal Fill
This is the final crochet row where we create the actual petals. In the first chain-two space (the gap created by the chains in the previous row), work six double crochet stitches. This creates a shell. In the next space (the V-shape space), work one single crochet to anchor the petal down. In the next chain-two space, work six double crochet stitches. Continue this pattern all the way across the strip. You will notice the strip beginning to curl naturally on its own. This is exactly what we want.
Step 5: Assembly
Fasten off the yarn, leaving a very long tail (at least eighteen inches). You will need this for sewing. Thread the tail into your yarn needle. Start rolling the strip from the end where you began crocheting (not the end where you finished). Roll it tightly at first to create a bud center. As you continue rolling, keep the bottom edge of the strip flat and aligned. Every few rolls, pass your needle and yarn through the bottom layers of the coil to stitch them together. Do not wait until the end to sew, or the center might pop out. Continue rolling and stitching through the base until the entire strip is used up. Secure the end of the strip with several tight stitches.
Finishing
Flip the rose over to check the back. It should look flat and secure. If you see any loose layers, add a few more stitches through the back to hold everything in place.
4. The Magenta Garden Rose with Leaves
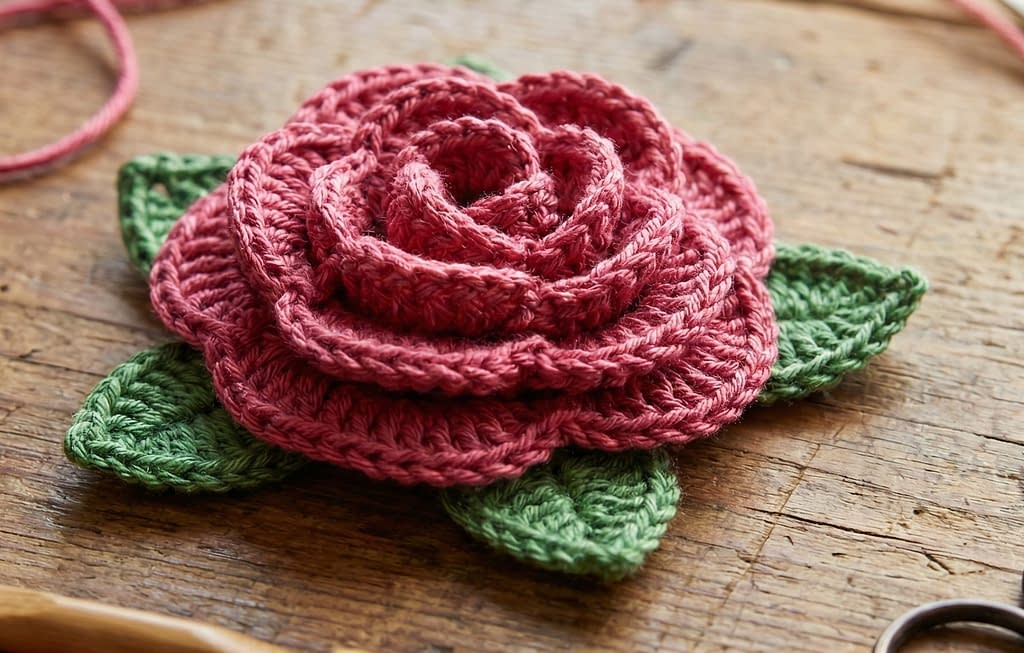
This pattern matches the flower in the top right corner of the visual. It features a bright pink, three-dimensional rose accompanied by two distinct green leaves. This pattern is ideal for a brooch or a hat decoration because it is a complete unit—flower and foliage together.
Skill Level
Intermediate
Materials
Dark pink or magenta yarn for the rose Leaf green yarn for the leaves A crochet hook size 4.0 mm Yarn needle and scissors
Notes
The rose portion is similar to the Classic Red Rose but with more texture on the petal edges. The leaves are made separately and sewn on, allowing you to position them exactly where you want them.
Instructions
Part 1: The Rose
Step 1: The Center
With the magenta yarn, chain four and join with a slip stitch to form a ring. Chain one. Work twelve single crochet stitches into the ring. Join with a slip stitch to the first single crochet.
Step 2: First Layer of Petals
Chain three (this counts as your first double crochet). In the same stitch, work four more double crochet stitches. Remove your hook from the loop. Insert your hook into the top of the chain-three you started with. Grab the dropped loop and pull it through. This is known as a popcorn stitch or a gathered shell, and it makes the petal pop out. Chain two. Skip one stitch. In the next stitch, work five double crochets, remove hook, insert into first double crochet, pull loop through. Chain two. Repeat this around until you have six puffy petals.
Step 3: Second Layer of Petals
Slip stitch into one of the chain-two spaces from the previous round. Chain one. In this same space, work one single crochet, one half double crochet, three double crochets, one half double crochet, and one single crochet. This sequence creates a perfectly shaped petal with a curved top. Move to the next chain-two space and repeat the exact same sequence. Continue around for all spaces. Fasten off the pink yarn and weave in the ends.
Part 2: The Leaves
Step 1: The Foundation Chain
With the green yarn, make a slip knot and chain ten. This will form the central vein of the leaf.
Step 2: Working the Leaf Shape
We will work down one side of the chain and then up the other. Insert hook into the second chain from the hook and work one single crochet. In the next chain, work one half double crochet. In the next two chains, work one double crochet in each. In the next two chains, work one treble crochet in each. In the next chain, work one double crochet. In the next chain, work one half double crochet. In the last chain, work three single crochet stitches. This turns the corner.
Step 3: The Other Side of the Leaf
Now working up the opposite side of the foundation chain: Work one half double crochet in the first stitch. Work one double crochet in the next. Work one treble crochet in the next two stitches. Work one double crochet in the next two stitches. Work one half double crochet in the next. Work one single crochet in the last stitch. Join with a slip stitch to the very first single crochet. Fasten off, leaving a tail for sewing. Repeat the leaf instructions to make a second leaf.
Assembly
Thread the tail of a green leaf onto your needle. Position the leaf behind the magenta rose so that the pointed end sticks out visible from the front. Sew the base of the leaf securely to the back of the rose. Repeat with the second leaf, placing it at a slight angle to the first for a natural look.
5. The Two Toned Pink Layered Rose
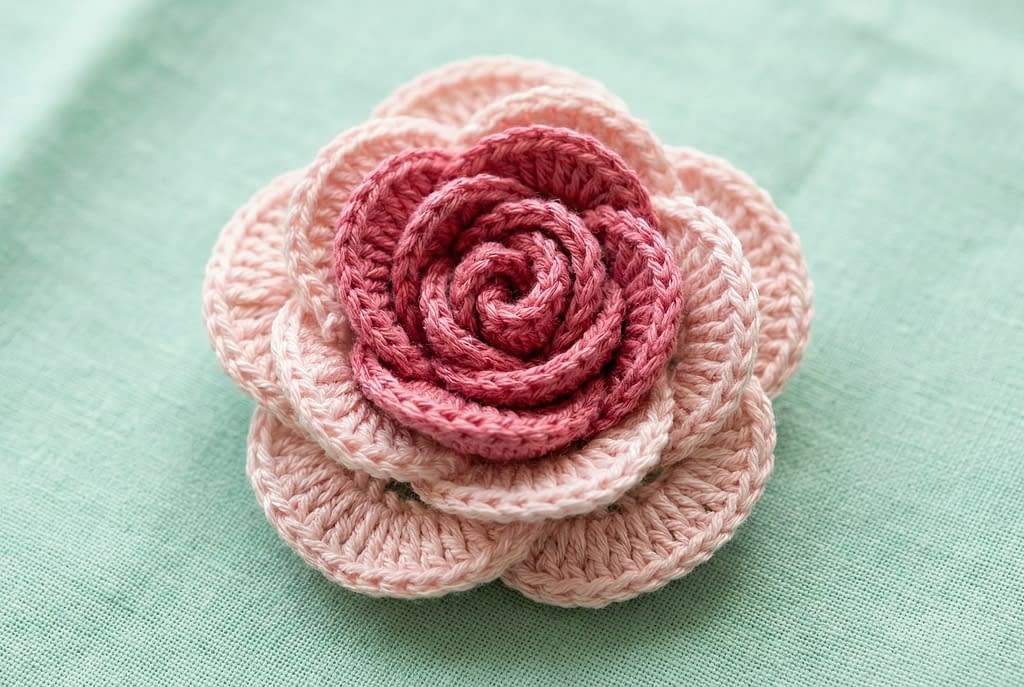
This pattern perfectly recreates the beautiful flower seen in the bottom left of our collection. What makes this design so striking is the visual depth created by using two different shades of pink. By starting with a darker, rich pink in the center and transitioning to a soft, pastel pink for the large outer petals, you create a realistic fading effect. This appliqué is fantastic for adding a pop of color to a denim jacket or a plain canvas tote bag.
Skill Level
Intermediate
Materials
Medium weight cotton or acrylic yarn in a dark pink color Medium weight cotton or acrylic yarn in a light pink color A crochet hook size 4.5 millimeters A yarn needle Scissors
Notes
This rose is constructed using the layered loop method, similar to our second pattern, but with a crucial color change in the middle. You will be working a flat foundation circle, and then attaching the petals to the front loops for the inner layers, and the back loops for the outer layers. When transitioning between the dark pink and light pink yarn, it is important to weave in your ends securely so the back of the appliqué remains neat.
Instructions
Step 1: The Foundation Base with Dark Pink
Begin with your dark pink yarn. Create a slip knot and chain five stitches. Insert your crochet hook into the very first chain stitch you created and pull the yarn through both the chain and the loop on your hook to create a slip stitch. You now have a small center ring. Chain three stitches. This initial chain three will count as your very first double crochet stitch for this round. Work fifteen more double crochet stitches directly into the center of the ring. To make a double crochet, yarn over your hook, insert the hook into the ring, pull up a loop, yarn over and pull through two loops, then yarn over and pull through the final two loops. Once you have sixteen stitches in total, insert your hook into the top chain of your starting chain three, and slip stitch to close the round.
Step 2: Creating the Dark Pink Inner Petals
We will now create the first layer of petals using the front loops of the round you just completed. A stitch looks like a small letter V from the top. The side of the V closest to you is the front loop. Chain one stitch. Working only in the front loops, work one single crochet into the first stitch. In the next front loop, work four double crochet stitches. In the next front loop, work one single crochet. You have just created one small inner petal. Repeat this exact sequence around the circle: single crochet in the next front loop, four double crochets in the next front loop, single crochet in the next front loop. When you reach the end of the round, slip stitch into the very first single crochet. Fasten off the dark pink yarn and cut it, leaving a small tail.
Step 3: Attaching the Light Pink Yarn
Turn your flower slightly so you can see the unworked back loops from the foundation round. These loops are tucked just behind the dark pink petals you just made. Take your light pink yarn and make a slip knot on your hook. Insert your hook into any of the available back loops. Pull the slip knot through to attach the new color. Chain one stitch to secure it.
Step 4: The Middle Layer of Light Pink Petals
Working entirely in those back loops now, work one single crochet into the first stitch. In the next stitch, work one half double crochet, three double crochet stitches, and another half double crochet all into the same back loop. This creates a slightly wider, taller petal than the center ones. In the next back loop, work one single crochet to anchor the petal down. Continue this pattern all the way around the circle: single crochet, then the large petal group in the next stitch, then a single crochet. Slip stitch into the first single crochet to close this round.
Step 5: The Final Large Outer Petals
For this final layer, we need to create a base of chain spaces behind the petals we just finished. Chain four stitches. Reach your hook behind the petal you just made and locate the single crochet stitch from the previous round. Slip stitch around the post of that single crochet. Chain four stitches again, and slip stitch around the post of the next single crochet. Repeat this around until you have a series of chain loops hidden behind your middle petals. Now, working into those chain loops, slip stitch into the first loop. Chain two stitches. Work seven double crochet stitches into the loop. Chain two stitches, and slip stitch back into the same loop. Move to the next chain loop, slip stitch into it, chain two, work seven double crochets, chain two, and slip stitch. Repeat this for every loop to create the large, sweeping outer petals. Fasten off and weave in all loose ends carefully with your yarn needle.
6. The Mustard Yellow Textured Rose
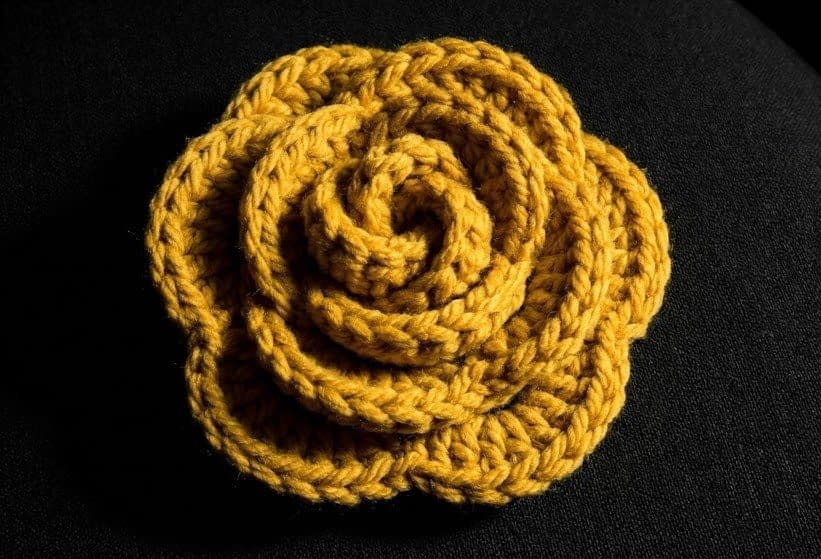
Represented in the bottom middle left image, this stunning mustard yellow rose stands out due to its incredible, almost ribbed texture. The rich, golden color paired with highly defined, thick stitches gives it a rustic, cozy feel. This pattern is thick and substantial, making it an excellent choice for winter accessories like chunky beanies, thick scarves, or heavy afghan blankets.
Skill Level
Intermediate to Advanced
Materials
Chunky weight or thick worsted weight yarn in a mustard yellow or gold color A crochet hook size 5.5 millimeters A large eye yarn needle Scissors
Notes
To achieve the distinct ridged look of this flower, we will be utilizing back post stitches and front post stitches, as well as working strictly in the back loops for certain sections. Because the yarn is chunky, the flower works up quickly, but you must pay close attention to your tension. If you crochet too tightly with chunky yarn, the flower will become stiff and lose its beautiful layered drape.
Instructions
Step 1: The Magic Ring Center
Start by creating a magic ring. To do this, loop the yarn around your fingers, insert your hook into the center, pull up a loop, and chain one stitch to secure it. If you prefer, you can chain four and slip stitch to form a ring, but the magic ring provides a tighter, cleaner center for chunky yarn. Chain two stitches. These two chains do not count as a stitch. Work twelve double crochet stitches into the center of the magic ring. Pull the tail of the yarn tightly to close the hole in the center. Slip stitch into the very first double crochet to join the round.
Step 2: The Raised Center Round
To create the textured center, we will use front post double crochet stitches. Chain two stitches. Yarn over your hook. Instead of inserting your hook into the top of the next stitch, insert it from the front to the back and out to the front again, going entirely around the vertical post of the first double crochet from the previous round. Pull up a loop, yarn over and pull through two loops, yarn over and pull through two loops. This forces the stitch to pop forward. Work one front post double crochet around every single stitch from the previous round. You will still have twelve stitches. Join with a slip stitch.
Step 3: The First Layer of Textured Petals
Chain one stitch. We will now work into the spaces between the post stitches. In the space between the first and second stitch, work one single crochet. In the next space, work five double crochet stitches. In the next space, work one single crochet. Repeat this sequence around the entire circle. You are creating petals that sit behind the raised center ring. Join with a slip stitch to the first single crochet.
Step 4: Creating the Ribbed Outer Petals
This is where the unique texture is fully realized. We need to create a foundation behind the first petals, just like we did in previous patterns. Chain four stitches. Slip stitch around the back post of the single crochet from the previous round. Repeat this around to create your hidden chain spaces. Slip stitch into the first chain space. Chain two stitches. We will now create the petal, but to give it that ribbed look, we will alternate standard stitches with back loop only stitches. Work one double crochet into the space. Work one double crochet into the back loop only of the chain itself. Work three treble crochet stitches directly into the space. A treble crochet involves yarning over twice, inserting the hook, pulling up a loop, and pulling through two loops three separate times. Work one double crochet into the back loop only. Work one double crochet into the space. Chain two and slip stitch into the space. Repeat this intricate petal sequence in every chain space around the flower. The alternating placement of the stitches creates the thick, wavy ridges seen in the photograph. Fasten off and use your yarn needle to weave the chunky tail through the thickest parts of the base to hide it completely.
7. The Miniature Rose Bouquet Collection
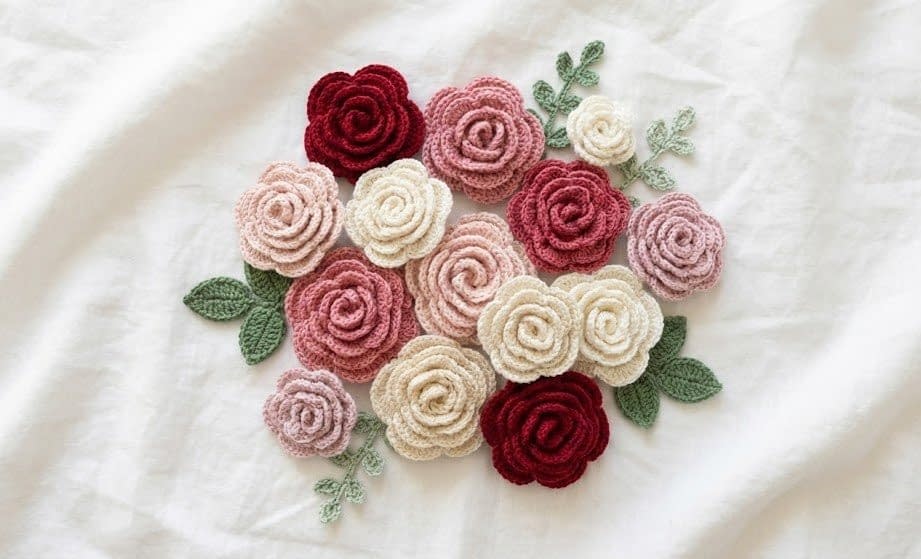
If you look at the bottom middle right image, you will see an adorable assortment of tiny, delicate roses in shades of deep red, soft pink, and cream, beautifully accented with tiny, intricate green leaves. These micro appliqués are incredibly versatile. They are perfect for doll clothes, delicate baby cardigans, adding a subtle touch to a collar, or even clustering together to create a stunning piece of textile jewelry.
Skill Level
Beginner
Materials
Fingering weight or light sport weight yarn in your choice of colors for the flowers Fingering weight yarn in a soft sage green for the leaves A crochet hook size 2.5 millimeters or 3.0 millimeters A very fine yarn needle or a large embroidery needle Small, sharp scissors
Notes
Because these flowers are so small, lighting and patience are very important. We will be using the ribbon rolling method, similar to the lilac rose we made earlier, but on a much smaller scale with thinner yarn. The leaves are created using a very simple chain and slip stitch technique to keep them looking delicate and vine-like rather than thick and bulky.
Instructions
Part 1: The Miniature Rose
Step 1: The Tiny Foundation
With your chosen flower color, create a slip knot. Chain twenty one stitches. Make sure your chains are relatively loose; if they are too tight, it will be very difficult to work your stitches into them in the next step.
Step 2: Creating the Micro Petals
You will be working into the foundation chain you just made. Skip the very first chain stitch next to your hook. In the second chain stitch, work two single crochet stitches. In the next chain stitch, work two half double crochet stitches. To recap, yarn over, insert hook, pull up a loop, yarn over, and pull through all three loops. In the next chain stitch, work three double crochet stitches. This creates the peak of your first tiny petal. In the next chain stitch, work two half double crochet stitches. In the next chain stitch, work one slip stitch to anchor the petal and separate it from the next one. Repeat this entire sequence down the length of the chain: two single crochets in the next chain, two half double crochets in the next, three double crochets in the next, two half double crochets in the next, and a slip stitch in the next. When you reach the end of the chain, you will have a small, very curly piece of crochet fabric. Fasten off the yarn, leaving a long tail for sewing.
Step 3: Rolling the Miniature Rose
Thread the long tail onto your needle. Starting from the end where you began your foundation chain, begin to roll the curly strip inward, keeping the flat bottom edge completely aligned. Roll it tightly to form a neat, tiny bud. Once rolled, turn it over and use the needle to sew back and forth across the bottom foundation chains, passing through every layer. You only need a few stitches to secure such a small flower. Tie a knot and trim the excess yarn.
Part 2: The Delicate Fern Leaves
Step 1: The Stem
With your green yarn, create a slip knot. Chain ten stitches. This creates the main stem of the tiny leaf sprig.
Step 2: The First Leaflet
Skip the first chain next to your hook. In the second chain, work a slip stitch. In the third chain, work a single crochet. In the fourth chain, work a slip stitch. You have just created a tiny leaf jutting off the side of the stem.
Step 3: Continuing the Sprig
Slip stitch into the next two chains on the main stem to move down slightly. Now, we will make another leaflet on the opposite side. Chain four stitches extending away from the main stem. Skip the first chain from the hook. Slip stitch in the next chain, single crochet in the next, slip stitch in the next. You are now back at the main stem. Slip stitch into the remaining chains of the main stem until you reach the end. Fasten off, leaving a tail. You can sew these delicate leafy sprigs directly underneath your clustered miniature roses to recreate the beautiful botanical look seen in the visual.
8. The Large Fluffy Light Pink Ruffled Rose
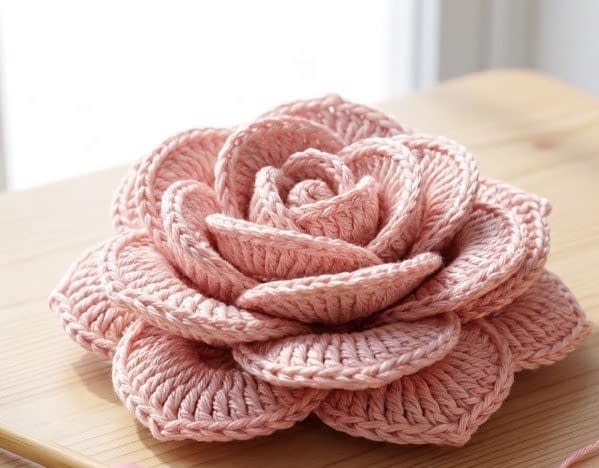
The final pattern in our guide corresponds to the magnificent flower in the bottom right corner of the visual. This is a true statement piece. It is large, incredibly fluffy, and features dozens of wide, heavily ruffled petals that overlap each other in dense layers. This specific appliqué is perfect for the center of an afghan, a decorative throw pillow, or a bold adornment for a large sun hat.
Skill Level
Advanced Beginner to Intermediate
Materials
Light worsted weight or double knitting weight yarn in a soft, blush pink color A crochet hook size 4.0 millimeters A yarn needle Scissors
Notes
To achieve the massive amount of ruffles seen in this flower, we have to use a technique called increasing. By placing multiple tall stitches into a single space, the crochet fabric is forced to wave and fold over on itself, creating the illusion of many, many petals. This pattern uses a lot of yarn and takes a bit of time, but the dramatic result is absolutely worth the effort. We will work this in continuous concentric circles, building outward.
Instructions
Step 1: The Dense Center Base
Create a magic ring with your soft pink yarn. Chain three stitches, which will count as your first double crochet. Work fifteen more double crochet stitches into the magic ring. Pull the tail tightly to close the hole completely. You need a very firm base for this heavy flower. Slip stitch into the top of the initial chain three to join the round. You now have sixteen stitches.
Step 2: The First Ruffle Layer
We will be working in the front loops only for this entire round. Chain three stitches. Working in the front loop of the very same stitch you just joined in, work three more double crochet stitches. You now have four tall stitches coming out of one tiny loop. In the next front loop, work four double crochet stitches. Repeat this process, working four double crochet stitches into every single front loop around the circle. By the time you finish this round, the fabric will be extremely wavy and crowded. This is exactly what creates the ruffles. Slip stitch to the top of the beginning chain three to join.
Step 3: The Second Ruffle Layer
Turn the flower slightly to look behind the massive ruffle you just created. You will see the unworked back loops from the foundation round. Slip stitch your yarn loosely to the first available back loop to move your starting point behind the first layer. Chain four stitches. This counts as your first treble crochet stitch. A treble crochet is taller than a double crochet and will help the next layer peak out above the first. Working in the back loops only, work four treble crochet stitches into the exact same back loop. In the next back loop, work five treble crochet stitches. Continue working five treble crochet stitches into every single back loop around the foundation circle. The ruffles will become even more pronounced. Slip stitch to the top of the initial chain four to join.
Step 4: Building the Massive Outer Petals
Now that we have the ruffled center, we will frame it with wide, distinct petals. We need to create chain loops behind the entire piece. Look at the back of the flower, specifically at the base of the treble crochets you just made. Slip stitch around the post of one of the stitches. Chain five stitches. Skip three stitches, and slip stitch around the post of the fourth stitch. Chain five, skip three stitches, slip stitch around the next. Repeat this all the way around the back of the flower to create a large outer ring of chain spaces.
Step 5: Filling the Outer Petals
Slip stitch into the first chain five space. Chain three stitches. In this space, work eleven double crochet stitches. Chain three, and slip stitch back down into the exact same space. This creates one massive, wide petal. Move to the next chain five space. Slip stitch into it. Chain three, work eleven double crochet stitches into the space, chain three, and slip stitch back into the space. Repeat this process for every single chain space around the back of the flower. Because the petals are so wide, they will naturally overlap each other, pushing against one another to create that lush, full, garden rose appearance. Once you have filled every space, fasten off your yarn. Because this flower is heavy, leave an extra long tail so you have plenty of yarn to sew it securely onto your chosen project. Weave in the starting tail from your magic ring. Use your hands to fluff the ruffles and arrange the large overlapping petals until the flower looks perfectly blooming.
Conclusion
Creating your own floral embellishments is one of the most rewarding aspects of learning to crochet. As we have explored in this comprehensive guide to 8 Crochet Rose Appliqué Patterns, a few basic stitches can be transformed into completely different shapes, textures, and styles simply by changing where you insert your hook and how many stitches you group together.
From the elegant simplicity of the classic deep red bud to the intricate, textured layers of the mustard yellow bloom, and from tiny, delicate doll-sized accents to massive, ruffled statement pieces, you now have a pattern suited for every possible crafting scenario.
Remember that practice makes perfect. If your first attempt at working in back loops or mastering the treble crochet does not look exactly like the pictures, do not be discouraged. Tension plays a massive role in how a crochet flower ultimately takes shape, and finding your natural rhythm takes time. Take these full-sentence, step-by-step instructions at your own pace. Mix and match the colors, experiment with different weights of yarn, and most importantly, enjoy the process of watching a beautiful rose bloom right from the tip of your crochet hook.