
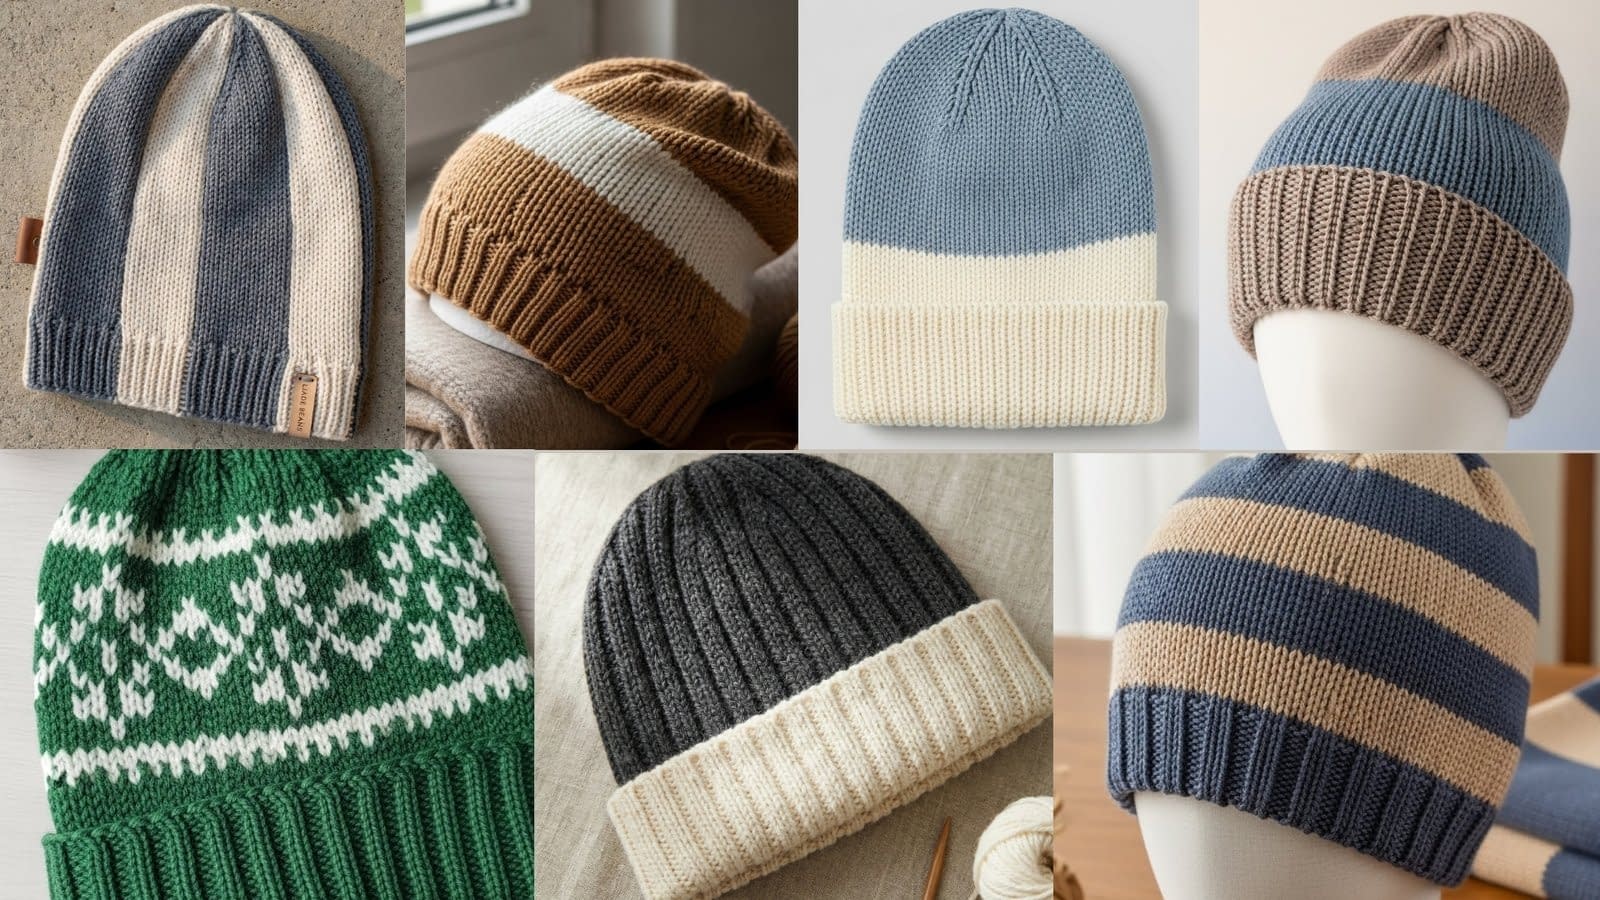
Two-color knit beanies are a timeless staple in handmade winter accessories. They offer visual interest without overwhelming complexity, making them ideal for knitters who want to elevate their work while still enjoying a relaxing, rhythmic project. By combining just two carefully chosen yarn colors, you can create striking textures, clean contrasts, and polished finishes that look both modern and classic.
In this in-depth guide to 7 Two-Color Knit Beanie Patterns, you will find thoughtfully designed styles that range from simple ribbing to structured stripes and beginner-friendly colorwork motifs. Each pattern is written with clarity and intention, guiding you through every stage of the knitting process, from casting on to crown shaping and finishing. The instructions are slow, descriptive, and approachable, making them suitable for confident beginners as well as intermediate knitters who appreciate professional-level detail.
This post focuses on technique, construction logic, and practical tips so you understand not only what to do, but why each step matters. The first three patterns below introduce foundational two-color methods that build skills gradually while producing wearable, high-quality results.
1. Classic Two-Color Ribbed Beanie Pattern
Skill level
Beginner to intermediate
This pattern is ideal for knitters who are comfortable with knit and purl stitches and want to practice clean color changes and elastic ribbing.
Finished size
Adult medium beanie
Approximately 20 to 22 inches in circumference with natural stretch, and approximately 8.5 to 9 inches from brim to crown. The size can be adjusted by changing needle size or stitch count in multiples that maintain the rib pattern.
Materials
- Worsted weight yarn in two colors
Main color: deep charcoal gray
Contrast color: soft cream - Circular knitting needle, 16-inch length, size appropriate for gauge
- Double-pointed needles or long circular needle for crown shaping
- Stitch marker
- Yarn needle
- Scissors
Notes on construction
This beanie is worked in the round from the bottom up. The brim is knitted using a two-color rib pattern that creates visual contrast and strong elasticity. The body transitions smoothly into a single-color rib or stockinette section before classic crown decreases are worked in the main color for a clean finish.
Brim: Two-color ribbing
Step 1: Cast on
Using the contrast color, cast on an even number of stitches suitable for your desired size. Join the stitches in the round carefully, making sure the cast-on edge is not twisted. Place a stitch marker to indicate the beginning of the round.
Step 2: Establish the rib pattern
Begin working a rib pattern by alternating knit stitches and purl stitches. For example, knit one stitch, purl one stitch, repeating this sequence around the entire round. Maintain even tension, as ribbing highlights inconsistencies more than other stitch patterns.
Step 3: Introduce the second color
After completing two rounds in the contrast color, introduce the main color without cutting the contrast yarn. Hold the unused yarn loosely along the inside of the work to avoid puckering. Continue working the rib pattern, alternating colors every two rounds. Always change colors at the beginning of a round for a clean vertical transition.
Step 4: Brim length
Continue knitting the ribbing until the brim measures approximately two inches, or longer if you prefer a fold-over brim. If you want a folded brim, knit at least four inches of ribbing.
Body: Transition and main section
Step 5: Color transition
Once the brim is complete, drop the contrast color and continue using only the main color. Knit one full round in knit stitches to smooth the transition between ribbing and body.
Step 6: Knit the body
Continue knitting in stockinette stitch, which means knitting every round, until the beanie measures approximately seven inches from the cast-on edge, or until it reaches the desired height before crown shaping.
Crown shaping
Step 7: Begin decreases
Switch to double-pointed needles or a longer circular needle when needed. Begin decreasing by evenly spacing decrease points around the round. For example, knit six stitches, then knit two stitches together. Repeat this sequence around the round.
Step 8: Continue shaping
On the following round, knit all stitches without decreasing. Alternate decrease rounds and plain knit rounds, reducing the number of stitches between decreases as the crown narrows.
Step 9: Finish the crown
When only a small number of stitches remain, cut the yarn leaving a long tail. Thread the tail through a yarn needle, pass it through the remaining stitches, pull tightly to close the top, and secure on the inside.
Finishing
Weave in all yarn ends neatly on the inside of the beanie. Lightly block if desired to even out stitches and enhance stitch definition.
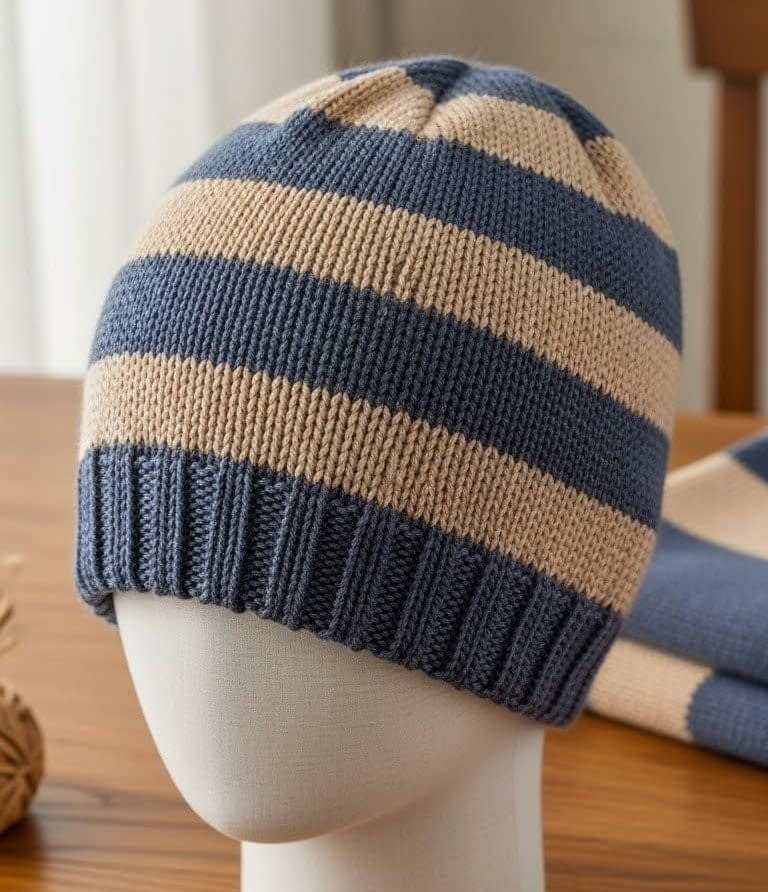
2. Two-Color Striped Knit Beanie Pattern
Skill level
Beginner to intermediate
This pattern focuses on clean horizontal stripes and smooth color transitions without jogs.
Finished size
Adult medium
Approximately 21 inches in circumference and 9 inches in height.
Materials
- Worsted weight yarn in two colors
Color one: muted navy blue
Color two: warm oatmeal beige - Circular knitting needle
- Double-pointed needles or long circular needle
- Stitch marker
- Yarn needle
- Scissors
Notes on construction
This beanie is worked in the round from the bottom up using horizontal stripes. Color changes are managed carefully to maintain smooth transitions and an even fabric.
Brim: Single-color foundation
Step 1: Cast on
Using the navy blue yarn, cast on the required number of stitches and join in the round. Place a stitch marker.
Step 2: Knit the brim
Work a rib pattern by knitting one stitch and purling one stitch for approximately two inches. This provides elasticity and structure.
Body: Horizontal stripes
Step 3: Begin striping
After completing the brim, switch to stockinette stitch. Knit three rounds in navy blue.
Step 4: Change color cleanly
At the beginning of the next round, drop the navy blue yarn and pick up the oatmeal beige yarn. Knit one stitch tightly to anchor the new color, then continue knitting the round normally.
Step 5: Stripe sequence
Work three rounds in oatmeal beige, then switch back to navy blue. Repeat this stripe sequence consistently throughout the body of the beanie.
Step 6: Maintain even tension
Always pull the new color snugly on the first stitch of each round to prevent gaps. Carry the unused yarn loosely along the inside if stripes are narrow, or cut and rejoin if stripes are wide.
Body length
Continue striping until the beanie measures approximately seven inches from the cast-on edge.
Crown shaping with stripes
Step 7: Align decreases
Begin crown shaping while maintaining the stripe pattern. Always complete a stripe section before starting a decrease round to keep the crown visually balanced.
Step 8: Decrease rounds
Work decrease rounds as follows: knit five stitches, then knit two stitches together. Repeat around. Knit one plain round between decrease rounds.
Step 9: Final shaping
As the stitch count decreases, switch needles as needed and continue until only a few stitches remain.
Finishing
Draw the remaining stitches together, secure the yarn, and weave in all ends carefully. Light blocking will help smooth stripe transitions.
3. Two-Color Colorwork Motif Beanie Pattern

Skill level
Intermediate beginner
Some familiarity with basic stranded colorwork is helpful, but this pattern uses simple motifs and short floats.
Finished size
Adult medium
Approximately 20 to 22 inches in circumference and 9 inches in height.
Materials
- Worsted weight yarn in two colors
Base color: forest green
Motif color: ivory white - Circular knitting needle
- Double-pointed needles or long circular needle
- Stitch marker
- Yarn needle
- Scissors
Notes on construction
This beanie introduces simple two-color stranded knitting. The motif band is placed around the body of the hat, while the brim and crown are worked in a single color for simplicity and structure.
Brim: Solid foundation
Step 1: Cast on
Using the forest green yarn, cast on the desired number of stitches and join in the round.
Step 2: Ribbing
Work a knit one, purl one rib for approximately two inches.
Body: Prepare for colorwork
Step 3: Transition to stockinette
After the ribbing, knit one full round to prepare for the colorwork section.
Step 4: Introduce motif color
Join the ivory white yarn at the beginning of the motif section. Hold one color in each hand or manage both yarns in the same hand, whichever feels more comfortable.
Colorwork motif section
Step 5: Knit the motif
Follow a simple geometric motif pattern, such as alternating blocks or small diamonds. Knit with one color while carrying the unused color loosely across the back of the work.
Step 6: Manage floats
Ensure that the carried yarn does not stretch tightly across the inside. Catch the float every three to four stitches by lightly twisting the yarns together on the wrong side.
Step 7: Complete motif band
Continue knitting the motif evenly around the beanie for approximately two inches.
Body and crown
Step 8: Return to base color
Drop the motif color and continue knitting in forest green only until the beanie reaches crown height.
Step 9: Crown decreases
Begin decreasing evenly, keeping all decreases in the base color for a clean finish.
Finishing
Close the crown, secure the yarn, and weave in all ends. Light blocking will help even out the colorwork and enhance stitch clarity.
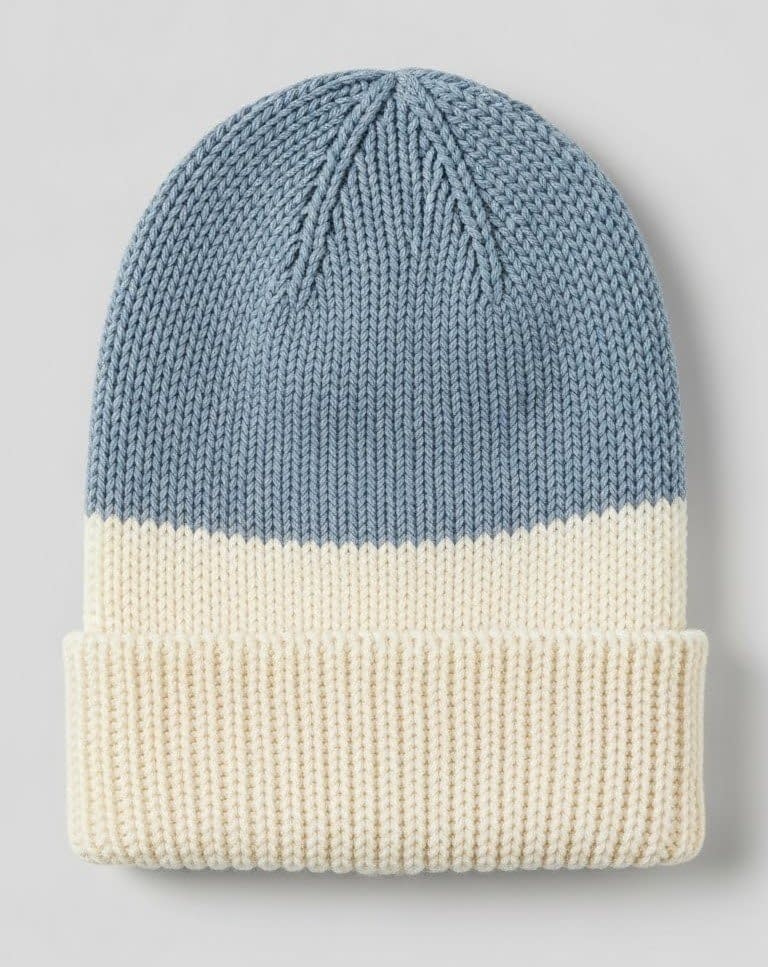
4. Two-Color Beanie with Color-Blocked Body Sections
Skill level
Confident beginner
This pattern is suitable if you can knit, purl, and are comfortable repeating simple steps. No special colorwork skills are required.
Finished size
Adult medium beanie
Fits approximately 20 to 22 inches around the head. The hat stretches naturally when worn. The finished height is about 9 inches.
Materials
- Worsted weight yarn in two colors
Color A (lower section and brim): cream
Color B (upper section): dusty blue - One circular knitting needle, 16-inch cable
- One set of double-pointed needles or a long circular needle for the top of the hat
- One stitch marker
- One yarn needle
- Scissors
Before you begin
This beanie is worked in the round, which means you knit in a continuous circle instead of turning your work back and forth. The hat begins at the bottom edge and grows upward toward the crown. You will change colors once, creating a clean horizontal division between the lower and upper sections.
Step 1: Casting on and joining in the round
Using the cream yarn, cast on the required number of stitches for your size. After casting on, place the stitches onto your circular needle.
Lay the needle flat on a table and make sure all stitches are facing the same direction. This step is critical. If the stitches are twisted when you join the round, the brim will twist permanently and cannot be corrected later.
Join the stitches into a circle by knitting the first stitch of the cast-on row. Place a stitch marker to mark the beginning of the round.
Step 2: Knitting the ribbed brim
The brim gives the hat stretch so it fits comfortably.
Knit one stitch, then purl one stitch. Repeat this sequence around the entire round. Continue working this ribbing until the brim measures approximately two inches. If you prefer a folded brim, continue until it measures four inches.
At this stage, your work should look stretchy and slightly corrugated. That is exactly what ribbing is supposed to do.
Step 3: Transitioning to the body
After finishing the ribbing, knit every stitch in the next round. This smooth round helps the fabric transition cleanly from ribbing to the main body of the hat.
Step 4: Knitting the lower body section
Continue knitting every stitch in cream. This creates a smooth fabric called stockinette stitch when worked in the round.
Keep knitting until the hat measures about four inches from the cast-on edge. Measure by laying the hat flat without stretching it.
Step 5: Changing to the second color
At the beginning of a new round, stop knitting and drop the cream yarn. Pick up the dusty blue yarn.
Knit the first stitch firmly, but not tightly. This first stitch anchors the new color and prevents a loose gap where the colors meet.
Continue knitting the rest of the round in dusty blue.
If you look inside the hat, you may see the cream yarn hanging loosely. That is normal. You do not need to cut it yet.
Step 6: Knitting the upper body
Continue knitting every stitch in dusty blue until the hat measures about seven inches from the cast-on edge.
At this point, the hat should comfortably cover the ears when held against the head.
Step 7: Beginning crown shaping
The crown is the top of the hat. Shaping it allows the hat to close smoothly instead of forming a flat tube.
Knit six stitches, then knit two stitches together. Repeat this pattern around the entire round. This reduces the number of stitches evenly.
Step 8: Continuing the decreases
Knit one full round without decreasing.
On the next decrease round, knit five stitches, then knit two stitches together. Continue alternating a decrease round with a plain knit round, reducing the number of stitches between decreases each time.
As the stitches become crowded, switch to double-pointed needles or use the magic loop method.
Step 9: Closing the crown
When only a small number of stitches remain, cut the yarn leaving a long tail. Thread the tail through a yarn needle, pass it through all remaining stitches, pull tight, and secure on the inside of the hat.
Finishing
Weave in all yarn ends neatly. Your color block should appear clean and straight. Light blocking can help smooth the fabric if desired.
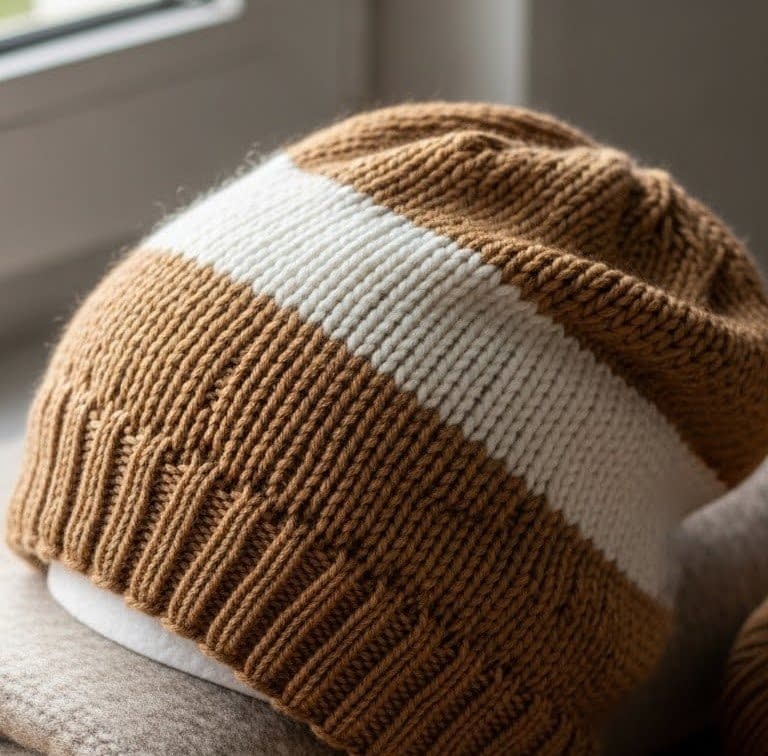
5. Two-Color Slouchy Knit Beanie

Skill level
Beginner
This pattern is forgiving and relaxed. Small inconsistencies are hidden by the slouchy shape.
Finished size
Adult slouchy fit
Approximately 22 inches around and 11 inches tall.
Materials
- Worsted weight yarn
Main color: camel brown
Accent color: cream - Circular knitting needle
- Double-pointed needles or long circular needle
- Stitch marker
- Yarn needle
- Scissors
Step 1: Cast on and brim
Using camel brown, cast on your stitches and join in the round carefully. Place a stitch marker.
Work knit one stitch, purl one stitch ribbing for two inches.
Step 2: Knitting the slouchy body
Begin knitting every stitch. This section is intentionally long to create the slouch.
Continue knitting until the hat measures about nine inches from the cast-on edge. When worn, this extra length falls softly toward the back of the head.
Step 3: Adding accent rows
Switch to the cream yarn and knit two full rounds.
Switch back to camel brown and knit two rounds.
These accent rows add visual interest near the crown without requiring complex techniques.
Step 4: Crown shaping
Begin decreasing by knitting seven stitches, then knitting two stitches together. Work one plain knit round between decrease rounds.
Because the hat is slouchy, the crown shaping feels gentle and gradual.
Step 5: Finish
Close the crown as described in previous patterns. Weave in ends and gently shape the hat with your hands.
6. Two-Color Knit Beanie with Vertical Paneling
Skill level
Confident beginner to early intermediate
This pattern is appropriate if you are comfortable knitting in the round and are ready to learn how to manage two colors across the width of a project. No advanced colorwork techniques are required.
Finished size
Adult medium beanie
Fits approximately 20 to 22 inches around the head with natural stretch. Finished height is approximately 9 inches from brim to crown.
Materials
- Worsted weight yarn in two colors
Color A: slate gray
Color B: soft off-white - One circular knitting needle, 16-inch cable, suitable for worsted weight yarn
- One set of double-pointed needles or a long circular needle for crown shaping
- One stitch marker
- One yarn needle
- Scissors
Before you begin
This beanie is worked in the round from the bottom upward. The defining feature of this design is a series of vertical color panels that run from the brim all the way to the crown. Each panel is created by assigning a group of stitches to one color and keeping those stitches in the same color on every round.
This pattern teaches you:
- How vertical color panels are formed
- How to carry yarn up the inside of a hat without tangling
- How to maintain straight color lines
- How to shape the crown without disrupting the panel design
Step 1: Casting on and joining in the round
Using the slate gray yarn, cast on the required number of stitches for your size. Slide the stitches onto your circular needle.
Lay the needle flat on a table and check carefully that all the cast-on stitches are facing the same direction. The bottom edge should form a smooth circle with no twists.
Join the round by knitting the first stitch. Place a stitch marker immediately after this stitch to mark the beginning of each round.
Step 2: Knitting the ribbed brim
The brim is worked in a single color to keep the foundation of the hat clean and elastic.
Work the following sequence around the entire round:
- Knit one stitch
- Purl one stitch
Continue this ribbing until the brim measures approximately two inches. If you want a folded brim, continue until it measures four inches.
The ribbing should feel stretchy and slightly springy when you gently pull it.
Step 3: Transitioning from brim to body
After completing the ribbing, knit every stitch in the next round using slate gray. This smooth round prevents the fabric from flaring outward and prepares the surface for the vertical panels.
Step 4: Planning the vertical panels
Before introducing the second color, you need to decide how wide each panel will be.
A good beginner-friendly option is:
- Ten stitches in slate gray
- Ten stitches in off-white
Repeat this sequence around the entire hat. The total number of stitches must be divisible by the combined panel width so the pattern lines up evenly.
This planning step is important. Once the panels are established, they must remain consistent throughout the hat.
Step 5: Introducing the second color
At the beginning of a new round, continue knitting the first panel section in slate gray.
When you reach the first stitch of the off-white panel, drop the slate gray yarn and pick up the off-white yarn. Knit the first stitch firmly, but not tightly, to anchor the new color.
Continue knitting the assigned number of stitches in off-white, then switch back to slate gray for the next panel.
Step 6: Carrying yarn inside the hat
Because the panels are vertical, each color will be used repeatedly on every round.
When you switch colors:
- Let the unused yarn hang loosely inside the hat
- Do not pull the yarn tightly across the back
- Keep the strands relaxed to prevent puckering
After a few rounds, you will see neat vertical columns forming. The inside of the hat will show strands of yarn running upward. This is normal.
Step 7: Maintaining straight panel edges
To keep the panels straight:
- Always switch colors at the same stitch position
- Knit the first stitch of a new color slightly snug
- Avoid twisting the yarns together tightly
If your panels begin to slant, slow down and check that you are switching colors at the correct stitch count.
Step 8: Knitting the body with panels
Continue knitting in this panel pattern until the hat measures approximately seven inches from the cast-on edge.
Periodically lay the hat flat and check that the panels are even in width and running straight toward the top.
Step 9: Preparing for crown shaping
Before beginning the crown, take a moment to examine your work.
The hat should look like a smooth tube with clearly defined vertical stripes. The top is still open and flat. This is exactly how it should look at this stage.
Step 10: Beginning crown decreases within panels
To preserve the panel design, decreases should occur within each color section rather than at the color boundaries.
For example:
- In each slate gray panel, knit two stitches together near the center of the panel
- Repeat the same decrease placement in each off-white panel
This keeps the panels visually balanced as the crown narrows.
Step 11: Continuing crown shaping
After a decrease round, knit one full round without decreasing.
On each subsequent decrease round, reduce stitches evenly within each panel. The panels will naturally narrow as the crown forms.
As the stitches become crowded, switch to double-pointed needles or use the magic loop method.
Step 12: Closing the crown
When only a small number of stitches remain, cut the yarns, leaving long tails.
Thread one yarn tail through a yarn needle and pass it through the remaining stitches, pulling gently to close the crown. Secure the yarn on the inside.
Repeat with the second color if necessary, weaving ends carefully so the top remains smooth.
Step 13: Weaving in ends and finishing
Turn the hat inside out. Weave in all yarn ends along existing stitch paths to keep them invisible from the outside.
Turn the hat right side out and gently shape it with your hands. Light blocking can help even out the panel lines, but it is optional.
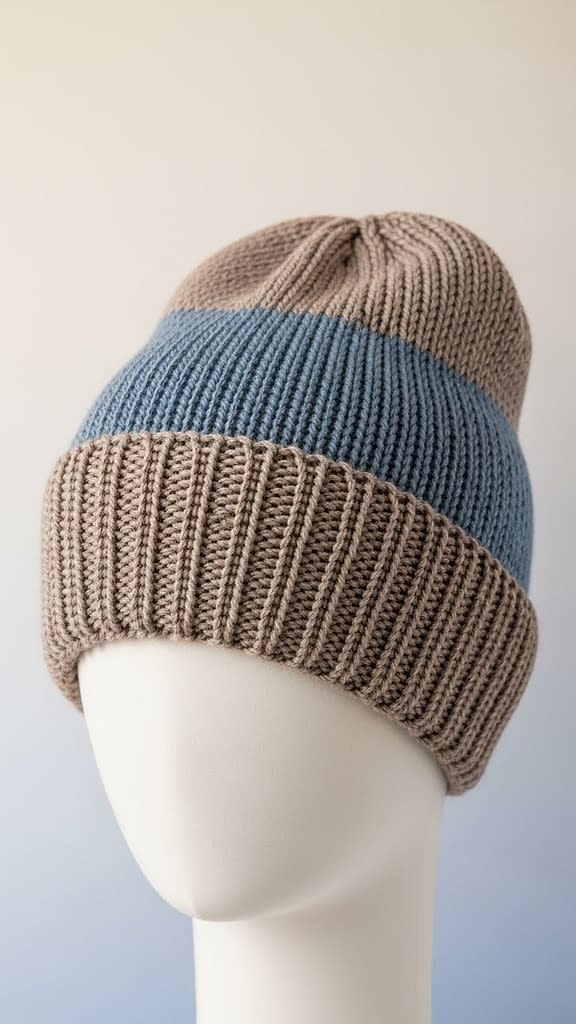
7. Two-Color Knit Beanie with Crown Accent
Skill level
Beginner
This pattern is ideal for knitters who want to try two-color knitting without managing multiple colors at the same time. All color changes happen at the crown, which keeps the process calm and easy to follow.
Finished size
Adult medium beanie
Fits approximately 20 to 22 inches around the head with comfortable stretch. Finished height is approximately 9 inches from brim to crown.
Materials
- Worsted weight yarn in two colors
Main body color: warm taupe
Crown accent color: muted blue - One circular knitting needle, 16-inch cable, suitable for worsted weight yarn
- One set of double-pointed needles or a long circular needle for crown shaping
- One stitch marker
- One yarn needle
- Scissors
Before you begin
This beanie is worked in the round from the bottom up. The entire brim and body are knitted in one solid color, which allows you to focus on building confidence and rhythm. The second color is introduced only when shaping the crown, creating a subtle yet professional-looking design detail.
This pattern teaches you:
- How a basic beanie is constructed
- How crown shaping works
- How to change colors cleanly at the top of a hat
- How decreases affect the overall shape
Step 1: Casting on and joining in the round
Using the warm taupe yarn, cast on the required number of stitches for your size. After casting on, slide the stitches onto your circular needle.
Lay the needle flat and carefully check that all stitches are facing the same direction. The cast-on edge should form a smooth circle without twisting. This step is extremely important. A twisted join will permanently distort the brim.
Join the round by knitting the first stitch. Place a stitch marker immediately after this stitch to mark the beginning of each round.
Step 2: Knitting the ribbed brim
The brim helps the beanie stretch and stay snug on the head.
Work the following pattern around the entire round:
- Knit one stitch
- Purl one stitch
Repeat this sequence until the brim measures approximately two inches. If you prefer a folded brim, continue until it measures about four inches.
At this stage, the fabric should feel stretchy and springy. That is exactly what you want.
Step 3: Transitioning from brim to body
After completing the ribbing, knit every stitch in the next round. This single round smooths the transition from ribbing to the main body and prevents the fabric from flaring outward.
Step 4: Knitting the main body of the beanie
Continue knitting every stitch in the warm taupe yarn. Because you are working in the round, knitting every stitch creates a smooth fabric automatically.
Keep knitting until the beanie measures approximately seven inches from the cast-on edge. To measure, lay the beanie flat without stretching it and measure straight up from the brim.
At this point, the hat should cover the ears comfortably when held against the head. If you prefer a slightly longer hat, you may knit one or two additional rounds before starting the crown.
Step 5: Preparing for crown shaping
Before changing colors, pause and look at your work.
Your hat should look like a simple tube with a finished brim and smooth body. The top is still open and flat. This is exactly what it should look like before crown shaping begins.
Now is a good time to gently stretch the fabric with your hands and make sure there are no tight spots.
Step 6: Introducing the crown accent color
At the beginning of the next round, stop knitting with the warm taupe yarn. Drop it gently and pick up the muted blue yarn.
Knit the first stitch of the round firmly, but not tightly. This first stitch secures the new color and prevents a loose gap where the color change happens.
Continue knitting the rest of the round in muted blue.
The inside of the hat may show the taupe yarn hanging loosely. That is normal and will be secured later when weaving in ends.
Step 7: Beginning crown decreases
Crown shaping reduces the number of stitches gradually so the hat closes smoothly.
Work the following decrease pattern:
- Knit six stitches
- Knit two stitches together
Repeat this sequence around the entire round.
After completing this round, knit one full round without decreasing. This plain round helps the crown slope gently instead of forming sharp angles.
Step 8: Continuing crown shaping
On the next decrease round, work:
- Knit five stitches
- Knit two stitches together
Again, follow this with one plain knit round.
Continue decreasing in this manner, reducing the number of stitches between decreases each time:
- Knit four stitches, knit two together
- Knit three stitches, knit two together
Always knit one plain round between decrease rounds.
As the number of stitches becomes smaller, the fabric will start to curve inward. This is a sign that the crown is forming correctly.
Step 9: Managing needle changes
When the stitches begin to feel crowded on your circular needle, switch to double-pointed needles or use the magic loop method.
Take your time during this transition. Stitches may feel awkward at first, but this is normal and temporary.
Step 10: Closing the crown
When only a small number of stitches remain, cut the muted blue yarn, leaving a long tail of about eight to ten inches.
Thread the tail through a yarn needle. Carefully pass the needle through all remaining stitches, then pull the yarn firmly to close the top of the hat.
Secure the yarn on the inside with a small knot or tight weave.
Step 11: Weaving in ends and finishing
Turn the beanie inside out. Use a yarn needle to weave in the ends from both the taupe and muted blue yarns.
Weave along existing stitches rather than straight across to keep the fabric smooth and invisible from the outside.
Turn the hat right side out and gently shape it with your hands. Light blocking can be done if desired, but it is not required.
Overall Conclusion
These 7 Two-Color Knit Beanie Patterns are designed to show that working with more than one color does not have to be intimidating. By introducing color in controlled, thoughtful ways, each pattern allows you to focus on one new idea at a time while still producing a polished, wearable result.
If you are learning how ribbing stretches, how color changes behave, or how crown shaping works, these patterns build skills gradually and intentionally. With patience and careful attention to each step, even a new knitter can create professional-looking beanies that are warm, stylish, and satisfying to make.


