
Paper succulents have become a favorite craft for people who love greenery but want a long-lasting, low-maintenance alternative. Unlike real plants, paper succulents never wilt, require no watering, and can be customized endlessly in color, size, and style. With the right cutting techniques, careful folding, and thoughtful glue placement, paper can convincingly mimic the thick, fleshy leaves and sculptural beauty of real succulents.
This guide, 7 Paper Succulent Arrangement Tutorials, is designed to walk you through realistic paper succulent projects in a clear, structured, and beginner-friendly way. Each tutorial focuses not only on the final look but also on the process: how to cut accurate leaf shapes, how to curl and fold them for volume, where to apply glue for strength without bulk, and how to assemble everything into a polished arrangement.
The tutorials progress gently, making them suitable even if you have never worked with paper plants before. You will learn foundational techniques that can be reused across all paper succulent designs, along with specific tips for each arrangement style.
Essential Tools and Materials (Read Before Starting)
Before beginning the tutorials, gather the following supplies. Using the right tools will significantly improve realism and ease of work.
Paper Selection
Use medium to heavy cardstock (160–220 gsm). Lightweight paper collapses easily, while overly thick paper is difficult to curl. Choose matte cardstock with visible fiber or grain for the most realistic finish.
Cutting Tools
A sharp craft knife and small detail scissors are essential. Scissors handle curved edges better, while the knife helps with precise inner cuts. Always cut slowly to avoid jagged edges.
Shaping Tools
A wooden skewer, thin paintbrush handle, or embossing stylus works well for curling and shaping leaves. Soft foam or a folded cloth can be used underneath when shaping for gentler curves.
Adhesives
Use a fast-drying liquid glue with a fine tip. Avoid glue sticks for structural parts, as they do not hold curved shapes well. A toothpick helps control tiny glue amounts.
Finishing Details
Optional watercolor, ink pads, or diluted acrylic paint can be used to shade edges. A soft brush or sponge is ideal for subtle color transitions.
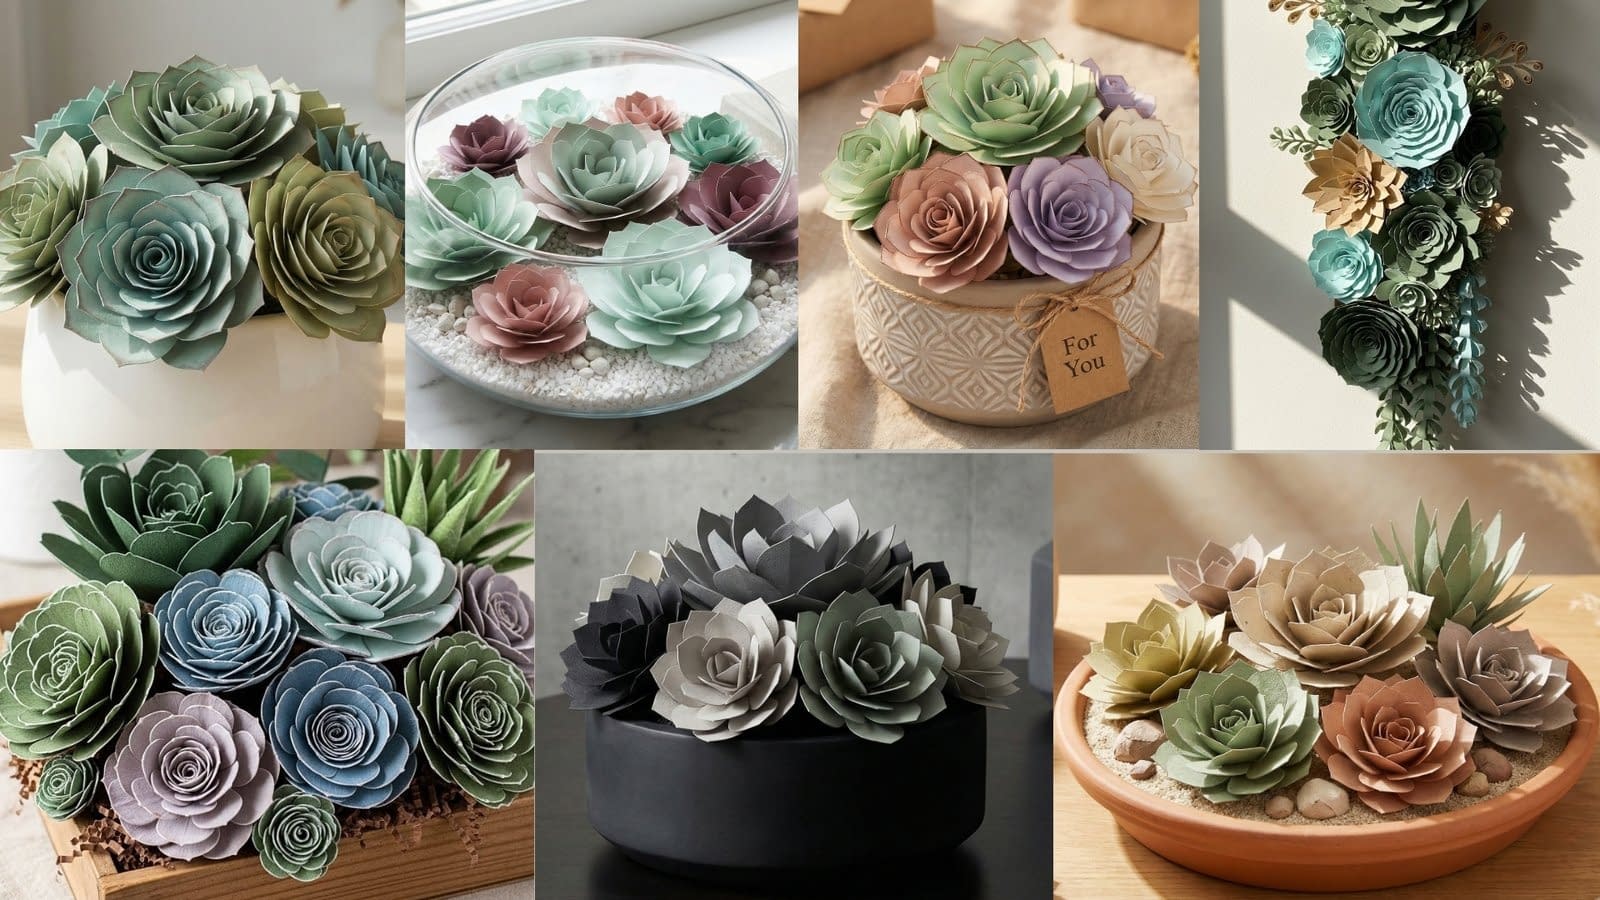
Tutorial 1: Minimalist Ceramic Pot Paper Succulent Arrangement

Overview and Design Concept
This arrangement focuses on clean lines, neutral styling, and realistic leaf structure. The succulents are tightly clustered to mimic natural rosette growth, making it perfect for modern interiors. The emphasis here is precision in cutting and controlled curling rather than heavy decoration.
Materials Specific to This Tutorial
White or light-toned ceramic pot
Cardstock in dusty green, sage, muted teal, and pale olive
Scrap cardboard or thick paper for pot base
Fine-tip liquid glue
Wooden skewer or round brush handle
Step 1: Preparing the Leaf Templates
Start by sketching simple teardrop and elongated oval shapes in three sizes: small, medium, and large. Each leaf should have a rounded base and a gently pointed tip. Keep the shapes slightly asymmetrical, as perfect symmetry looks unnatural.
Cut out one of each size to use as reusable templates. Trace these onto your cardstock lightly with a pencil.
Step 2: Cutting the Leaves
Cut the traced shapes slowly with scissors, rotating the paper rather than the scissors to keep curves smooth. Avoid sharp angles. Each succulent will need approximately 12–18 leaves, depending on size.
For realism, lightly taper the tip by trimming a tiny sliver from each side. This gives the leaf a softer point rather than a flat end.
Step 3: Curling and Folding for Dimension
Place a leaf face down on a soft surface. Using the skewer, gently roll from the base toward the tip. Apply light pressure; the goal is a shallow curve, not a tight roll.
Once curled, pinch the base of the leaf between your fingers to create a subtle crease. This pinch helps the leaf sit upright when glued and mimics the thicker base of real succulents.
Repeat this process for all leaves, varying the curl slightly so no two leaves look identical.
Step 4: Assembling the Rosette
Begin with the smallest leaves. Apply a tiny dot of glue to the pinched base and attach it to a small cardboard circle, angling the leaf slightly outward.
Continue adding small leaves in a circular pattern, overlapping the bases slightly. Allow this inner layer to set for a minute before adding the next layer.
Move to medium leaves, gluing them just outside the first layer. Angle them lower and curl them outward more.
Finish with large leaves, placing them at the widest angle to form a full rosette. Let the completed succulent dry completely.
Step 5: Pot Assembly and Arrangement
Glue a cardboard base inside the ceramic pot. Arrange multiple rosettes tightly together, gluing each in place. Fill gaps with small filler leaves or rolled paper scraps to hide mechanics.
Optional edge shading can be added using diluted paint along leaf tips.
Tutorial 2: Rustic Wooden Box Paper Succulent Centerpiece

Overview and Design Concept
This centerpiece emphasizes organic variation, texture, and a relaxed arrangement style. Unlike the tight symmetry of the minimalist pot, this design benefits from irregular spacing and varied leaf forms.
Materials Specific to This Tutorial
Shallow wooden box
Cardstock in eucalyptus green, moss, dusty blue, muted lavender
Brown paper scraps for filler
Fine-tip glue and toothpick
Wooden skewer
Step 1: Creating Varied Leaf Shapes
Draw a mix of rounded, paddle-shaped, and pointed leaves. Include wider bases and blunt tips for some leaves to create contrast.
Cut at least four different leaf shapes. Trace and cut multiple copies in each color.
Step 2: Distressing the Edges
Lightly run the scissors along the leaf edges at a slight angle to roughen them. Do not cut deeply; the goal is subtle texture.
You can also gently rub edges with sandpaper or a nail file for a worn look.
Step 3: Shaping and Folding
Curl each leaf using the skewer, but apply uneven pressure so some leaves curve more than others. For thicker-looking leaves, fold a very shallow crease lengthwise down the center, then open it slightly.
Step 4: Building Multiple Succulent Types
Create several small rosettes and a few spiky succulents. For spiky forms, use narrower leaves and glue them at steeper angles.
Assemble each plant separately and allow them to dry before placement.
Step 5: Arranging in the Wooden Box
Line the box bottom with brown paper filler, crumpled loosely. Glue the largest succulents first, then fill gaps with smaller ones.
Press gently until secure, then let dry completely before moving.
Tutorial 3: Elegant Glass Bowl Paper Succulent Display

Overview and Design Concept
This arrangement focuses on refinement, balance, and visibility from every angle. Because the container is transparent, there is nowhere to hide rough cuts, bulky glue, or uneven bases. Every leaf, curve, and joint must be intentional. This tutorial teaches patience and precision, making it ideal for beginners who want to improve craftsmanship and achieve a polished, display-worthy result.
The goal is to create a circular, harmonious composition that feels light and elegant, with subtle color transitions and clean construction that looks beautiful from the top, sides, and even the bottom.
Materials Specific to This Tutorial
Clear glass bowl (round or slightly oval) Cardstock in pale mint, soft jade, dusty rose, muted plum, and off-white White cardstock or shredded paper for gravel Small scrap cardboard circles for bases Fine-tip liquid glue Toothpick for glue control Wooden skewer or thin brush handle Soft foam or folded cloth for shaping
Step 1: Designing Refined Leaf Shapes
Draw leaf templates that are smoother and more elongated than rustic designs. Focus on gentle curves and rounded tips rather than sharp points. Prepare at least three sizes:
- Small inner leaves with narrow bases
- Medium leaves with balanced width
- Large outer leaves with broader bases
Trace templates lightly onto cardstock. Keep pencil pressure minimal to avoid visible marks on finished pieces.
Step 2: Precision Cutting for Clean Edges
Cut each leaf slowly using sharp scissors. Rotate the paper as you cut to maintain fluid curves. After cutting, inspect edges carefully. Trim away any uneven fibers or bumps.
Because the glass bowl exposes all angles, this step is critical. Even minor irregularities will be noticeable once light passes through the bowl.
Step 3: Subtle Curling and Surface Shaping
Place a leaf face down on a soft foam or cloth. Using the skewer, roll gently from the base toward the tip. Use less pressure than in previous tutorials. The curl should be barely noticeable.
For added realism, press lightly along the center length of the leaf with the skewer without creating a crease. This creates a natural, fleshy contour rather than a folded line.
Repeat for all leaves, keeping shapes consistent but not identical.
Step 4: Controlled Base Pinching
Pinch only the very bottom of each leaf between your fingers to narrow the base slightly. Avoid sharp creases. This small adjustment allows the leaf to sit upright without distorting its elegant shape.
Step 5: Building a Flat, Hidden Base
Glue the smallest leaves onto a thin cardboard circle. Use extremely small glue dots applied with a toothpick. Place leaves close together, slightly overlapping, and keep them nearly vertical.
Allow this inner layer to dry for at least two minutes before continuing. Rushing this step can cause leaves to shift and lose symmetry.
Step 6: Layering with Balance and Spacing
Add medium leaves around the inner layer, angling them outward just slightly. Rotate the piece as you work to maintain even spacing.
For the final layer, attach large leaves at a lower angle so they gently frame the rosette. Check from above and from the side to ensure the shape remains circular and graceful.
Let each succulent dry fully before handling.
Step 7: Creating Paper Gravel for the Bowl Base
Cut tiny irregular shapes from white cardstock to resemble pebbles. Roll some pieces lightly between your fingers to soften edges.
Fill the bottom of the glass bowl with these paper stones. Keep the layer thin so the arrangement does not appear heavy.
Step 8: Final Assembly Inside the Glass Bowl
Place each succulent gently onto the gravel layer. Avoid gluing immediately. Adjust positions until the arrangement feels balanced.
Once satisfied, apply minimal glue beneath each base and press gently into place. Be careful not to smear glue onto the glass.
Step 9: Final Inspection and Adjustments
Examine the arrangement from all angles. Adjust leaf spacing if needed using a skewer. Allow the entire piece to dry completely before moving.
Tutorial 4: Hanging Paper Succulent Wall Arrangement

Overview and Design Concept
This vertical arrangement is designed as wall décor, combining cascading succulents and rosette clusters. The emphasis is on layering, trailing elements, and creating depth. It is perfect for living rooms, offices, or craft displays.
Materials Specific to This Tutorial
Embroidery hoop or thin wooden backing Cardstock in muted emerald, soft sage, pale aqua, warm beige Fine-tip glue and toothpick Thin wooden skewer or paintbrush handle Hanging string or ribbon Soft foam for curling leaves
Step 1: Preparing Cascading Leaves
Draw elongated teardrop and paddle-shaped leaves. Cut carefully, keeping tips tapered. Make 3–5 leaves slightly longer to create a trailing effect. Vary the sizes slightly for a natural, flowing look.
Step 2: Curling and Shaping
Curl leaves using a skewer with varying degrees of roll. Gently pinch the base to help leaves stand away from the backing. For trailing pieces, curl lightly at the tip for a natural downward flow. Mix subtle curves for realism.
Step 3: Assembling Rosette Clusters
Build small rosettes first using the layered-leaf technique. Apply minimal glue to each leaf base and allow slight setting before adding the next layer. Create multiple clusters in different sizes for visual interest.
Step 4: Attaching to the Backing
Glue rosette clusters to the top center of the hoop or wooden backing. Start adding trailing leaves, layering slightly over the clusters to hide glue and create a flowing effect. Alternate leaf directions to avoid a flat appearance.
Step 5: Adding Dimension
Insert small filler leaves behind and between clusters to increase depth. Ensure each piece is angled to cast subtle shadows and maintain a three-dimensional look. Step back often to check balance.
Step 6: Hanging Preparation
Attach a string or ribbon to the top of the hoop. Ensure weight is evenly distributed so the arrangement hangs straight. Let glue dry completely before displaying.
Step 7: Final Touches
Adjust leaf angles with a skewer as needed to perfect the cascading effect. Confirm that all clusters are secure and the arrangement is visually balanced from different viewing angles.
Tutorial 5: Gift-Style Paper Succulent Arrangement in Decorative Planter

Overview and Design Concept
This arrangement is designed as a gift, focusing on compact, vibrant, and polished presentation. The combination of pastel hues, a decorative planter, and a small kraft paper tag makes this arrangement perfect for birthdays, holidays, or thoughtful gestures.
Materials Specific to This Tutorial
Decorative ceramic planter with subtle embossed pattern Cardstock in pastel green, muted blush, soft lavender, creamy off-white Twine and small kraft tag Fine-tip liquid glue Skewer or thin brush handle Soft foam for curling leaves
Step 1: Preparing Leaf Templates
Draw leaf templates in three sizes: small, medium, and large. Cut multiple copies of each shape, keeping subtle variations for a natural look. Slightly taper tips and round bases for realistic leaf structure.
Step 2: Cutting and Shaping Leaves
Cut carefully along pencil lines. Use a skewer or stylus to curl leaves gently, focusing on a gentle upward curve. Pinch the base lightly to help each leaf stand upright.
Step 3: Assembling Rosettes
Begin with small leaves at the center of each succulent. Layer medium and large leaves outward. Apply minimal glue and allow each layer to set slightly before adding the next. Repeat until each rosette is fully formed.
Step 4: Planter Assembly
Fill the planter with a cardboard or paper base to provide support. Glue each succulent in place, adjusting angles for a balanced arrangement. Add small filler leaves to cover gaps and create a full, lush appearance.
Step 5: Gift Presentation
Tie a small kraft paper tag with twine around the planter. Optional: add mini ribbons or decorative accents. Allow glue to dry completely before handling.
Tutorial 6: Desert-Inspired Paper Succulent Arrangement with Sand Tones

Overview and Design Concept
Inspired by desert landscapes, this arrangement blends warm, earthy tones with spiky and rosette succulent forms. It’s ideal for naturalistic décor and emphasizes texture, layering, and depth.
Materials Specific to This Tutorial
Shallow terracotta planter Cardstock in warm sage green, dusty beige, pale olive, soft clay, muted taupe Fine-tip glue and toothpick Wooden skewer or stylus Paper sand and tiny paper stones Soft foam for shaping
Step 1: Cutting Leaf Shapes
Draw a mix of rosette and spiky leaf shapes. Cut multiple sizes for each succulent. Slightly distress edges for realistic texture using scissors or light sanding.
Step 2: Curling and Folding
Use a skewer to gently curl leaves. For spiky types, fold lightly along the center to create a subtle ridge, giving leaves firmness and dimension.
Step 3: Assembling Individual Succulents
Build rosettes layer by layer, from small inner leaves to larger outer leaves. For spiky succulents, glue each leaf at steeper angles for a pointed, desert-appropriate look. Allow each succulent to dry before placement.
Step 4: Preparing the Sand Base
Spread paper sand evenly in the terracotta planter. Lightly glue down to prevent shifting. Add small paper stones for a realistic desert texture.
Step 5: Arranging Succulents in Planter
Glue rosettes and spiky succulents onto the sand base, alternating placement for natural variation. Fill small gaps with additional filler leaves or tiny stones to maintain balance and fullness.
Step 6: Finishing Touches
Inspect arrangement from all angles. Adjust leaf angles and spacing with a skewer as needed. Allow glue to dry completely before displaying.
Tutorial 7: Modern Monochrome Paper Succulent Arrangement

Overview and Design Concept
A sleek, monochrome arrangement focusing on symmetry, compactness, and clean lines. Using shades of gray and muted sage highlights, this design emphasizes modern style and bold, editorial presentation.
Materials Specific to This Tutorial
Matte black concrete-style planter Cardstock in charcoal gray, soft ash, pale stone, muted sage Fine-tip glue and toothpick Skewer or thin brush handle Soft foam for shaping
Step 1: Cutting and Preparing Leaf Shapes
Draw leaf templates in small, medium, and large sizes. Cut precisely, keeping smooth curves. For realism, slightly taper leaf tips and maintain rounded bases.
Step 2: Shaping Leaves
Use a skewer to curl leaves gently. Pinch bases lightly to ensure upright positioning. Keep curls minimal to preserve the clean, modern aesthetic.
Step 3: Assembling Rosettes
Layer leaves starting from smallest inner leaves, gradually adding medium and large outer leaves. Maintain symmetry, consistent spacing, and alignment for a balanced composition. Let each layer set slightly before continuing.
Step 4: Planter Assembly
Place a small cardboard or paper base inside the planter for support. Glue each succulent carefully, ensuring compact arrangement and uniform height. Adjust leaf angles with a skewer to refine symmetry.
Step 5: Finishing and Display
Inspect the arrangement from all angles. Adjust as needed. Allow glue to dry fully before displaying in your modern décor setting. The monochrome palette highlights the texture and form of each leaf.
Conclusion
These 7 Paper Succulent Arrangement Tutorials provide a complete, step-by-step guide to creating realistic, long-lasting paper succulents. From minimalist ceramic pots and rustic wooden boxes to elegant glass bowls, hanging wall designs, gift-ready planters, desert-inspired arrangements, and modern monochrome displays, each tutorial emphasizes precision, creativity, and beginner-friendly techniques. By mastering cutting, curling, folding, gluing, and layering, you can create stunning paper succulent arrangements that enhance any space. Experiment with color palettes, leaf shapes, and containers to make these designs your own, bringing lasting beauty and artistry into your home or gifting creations.


