
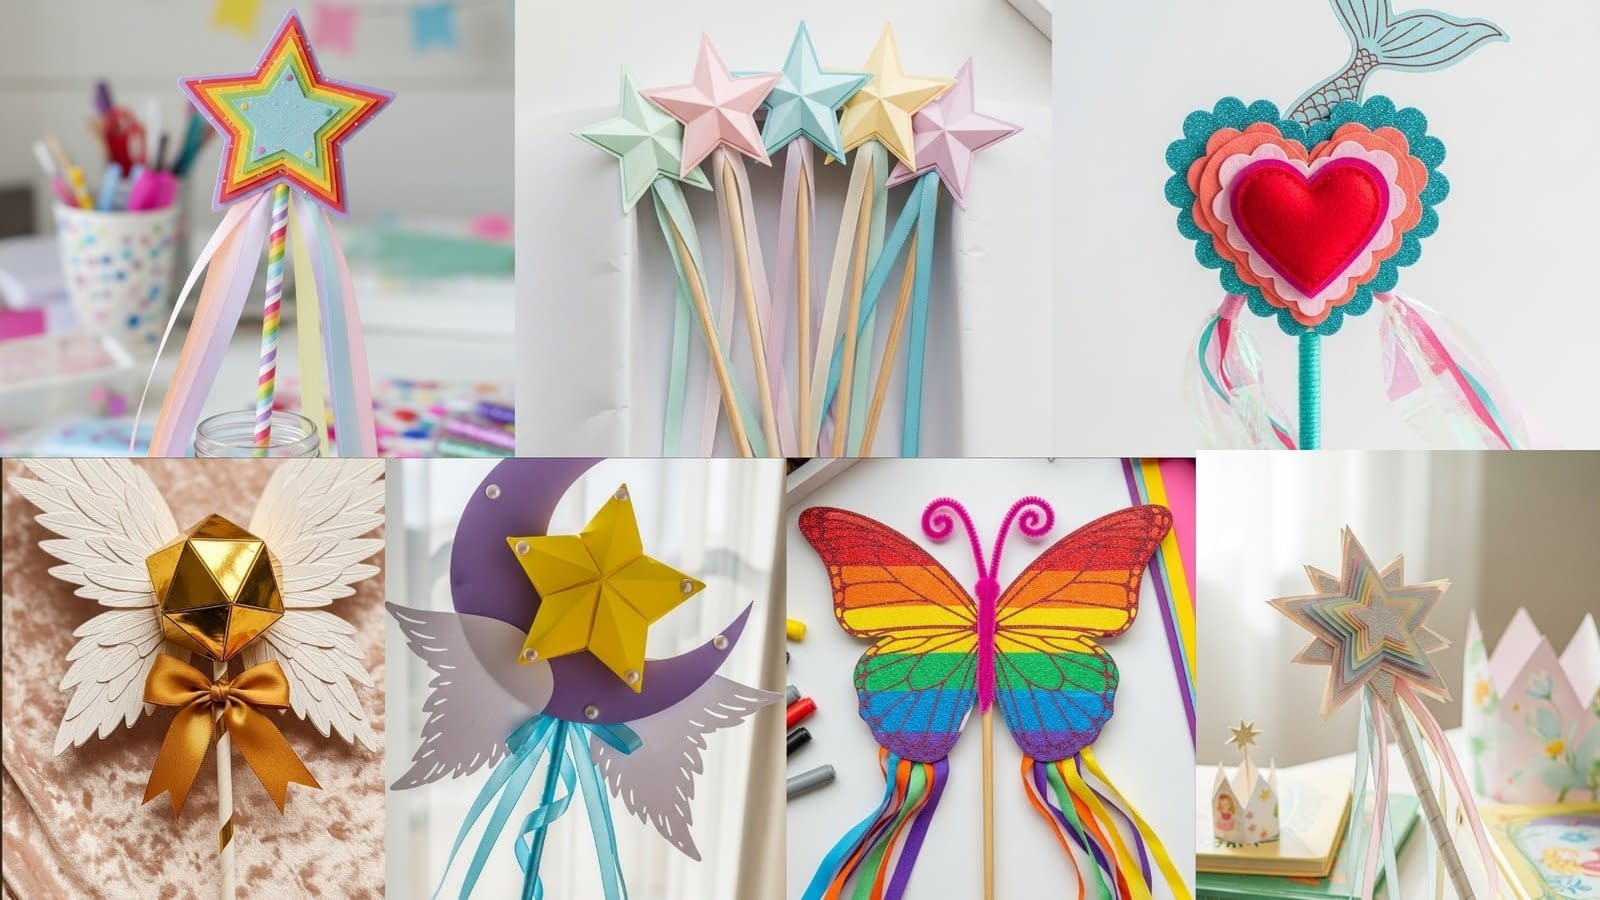
Paper fairy wands are inexpensive, creative, and perfect for hands-on play, party crafts, classroom projects, and gift-making. This post focuses on 7 Paper Fairy Wand tutorials for Kids and gives full, practical instructions you can follow at home. Each tutorial balances craft accuracy (how to fold, cut, and glue) with child-friendly construction and finishing touches that make the wands look professional.
Below are the first three tutorials in full detail: The Pastel Origami Star Wand, The Celestial Moon & Wing Wand, and The Mermaid Princess Heart Wand. Every tutorial includes materials, step-by-step assembly, when and where to use different glues, safety notes, variations, and display/playing tips. If you want the remaining four tutorials next, I’ll continue with the same level of detail.
Materials and general tools (what to have on hand)
These items are common across many wand designs. Keep them within reach before starting.
- Paper (various types): pearlescent pastel paper, heavyweight cardstock (200–300 gsm), glitter paper, metallic paper, translucent cellophane sheets
- Wooden dowels or bamboo sticks (12–15 inches / 30–38 cm) — one per wand
- Satin ribbon (1/4–3/8 inch / 6–10 mm wide), organza ribbon, yarn, crepe paper strips
- Glue: white craft glue (PVA/tacky glue), clear-drying craft glue, low-temperature hot glue gun (adult use), double-sided tape
- Scissors (child-safe scissors for kids, sharp scissors for adults)
- Pencil, ruler, craft knife (adult use only), cutting mat
- Hole punch (optional), scallop-edge scissors or decorative punches (optional)
- Felt (small pieces), small flat-back adhesive pearls or sequins, metallic gel pens
- Optional embellishments: shells, glitter glue, sequins, pipe cleaners
- Protective materials: scrap paper, craft apron, masking tape, and a damp cloth for spills
Safety note: If you use a hot glue gun, an adult must handle it or closely supervise. For younger children, use PVA glue and double-sided tape instead.
The Pastel Origami Star Wand

Concept: A soft, pearlescent 3D origami star head with cascading pastel ribbons. Child-friendly, elegant, and tactile.
Materials
- Pearlescent pastel paper strip for star: one strip, 60 cm (24 inches) long × 1.5 cm (0.6 inches) wide. (Alternatively, use a longer strip for a larger star; keep width consistent.)
- Light-colored wooden dowel, 30 cm (12 inches) long
- Satin ribbons in mint, baby blue, and soft yellow — three strips 45 cm (18 inches) each
- Clear-drying craft glue or low-temp hot glue (adult)
- Scissors, ruler, pencil
- Small circle of cardstock (approx. 2 cm / 0.8 in diameter) for reinforcement
- Optional: clear glitter glue for edges
How this star works (brief)
This is the classic puffy/pentagon origami “lucky star” made from a long strip. The technique creates a small, five-pointed puffy star that looks dimensional and is safe for kids. Two approaches are given: origami strip method (authentic folding) and cardstock 3D star (cut-and-fold) for younger children.
Step-by-step: Origami strip puffy star
- Prepare the strip. Use a strip 60 cm × 1.5 cm. A thicker, pearlescent strip creates a shinier puff.
- Tie the starting knot. Make a simple knot at one end of the strip to form a small pentagon loop; flatten this knot carefully so it forms five roughly equal sides. Pull gently to tighten so the loop holds its shape.
- Fold the long tail. Working clockwise, fold the long tail around the five sides of the pentagon, keeping each fold tight and even. Each time the tail wraps around, form another side on top of the base; keep edges aligned so the pentagon builds up with layered paper.
- Tuck the end. When you have about 2–3 cm of tail remaining, tuck the tail into the last fold securely. If it resists staying tucked, use a dot of clear craft glue to hold the tail inside the pentagon. Allow glue to dry before proceeding.
- Flatten slightly and mark points. With the pentagon completed, flatten gently and identify the five outer corners. On each corner, fold the corner toward the center once and then unfold — this pre-creases the eventual star points.
- Create the star points. Using your thumbnail or the blunt end of a pencil, press each corner to form a concave fold. Flip the pentagon over; you’ll now see five raised triangular points. The “puff” appears where you pinch the center of the star from the backside to bring out the three-dimensional form.
- Puff the star. Hold the star by the center, press inward along the back, and the points will pop outward. You can coax each point into a crisp shape by pinching and running the thumbnail along each edge.
- Reinforce the back. Add a small circle of cardstock glued to the center back to create a flat mounting surface for the dowel. Use craft glue and press a minute to set.
Attach to dowel
- Prepare the dowel. Lightly sand the end if it’s rough, and wrap the top 8 cm (3 in) with a short bit of ribbon to create friction.
- Apply glue. Use a generous bead of low-temp hot glue (adult) or thick PVA glue on the flat reinforced circle. Press the dowel into the center back of the star and hold for 30–60 seconds to set.
- Wrap and finish. Wrap the dowel where it meets the star with a small ribbon coil to hide seams, secure with a tiny dot of glue.
Add ribbons and finishing
- Arrange three 45 cm ribbons in a layered cluster; knot them together at the midpoint.
- Place the knot at the base of the star (where the ribbon wrap is), and glue the knot to the dowel under the ribbon coil.
- Allow glue to dry fully. Optionally, apply a thin line of clear glitter glue along star edges.
Safety tips and glue choices
- For children under 8, avoid hot-glue contact; use white craft glue and allow longer drying time.
- Double-sided tape can temporarily hold ribbon if you want the child to rearrange colors.
Variations
- Cardstock 3D star (cut-and-fold): For a larger display star, print a 5-point star template with tabs, cut it out of 200–300gsm cardstock, score fold lines, glue tabs to assemble a hollow 3D star, and use the cardstock disk to mount on the dowel.
- Mini bundle: make several small stars on short skewers and glue to the main dowel for a clustered look.
Where to use and play
This wand is ideal for gentle play, dress-up photos, party favors, or shelf display. Store flat in a box to protect points.
The Celestial Moon & Wing Wand

Concept: A “magical girl” crescent moon with a bright faceted star nested inside and delicate paper wings — designed for imaginative play and photo props.
Materials
- Lavender cardstock, 200–300 gsm for crescent
- Bright yellow cardstock for faceted star (or pre-made plastic faceted star)
- White cardstock for wings (heavyweight, textured if possible)
- Pale blue ribbon for handle wrap (1 m / 39 in)
- Adhesive flat-back pearls (small)
- Wooden dowel, 30–38 cm (12–15 in)
- Pencil, compass or circular object templates (2 different sizes), scissors, craft knife (adult), cutting mat
- White craft glue and low-temp hot glue (adult)
- Optional: tracing paper for templates
Templates and cutting
- Crescent moon template. Draw two circles: a larger circle (6–7 cm / 2.4–2.8 in diameter) and a smaller circle offset to one side (same diameter minus about 1.5–2 cm). Cut out the larger circle and then cut out the smaller circle so the leftover shape is a crescent. Alternatively, print a crescent template and trace.
- Star template. For a faceted look, cut a simple 5-point star from yellow cardstock and lightly score radial lines from the center to each point to suggest facets. If you want a true faceted look, cut two identical star layers, slightly offset them, and glue with a small bead of glue between to create dimension.
- Wing templates. Draw elongated teardrop shapes for each wing roughly 9–11 cm (3.5–4.5 in) long. Add feather lines with light pencil guides. Cut two mirror-image wings.
Step-by-step assembly
- Cut all pieces. Carefully cut the crescent, star, and wings. Use a craft knife on a mat for inner cuts (adult).
- Add feather details. Lightly score wing feather lines by drawing shallow, parallel strokes with a blunt tool or the back of a craft knife — this embosses texture without cutting through.
- Layer star inside moon. Position the yellow star so it sits in the crescent curve. If you want the star to appear “nested,” cut two small tabs from cardstock, glue them behind the star as tiny risers (about 2–3 mm thick) and glue the tabs to the back of the crescent so the star appears raised.
- Attach wings. Slightly curve each wing by rolling it over a pencil shaft to give a gentle arch. Glue the inner base of each wing to the back edges of the crescent so they flare out symmetrically.
- Decorate star. Add adhesive pearls to star points (one pearl per tip) and a few tiny pearls along wing bases for a magical feel.
Wrapping the handle and mounting
- Dowel prep. Lightly sand and wipe clean. Apply a base of glue where the crescent will rest.
- Mount crescent to dowel. Use hot glue (adult) or several layers of tacky glue with clamp tape. Press the crescent’s back flat against the dowel and hold in place until secure.
- Spiral-wrap ribbon. Begin at the top of the dowel under the moon setting. Secure ribbon end with a dot of glue, then wrap tightly in a spiral downward. Place small dots of glue every 5 cm to keep wraps in place. Finish by tucking the ribbon end under the last coil and securing with glue.
Details and finishing touches
- If you want the star to have a sparkle, apply a thin line of glitter glue to facet seams.
- For extra security, run a thin strip of clear tape along the backside seam where the moon meets the dowel before wrapping with ribbon.
Safety and durability
- For younger kids, avoid sticky pearls that may detach — instead use paper dots. If you attach small decorations, check periodically for loose pieces.
Variations
- Glow-in-the-dark paint on the crescent for nighttime play.
- Replace the star with a translucent gem for a stained-glass effect.
Where to use
Perfect for photos, imaginative role-play, and party activities. It’s also a strong contender as a durable prop because of the reinforced mounting and ribbon-wrapped handle.
The Mermaid Princess Heart Wand

Concept: A layered heart with mermaid-tail details, glitter, and iridescent streamers for seaside fantasy play.
Materials
- Teal glitter cardstock (outer scalloped heart)
- Coral cardstock (middle layer)
- Pink cardstock (inner layer)
- Puffy red felt heart (center)
- Metallic gel pen for scale drawing
- Teal yarn for handle wrap
- Iridescent cellophane and pink ribbon for streamers (4 strips, each 40–50 cm / 16–20 in)
- Small seashells or sea-glass embellishments (optional)
- Wooden dowel, 30–38 cm (12–15 in)
- White craft glue, low-temp hot glue (adult), tape
- Scalloped-edge scissors or scallop punch (optional)
- Pencil, ruler, sharp scissors
Cutting and layering
- Heart templates. Draw 3 hearts: the outer scalloped heart approx. 10 cm (4 in) high; the middle coral heart slightly smaller (9 cm), and the inner pink heart about 7.5 cm (3 in).
- Cut scallop. Use scallop-edge scissors or a scallop punch to create the scalloped outer heart from teal glitter cardstock. If you don’t have scallop tools, draw small semicircles along the outer edge and cut with regular scissors.
- Cut the inner layers. Cut the coral and pink hearts precisely so their edges nest inside the scalloped teal layer with a visible border.
Step-by-step assembly
- Layer glue. Apply a thin, even layer of white craft glue to the back of the pink heart and center it on the coral heart. Press briefly and allow the glue to set for 2–3 minutes. Repeat by gluing the coral heart to the scalloped glitter layer.
- Add puffy felt heart. Glue the felt heart in the very center using low-temp hot glue (adult) for immediate bond; for a safer child-friendly option, use tacky glue and clamp with clips until dry.
- Mermaid tail detail. Cut a mermaid tail shape from metallic cardstock (about 4–5 cm / 1.6–2 in high) and attach emerging from the top center of the heart. Use the metallic gel pen to draw scales in crescent strokes: start at the bottom of the tail and make small overlapping U-shapes going upwards. Go slowly — metallic gel pen shows best with steady pressure.
- Prepare streamers. Cut four strips of iridescent cellophane and four of pink ribbon, each 40–50 cm. Stack them in desired order and tie them with a small knot or use a small loop of ribbon to hold their tops together.
Mounting and handle wrap
- Reinforce the heart back. Cut a 3–4 cm wide strip of cardstock and glue it vertically across the back center of the heart to create a secure spine for the dowel insertion.
- Glue the dowel. Apply a generous bead of hot glue along the top of the dowel and press it into the reinforced spine on the back of the heart. Hold until set.
- Wrap with yarn. Immediately wrap the top 8–10 cm of the dowel with teal yarn to conceal glue and create a comfortable grip. Secure the end with a small dab of glue.
- Attach streamers. Glue the tied streamer knot to the back of the heart at the top where the tail is, or tie the streamers around the dowel under the yarn wrap and secure with glue.
Decorating and sealing
- Add small glued seashells or sea-glass near the base of the heart for authenticity.
- For sparkle, dust edges with a very thin line of glitter glue; allow drying completely.
- If you want the glitter to stay, spray a light coat of acrylic sealer (adult, well-ventilated area).
Safety and play notes
- Avoid tiny shells for toddlers; choose paper-safe embellishments or flat stickers.
- Make sure streamers are not too long for active play to avoid tripping or entanglement.
Variations
- Swap felt heart for a fabric pom-pom for a softer centerpiece.
- Create a “bubble” effect by gluing small clear flat sequins on the heart.
Where to use
This mermaid wand is excellent for beach-themed parties, imaginative play, and photo props. Store upright in a jar or lay flat in a craft box to keep the cellophane streamers uncrumpled.
The Rainbow Glitter Butterfly Wand

Concept: A vivid butterfly cutout with a rainbow gradient and a glitter finish. This wand emphasizes color blending, clean cutting, and careful glitter application so the final product sparkles without excessive mess.
Materials
- Heavyweight cardstock (200–300 gsm), white or very light color, 1 sheet (A4/letter)
- Acrylic paints or water-based craft paints (red, orange, yellow, green, blue, violet) or pre-colored cardstock in rainbow shades
- Fine loose glitter or glitter glue (fine grade) — choose non-toxic glitter
- Pink pipe cleaner for the butterfly body (one piece, about 15 cm / 6 in)
- Bamboo stick or wooden dowel, 30–38 cm (12–15 in), painted white (acrylic paint) or a pre-painted dowel
- Crepe paper strips in coordinating rainbow colors — multiple long strips (60 cm / 24 in)
- White craft glue (PVA), clear-drying craft glue, double-sided tape
- Scissors, pencil, ruler, cutting mat, craft knife (adult), small paintbrushes, masking tape
- Optional: small hole punch, glue sealer spray (for adult use, well-ventilated area)
Pattern and cutting the butterfly
- Draw the butterfly template. On cardstock, sketch a large symmetrical butterfly about 12–15 cm (4.5–6 in) wingspan. Fold the paper in half and draw half of the butterfly along the fold to ensure symmetry. The fold method ensures mirror-image wings. If you prefer, print a template and trace.
- Cut the butterfly. While the cardstock is still folded, carefully cut the outline so both wings are identical. Open to reveal a precise butterfly silhouette.
- Add wing details. Lightly score vein lines on the wings with the back of a craft knife (adult) or draw decorative patterns with pencil. These will help guide paint or color placement.
Creating the rainbow gradient
Option A — painting:
- Protect your workspace with scrap paper. Tape the butterfly down lightly with masking tape to prevent movement.
- Working left to right (or vice versa), apply thin horizontal bands of paint in rainbow order across both wings so when dry the color transitions smoothly. Use a damp brush to slightly blend the edges between colors for gradient effect.
- Allow paint to dry fully (30–60 minutes depending on paint).
Option B — layered cardstock:
- Cut narrower wing-shaped layers from rainbow-colored cardstock and glue them as overlays from largest (red) to smallest (violet) to produce a layered gradient look. This produces crisp color bands rather than a blended gradient.
Glitter application (clean, controlled method)
- If using loose glitter, apply a thin layer of clear-drying craft glue only to the areas you want glittered (for example, wing edges or specific patterns).
- Hold the butterfly over a tray and sprinkle glitter in small sections, tapping off excess into the tray for reuse.
- For an even finer finish, use fine-grade glitter or glitter glue applied with a small brush.
- Allow to dry fully. Seal with a light spray of glue sealer (adult, ventilated area) if you want to lock glitter — otherwise the glitter may shed during play.
Creating the pipe cleaner body and antennae
- Fold the pink pipe cleaner in half and twist the center gently to create a body segment about 3–4 cm long. Curl each end to form small antennae loops.
- Position the pipe cleaner along the center of the butterfly body and secure with a small dot of clear craft glue. For immediate hold, use a tiny bit of hot glue (adult) on the back center.
Attaching to the handle and adding crepe paper streamers
- Reinforce the back. Cut a 4–5 cm wide strip of cardstock to create a sturdy spine across the butterfly’s center on the backside. Glue this strip in place and let dry.
- Attach the dowel. Apply a bead of clear hot glue (adult) along the top of the dowel and press it onto the reinforced spine. Hold until secure.
- Prepare crepe streamers. Cut several long strips of crepe paper in coordinated rainbow shades (each 50–60 cm). Group them and tie or tape them together at the top.
- Attach streamers. Either glue the tied end to the back of the butterfly (under the spine) or tie them around the dowel beneath the butterfly and secure with glue. Use double-sided tape for less permanent attachment, allowing interchangeability.
Safety, durability, and cleanup
- Use non-toxic glitter and paints meant for crafts. Loose glitter can be messy — confine glitter work to a tray.
- For toddlers, avoid loose glitter; use glitter paper or glitter glue that dries firmly.
- Inspect pipe cleaner ends and tuck any sharp wires inside the glue line so they can’t poke through.
- Wash hands after handling glitter and paints.
Variations
- Add 3D layering: cut a second, slightly smaller butterfly from translucent vellum and glue only at the center for dimensional wings.
- Create a stained-glass effect by cutting out small wing sections and filling them with colored cellophane pieces glued under clear tape or adhesive film.
Where to use
This bright, tactile wand works well for parades, costume parties, and stage photos. Keep it for gentle play and display it in a craft supply jar between uses.
The Golden Snitch / Angel Wing Wand

Concept: An elegant, gold-focused wand with a central geometric golden sphere and large angelic wings. This design balances ornate detail with sturdy construction to create a sophisticated prop.
Materials
- Metallic gold paper (foldable but slightly stiff) or metallic foil cardstock — several A4/letter sheets
- Heavy cream watercolor paper for wings, 200–300 gsm
- White paper straws (or a painted wooden dowel if preferred)
- Silk ribbon (gold or cream) for bow
- Embossing tool or ballpoint pen cap for feather texture
- Low-temp hot glue (adult) and white craft glue
- Scissors, ruler, pencil, protractor (for polygon templates), craft knife (adult), cutting mat
- Optional: small gold beads or sequins for decoration
Creating the golden geometric sphere (simple low-poly method)
There are two practical approaches depending on skill and time: a wrapped ball method (fast, sturdy) and a folded dodecahedron (more authentic polyhedral fold).
Option A — Wrapped ball (recommended for ease)
- Use a small foam ball or tightly crumpled paper ball about 2–3 cm (0.8–1.2 in) in diameter as an internal core.
- Cut metallic gold paper into narrow 1–1.5 cm strips. Wrap each strip around the ball in overlapping segments, scoring lightly to create facets. Secure the ends with small dabs of glue. The goal is a faceted, geometric look without precise polygon assembly.
- For a more faceted look, cut small diamond shapes, curl slightly, and glue them side-by-side to form a low-poly surface.
Option B — Folded dodecahedron (12 pentagon faces) — more advanced
- Create a pentagon template (regular pentagon about 3 cm across) with 5 tabs (about 0.5 cm) around edges for gluing.
- Cut 12 identical pentagons from metallic cardstock.
- Score tabs and fold them up. Begin assembling by gluing tabs to connect faces; this creates a dodecahedron. This method requires precise cutting and patience—allow ample drying time.
- Once assembled, reinforce interior seams with small strips of tissue or tape for stability.
Wing construction and texture
- Draw wing shapes. On cream watercolor paper, draw two large symmetric wings approximately 12–16 cm (5–6.5 in) long. Keep the base wider to attach to the sphere.
- Cut wings carefully. Use heavy scissors or a craft knife for smooth edges (adult).
- Emboss feather texture. Lightly trace feather lines with a ballpoint pen cap or embossing tool, working from the wing base outward. Create layered feather rows that taper toward the tip.
- Optional edge detail. Use a thin wash of diluted gold paint to tint the feather edges for subtle shimmer.
Assembly: attaching sphere and wings to handle
- Prepare the handle. If using a paper straw, trim to 30–35 cm. If using a wooden dowel, paint it white and sand smooth.
- Mount the sphere. Apply a generous ring of hot glue (adult) to the top of the handle and press the sphere into place. Hold until the bond is firm. If using the folded dodecahedron, glue the inner tabs to a small circular cardstock disk glued to the handle for added stability.
- Attach wings. Position one wing on each side of the sphere’s midline. Use hot glue to attach the base of each wing to the sphere and to the handle for maximum strength. Press firmly and hold until set.
- Cover seams. Wrap a short length of silk ribbon around the base where the wings meet the handle, covering glue lines and forming a decorative collar. Glue the ribbon ends under the collar.
Finishing touches
- Tie a small silk golden bow around the handle under the wings.
- Add small gold beads or sequins along the wing bases for extra elegance, securing with tiny glue dots.
- If using metallic paper that may scratch, apply a thin layer of clear-drying glue to protect the finish.
Safety and play considerations
- Because the gold sphere or added beads can be a choking hazard, avoid giving this wand to children under 3. For older kids, ensure all small pieces are glued securely and check regularly.
- The paper straw handle is lightweight and safe; avoid sharp edges. If any interior supports (like foam or wire) were used, enclose them safely within the glue and ribbon.
Variations
- Create a vintage look by distressing the wing edges with light sandpaper and applying a wash of diluted brown paint.
- Replace the round sphere with a faceted gem or crystal (securely glued) for a different focal point.
Where to use
This elegant wand is suited for pageant photos, angel-themed costumes, and theatrical props. Store flat or in a box with tissue to preserve feather embossing.
Finished Paper Fairy Wand Styled for Kids’ Play

Concept: A polished, robust wand specifically designed for regular kids’ play. This tutorial synthesizes the safest techniques and finishes from the previous designs to create a durable, comfortable wand children can use daily.
Materials
- Lightweight but sturdy wand head: choose from cardstock star, felt heart, or pre-cut foam shapes
- Wooden dowel, sanded and rounded at both ends (30–38 cm / 12–15 in)
- Soft handle cover: cotton yarn or fabric strip
- Adhesives: strong white craft glue, optional fabric glue, double-sided tape
- Reinforcement materials: small cardstock discs, strip reinforcements, clear packing tape
- Decorative elements: ribbons, felt, foam stickers — choose non-toxic options
- Safety finishing supplies: sandpaper, glue sealer (optional), felt pads
Designing for play
When making a play-focused wand, prioritize:
- Rounded, smooth handles with no splinters
- Secure head attachment that can tolerate drops and gentle bending
- Non-toxic, washable materials where possible
- No small detachable pieces for kids under 5
Step-by-step assembly (durability-first method)
- Smooth and seal the dowel. Sand the dowel ends and run a fine sandpaper along its length to remove splinters. Wipe with a damp cloth and let dry.
- Prepare the wand head. If using layered cardstock: glue layers with full coverage glue to prevent delamination. If using felt or foam, ensure edges are sealed with fabric glue or a thin line of clear craft glue.
- Reinforce the joint. Cut a 4–6 cm long strip of cardstock and glue it vertically to the back of the wand head to form a spine. This creates a broad contact area for the dowel and distributes stress.
- Attach the head. Use multiple small dabs of strong craft glue along the dowel top and press into the reinforced spine. Wrap with clear packing tape (transparent) once the glue dries for an additional mechanical bond that also resists peeling.
- Add a handle cover. Wrap the top 10 cm of the dowel with cotton yarn or a soft fabric strip. Start with a small dot of glue at the base, coil the yarn tightly upward, and secure the end inside the wrap with a dab of glue. This provides a non-slip, comfortable grip for kids.
- Secure decorations safely. Glue larger decorations directly to the wand head with full-coverage glue. Avoid buttons, beads, or small stones unless permanently encased in glue and only for older children.
Safety finishing and testing
- Test the wand by gentle drop tests from 1 m onto carpet to ensure head remains attached.
- Check for loose threads or sharp edges; trim and re-glue as needed.
- If you used paint, ensure it is labeled non-toxic. For washable finishing, choose acrylic paints and run a damp cloth test to ensure colorfastness.
Age-specific recommendations
- Ages 2–4: Use foam or felt heads with no small parts and only fabric or paper streamers under 30 cm to prevent entanglement. Avoid hot glue entirely.
- Ages 5–8: Cardstock heads and lightweight embellishments are appropriate, with adult help for any hot glue.
- Ages 9+: More delicate or detailed pieces are acceptable if securely attached.
Play ideas and durability maintenance
- Turn the wand into a multi-function prop by adding Velcro-backed accessories (small felt shapes) that attach/detach for imaginative play.
- Inspect weekly for loose glue joints or worn wrap. Re-apply glue or re-wrap as needed.
- Hand-wash fabric handles if dirty; avoid saturating glued joints.
Where to use
This finished wand is the go-to for everyday pretend play, preschool dress-up boxes, and as a durable party favor that can survive enthusiastic use.
Rainbow Paper Fairy Wand for Kids

Concept: A cheerful, layered rainbow star wand designed for kids — bright, textured, and display-ready in a jar of craft supplies.
Materials
- Multiple colored cardstock sheets: soft rainbow shades (red, orange, yellow, green, blue, indigo, violet)
- Small amount of glitter glue (applied sparingly)
- Wooden dowel wrapped in rainbow-striped paper or washi tape
- Adhesive paper dots or small paper punched circles
- Cellophane, organza ribbons for streamers
- Cardstock spacer discs for layered assembly
- White craft glue, double-sided tape, scissors, ruler, pencil
Cutting and layering the rainbow star
- Create a star template. Draw a 5-point star about 8–10 cm (3–4 in) wide on cardstock. You can fold paper in half and quarter to measure equal points or use a printed template.
- Cut layered stars. Using the template, cut seven stars — one from each rainbow shade — each slightly smaller than the previous (about 2–3 mm smaller per layer) to reveal a narrow colored edge for each layer when stacked.
- Align and glue. Starting with the largest (red) as the base, apply a thin layer of glue and center the next color (orange) on top. Repeat with all colors until you have a stacked, visible edge rainbow star. Press gently and allow drying between layers to avoid slippage.
Applying glitter details and paper dots
- Use glitter glue to highlight only the star points or the central inner edges. Apply in a thin line and avoid heavy application to reduce shedding.
- Add small paper dots around the star or along edges using double-sided tape for less mess. These dots give a playful, child-friendly texture without loose beads.
Handle preparation and wrapping
- Wrap the dowel. Paint the dowel white and allow to dry, or wrap with rainbow-striped paper or washi tape in a spiral from top to bottom. Secure ends with a small piece of double-sided tape.
- Reinforce star back. Glue a 3–4 cm cardstock disc to the back center of the star to create a flat mounting surface.
- Attach to dowel. Apply a thick ring of glue (white craft glue applied liberally and clamped with tape) or use hot glue (adult) to quickly secure the dowel to the star back. For glue-only method, allow at least 30–60 minutes drying time with light pressure.
Streamers and jar display
- Prepare streamers. Cut several ribbons and thin cellophane strips in matching rainbow shades (40–50 cm each). Knot or tape them together at the top.
- Attach streamers. Tie around the dowel under the star or glue the knot to the back of the star under the mounting disc.
- Display in jar. Choose a clear glass jar and fill the bottom with colorful craft supplies: pom-poms, painted wooden beads (large, non-chokable), spare ribbons, or colored sand. Insert the wand upright; the jar both stores and showcases the wand.
- Stabilize the wand. If it tips, add more filler or use a small loop of tape adhered to the dowel base inside the jar bottom for extra hold.
Safety and finishing
- Keep streamers length manageable for small children; shorter streamers (30–40 cm) are safer for active play.
- Seal glitter areas with a thin coat of clear-drying glue or sealer (adult) to minimize shedding.
- Use oversized paper dots rather than small beads to reduce choking risk.
Variations
- Make a mini set of tabletop wands by using shorter dowels and smaller stars; these are great party favors.
- Create a reversible star by gluing a second smaller shape on the back that reveals a different color when flipped.
Where to use
This rainbow wand is perfect for classroom craft stations, party displays, gift jars, and photo props. The jar display doubles as storage and a decorative shelf piece.
Final notes: finishing, storage, and maintenance for all wands
- Allow full curing time for glues before heavy play: white craft glue often needs 24 hours to reach full strength; hot glue sets quickly but still benefits from a few hours of rest.
- Store wands flat in a shallow box or upright in a jar with plenty of support to prevent bending or crushing. For layered or puffy stars, store separately in tissue to preserve shape.
- For cleaning, spot-clean with a damp cloth. Avoid saturating paper elements.
- Periodically inspect for loose decorations and re-secure with glue as needed.
Conclusion
These 7 Paper Fairy Wand tutorials for Kids are designed to be creative, safe, and easy to adapt for different ages and skill levels. From simple folded stars to layered hearts, wings, and rainbow designs, each wand focuses on clear cutting, careful folding, secure gluing, and thoughtful finishing so the final result is both beautiful and durable. Whether you’re crafting for everyday pretend play, themed parties, classroom activities, or handmade gifts, these tutorials give you the confidence to create paper fairy wands that look polished while still being fun for kids to make and use. With basic materials and a little patience, each wand becomes a magical project that encourages imagination, creativity, and hands-on learning.


