
eusable market tote bags have become a staple for knitters who love blending practicality with creativity. Whether you’re heading to the farmer’s market, library, or a casual day out, a hand-knit tote offers both function and flair. These bags are lightweight, sturdy, and customizable — the perfect eco-friendly alternative to plastic bags.
In this guide, you’ll find 7 detailed knit market tote bag patterns ranging from beginner to advanced skill levels. Each section provides everything you need — from materials and techniques to shaping and assembly — written clearly so you can follow along easily. These patterns focus on durability, aesthetic appeal, and versatility, allowing you to create bags that suit your style while being strong enough to carry everyday essentials.
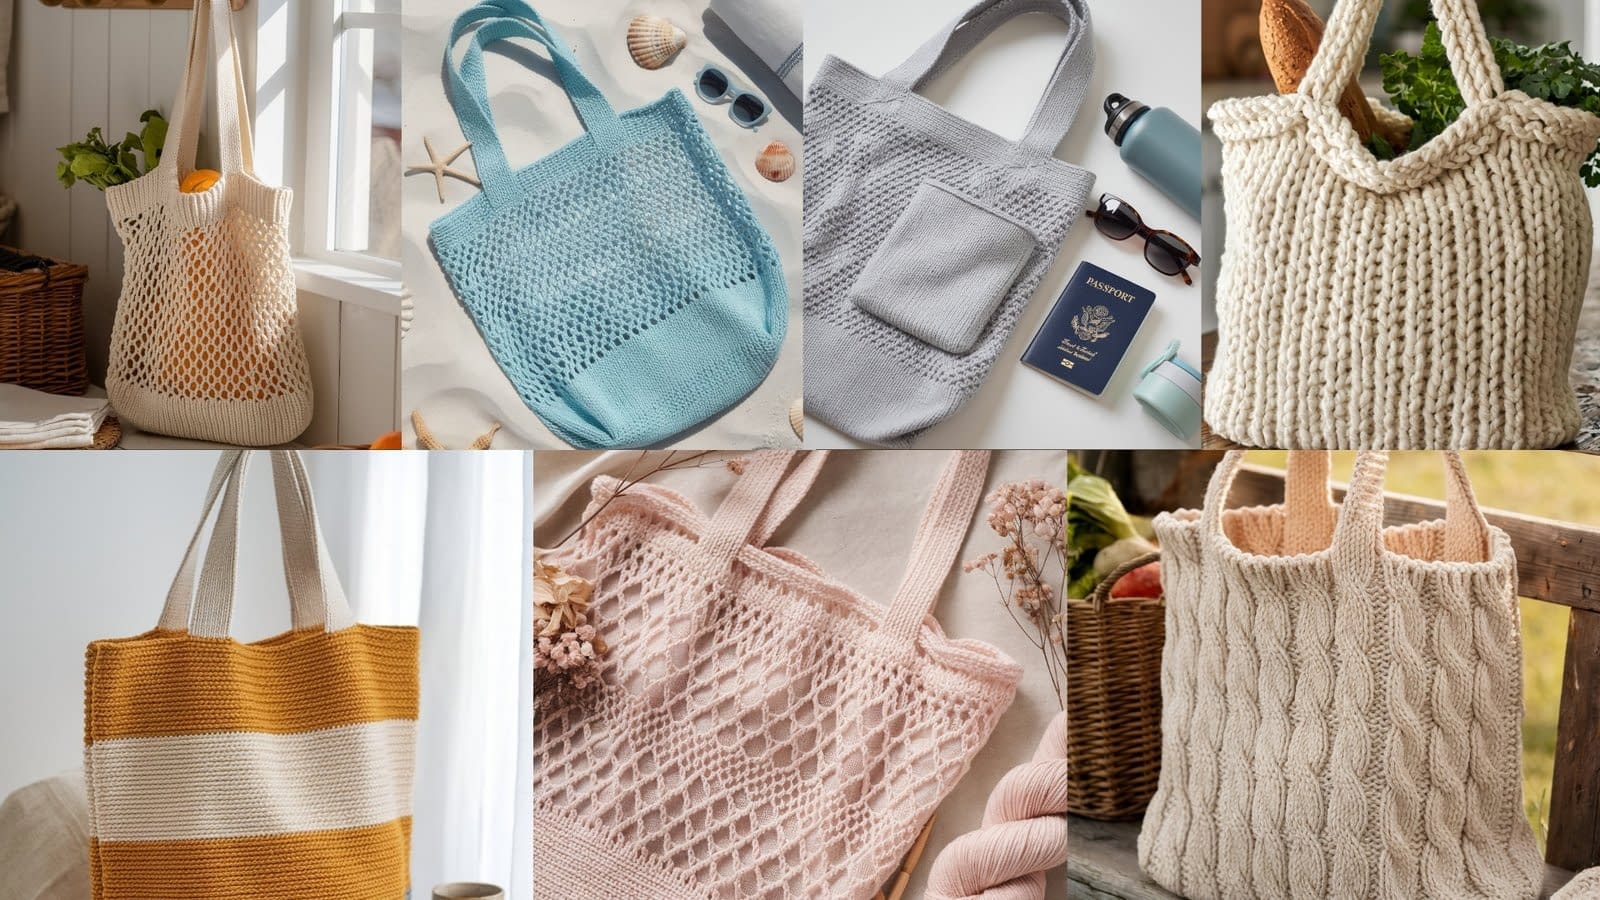
1. Classic Mesh Knit Market Tote Bag Pattern
Skill Level: Beginner
Finished Size: Approximately 14 inches wide × 16 inches tall (excluding handles)
Materials (copy text format)
- Worsted weight cotton yarn – approximately 250 yards
- 5 mm (US 8) circular knitting needles, 24 inches or longer
- Yarn needle for weaving in ends
- Scissors
- Stitch marker
Notes
This simple and stretchable mesh tote is perfect for grocery runs, beach days, or everyday carrying. The mesh fabric expands beautifully, making it lightweight yet durable. It is knitted in the round from the bottom up, so there are no seams to sew later. Cotton yarn is recommended for strength and washability.
Instructions
Step 1: Knit the Base
- Using your worsted weight cotton yarn, cast on 40 stitches.
- Work in garter stitch for 6 rows. This means you will knit every row.
- After 6 rows, you should have a rectangular panel forming the sturdy base of your tote.
- When finished, do not cut the yarn. You will pick up stitches along the other three sides to begin working in the round.
Step 2: Pick Up and Join in the Round
- With your working yarn still attached, pick up 40 stitches evenly along the long side of the base, 40 stitches along the opposite long edge, and 40 stitches along the final edge for a total of 160 stitches.
- Place a stitch marker at the beginning of the round to mark your starting point.
- Join carefully in the round, making sure the base is not twisted.
Step 3: Knit the Mesh Body
- Begin the mesh pattern as follows:
- Round 1: Knit two stitches together, then yarn over. Repeat this sequence around the entire round.
- Round 2: Knit every stitch.
- Continue repeating Rounds 1 and 2 until the bag measures about 14 inches tall or your desired height.
- The mesh will start to form evenly and stretch slightly as you work upward.
Step 4: Form the Top Edge
- Knit 4 rounds in garter stitch (knit one round, purl one round) to create a firm top border.
- This will prevent the top of the tote from stretching excessively.
Step 5: Create the Handles
- Bind off 20 stitches for the first handle gap.
- Knit 40 stitches for the front panel.
- Bind off 20 more stitches for the second handle gap.
- Knit 40 stitches for the back panel.
- Continue working flat on the remaining stitches for 6 rows in garter stitch for both handle straps.
- Bind off loosely.
Step 6: Finishing
- Cut the yarn, leaving an 8-inch tail.
- Weave in all loose ends using a yarn needle.
- Block lightly with warm water to even out the mesh pattern.
Tips
- Always use cotton or linen yarn to prevent excessive stretching.
- If you prefer a smaller tote, stop knitting the mesh section earlier.
- Add a fabric lining if you want to carry smaller items.
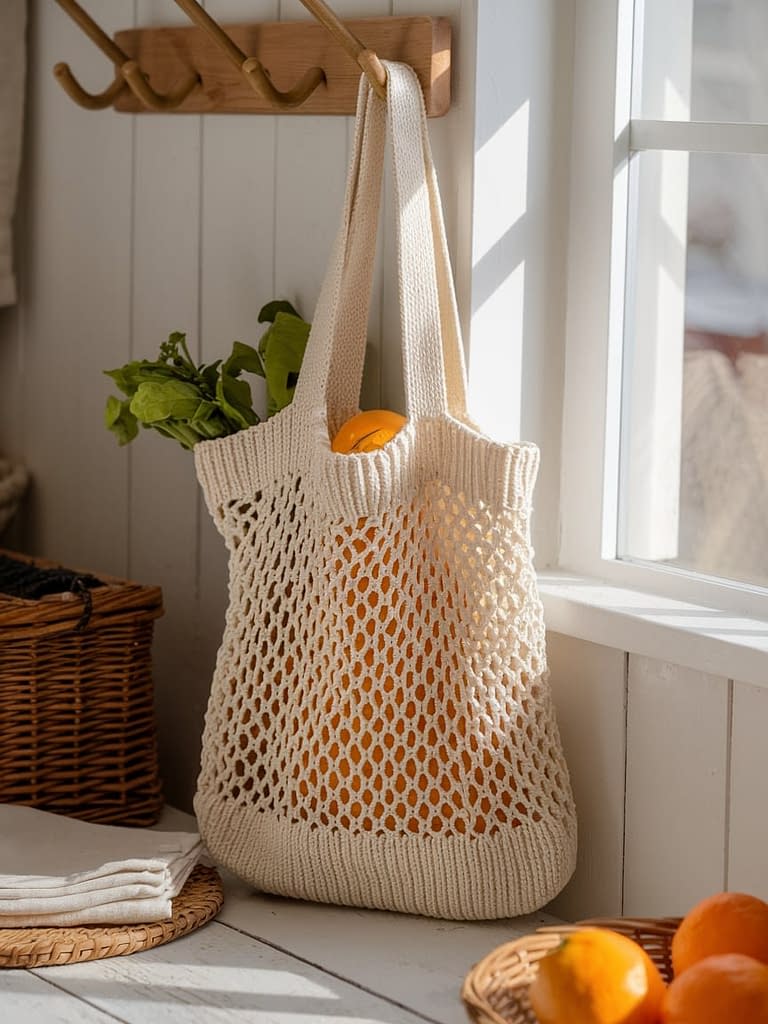
2. Striped Colorblock Knit Market Tote Bag Pattern
Skill Level: Beginner–Intermediate
Finished Size: Approximately 15 inches wide × 17 inches tall
Materials (copy text format)
- DK weight cotton yarn in three colors (Color A, Color B, Color C) – approximately 300 yards total
- 4.5 mm (US 7) circular knitting needles
- Yarn needle for weaving in ends
- Scissors
Notes
This colorblock tote bag combines simplicity with a bold, modern look. The horizontal color bands make it visually appealing and easy to customize. The pattern uses basic knit and purl stitches, making it ideal for confident beginners who want to experiment with color transitions.
Instructions
Step 1: Cast On and Base Panel
- Using Color A, cast on 50 stitches.
- Knit 8 rows in garter stitch (knit every row).
- This will create a sturdy, non-rolling edge for the bottom of the tote.
Step 2: Body – Color Section 1
- Switch to Color B.
- Begin knitting in stockinette stitch: knit one row, purl one row.
- Continue for 20 rows or until you are satisfied with the height of the first color band.
Step 3: Body – Color Section 2
- Switch to Color C.
- Continue knitting in stockinette stitch until the total body length measures 17 inches.
- The bag will naturally curl slightly, which adds softness to the structure once assembled.
Step 4: Shaping the Handle Openings
- Bind off 10 stitches at the beginning of the next row.
- Knit across the remaining 40 stitches.
- Bind off another 10 stitches at the beginning of the following row.
- You will now have a central section for the handles and two open gaps on either side.
Step 5: Knit the Handle Straps
- Continue knitting the remaining stitches in garter stitch for 8 rows to form the handles.
- Bind off loosely to maintain stretch at the top.
Step 6: Assembly
- Fold the piece in half with the right sides facing each other.
- Seam the two sides together using a mattress stitch or whip stitch.
- Turn the tote right side out.
- Weave in all ends neatly using a yarn needle.
Variation
Try using gradient or ombré yarn for a soft, fading effect instead of solid color blocks. You can also adjust the width of each color section to create your own unique design.
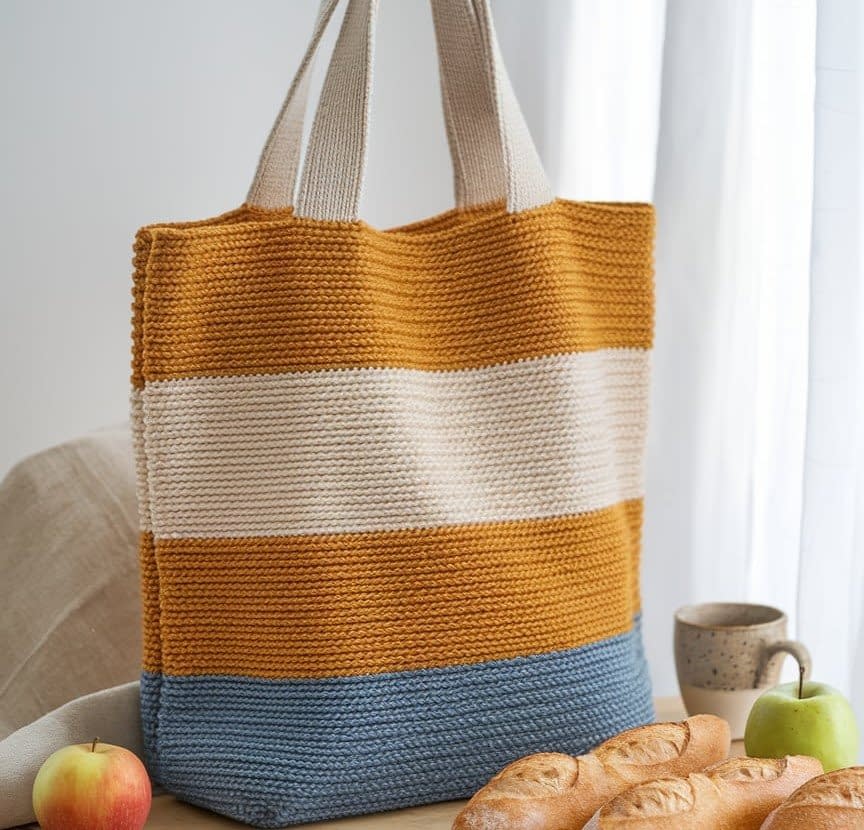
3. Lace Diamond Knit Market Tote Bag Pattern
Skill Level: Intermediate
Finished Size: Approximately 13 inches wide × 15 inches tall
Materials (copy text format)
- Fingering weight cotton yarn – approximately 300 yards
- 4 mm (US 6) circular knitting needles
- Yarn needle for finishing
- Scissors
- Stitch markers
Notes
This lace diamond tote adds elegance and texture to a practical design. The diamond-shaped openings stretch gently, allowing the bag to expand without losing its structure. The lightweight fabric makes it perfect for summer markets or everyday errands.
Instructions
Step 1: Cast On and Setup
- Cast on 100 stitches using the long-tail cast-on method.
- Join in the round, being careful not to twist your stitches.
- Place a stitch marker to mark the beginning of the round.
- Knit 6 rounds in garter stitch (knit one round, purl one round) to form a firm bottom edge.
Step 2: Begin Lace Diamond Pattern
The lace pattern repeat uses 8 stitches and 8 rows. Repeat this pattern around the entire bag.
Lace Diamond Pattern:
- Row 1: Knit two stitches together, yarn over, knit four stitches, yarn over, slip-slip-knit.
- Row 2: Knit all stitches.
- Row 3: Knit one stitch, yarn over, knit one, knit two together, knit two, slip-slip-knit, yarn over, knit one.
- Row 4: Knit all stitches.
- Row 5: Yarn over, knit two, knit two together, knit one, slip-slip-knit, knit two, yarn over.
- Row 6: Knit all stitches.
- Row 7: Knit one, slip-slip-knit, yarn over, knit four, yarn over, knit two together.
- Row 8: Knit all stitches.
Continue repeating these eight rows until the tote body measures about 15 inches tall.
Step 3: Top Edge
- Knit 6 rounds in garter stitch to create a neat, reinforced edge.
- This will prevent the lace pattern from stretching too much at the top.
Step 4: Create Handles
- Bind off 15 stitches for the first handle gap.
- Knit 35 stitches for the front handle section.
- Bind off 15 more stitches for the second handle gap.
- Knit 35 stitches for the back section.
- Knit 6 rows in garter stitch for both handle straps.
- Bind off loosely.
Step 5: Finishing
- Cut the yarn, leaving a long tail.
- Weave in all loose ends securely using a yarn needle.
- Soak the finished bag in lukewarm water, gently squeeze out excess, and lay flat to block.
- Blocking helps open up the lace pattern and gives the bag a smooth, professional look.
Tip
To strengthen the handles, you can thread a thin cord or piece of fabric ribbon through the inside of the handle tubes before finishing. This will help them retain their shape when carrying heavier items.
4. Chunky Knit Market Tote Bag Pattern
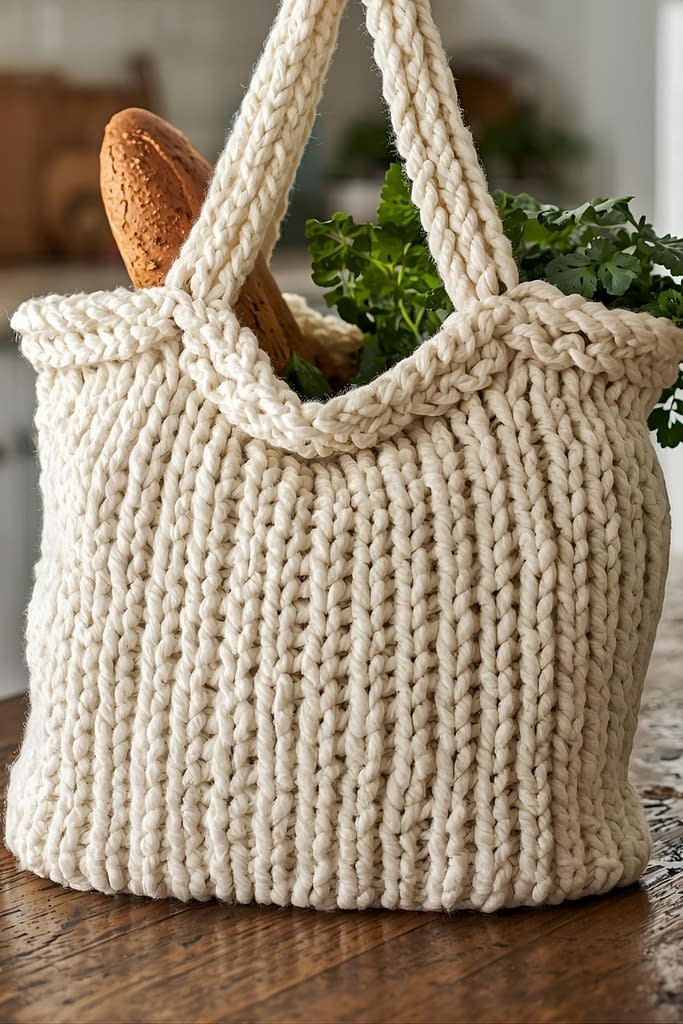
Skill Level: Beginner
Finished Size: Approximately 16 inches wide × 18 inches tall
Materials (copy text format)
- Bulky weight cotton yarn – approximately 200 yards
- 8 mm (US 11) circular knitting needles, 24 inches or longer
- Yarn needle
- Scissors
- Stitch marker
Notes
This chunky knit tote bag works up quickly and has a sturdy structure, thanks to the thick yarn and large needles. It’s ideal for carrying groceries, books, or even beach towels. The pattern uses a simple mesh texture that looks beautiful and stretches naturally without losing strength.
Instructions
Step 1: Knit the Bottom Panel
- Using bulky cotton yarn, cast on 30 stitches.
- Knit 10 rows in garter stitch (knit every row).
- This will create a flat and sturdy base for the tote.
Step 2: Pick Up Stitches and Begin in the Round
- Pick up 30 stitches along each of the long sides of the panel and 10 stitches along each short edge for a total of 80 stitches.
- Join to work in the round, placing a stitch marker at the beginning of the round to track your position.
Step 3: Knit the Mesh Body
- Begin the mesh pattern:
- Round 1: Yarn over, knit two together, repeat to the end of the round.
- Round 2: Knit all stitches.
- Repeat Rounds 1 and 2 until the body measures approximately 14 inches tall or your desired height.
- The bag will naturally form a stretchy, open texture as you knit upward.
Step 4: Create the Top Edge
- Knit 4 rounds in garter stitch (knit one round, purl one round) to form a sturdy border at the top.
- This will help prevent the mesh from stretching too far.
Step 5: Add the Handles
- Bind off 10 stitches for the first handle gap.
- Knit 30 stitches, then bind off another 10 stitches for the second handle gap.
- Knit the remaining 30 stitches.
- Work 6 rows in garter stitch on each remaining set of stitches to form handle straps.
- Bind off loosely.
Step 6: Finishing
- Cut the yarn, leaving a long tail for weaving in.
- Weave in all ends securely with a yarn needle.
- Steam block the tote gently to shape it and relax the fabric.
Tip
For added strength, you can crochet or knit an I-cord handle and sew it over the existing handles for reinforcement. This makes it more comfortable to carry heavier items.
Variation
Try using recycled cotton or hemp yarn for a rustic, eco-friendly look. You can also alternate two shades of yarn for a marled effect.
5. Foldable Travel Knit Tote Bag Pattern
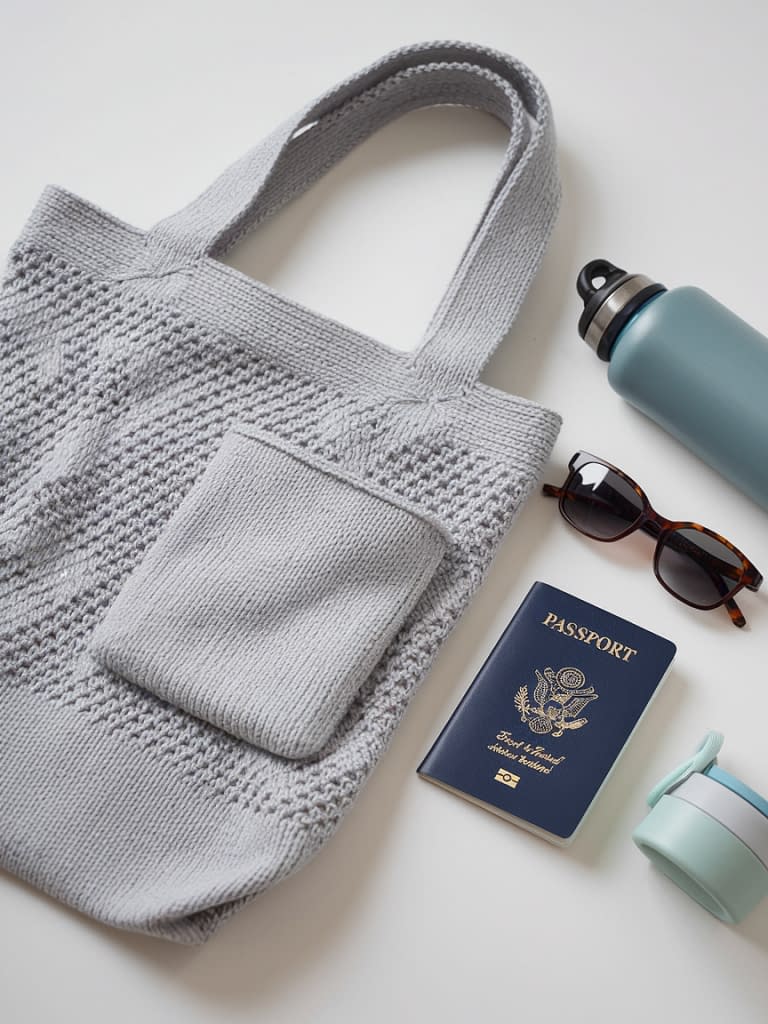
Skill Level: Intermediate
Finished Size: Approximately 12 inches wide × 14 inches tall (folds into a 6-inch pocket)
Materials (copy text format)
- Lightweight cotton blend yarn – approximately 300 yards
- 4 mm (US 6) circular knitting needles
- Yarn needle
- Scissors
- Small button or snap closure (optional)
Notes
This foldable tote is perfect for travel or quick errands. It is light, compact, and can be folded neatly into a small pouch attached to its interior. Despite its delicate look, the fabric is strong and resilient, thanks to the combination of yarn overs and simple stockinette.
Instructions
Step 1: Knit the Body
- Cast on 80 stitches using the long-tail cast-on method.
- Work 6 rows in garter stitch for a sturdy bottom edge.
- Switch to stockinette stitch (knit one round, purl one round).
- Every fourth round, work a row of yarn overs: yarn over, knit two together — repeat across the round to create small eyelets for breathability.
- Continue knitting in this pattern until the body measures about 14 inches tall.
Step 2: Create the Pocket
- Cast on 30 stitches separately for the pocket panel.
- Knit in garter stitch until the piece measures 6 inches tall.
- Bind off and cut the yarn, leaving a long tail for sewing.
- Sew the pocket to the inside bottom of the tote using the yarn tail and a yarn needle, leaving the top open.
Step 3: Knit the Handles
- From the top edge of the bag, bind off 10 stitches for the first handle gap, knit 30 stitches, bind off 10 more stitches, and knit the last 30 stitches.
- Work 8 rows in garter stitch to make sturdy handle straps.
- Bind off loosely.
Step 4: Optional Closure
If desired, sew a small button or snap closure to the inside of the pocket so the folded bag stays compact.
Step 5: Finishing
- Weave in all yarn ends neatly.
- Block lightly to smooth out the stitches.
- Fold the tote by tucking it into its attached pocket for easy storage.
Tip
For extra portability, attach a keyring or carabiner to the folded bag so you can clip it to your purse or backpack.
Variation
Add a small zipper along the top for a secure travel version or make the pocket slightly larger to hold your phone and wallet.
6. Farmer’s Cable Knit Tote Bag Pattern
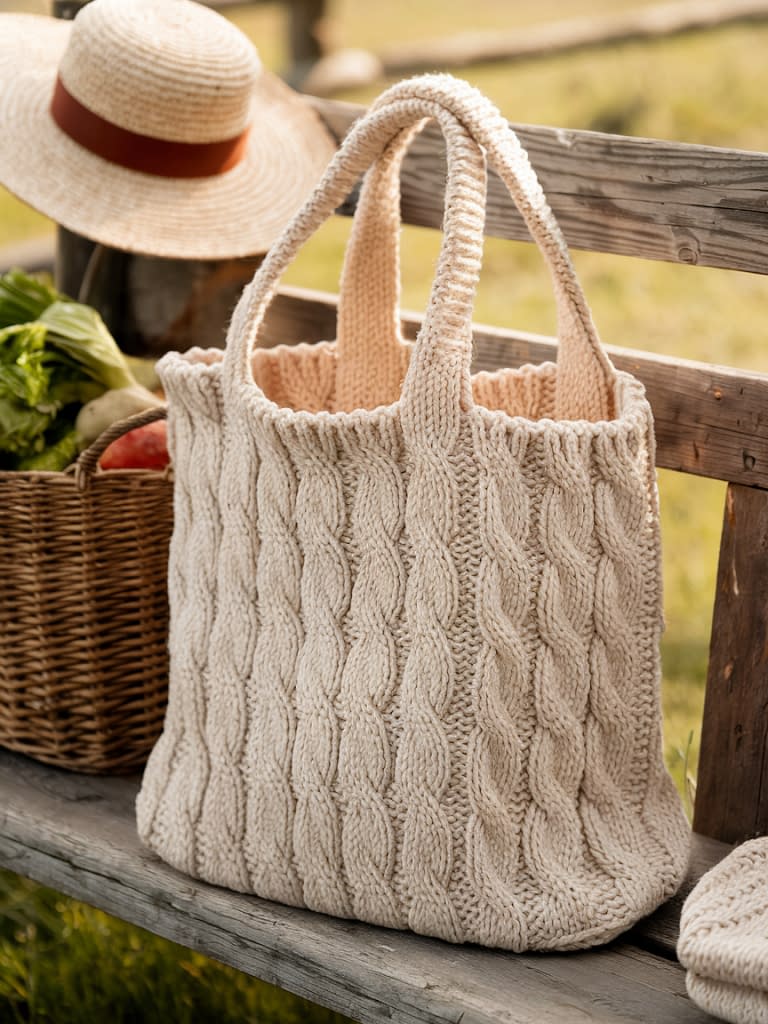
Skill Level: Advanced
Finished Size: Approximately 15 inches wide × 17 inches tall
Materials (copy text format)
- Worsted weight cotton yarn – approximately 350 yards
- 5 mm (US 8) circular knitting needles
- Cable needle
- Yarn needle
- Scissors
- Stitch markers
Notes
This tote combines beauty and strength with classic cable patterns. It’s ideal for knitters who enjoy texture-rich projects. The cables create a thick, durable fabric that holds its shape, making it excellent for carrying heavier loads like books or produce.
Instructions
Step 1: Front Panel
- Cast on 60 stitches.
- Knit 10 rows in K4, P2 ribbing to form the bottom edge.
- Begin the cable panel pattern:
- Row 1: C4F (cable 4 front), P2 repeat to the end of the row.
- Row 2: Knit 4, Purl 2 repeat to end.
- Continue repeating Rows 1–2, working the cable twist (C4F) every 6th row.
- Knit until the panel measures 17 inches tall.
Step 2: Back Panel
- Cast on 60 stitches.
- Work in plain stockinette stitch (knit one row, purl one row) until the back matches the height of the front panel.
Step 3: Assembly
- Place both panels right sides together.
- Seam the sides and bottom using a mattress stitch.
- Turn the tote right side out.
Step 4: Create Handles
- Pick up 10 stitches along the top edge for the first handle.
- Knit an I-cord handle approximately 16 inches long.
- Attach the handle ends to the opposite side using a backstitch.
- Repeat for the second handle.
Step 5: Finishing
- Weave in all yarn tails.
- Lightly steam block to set the cables and smooth the fabric.
Tip
Cabled fabric can stretch slightly, so avoid using overly soft yarn. Cotton or cotton-blend yarns hold the structure best.
Variation
You can alternate the direction of the cables (some twisting left, others right) for a braided appearance. Adding wooden handles gives it a classic farmhouse look.
7. Open Weave Summer Knit Tote Bag Pattern
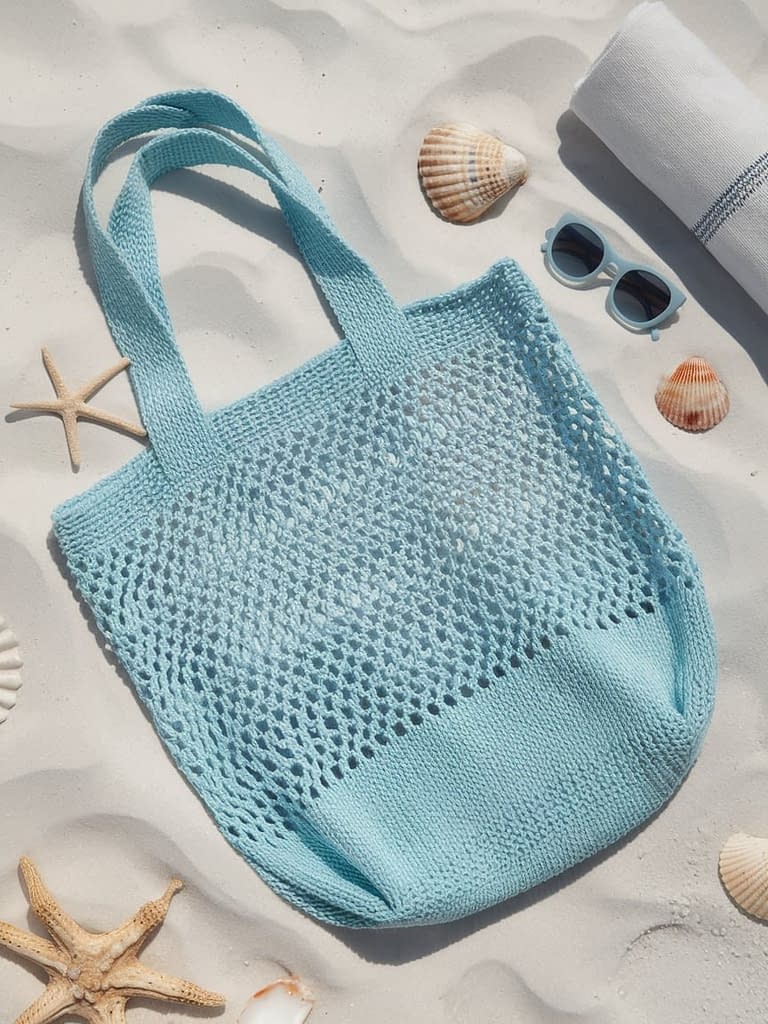
Skill Level: Beginner
Finished Size: Approximately 13 inches wide × 15 inches tall
Materials (copy text format)
- Mercerized cotton yarn – approximately 250 yards
- 5 mm (US 8) knitting needles
- Yarn needle
- Scissors
Notes
Lightweight and breathable, this summer tote is perfect for beach days or casual outings. The open weave pattern makes it airy, while mercerized cotton provides sheen and strength. The bag’s relaxed shape makes it easy to pack and carry.
Instructions
Step 1: Cast On
- Cast on 60 stitches using the long-tail method.
- Knit 4 rows in garter stitch to create a firm foundation edge.
Step 2: Body Pattern
- Work in the following open weave pattern:
- Row 1: Yarn over, knit two together, repeat across.
- Row 2: Knit all stitches.
- Repeat these two rows continuously until the bag measures about 13 inches tall.
Step 3: Top Edge
- Knit 6 rows in garter stitch to form a solid top edge.
- Bind off loosely to maintain stretch.
Step 4: Knit the Handles
- Knit two separate I-cord handles, each approximately 16 inches long.
- For each handle: Cast on 4 stitches and knit an I-cord until desired length.
- Attach the ends of each I-cord handle securely to the inside edges of the bag using a yarn needle and matching yarn.
Step 5: Finishing
- Weave in all yarn ends neatly.
- Block the tote gently to open the weave pattern.
- Allow it to dry completely before use.
Tip
If you want the bag to hold smaller items, line it with a lightweight cotton fabric. You can hand sew or machine stitch the lining before attaching the handles.
Variation
Experiment with natural tones like sand, cream, or sky blue for a beach-inspired palette, or use bold tropical colors for a vibrant summer look.
Conclusion
Knitting your own market tote bags is a satisfying and sustainable craft that allows creativity to meet functionality. Each of these 7 knit market tote bag patterns offers a different aesthetic and level of challenge — from simple mesh styles to elegant lace and cables. By using eco-friendly materials like cotton or recycled yarn, you’re not only creating something beautiful but also contributing to a greener planet.
Once you’ve finished one, it’s hard to stop — these totes make thoughtful handmade gifts and reliable daily companions. So grab your yarn and needles, and start crafting your favorite reusable bag today.


