
Winter creates a magical landscape outside, but it often leads to long hours spent inside the house. When the temperatures drop and the wind begins to howl, keeping children entertained without resorting to screens can be a significant challenge for parents and caregivers. Fortunately, you do not need expensive supplies or a degree in art to create a wonderland of creativity right at your kitchen table. Paper is one of the most versatile, affordable, and accessible materials available, making it the perfect medium for spontaneous afternoon activities.
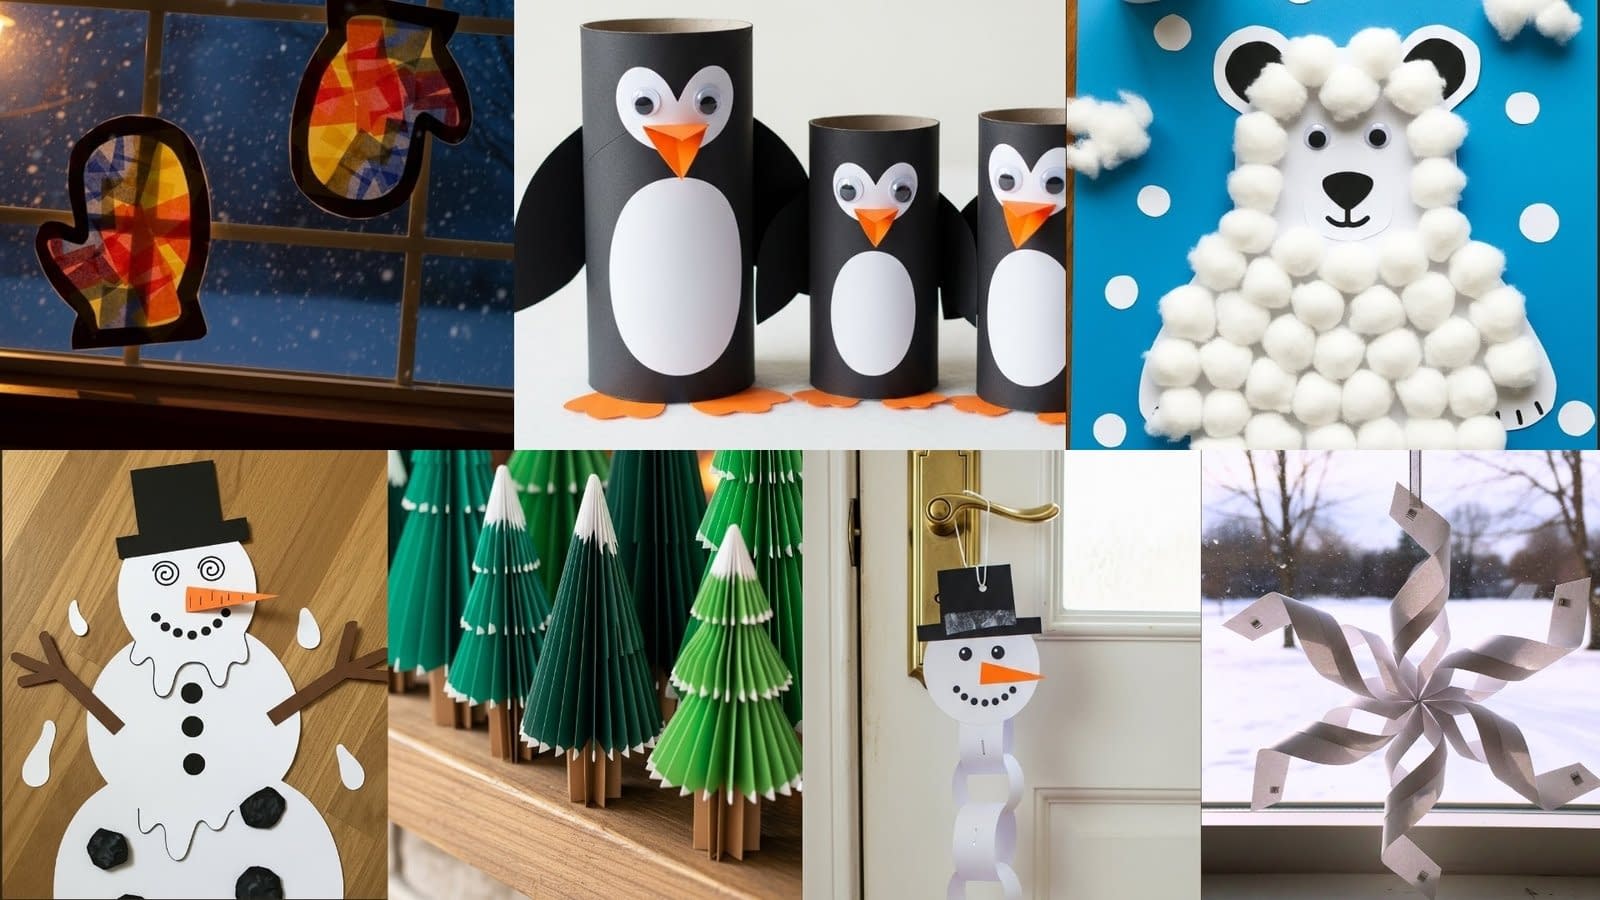
This comprehensive guide focuses on 7 easy paper winter crafts for kids to make indoors. These projects are designed to develop fine motor skills, encourage artistic expression, and provide high-quality bonding time. We have curated a list that ranges from simple cutting and pasting exercises for toddlers to slightly more structural engineering challenges for older children. Each craft includes a detailed materials list and rigorous step-by-step instructions to ensure your success. Whether you are looking to decorate a classroom or just want to add some festive cheer to your living room, these paper winter crafts are the perfect solution for a snowy day.
Setting Up Your Winter Crafting Station
Before diving into the specific projects, it is helpful to gather your supplies and prepare a workspace. Since we are focusing on paper crafts, the mess is generally minimal, but having the right tools on hand will prevent frustration during the creative process. A dedicated station allows children to focus on the task at hand without constant interruptions to find missing items.
Essential Materials for Paper Crafts
To complete these 7 easy paper winter crafts for kids to make indoors, you will primarily need basic stationery items. Ensure you have plenty of construction paper in cool winter tones like blue, white, silver, and purple. White printer paper is also excellent for snowflakes as it is thinner and easier to fold. You will need a reliable pair of child-safe scissors for the little ones and a sharper pair for adults to help with tricky cuts.
Adhesives are crucial. A glue stick is best for flat paper-to-paper connections because it dries quickly and creates less mess. However, for structural crafts where paper needs to hold a specific shape or support weight, a bottle of white PVA school glue or clear tape is often more effective. Optional embellishments like bio-degradable glitter, cotton balls, and markers can add a personalized touch to the finished pieces.
Creating a Safe Workspace
Cover your table with an old tablecloth or a layer of newspaper. This protects your furniture from stray glue marks and makes cleanup significantly faster. If you are working with younger children, pre-cut some of the shapes required for the crafts to keep the momentum going. Lighting is also important; ensure you are working in a well-lit area so children can see the lines they are cutting and the details they are drawing.
1. The Classic 3D Paper Snowflake

While everyone knows how to make a flat paper snowflake, the 3D version is a showstopper that looks incredibly complex but is actually quite simple to assemble. This craft teaches symmetry and patience. It results in a large, voluminous decoration that looks beautiful hanging in a window or from the ceiling.
Materials Needed
Six square sheets of white paper (standard printer paper works best) Clear tape Stapler Scissors Ribbon or string for hanging
Step-by-Step Instructions
Begin by preparing your paper. If you are using standard rectangular letter-sized paper, you must first convert it into a square. Take one corner of the paper and fold it diagonally across to the opposite edge to form a triangle. You will have a rectangular strip remaining at the bottom. Cut this strip off carefully and discard it. You should now have a perfect square folded into a triangle.
Fold this triangle in half again to create a smaller triangle. Hold the triangle so that the longest side (the hypotenuse) is facing away from you and the solid folded edge is at the bottom. You are now going to make three parallel cuts. Starting from the folded edge, cut parallel to the side of the triangle, stopping about half an inch before you reach the top edge. Do not cut all the way through. Repeat this two more times, making the cuts progressively shorter as you move toward the center of the triangle.
Unfold the paper completely. You should see a square with diamond-shaped slits cut into it. Place the paper flat on the table in a diamond orientation. Locate the innermost diamond flaps. Curl these two small points toward each other to form a tube. Secure them together with a small piece of clear tape.
Flip the entire paper over to the other side. Take the next set of diamond points (the ones immediately outside the tube you just made) and pull them together on this new side. Tape them together. Flip the paper over again and join the third set of points. Flip it one last time to join the outermost points. You should now have a single spun spiral shape.
Repeat this entire process with the remaining five sheets of paper until you have six identical spiral arms. To assemble the snowflake, take three of the arms and staple their bottom points together. Do the same with the remaining three arms. Finally, staple the two halves together at the center. For added stability, staple the side points where the arms touch each other. Punch a hole at the top of one arm and thread your ribbon through to hang your masterpiece.
2. The Accordion Fold Winter Forest

This project utilizes the accordion folding technique to create standing 3D trees. It is one of the best 7 easy paper winter crafts for kids to make indoors because it allows for endless variation in size and color, letting children create an entire forest scene on a windowsill or mantelpiece.
Materials Needed
Green construction paper (various shades) Brown cardstock or construction paper Glue stick Scissors White paint or a white gel pen (optional for snow details) Star stickers (optional)
Step-by-Step Instructions
Start by cutting your green paper into rectangles. To make a varied forest, cut rectangles of different sizes. For a standard tree, a piece of paper that is roughly 8 inches by 5 inches works well. Place the paper vertically on the table.
Begin folding the paper from the bottom edge. Make a fold about one inch wide. Press the crease down firmly with your fingernail or the handle of the scissors to ensure it is sharp. Flip the paper over and fold it back the other way, matching the width of the first fold. Continue this back-and-forth accordion style folding until you have reached the top of the paper. You should now have a long, compressed strip of paper.
While keeping the paper folded in its strip form, you need to cut it to shape. Hold the strip firmly. You want the tree to be wider at the bottom and narrower at the top. Use your scissors to cut a diagonal line from the bottom corner to the top opposite corner. When you release the paper, it will look like a zig-zag triangle.
To make the tree stand, you need a trunk. Cut a strip of brown cardstock approximately 2 inches wide and 5 inches long. Fold this brown strip in half lengthwise to give it structural strength. Apply a generous amount of glue to the top two inches of the brown strip. Press the center of your green accordion tree onto the glued section of the trunk.
Allow the glue to dry completely. Once dry, you can gently stretch the accordion folds out so the tree stands up on its own. If you want to add snow, use a white gel pen to draw patterns on the edges of the branches, or lightly dab white paint on the tips. Add a star sticker to the top for a festive finish.
3. The Cotton Ball Polar Bear Mosaic

For younger children, focusing on texture is a great way to engage their senses. This craft combines paper cutting with a sensory element using cotton balls. It is a forgiving project where precision is not strictly necessary, making it perfect for toddlers and preschoolers.
Materials Needed
Blue construction paper (for the background) White cardstock Black construction paper Cotton balls White school glue (liquid glue is better than a glue stick here) Googly eyes
Step-by-Step Instructions
Draw a large outline of a polar bear on the white cardstock. You can draw a simple large oval for the body and a smaller circle for the head if you want to keep it abstract, or trace a template found online. Cut out the polar bear shape.
Paste the white polar bear cutout onto the center of the blue construction paper. This provides a sturdy base and a nice wintry contrast. Now comes the tactile part. Pour a small amount of white liquid glue into a shallow dish or a plastic lid.
Have the child take a cotton ball. Depending on the size of your bear, you might want to use whole cotton balls or pull them apart to make smaller fluffy tufts. Dip the cotton ball into the glue or use a paintbrush to apply glue to the bear’s body, then press the cotton down firmly. Continue this process until the entire white cardstock shape is covered in fluffy cotton.
While the body is drying, cut out a small black nose and two small black semi-circles for ears from the black construction paper. Apply glue to the back of these pieces and nestle them into the cotton on the head area. Adhere the googly eyes above the nose.
For the background, you can cut small circles out of white paper to represent falling snow and glue them around the bear on the blue paper. This creates a complete winter scene.
4. The Cylindrical Paper Penguin Family

This craft introduces children to working with cylinders and turning 2D paper into a 3D character. These penguins are sturdy and can be used as toys once the glue has dried. They are a charming addition to our list of 7 easy paper winter crafts for kids to make indoors.
Materials Needed
Black construction paper White paper Orange construction paper Toilet paper rolls (or black paper rolled into a tube) Glue stick Scissors Pencil
Step-by-Step Instructions
If you are using a toilet paper roll, start by cutting a strip of black construction paper that is the same width as the roll and long enough to wrap around it completely. Apply glue all over one side of the black paper strip. carefully wrap it around the cardboard tube, smoothing it out as you go to avoid wrinkles. If you do not have a tube, simply roll a piece of black cardstock into a cylinder and tape it secure.
Next, make the penguin’s belly. Cut a long oval shape out of the white paper. The oval should be slightly shorter than the tube. Apply glue to the back of the white oval and press it onto the front of the black cylinder. Ensure it is centered.
For the eyes, you can either cut two small white circles and draw black dots in the center, or use googly eyes. Glue these near the top of the tube, above the white belly.
To make the beak, cut a small diamond shape out of the orange paper. Fold the diamond in half horizontally. Apply a small dot of glue to the fold line and stick it onto the face just below the eyes. The fold allows the beak to open and close slightly, adding a 3D effect.
For the wings, cut two leaf shapes out of the black paper. Fold a small tab at the wider end of the leaf shape. Apply glue to this tab and attach the wings to the sides of the penguin’s body. You can fold the wings outward or keep them flat against the body. Finally, cut two heart shapes or webbed shapes from the orange paper for feet and glue them to the bottom rim of the tube so they stick out in front.
5. The Paper Chain Snowman Countdown

Children love counting down to events, whether it is a holiday, a snow day, or simply the weekend. This craft combines the classic paper chain with a snowman character to create a functional and decorative piece.
Materials Needed
White construction paper Orange, black, and colored paper (for accessories) Stapler or tape Glue stick Scissors Marker
Step-by-Step Instructions
Decide how long you want your countdown to be. If you want a 10-day countdown, you will need 10 strips of white paper. Cut the white paper into strips that are approximately 2 inches wide and 8 inches long.
Take the first strip and curl it into a circle, overlapping the ends by about an inch. Staple or tape the ends together. Take the second strip, thread it through the first circle, and then curl it to close the loop. Secure the ends. Continue this process until you have a chain of 10 white links.
Now you will create the snowman’s head. Cut a circle out of white cardstock that is slightly wider than your paper links. Draw a face on the circle using markers. You can cut out a carrot nose from orange paper and glue it on for extra detail. You can also cut out a hat from black paper or a beanie from colored paper and glue it to the top of the head.
Attach the head to the top link of the paper chain using glue or a staple. To finish the snowman, you can cut out buttons from black paper and glue one onto each link of the chain, or simply number the links from 1 to 10.
Hang the snowman on a door handle or a hook. Each day, the child can tear off one link from the bottom of the chain, watching the snowman get shorter as the special day approaches.
6. The Stained Glass Ice Mitten

This craft mimics the look of stained glass and looks beautiful when taped to a window to catch the winter sunlight. It focuses on cutting and arranging shapes, which is excellent for cognitive development and spatial awareness.
Materials Needed
Black construction paper Tissue paper in various colors (blue, purple, pink, white) Clear contact paper (or wax paper and glue) Scissors Pencil White crayon or chalk
Step-by-Step Instructions
Start by drawing the outline of a mitten on the black construction paper using a white crayon or chalk so you can see the line. You need to create a frame, so draw a second mitten outline inside the first one, leaving a border of about half an inch. Cut along the outer line first, then carefully poke your scissors into the center to cut out the inner shape. You should be left with a black outline of a mitten.
Cut a piece of clear contact paper that is slightly larger than your mitten frame. Peel off the backing of the contact paper and lay it sticky-side up on the table. Secure the corners with tape to stop it from moving. Place your black mitten frame onto the sticky contact paper.
Cut the colored tissue paper into small squares, triangles, or irregular shapes. This is a great step for kids to help with. Press the tissue paper pieces onto the sticky contact paper inside the mitten frame. It is okay if the pieces overlap; this actually creates beautiful new colors when the light shines through. Continue until the entire inside of the mitten is filled with color.
Once the area is filled, cut another piece of contact paper and place it over the top to seal the tissue paper inside. Smooth out any air bubbles with your hand. Finally, use scissors to trim the excess contact paper around the outside of the black mitten frame. Tape your finished mitten to the window.
7. The “Melting” Paper Snowman

Sometimes winter crafts can be humorous. The melting snowman is a funny take on the traditional snowman and allows for more creative freedom since there is no “perfect” shape required. This is a fun addition to our collection of 7 easy paper winter crafts for kids to make indoors.
Materials Needed
White cardstock or construction paper Orange, black, and brown construction paper Scissors Glue stick Markers
Step-by-Step Instructions
Begin by cutting a large, irregular wavy shape out of the white cardstock. This represents the puddle of melted snow. It should not be a perfect circle; make it look like a splash or a blob. This will be the base of your craft.
Next, you need to create the illusion that the snowman’s accessories are floating in the puddle. Cut out three small irregular black shapes to represent pieces of coal (buttons) and glue them randomly onto the white blob.
Cut two brown strips for stick arms. Since the snowman is melted, these shouldn’t be sticking out of a body. Instead, glue them flat onto the white shape as if they have fallen off.
For the head, you generally do not have a full head left in a melted puddle, but you might have the hat and the nose. Cut a top hat out of black paper and glue it near the top of the puddle. Cut a triangle orange nose. To make it look like the nose is pointing up at you, draw a small circle on the wide end of the triangle to represent the base of the carrot. Glue this near the hat.
Finally, use a marker to draw two eyes and a mouth. You can draw them looking surprised or dizzy to add to the comedic effect of the melting snowman. This craft tells a story and allows children to use their imagination regarding how the snowman melted.
Conclusion
Winter days do not have to be dull or filled with screen time. By utilizing these 7 easy paper winter crafts for kids to make indoors, you can turn a gloomy afternoon into a bright and productive session of creativity. These projects require minimal preparation and use materials you likely already have in your home.
From the intricate folding of the 3D snowflake to the sensory fun of the cotton ball polar bear, there is something here for every age and skill level. Not only do these activities help pass the time, but they also result in beautiful, handmade decorations that you can cherish for years to come. So, clear off the kitchen table, grab your scissors and glue, and start making memories this winter season.


