
Crochet anklets are one of the most rewarding small accessories to create. They are lightweight, quick to finish, and endlessly customizable, making them ideal projects for both beginners who want to practice precision and experienced crocheters who enjoy delicate detail work. In this guide to 7 Crochet Anklet Patterns, you will explore a carefully curated collection of designs that range from floral and romantic to bohemian and modern. Each anklet pattern is written as a complete, professional-style tutorial with clear explanations, full stitch names, and beginner-friendly guidance.
These crochet anklet patterns are designed to be worn comfortably against the skin, styled for everyday use, beach outings, special occasions, or handmade gifting. Throughout this post, you will find information on skill level, sizing, materials, stitch structure, assembly, variations, and finishing techniques. The focus is not only on creating something beautiful, but also on understanding why each step matters so that you can confidently adjust the patterns to suit your own style.
Below are the first four designs in the 7 Crochet Anklet Patterns collection. Each pattern is explained in depth with step by step instructions written in long form, without shorthand, so that even newer crocheters can follow along comfortably.
1. The Purple Floral and Bead Anklet

Overview and design concept
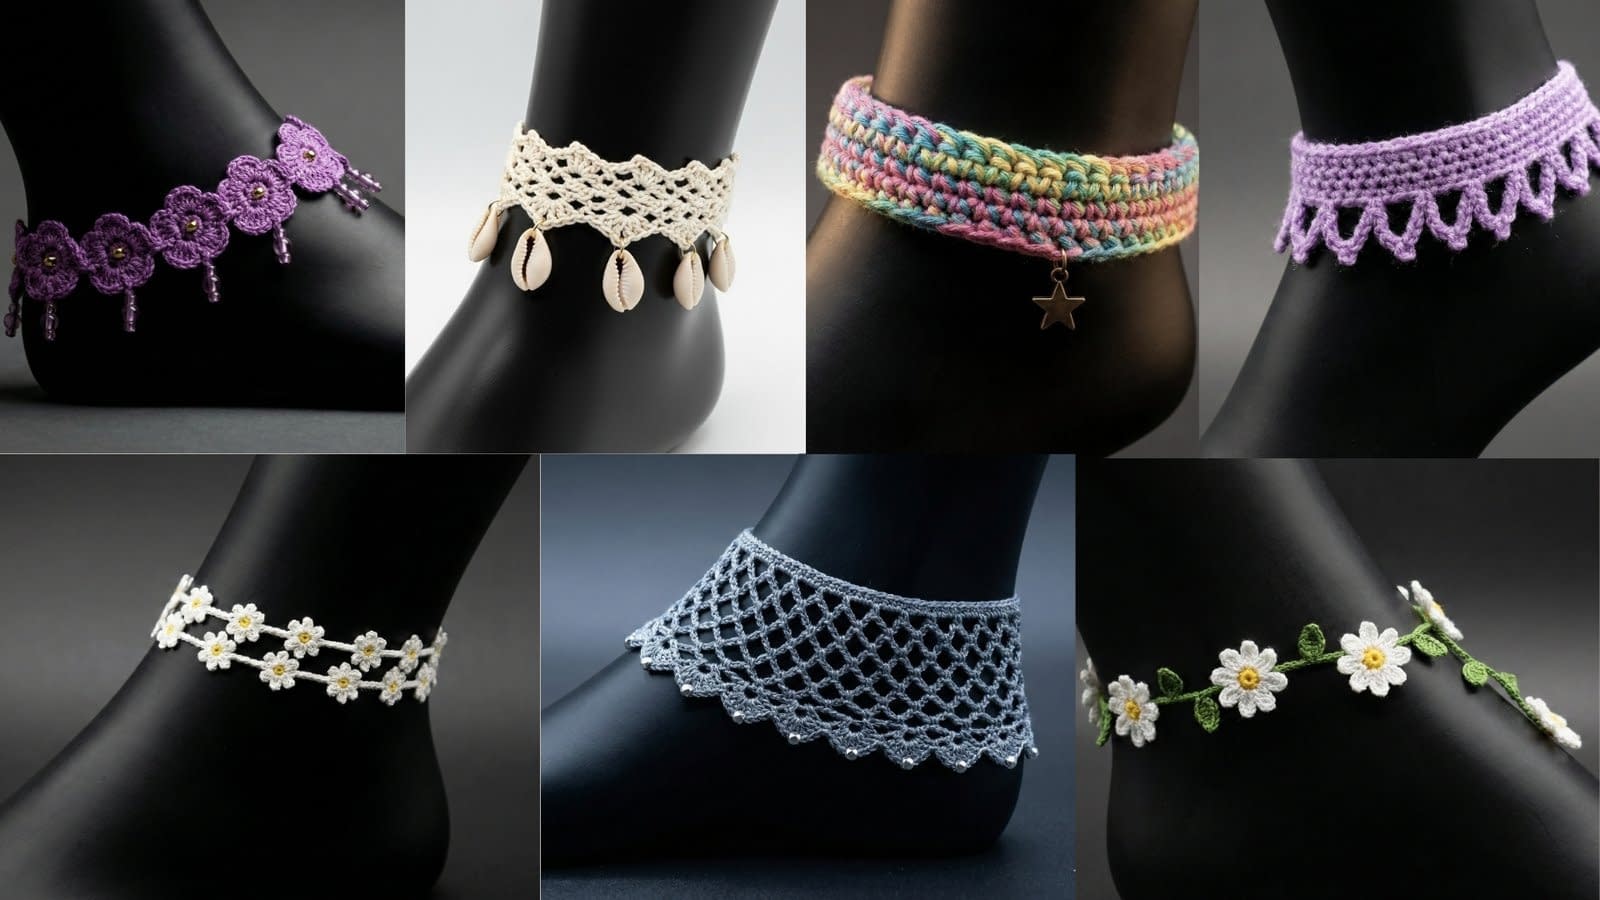
The Purple Floral and Bead Anklet is a decorative, feminine design built from a series of connected five petaled crochet flowers. Each flower features a small gold-toned center and delicate dangling purple beads that add gentle movement and elegance when worn. This anklet is ideal for summer styling, festive occasions, or as a statement accessory paired with sandals.
Skill level
Beginner to intermediate. This pattern requires confidence with basic crochet stitches, working in the round, consistent tension, and simple joining techniques.
Finished size
Approximately 8 to 9 inches in length to fit an average adult ankle, with an adjustable closure option. Length can be customized by adding or removing floral motifs.
Materials
Lightweight yarn or fine cotton yarn in purple for the flowers
Small amount of gold or yellow yarn or embroidery thread for flower centers
Crochet hook appropriate for the yarn, typically between 2.5 millimeters and 3.0 millimeters
Small translucent purple beads with holes large enough for yarn or sewing thread
Yarn needle
Fine sewing needle for beads
Strong sewing thread or matching yarn for attaching beads
Scissors
Optional clasp, button, or tie strings for closure
Construction notes
The anklet is made by crocheting individual flower motifs and joining them as you go to form a flexible chain. Beads are attached after the crochet work is complete. This allows better control over bead placement and durability.
Step by step instructions
Creating the floral motif
Begin by forming a small adjustable loop using your purple yarn. Carefully tighten the loop enough so that the center does not leave a visible gap, but remains flexible.
Work one chain stitch to secure the loop. Into the center of the loop, work ten single crochet stitches, placing them evenly around the circle. This forms the base ring of the flower. Gently pull the tail of the adjustable loop to close the center completely. Join with a slip stitch into the first single crochet stitch.
To create the petals, work the following sequence five times. Chain three stitches, then work two double crochet stitches into the same stitch as the chain. Chain three stitches again, then slip stitch into the next single crochet stitch. Each repetition creates one petal. After completing five petals, fasten off and weave in the ends neatly on the back of the flower.
Adding the flower center
Using gold or yellow yarn or embroidery thread, thread a yarn needle and bring it up through the center of the flower. Create several small straight stitches or a compact French knot cluster to fill the center area. Secure the thread firmly on the back and trim excess.
Joining the flowers
Lay the completed flowers flat and determine the desired anklet length. To join flowers, attach your yarn to the side of one petal on the first flower. Insert the hook through the corresponding petal space on the next flower and work a slip stitch to connect them. Repeat this joining method until all flowers are connected into a continuous chain.
Creating the closure
For a tie closure, attach yarn to one end of the flower chain and work a chain of thirty to forty stitches. Fasten off. Repeat on the opposite end. For a button closure, crochet a short chain loop on one end and sew a small button securely to the other end.
Attaching the beads
Thread a fine needle with strong thread. Secure the thread to the underside of a flower petal. String one bead and stitch it back through the petal edge so that the bead dangles slightly below the flower. Knot securely. Repeat this process for each flower, spacing the beads evenly for balance.
Variations and tips
You can substitute clear beads, pearl beads, or metallic charms for a different effect. For a more delicate anklet, use fewer flowers and smaller beads. Always reinforce bead stitches, as anklets experience movement during wear.
2. The Boho Seashell Beach Anklet

Overview and design concept
The Boho Seashell Beach Anklet is inspired by coastal textures and relaxed summer styling. It features a lace-style crochet band made from cotton yarn, with natural cowrie shells suspended along the lower edge. The contrast between soft yarn and smooth shell creates a striking beach-ready accessory.
Skill level
Intermediate. This pattern involves lace spacing, even stitch tension, and secure attachment of heavier decorative elements.
Finished size
Approximately 9 inches long, adjustable. Designed to sit comfortably without twisting.
Materials
Cotton yarn in cream or off-white
Crochet hook sized for the yarn, typically 3.0 to 3.5 millimeters
Natural cowrie shells with pre-drilled holes
Strong sewing thread or thin nylon cord
Yarn needle
Sewing needle
Scissors
Optional clasp or tie strings
Construction notes
The anklet band is worked in rows, then joined into a loop or finished with ties. Shells are attached after the crochet band is complete.
Step by step instructions
Creating the lace band
Begin with a foundation chain long enough to wrap around the ankle comfortably, typically forty to forty-five chain stitches. Ensure the chain is not twisted.
Row one: Work one single crochet stitch into the second chain from the hook. Chain two stitches, skip two chains, then work one single crochet into the next chain. Repeat across the row. Turn your work.
Row two: Chain three stitches. Work one double crochet into the first single crochet stitch from the previous row. Chain two stitches, then work one double crochet into the next single crochet stitch. Repeat across. Turn.
Row three: Chain one stitch. Work one single crochet into the first double crochet. Chain two stitches, then work one single crochet into the next double crochet. Repeat across. Turn.
Repeat rows two and three until the band reaches approximately one inch in width. Fasten off.
Joining the band
Either seam the short ends together using a whip stitch to form a continuous loop, or leave the ends open and add tie strings using long chains.
Attaching the shells
Thread a sewing needle with strong thread. Secure the thread to the bottom edge of the anklet band. String one shell and stitch it firmly to a chain space along the lower edge. Repeat at regular intervals, ensuring the shells hang evenly and securely.
Variations and tips
You can alternate shells with wooden beads or add small knots between shells for texture. Always test the weight distribution so the anklet sits flat on the ankle.
3. The Daisy and Leaf Vine Anklet

Overview and design concept
The Daisy and Leaf Vine Anklet is a nature-inspired design that mimics a delicate floral vine wrapped around the ankle. Small three-dimensional daisies are connected by slender green crochet vines and tiny leaves, creating a lightweight and elegant accessory.
Skill level
Intermediate, due to small-scale work and multiple components.
Finished size
Approximately 8 to 9 inches, adjustable by adding vine segments.
Materials
Fine cotton yarn in white, yellow, and green
Small crochet hook, typically 2.0 to 2.5 millimeters
Yarn needle
Scissors
Optional clasp or ties
Step by step instructions
Creating the daisy flower
Form an adjustable loop with white yarn. Work twelve single crochet stitches into the loop. Close the loop tightly and join with a slip stitch.
Attach yellow yarn to the center. Work small straight stitches or French knots to create the flower center. Fasten off.
Creating the vine and leaves
Attach green yarn to the back of a flower. Chain six stitches. In the second chain from the hook, work one single crochet, then one half double crochet in the next chain, one double crochet in the next, and one slip stitch in the last chain to form a leaf. Chain three stitches to return to the vine.
Joining flowers
Continue chaining and adding leaves between flowers, joining each new flower by slip stitching into a petal space. Repeat until the desired length is reached.
Variations
Add more leaves for a fuller vine or keep the spacing minimal for a dainty look.
4. The Elegant Grey Mesh Anklet

Overview and design concept
The Elegant Grey Mesh Anklet is a refined, modern design featuring an open-work lattice pattern with a scalloped edge accented by tiny silver beads. It is subtle, lightweight, and suitable for both casual and dressy outfits.
Skill level
Intermediate.
Finished size
Approximately 9 inches, adjustable.
Materials
Fine grey yarn
Crochet hook 2.5 to 3.0 millimeters
Small silver beads
Sewing needle and thread
Yarn needle
Scissors
Step by step instructions
Creating the mesh band
Chain a foundation length to fit the ankle. Join into a ring with a slip stitch, ensuring the chain is not twisted.
Round one: Chain three stitches. Work one double crochet into the same stitch. Chain two stitches, skip two stitches, then work one double crochet into the next stitch. Repeat around. Join with a slip stitch.
Round two: Slip stitch into the first chain space. Chain three stitches. Work two double crochet stitches into the same space. Chain two stitches, then work three double crochet stitches into the next chain space. Repeat around.
Creating the scalloped edge
Chain one stitch. In each chain space, work one single crochet, chain three stitches, then work one single crochet again into the same space. This forms a small scallop.
Adding beads
Sew a bead to the tip of each scallop using strong thread. Secure firmly.
5. The Lavender Picot Fringe Anklet

Overview and design concept
The Lavender Picot Fringe Anklet is a soft, romantic design that highlights texture rather than heavy decoration. It is built as a smooth crochet band finished with a decorative picot fringe that gently moves with every step. The lavender color enhances the delicate appearance, making this anklet ideal for everyday wear, spring styling, or pairing with open footwear.
Skill level
Beginner to intermediate. The stitches themselves are simple, but even spacing and consistent tension are important for a polished result.
Finished size
Approximately 8.5 to 9 inches in length, adjustable through ties or button closure.
Materials
Lightweight acrylic or cotton blend yarn in lavender purple
Crochet hook sized appropriately for the yarn, usually between 3.0 and 3.5 millimeters
Yarn needle
Scissors
Optional button or clasp
Construction notes
The anklet is worked in rows as a solid band and then finished with a picot fringe edging along one side. The picots are worked directly into the edge stitches, creating a decorative yet flexible finish.
Step by step instructions
Creating the main band
Begin by making a foundation chain long enough to comfortably wrap around the ankle without stretching. This usually requires between forty and forty-five chain stitches. Take care to keep the chain loose and even.
Row one: Work one single crochet stitch into the second chain from the hook. Continue working one single crochet stitch into each chain across the row. Turn your work.
Row two: Chain one stitch to begin the row. Work one half double crochet stitch into each stitch across the row. Turn.
Row three: Chain one stitch. Work one single crochet stitch into each stitch across. Turn.
Repeat rows two and three until the band measures approximately three quarters of an inch in width. This creates a stable yet soft fabric that sits comfortably against the skin.
Fasten off only after completing the fringe edge, unless you are planning to add ties.
Creating the picot fringe edge
Attach yarn to one corner of the long edge of the band. Work one single crochet stitch into the first edge stitch. Chain three stitches, then slip stitch into the first chain to form a picot loop. Work one single crochet into the next edge stitch.
Repeat this sequence along the entire edge of the band. Keep the picots evenly spaced so the fringe hangs uniformly.
Closure options
For a tie closure, attach yarn to each short end of the band and work a chain of thirty stitches. Fasten off securely. For a button closure, sew a small button to one end and create a chain loop on the opposite end.
Variations and tips
You can lengthen the picot loops for a bolder fringe or keep them short for a subtle finish. Using a slightly fuzzy yarn enhances the softness of this design.
6. The Dainty White Daisy String

Overview and design concept
The Dainty White Daisy String Anklet is a minimalist floral design that wraps lightly around the ankle. It features miniature daisy motifs spaced along a thin crochet string and is designed to be wrapped twice around the ankle for a layered look. This anklet is elegant, understated, and perfect for those who prefer delicate accessories.
Skill level
Intermediate. This pattern involves very small motifs and fine yarn work.
Finished size
Approximately 18 to 20 inches total length to allow for double wrapping and tying.
Materials
Fine cotton yarn in white and yellow
Small crochet hook, approximately 2.0 millimeters
Yarn needle
Scissors
Step by step instructions
Creating the base string
Begin by chaining a long foundation chain of approximately one hundred stitches. This chain forms both the structure and flexibility of the anklet.
Work one slip stitch into each chain across to reinforce the string and prevent stretching.
Creating the miniature daisies
Attach white yarn at the desired placement point along the string. Form an adjustable loop. Work eight single crochet stitches into the loop. Close the loop tightly and join with a slip stitch.
To create petals, chain three stitches, work one double crochet stitch into the same stitch, chain three stitches again, then slip stitch into the next stitch. Repeat this around the circle to create small petals.
Attach yellow yarn to the center and add tiny straight stitches to suggest the flower center. Fasten off neatly.
Repeat the daisy motif at regular intervals along the string.
Finishing and tying
Once all daisies are attached, weave in all ends carefully. Wrap the anklet twice around the ankle and tie securely with a small bow.
Variations
You may space the daisies farther apart for a simpler look or cluster them closer for a more decorative style.
7. The Rainbow Variegated Band Anklet

Overview and design concept
The Rainbow Variegated Band Anklet is a bold, cheerful design that showcases vibrant multicolored yarn. The thick band structure highlights uniform stitches and includes a small bronze charm for a playful finishing touch. This anklet works well as a statement accessory and is especially appealing for casual summer outfits.
Skill level
Beginner. The focus is on maintaining consistent stitch tension.
Finished size
Approximately 9 inches, adjustable.
Materials
Variegated rainbow yarn in pink, blue, yellow, and green tones
Crochet hook 3.5 to 4.0 millimeters
Small bronze charm
Sewing thread and needle
Yarn needle
Scissors
Step by step instructions
Creating the band
Chain a foundation length that fits comfortably around the ankle. Join with a slip stitch to form a ring.
Round one: Chain one stitch. Work one single crochet stitch into each chain around. Join with a slip stitch.
Round two: Chain one stitch. Work one half double crochet stitch into each stitch around. Join.
Repeat round two until the band reaches approximately one inch in width.
Adding the charm
Using sewing thread, securely stitch the bronze charm to the center front of the anklet. Reinforce the attachment so it withstands movement.
Variations
You may substitute the charm with a bead or omit it entirely for a simpler look.
Conclusion
The 7 Crochet Anklet Patterns presented in this guide demonstrate how versatile and expressive small crochet projects can be. From floral motifs and beach-inspired textures to minimalist strings and bold color bands, each design offers a unique opportunity to explore stitch work, embellishment, and personal style.
By following these detailed, step by step tutorials, you can confidently create handmade anklets that are both beautiful and durable. Whether you are crafting for yourself, preparing gifts, or developing items for sale, these crochet anklet patterns provide a strong foundation for creativity and skill building. With thoughtful finishing and careful attention to detail, each anklet becomes a wearable expression of craftsmanship and care.


