
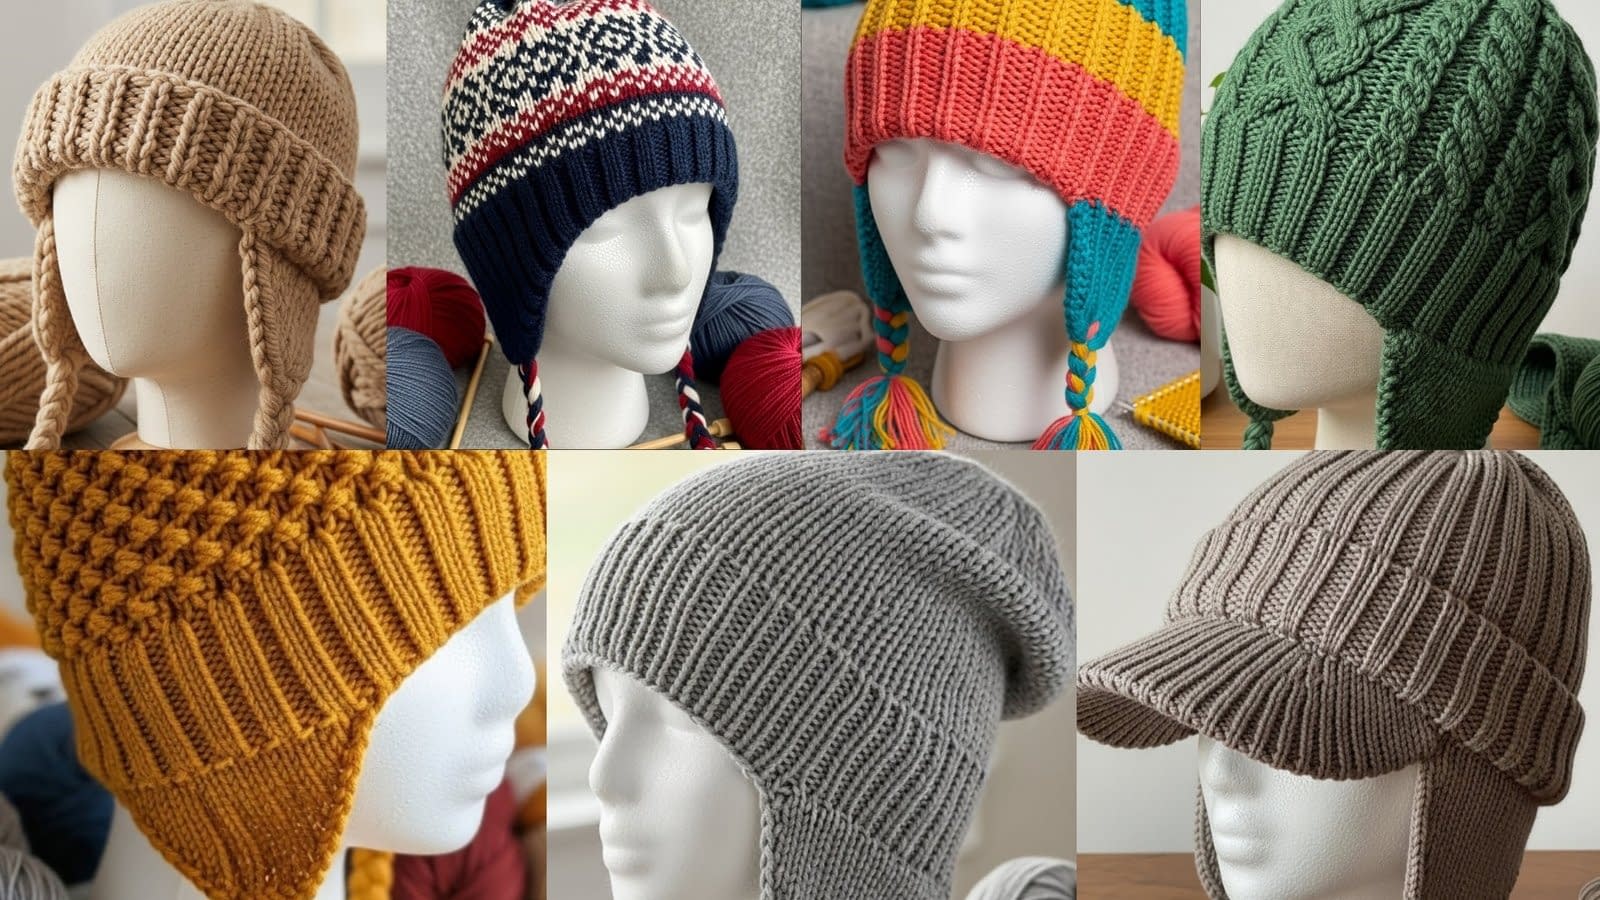
Knit earflap hats are a timeless winter accessory, offering warmth, comfort, and a touch of personality. Whether you are crafting for yourself, a family member, or as a handmade gift, earflap hats combine functionality with style, making them ideal for chilly days. The unique design, which extends down to cover the ears, ensures maximum protection from cold winds, while the decorative earflaps can be adorned with tassels, braids, or other creative finishes.
In this post, we present seven comprehensive knit earflap hat patterns, each with detailed instructions suitable for beginners, intermediate, and advanced knitters. Every pattern is explained with precise stitch instructions, measurements, materials, tips, and potential variations, ensuring you can follow along easily and produce professional-looking hats. By the end of this guide, you will have multiple designs at your fingertips, each customizable to your preference.
1. Classic Chunky Knit Earflap Hat
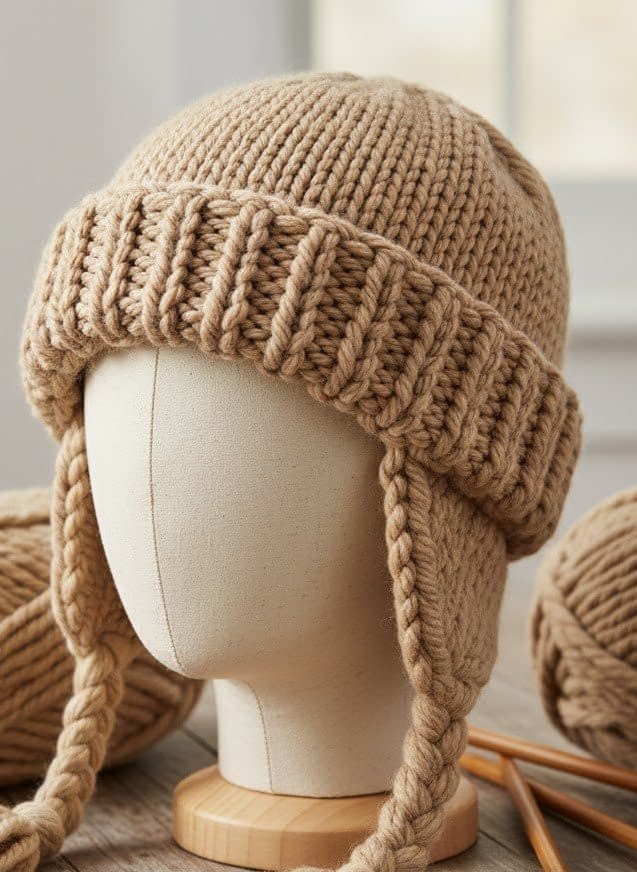
Skill level: Beginner–intermediate
Finished size: Adjustable; average adult size approximately 20 inches in circumference and 8 inches in height.
Materials
- Super bulky (#6) yarn, approximately 200 yards
- Knitting needles: US size 11 (8 mm) circular or straight needles
- Cable needle (optional for decorative twists)
- Tapestry needle for weaving in ends
- Scissors
- Stitch markers
Instructions
Hat Body
- Cast on 64 stitches using a long-tail cast-on method, ensuring the edge is firm but flexible.
- Join in the round carefully, ensuring the stitches are not twisted. Place a stitch marker at the beginning of the round.
- Work in a knit 1, purl 1 ribbing for 2 inches to create a snug brim.
- Transition into stockinette stitch (knit every round) and continue knitting until the body measures approximately 6 inches from the cast-on edge.
Shaping the Crown
- Begin decreasing for the crown as follows:
- Round 1: Knit 6, knit 2 together around.
- Round 2: Knit all stitches.
- Round 3: Knit 5, knit 2 together around.
- Round 4: Knit all stitches.
- Continue in this manner, decreasing the number of stitches between decreases by one each decrease round until 8 stitches remain.
- Cut the yarn, leaving a 12-inch tail, and thread it through the remaining stitches using a tapestry needle. Pull tight and secure.
Earflaps
- Pick up 16 stitches on one side of the hat where you want the first earflap.
- Knit in stockinette stitch for 5 inches.
- Begin decreasing at the edges for a triangular shape: Knit 2 together at the beginning and end of each row until 2 stitches remain.
- Bind off the remaining stitches and weave in the ends.
- Repeat for the second earflap on the opposite side.
Finishing Touches
- Add tassels or braids to the ends of the earflaps if desired.
- Weave in all loose ends.
- Block the hat gently to even out the stitches and improve the overall shape.
Tip: Using bulky yarn ensures warmth and reduces knitting time while maintaining structure.
2. Fair Isle Patterned Earflap Hat
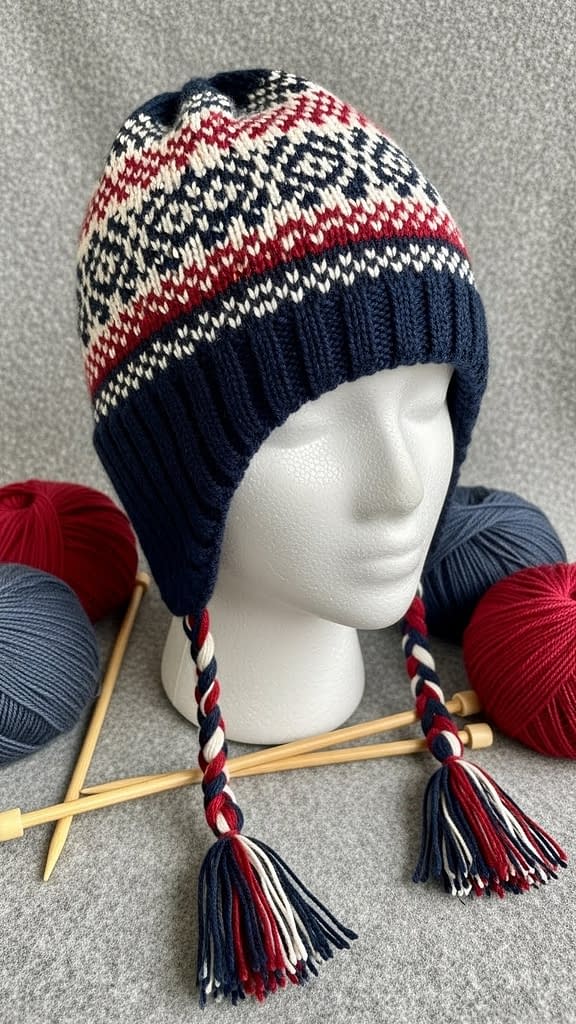
Skill level: Intermediate
Finished size: Fits most adults; circumference approximately 20 inches, height 8 inches
Materials
- Worsted weight (#4) yarn in two or three contrasting colors
- US size 8 (5 mm) circular needles
- Double-pointed needles (for crown shaping)
- Tapestry needle
- Stitch markers
Instructions
Hat Body
- Cast on 96 stitches using a stretchy cast-on technique and join in the round.
- Work 2 inches of ribbing (k2, p2) for the brim.
- Begin the Fair Isle pattern according to the chart: alternate colors to create geometric or Nordic motifs. Maintain a loose tension to avoid puckering.
- Continue knitting until the hat measures 6 inches from the cast-on edge.
Crown Shaping
- Switch to stockinette stitch if desired for the final 2 inches to prepare for decreases.
- Decrease using knit 8, knit 2 together around.
- Knit one round, then knit 7, knit 2 together, and continue decreasing in this manner until 12 stitches remain.
- Thread the yarn through remaining stitches and pull tight to close.
Earflaps
- Pick up 20 stitches for each earflap.
- Work 5 inches in stockinette stitch.
- Decrease at edges by knitting 2 together at the beginning and end of each row until 2 stitches remain.
- Bind off and weave in ends.
Finishing
- Add braided cords or pom-poms to the earflaps for extra decoration.
- Ensure the color transitions in the Fair Isle pattern are even and tidy.
Tip: Carry the unused yarn loosely across the back to prevent puckering.
3. Slouchy Knit Earflap Hat
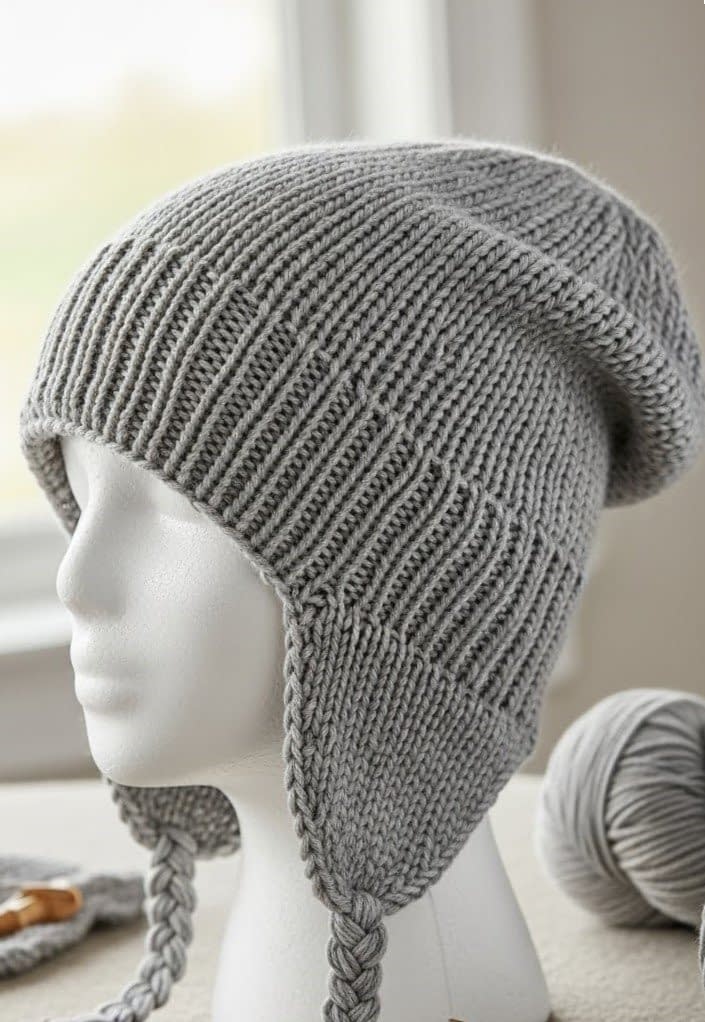
Skill level: Intermediate
Finished size: Fits most adults; circumference approximately 22 inches, height 10 inches
Materials
- Light bulky yarn (#5), approximately 250 yards
- US size 10 (6 mm) circular knitting needles (16-inch cable)
- Double-pointed needles (for crown shaping)
- Stitch markers
- Tapestry needle
- Scissors
Instructions
Hat Body
- Using a long-tail cast-on method, cast on 72 stitches. Make sure your cast-on edge is firm but flexible, as it will form the base of the ribbed brim.
- Join in the round carefully, ensuring the stitches are not twisted. Place a stitch marker at the beginning of the round.
- Work 3 inches in k2, p2 ribbing to create a slightly folded, elastic brim. This helps the hat stay snug on the head.
- Switch to stockinette stitch by knitting every round. Knit until the hat body measures 8 inches from the cast-on edge.
Crown Shaping
- Begin the crown decreases for the slouchy effect:
- Round 1: Knit 8, knit 2 together around.
- Round 2: Knit all stitches.
- Round 3: Knit 7, knit 2 together around.
- Round 4: Knit all stitches.
- Continue decreasing in this manner, reducing the number of stitches between decreases by one each decrease round until 10 stitches remain.
- Cut the yarn, leaving a 12-inch tail. Thread it through the remaining stitches and pull tight to close the top.
Earflaps
- Decide the placement of the earflaps on either side of the hat. Pick up 18 stitches for the first earflap.
- Work in stockinette stitch for 6 inches.
- Begin shaping the triangle by decreasing one stitch at the beginning and end of every other row until only two stitches remain.
- Bind off and repeat for the second earflap.
Finishing Touches
- Create braided ties for each earflap using leftover yarn. Cut three equal lengths, braid, and secure with a knot.
- Weave in all ends carefully to prevent unraveling.
- Lightly block the hat to even out the stitches, especially for the slouchy effect.
Tip: Adjust the length of the slouch by knitting more or fewer rounds before starting crown decreases. You can also add a pom-pom for extra personality.
4. Cable Knit Earflap Hat
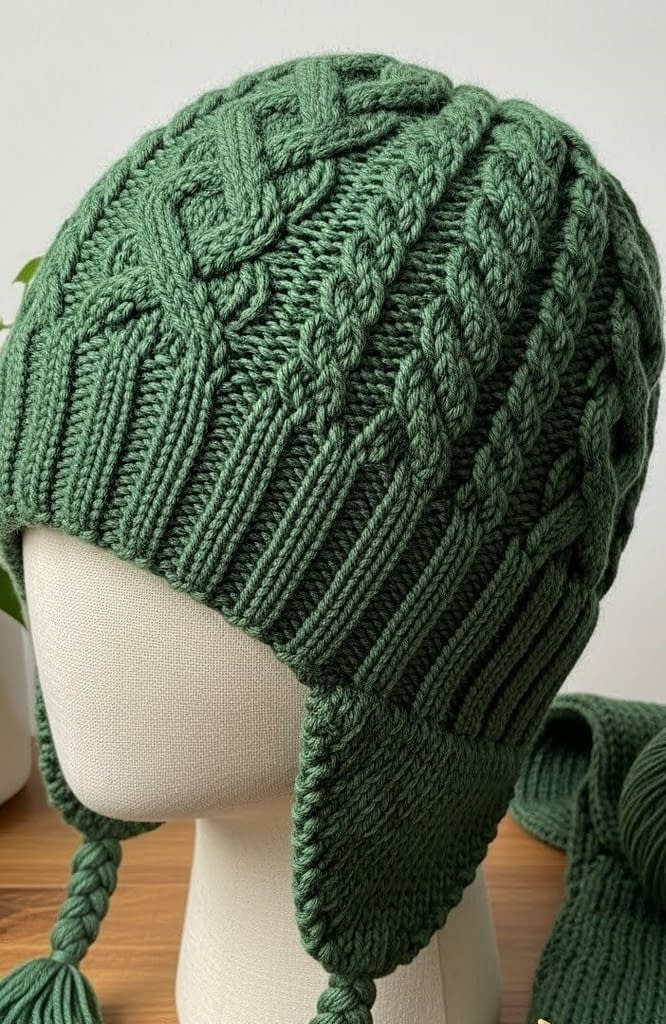
Skill level: Intermediate–advanced
Finished size: Approximately 21 inches circumference, height 8 inches
Materials
- Worsted weight yarn (#4), approximately 220 yards
- US size 7 (4.5 mm) circular needles
- Cable needle
- Stitch markers
- Tapestry needle
Instructions
Hat Body
- Cast on 80 stitches using a stretchy cast-on method. Join in the round and place a stitch marker at the beginning.
- Work 2 inches in k2, p2 ribbing for a snug brim.
- Follow the cable chart provided below: twist 6 stitches every 6 rows to create a braided effect. Maintain consistent tension to avoid uneven cables.
Cable Chart Explanation
- Round 1: Knit 6, purl 2 around.
- Round 2: Knit 6, purl 2 around.
- Round 3: Slip 3 stitches to cable needle and hold in front, knit 3 from left needle, then knit 3 from cable needle; purl 2 around.
- Repeat rounds 1–3 until the hat body measures 6 inches from the cast-on edge.
Crown Shaping
- Begin decreasing for the crown while maintaining cable alignment:
- Round 1: Knit 2 together at the center of each cable, knit 2 around.
- Round 2: Knit all stitches.
- Continue decreasing in this manner until 12 stitches remain.
- Thread the yarn through the remaining stitches and pull tightly to close the crown.
Earflaps
- Pick up 18 stitches on one side for the first earflap.
- Work 5 inches in stockinette stitch.
- Shape the triangle by decreasing 1 stitch at the beginning and end of every other row until 2 stitches remain.
- Bind off and repeat for the second earflap.
Finishing
- Add braided ties with tassels or small pom-poms at the ends.
- Weave in all loose ends and block the hat gently to enhance the cable pattern.
Tip: Blocking is especially important for cables as it defines twists and gives a professional finish.
5. Textured Seed Stitch Earflap Hat

Skill level: Beginner–intermediate
Finished size: 20 inches circumference, 8 inches height
Materials
- Worsted weight yarn (#4), approximately 200 yards
- US size 8 (5 mm) circular needles
- Stitch markers
- Tapestry needle
Instructions
Hat Body
- Cast on 80 stitches and join in the round. Place a stitch marker at the beginning.
- Work 2 inches in k1, p1 ribbing for a stretchy brim.
- Switch to seed stitch: alternate knit and purl stitches in each round so that no two same stitches touch. For example, Round 1: Knit 1, purl 1 repeat; Round 2: Purl 1, knit 1 repeat.
- Continue until the hat measures 6 inches from the cast-on edge.
Crown Shaping
- Begin decreases while maintaining the seed stitch pattern.
- Round 1: Knit 6, knit 2 together around.
- Round 2: Continue seed stitch pattern without decreasing.
- Round 3: Knit 5, knit 2 together around.
- Repeat until 10 stitches remain.
- Thread yarn through remaining stitches and pull tight to close the top.
Earflaps
- Pick up 16 stitches on each side for earflaps.
- Work 5 inches in seed stitch.
- Shape the triangle by decreasing 1 stitch at each edge every other row until 2 stitches remain.
- Bind off and create braided ties or tassels at the ends.
Tip: Seed stitch gives a cozy, squishy texture that is excellent for warmth and visual interest.
6. Double Brim Knit Earflap Hat
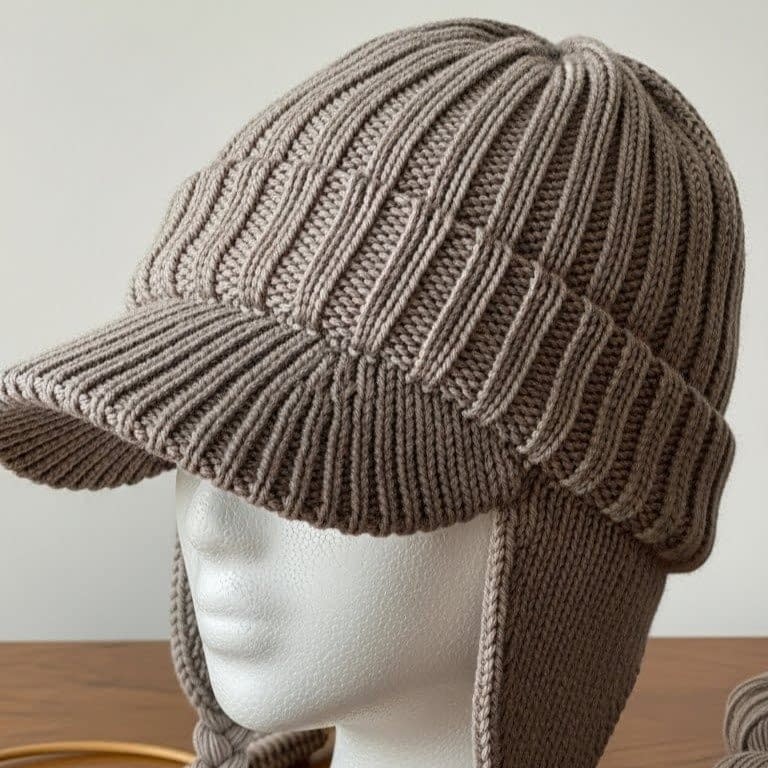
Skill level: Intermediate
Finished size: 21 inches circumference, 9 inches height
Materials
- Worsted weight yarn (#4), approximately 220 yards
- US size 7 (4.5 mm) circular needles
- Stitch markers
- Tapestry needle
Instructions
Hat Body
- Cast on 88 stitches, join in the round, and place a stitch marker at the beginning.
- Knit 4 inches of ribbing (k2, p2) to form the first brim. Fold the brim up inside the hat to create a double-layered edge for extra warmth.
- Continue knitting in stockinette stitch until the hat measures 5 inches from the cast-on edge.
Crown Shaping
- Begin crown decreases for shaping:
- Round 1: Knit 8, knit 2 together around.
- Round 2: Knit all stitches.
- Round 3: Knit 7, knit 2 together around.
- Continue until 12 stitches remain. Thread yarn through the remaining stitches and pull tightly to close.
Earflaps
- Pick up 20 stitches for each earflap.
- Work 6 inches in stockinette stitch.
- Decrease 1 stitch at each edge every other row to form a triangular shape.
- Bind off and add braided ties or tassels.
Tip: A double brim provides additional warmth around the ears and forehead, ideal for very cold climates.
7. Color Block Knit Earflap Hat
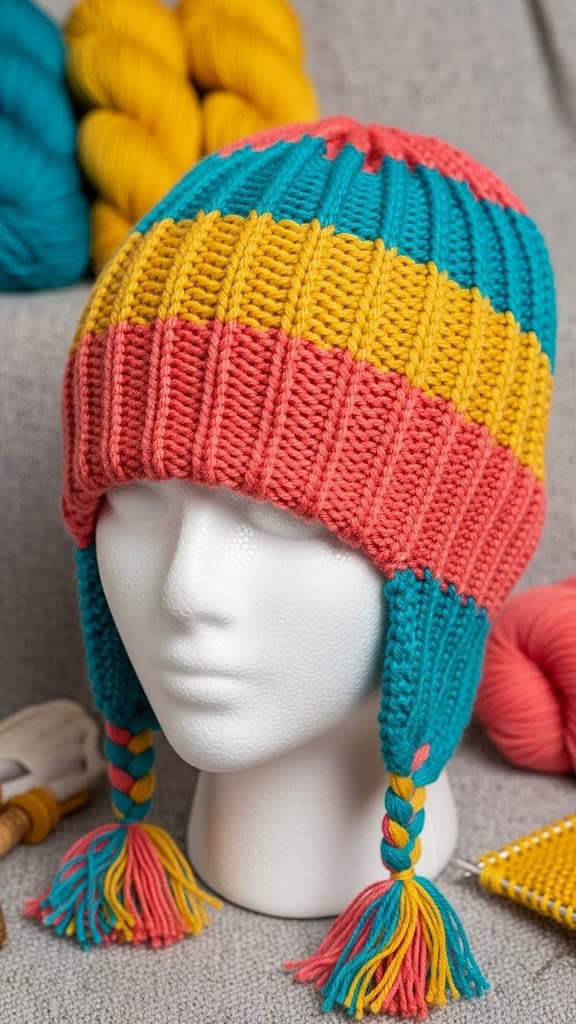
Skill level: Beginner–intermediate
Finished size: 20 inches circumference, 8 inches height
Materials
- Worsted weight yarn in three contrasting colors, approximately 200 yards total
- US size 8 (5 mm) circular needles
- Stitch markers
- Tapestry needle
Instructions
Hat Body
- Cast on 80 stitches and join in the round, placing a stitch marker at the beginning.
- Work 2 inches in ribbing using the first color.
- Switch colors every 2 inches to create horizontal color blocks. Carry yarn loosely at the back to prevent puckering.
- Continue until the hat body measures 6 inches from the cast-on edge.
Crown Shaping
- Begin decreases while maintaining the color block pattern:
- Round 1: Knit 6, knit 2 together around.
- Round 2: Knit all stitches.
- Continue decreasing until 10 stitches remain. Pull yarn through remaining stitches to close the crown.
Earflaps
- Pick up 16 stitches for each earflap.
- Work 5 inches in stockinette stitch, changing colors as needed to match the body.
- Decrease 1 stitch at each edge every other row until 2 stitches remain. Bind off.
- Finish with braided ties or tassels in matching colors.
Tip: Color blocks allow creative use of leftover yarn, making each hat unique and visually appealing.
Conclusion
Knitting earflap hats is a rewarding craft that combines functionality and style. From classic chunky designs to intricate cable and Fair Isle patterns, each of the seven knit earflap hat patterns presented in this guide offers something unique for knitters of all skill levels. By following these detailed instructions, you can create cozy, customized hats perfect for winter wear or as thoughtful handmade gifts. Experiment with yarn weights, colors, and textures to make each hat your own, and enjoy the satisfaction of wearing or gifting a handmade piece created with care.
Each pattern is versatile, allowing for variations and personalization while following the structured steps ensures a polished final product. Winter warmth and creative expression can now come together beautifully in your knitting projects.


