
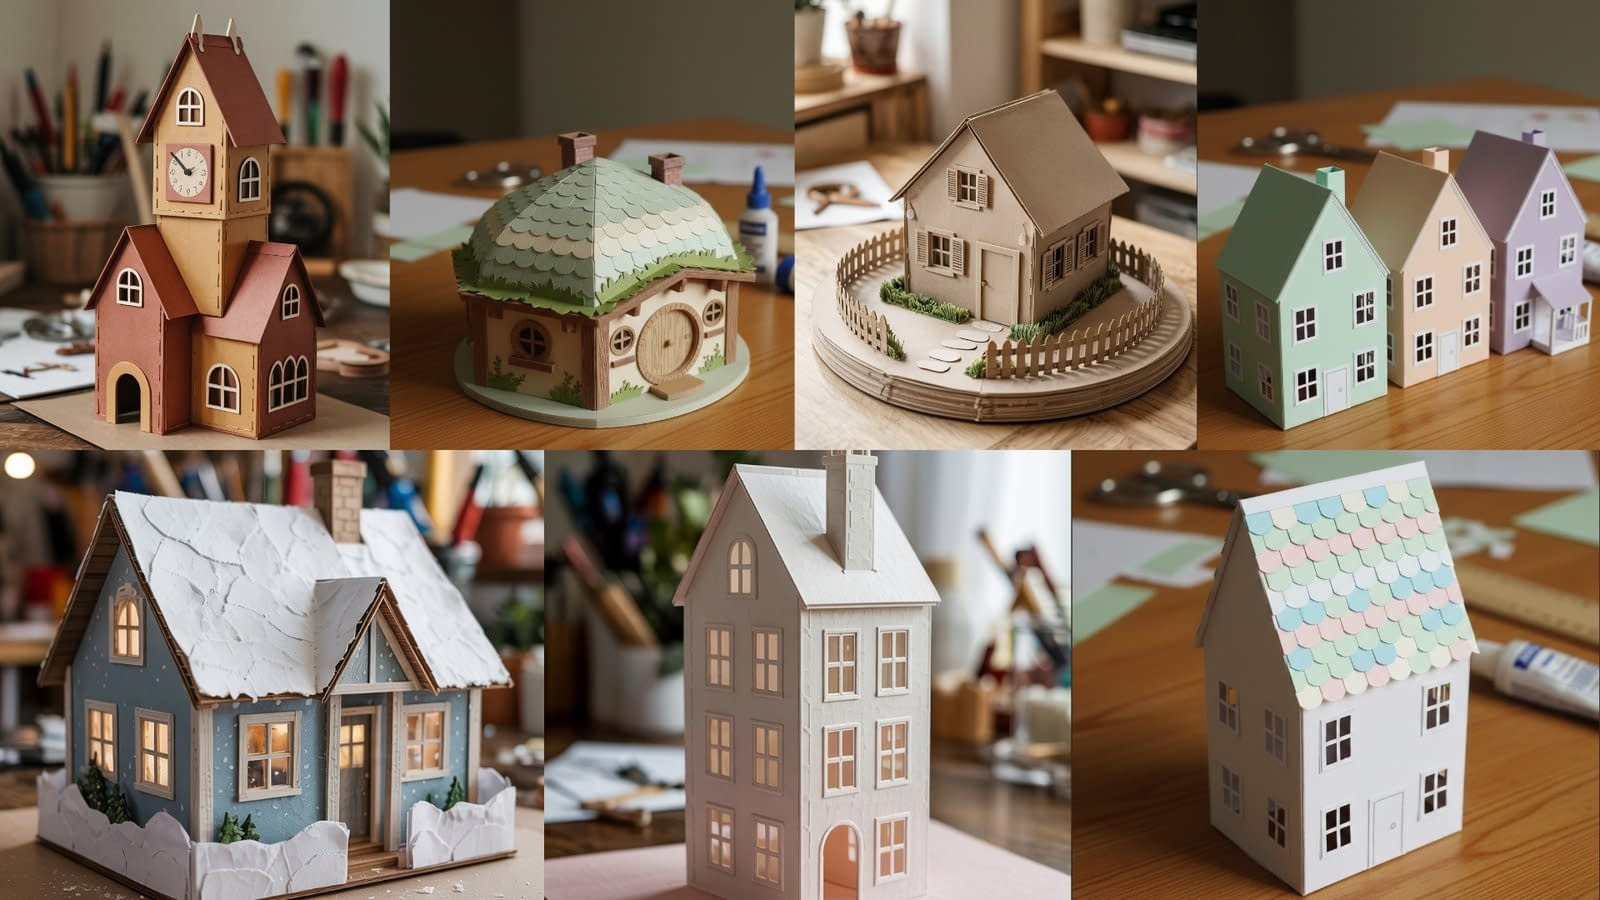
Creating a 3D paper house village is a satisfying blend of precise cutting, careful scoring, and clean assembly. This tutorial walks you through everything — from preparing paper and tools, to exact folding and gluing techniques, to building seven distinct houses that fit together visually as a charming village display. I’ll keep the structure clear: materials, structural basics, and one complete tutorial per house with exhaustive, practical instructions for cutting, scoring, folding, where to apply glue, and how to finish. This is written for crafters who want professional-looking results without guesswork.
Materials You Will Need
Paper recommendations and tools matter more than you might expect. Use heavier paper for walls and lighter weights for decorative layers unless otherwise noted.
Paper
- Cardstock 180–250 gsm for main walls and roofs (recommended: 200 gsm for a balance of stiffness and workability).
- Lightweight cardstock or patterned paper 120–160 gsm for roof coverings, window frames, and decorative layers.
- Plain printer paper (80–100 gsm) for printable templates and test cuts.
Cutting, scoring, and assembly tools
- Precision craft knife (sharp blade) and plenty of replacement blades.
- Cutting mat (self-healing).
- Metal ruler (stainless, at least 30 cm / 12 in).
- Fine-point scissors for small cutouts.
- Bone folder or scoring tool (for crisp folds).
- Scoring board or a ruler + blunt scoring stylus.
- Clear craft glue (liquid with a precision nozzle) and quick-drying tacky glue.
- Double-sided tape (thin) for invisible joins on non-structural parts.
- Tweezers for small pieces.
- Toothpicks for precise glue application.
- Pencil, eraser, and a small square or T-square for right angles.
Optional finishing and display
- Small LED tea lights (battery-operated) for window lighting.
- Artificial snow, flocking, or glitter for winter details.
- Foam board or wood plank as a display base.
- Small faux trees, moss, or miniature props.
Practical measurements and notes
- Tabs: standard tab width = 6–8 mm (1⁄4 inch) unless otherwise specified. Wider tabs for heavier cardstocks.
- Roof overhang: 4–6 mm (1⁄8–1⁄4 inch) beyond the wall edge for realistic shadow and to hide glue tabs.
- Scoring depth: score gently so you don’t cut through — one firm pass with the bone folder after initial scoring will make crisp folds.
Understanding the Basic Structure of 3D Paper Houses
Before you cut templates, understand the recurring elements.
Basic components
- Wall panel layout: usually a single strip that includes front, side, back, side panels in sequence with tabs.
- Roof panel(s): separate pieces that sit on top — single ridge roof, double ridge, or shaped roofs.
- Tabs: small extensions used to glue walls together and to secure roofs. Keep tabs consistent in width across the project.
- Decorative layers: window frames, shutters, chimneys, porches — these are cut from thinner paper and glued on top.
Cutting and scoring best practices
- Always score fold lines before folding. For cardstock above 200 gsm, make a light pass first, then a firmer pass.
- Use the metal ruler as a guide for both cutting and scoring. For cutting, press the blade in a single controlled pass rather than multiple sawing strokes.
- For long straight internal cuts (like windows), use an L-shaped or square fence to keep the blade from slipping.
Gluing tips
- Use thin, even lines of glue on tabs. Too much glue will warp paper and cause seepage.
- For small details, apply glue with a toothpick or a precision applicator.
- Hold glued areas together for 10–20 seconds; use a clothespin or binder clip (with scrap paper to protect surfaces) for bigger joints until set.
Finishing touches
- Sand small edges lightly with fine-grit sanding stick to remove burrs from cutting if needed.
- Use double-sided tape for non-structural layers where visible glue seam is a concern.
- Add LED lights behind windows by cutting a small hole in the back wall and tucking the light inside.
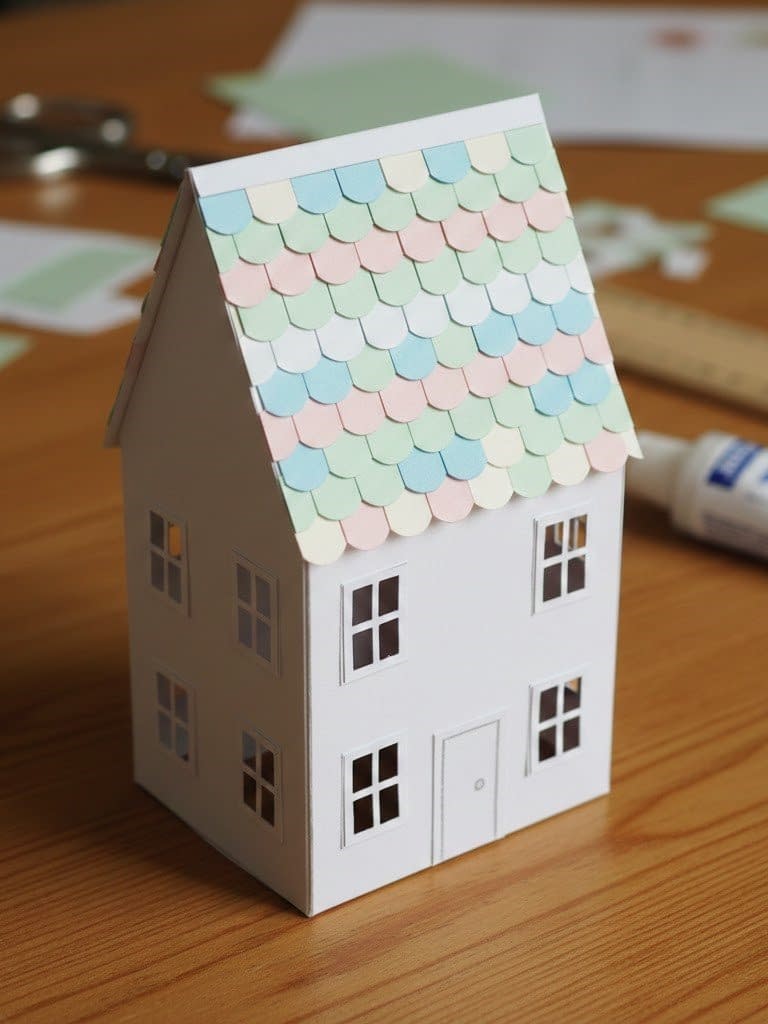
Classic Gabled-Roof Paper House
Overview
This is a simple, elegant gabled-roof house: rectangular body, central pitched roof, symmetrical windows. It’s the backbone piece in many villages.
Cutting the wall template
- Layout: On cardstock, draw four vertical panels in sequence: front, right side, back, left side. Each panel should have the same width. Recommended proportion: panel width = 1 unit, height = 1.3–1.5 units (taller houses look nicer).
- Add a glue tab (6–8 mm) to the right edge of the left-most panel or one side edge—this will hide inside when glued.
- Add roof tab flaps across the top: 8–10 mm wide, scored along the join line. These tabs fold inward and accept the roof.
- Windows and door: mark window rectangles on the front and side panels. Cut window openings with a craft knife; keep the knife at a slight downward angle for clean corners. For arched door top, draw a semicircle and cut carefully.
Scoring and folding
- Score vertical lines between panels and along each roof tab fold line. Use a bone folder for crisp edges.
- Fold tabs inward toward the house interior. For the front and back panels, fold so their exterior faces are outward and tabs are hidden inside.
Assembling the walls
- Apply a thin line of craft glue to the glue tab. Align the opposite panel’s edge and press for 15–20 seconds. Use a binder clip with scrap paper to secure while drying.
- Ensure the base sits flat — if one corner lifts, slightly adjust by sanding the tab edge.
Roof construction
- Cut a roof piece sized to the house width plus 8–12 mm for overhang. For a symmetrical pitch, cut a rectangle whose length equals house width × 2 (for both slopes), and the width equals roof rise + overlap. Score down the center to create the peak.
- Optionally, add shingles: draw parallel horizontal guide lines and small staggered vertical cuts; or glue thin strips of paper to simulate layered shingles.
Attaching the roof
- Apply glue to the roof tabs on top of the walls. Position the roof, aligning the center score with the center of the house. Hold in place until secure. Add small interior tabs glued to the underside of the roof for extra hold.
Finishing details
- Chimney: folded rectangular tube (tab glue) glued to one roof slope; seal with a dab of glue at each seam.
- Window frames: cut thin strips of patterned paper (3–4 mm) and glue around window openings. Use tweezers for precise placement.
Tall Narrow Townhouse With Layered Windows

Overview
A vertical, slim townhouse with stacked windows, layered trims, and a narrow roof. This house adds vertical interest to the village.
Cutting the template
- Proportions: width = 1 unit, height = 2–2.5 units (tall). Panels: front, side, back, side; add a 6 mm glue tab.
- Draw multiple window rows. For each window, plan a frame layer (thin 3–4 mm strip) cut separately. Mark window openings before removing the full template.
- Roof tab: 8 mm tabs along the top; if adding a small cornice, include a 10 mm outward-facing fold line above the top windows.
Scoring and folding
- Score vertical seams and the decorative cornice fold line. For tall pieces, score twice to ensure crisp vertical edges.
- Fold panels inward, keeping the front panel flat and true.
Assembly
- Glue the side tab carefully and press; for tall units use two binder clips set vertically to keep edges aligned.
- Reinforce the inside bottom with a narrow strip of cardstock glued across the floor seam for stability.
Window layering
- Cut window frames from lighter patterned paper. Apply thin glue along frame edges and place on outside surface, flush with the window opening. This gives depth.
- For layered sills: glue a 4–5 mm strip below each window and a thin header above.
Roof and chimney
- Cut a narrow rectangle for the roof, score center for pitch. For added detail, add a slim parapet or a tiny balcony by gluing a folded strip beneath a second-floor window.
Finishing
- Balcony railing: cut thin repeated slits or glue thin strips across two posts.
- Lighting effect: cut a small hole in the back wall center and tuck a tiny LED behind the second-floor window.
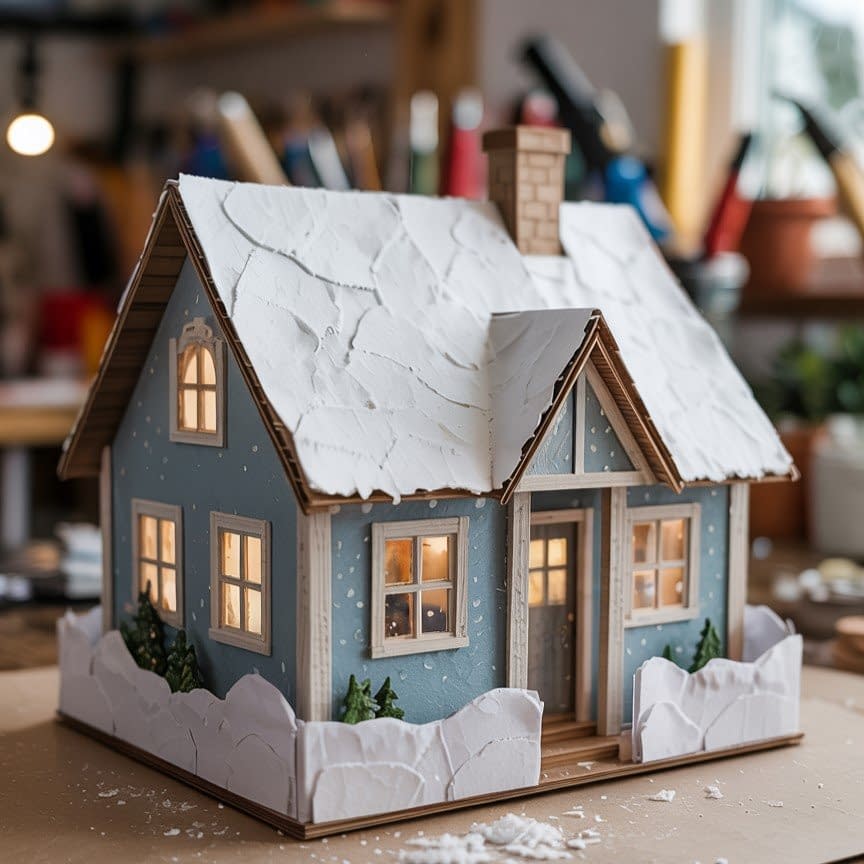
Winter Cottage With Snowy Roof
Overview
A cozy low-slung cottage with textured “snow” on the roof and frosted window detail. Slightly wider proportions and decorative trims give a wintery feel.
Cutting the template
- Proportions: width = 1.4 units, height = 1.0 unit (wider, squat). Draw the wall sequence and add tabs.
- Pre-cut windows and a central door. For the porch, include a narrow rectangular porch roof tab at the front that will fold out.
Scoring and folding
- Score and fold vertical panels. Score porch roof tabs separately and fold outward to create an overhang.
Assembly
- Glue the side tab and press. Attach the porch by applying glue to the porch roof tab and aligning with the front wall fold; hold until set.
Snow roof creation
- Build a single roof with an overhang (6–8 mm). For “snow,” cut irregular-edged strips of white lightweight cardstock or textured paper and layer them across the roof slopes from bottom to top, slightly overlapping like natural snow banks. Glue each strip with a thin line along its inner edge so the outer rim of the “snow” stays slightly lifted for dimension.
- To add sparkle, dab a tiny amount of translucent glitter glue along the snow edges once dry.
Window frost and details
- For frosted windows, use vellum: cut window interior panels from vellum and glue to the inner face of the wall so light diffuses softly. Add window muntins (thin strips) on top of the vellum.
- Add a tiny wreath or snow pile at the door base by gluing a little cotton tuft with a dot of glue.
Finishing
- Place artificial snow around the base of the cottage on your display board and secure with tacky glue.
Multi-House Paper Village Row

Overview
A connected row of three (or more) small houses attached side-by-side on a single base. This creates a street-like visual that’s great for centerpieces.
Layout and planning
- Decide the number of houses and their widths so the row fits on one base board. For three houses, plan widths like 1.0 / 0.9 / 1.1 units for visual variety.
- Each house will have its own roof style but share a single continuous base.
Cutting the templates
- For each house, draw its wall panels separately but plan their adjacent join edges without tabs on the touching sides. Instead, use internal overlap tabs: a 8 mm tab on one house that glues behind the adjacent house’s front face for a seamless join.
- Cut individual roofs sized to each house.
Scoring and folding
- Score each house’s vertical lines and fold. For connecting edges, pre-crease the overlap tab so it sits flat behind the neighboring wall.
Assembly
- Build each house individually, then glue them together on the base: place the first house, apply glue to its side overlap tab, and press the second house onto it. Repeat for the third.
- For extra rigidity, glue a narrow strip of cardstock along the interior seam where houses meet.
Roofing and continuity
- Make roofs either continuous (one long roof across multiple houses) or individual. A continuous roof requires precise measurement and a long center score. A staggered roof height gives a charming, varied streetscape.
Finishing
- Create a sidewalk by cutting a long strip of light gray cardstock and adding scored lines to imitate slabs. Glue along the front of the row.
Circle-Base 3D Paper House With Garden Fence

Overview
A single house mounted on a circular base with a tiny paper fence and garden area — perfect as a focal tabletop piece.
Base preparation
- Cut a circular base from 2-layered cardstock (double 200 gsm glued together) to give weight. Typical diameter: 12–20 cm depending on house scale. Score a center guide if needed.
House design and cutting
- The house can be any small cottage shape (square or rectangular). Build the walls with 6–8 mm tabs for gluing into the base. Instead of a flat glued bottom, glue the house’s inside tabs to a recessed ring on the base so the house sits slightly inset.
Scoring and folding
- Score wall panels and base mounting tabs. For inset mounting, cut a circular ring from the base center equal to the house footprint; glue the house tabs to the ring’s inner face.
Garden fence and path
- Fence: cut thin strips (3–4 mm) and glue perpendicular posts at regular intervals. Connect posts with horizontal rails. For a picket fence, cut small triangles at the top of each post. Glue the fence around the base perimeter with tiny tabs.
- Path: cut a narrow strip of textured paper or draw stone shapes on paper and glue from the door to the base edge.
Finishing
- Add tiny paper shrub clumps (small rolled paper flowers) and use green-colored paper to simulate grass. Secure everything with small dabs of glue.
Tall Clock-Tower Village House

Overview
A vertical tower with a clock face near the top and strong architectural presence—this becomes a focal landmark.
Cutting the template
- Proportions: tower width = 1 unit, height = 2.5–3 units. Draw four narrow panels and a small roof platform. Include 6–8 mm tabs.
- Cut a circular hole or window near the top for a clock face or glue a round paper clock on the exterior.
Scoring and folding
- Score and fold slowly; for tall towers, score twice along vertical seams to avoid splitting.
Assembly
- Glue the side tab and use vertical binder clips while drying to ensure true corners. Reinforce the interior with a narrow vertical stiffener glued along one inside seam if needed.
Clock face and roof
- Clock: cut a small circle (suggested diameter = 12–18 mm for small models), print or draw numerals, and glue centered in the top window. For depth, glue a thin backing disc inside and a tiny clock hand assembly made from layered paper.
- Roof: cut a steep pyramid or pointed cone. For a four-sided spire, cut a square with radial score lines and fold upward into a pyramid, gluing edges to form the spire.
Finishing
- Add tiny ledges and bands made from thin strips for architectural detail. Paint or ink edges of the clock hands for contrast.
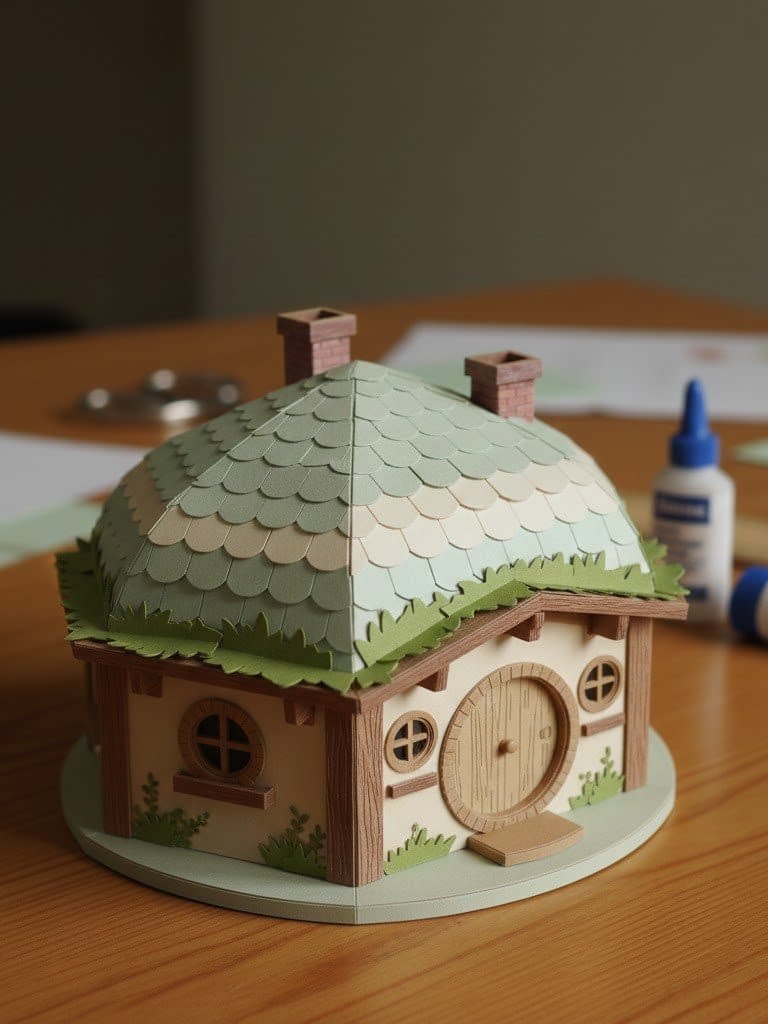
Round Hobbit-Style Paper House With Arched Door
Overview
A whimsical circular house with curved walls, round windows, and a prominent arched door. This design uses curved cutting and careful tab placement.
Cutting the curved walls
- Create a curved wall strip: draw an arc whose length equals the circumference of your intended house footprint. Divide into panels (e.g., 6–8 panels) with vertical seams and 6–8 mm tabs. Each panel will be slightly trapezoidal to form the circle.
- For small round houses, use 6 panels; for larger, use 8–10 panels to reduce panel bowing.
Scoring and folding
- Score vertical seams and fold tabs inward. Curve each panel slightly before gluing to reduce stress on joints.
Assembly
- Apply glue to a tab and bring the next panel in until the circle is closed. For stability, glue the final seam then add an internal ring (a narrow strip glued inside at the base) to hold panels upright.
Roof construction
- For a conical roof, cut a sector of cardstock with radius equal to roof slope. Trim precisely so the arc length matches the house circumference. Score along radial lines to create small tabs and glue into a cone. Fit over the circular top and glue inner tabs.
- For a layered turf roof look, glue concentric rings of textured paper or torn paper strips, overlapping inward.
Door and round windows
- Cut a prominent arched door from a separate piece; score vertical hinges and glue only the hinge tab to the wall so the door can open slightly. Add a tiny handle made from a paper coil.
- Windows: cut round openings and glue thin window frames around them. For depth, add interior shutters or mullions.
Finishing
- Add faux moss (green paper scraps) around the base. A small pebble path (tiny paper ovals) leading to the door finishes the fairy-tale look.
Displaying Your Paper House Village
Base layout
- Use white foam board or a painted wood plank as your base. Arrange tall structures (townhouse, clock tower) at the back and shorter homes (cottage, A-frame) toward the front for depth. Leave space for paths or lighting.
Lighting
- Place LED tea lights behind window cutouts — run wiring discreetly beneath the base if lights are wired. For battery LEDs, tuck a small battery pack under a house base and secure with double-sided tape.
Seasonal themes
- Winter: add artificial snow, glitter dust, and cotton for smoke coming from chimneys.
- Spring: pastel house colors, paper flowers, and small leafy trees.
- Minimalist: neutral cardstocks, clean lines, and no extra props.
Transport and storage
- For transport, glue each house onto removable mounting disks (Velcro dots) so you can pack them separately and reassemble.
Tips for Professional-Level Results
Precision cutting
- Change blades often — a dull blade tears edges.
- Use a fresh cutting mat and a metal ruler for straight cuts. Clamp ruler to prevent slipping.
Glue cleanliness
- Use a toothpick for precise glue placement. Wipe excess glue immediately with a damp cloth.
- For visible joins use double-sided tape and reserve glue for structural points.
Durable folds
- Score thoroughly, then fold with the bone folder. For thick cardstock, score on both sides lightly then fold.
Edge finishing
- Ink or distress the edges of white paper with a light gray marker to hide paper whiteness and give depth.
- For a painted look, dry-brush acrylic on textured roofs and door trims.
Practice and templates
- Make a single test house at a smaller scale to refine measurements before cutting final materials. Save templates for future use.
Conclusion
This complete 7 3D Paper House Village Tutorial gives you the tools, techniques, and step-by-step instructions to craft seven distinct houses that form a cohesive village display. From the Classic Gabled-Roof Paper House to the whimsical Round Hobbit-Style House, each tutorial explains exactly how to cut, score, fold, glue, and finish the piece so you can achieve professional-level results. Take your time, follow the scoring and tab-width guidelines, and refine your technique on a practice template — the patience pays off in crisp edges, stable joins, and beautiful miniature architecture.


