Spring is a season of renewal, fresh starts, and, most importantly, blooming flowers. As the grey days of winter fade away, many of us feel the urge to bring light and color back into our living spaces. One of the most charming and versatile ways to do this is by creating handmade decor. This blog post explores 6 Spring Crochet Flower Garland Patterns that are perfect for adding a touch of whimsy and nature to your windows, mantels, or nurseries.
Crocheting a garland is a uniquely satisfying project. Unlike a large blanket or a fitted garment, garlands are composed of small, manageable motifs. This means you can work on a single flower or leaf in a spare five minutes, making it the ideal project for busy crafters. Furthermore, these patterns offer endless opportunities for customization. By simply changing your yarn colors from pastels to vibrant brights, or by adjusting the length of your connecting chains, you can tailor these decorations to fit any room in your house perfectly.
Whether you are looking for a vertical curtain of blooms to hang in a sunny window or a horizontal swag of large, intricate blossoms to drape across a fireplace, this guide has something for you. We have broken down each pattern into incredibly detailed, step-by-step instructions. We avoid using confusing abbreviations, opting instead for full terminology to ensure that even absolute beginners can follow along with confidence. Grab your hook and yarn, and let us start bringing the beauty of spring indoors.
1. The Rustic Boho Vertical Flower Curtain
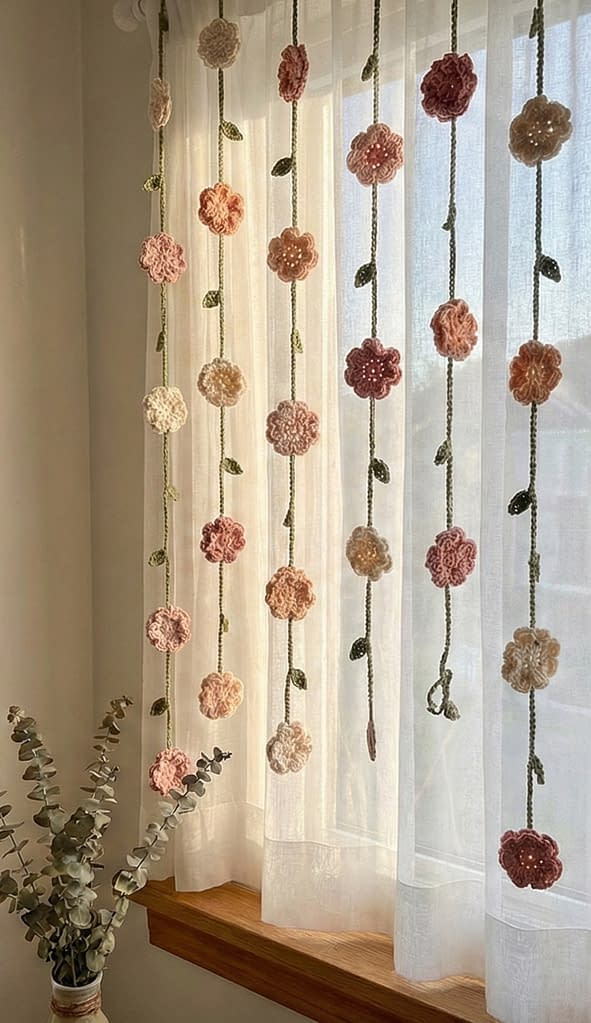
This first pattern is inspired by the delicate, airy aesthetic of vertical wall hangings. Based on the visual of the cream and dusty pink flowers suspended on long green vines, this project is perfect for creating a “living wall” effect without the maintenance of real plants. The flowers are flat and simple, allowing them to lay clearly against a wall or window pane. The construction involves creating individual flower motifs and then attaching them to long, vertical chains interspersed with small leaves.
Skill Level
Beginner to Intermediate
Materials
- Yarn: Worsted weight cotton yarn is recommended for this project because it provides good stitch definition and sturdy structure. You will need a sage green for the stems and leaves, and various earthy tones like cream, dusty rose, and terracotta for the flowers.
- Crochet Hook: A 4.0 millimeter hook is suitable for worsted weight yarn.
- Tools: A yarn needle for weaving in ends and a sharp pair of scissors.
Notes
This project is constructed by making all the flower heads first. Once your flowers are complete, you will crochet long vertical chains (the vines) and attach the flowers and leaves as you go. This prevents the need for excessive sewing at the end. The tension should be consistent so the flowers hang flat and do not curl.
Instructions
Flower Motif
Make as many flowers as you wish for your garland. A standard strand might have five to seven flowers.
Center Ring Start by making a slip knot and placing it on your hook. Create a foundation chain of four stitches. Insert your hook into the first chain stitch you made and perform a slip stitch to join them into a circle.
Round 1 Chain one stitch to rise (this does not count as a stitch). Work ten single crochet stitches into the center of the ring. To do a single crochet, insert your hook into the center of the ring, yarn over, pull up a loop, yarn over again, and pull through both loops on the hook. Once you have ten stitches, join the round by slip stitching into the first single crochet.
Round 2 (Petals) Chain two stitches. In the same stitch where you joined, work four double crochet stitches. To do a double crochet, yarn over, insert hook, pull up a loop, yarn over, pull through first two loops, yarn over, pull through remaining two loops. After your four double crochet stitches, chain two stitches again and slip stitch into the same base stitch. This completes your first petal. Slip stitch into the next stitch of the previous round to move to the new position. Repeat the petal sequence: Chain two, work four double crochet stitches into the same stitch, chain two, and slip stitch into the same stitch. Repeat this process around the circle until you have five distinct petals. You will likely use every other stitch from the base round to space them out, or work them into adjacent stitches for a tighter flower. Fasten off the yarn and weave in the ends on the back of the flower.
Assembly and Vine Construction
You will now create the vertical vine and attach the flowers.
Starting the Vine With your green yarn, make a slip knot and place it on the hook. Chain twenty stitches. This creates the top loop and the first section of the stem.
Adding a Leaf To create a small leaf directly on the chain: Chain four more stitches. Slip stitch into the second chain from the hook. Work a single crochet into the next chain. Work a half double crochet into the last chain. This forms a small leaf shape. Continue chaining for the main stem for another ten to fifteen stitches, depending on how far apart you want your elements.
Attaching a Flower Hold one of your completed flower motifs with the right side facing you. Insert your hook into the top of a petal on the flower (specifically into the top of a double crochet stitch). Perform a slip stitch through the flower petal to secure it to your working green yarn. Immediately continue chaining ten to fifteen stitches to create the space between the flower and the next leaf.
Continuing the Strand Repeat the process of adding a leaf (chain four, work stitches back down the chain) and attaching flowers (slip stitching into the top of a petal) until your strand reaches the desired length. Finish the strand by chaining ten stitches and fastening off. Weave in any remaining ends. Repeat this entire assembly process to create multiple vertical strands to hang side by side.
2. The Multicolored Puff Stitch Spring Vine
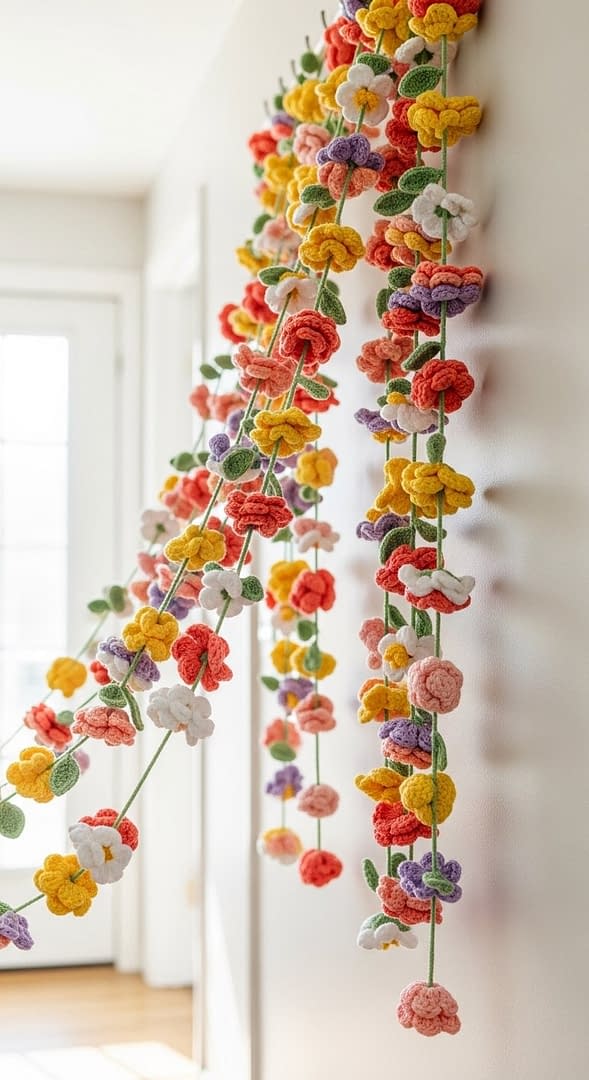
This pattern replicates the playful and vibrant look of the garland featuring small, puffy flowers in yellow, purple, pink, and white. These flowers have a three-dimensional texture, often referred to as a “puff” or “popcorn” look, which makes them pop against the green vine. This garland is constructed vertically as separate strands, similar to the first pattern, but the leaves are paired, and the flowers are more spherical.
Skill Level
Intermediate (requires comfort with tension and puff stitches)
Materials
- Yarn: Light worsted or DK weight yarn works best here to keep the puff flowers from becoming too heavy. You need a bright green for the vine and a variety of pastel spring colors (lemon yellow, lavender, baby pink, white) for the flowers.
- Crochet Hook: A 3.5 millimeter or 4.0 millimeter hook.
- Tools: Yarn needle and scissors.
Notes
The “Puff Stitch” used here creates the thick, soft petals. It is essential to keep your loops loose when pulling up yarn for the puff stitch, or it will be very difficult to pull your hook through all the loops at the end.
Instructions
Puff Flower Motif
Make these individually in various colors.
Center Ring With your flower colored yarn, make a magic ring (also known as a magic circle). Alternatively, chain four and join with a slip stitch to form a ring.
Round 1 (Puff Petals) Chain two stitches. Step 1: Yarn over, insert hook into the ring, and pull up a long loop (height of a double crochet). Step 2: Yarn over, insert hook into the ring, and pull up another long loop. Step 3: Yarn over, insert hook into the ring, and pull up a third long loop. You should now have seven loops on your hook. Step 4: Yarn over and carefully pull through all seven loops on the hook. Step 5: Chain two stitches to lock the puff and create space. This completes one puff petal. Repeat steps 1 through 5 four more times into the ring. You should have a total of five puff petals. Join the round by slip stitching into the top of the first puff stitch. Fasten off and pull the magic ring tight to close the center hole. Weave in the ends.
Vine Construction with Paired Leaves
This vine features leaves that appear in pairs or singly along the chain.
Main Chain With green yarn, make a slip knot and chain fifteen stitches.
Making Paired Leaves Leaf 1: Chain five stitches. Slip stitch in the second chain from the hook. Single crochet in the next chain. Half double crochet in the next chain. Double crochet in the last chain. You are now back at the main chain. Leaf 2: Do not continue the main chain yet. Instead, chain five stitches again extending from the same point. Slip stitch in the second chain from hook, single crochet in the next, half double crochet in the next, and double crochet in the last. Slip stitch back into the original main chain stitch to anchor both leaves. This creates two leaves sprouting from one point.
Attaching the Flower Chain ten stitches. Pick up a puff flower. Insert your hook through one of the chain-two spaces between the petals of the flower. Yarn over with the green yarn and pull through to create a slip stitch, securing the flower to the chain. To make sure the flower hangs straight, you can slip stitch into the opposite side of the flower petal space as well, or just let it dangle freely from one point.
Continuing the Pattern Chain ten stitches. Create another set of leaves (single or paired). Chain ten stitches. Attach another puff flower. Continue this sequence until the vine is complete. Fasten off and weave in ends.
3. The Grand Layered Peony Swag
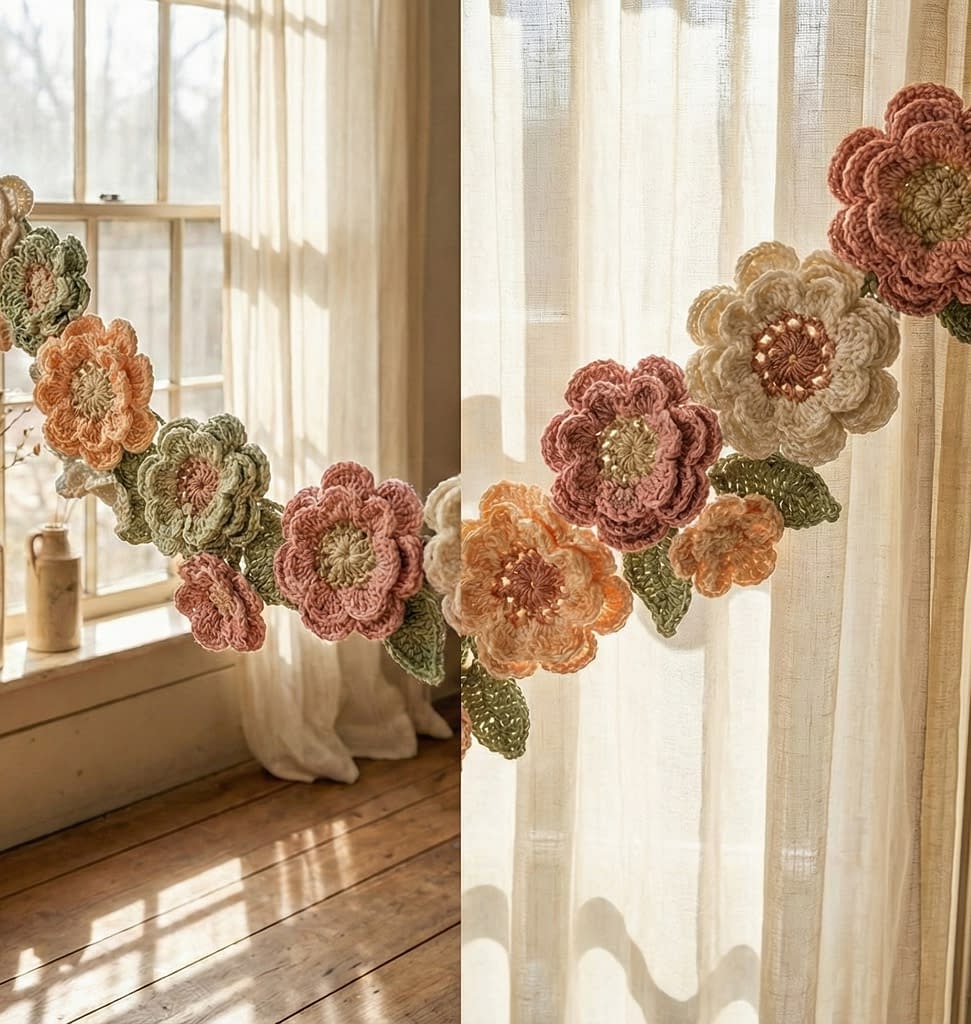
Based on the image of the large, beige and pink flowers draped horizontally, this pattern is for a “bunting” or “swag” style garland. These flowers are significantly larger than the previous ones and feature multiple layers of petals, resembling peonies or wild roses. They are connected side-by-side rather than hanging vertically. This adds a vintage, romantic feel to a room.
Skill Level
Intermediate
Materials
- Yarn: Worsted weight yarn in vintage shades like oatmeal, dusty pink, antique rose, and sage green.
- Crochet Hook: A 4.5 millimeter or 5.0 millimeter hook to give the petals a relaxed drape.
- Tools: Yarn needle and scissors.
Notes
The layered effect is achieved by working in the “front loops” and “back loops” of the stitches. You will create the first layer of petals, and then work behind them to create a foundation for the second, larger layer of petals.
Instructions
Large Layered Flower
Center With yellow or a contrasting center color, create a magic ring. Round 1: Chain one. Work twelve single crochet stitches into the ring. Join with a slip stitch to the first single crochet. Fasten off the center color if you wish to change colors for the petals, or continue with the same color.
Round 2 (Back Loop Foundation) Join your petal color (e.g., pink) to any stitch. Working only in the front loops of the previous round: Chain three (counts as a double crochet), work two double crochet stitches in the same front loop. Work three double crochet stitches in the next front loop. Repeat this pattern (three double crochets in each front loop) around. Join with a slip stitch. This creates a ruffled inner center. Note: If this is too ruffly for your taste, do two double crochets per stitch instead.
Round 3 (Establishing the Outer Layer) Now you need to work into the exposed back loops of Round 1 (the center circle) that you left behind. Join your yarn to a back loop of Round 1 behind the ruffles. Chain one. Single crochet in the same spot. Chain three, skip one back loop, single crochet in the next back loop. Repeat from * to * around. You are creating a series of chain-loops behind the first layer of petals. Join with a slip stitch to the first single crochet. You should have six chain-loops.
Round 4 (Outer Petals) Work into the chain-three loops you just created in Round 3. In the first chain loop space, work the following combination: One single crochet, one half double crochet, five double crochet stitches, one half double crochet, one single crochet. This forms a large, rounded petal. Move to the next chain-three loop and repeat the exact same sequence. Continue around until all six loops are filled with petals. Join with a slip stitch and fasten off.
Leaves
Make large separate leaves to sew between the flowers. Chain ten. Single crochet in second chain from hook. Half double crochet in next. Double crochet in next five chains. Half double crochet in next. Single crochet in last chain. Chain two, and work down the other side of the foundation chain to mirror the stitches: Single crochet, half double crochet, five double crochets, half double crochet, single crochet. Join with a slip stitch. Fasten off, leaving a tail for sewing.
Assembly
This garland is assembled horizontally. Cut a long piece of yarn or crochet a thick foundation cord (a chain of 150+ stitches). Using a yarn needle, sew the flowers onto the cord by stitching through the back of the center rounds. Sew the leaves onto the cord in between the flowers, angling them so they poke out nicely. Space the flowers so they are slightly touching or overlapping to create a lush, full swag look.
4. The Classic White Daisy Window Garland
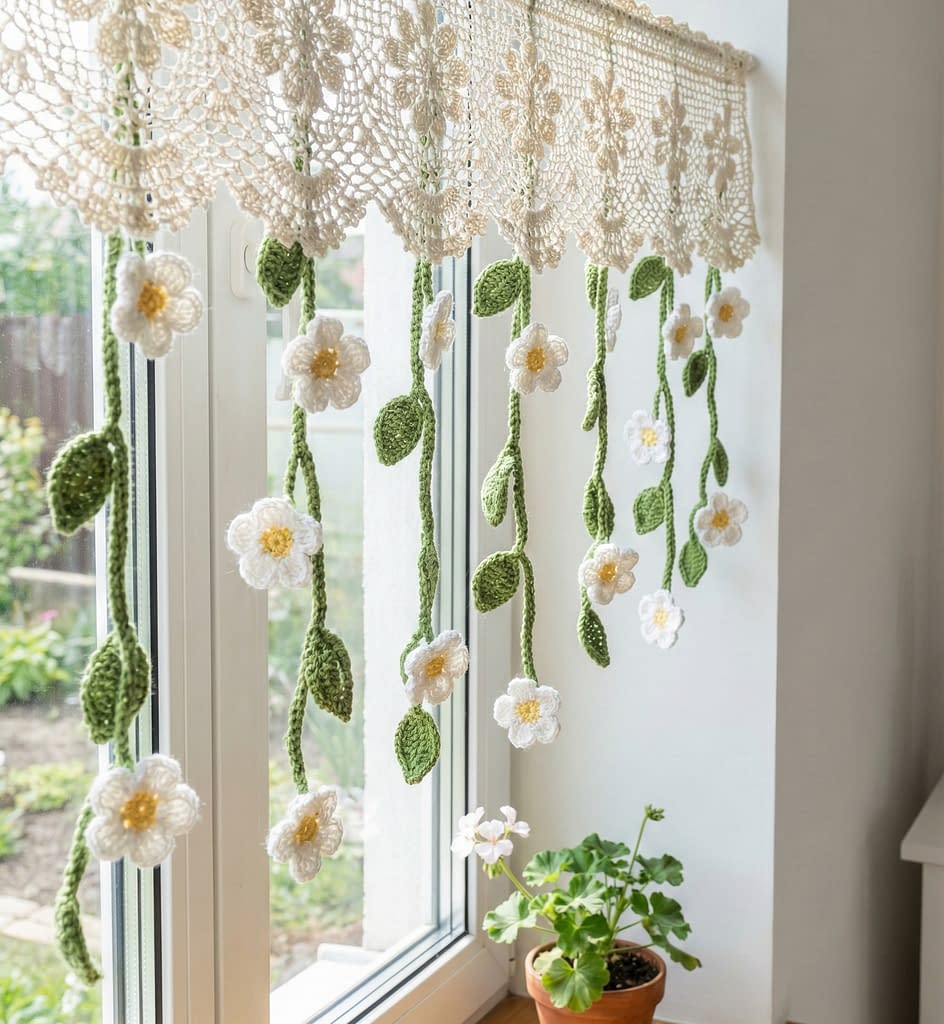
This pattern captures the pristine beauty of the white daisies seen in the bottom-left visual. Unlike the delicate, thin vines of the previous patterns, this design features sturdier, thicker green stems that hold their shape well, making them perfect for framing a window or hanging vertically as a structured curtain. The bright white petals with sunny yellow centers offer a crisp, clean look that screams springtime freshness.
Skill Level
Beginner
Materials
- Yarn: Worsted weight acrylic or cotton yarn. You will need a bright, clean white for the petals, a sunshine yellow for the flower centers, and a forest green for the stems and leaves.
- Crochet Hook: A 4.0 millimeter or 4.5 millimeter hook.
- Tools: Yarn needle, scissors, and optionally a small amount of fabric stiffener if you want the stems to stand perfectly straight.
Notes
The stems in this pattern are made slightly thicker than a standard chain to give them the visual weight seen in the image. We achieve this by working slip stitches back along the chain. The flowers are made separately and sewn on, allowing you to position them exactly where you want them to face.
Instructions
The Daisy Motif
Make approximately ten to twelve daisies for a standard window length.
Center Disk With your yellow yarn, start with a magic ring. Round 1: Chain one stitch. Work six single crochet stitches into the center of the magic ring. Pull the tail tight to close the hole. Join the round by slip stitching into the first single crochet stitch. Fasten off the yellow yarn and leave a small tail to weave in later.
Petals Join your white yarn to any stitch on the yellow center disk. Round 2: Step 1: Chain three stitches. Step 2: Work two treble crochet stitches into the same stitch where you joined. To do a treble crochet, yarn over your hook twice, insert the hook into the stitch, yarn over and pull up a loop (four loops on hook). Yarn over and pull through the first two loops. Yarn over and pull through the next two loops. Yarn over and pull through the last two loops. Step 3: Chain three stitches again. Step 4: Slip stitch back into the same base stitch. This completes one petal. Step 5: Slip stitch into the very next stitch on the yellow center. Repeat Steps 1 through 5 around the circle until you have six petals total. Fasten off the white yarn. Weave in all ends securely on the back of the flower.
The Thick Stem and Leaves
This part creates the vertical green vine.
Main Stem Foundation With your green yarn, make a slip knot and chain one hundred stitches (or as long as you need for your window height). To thicken the stem: Turn your work and slip stitch into the back hump of each chain stitch all the way back to the beginning. This creates a cord-like stem that is sturdier than a single chain.
Adding Leaves You can crochet leaves separately and sew them on, or crochet them directly off the stem. For the look in the image, separate leaves sewn on often sit better. Leaf Pattern: Chain eight stitches. Single crochet in the second chain from the hook. Half double crochet in the next chain. Double crochet in the next three chains. Half double crochet in the next chain. Single crochet in the last chain. Chain one, turn to work down the other side of the chain. Single crochet in the first stitch. Half double crochet in the next. Double crochet in the next three. Half double crochet in the next. Single crochet in the last. Join with a slip stitch to the first single crochet. Fasten off, leaving a tail for sewing.
Assembly
Lay your green stem flat on a table. Arrange your white daisies at even intervals along the stem. The image shows them spaced about four to six inches apart. Place a leaf near the base of each flower, or alternate them (flower, leaf, flower, leaf). Using your yarn needle and the tail ends of your yarn (or a fresh piece of matching thread), sew the back of each flower firmly onto the stem. Sew the leaves onto the stem, angling them slightly upwards to mimic natural growth. Hang your garland using small clear hooks or by tying the top of the stem to a curtain rod.
5. The Forget-Me-Not Blue and Purple Backdrop
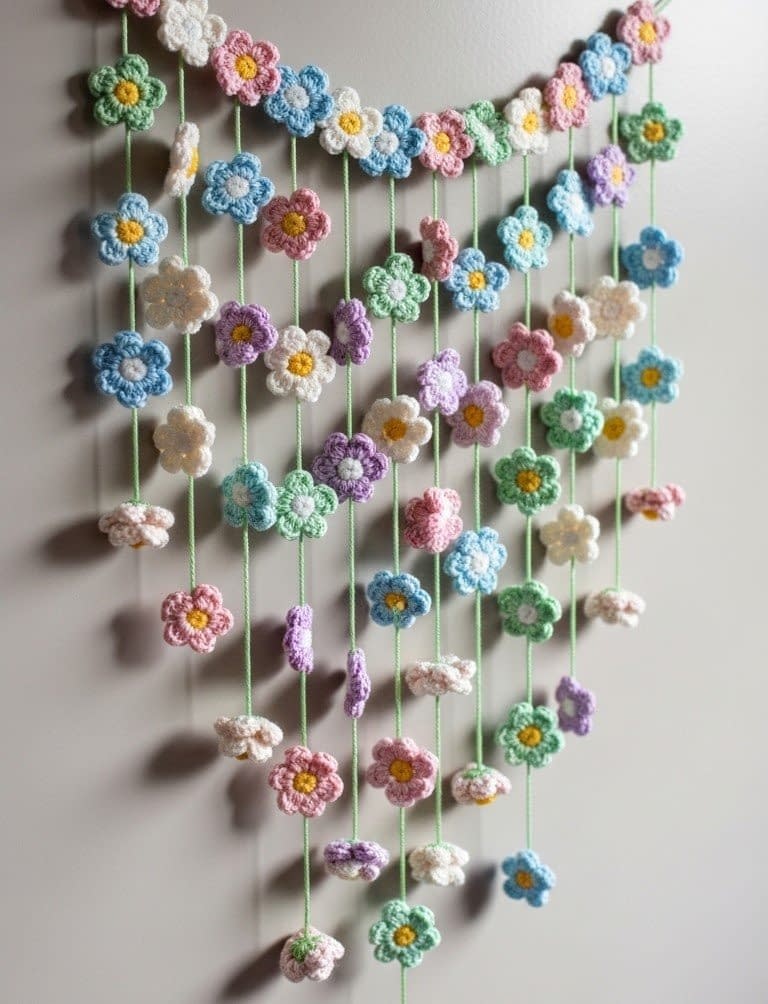
Inspired by the bottom-right visual, this pattern creates a dense, colorful wall of flowers. The aesthetic here is all about volume and color variety—specifically cool tones like blues, purples, lavenders, and whites. These flowers are simple, flat, and five-petaled, designed to hang straight without twisting. This is an excellent project for using up scrap yarn, as each flower uses very little material.
Skill Level
Beginner
Materials
- Yarn: DK or light worsted weight yarn. You need a variety of cool-toned colors: sky blue, navy, lavender, dark purple, and white. You will also need a pale green or sage green for the connecting strings.
- Crochet Hook: A 3.5 millimeter or 3.75 millimeter hook to keep the flowers tight and neat.
- Tools: Yarn needle and scissors.
Notes
This garland is best displayed as a “curtain” with multiple strands hanging side-by-side. The key to the look in the image is the variety of colors mixed randomly. Do not worry about creating a perfect pattern; the random placement looks more natural.
Instructions
Simple 5-Petal Flower
Make a large pile of these flowers in all your different blue and purple shades.
Center Ring With the flower color of your choice (or a contrasting yellow center if preferred), make a magic ring. Round 1: Chain one. Work ten single crochet stitches into the ring. Join with a slip stitch to the first single crochet. Pull the ring tight.
Round 2 (Petals) Step 1: Chain two stitches. Step 2: Work one double crochet stitch into the same stitch. Step 3: Work another double crochet stitch into the same stitch. Step 4: Chain two stitches. Step 5: Slip stitch into the same stitch. This completes one petal. Step 6: Slip stitch into the next stitch of the previous round. Step 7: Repeat the petal sequence (Chain 2, 2 Double Crochet, Chain 2, Slip Stitch) in this next stitch. Step 8: Slip stitch into the next stitch. Repeat this until you have five petals. Note that you will be working into every other stitch of the ten-stitch center ring (using 5 stitches for petals and skipping or slip stitching over the others to space them out). Alternatively, you can work a petal into every second stitch to give them room to lay flat. Fasten off and weave in the ends.
Assembly on a String
This method attaches the flowers to a simple chain string.
The String With your green yarn, chain ten stitches. Attaching a Flower: Insert your hook through the top of a petal on one of your finished flowers (choose a petal that points upwards). Slip stitch through the petal to secure it to your working chain. Spacing: Chain twelve to fifteen stitches. Pick up a different colored flower. Insert hook through the top petal. Slip stitch to join. Continuing: Repeat the “Chain 15, Attach Flower” sequence until the strand is the desired height. Make 5 to 10 of these strands to create the full curtain effect seen in the image. Hang them about three inches apart on your wall or window frame.
6. The Whimsical Wildflower Strand
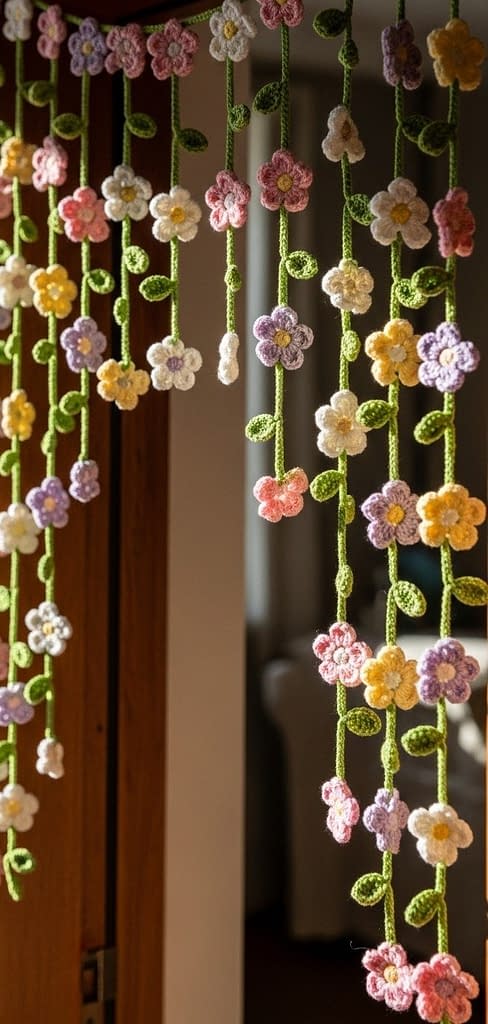
This final pattern draws inspiration from the top-middle visual, which features a cheerful mix of yellow, pink, and white flowers on delicate vines. These flowers appear slightly smaller and more “cupped” or rounded than the flat daisies, giving them a charming, bud-like appearance. The vines in this style are often draped loosely rather than pulled taut, adding to a relaxed, boho-chic vibe.
Skill Level
Beginner to Intermediate
Materials
- Yarn: Sport weight or cotton blend yarn. The slightly thinner yarn gives these flowers a delicate, wildflower appearance. Colors: Lemon yellow, blush pink, cream, and a bright grass green.
- Crochet Hook: A 3.0 millimeter or 3.25 millimeter hook.
- Tools: Yarn needle and scissors.
Notes
To get the slightly “cupped” look described in the visual analysis, we will use half double crochet stitches for the petals, which are shorter and tend to curve slightly more than double crochets. This pattern is worked as one continuous piece—you make the vine and the flowers as you go, which saves on sewing time!
Instructions
Continuous Vine and Flower Method
This method is advanced but very rewarding because you do not have to sew flowers on later.
Starting the Vine With green yarn, chain fifteen stitches.
Switching to Flower Color Stop the green yarn (do not cut it, just drop it or carry it loosely behind). Join your flower color (e.g., pink) into the last chain you made. Making the Flower Center: Chain four stitches with the pink yarn. Slip stitch into the first pink chain to make a small ring. Making the Petals: Round 1: Working into the small pink ring: Chain one, Half Double Crochet, Chain one, Slip Stitch. Repeat this sequence five times into the ring to make five small, cute petals. Finishing the Flower: Slip stitch into the base of the flower to secure it. Fasten off the pink yarn, leaving a small tail to weave in.
Resuming the Vine Pick up your green yarn again. Insert your hook into the green chain stitch right before where you added the flower. Pull up a loop of green yarn. Chain one carefully to bridge the gap behind the flower. Continue chaining fifteen stitches for the vine.
Repeating the Process After fifteen green chains, drop the green loop. Join a new flower color (e.g., yellow) into the last chain. Make the flower (Chain 4 ring, work 5 petal sequences). Fasten off yellow. Pick up green, anchor it, and continue chaining.
Alternative Beginner Assembly If the “join as you go” method is too fiddly with color changes: Simply crochet a very long green chain (the vine). Crochet small flowers separately: Magic ring, (Chain 2, 2 Half Double Crochet, Chain 2, Slip Stitch) x 5 into ring. Use the tail ends of the flowers to tie them directly onto the green chain at even intervals. This is much faster and allows you to slide the flowers up and down the chain to adjust spacing before double-knotting them securely.
Conclusion
Bringing the freshness of spring into your home does not require a green thumb; it just takes a crochet hook and a little bit of creativity. Whether you choose the structured elegance of the White Daisy Window Garland, the vibrant and playful wall of the Forget-Me-Not Backdrop, or the delicate charm of the Whimsical Wildflower Strand, you are creating a piece of decor that will last for years.
These six patterns offer a range of styles from rustic to romantic, ensuring there is a perfect match for your personal taste and interior design. Remember, the beauty of these projects lies in their customization. Feel free to experiment with yarn weights to make giant oversized blooms, or use thread for tiny, intricate garlands. As you work through these stitches, you are not just making loops of yarn; you are crafting a permanent springtime that will brighten your home no matter the weather outside.