
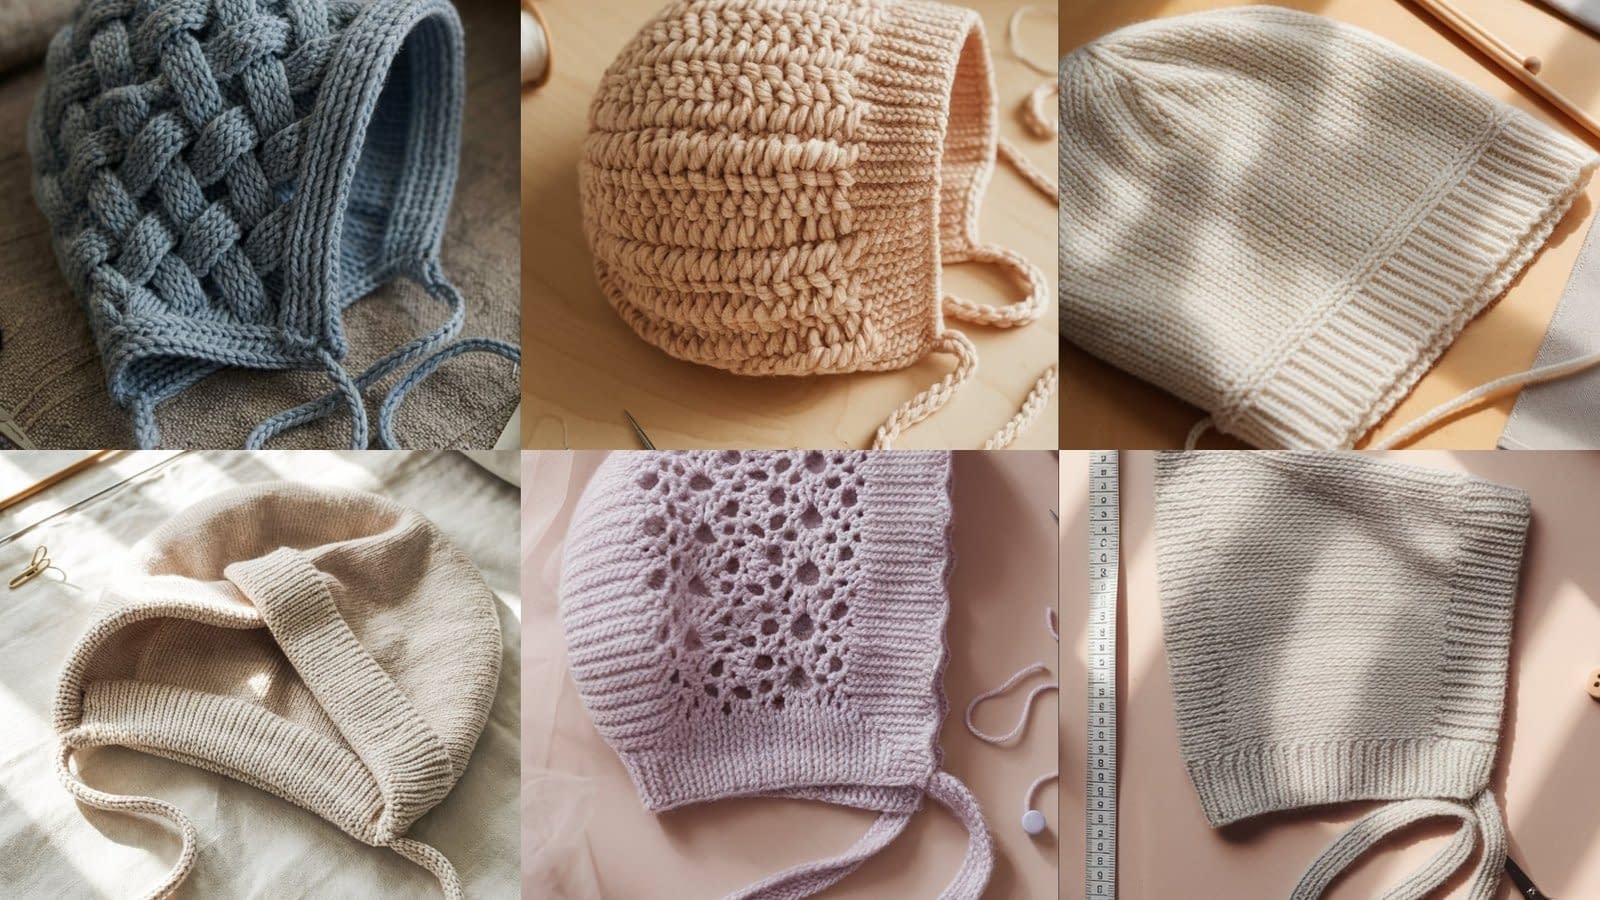
When it comes to knitting for babies, few projects are as charming and practical as a knit baby bonnet. These small, cozy accessories are loved for their timeless look, secure fit, and the heartfelt touch they add to any newborn’s wardrobe. This comprehensive guide explores a 6 knit baby bonnet pattern collection crafted for different styles, seasons, and skill levels. Whether you are creating a bonnet as a heartfelt gift, preparing for a newborn photoshoot, or simply enjoying the craft, this detailed post ensures you can follow each pattern confidently.
Throughout this long-form guide, you will find carefully structured instructions with step-by-step shaping, folding guidelines, seaming techniques, and finishing steps. Each of the 6 knit baby bonnet pattern variations is explained thoroughly without leaving any room for confusion, making this post a thorough resource for beginners and advanced knitters alike.
Understanding the Structure of a Knit Baby Bonnet
Before diving into the 6 knit baby bonnet pattern instructions, understanding the anatomy of a bonnet is essential. The typical baby bonnet consists of three main areas:
- The crown or back panel
- The side panels that curve around the baby’s head
- The front band or brim, often folded or shaped to frame the face
Most bonnet patterns require folding to shape the back curvature or to attach ties, and some require simple cutting templates when creating lining from fabric. In this post, each pattern includes instructions for these construction details so the maker can visualize and execute them accurately.
Essential Tools and Materials for Baby Bonnet Knitting
Before starting any pattern in this 6 knit baby bonnet pattern collection, gather the following tools:
- Soft, baby-safe yarn (superwash merino, cotton, bamboo blend, or acrylic)
- Knitting needles (straight or circular, depending on pattern)
- Stitch markers
- Yarn needle for seaming
- Scissors
- Optional fabric lining (light cotton or fleece)
- Fabric scissors for lining
- Non-toxic fabric glue (optional for lining edges)
- Blocking mat and pins
Using safe, hypoallergenic materials ensures that the finished baby bonnets are gentle and comfortable on delicate skin.
Pattern 1: Classic Garter Stitch Bonnet

This is the simplest design in the 6 knit baby bonnet pattern list. It features a sturdy texture, stretchy fabric, and easy shaping, making it an excellent starter project.
Construction Overview
This bonnet is knit flat as one rectangular piece, later folded, shaped, and seamed to create the rounded back. The front edge is finished with an i-cord or garter edge.
Step 1: Cast On and Begin the Body
Cast on enough stitches to measure the width from one cheek to the other, typically around 60–70 stitches for a newborn size.
Work in garter stitch (knit every row) until the piece measures from the front hairline to the back of the head, usually 5–6 inches.
Step 2: Shaping the Back Panel
Once the rectangle is formed, fold it in half with the cast-on and last row edges aligned.
The folding should create a sharp crease along the center. This crease marks the top of the head.
Using yarn and needle, seam from the fold downward, stopping around halfway. Leave the remaining half unseamed. This creates the curved opening at the neck.
Step 3: Forming the Back Curve
With the unseamed section spread open like a triangle, bring both sides together to form a flat edge.
Seam this edge completely.
This folding-and-seaming technique creates a nicely rounded bonnet shape without complicated decreases.
Step 4: Adding Ties
Pick up stitches along the lower front edges and knit i-cord ties or attach woven cotton ties.
Optional Step: Adding a Lining
If you want to line the bonnet, cut a fabric square the same size as the original knitted rectangle before folding.
Fold the fabric exactly as the knitting was folded and seam it with small stitches.
Insert inside the bonnet and secure lightly with fabric glue along the edges, using only a thin line of glue so the fabric stays flexible.
Pattern 2: Ribbed Edge Bonnet With Lace Back

This bonnet in the 6 knit baby bonnet pattern collection combines structure and elegance. The ribbed front ensures a snug fit, while the lace at the back adds a decorative, airy quality.
Construction Overview
The bonnet is knit flat from front to back, with a ribbed band followed by a lace panel. Afterward, it is folded and seamed.
Step 1: Cast On and Make the Ribbed Band
Cast on 72 stitches.
Work 1×1 rib (knit 1, purl 1) for at least 1.5 inches.
Step 2: Begin Lace Section
Switch to lace pattern, such as a simple eyelet lace (yarn overs and knit-two-together).
Continue until the piece measures 6 inches from the cast-on edge.
Step 3: Folding and Seaming
Fold the piece in half with the ribbed band at the front.
Seam the top edge using mattress stitch.
To shape the crown, bring the lower corners together and seam into a central point.
This method creates a natural dome-like shape ideal for lace patterns.
Step 4: Finish Edges
Pick up stitches along the neckline and knit a few rows of ribbing. This prevents rolling and improves durability.
Optional Lining
Because lace is airy, lining is recommended for winter use.
Cut a rounded triangular fabric piece to fit the back curve, fold gently at the seams, and use small fabric stitches around the perimeter.
Avoid glue on lace, as it may seep through holes.
Pattern 3: Vintage Pixie Bonnet

A pixie-style bonnet is known for its pointed back. This variation from the 6 knit baby bonnet pattern set is formed with minimal shaping but creates an iconic, whimsical look.
Construction Overview
The bonnet is knit as a square or rectangle, then folded vertically and seamed along the back to form the pointed shape.
Step 1: Knitting the Square Body
Cast on 56 stitches.
Knit in stockinette stitch (knit one row, purl one row) until the piece is a perfect square. Measure carefully to ensure the height equals the width.
Blocking can help square the edges accurately.
Step 2: Folding and Creating the Pixie Shape
Fold the square in half vertically (from left edge to right edge). Make sure the fold line is straight and forms the top center.
Seam along the back edge from top to bottom.
This single seam creates the pointed back of the pixie bonnet.
Step 3: Forming the Face Opening
Pick up stitches along the front edges and work 6–8 rows of garter stitch or ribbing.
Choose ribbing if you want a more elastic, snug frame.
Step 4: Adding Ties
Create long i-cord ties or attach ribbon ties.
For extra durability, thread ties through reinforced corner stitches before knotting them.
Pattern 4: Textured Seed Stitch Bonnet With Rounded Crown

This bonnet in the 6 knit baby bonnet pattern group uses increases and decreases to shape the crown while maintaining full texture.
Construction Overview
Knit from the front brim toward the back of the head, then decrease gradually to form a smooth round top.
Step 1: Cast On for Brim
Cast on 70 stitches.
Work 1×1 seed stitch for 1.5 inches.
Step 2: Begin Body and Crown Shaping
Switch to stockinette or continue seed stitch, according to preference.
Start decreasing at even intervals near the crown.
For example, decrease 6 stitches evenly every right-side row until only 8 stitches remain.
Step 3: Finishing the Crown
When 8 stitches remain, cut the yarn and thread tail through all stitches. Pull tight to close.
Fold the bonnet so the side edges align and seam only the straight side sections.
Leave the front and lower edges open.
Step 4: Finishing the Neckline
Pick up stitches along the neckline and knit ribbing for reinforcement.
Optional Step: Add Lining
Because seed stitch is thick, a thin cotton lining prevents overheating.
Cut a curved template matching the inside of the bonnet. Fold around edges and secure using minimal fabric glue only at seams.
Pattern 5: Modern Minimalist Bonnet With Front Folded Brim

This 6 knit baby bonnet pattern variation features a folded double-thick brim for warmth and style. The brim is knit longer than needed, then folded backward and secured.
Construction Overview
This bonnet is knit flat and includes a long rectangular brim that is folded inside and sewn.
Step 1: Cast On for the Long Brim
Cast on 76 stitches.
Work in ribbing for 3–4 inches. This long section will eventually be folded in half.
Step 2: Folding and Securing the Brim
Fold the ribbing toward the inside so that the cast-on edge meets the row where the body knitting begins.
Use small whip stitches to attach the folded brim from the inside.
Make sure to sew evenly to avoid puckering.
Step 3: Knitting the Body
Work in stockinette or a chosen texture for 4–5 inches.
Step 4: Shaping the Back
Decrease 6–8 stitches every other row until only 12 stitches remain.
Cut yarn, pull through stitches, and tighten to close the back.
Step 5: Adding Ties
Pick up stitches at lower corners and knit i-cord ties.
Pattern 6: Cable Knit Bonnet With Panel Shaping

This is the most advanced in the 6 knit baby bonnet pattern series. Cables add thickness, structure, and a sophisticated appearance. This bonnet uses panel shaping to achieve a rounded, sculpted fit.
Construction Overview
The bonnet is knit in three panels: center panel and two side panels. You will knit each piece separately and then seam them together.
Step 1: Knitting the Center Cable Panel
Cast on 24 stitches.
Work a cable pattern, such as a 6-stitch cable flanked by seed stitch borders.
Knit the panel until it measures from the forehead to the nape.
Step 2: Knitting Side Panels
Cast on 16 stitches for each side panel.
Work in stockinette or seed stitch so that the texture complements the cable.
Shape the top of each panel using short rows, which create curvature.
To execute short rows:
- Knit across to the last 4 stitches.
- Turn your work.
- Purl to the last 4 stitches.
- Repeat, leaving 4 more stitches unworked each time.
This creates a slanted edge that will curve around the head.
Step 3: Assembly
Lay the center panel flat.
Align the slanted edge of one side panel to the length of the center panel.
Sew neatly using mattress stitch.
Repeat on the opposite side.
Step 4: Neckline Finishing
Pick up stitches all around the bottom edge and knit ribbing for 1 inch.
Step 5: Adding Ties
Attach ties at the lower corners.
Tips for Perfect Finishing on Any Bonnet
Blocking
Always block finished bonnets to smooth stitches and shape the bonnet before adding ties or lining.
Softening the Yarn
Wash gently with baby-safe wool wash to ensure softness.
Choosing the Right Size
Use measurements for newborn, 0–3 months, 6 months, and 12 months.
Conclusion
This in-depth guide to creating a 6 knit baby bonnet pattern collection ensures that you can confidently produce beautiful, comfortable, and well-fitting knit baby bonnets. Each pattern offers distinct textures, shapes, and construction methods, making this collection versatile for makers of all skill levels. With clear instructions, careful folding, detailed shaping techniques, and thorough finishing methods, you can craft bonnets that are timeless, practical, and cherished by families.


