
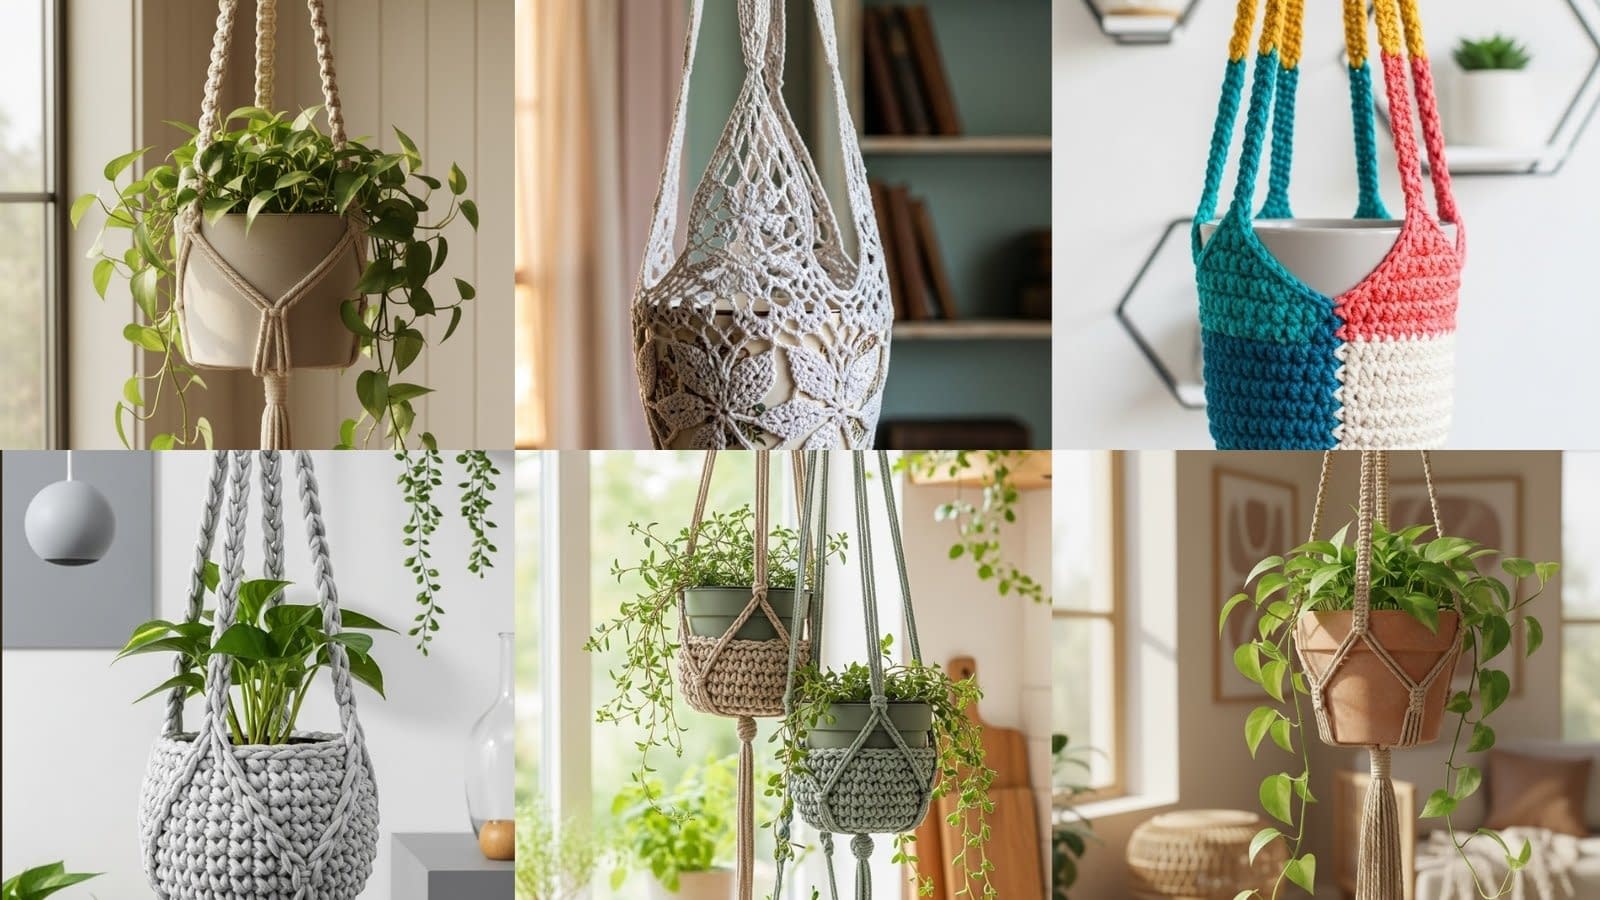
Crochet plant hangers have become one of the most practical and stylish projects for anyone who enjoys creating handmade home décor. They are functional, beginner-friendly, customizable, and a great way to showcase houseplants in a unique way. Whether you want a minimal look, a bold modern style, or something with intricate details, there is a pattern that fits every space and skill level. This guide, titled 6 Crochet Plant Hanger Patterns, brings together six distinct styles that range from simple and classic to elaborate and decorative. Each design is fully explained so beginners and experienced crocheters can create sturdy, beautiful hangers with confidence.
Unlike many short and vague tutorials, this post prioritizes clear structure, long-form explanations, and deeply detailed steps. Each pattern includes shaping instructions, joining methods, construction notes, and suggestions for adjusting the size so the hanger fits different pots. By the end, you will understand not only how to recreate each hanger but also how to alter them, troubleshoot common issues, and personalize the designs.
This guide is designed to be helpful, practical, and inspiring. Whether you are crocheting plant hangers for your home, for gifts, or for selling at markets, these designs offer versatility and style while teaching valuable techniques that you can apply to many other projects.
Classic Single-Strand Plant Hanger

The classic single-strand plant hanger is one of the simplest and most versatile designs. It uses a long crocheted strap that forms both the hanging loop and the support cradle for the pot. The structured design allows the weight of the pot to distribute evenly, making it sturdier than it looks despite its minimal construction. This is a great beginner-friendly project because the shaping is simple and repetitive, and it teaches important techniques like blending flat and strap-like crochet sections.
Materials
• Cotton yarn in cream or natural tones
• Crochet hook sized appropriately for the yarn weight
• Scissors
• Yarn needle
• Plant pot (medium-sized)
Construction overview
This pattern is worked in two parts: the long strap and the cradle portion. The strap is created first, forming a continuous piece that will eventually fold into a loop. The cradle is formed by creating branching sections near the bottom to support the pot evenly.
Creating the long strap
Start by creating a slip knot and chaining a long length. This chain should be strong and tight because it forms the main base of the hanger. After the foundation chain is complete, work a single crochet stitch into each chain, creating a dense strap that will hold weight without stretching too much.
To ensure the strap remains sturdy, maintain consistent tension and avoid loose loops. After completing the first row, turn the work and repeat the single crochet row. Continue crocheting until the strap reaches a long length that, when folded, determines how high or low the pot will hang.
Forming the hanging loop
The two ends of the strap need to be joined together. To form the loop, bring both ends together, align them carefully, and use either slip stitches or whip stitching to create a clean, secure join. This loop will be the top of the hanger and must be reinforced. Once stitched, wrap the joining area with several tight rounds of single crochet or slip stitches to prevent any separation under the pot’s weight.
Creating the pot support
To create the cradle, fold the strap so that the joined loop remains at the top. Move down toward the bottom, where the pot will sit. Divide the strap into sections by creating evenly spaced slip stitch anchors. From each anchor, create a chain strand and a small flat section by working several stitches, forming mini straps that wrap around the pot.
These straps should be measured against the pot to ensure they support it evenly. After the strands are created, gather them at the bottom and join them together. Use tight stitches to create a dense base that prevents the pot from slipping through.
Adjusting the fit
The height, length, and width of the hanger depend entirely on the pot size. Larger pots require longer branching straps and a wider base. If the pot is smaller, shorten the chains and reduce the number of rows in the cradle. Cotton yarn is preferred because it does not stretch as easily as acrylic, ensuring the plant maintains stability.
Boho Macramé-Inspired Crochet Hanger

The boho macramé-inspired crochet plant hanger uses decorative techniques that imitate traditional macramé, but everything is done using crochet stitches. It is ideal for those who enjoy bohemian interiors and want a more textured, ornamental hanging piece.
Materials
• Thick natural cotton cord or bulky cotton yarn
• Large crochet hook to accommodate the cord size
• Yarn needle
• Scissors
• Terracotta pot
Creating the decorative stems
Begin by making several long strands of crochet cord. These are created by chaining a long foundation row and working tight slip stitches back across. The slip stitches create a cord-like structure that resembles macramé rope. Make at least four cords for a symmetrical hanger.
Adding braided sections
After the cords are created, group them into sets of two or three, depending on the desired look. Braid them carefully. When braiding, keep the tension even to prevent a wavy or uneven appearance. The braids should be snug but not stiff, allowing natural flexibility. Once the braids reach a desired length, secure the ends with tight knots.
Forming decorative knots
Using the braided cords, begin adding macramé-inspired knots. To do this with crochet, fold a cord loop, pull another cord through it, and alternate structural loops that interlock. This forms a layered pattern that mimics square knots or half hitch knots. Repeat this process across all cords to create a visually consistent design.
Creating a tassel finish
The lower ends of the cords should be left long. Trim them evenly and comb them with fingers to let the fibers separate slightly. This creates a natural tassel effect. This tassel is a signature feature of bohemian plant hangers.
Creating the top loop
To form the hanging loop, gather all cords at the top and wrap them tightly with several rounds of crochet. This secures the cords firmly while providing a clean finish.
Adding the pot
Once the frame is complete, place the pot inside and adjust the cords so they sit evenly around the pot’s circumference. The terracotta color contrasts beautifully with the neutral fiber tones.
Chunky Rope Crochet Plant Hanger

The chunky rope crochet plant hanger is perfect for those who want a rustic, bold, and sturdy design. Its thick yarn provides excellent support for medium to large pots and creates a visually substantial piece that can anchor a room’s décor. This design uses rope-style yarn worked into dense, supportive strands, with careful joins and a secure cradle to ensure the pot is held evenly and safely.
Materials
• Super bulky cotton rope-style yarn, 30–40 yards
• Large crochet hook appropriate for the yarn (12–15 mm)
• Scissors
• Measuring tape
• Metal or wooden ring (optional, 3–4 inches wide for top loop)
• Yarn needle
• Optional: small amount of fabric glue or lighter for sealing yarn ends depending on the fiber type
• Medium to large plant pot
Construction overview
This hanger is composed of several thick strands worked individually and then joined to create a loop at the top and a cradle at the bottom. Unlike thin or delicate designs, the chunky rope requires careful attention to spacing and even tension to prevent stretching or sagging. The top loop can be reinforced with a ring, and the bottom cradle uses tight joining stitches to create a stable base for the pot.
Creating the main strands
Begin by measuring and cutting four to six long strands of rope yarn. Each strand should be at least three times the desired finished hanging length, allowing room for knots and folds. Using a large crochet hook, work each strand in single crochet along the length, keeping stitches tight and uniform. This ensures that each cord maintains its shape and strength.
After completing each strand, fold the yarn ends and secure them with small loops or stitches to prevent fraying. For synthetic rope yarn, you may use a lighter to carefully melt the ends or apply a tiny dab of fabric glue. For natural cotton, a tight knot or whipped stitch is sufficient.
Forming the hanging loop
Gather all strands at the top and fold them evenly. If using a metal or wooden ring, thread each strand through the ring and adjust so that all cords are equal in length below. Wrap several rounds of crochet stitches or a tightly braided piece of yarn around the top to secure the cords firmly. Make sure the wrap is dense enough to hold the combined weight of the pot and rope strands.
Creating the cradle for the pot
Measure the pot to determine the width of the cradle. Spread the bottom sections of each strand outward and mark where they will meet. Using single crochet or slip stitches, join the cords together to form a tight circle or square base, depending on your design preference. Check the fit by gently placing the pot in the cradle to ensure it sits snugly without tipping.
Adjusting for stability
To make the hanger more stable, evenly space the cords around the pot. The cradle can be reinforced by weaving a second layer of stitches or wrapping additional yarn around the base junction. Make small adjustments to ensure that each strand bears an equal amount of weight.
Variations and finishing touches
• For extra texture, braid two strands together before joining to the cradle.
• Add small tassels or knots at the bottom for decorative appeal.
• Dye sections of the yarn for a subtle ombre effect.
• For hanging outdoors, seal the yarn ends with weatherproof glue or apply a light coat of clear varnish to prevent fraying.
Lacy Vintage-Style Plant Hanger

The lacy vintage-style plant hanger is elegant and intricate, perfect for lightweight decorative pots. Its delicate stitchwork adds a refined, airy touch, making it ideal for romantic or antique-themed interiors.
Materials
• Thin cotton thread in soft white or ivory
• Small crochet hook suitable for fine thread
• Scissors
• Yarn needle
• Lightweight plant pot
• Optional beads or sequins for decoration
Construction overview
This hanger features openwork stitches forming a mesh-like body, combined with long delicate straps. The base is circular or hexagonal to cradle the pot, and the mesh walls rise to hold the plant securely. Stitch consistency is critical for maintaining symmetry and shape.
Creating the lace base
Begin by forming a tight magic ring or small chain circle. Work the first round with single crochet or half double crochet stitches to establish a firm center. In subsequent rounds, use chain spaces and double crochet stitches to create the lacy effect. Each stitch should be uniform, and tension must remain consistent to prevent warping.
Building the walls
After completing the base, continue crocheting upward using alternating chains and double crochets to form the walls. Space the chains evenly and adjust height according to the pot size. The openwork should be delicate yet strong enough to prevent the pot from falling through.
Making the straps
Attach several long chains at equal intervals around the top edge of the hanger. Reinforce each chain with slip stitches or single crochet for strength. Gather all chains at the top and join using a tightly wrapped cord or small crochet band, forming the hanging loop.
Decorative finishing
Add picot stitches, scalloped edges, or tiny beads along the top or base for embellishment. Optional embroidery or small sequins can be stitched into the lace pattern to enhance vintage charm.
Adjusting and variations
• Make a slightly wider base for heavier pots.
• Use colored cotton thread for a subtle accent.
• Add a folded top loop wrapped with a ribbon or yarn braid for a decorative touch.
Color-Blocked Modern Crochet Hanger

The color-blocked modern crochet hanger is vibrant and contemporary. It uses multiple yarn colors in clearly defined sections to create visual contrast, making it a statement piece for any modern interior.
Materials
• Cotton yarn in 3–4 contrasting colors
• Medium crochet hook compatible with the yarn
• Scissors
• Yarn needle
• Plant pot
Construction overview
This hanger is constructed in long continuous straps with color transitions. The bottom cradle and top hanging loop are created using the same color-block pattern to maintain visual cohesion. Clean color changes are essential for a polished look.
Planning the color sections
Determine the width of each color block and the total length of the strap. Measure the pot to decide how many color sections will appear along the supporting strands. Choose complementary or bold contrasting colors according to your preference.
Crocheting the straps
Start with the first color and work a chain long enough for the desired hanging length. Use single crochet stitches along the chain. When changing colors, finish the last yarn-over of the previous stitch with the new color. Continue the next section with the new color, ensuring a neat transition.
Creating the cradle
Split the long straps into individual support strands for the pot. Measure the circumference of the pot and create enough strands so that each color appears symmetrically around the base. Join strands at the bottom using tight slip stitches or single crochet to form a secure cradle.
Forming the top loop
Gather all strands at the top, fold evenly, and wrap with the first color block yarn or a coordinating shade. This creates a reinforced loop that matches the color-block design. Check that the hanger is balanced and the pot sits level.
Adjustments and variations
• For smaller pots, reduce the number of color blocks or shorten the strap length.
• For larger pots, add extra strands or lengthen each color section.
• Consider mixing yarn textures to add subtle depth and tactile appeal.
Multi-Tier Hanging Plant Hanger (2–3 Pots)

The multi-tier hanging plant hanger holds multiple pots vertically, creating a dramatic cascading display. Proper measurement and careful construction are crucial to ensure balance and stability.
Materials
• Medium-weight cotton yarn in natural tones
• Crochet hook suitable for yarn
• Scissors
• Yarn needle
• 2–3 small to medium plant pots
Construction overview
Each tier is created as an individual circular or square cradle. Long connecting straps join the tiers while maintaining equal spacing. A reinforced top loop supports the combined weight of all tiers.
Making individual cradles
Begin with the bottom cradle, creating a circular base using single crochet or half double crochet. Work in rounds until the base diameter matches the pot. Once the base is complete, crochet upward to form a shallow wall that holds the pot securely.
Repeat the process for the middle and top tiers. Ensure that each cradle is proportional to the pot it will hold. Mark the joining points for the connecting straps to maintain consistent spacing between tiers.
Creating connecting straps
Measure the vertical distance needed between each tier. Chain the length using single crochet or double crochet stitches. Attach one end of each strap to the bottom edge of the upper cradle and the other end to the top edge of the lower cradle. Reinforce each join with extra stitches for stability.
Forming the top loop
Gather all upper straps at the top and fold evenly. Wrap tightly with yarn to create a strong hanging loop. Ensure that the weight is distributed evenly to prevent tilting of the tiers.
Final adjustments and variations
• Adjust the length of each tier’s connecting straps for aesthetic balance.
• Add decorative knots or beads between tiers for visual interest.
• For outdoor use, seal the yarn ends or treat the fibers for weather resistance.
Conclusion
Crochet plant hangers offer endless creative possibilities, and the six designs featured here in 6 Crochet Plant Hanger Patterns provide a range of styles that suit different aesthetics and skill levels. From minimalist single-strand designs to intricate lace patterns and modern color-blocked styles, each hanger encourages creativity while teaching useful techniques. These detailed explanations allow anyone to create sturdy, beautiful holders that elevate their indoor plants and personalize their home décor.


